CL-8330BF - Lawn mower HITACHI - Free user manual and instructions
Find the device manual for free CL-8330BF HITACHI in PDF.

| Product Type | Lawn Mower |
| Model | CL-8330BF |
| Brand | Hitachi |
| Cutting Width | 33 cm |
| Cutting Height Adjustment | Central lever, 5 positions |
| Power Source | Electric corded (120 V / 60 Hz) |
| Motor Power | 1200 W |
| Grass Collection Bag Capacity | 30 L |
| Weight | 12.5 kg |
| Dimensions (L x W x H) | 78 x 45 x 35 cm |
| Noise Level | 85 dB(A) |
| Safety Features | Safety switch, blade brake |
| Maintenance | Clean after use, sharpen blade annually |
| Spare Parts Availability | Blades, belts, wheels available online |
| Reparability | User-replaceable blade and belt |
| Warranty | 2 years limited |
Frequently Asked Questions - CL-8330BF HITACHI
User questions about CL-8330BF HITACHI
0 question about this device. Answer the ones you know or ask your own.
Ask a new question about this device
Download the instructions for your Lawn mower in PDF format for free! Find your manual CL-8330BF - HITACHI and take your electronic device back in hand. On this page are published all the documents necessary for the use of your device. CL-8330BF by HITACHI.
USER MANUAL CL-8330BF HITACHI
HITACHI Inspire the Next
只作家居用途 For household use only
text_image
Technical line drawing of a hairbrush with Chinese labels indicating part names and specifications日本製造
Made in Japan
English Page·1\~7···
中文 …… 頁 8\~14
HOW TO REPLACE THE CUTTER
How to remove
Step 1 Step 2
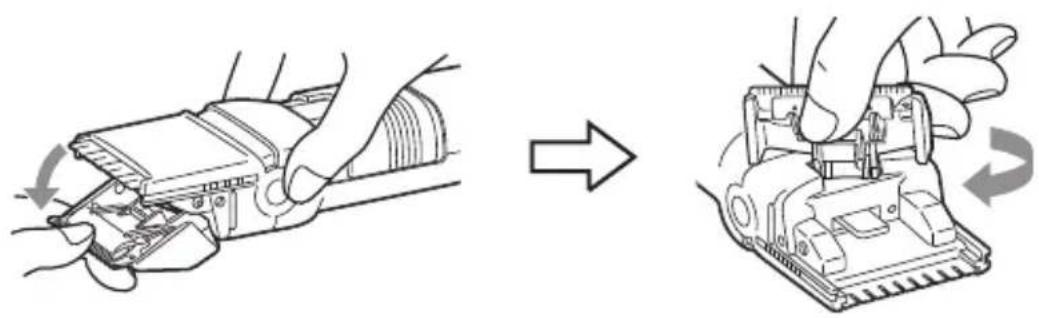
natural_image
Illustration showing a hand using a tool to adjust or install a mechanical component, with no visible text or symbols.How to install
Step 1 Step 2
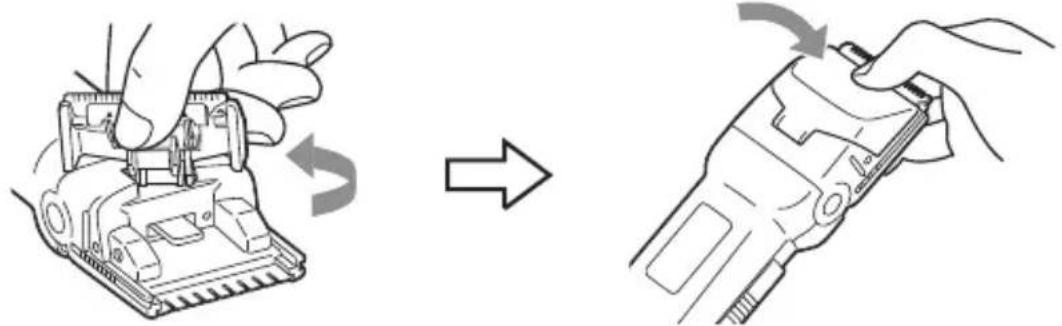
natural_image
Illustration showing a hand using a device to adjust the internal components of a device, with no visible text or symbols.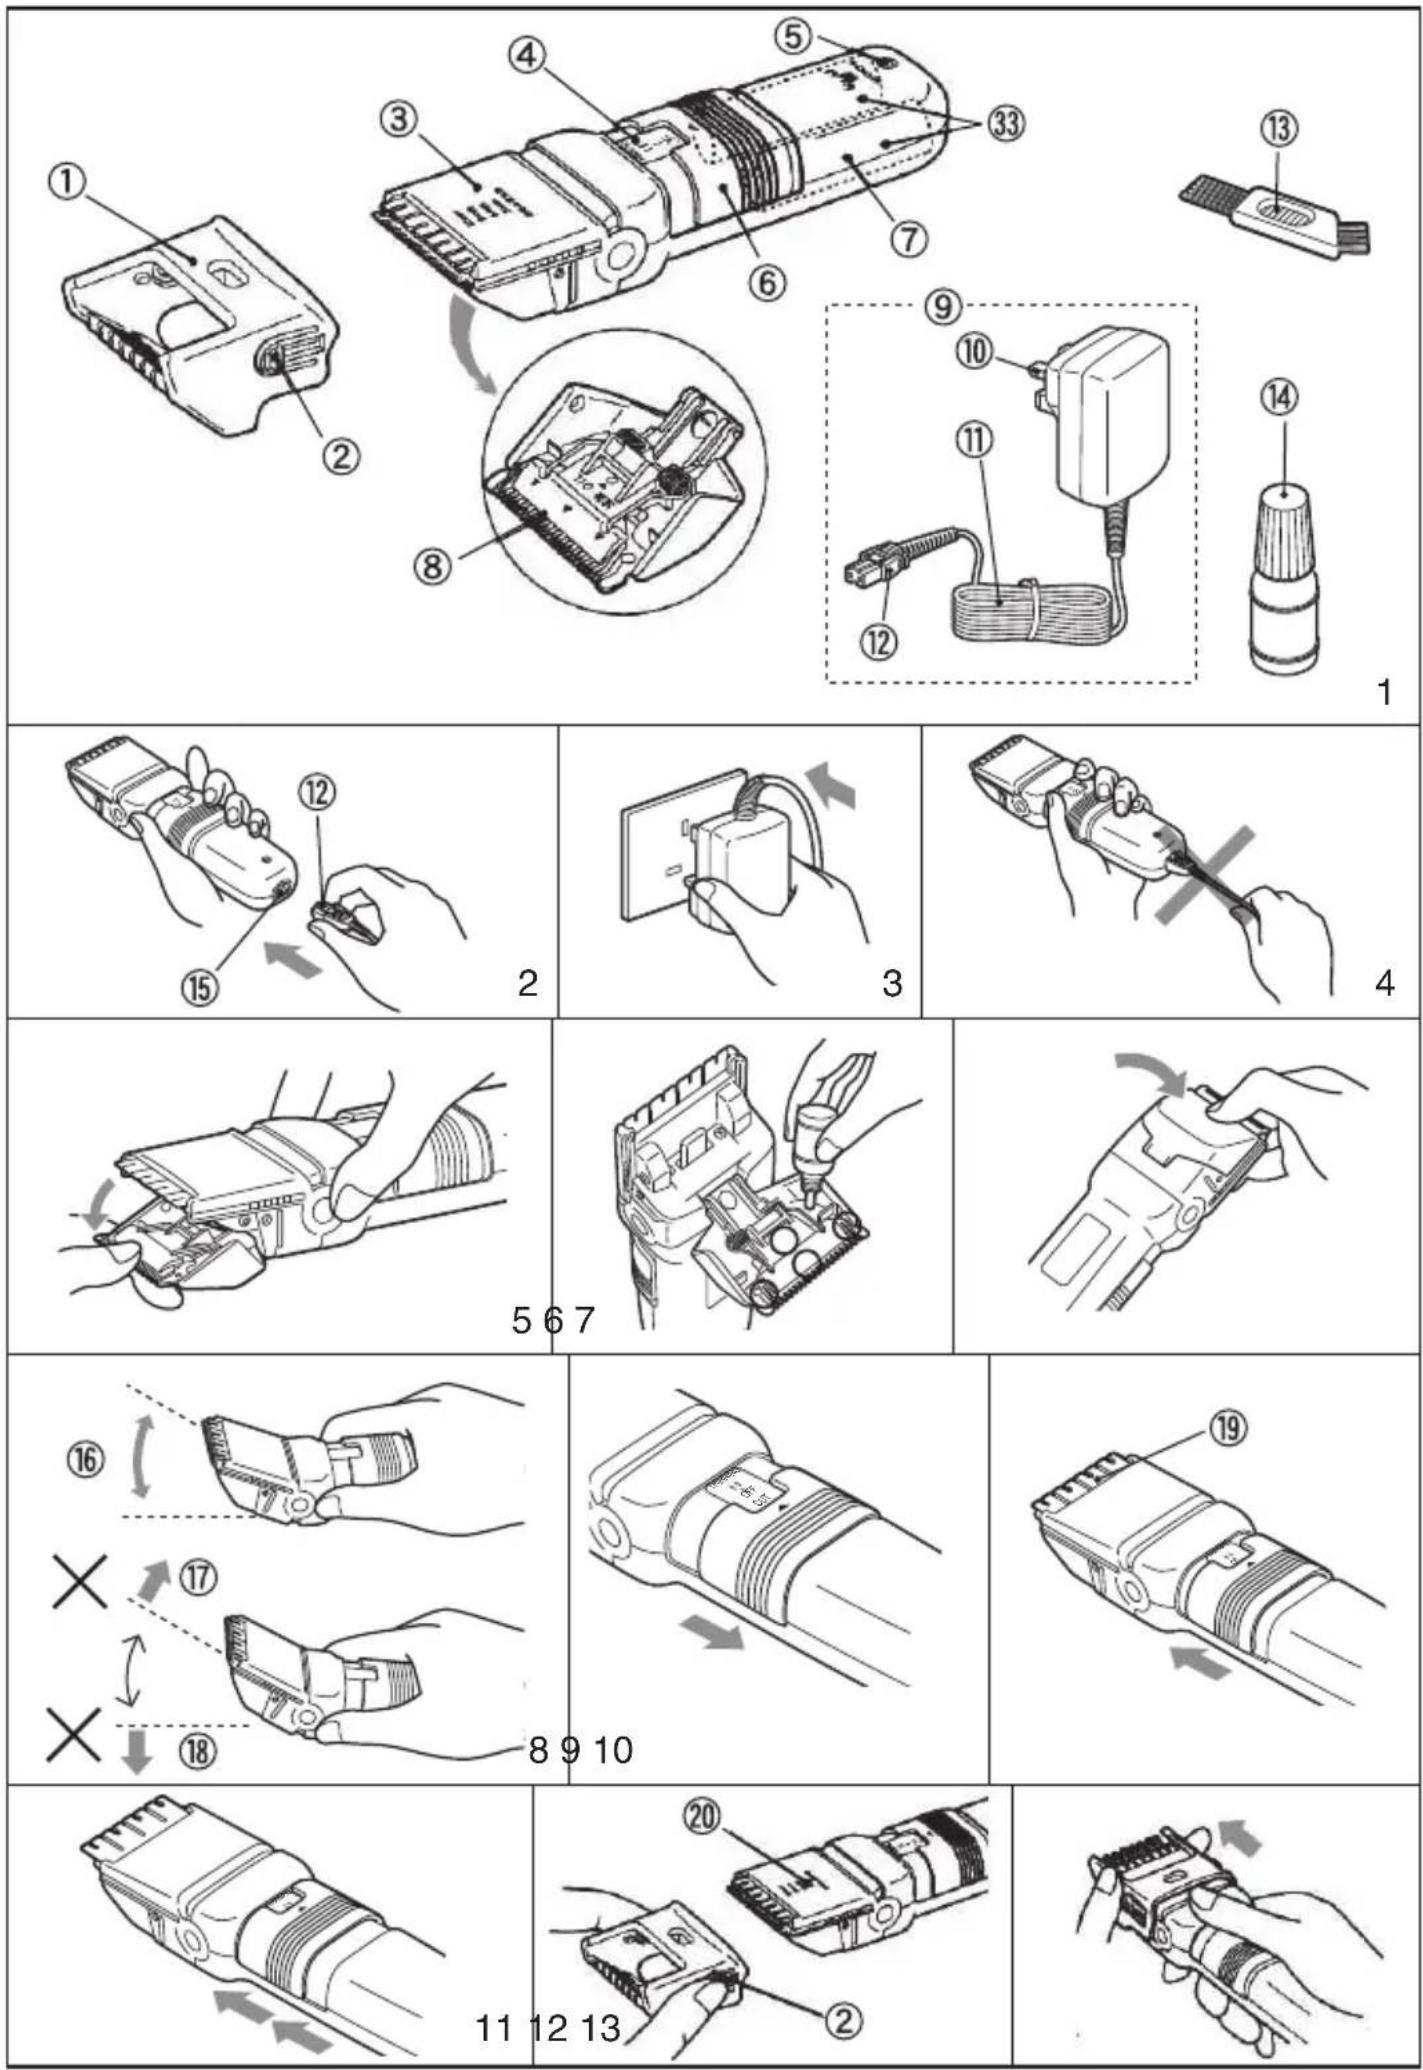
 14 15 16 14 15 16 | 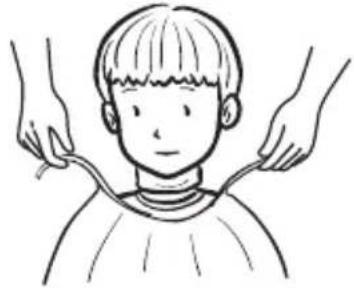 | 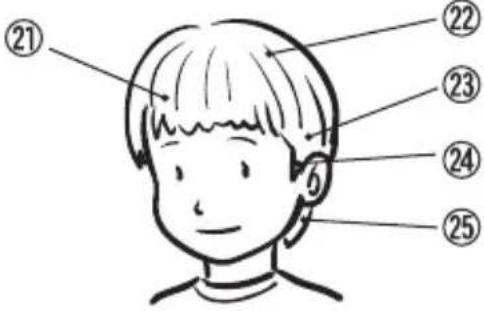 | ||||
 17 18 19 17 18 19 | How to hold Switch position |Tilt head position or || |Tilt head position or || | 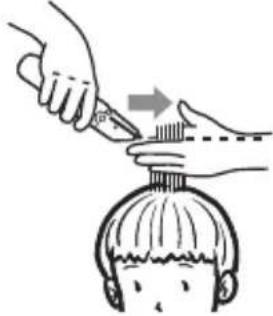 | ||||
How to hold Switch position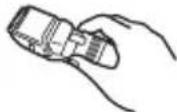 CUTStraight head position20 21 22 23 CUTStraight head position20 21 22 23 | 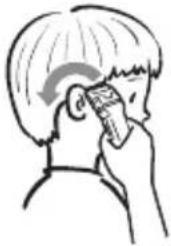 | How to hold Switch position CUTTilt head position CUTTilt head position | 29 30 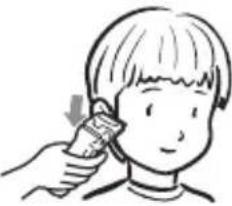 | |||
How to hold Switch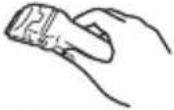 CUTTilt head position24 25 26 27 CUTTilt head position24 25 26 27 | 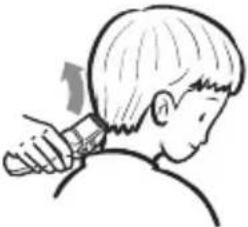 | How to hold Switch position CUTTilt head position CUTTilt head position | 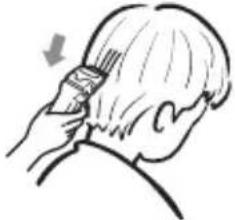 | |||
How to hold Switch position Tilt head position28 29 30 Tilt head position28 29 30 | 26 → 27 → 28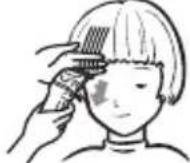 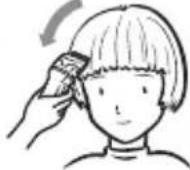 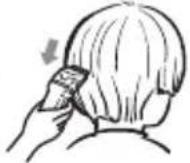 | 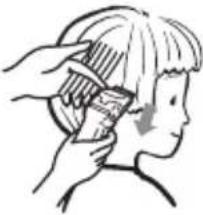 | ||||
  31 32 33 31 32 33 | 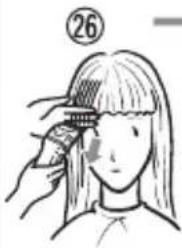 | 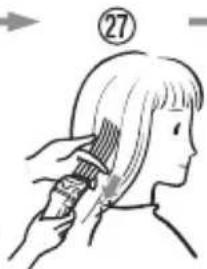 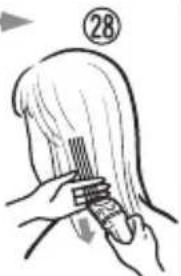 | ||||
English
Safety precautions
- Items described here are for using the product safely and properly, and to prevent hazards and injury to the user and other persons before they occur.
•
therefore make sure to observe them.
| WARNING | Extent of hazard which has the potential to cause death or serious injury to the user in the case of improper handling. |
| CAUTION | Extent of hazard or damage which has the potential to cause slight injury to the user or damage to property (house or household goods) in the case of improper handling. |
This symbol means "prohibited" (never do this).


"Prohibited to wet"

"Prohibited to clean with water"

- symbol means "compulsory" (be sure to do).


• After reading, make sure to keep this manual in a place where users can refer to it at any time.
| WARNING | |
 Prohibited Prohibited | Use only 100 - 240V AC for power supply. (Cause of fires and electric shocks) |
| This appliance is not intended for use by persons (including children) with reduced physical, sensory or mental capabilities, or lack of experience and knowledge, unless person responsible for their safety. | |
| Children should be supervised to ensure that they do not play with the appliance. | |
| Never use a power cord or power plug if they are damaged or outlet insertion is loose. (Cause of electric shocks, short circuits and ignition) | |
| Never allow pins or dust to attach to the power plug or plug for the appliance. (Cause of electric shocks, short circuits or ignition) | |
| Never damage, forcibly bend, pull, twist, place a heavy object on top, sandwich, modify, or wind the power cord around the power adaptor, etc. (Cause of fire or electric shocks) | |
| The cord of the power adaptor cannot be replaced.If the cord is damaged, the power adaptor should be scrapped. | |
 Prohibited Prohibited | Keep the appliance dry. |
| Never place or store the appliance where it can fall or be pulled into a bath or sink.Do not place in or drop into water or other liquid.(Cause of electric shocks and short circuits) | |
 Prohibited Prohibited | Never clean the appliance and power adaptor with water.Never soak it in water or splash water on it. (Cause of electric shocks and short circuits) |
 Prohibited Prohibited | Never use the appliance and power adaptor in a place where water is splashed such as a bathroom or in a place with high humidity. (Cause of electric shocks and short circuits) |
 Unplug Unplug | Make sure to disconnect the power plug from the outlet for maintenance.Never connect or disconnect the power plug to/from the outlet with wet hands.(Cause of electric shocks or injury) |
 Prohibited Prohibited | Never modify the appliance. Only a qualified technician may make repairs.(Cause of fires, electric shocks, or injury) |
CAUTION
 Make sure Make sure | When disconnecting a power plug or plug for the appliance, do not pull the cord, but make sure to pull the plug to disconnect.(Cause of electric shocks, short circuits or ignition) |
| Regularly clean the power plug and plug for the appliance, so that dust does not attach.(Cause of electric shocks, short circuits or ignition) | |
| After operation, keep the appliance in a place free from moisture. (Cause of damage to the clipper if left in a bathroom due to condensation and rust occurring inside the clipper) | |
| Secure the appliance and power adaptor to prevent it from dropping in water. | |
| The blade has been finished to high precision. Do not allow contact with hard surfaces. If the edge becomes damaged or deformed, it can cause injuries to the skin. | |
| Do not press cutting edge against skin too hard since this could result in skin injury. | |
 Prohibited Prohibited | Never touch the edge of the operating blade with bare hands. (Cause of injury to fingers) |
| Never use another power adaptor than the included power adaptor. Never charge another product with the included power adaptor.(Cause of short circuits or ignition due to abnormal heating) | |
| Never charge or leave in humid or hot places. (inside a car in summer, etc)(Failure to do so may result in malfunctions.) | |
| The clippers are specifically designed for human hair cutting. Do not use your clippers on cats, dogs, or other pets. | |
 Unplug Unplug | Disconnect the power plug from the outlet after charging. (Cause of injury or burns, or electrical shocks/current leakage fire due to degradation of insulation) |
Safety precautions
- Never use cream or gel shaving agents.
Cause of blade clogging or damage.
- Do not charge each time you use the clipper.
Cause for loss of battery performance.
-
When the appliance has stopped moving, do not leave it with the switch turned on.
-
Never place or dry in places exposed to direct sunlight or high temperatures.
Cause of damage by deformation or discoloration.
- Never wipe the appliance or power adaptor with alcohol, benzene, or thinner.
Cause of deformation or discoloration.
FEATURES
- Easy-to-use tiltable head.
The head is tiltable up to 25 degree for ease of side trimming.
- Since two Ni-MH batteries are built in, the clipper can be used for about 50 minutes with a full charge.
• Cutting length can be adjusted to 3mm, 6mm, 9mm, 12mm by using the cropped hair attachments.
- Cordless 5 hour charging/AC type.
NAMES OF PARTS (Fig.1)
① Cropped hair attachment
②Knob
③Head
④ Switch position display
⑤ Charge indicator lamp
⑥ Switch
⑦Body
⑧Cutter
⑨Power adaptor (KH-185B)
⑩Power plug
⑪ Cord
⑫Plug for equipment
⑬Cleaning brush
⑭Lubrication oil
PREPARATIONS BEFORE USING PROCEDURE FOR CHARGING
Before using, first charge the clipper or connect to AC outlet.
- Turn the switch "OFF" and insert plug for equipment into the unit socket. (Fig.2) ⑮ Socket Charging can only be done at the "OFF" position.
- Insert power plug into outlet. (Fig.3)
- During charging, the charge indicator lamp lights.
• Standard charging time is 5 hours.
- The unit can be operated for about 50 minutes on a full charge.
- When using continuously for more than 20 minutes, stop and allow to rest about 10 minutes every 20 minutes and lubricate oil to the cutting edge.
Continuous use of the unit for over 20 minutes may cause deterioration of cutting performance.
This is the same with when using the unit with AC current.
- After charging the clipper, unplug the power adaptor and plug for equipment.
•
•
Extreme temperatures will shorten battery life.
DIRECT AC POWER SOURCE
As in the case of charging, insert plug for equipment into the socket and power plug into outlet. Wait 2 minutes to turn the switch on.
If the switch is set at "OFF" after use, the clipper starts charging.
BEFORE USING
- Open the cutter in direction of arrow. (Fig.5)
- Apply about 1 drop of accessory oil at the blade 4 oil points. (Fig.6)
• Always lubricate before and after use.
Cutting performance deteriorates if the cutter is not lubricated properly. When doing more than one haircut in one session, clean and lubricate the blade once after finishing each cut.
- Allow the clipper to operate without actually cutting for about 10 seconds and wipe off any excessive lubrication oil.
HEAD TILTING
Head can tilt 25 degrees as shown in the figure. (Fig.8)
⑯ 25° ⑰ Over 25 degrees Opposite direction
CUTTING AND THINNING OPERATION
CUTTING
- Slide the switch in direction of arrow; and set the position read as "CUT" then the clipper starts operating. (Fig.9)
THINNING CUT
and the blade starts operating. (Fig.10) ⑲ Thinning plate
the thinning plate protrudes clipper farther. (Fig.11)
HOW TO USE THINNING
- When first starting to use the unit
- When thinning a small quantity
- When finishing
- When thinning a large quantity.
flowchart
graph TD
    A["Input Arrow"] --> B["Output Box"]
    C["Input Arrow"] --> B["Output Box"]
CONNECTION AND ADJUSTMENT OF ATTACHMENT
- While pressing knob at each side of the attachment, align attachment with cutting height display panel (12 mm.... 3 mm) on the clipper and press the attachment as behind as
⑳ Cutting height display
PREPARATIONS BEFORE CUTTING
- Place a vinyl sheet or a sheet of newspaper on the floor.
- Use a chair as high as possible for haircut work.
-
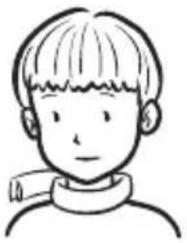
Apply powder to the neck, place tissue paper, and wrap around it with a towel. (Fig.14)
-
Put on a cape from the front and fasten it with a string.
- If a suitable cape is not available, substitute a nylon wrapping cloth or the like.
NAMES OF HAIR PARTS (Fig.15)
② Bangs Crown Around ears Sideburn Neck ②4 ②5
HAIRCUT SHORT HAIR
- Thinning (entire head)
(1) Comb hair to desired style.
(2) Lightly move the clipper from top to bottom as if combing the hair. (Fig.17.18)
⑳ Front ⑳ Side Back
- By keeping one hand underneath the hair while cutting with the clipper, there is little chance of cut hair getting in the face.
- Do not thin hair near top of head since short hair will stand up.
- Cutting top head
Pull up hair between fingers directly perpendicular to top head and slowly run the clipper above fingers to cut.
- To ensure cutting at the same length, take up hair already cut together with hair to be cut and cut latter to the same length as the former. (Fig.19.20)
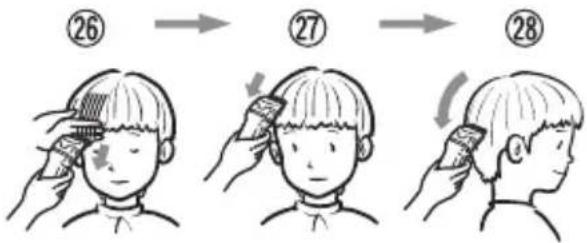
- Cutting around ears
Put the cutter lightly against the skin and move it in a circle in the arrow direction. (Fig.21.22)
- Hold the ear by hand to facilitate the job.
- Side cutting (evening up the sides)
Put the cutter at right angles to the skin to trim the hair. (Fig.23.24) ⑲ Neck ⑳ Sideburns
5.Shaving downy hair
Put the cutter directly on the skin and shave the downy hair working from the lower to the upper part of the neck. (Fig.25.26)
- Do not press the cutter too hard.
6.Finishing the whole head
Comb entire head. Even out any rough parts by using the clipper with thinning comb. (Fig.27.28)
BOB STYLE
1. Thinning (entire head)
(1) Comb hair to desired style.
(2) Lightly move the clipper from top to bottom as if combing the hair. (Fig.29.18)
- By keeping one hand underneath the hair while cutting with the clipper, there is little chance of cut hair getting in the face.
- Do not thin hair near top of head since short hair will stand up.
- If person has a lot of hair, take up a portion of hair in hand and thin hair beneath hand. (Fig.30)
2. Side cutting (evening up the sides)
Put the cutter at right angles to the skin to trim the hair. (Fig.31.24)
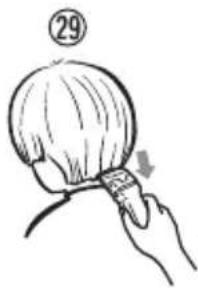
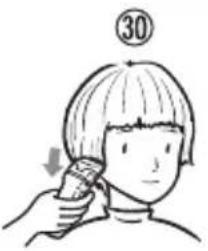
3.Shaving downy hair
Put the cutter directly on the skin and shave the downy hair working from the lower to the upper part of the neck. (Fig.32.26)
Do not press the cutter too hard.
LONG HAIR
1. Thinning (entire head)
(1) Comb hair to desired style.
(2) Lightly move the clipper from top to bottom as if combing the hair. (Fig.33.18)
- Do not thin hair near top of head since short hair will stand up.
- If person has a lot of hair, take up a portion of hair in hand and thin hair beneath hand. (Fig.34)
2. Side cutting (evening up the sides)
Side and back
Apply the cutter to skin at right angle.
- Comb hair first, and be sure to keep evenness and balance in hair length while cutting. (Fig.35.24)
3.Shaving downy hair
Put the cutter directly on the skin and shave the downy hair working from the lower to the upper part of the neck. (Fig.36.26)
- Do not press the cutter too hard.
CREW CUT
1. Close cropping
Clipping the entire part
(1) Mount the cropped hair attachment of proper size of for the desired cutting length.
(2) While putting the comb of the cropped hair attachment in contact with the head skin, slowly crop the hair from the hairline toward the crown against the growing direction of the hair. (Fig.37.20)
- The knack for quick and clean cropping is to crop the once cropped part over again. (Fig.38)
(3) Finish by cropping the entire part in crossed manner as shown to make sure that no part is left uncropped. (Fig.39)
(4) Clip the lower part of the back.
- Mount the cropped hair attachment one size smaller than the cropped hair attachment used for close cropping.
9mm for side trimming against 12mm for close cropping. 6mm against 9mm, 3mm against 6mm.
- Clip the lower part of the back by gradually moving the clippers away from the head skin. (Fig.40.26)
2. Cutting around ears
(1) Remove the cropped hair attachment.
(2) Put the cutter lightly against the skin and move it in a circle in the arrow. (Fig.41.22)
- Hold the ear by hand to facilitate the job.
3. Side cutting (evening up the sides)
Put the cutter at right angle to the skin to trim the hair. (Fig.42.24)
4.Shaving downy hair
Put the cutter directly on the skin and shave the downy hair working from the lower to the upper part of the neck. (Fig.43.26)
- Do not press the cutter too hard.
LAYERING AND SHAPING
1. Thinning (entire head)
(1) Comb hair to desired style.
(2) Lightly move the clipper from top to bottom as if combing the hair. (Fig.44.18)
- By keeping one hand underneath the hair while cutting with the unit, there is little chance of cut hair getting in the face.
- Do not thin hair near top of head since short hair will stand up.
- If person has a lot of hair, take up a portion of hair in hand and thin hair beneath hand. (Fig.45)
2. Cutting of crown
Pull up hair between fingers directly perpendicular to top head and slowly run the clipper above fingers to cut. (Fig.46.20)
- To ensure cutting at the same length, take up hair already cut together with hair to be cut and cut latter to the same length as the former.
3. Layering and shaping
(1) Lift up hair from the bottom with a comb.
(2) Hold comb firmly in place and cut hair in direction of arrow. (Fig.47.20)
- Do not try to cut a lot of hair at once.
Cut a little at a time.
- Always comb hair cutting and trim □ portion while checking that cutting has been done properly.
4. Cutting around ears
Put the cutter lightly against the skin and move it in a circle in the arrow direction. (Fig.48.22)
- Hold the ear by hand to facilitate the job.
5. Side cutting (evening up the sides)
Put the cutter at right angle to the skin to trim the hair. (Fig.49.24)
6.Shaving downy hair
Put the cutter directly on the skin and shave the downy hair working from the lower to the upper part of the neck. (Fig.50.26)
- Do not press the cutter too hard.
7. Finishing the whole head
Comb entire head. Even out any rough parts by using the clipper set for thinning. (Fig.51.28)
SERVICING PROCEDURES
• Always clean out hair and lubricate the cutter after use.
1. Always turn switch to "OFF" before servicing the unit.
2. Use accessory cleaning brush to clean out hair from the unit and around cutter. (Fig.52)
3. Open the blade from the clipper and clean out hair from the inside. (Fig.53)
4. Lubricate the cutter with a few drops of oil.
- Store the clipper in a dry place.

This mark means that the appliance is not washable.
SPECIFICATION
| Power supply | Power adaptor (KH-185B) | 100-240V AC 50-60Hz |
| Ni-MH battery (DC 1.2V, 950mAh × 2)Main body | ||
| Charging time 5 hours (Standard) | ||
| Weight | Body : Approximately 155g Power adaptor : Approximately 100g | |
| Accessories | Cropped hair attachment, Cleaning brush, Lubrication oil | |
| Cord length 1.8 m | ||
■ When any trouble occurs during use, disconnection the use, and make sure of the following points before asking a repair.
| Symptom Points to be checked Remedy | ||
| ●Sharpness is not good. ●Rotation is weak. | A great deal of hair cuttings are accumulated inside the cutter. | Periodically clean up and lubricate. |
| ●Charging is not available. | The switch is set to on. | Turn the switch “OFF” and begin charging. |
| ●The clipper is out of charge. It does not work even through the cord is connected. | The cord is connected with the switch set to on. | Turn the switch “OFF” and use after waiting for a while. |
| ●Charging is not available. ●Does not work. | The cord is interrupted. Is not the service life of Ni-MH battery, cutter or motor over? | Ask a shop where you have bought, to repair. |
PLEASE NOTE WHEN DISPOSING OF THE PRODUCT
WARNING
Keep the removed battery out of the reach of children.
If a child appears to have swallowed a battery, immediately seek medical attention. If the battery electrolyte leaks, do not touch it with bare hands but take the following action.
- If electrolyte gets into eyes, do not rub eyes but immediately rinse with clean water and then seek medical attention.
- If electrolyte adheres to the body or clothing, sufficiently rinse with clean water and then seek medical attention.
Never disassemble except when disposing of the product. (Cause of fires, electric shocks, or injury)
The battery is to be disposed of safely.
In accordance with current recycling legislation, do not dispose of the battery contained in this appliance with normal household waste. When recharging can no longer be effected, please dispose in the method advised by your local area council.
HOW TO REMOVE THE NICKEL METAL HYDRIDE BATTERY
- Remove the battery before disposing of the appliance.
- Disconnect the power adaptor from the appliance when removing the battery.
- Keep the switch at on until the shaver stops moving completely to discharge the battery.
- Remove the cutter.
- With the switch at "OFF" remove the 1 (+) screw from the body, and remove the front case.
(Fig. 54)

Screw Frontcase
- Take the battery out of the main body, cut the lead wires of the battery near the terminals. (Fig. 55)

Battery

Lead wires

Terminal

CAUTION
Never allow the (+) and (-) terminals of the removed battery to make contact.
(Cause of short circuits or burns)
| ! | |
 | |
 | |
 | |
 | |
| ! | |
 | |
 | |
 | |
• • • •
① ② ③ ④ ⑤
⑥ ⑦ ⑧ ⑨ ⑩
⑪ ⑫ ⑬ ⑭
15
• • • •
. . .
⑯
⑰
⑱
19

flowchart
graph LR
    A["•"] --> B["→"]
    C["•"] --> D["→"]
20
②1 ②2 ②3 ②4 ②5
②6 ②7 ②8
•
•
•
•
•
29 30
• • •