
ORCH 40 W - Heating Orima - Free user manual and instructions
Find the device manual for free ORCH 40 W Orima in PDF.

| Product Type | Thermoelectric Minibar |
| Model | ORCH 40 W |
| Gross Capacity | 40 liters |
| Voltage | 220-240 V |
| Frequency | 50 Hz |
| Rated Power | 65 W |
| Energy Class | A++ |
| Energy Consumption | 62 kWh/year |
| Noise Level | 30 dB(A) |
| Dimensions (WxDxH) | 405 x 445 x 545 mm |
| Packed Dimensions | 460 x 495 x 585 mm |
| Net Weight | 13.5 kg |
| Gross Weight | 14.5 kg |
| Cooling System | Thermoelectric |
| Defrosting | Automatic |
| Ventilation Requirements | Min 200 cm³ free air, 20 mm from wall, 50 mm bottom clearance |
| Power Supply | Earthed socket, check voltage/frequency match |
| Maintenance | Clean dust from fan, ensure proper ventilation |
| Troubleshooting | See table for no cooling, poor cooling, noise, frost |
| Disposal | Recycle according to local regulations |
Frequently Asked Questions - ORCH 40 W Orima
User questions about ORCH 40 W Orima
0 question about this device. Answer the ones you know or ask your own.
Ask a new question about this device
Download the instructions for your Heating in PDF format for free! Find your manual ORCH 40 W - Orima and take your electronic device back in hand. On this page are published all the documents necessary for the use of your device. ORCH 40 W by Orima.
USER MANUAL ORCH 40 W Orima
natural_image
Black-and-white photo of a woman holding a small object with a glowing smoke (no text or symbols visible)
natural_image
Black-and-white portrait of a person with short hair and flowing hair accessories (no text or symbols visible)
natural_image
Woman in white shirt pointing to a steaming flame (no text or symbols visible)
natural_image
Close-up of a smiling woman holding a glass, no visible text or symbols
natural_image
Black-and-white portrait of a smiling person with hands reaching toward the face, surrounded by soft white foam-like foam (no text or symbols visible)

natural_image
Black-and-white photo of a woman meditating in meditation pose under a cloudy sky (no text or symbols visible)
Orima®
electrodomésticos
MANUAL DE INSTRUÇÕES INSTRUCTION MANUAL
Minibar Termoelétrico Minibar Thermoelectric

natural_image
Black Orima refrigerator with ventilation grille and label (no additional text or symbols visible)ORCH 48 / ORCH 40 W
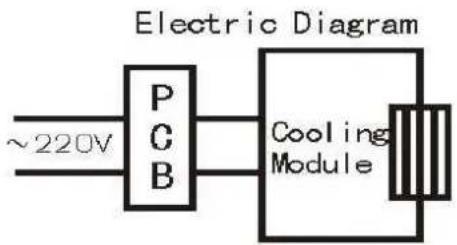
• DIAGRAMA ELÉCTRICO
natural_image
Diagram of a mechanical or architectural component with directional arrows and hatched area, no readable text or symbols present.

natural_image
Diagram showing a light blue rectangular block with directional arrows and a small yellow object inside, surrounded by diagonal hatching (no text or symbols)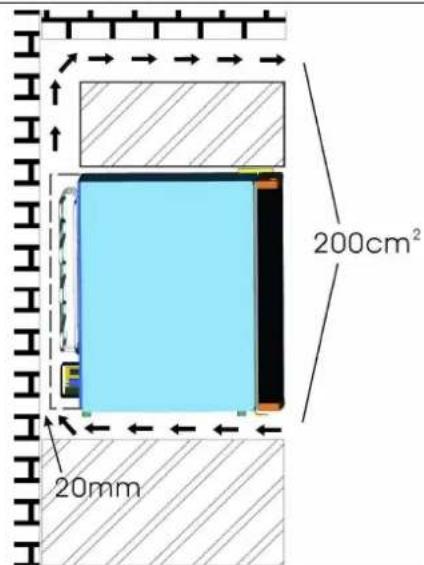
Thank you very much for buying this product. Before using your new refrigerator, please read this operation manual to ensure that you gain the maximum benefit from it.
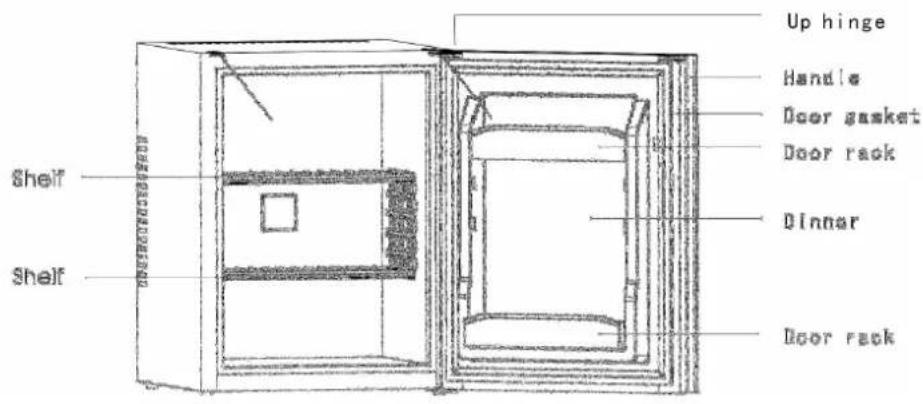
• INDICATION OF PARTS
ORCH-48


• INDICATION OF PARTS
ORCH-40B
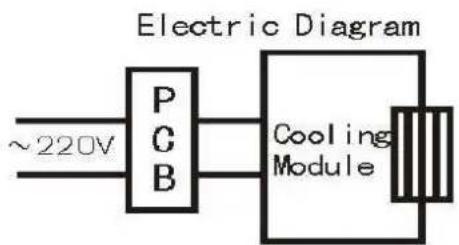
• ELECTRIC DIAGRAM
• INSTRUCTION FOR USES
1,Note
1, 1: Position your refrigerator so that the plug is accessible.
1, 2: Keep your refrigerator out of direct sunlight.
1, 3: Do not place next to heat generating appliance.
1, 4: Do not place directly on the ground. Provide suitable stand.
2, Very important:
2, 1: The minibar will have better performance at ambient of 20-25 degree; We suggest the minibar be powered off if the ambient temperature is lower than 10 degree.
2, 2: After plugging the appliance, allow the unit to cool down for 2-3 hours before placing beverage into the refrigerator compartment.
2, 3: Ventilation is very important for this kind thermoelectric refrigerator; The inside PCB will be broken easily if the ventilation is bad; It will also reduce the life of the refrigerator.
2, 4: If leakage occurs (which can be easily detected due to the unpleasant smell), please
A: Switch off the minibar immediately
B: Ventilate the room thoroughly
C: Call for the after sales service department
2, 5: This model uses a thermoelectric cooling system with automatic defrosting system, so there is no need to defrost it manually.
3, Power supply:
3, 1: The refrigerator must be connected to a properly earthed socket in line with relevant valid country regulations before operating;
3, 2: Check the data label (which is on the side of the refrigerator) for voltage and frequency corresponds to your local one; If not, don't plug your cable into the socket;
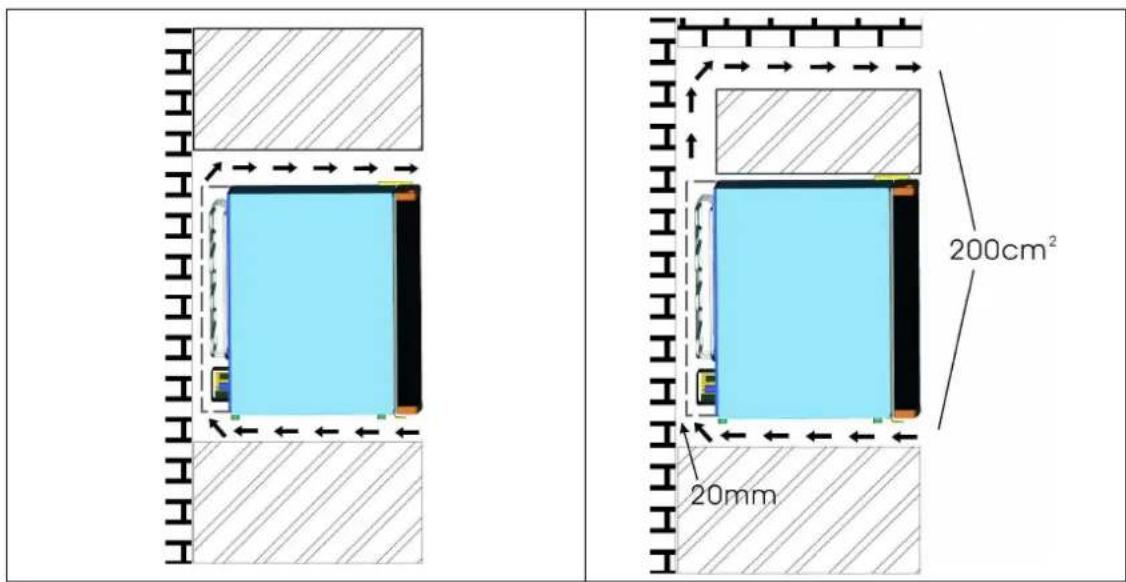
• VENTILATION
When install a TE minibar, ventilation should be considered seriously, please refer to the following:
- there should be left at least 200cm^3 for ventilation
- the distance between wall and minibar side should be at least 20mm
- the bottom should be left at least 50mm for air flowing
- air passing through must not be preheated
5, entire cooling system should be considered in the ventilation
6, the following four pictures show four installation ways:

• TROUBLE SHOOTING GUILDS
Failure: no cooling
| Possible reason Action | |
| No power Check the electricity supply, or change a new plug | |
| PCB broken Replace a new PCB | |
| Fan broken Replace a new fan | |
| Leakage Replace a new heat pump | |
| Cooling module broken Replace a new cooling module with silicone | |
Failure: poor cooling performance
| Possible reason Action | |
| High ambient temperature | The room temperature is hotter than normal |
| Poor instruction The door is | opened too often |
| Poor ventilation Install mini | bar according to our ventilation instruction |
| Poor gasket Replace a new | door gasket |
| Poor silicone Change the sil | icone on the surface of the cooling module |
Failure: noisy
| Possible reason Action | |
| Dust Clean the dust from the fan | |
| Fan broken Change to a new fan | |
| Poor heat pump Replace a new heat pump |
Failure: frost or ice inside minibar
| Possible reason Action | |
| No defrost Stop minibar working for at least one hour, then restart it | |
| Low ambient temperature | Adjust the air-conditioner to be around 25degree |
• TECHNICAL DATA
| Model No. BCH-48 BCH-40B | ||
| Gross Capacity (liters) 48 40 | ||
| Voltage (V) 220-240V | ||
| Frequency (Hz) 50 | ||
| Rated Power (W) 83 65 | ||
| The current consumption depends on how the appliance is used and it's location | ||
| Energy Class | A+ A++ | |
| Consumption Kwh/year | 88 62 | |
| Noise Level, db(A) re 1pw | 0 30 | |
| Dimension (mm) | 430x480x510 405*445*545 | |
| Packing (mm) | 460x510x535 460*495*585 | |
| Net Weight (kg) | 12.5 | 13.5 |
| Gross Weight (kg) | 13.5 | 14.5 |
| Electrical Information | See the product registration | |
| Note: The manufacturer reserves the right to make future changes in specifications and technical parameters | ||
DISPOSAL
natural_image
Simple line drawing of a trash bin with diagonal lines crossing through it, no text or symbols present.Environmental Protection
Waste electrical production should not be disposed of with household waste. Please recycle where facilities exist. Check with your Local Authority or retailer for recycling advice.
Brand : Orima
Model : ORCH 40 W
Category : Heating