
CU-RF100-U - Radio PIONEER - Free user manual and instructions
Find the device manual for free CU-RF100-U PIONEER in PDF.
| Product type | Universal remote control with RF adapter |
| Brand | Pioneer |
| Model | CU-RF100-U |
| Remote control dimensions | 51 mm (W) x 255 mm (H) x 34 mm (D) |
| Remote control weight | 190 g |
| RF adapter dimensions | 49 mm (W) x 21 mm (H) x 64.5 mm (D) |
| RF adapter weight | 90 g |
| Power supply | 4 AA/LR6 dry cell batteries |
| Frequency band | 2.4 GHz |
| Modulation system | Direct Sequence Spread Spectrum (DSSS) |
| RF range (line of sight) | Approximately 10 meters |
| IR range | 7 meters within 30° angle |
| Main functions | Bidirectional RF communication, pairing, IR learning, preset codes, multi-zone control, operation sequences, input name synchronization |
| Included accessories | RF adapter, IR blaster cables (x2), batteries, warranty card, instruction manual |
| Care and cleaning | Clean with a soft, dry cloth. Do not use solvents or abrasive products. |
| Safety | Do not expose to water or moisture. Use only batteries of the same type. Do not dispose of used batteries with household waste. |
| Spare parts and repairability | Contact an authorized Pioneer after-sales service for any repairs. Batteries are replaceable by the user. |
| General information | Domestic use. Complies with Directive 1999/5/EC. Product registration possible on the Pioneer website. |
Frequently Asked Questions - CU-RF100-U PIONEER
User questions about CU-RF100-U PIONEER
0 question about this device. Answer the ones you know or ask your own.
Ask a new question about this device
Download the instructions for your Radio in PDF format for free! Find your manual CU-RF100-U - PIONEER and take your electronic device back in hand. On this page are published all the documents necessary for the use of your device. CU-RF100-U by PIONEER.
USER MANUAL CU-RF100-U PIONEER
Omni-Directional RF Remote Control
This equipment is not waterproof. To prevent a fire or shock hazard, do not place any container filled with liquid near this equipment (such as a vase or flower pot) or expose it to dripping, splashing, rain or moisture.
D3-4-2-1-3_A1_En
This product is for general household purposes. Any failure due to use for other than household purposes (such as long-term use for business purposes in a restaurant or use in a car or ship) and which requires repair will be charged for even during the warranty period.
K041_A1_En
U.S. and Canadian models only
NOTE:
This equipment has been tested and found to comply with the limits for a Class B digital device, pursuant to Part 15 of the FCC Rules. These limits are designed to provide reasonable protection against harmful interference in a residential installation. This equipment generates, uses, and can radiate radio frequency energy and, if not installed and used in accordance with the instructions, may cause harmful interference to radio communications. However, there is no guarantee that interference will not occur in a particular installation. If this equipment does cause harmful interference to radio or television reception, which can be determined by turning the equipment off and on, the user is encouraged to try to correct the interference by one or more of the following measures:
— Reorient or relocate the receiving antenna.
— Increase the separation between the equipment and receiver.
- Connect the equipment into an outlet on a circuit different from that to which the receiver is connected.
— Consult the dealer or an experienced radio/TV technician for help.
D8-10-1-2_A1_En
Caution
FCC Radiation Exposure Statement: This equipment complies with FCC radiation exposure limits set forth for an uncontrolled environment. This equipment should be installed and operated with minimum distance 20~cm between the radiator and your body.
This device complies with Part 15 of the FCC Rules. Operation is subject to the following two conditions: (1) this device may not cause interference, and (2) this device must accept any interference, including interference that may cause undesired operation of the device.
Information to User
Alterations or modifications carried out without appropriate authorization may invalidate the user's right to operate the equipment.
D8-10-2_A1_En
This Class B digital apparatus complies with Canadian ICES-003. D8-10-1-3_A1_En
Register Your Product on
http://www.pioneerelectronics.com (US)
http://www.pioneerelectronics.ca (Canada)
European model only
Information for users on collection and disposal of old equipment and used batteries
(Symbol for equipment)


(Symbol examples) for batteries


Pb
These symbols on the products, packaging, and/or accompanying documents mean that used electrical and electronic products and batteries should not be mixed with general household waste.
For proper treatment, recovery and recycling of old products and used batteries, please take them to applicable collection points in accordance with your national legislation.
By disposing of these products and batteries correctly, you will help to save valuable resources and prevent any potential negative effects on human health and the environment which could otherwise arise from inappropriate waste handling.
For more information about collection and recycling of old products and batteries, please contact your local municipality, your waste disposal service or the point of sale where you purchased the items.
These symbols are only valid in the European Union.
For countries outside the European Union:
If you wish to discard these items, please contact your local authorities or dealer and ask for the correct method of disposal.
K058a_A1_En
Contents
01 Before you start
Loading the batteries 4
Flow for operating the receiver with RF two-way communications 4
02 Using the RF communications function
About the RF communications function . . . . . 5
Pairing the RF adapter and remote control . . .6
Operating the receiver by RF communications 7
Operating other components by RF communications 7
Renaming input function names in synchrony with the receiver. 8
Setting the remote control operation mode....9
Precautions when using the Omni-Directional RF Remote Control. 10
Precautions regarding wavelength. 10
Usable range. 10
Signal reflection 11
For safe use. 11
03 Controlling the rest of your system
About the Remote Setup menu. 12
Operating multiple receivers. 13
Setting the remote to control other components. 13
Selecting preset codes directly 14
Programming signals from other remote controls 14
Erasing one of the remote control button settings 16
Resetting the input assignment of one of the input function buttons 16
Resetting the remote control settings 16
Confirming preset codes. 16
Renaming input function names manually . . .17
Direct function 17
Multi Operation and System Off 17
Programming a multi-operation or a shutdown sequence 18
Using multi operations. 19
Using System off 19
Controlling components 19
04 Controls and displays
Remote control. 22
Remote control display. 24
RFadapter 25
Operating range of remote control unit for infrared (IR) signal transmission. 25
05 Additional information
Troubleshooting 26
Specifications. 27
Checking what's in the box
Please check that you've received the following supplied accessories:
AA/LR6 dry cell batteries x4
RF adapter
- IR blaster cable x2
These operating instructions
European, U.S. and Canadian models only:
Warranty card
Chapter 1:
Before you start
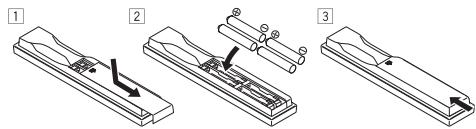
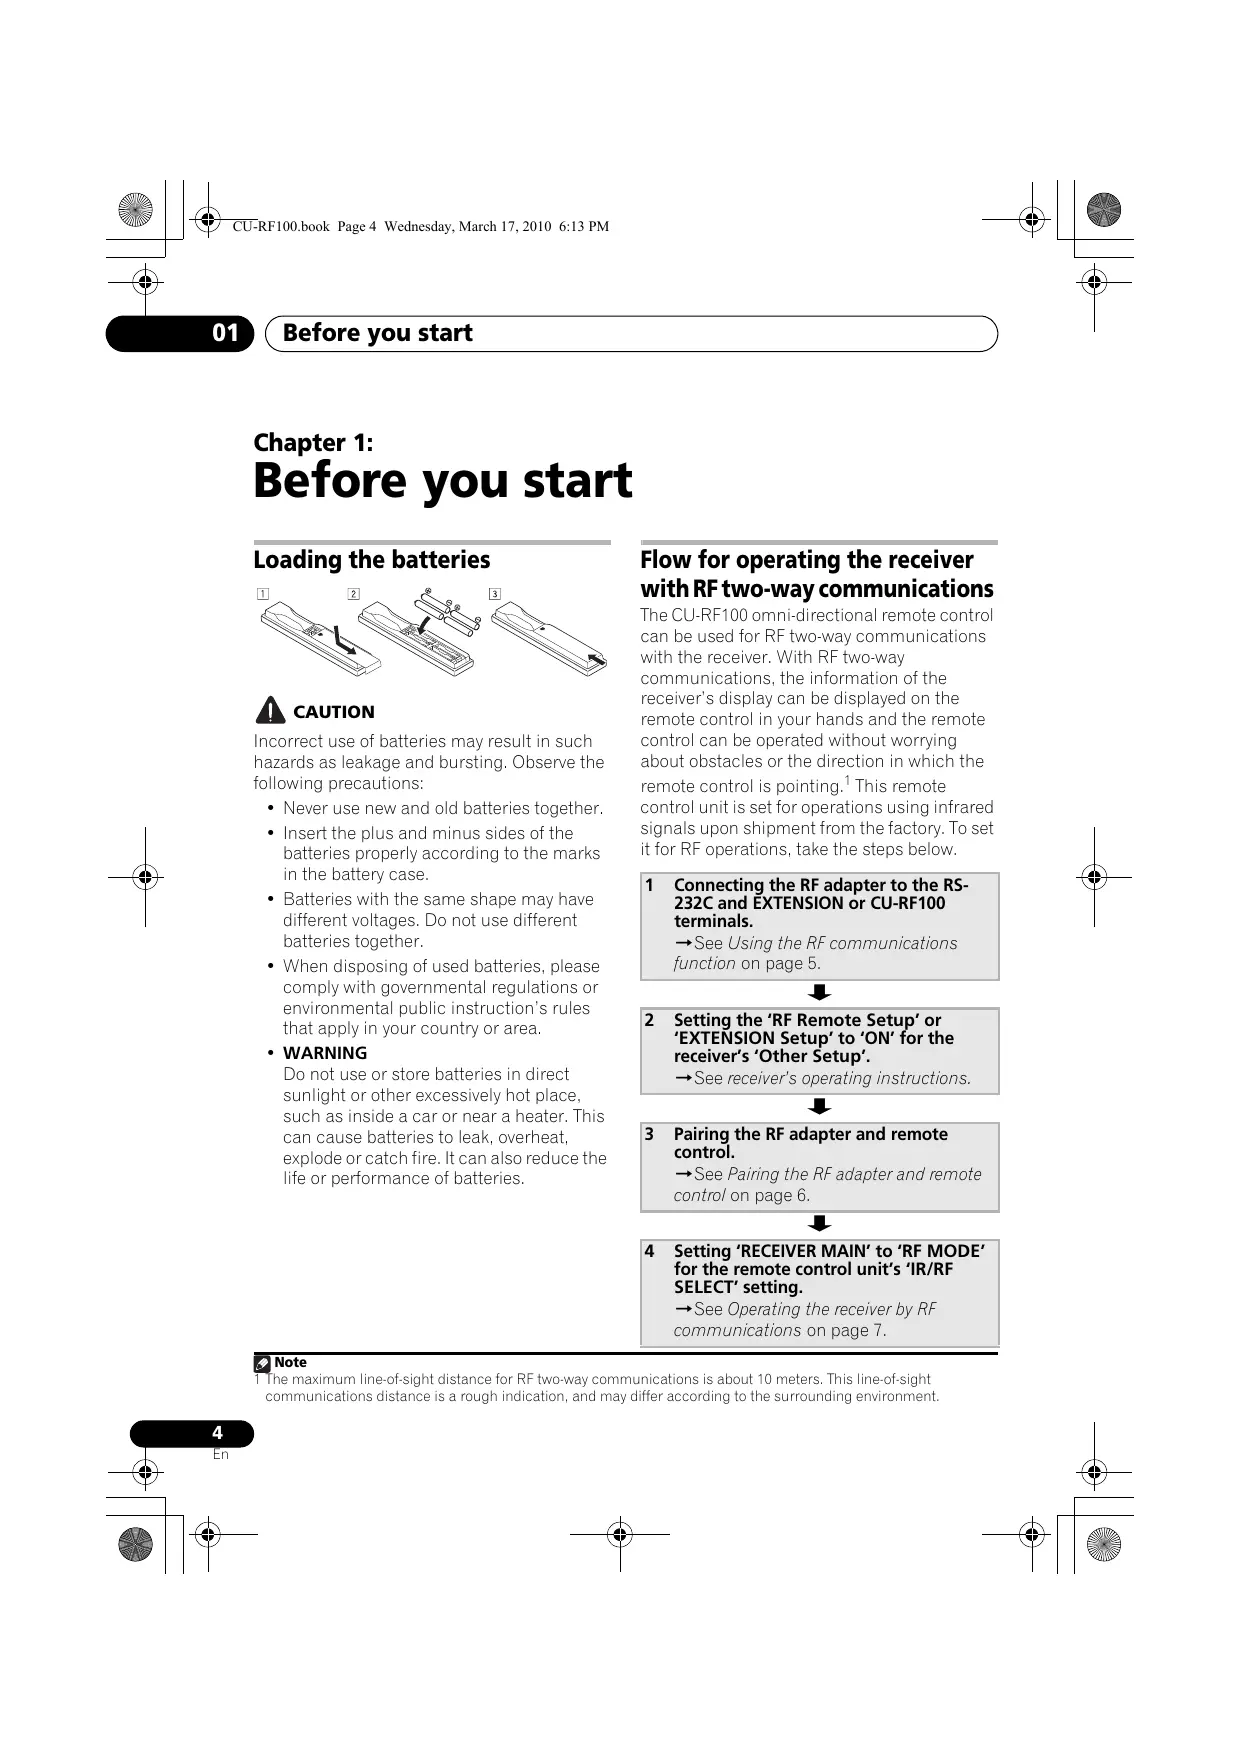
Loading the batteries

CAUTION
Incorrect use of batteries may result in such hazards as leakage and bursting. Observe the following precautions:
WARNING
- Never use new and old batteries together.
- Insert the plus and minus sides of the batteries properly according to the marks in the battery case.
- Batteries with the same shape may have different voltages. Do not use different batteries together.
- When disposing of used batteries, please comply with governmental regulations or environmental public instruction's rules that apply in your country or area.
Do not use or store batteries in direct sunlight or other excessively hot place, such as inside a car or near a heater. This can cause batteries to leak, overheat, explode or catch fire. It can also reduce the life or performance of batteries.
Flow for operating the receiver with RF two-way communications
The CU-RF100 omni-directional remote control can be used for RF two-way communications with the receiver. With RF two-way communications, the information of the receiver's display can be displayed on the remote control in your hands and the remote control can be operated without worrying about obstacles or the direction in which the remote control is pointing. This remote control unit is set for operations using infrared signals upon shipment from the factory. To set it for RF operations, take the steps below.
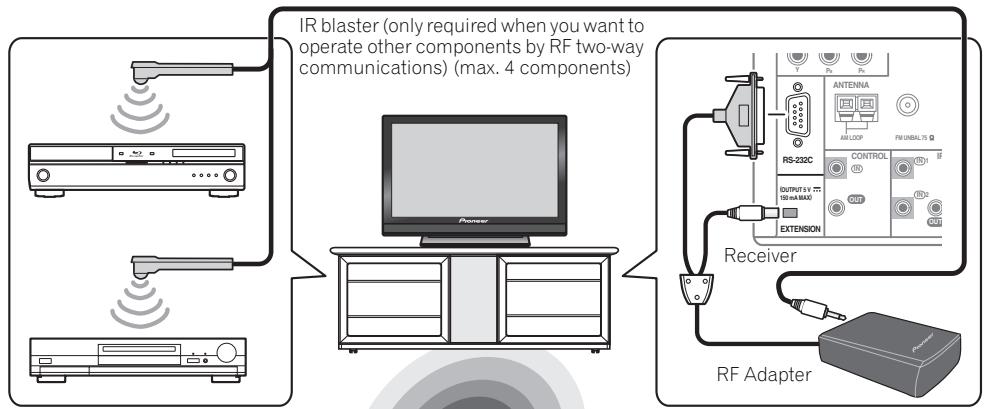
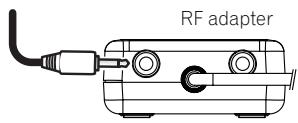
1 Connecting the RF adapter to the RS-232C and EXTENSION or CU-RF100 terminals.
See Using the RF communications function on page 5.

2 Setting the 'RF Remote Setup' or 'EXTENSION Setup' to 'ON' for the receiver's 'Other Setup'.
See receiver's operating instructions.

3 Pairing the RF adapter and remote control.
See Pairing the RF adapter and remote control on page 6.

4 Setting 'RECEIVER MAIN' to 'RF MODE' for the remote control unit's 'IR/RF SELECT' setting.
See Operating the receiver by RF communications on page 7.

Note
1 The maximum line-of-sight distance for RF two-way communications is about 10 meters. This line-of-sight communications distance is a rough indication, and may differ according to the surrounding environment.
Chapter 2:
Using the RF communications function

CAUTION
- Before making or changing the connections, switch off the power and disconnect the power cord from the power outlet. Plugging in should be the final step.
Operation of the receiver or other components placed in a rack is possible
Operation is possible in any direction the remote control is pointed (360^)
Remote control operation
About the RF communications function
With this remote control, two-way communications between the receiver and remote control are possible by connecting the included RF adapter to the RS-232C and CU-RF100/EXTENSION terminals on the receiver. For instructions on connecting the RF adapter, see above. Two-way communications allow you to use the following functions:
- The receiver can be operated by pointing the remote control in any direction (360^) (maximum line-of-sight distance for two-way communications: about 10 meters).
- Operate is possible without being affected by obstacles (even products in racks can be operated).
-
The information shown on the receiver's display can be displayed on the remote control's display as you operate.
-
RF communications can be used to operate up to 4 other components connected to the receiver (using the included IR blaster. For details, see Operating other components by RF communications on page 7).
- The remote control input display names can be synchronized with the input names changed at Input Name on the receiver's Input Setup menu (see receiver's Operating Instructions) and acquired automatically. For details, see Renaming input function names in synchrony with the receiver on page 8.
- When the receiver's input is switched, the remote control's display and operating mode switch to that input automatically. For details, see Setting the remote control operation mode on page 9.

Important
- The line-of-sight communications distance is a rough indication, and may differ according to the surrounding environment.
- Depending on the communications environment, functions using two-way communications between the receiver and remote control may not operate properly. For details, including cautions on the communications environment and usage procedure, etc., see Precautions when using the Omni-Directional RF Remote Control on page 10.

Note
- You can cancel or exit any of the steps by press and hold MULTI OPERATION for a couple of seconds. To go back a step, press RETURN.
Pairing the RF adapter and remote control
Pairing is necessary in order to use the RF communications function. Perform the operation below after connecting the RF adapter and receiver.
1 Switch on the receiver.
2 Setting the 'RF Remote Setup' or 'EXTENSION Setup' to 'ON' for the receiver's 'Other Setup'.
For details, see receiver's operating instructions.
3 Press the SETTING button on the front of the RF adapter.
RF adapter's LED blinks red.
4 While pressing MULTI OPERATION, press VIDEO PARAMETER on the remote control.
The remote display shows PAIRING.
5 Press ENTER on the remote control.
AUTHORIZATION flashes and pairing is performed. When pairing is successful, SUCCESS is displayed and pairing is completed. RF adapter's LED lights green.
The display on the receiver itself is displayed on the remote control's display. For details, see Remote control display on page 24.
If ERROR is displayed, pairing has not been successful. Check the connections and distance with the RF adapter, then start over from step 1.
The remote control unit's receiver operation mode must be set to "RF" in order to operate the receiver with RF two-way communications. Make this setting as described at Operating the receiver by RF communications on page 7.
Operating the receiver by RF communications
Use this procedure to make the remote control settings to operate the receiver using RF two-way communications. The settings can be made individually for the main zone, ZONE 2 and ZONE 3. Connect the receiver and RF adapter and pair the RF adapter and remote control unit beforehand.
1 While pressing MULTI OPERATION, press HOME MENU.
The remote display shows SETUP MENU.
2 Use / to select 'IR/RF SELECT', then press ENTER.
Check that the units are paired. If RECEIVER MAIN is displayed, pairing has been performed properly, so proceed to step 3. If RF MODE ONLY flashes, pairing has not been performed properly, so perform this procedure again after performing pairing (see Pairing the RF adapter and remote control on page 6).
3 Use / to select the receiver zone for which you want to use RF two-way communications, then press ENTER.
4 Use ↑/↓ to select 'RF MODE', then press ENTER.1
Select IR MODE to return to operation by infrared signal.
5 If you want to operate other zones with RF two-way communications, repeat steps 3 and 4.
6 Press and hold MULTI OPERATION for a couple of seconds to exit and store the operation(s).
Operating other components by RF communications
Up to 4 other components connected to the receiver can be operated by RF communications. Use the IR blaster to communicate between the RF adapter and other components, and switch the remote control's setting to RF. The remote control's setting can be switched individually for each input.
Note
1 When RECEIVER is selected and RF MODE is set at step3, HMG NET RADIO, ADAPTER PORT, iPod USB and TUNER are automatically set to the RF mode. Note that RF MODE cannot be set for OPTION 1 and OPTION 2.
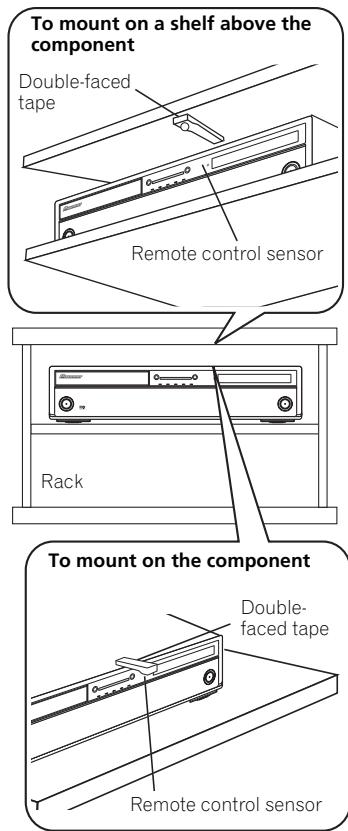
1 Connect the IR blaster to the RF Adapter's IR Blaster terminal and mount the transmitter on the component you want to operate with RF communications.
- Operation is not possible unless the IR blaster is mounted in an appropriate position. Whenever possible, mount it above the other component's remote control sensor. If mounted below, the influence of external light, etc., could hamper reception.
- Mount the IR blaster securely to a position near the other component's remote control sensor. For the location of the other component's remote control sensor, see the component's operating instructions.
- Clean any dirt or dust off the place at which the double-faced tape is to be attached beforehand.
Note that the double-faced tape is strong, and that trying to peel it off the shelf, etc., after it has been applied may damage the shelf's surface.
2 While pressing MULTI OPERATION, press HOME MENU.
The remote display shows SETUP MENU.
3 Use ↑/↓ to select 'IR/RF SELECT', then press ENTER.
Check that the units are paired. If RECEIVER MAIN is displayed, pairing has been performed properly, so proceed to step 4. If RF MODE ONLY flashes, pairing has not been performed properly, so perform this procedure again after performing pairing (see Pairing the RF adapter and remote control on page 6).
4 Use / to select input function for the component you want to operate using RF communications, then press ENTER.
Select the input component to which the IR blaster was mounted in step 1.
5 Use ↑/↓ to select 'RF MODE', then press ENTER.
Select IR MODE to return to operation by infrared signal.
6 If other input function buttons also switch to RF communications operation, repeat step 4 to 5.
7 Press and hold MULTI OPERATION for a couple of seconds to exit and store the operation(s).
Renaming input function names in synchrony with the receiver
- Default setting: MANUAL
The remote control input display names can be synchronized with the input names that have been changed at Input Name on the receiver's Input Setup menu (see receiver's operating instructions) and acquired automatically. There are two modes: AUTO in which the receiver's input names are acquired automatically each time the input is switched, and MANUAL in which the receiver's input names are only acquired for input functions selected manually. Even when input names are changed manually at Renaming input function names manually on page 17, when synchro renaming is performed here, the input name is overwritten.
1 While pressing MULTI OPERATION, press HOME MENU.
The remote display shows SETUP MENU.
2 Use / to select 'SYNC RENAMING', then press ENTER.
MANUAL flashes in the remote display.
3 Use ↑/↓ to select 'AUTO' or 'MANUAL', then press ENTER.
If you selected AUTO, this completes the setting. The receiver's input names are acquired automatically in synchrony with the receiver each time the remote control's input is switched. Proceed to step 7.
If you selected MANUAL, go to step 4.
4 Press the input function button for the component whose receiver input name you want to acquire, then press ENTER.2
The receiver's input name is acquired. After PLEASE WAIT is displayed, the receiver's input name flashes. If the name has not been changed at Input Name on the receiver's Input Setup menu (see receiver's operating instructions), NO CHANGE flashes.
5 Press ENTER to enter the input name displayed on the remote control.
COMPLETE is displayed and the input name is registered.
6 To acquire the receiver input names for other input function buttons, repeat step 4 to 5.
7 Press and hold MULTI OPERATION for a couple of seconds to exit and store the operation(s).
Setting the remote control operation mode
- Default setting: ON
When the remote control operation mode is turned on and the receiver's input is switched, the remote control display and operation mode switch automatically to that input. Select OFF if you do not want the remote control's function to switch automatically when the receiver's input is switched.3
1 While pressing MULTI OPERATION, press HOME MENU.
The remote display shows SETUP MENU.
2 Use / to select 'OPERATION MODE', then press ENTER.
Check that the units are paired. If SYNCHRO ON is displayed, pairing has been performed properly, so proceed to step 3. If RF MODE ONLY flashes, pairing has not been performed properly, so perform this procedure again after performing pairing (see Pairing the RF adapter and remote control on page 6).
3 Use / to select 'SYNCHRO ON' or 'SYNCHRO OFF', then press ENTER.
The remote display shows OK to confirm the setting.
4 Press and hold MULTI OPERATION for a couple of seconds to exit and store the operation(s).
Note
If RF MODE ONLY flashes, pairing has not been performed properly or RECEIVER may be set to IR MODE at the remote control's IR/RF SELECT setting. In this case, perform pairing, then switch RECEIVER to RF MODE at the remote control's IR/RF SELECT setting. For details, see Pairing the RF adapter and remote control on page 6 and Operating the receiver by RF communications on page 7.
2 The HDMI input function button is not supported.
3. When the remote control's input is switched, the receiver's input also switches, but for functions for which the remote control direct function (page 17) is set to off, when the remote control's input is switched, the receiver's input does not switch and only the remote control unit's operating screen switches.
- The remote control operation mode is only valid when the remote control operation selector switch is set to SOURCE.
Precautions when using the Omni-Directional RF Remote Control
Precautions regarding wavelength
- This remote control is designed to prevent other persons from eavesdropping on the transmitted signals, but precautions should nonetheless be taken against the chance that other persons' could intercept and listen to the signals transmitted. Given that this remote control produces radio wave transmissions, another person could deliberately use a receiver to attempt to intercept such transmissions. As a result, this device should not be used to play important transmissions demanding privacy.
This remote control utilizes the 2.4 GHz frequency band. This band is also used by a variety of other devices as noted below. In particular, devices not often cognizant to the user are listed in item 2.
1 Examples of common devices utilizing the 2.4 GHz band:
- Cordless phone
- Cordless facsimile
- Microwave oven
- Wireless LAN router
- Wireless AV device
- Wireless controllers for games
- Microwave therapeutic devices
- Bluetooth wireless technology devices
2 Other devices using 2.4 GHz:
- Shoplifting-prevention systems
- Amateur wireless radio
- Distribution control systems at factories and warehouses
- Railway and emergency vehicle wireless identification systems
When such devices are used simultaneously with this remote control, signal interference may occur, resulting in signal dropouts.
To improve reception quality, try the following:
- Turn off the other device emitting radio waves.
- Place the interfering device farther away (Move both the remote control and RF adapter away from the interfering device).
Do not use this remote control in the following locations, since transmission interruption may result:
- Locations where another device using the same 2.4 GHz frequency is being used, such as a Bluetooth wireless technology device or wireless LAN, or in the vicinity where the magnetic field, static electricity, or radio wave interference from another device may occur (depending on the environment, radio waves may not transmit effectively).
- Move the radio farther away.
- If visual noise appears on the television screen, it is possible that this remote control is producing adverse influence on the antenna input of the television, video device, BS tuner, or CS tuner. Move this remote control farther away from the antenna input of the affected device.
Usable range
- Designed for use only within private homes (signal transmission distance may be reduced due to room design or conditions).
In the following cases, this remote control cannot operate due to poor or erratic radio wave transmission.
- When signal transmission is blocked by a wall or floor constructed of ferro-concrete or metal.
- Nearby large metal furniture objects
-
In large crowds of people, or near obstructive buildings.
-
Locations where another device using the same 2.4 GHz frequency is being used, such as a Bluetooth wireless technology device or wireless LAN, or in the vicinity where the magnetic field, static electricity, or radio wave interference from another device may occur.
- When living in a housing complex (apartment, condominium, etc.) where the next-door unit has a microwave oven located near to this remote control. Note that even a microwave oven will not interfere with this remote control when not in use.
- When using multiple Omni-Directional RF Remote Control in the same location.
Signal reflection
- The signals reaching the remote control include those transmitted in a straight line from the main unit (direct waves), and those that are received after being bounced off of walls, furniture, and other buildings (reflected waves).
As a result, reflected waves can be generated by obstacles and other reflective objects, causing variations in the signal quality. In such cases, try slightly changing the position of the remote control.

CAUTION
- With the exception of cases determined by law to be the subject of legal liability, Pioneer refuses all responsibility for any harm resulting to the customer or other person as a result of the use of this remote control.
For safe use
- Do not use near electronic devices utilizing high-precision or very delicate radio waves, since the other device may operate incorrectly, resulting in malfunction.
Examples of devices requiring particular caution:
- Hearing aids, pacemakers and other medical or therapeutic electronic devices, fire/smoke detectors, automatic door openers, other automatic devices.
- Persons using pacemakers or other medical or therapeutic electronic devices should consult the manufacturer or dealer of their device regarding the potential effects of radio waves from this remote control.
- Do not use in aircraft, hospitals, or other locations where the use of radio-wave-generating devices is prohibited, since adverse affects may be caused to flight communications equipment or medical devices. Follow all precautions and directives given by medical institutions.
Chapter 3:
Controlling the rest of your system
About the Remote Setup menu
The Remote Setup mode is set by pressing the HOME MENU button while pressing MULTI OPERATION. The different items on the Remote Setup menu are described below. For their setting procedures, refer to the explanations for the respective items.
| Setting | What it does |
| PRESET RECALL | Preset codes can be set for the various input functions. The remote control codes of a number of other devices (including products of other brands) are preset in the remote control to allow these devices to be operated. See Selecting preset codes directly on page 14. |
| CODE LEARNING | If the desired operations cannot be performed even though you have set the preset codes, the remote control signals of other devices can be learned directly. See Programming signals from other remote controls on page 14. |
| MULTI OPERATE | A series of the remote control operations for starting listening or viewing can be programmed. Multiple remote control codes can be set for the different input functions. See Multi Operation and System Off on page 17. |
| SYSTEM OFF | This is a function for automatically turning off the power of devices connected to the receiver. Multiple remote control codes can be set, as desired. See Multi Operation and System Off on page 17. |
| DIRECT FUNC | This is a setting for changing only the remote control unit's operation screen, without changing the receiver's input, when the remote control unit's input function buttons are pressed. This is convenient for using the remote control unit for devices not connected to the receiver. See Direct function on page 17. |
| Setting | What it does |
| RENAME | The names of the input function buttons displayed on the remote control unit can be changed as desired. See Renaming input function names manually on page 17. |
| SYNC RENAMING | Input function names changed on the receiver can be acquired by the remote control unit so that the names are the same on the remote control unit. See Renaming input function names in synchrony with the receiver on page 8. |
| ERASE LEARNING | This function is used to erase remote control codes that have been learned. Codes learned for the different input functions can be erased individually. See Erasing one of the remote control button settings on page 16. |
| IR/RF SELECT | This function is for selecting wireless (RF) or infrared (IR) as the remote control operating mode for the different devices. See Operating the receiver by RF communications on page 7 and Operating other components by RF communications on page 7. |
| OPERATION MODE | The remote control unit's operation screen switches automatically when the receiver's input is switched (This is only valid when the operation selector switch is set to SOURCE). See Setting the remote control operation mode on page 9. |
| KEY RESET | This is a function for resetting preset codes that have been set. Key resetting can be done for individual input functions. See Resetting the input assignment of one of the input function buttons on page 16. |
| ALL RESET | This is a function for resetting all remote control unit settings you have made to the defaults set upon shipment from the factory. See Resetting the remote control settings on page 16. |
| READ PRESET ID | The preset codes set for the different input functions can be checked. See Confirming preset codes on page 16. |
| CHANGE RC MODE | If you have multiple Pioneer receivers, amplifiers, etc., this setting can be used to prevent other units from operating simultaneously when the remote control unit is operated. See Operating multiple receivers on page 13. |
| EXIT SETUP | Exits the setup menu. |

Note
- You can cancel or exit any of the steps by press and hold MULTI OPERATION for a couple of seconds. To go back a step, press RETURN.
- After one minute of inactivity, the remote automatically exits the operation.
Operating multiple receivers
The remote control included with this receiver can be used to operate up to three other receivers (of the same model as this receiver) in addition to this receiver. The receiver to be operated is switched by inputting the preset code to set the remote control setting.
- Set the remote modes on the receivers before using this function (see receiver's operating instructions).
1 Check that the remote control's MULTI-ZONE selector switch is set to MAIN and that the operation selector switch is set to RECEIVER.
2 While pressing MULTI OPERATION, press HOME MENU.
The remote display shows SETUP MENU.
3 Use / to select 'CHANGE RC MODE', then press ENTER.
4 Use ↑/↓ to select the remote mode. RC MODE 1 to 4 can be selected.
5 Press ENTER to set the remote mode.
The selected mode flashes for 3 seconds.
To operate another receiver, start over from step 1 to input its preset code.
Setting the remote to control other components
Most components can be assigned to one of the input function buttons (such as DVD or CD) using the component's manufacturer preset code stored in the remote.
However, there are cases where only certain functions may be controllable after assigning the proper preset code, or the codes for the manufacturer in the remote control will not work for the model that you are using.
If you can't find a preset code that matches the component you want to control, you can still teach the remote individual commands from another remote control (see Programming signals from other remote controls on page 14).
Devices may be assigned to the following input function buttons.

Note
1 This function is only valid when RECEIVER is set to IR MODE at the remote control's IR/RF SELECT setting (page 7).
Selecting preset codes directly
1 While pressing MULTI OPERATION, press HOME MENU.
The remote display shows SETUP MENU.
2 Use / to select 'PRESET RECALL', then press ENTER.
3 Press the input function button for the component you want to control, then press ENTER.
When assigning preset codes to TV CONTROL, set the remote control operation selector switch to TV here.
The remote display shows the component you want to control (for example DVD or TV).1
4 Use ↑/↓ to select the first letter of the brand name of your component, then press ENTER.
This should be the manufacturer's name (for example, P for Pioneer).
5 Use / to select the manufacturer's name from the list, then press ENTER.
6 Use / to select the proper code from the list, then try using this remote with your component.
The code should start with the component type (for example, DVD 020). If there is more than one, start with the first one.
To try out the remote control, switch the component on or off (into standby) by pressing
SOURCE. If it doesn't seem to work, select the next code from the list (if there is one).
- If you can't find or properly enter a preset code, you can still teach the remote individual commands from another remote control (see Programming signals from other remote controls below).
7 If your component is controlled successfully, press ENTER to confirm.
The remote display shows OK.
Programming signals from other remote controls
If the preset code for your component is not available, or the available preset codes do not operate correctly, you can program signals from the remote control of another component.
This can also be used to program additional operations (buttons not covered in the presets) after assigning a preset code.3
1 While pressing MULTI OPERATION, press HOME MENU.
The remote display shows SETUP MENU.
2 Use ↑/↓ to select 'CODE LEARNING', then press ENTER.
The remote display prompts you for the component you want to control (for example DVD or TV).
3 Press the input function button for the component you want to control, then press ENTER.
PRESS KEY blinks in the remote display.4
Note
1 You can't assign TUNER, HMG NET RADIO, ADAPTER PORT and iPod USB. Preset codes can be assigned to the OPTION 1 and OPTION 2 buttons. U.S. and Canadian models only: Note, however, that Sirius is pre-assigned to OPTION 1, XM to OPTION 2, and if other preset codes are assigned, Sirius and XM operations can no longer be performed. If you accidentally assign other codes to one of these buttons, it is possible to reset that button only (see Resetting the input assignment of one of the input function buttons on page 16).
2 • When using a Pioneer HDD recorder, please select PIONEER DVR 450, 451 or 452.
- When using a Pioneer flat panel TV released prior to summer 2005, please select preset code 644.
3 The remote can store about 200 preset codes (this has been tested with codes of Pioneer format only).
4 - You can't assign TUNER, HMG NET RADIO, ADAPTER PORT and iPod USB.
- The TV CONTROL buttons (TV0, TV VOL +/-, TV CH +/-, MUTE and INPUT) can only be learned after the operation selection switch is set to TV.
4 Point the two remote controls towards each other, then press the button that will be doing the learning on this receiver's remote control.
PRESS KEY lights continuously to indicate the remote is ready to accept a signal.
- The remote controls should be 3 cm (1 inch) apart.

5 Press the corresponding button on the other remote control that is sending (teaching) the signal to this receiver's remote control.
For example, if you want to learn the playback control signal, press and hold briefly. The remote display will show OK if the operation has been learned.
If for some reasons the operation hasn't been learned the remote display shows ERROR briefly, and then display PRESS KEY again. If this happens, keep pressing the (teaching) button as you vary the distance between the two remotes, until the remote display shows OK.2
Certain buttons represent operations that cannot be learned from other remote controls. The buttons available are shown below:
6 To program additional signals for the current component repeat steps 4 and 5.
To program signals for another component, exit and repeat steps 1 through 5.
7 Press and hold MULTI OPERATION for a couple of seconds to exit and store the operation(s).
Note
1 Note that interference from TVs or other devices will sometimes result in the remote control learning the wrong signal.
2. Some commands from other remote controls cannot be learned, but in most cases the remotes just need to be moved closer together or farther apart.
- If the remote display shows MEMORY FULL, it means the memory is full. See Erasing one of the remote control button settings on page 16 to erase a programmed button you're not using to free up more memory (note that some signals may take more memory than others).
- Depending on the type of command that has been learned, operation may not be possible with RF two-way communications. In this case, operate using IR signal transmission. For instructions on switching between the IR and RF modes, see Operating other components by RF communications on page 7.
Erasing one of the remote control button settings
This erases one of the buttons you have programmed and restores the button to the factory default.
1 While pressing MULTI OPERATION, press HOME MENU.
The remote display shows SETUP MENU.
2 Use / to select 'ERASE LEARNING', then press ENTER.
The remote display prompts you for the component corresponding to the button setting to be erased.
3 Press the input function button corresponding to the command to be erased, then press ENTER.
The remote display flashes PRESS KEY.
4 Press and hold the button to be erased for two seconds.
The remote display shows OK or NO CODE to confirm the button has been erased.
5 Repeat step 4 to erase other buttons.
6 Press and hold MULTI OPERATION for a couple of seconds when you're done.
Resetting the input assignment of one of the input function buttons
This procedure resets the input assignment preset at the remote control's input function button, restoring the default.
1 While pressing MULTI OPERATION, press HOME MENU.
The remote display shows SETUP MENU.
2 Use ↑/↓ to select 'KEY RESET', then press ENTER.
The remote display prompts you for the component corresponding to the button setting to be erased.
3 Press the input function button for the component whose input assignment you want to reset, then press and hold ENTER for a couple of seconds.
The remote display shows OK when the input assignment of the remote control's input function button is reset.
Resetting the remote control settings
Use this procedure to reset all the remote control's settings to the factory default.
1 While pressing MULTI OPERATION, press HOME MENU.
The remote display shows SETUP MENU.
2 Use / to select 'ALL RESET', then press ENTER.
ALL RESET flashes in the remote display.
3 Press and hold ENTER for about two seconds.
The remote display shows OK to confirm the remote presets have been erased.
Confirming preset codes
Use this feature to check which preset code is assigned to an input function button.
1 While pressing MULTI OPERATION, press HOME MENU.
The remote display shows SETUP MENU.
2 Use ↑/↓ to select 'READ PRESET ID', then press ENTER.
The remote display prompts you for the input function button you want to check.
Note
When Selecting preset codes directly on page 14 are set, all the signals learned in the input function buttons are cleared. This function is convenient when you want to reset some but not all of input function buttons.
3 Press the input function button of the component for which you want to check the preset code, then press ENTER.
The brand name and preset code appears in the display for three seconds.
Renaming input function names manually
You can customize the names that appear on the remote display when you select an input function (for example, you could change the name of DVR/BDR to DVR-LX61).
1 While pressing MULTI OPERATION, press HOME MENU.
The remote display shows SETUP MENU.
2 Use / to select 'RENAME', then press ENTER.
The remote display prompts you for the button of the input function you want to rename.
3 Press the input function button you want to rename then press ENTER.1
4 Use ↑/↓ to select 'NAME EDIT', then press ENTER.
To reset the button to its original (default) name, select NAME RESET above.
5 Edit the name of the input function in the remote control display, pressing ENTER when you're finished.
Use / to change the character and / to move forward/back a position. The name can be up to 14 characters.
Direct function
- Default setting: ON
You can use the direct function feature to control one component using the remote control while at the same time, using your receiver to playback a different component. This could let you, for example, use the remote control to set up and listen to a CD on the receiver, and then use the remote control to rewind a tape in your VCR while you continue to listen to your CD player.
When direct function is on, any component you select (using the input function buttons) will be selected by both the receiver and the remote control. When you turn direct function off, you can operate the remote control without affecting the receiver.
1 While pressing MULTI OPERATION, press HOME MENU.
The remote display shows SETUP MENU.
2 Use ↑/↓ to select 'DIRECT FUNC', then press ENTER.
The remote display prompts you for the button of the input function you want to control.
3 Press the input function button for the component you want to control, then press ENTER.2
4 Use ↑/↓ to switch direct function ON or OFF, then press ENTER.
The remote display shows OK to confirm the setting.
Multi Operation and System Off
The Multi Operation feature allows you to program a series of up to 6 commands for the components in your system. For example, you could turn on your TV, turn on your DVD player and start playing the loaded DVD using only two buttons on the remote control.
Note
1 The TV CONTROL name can be changed when the remote control operation selector switch is switched to TV. To change the names of the input functions, set the remote control operation selector switch to SOURCE.
2 You can't use direct function TUNER, HMG NET RADIO, ADAPTER PORT and iPod USB.
Similar to multi operations, System Off allows you to use one button to stop and switch off a series of components in your system at the same time.
Programming a multi-operation or a shutdown sequence
Set the remote control operation mode selector switch to RECEIVER when you want to program this receiver's operations, to SOURCE when you want to program operations of other components.
1 While pressing MULTI OPERATION, press HOME MENU.
The remote display shows SETUP MENU.
2 Use ↑/↓ to select 'MULTI OPERATE' or 'SYSTEM OFF' from the menu and press ENTER.
If you selected Multi Operation (MULTI OPERATE), the remote display prompts you for an input function button.
If you selected System Off (SYSTEM OFF), go to step 4.
3 Press the input function button for the component that will start the multi-operation, then press ENTER.
For example, if you want to start the sequence by switching on your DVD player, press DVD.
4 Use ↑/↓ to select 'EDIT CODE', then press ENTER.
To erase any previously stored multi-operations (or shutdown sequences) select CLEAR CODE above.
5 Use ↑/↓ to select a command in the sequence, then press ENTER.
If this is the first command in the sequence, select 1ST CODE. Otherwise, simply choose the next command in the sequence. PRESS KEY flashes after you press ENTER.
6 If necessary, press the input function button for the component whose command you want to input.
This is only necessary if the command is for a new component (input function).
7 Select the button for the command you want to input.
The following remote control commands can be selected:


- You don't need to program the receiver to switch on or off. This is done automatically.
With Pioneer components, you don't need to:
- program the power to switch off in a shutdown sequence (except DVD recorders);
These take priority in multi operations (not shutdown).
Note
1 - Before Multi Operation and System Off will work correctly, you must setup the remote to work with your TV and other components (see Setting the remote to control other components on page 13 for more on this).
- Some units may take some time to power up, in which case multiple operations may not be possible.
- Power on and off commands only work with components that have a standby mode.
- Up to 5 commands can be programmed for System Off.
8 Repeat steps 5 to 7 to program a sequence of commands.
9 When you're finished, use / to select 'EDIT EXIT' from the menu and press ENTER.
You will return to the remote control Setup menu. Select EXIT SETUP to exit.
Using multi operations
You can start multi operations with the receiver switched on, or in standby.
1 Press MULTI OPERATION.
MULTI OPERATE flashes in the display.
2 Press an input function button that has been set up with a multi operation.
The receiver switches on (if it was in standby) and the programmed multi operation is performed automatically.
Using System off
1 Press MULTI OPERATION.
MULTI OPERATE flashes in the display.
2 Press SOURCE.
The command sequence you programmed will run, then all Pioneer components will switch off2, followed by this receiver.3
Controlling components
This remote control can control components after entering the proper codes (see Selecting preset codes directly on page 14). Set the remote control operation selector switch to SOURCE, then press the input function buttons to select the component.
- TV CONTROL on the remote control are dedicated to control the TV assigned to the TV operation selector switch. If you have two TVs, assign the main TV to the TV operation selector switch.
Note
With this remote control, the IR and RF modes can be selected separately for the individual input functions. To perform a multi operation on a device (input function) for which the IR mode is selected, point the remote control toward the remote sensor on that device.
2 In order to avoid accidentally switching off a DVD recorder that is currently recording, no DVD recorder power off codes are sent.
3. With this remote control, the IR and RF modes can be selected separately for the individual input functions. To turn off the power of a device (input function) for which the IR mode is selected using the System Off function, point the remote control toward the remote sensor on that device.
- When the power code of another brand is registered, the power on/off operation may be inverted. When using the System Off function for a multi operation including the power codes of other brands, always check that the power of all the components has turned off.
| Button(s) | TV | TV (Monitor) | BD/DVD | HDD/DVR | VCR | SAT/CATV |
| SOURCE | POWERON/OFF | POWERON/OFF | POWERON/OFF | POWERON/OFF | POWERON/OFF | POWERON/OFF |
| Number buttons | numerics | numerics | numerics | numerics | numerics | numerics |
| (.dot) | (.dot) | KURO LINK | CLEAR | + | - | * |
| ENTER(CLASS) | CH ENTER | CH ENTER | ENTER | CLEAR | - | ENTER |
| × | EXIT/INFO | EXIT | TOP MENU | TOP MENU/DISC NAVI | - | LIST |
| f | TOOLS/GUIDE | USER MENU | TOOLSa | GUIDE | - | GUIDE |
| ↑/↓/←/→ | ↑/↓/←/→ | ↑/↓/←/→ | ↑/↓/←/→ | ↑/↓/←/→ | - | ↑/↓/←/→ |
| ENTER | ENTER | ENTER | ENTER | ENTER | - | ENTER |
| @ | HOME MENU | HOME MENU | HOME MENU | HOME MENU | - | HOME |
| @ | RETURN | RETURN | RETURN | RETURN | - | RETURN |
| PGM (Red) | Red | Red | - | HDD/DVD | - | Red |
| MENU (Green) | Green | Green | - | MENU | - | Green |
| @ (Yellow) | Yellow | Yellow | - | VCR | - | Yellow |
| @ (Blue) | Blue | Blue | MENU | TV/DTV | - | Blue |
| ▲ | - | - | ▲ | ▲ | ▲ | ▲ |
| II | - | AUTO SETUP | II | II | II | C/II |
| ■ | - | FREEZE | ■ | ■ | ■ | D/■ |
| ▲ | - | - | ▲ | ▲ | ▲ | A/▲ |
| ▲ | - | - | ▲ | ▲ | ▲ | ▲ |
| I▲ | ANT | AV SELECTION | I▲ | I▲ | I▲ | B/I▲ |
| ▲I | - | SCREEN SIZE | ▲I | ▲I | ▲I | E/▲I |
| AUDIO | AUDIO | AUDIO | AUDIO | AUDIO | AUDIO | AUDIO |
| DISP | DISPLAY | DISPLAY | DISPLAY | DISPLAY | - | DISPLAY/INFO |
| CH +/- | CH+/− | CH+/− | OUTPUTRESOLUTION+/-a | CH+/− | CH+/− | CH+/− |
| ■ + ▲ | - | - | - | - | - | RECORD |
a.Controls for BD.
| Button(s) | LD | CD/CD-R/SACD | MD/DAT | TAPE |
| SOURCE | POWER ON/OFF | POWER ON/OFF | POWER ON/OFF | POWER ON/OFF |
| Number buttons | numerics | numerics | numerics | - |
| • (dot) | +10 | >10/CLEAR | CLEARa | CLEAR |
| ENTER (CLASS) | ENTER | DISC/ENTER | - | ENTER |
| X | TOP MENU | - | - | - |
| f | - | LEGATO LINKb | - | - |
| ↑/↓/←/→ | ↑/↓/←/→ | - | - | II/III/←/→ |
| ENTER | ENTER | - | - | I▲ |
| - | SACD SETUPb | - | - | |
| RETURN | - | - | - | |
| PGM (Red) | PROGRAM | |||
| ○ (Yellow) | REPEAT | |||
| × (Blue) | SHUFFLE | |||
| II | II | II | II | II |
| ■ | ■ | ■ | ■ | ■ |
| AUDIO | AUDIO | PURE AUDIOb | - | - |
| DISP | DISPLAY/ INFO | TIMEb | - | - |
a.Controls for MD.
b.Controls for SACD.
c.Controls for DAT.
| Button(s) | TV (Projection) |
| SOURCE | POWER ON |
| 1 | MOVIE |
| 2 | STANDARD |
| 3 | DYNAMIC |
| 4 | USER1 |
| 5 | USER2 |
| 6 | USER3 |
| 7 | COLOR+ |
| 8 | SHARP+ |
| 9 | GAMMA |
| 0 | COLOR- |
| ● (dot) | SHARP- |
| ENTER (CLASS) | COLOR TEMP |
| × | EXIT |
| f | INFO |
| ↑/↓/←/→ | ↑/↓/←/→ |
| ENTER | ENTER |
| TEST | |
| HIDE | |
| × | MENU |
| HDMI1 | |
| HDMI2 | |
| COMP. | |
| VIDEO | |
| II | S-VIDEO |
| BRIGHT- | |
| BRIGHT+ | |
| AUDIO | POWER OFF |
| DISP | ASPECT |
| CH +/- | CONTRAST +/- |
Chapter 4:
Controls and displays
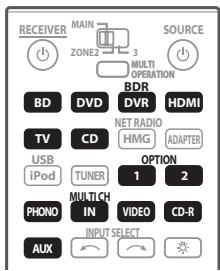
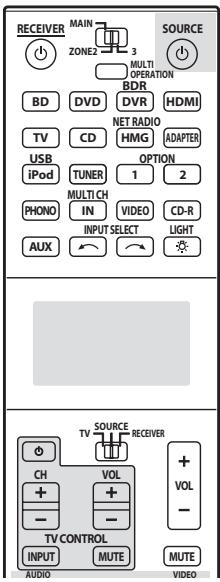
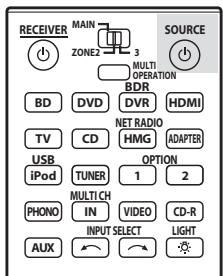
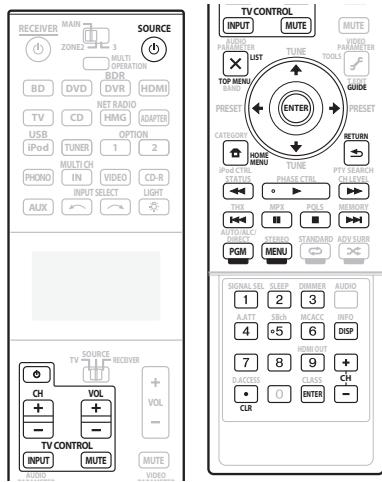
Remote control
This section explains how to operate the remote control for the receiver.
The remote has been conveniently color-coded according to component control using the following system:
- White - Receiver control, TV control
- Blue - Other controls (See page 19)
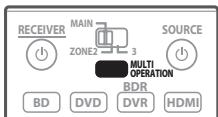
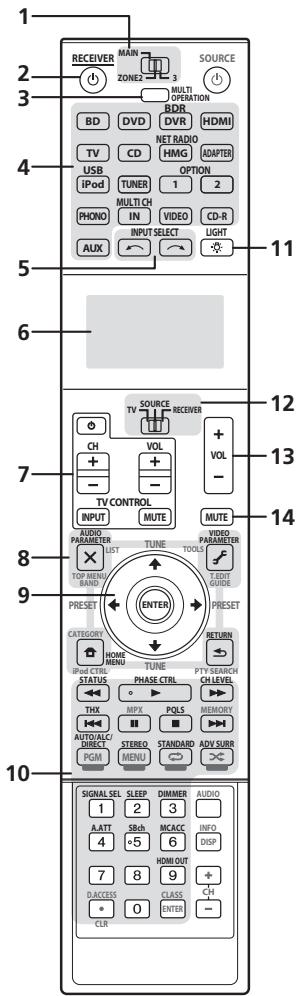
1 MULTI-ZONE operation selector switch
Switch to perform operations in the main zone, ZONE 2 and ZONE 3.
2 RECEIVER
This switches between standby and on for this receiver.
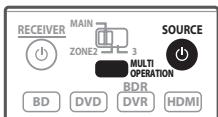
3 MULTI OPERATION
Use this button to perform multi operations (page 17).
4 Input function buttons
Press to select control of other components. With U.S. and Canadian models, the Sirius input is selected with the OPTION 1 button, the XM input with the OPTION 2 button. The AUX button can only be used on models to which it applies.
5 INPUT SELECT
Use to select the input function.
6 Character display
This display shows information when transmitting control signals. The remote screen's display differs when operating the receiver by sending infrared signals from the remote control and when operating it by RF two-way communications. For details, see Remote control display on page 24.
7 TV CONTROL buttons
These buttons are dedicated to control the TV assigned to the TV operation selector switch.
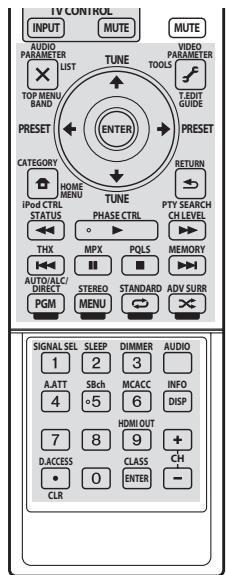
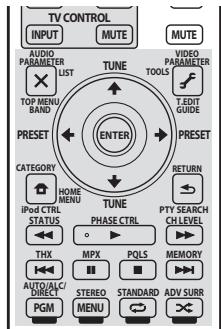
8 Receiver setting buttons
Set the remote control operation selector switch to RECEIVER first to access:
AUDIO PARAMETER - Use to access the Audio options.
VIDEO PARAMETER - Use to access the Video options.
HOME MENU - Use to access the Home Menu.
RETURN - Press to confirm and exit the current menu screen.
9 / / / / ENTER
Use the arrow buttons when setting up your surround sound system and the Audio or Video options.
10 Receiver Control buttons
Set the remote control operation selector switch to RECEIVER first to access:
STATUS - Press to check selected receiver settings.
PHASE CTRL - Press to switch on/off Phase Control or Full Band Phase Control.
CH LEVEL - Press repeatedly to select a channel, then use / to adjust the level.
THX - Press to select a Home THX listening mode.
PQLS - Press to select the PQLS setting.
AUTO/ALC/DIRECT - Switches between Auto Surround, Auto Level Control, Optimum Surround mode and Stream Direct mode.
STEREO - Switches between stereo playback and Front Stage Surround Advance modes.
STANDARD - Press for Standard decoding and to switch various modes (Pro Logic, Neo:6, etc.).
ADV SURR - Use to switch between the various surround modes.
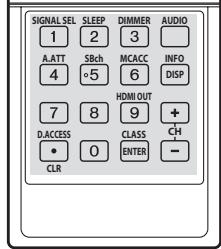
SIGNAL SEL - Use to select an input signal.
SLEEP - Use to put the receiver in sleep mode and select the amount of time before sleep.
DIMMER - Dims or brightens the display.
A.ATT - Attenuates (lowers) the level of an analog input signal to prevent distortion.
SBch - The SBch button can only be used on models to which it applies.
MCACC - Press to switch between MCACC presets.
HDMI OUT - Switch the HDMI output terminal.
11 LIGHT
Press to turn on/off the illumination for the buttons.1
12 Remote control operation selector switch Set to RECEIVER to operate the receiver, TV or SOURCE to operate the TV or the source device.
When this switch is set to RECEIVER, the receiver can be controlled (used to select the white commands). Also use this switch to set up surround sound.
13 VOL + / -
Use to set the listening volume.
14 MUTE
Mutes the sound or restores the sound if it has been muted (adjusting the volume also restores the sound).
Note
1 Press and hold in the LIGHT button for 5 seconds to change the illumination mode 1 or 2. When set to LIGHT MODE 2 (default), the illumination only lights when the remote control LIGHT button is pressed. When switched to LIGHT MODE 1, the illumination lights whenever buttons are operated. Setting LIGHT MODE 1 will shorten the service life of the batteries.
Remote control display1
Remote control display for infrared signal transmission (default)
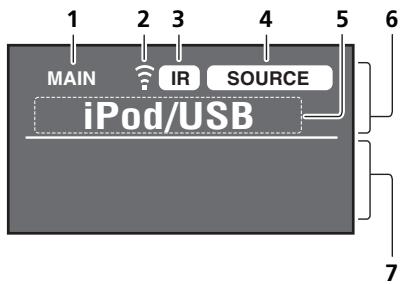
Remote control display for RF two-way communications²

1 Remote control operating zone indicator
This indicates which zone the remote control is currently set to operate. The display indicates the setting of the MULTI-ZONE operation selector switch.
Only when RF two-way communications:
The box display here indicates the communication status between this remote control unit and the receiver.
MAIN (White box with black letters): Two-way communications are established and the receiver's power is on.
MAIN (Gray box with black letters): Two-way communications are established and the receiver's power is off.
MAIN (White letters only): Two-way communications are not working well. In this case, the area indicating the receiver's status (12) is not displayed.
2 Remote control code sending indicator
This appears when signals are sent from the remote control.
3 Remote control code sending mode indicator
This indicates whether remote control codes are being sent by infrared (IR) signal or RF communications.
4 Remote control operation indicator
This indicates which operation mode the remote control is currently set to. The display indicates the setting of the remote control operation selector switch.
5 Input function and sending code indicator
This indicates what input function can currently be operated with the remote control. Also, when a button is pressed and its operation code is sent, the name of that code is displayed.
Note
1 The display lights when a remote control operation is performed, then turns off after 20 seconds if no other operation is performed. When in the Remote Setup mode, the setup is canceled and the display turns off if no operation is performed for 1 minute (page 12).
2. This is displayed when an RF adapter is connected to the receiver and paired with the remote control. For details, see Using the RF communications function on page 5.
- Depending on the communications environment, two-way communications may not work well and the remote control display may not reflect the receiver's status.
6 Area indicating the remote control's status
7 Nothing displayed
Nothing is displayed here when the remote control code sending mode is set to IR.
8 Scroll indicators
Light when there are more selectable items when making the various settings.
9 Receiver input indicator
This indicates the input function currently selected for the receiver's zone.
10 Receiver display
The same information as on the receiver's display is displayed here.
11 Master volume display
This indicates the volume of the receiver's main zone using, as an icon and in decibels (dB). When the sound is muted, the icon is displayed.
12 Area indicating the receiver's status
RFadapter
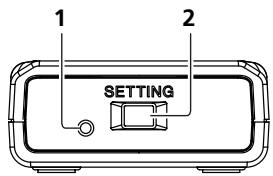
Front
Rear
1 LED
2 SETTING
Use to pairing the RF adapter and remote control (page 6).
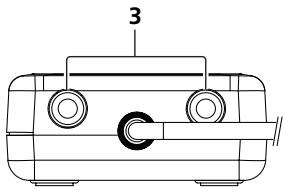
3 IR blaster terminals
Connect the IR blaster cable (page 7).
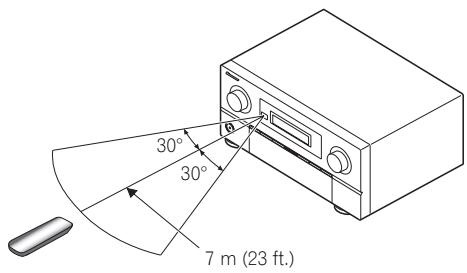
Operating range of remote control unit for infrared (IR) signal transmission
The remote control may not work properly if:
- There are obstacles between the remote control and the receiver's remote sensor.
- Direct sunlight or fluorescent light is shining onto the remote sensor.
- The receiver is located near a device that is emitting infrared rays.
- The receiver is operated simultaneously with another infrared remote control unit.
Chapter 5:
Additional information
Troubleshooting
Incorrect operations are often mistaken for trouble and malfunctions. If you think that there is something wrong with this remote control unit, check the points below. If the trouble cannot be rectified even after exercising the checks listed below, ask your nearest Pioneer authorized independent service company to carry out repair work.
| Symptom | Remedy |
| The power does not turn on. | ·When remote control operation is set to RF two-way communications, the receiver's power cannot be turned on unless RF Remote Setup or EXTENSION Setup is set to ON (see receiver's operating instructions). ·When remote control operation is set to RF two-way communications, check whether the RF adapter is properly connected to the receiver. |
| Cannot be remote controlled. | ·Set the remote control unit's remote control mode so that it matches the setting on the main unit (see Operating multiple receivers on page 13). ·Check whether the receiver's remote control mode is properly set (see receiver's operating instructions). ·Try replacing the batteries in the remote control (see Loading the batteries on page 4). ·Be sure to operate within 7 m (23 feet) and a 30° angle of the remote sensor on the front panel (see Operating range of remote control unit for infrared (IR) signal transmission on page 25). ·Check that there are no obstacles between the receiver and the remote control. ·Make sure that there is no fluorescent or other strong light shining on to the remote sensor. ·Check the connections of the CONTROL IN jack (see receiver's operating instructions). |
| Receiver or other components cannot be operated by RF two-way communications. | ·There may be radio interference with other devices. Try increasing the distance from microwave ovens, devices on a wireless LAN, other wireless devices, etc. (see Precautions when using the Omni-Directional RF Remote Control on page 10). ·Try replacing the batteries in the remote control (see Loading the batteries on page 4). ·If the RF adapter's LED is off, the RF adapter may not be properly connected to the receiver. Check whether the RF adapter is properly connected to the receiver (see Using the RF communications function on page 5). ·The devices may no longer be properly paired. Pair them again (see Pairing the RF adapter and remote control on page 6). ·When the remote control or main unit are reset, the RF communications function is also reset. Make the settings again (see Using the RF communications function on page 5). |
| Other components can't be operated with the system remote. | ·If the battery ran down, the preset codes may have been cleared. Re-enter the preset codes. ·The preset code may be incorrect. Redo the procedure for entering preset codes. ·When commands from the remote control units of other devices are registered using the learning function, in some cases they may not be learned properly. In this case, register the commands again using the learning function (see Programming signals from other remote controls on page 14). If they still do not work, they may be in a special format that cannot be registered on this receiver's remote control. Operate the device using another remote control. |
| The remote control display flickers. | ·Flickering may occur when the remaining battery power is low. Replace the batteries with new ones (see Loading the batteries on page 4). |
| U.S. and Canadian models only: Input does not switch to Sirius or XM when OPTION 1 or OPTION 2 button is pressed. | ·Sirius and XM operations can no longer be performed if other preset codes are assigned to the OPTION 1 (Sirius) or OPTION 2 (XM) button. In this case, reset the OPTION 1 or OPTION 2 button (see Resetting the input assignment of one of the input function buttons on page 16). |
Specifications
Remote control unit
Power DC3V
Estimated line-of-sight transmission distance*
About 10 m
Radio frequency band. 2.4 GHz
Modulation system
......Direct Sequence Spread Spectrum (DSSS)
Dimensions
.51 mm (W) x 255 mm (H) x 34 mm (D)
(2^1 / 16 in. (W) × 10^1 / 16 in. (H) × 1^3 / 8 in. (D))
Weight 190 g (0.4 lb)
RF adapter
Power DC5V
Estimated line-of-sight transmission distance*
About 10 m
Radio frequency band. 2.4 GHz
Modulation system
......Direct Sequence Spread Spectrum (DSSS)
Dimensions
49 mm (W) x 21 mm (H) x 64.5 mm (D)
(2 in. (W) x 7/8 in. (H) x 2 9/16 in. (D))
Weight 90 g (0.2 lb)
- The line-of-sight transmission distance is an estimate. Actual transmission distances supported may differ depending on surrounding conditions.

Note
- Specifications and the design are subject to possible modifications without notice, due to improvements.
WARNING: Handling the cord on this product or cords associated with accessories sold with the product may expose you to chemicals listed on proposition 65 known to the State of California and other governmental entities to cause cancer and birth defect or other reproductive harm.
Wash hands after handling.
D36-P5_B1_En
Published by Pioneer Corporation.
Copyright © 2010 Pioneer Corporation.
All rights reserved.
AVERTISSEMENT
Alimentation. CC 3 V
Alimentation. CC 5 V
Publication de Pioneer Corporation.
© 2010 Pioneer Corporation.
Declaration of Conformity with regard to the R&TTE Directive 1999/5/EC
Manufacturer:
Pioneer Corporation
1-1, Shin-ogura, Saiwai-ku,
Kawasaki-shi, Kanagawa
212-0031, Japan
EU Representative's:
Pioneer Europe NV
Haven 1087, Keetberglaan 1,
9120 Melsele, Belgium
http://www.pioneer.eu
C E
English:
Hereby, Pioneer, declares that this CU-RF100-U is in compliance with the essential requirements and other relevant provisions of Directive 1999/5/EC.
Suomi:
C NaCToIeTo, Pioneer DeKnapipa, Ye To3n CU-RF100-U OTROBapra Ha OCHOBHInTe N3NCKBaHnI NdpYr CbOTBeTHN IOCTaHOBJIeHnHa DnpeKTnBa 1999/5/EC.
Polski:
AFTER-SALES SERVICE FOR PIONEER PRODUCTS
Please contact the dealer or distributor from where you purchased the product for its after-sales service (including warranty conditions) or any other information. In case the necessary information is not available, please contact the Pioneer's subsidiaries (regional service headquarters) listed below:
PLEASE DO NOT SHIP YOUR PRODUCT TO THE COMPANIES at the addresses listed below for repair without advance contact, for these companies are not repair locations.
AMERICA
PIONEER ELECTRONICS (USA) INC.
P.O. BOX 1760, LONG BEACH, CA 90801-1760, U.S.A.
EUROPE
PIONEER EUROPE NV
EUROPEAN SERVICE DIVISION
HAVEN 1087, KEETBERGLAAN 1, B-9120 MELSELE, BELGIUM
ASEAN
PIONEER ELECTRONICS ASIACENTRE PTE. LTD. SERVICE DEPARTMENT 253, ALEXANDRA ROAD #04-01 SINGAPORE 159936
JAPAN AND OTHERS
PIONEER CORPORATION (HEAD OFFICE)
CUSTOMER SUPPORT CENTER
1-1, SHIN-OGURA, SAIWAI-KU, KAWASAKI-SHI, KANAGAWA
212-0031, JAPAN
S016_C1_En
Published by Pioneer Corporation.
Copyright © 2010 Pioneer Corporation.
All rights reserved.
Publication de Pioneer Corporation.
© 2010 Pioneer Corporation.
PIONEER ELECTRONICS (USA) INC.
P.O. BOX 1540, Long Beach, California 90801-1540, U.S.A. TEL: (800) 421-1404
PIONEER ELECTRONICS OF CANADA, INC.
300 Allstate Parkway, Markham, Ontario L3R 0P2, Canada TEL: 1-877-283-5901, 905-479-4411
PIONEER EUROPE NV
Haven 1087, Keetberglaan 1, B-9120 Melsele, Belgium TEL: 03/570.05.11
PIONEER ELECTRONICS ASIACENTRE PTE. LTD.
253 Alexandra Road, #04-01, Singapore 159936 TEL: 65-6472-7555
PIONEER ELECTRONICS AUSTRALIA PTY. LTD.
178-184 Boundary Road, Braeside, Victoria 3195, Australia, TEL: (03) 9586-6300
PIONEER ELECTRONICS DE MEXICO S.A. DE C.V.
Blvd. Manuel Avila Camacho 138 10 piso Col.Lomas de Chapultepec, Mexico, D.F. 11000 TEL: 55-9178-4270 K002_B1_En
- Omni-Directional RF Remote Control
- U.S. and Canadian models only
- NOTE:
- Caution
- Information to User
- European model only
- Information for users on collection and disposal of old equipment and used batteries
- Contents
- Before you start
- Using the RF communications function
- Controlling the rest of your system
- Controls and displays
- Additional information
- Checking what's in the box
- Chapter 1:
- Before you start
- WARNING
- Flow for operating the receiver with RF two-way communications
- Note
- Chapter 2:
- Using the RF communications function
- About the RF communications function
- Important
- Pairing the RF adapter and remote control
- Operating the receiver by RF communications
- While pressing MULTI OPERATION, press HOME MENU.
- Use / to select 'IR/RF SELECT', then press ENTER.
- Use / to select the receiver zone for which you want to use RF two-way communications, then press ENTER.
- Use ↑/↓ to select 'RF MODE', then press ENTER.1
- If you want to operate other zones with RF two-way communications, repeat steps 3 and 4.
- Press and hold MULTI OPERATION for a couple of seconds to exit and store the operation(s).
- Operating other components by RF communications
- Renaming input function names in synchrony with the receiver
- Setting the remote control operation mode
- Precautions when using the Omni-Directional RF Remote Control
- Precautions regarding wavelength
- Examples of common devices utilizing the 2.4 GHz band:
- Other devices using 2.4 GHz:
- Usable range
- Signal reflection
- For safe use
- Chapter 3:
- Controlling the rest of your system
- About the Remote Setup menu
- Operating multiple receivers
- Setting the remote to control other components
- Selecting preset codes directly
- Programming signals from other remote controls
- Point the two remote controls towards each other, then press the button that will be doing the learning on this receiver's remote control.
- Press the corresponding button on the other remote control that is sending (teaching) the signal to this receiver's remote control.
- To program additional signals for the current component repeat steps 4 and 5.
- Erasing one of the remote control button settings
- Use / to select 'ERASE LEARNING', then press ENTER.
- Press the input function button corresponding to the command to be erased, then press ENTER.
- Press and hold the button to be erased for two seconds.
- Repeat step 4 to erase other buttons.
- Press and hold MULTI OPERATION for a couple of seconds when you're done.
- Resetting the input assignment of one of the input function buttons
- Use ↑/↓ to select 'KEY RESET', then press ENTER.
- Press the input function button for the component whose input assignment you want to reset, then press and hold ENTER for a couple of seconds.
- Resetting the remote control settings
- Use / to select 'ALL RESET', then press ENTER.
- Press and hold ENTER for about two seconds.
- Confirming preset codes
- Use ↑/↓ to select 'READ PRESET ID', then press ENTER.
- Renaming input function names manually
- Direct function
- Multi Operation and System Off
- Programming a multi-operation or a shutdown sequence
- Use ↑/↓ to select 'MULTI OPERATE' or 'SYSTEM OFF' from the menu and press ENTER.
- Press the input function button for the component that will start the multi-operation, then press ENTER.
- Use ↑/↓ to select 'EDIT CODE', then press ENTER.
- Use ↑/↓ to select a command in the sequence, then press ENTER.
- If necessary, press the input function button for the component whose command you want to input.
- Select the button for the command you want to input.
- Using multi operations
- Press MULTI OPERATION.
- Press an input function button that has been set up with a multi operation.
- Using System off
- Press SOURCE.
- Controlling components
- Chapter 4:
- Controls and displays
- Remote control
- MULTI-ZONE operation selector switch
- RECEIVER
- MULTI OPERATION
- Input function buttons
- INPUT SELECT
- Character display
- TV CONTROL buttons
- Receiver setting buttons
- / / / / ENTER
- Receiver Control buttons
- LIGHT
- VOL + / -
- MUTE
- Remote control display1
- Remote control display for infrared signal transmission (default)
- Remote control display for RF two-way communications²
- Remote control operating zone indicator
- Only when RF two-way communications:
- Remote control code sending indicator
- Remote control code sending mode indicator
- Remote control operation indicator
- Input function and sending code indicator
- Area indicating the remote control's status
- Nothing displayed
- Scroll indicators
- Receiver input indicator
- Receiver display
- Master volume display
- Area indicating the receiver's status
- RFadapter
- LED
- SETTING
- IR blaster terminals
- Operating range of remote control unit for infrared (IR) signal transmission
- Chapter 5:
- Additional information
- Troubleshooting
- Specifications
- Remote control unit
- RF adapter
- AVERTISSEMENT
- Declaration of Conformity with regard to the R&TTE Directive 1999/5/EC
- Pioneer Corporation
- Pioneer Europe NV
- C E
- English:
- Suomi:
- Polski:
- AFTER-SALES SERVICE FOR PIONEER PRODUCTS
- AMERICA
- EUROPE
- ASEAN
- JAPAN AND OTHERS
- PIONEER ELECTRONICS (USA) INC.
- PIONEER ELECTRONICS OF CANADA, INC.
- PIONEER ELECTRONICS ASIACENTRE PTE. LTD.
- PIONEER ELECTRONICS AUSTRALIA PTY. LTD.
- PIONEER ELECTRONICS DE MEXICO S.A. DE C.V.
Brand : PIONEER
Model : CU-RF100-U
Category : Radio