
CD-IB100 II - Car audio accessory PIONEER - Free user manual and instructions
Find the device manual for free CD-IB100 II PIONEER in PDF.

| Product Type | iPod Car Stereo Adapter |
| Brand | Pioneer |
| Model | CD-IB100 II |
| Compatibility | iPod with dock connector (software versions after 2004-10-20) |
| Power Supply | 14.4 V DC (10.8 V - 15.1 V acceptable), negative ground |
| Main Functions | Play, pause, fast forward/rewind, repeat (track/album), shuffle (track/album), search by playlist, genre, artist, album |
| Display | Text information (title, artist, album, time) on compatible car stereo |
| iPod Charging | Automatic charging when ignition is in ACC or ON position |
| Connection | IP-BUS cable (blue input, black output), iPod dock connector |
| Installation | In-vehicle only, Velcro or similar mounting, away from heat and moisture |
| Maintenance | Clean with a dry cloth, avoid any liquid |
| Safety | Do not expose to liquids, do not obstruct pedals, secure firmly to prevent movement |
| Troubleshooting | Error messages: ERROR-11 (communication), ERROR-21 (iPod version), ERROR-30 (iPod failure), NO TRACK, STOP |
| Repairability | Contact a Pioneer dealer or authorized service center |
Frequently Asked Questions - CD-IB100 II PIONEER
User questions about CD-IB100 II PIONEER
0 question about this device. Answer the ones you know or ask your own.
Ask a new question about this device
Download the instructions for your Car audio accessory in PDF format for free! Find your manual CD-IB100 II - PIONEER and take your electronic device back in hand. On this page are published all the documents necessary for the use of your device. CD-IB100 II by PIONEER.
USER MANUAL CD-IB100 II PIONEER
Thank you for buying this Pioneer product.
Please read through these operating instructions so you will know how to operate your model properly. After you have finished reading the instructions, keep this manual in a safe place for future reference.
01 Before You Start
Information to User 3
About this unit 3
About this manual 3
About handling the iPod 4
- About iPod settings 4
Connecting and disconnecting the iPod 4
12 Playing songs on iPod
Listening to songs on your iPod 5
Browsing for a song 5
Pausing a song 6
Displaying text information on iPod 6
Repeating play 6
Playing songs in a random order (shuffle) 6
03 Operating with different head units
Using as an external unit 7
Function compatibility charts 7
- Head unit group 1 7
- Head unit group 2 7
- Head unit group 3 8
- Head unit group 4 8
Overview of playlist selection and preference modes 9
-Playback by selecting a playlist from PLAYLIST 9
- Searching for a desired track from GENRE (list of genres), ARTIST (list of artists) and ALBUM (list of albums) 9
Searching for a desired track 10
- Other preference setting procedures 10
Playback by selecting a playlist 11
Displaying text information on iPod 11
Repeating play 11
Playing songs in a random order (shuffle) 12
04 Connections
Connecting the units 14
05 Installation
Installing this unit 15 - Mounting with Velcro fasteners 15
Additional Information
Troubleshooting 16 Understanding error messages 16 Specifications 16
Information to User
Alteration or modifications carried out without appropriate authorization may invalidate the user's right to operate the equipment.
This device complies with part 15 of the FCC Rules. Operation is subject to the following two conditions:
(1) This device may not cause harmful interference, and (2) this device must accept any interference received, including interference that may cause undesired operation.

About this unit
This unit is the adapter for a Pioneer head unit to control and listen to songs on an iPod with Dock Connector.
- iPod is a trademark of Apple Computer, Inc., registered in the U.S. and other countries.
- This unit is designed to use only in a vehicle.
- This unit supports only an iPod with Dock Connector.
- This unit does not support software versions prior to iPod update 2004-10-20. For supported versions, consult your nearest Pioneer dealer.
- Operations may vary depending on the software version of iPod.

WARNING: For U.S. models
Handling the cord on this product or cords associated with accessories sold with the product may expose you to chemicals listed on proposition 65 known to the State of California and other governmental entities to cause cancer and birth
defects or other reproductive harm. Wash hands after handling.

CAUTION
- Do not allow this unit to come into contact with liquids. Electrical shock could result. Also, this unit damage, smoke, and overheat could result from contact with liquids.
- Keep this manual handy as a reference for operating procedures and precautions.
Always keep the volume low enough so that you can hear sounds from outside the vehicle. - Protect this unit from moisture.
- Should this product fail to operate properly, contact your dealer or nearest authorized Pioneer Service Station.

Important (Serial number)
The serial number is located on the bottom of this unit. For your own security and convenience, be sure to record this number on the enclosed warranty card.
About this manual
Operate this unit with the connected head unit. Instructions in this manual use AVH-P5700DVD (AVH-P5750DVD) as an example of head unit.
When using the head units other than AVHP5700DVD (AVH-P5750DVD), refer to Operating with different head units on page 7.
We recommend that you familiarize yourself with the functions and their operation by reading through the manual before you begin using this unit. It is especially important that you read and observe WARNINGs and CAUTIONs in this manual.
About handling the iPod

CAUTION
- Pioneer accepts no responsibility for lost data on the iPod even if that data is lost while using this unit.
- Do not allow direct sunlight to fall on the iPod when it is not being used. Extended exposure to direct sunlight can result in iPod malfunction due to the resulting high temperatures.
- Do not leave the iPod in high temperatures or direct sunlight.
Fix the iPod securely when using with this unit. Do not let the iPod fall onto the floor, where it may become jammed under the brake or accelerator pedal.
For details, refer to the iPod's manuals.
About iPod settings
- You cannot operate the iPod Equalizer on the Pioneer products. We recommend that you set the iPod Equalizer to off, before connecting the iPod to this unit.
- You cannot set Repeat to off on the iPod when using this unit. Even if you set Repeat to off on the iPod, Repeat is changed to All automatically when connecting the iPod to this unit.
- The Shuffle function of the iPod is operated as Random on the Pioneer products.
Connecting and disconnecting the iPod
- Connect only the dock connector to the iPod so that this unit works properly.
- Before connecting the dock connector to the iPod, disconnect the headphones from the iPod.
- Connect the iPod to this unit.
As soon as the iPod is connected, its power is automatically turned on.
While the iPod is connected to this unit, PIONEER (or (check mark)) is displayed on the iPod.
- When the ignition switch is set to ACC or ON, the iPod's battery is charged while the iPod is connected to this unit.
While the iPod is connected to this unit, the iPod itself cannot be turned on or off.
The iPod connected to this unit is turned off about two minutes after the ignition switch is set to OFF.
- Remove the iPod from this unit.
When removing the iPod from this unit, the iPod main menu is displayed after a few seconds.
Listening to songs on your iPod
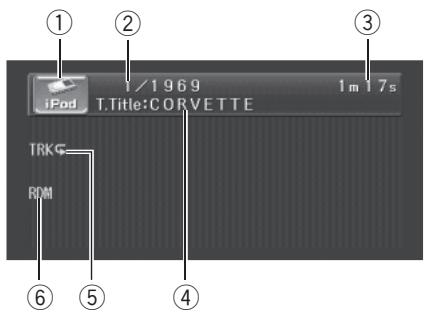
① Source icon
Shows which source has been selected.
② Song number indicator
Shows the number of song played in the selected list.
③ Play time indicator
Shows the elapsed playing time of the current song.
④ Song title indicator
Shows the title of the currently playing song.
⑤ Repeat indicator
Shows when repeat range is selected to current track.
⑥ RDM indicator
Shows when random play is set to TRACK or ALBUM.
1 Touch the source icon and then touch iPod to select the iPod.
- You can also select the iPod source by pressing SOURCE repeatedly.
- When the iPod is not connected to this unit, you cannot select the iPod as a source.
2 Touch the screen to display the touch panel keys.
3 To skip back or forward to another song, touch 口 口 or
Touching skips to the start of the next song. Touching once skips to the start of the current song. Touching it again will skip to the previous song.
- You can also skip back or forward to another song by pressing or .
4 To perform fast forward or reverse, keep touching or .
- You can also perform fast reverse/fast forward by pressing and holding or .
Browsing for a song
The operation of this unit to control an iPod is designed to be as close to the operation of the iPod as possible for easy operation and song search.
1 Touch TOP to display the top menu.
2 Touch one of the categories in which you want to search for a song.
- PLAYLISTS (playlists)
GENRES (genres) - ARTISTS (artists)
- ALBUMS (albums)
- SONGS (songs)
3 Touch a list title that you want to play. Repeat this operation until you find the desired song.
- You can start playback throughout the selected list if you keep touching a list title.
- To go to the next group of list titles, touch .
- To return to the previous group of list titles, touch x
To return to the previous menu, touch
To go to the top menu of the list search, touch TOP.
Playing songs on iPod
Pausing a song
Pause lets you temporarily stop playback of a song.
- Touch /II during playback.
PAUSE appears in the display.
To resume playback at the same point that you turned pause on, touch again.
- You can also turn pause on or off by pressing PGM.
Displaying text information on iPod
Text information recorded on the iPod can be displayed.
- Touch DISP.
Touch DISP repeatedly to switch between the following settings:
T. Title (song title)—Artist (artist name)—Album (album title)
If the characters recorded on the iPod are not compatible with a head unit, those characters will not be displayed.

Note
You can scroll the title to the left by keeping touching DISP.
Repeating play
For playback of the songs on the iPod, there are two repeat play ranges: TRACK (repeat one song) and ALL (repeat all songs in the list).
While REPEAT is set to TRACK, you cannot select the other songs.
1 Press A.MENU and then touch FUNC to display the function names.
2 Touch REPEAT to select the repeat range.
Touch REPEAT repeatedly until the desired repeat range appears in the display.
- TRACK - Repeat just the current song
- ALL - Repeat all songs in the selected list
Playing songs in a random order (shuffle)
For playback of the songs on the iPod, there are two random play methods: TRACK (play back songs in a random order) and ALBUM (play back albums in a random order).
1 Press A.MENU and then touch FUNC to display the function names.
2 Touch RANDOM to select the random play method.
Touch RANDOM repeatedly until the desired random play method appears in the display.
- TRACK - Play back songs in a random order within the selected list
- ALBUM - Select an album randomly, and then play back all the songs in it in order
Operating with different head units
Using as an external unit
The following head units operate this unit as an external unit. For more details about the external unit, refer to the head unit's manual.
- FUNC4 (F4), FUNCTION4 and 1-6KEY
doesn't be used to operate this unit.
Head unit group 1
The following head units featuring FUNCTION button operation or SOFT KEY operation. DEH-P9450MP, DEH-P9400MP, DEH-P7700MP (European model), DEH-P6880MP, DEH-P6800MP (European model), DEH-P6750MP, DEH-P6700MP, DEH-P5850MP, DEH-P5850MP, DEH-P5800MP, DEH-P5750MP, DEH-P5730MP, DEH-P5700MP, DEH-P4880MP, DEH-P4850MP, DEH-P4850MP, DEH-P4800MP, DEH-P4770MP, DEH-P4750MP, DEH-P4700MP, DEH-P3800MP, DEH-P940MP, DEH-P670MP, DEH-P580MP, DEH-P480MP, DEH-P470MP, DVH-P5850MP, DVH-P5650MP, DVH-P580MP, FH-P9200MP, FH-P4200MP
Head unit group 2
The following head units featuring MULTI-CONTROL operation.
DEH-P8650MP, DEH-P8600MP, DEH-P7750MP, DEH-P7700MP (North American model), DEH-P860MP, DEH-P770MP, DEH-P80MP, DEH-P8MP, DEH-P1Y
Head unit group 3
The following head units featuring touch panel key operation.
AVH-P7650DVD, AVH-P7600DVD, AVH-P7550DVD, AVH-P7500DVDII, AVH-P7500DVD, AVH-P6650DVD, AVH-P6600DVD, AVH-P6550DVD, AVH-P6500DVD
Head unit group 4
The following head units are navigation units featuring touch panel key operation. AVIC-D2,AVIC-N1,AVIC-X1
Function compatibility charts Head unit group 1
| Controls | |
| Select iPod as a source | Press SOURCE. |
| Select a category | Press BAND (BAND/ESC). |
| Select a list | Press ▲ or ▼. |
| Skip back or forward to another song*1 | Press ▲ or ▲. |
| Fast forward/re-verse*2 | Press and hold ▲ or ▲. |
| Select a function | Press FUNCTION (FUNC). |
| Pause a song | Press ▲ or ▼ in FUNC1 (F1). |
| Select a repeat range | Press ▲ or ▼ in FUNC2 (F2). |
| Select a random play method | Press and hold ▲ or ▼ in FUNC2 (F2). |
| Switch the display | Press ▲ or ▼ in FUNC3 (F3). |
| Scroll the title | Press and hold ▲ or ▼ in FUNC3 (F3). |
| Switch between AUTO and MANUAL | Press ▲ or ▲ in AUTO/MANUAL (A/M). |
Head unit group 2
| Controls | |
| Select iPod as a source | Press SOURCE. |
| Select a category | Press BAND (BAND/ESC). |
1 You can use this function when you select AUTO in AUTO/MANUAL (A/M).
2 You can use this function when you select MANUAL in AUTO/MANUAL (A/M).
Operating with different head units
| Controls | |
| Select a list | Push MULTI-CONTROL up or down. |
| Skip back or forward to another song*1 | Push MULTI-CONTROL left or right. |
| Fast forward/re-verse*2 | Push and hold MULTI-CONTROL left or right. |
| Select a function | Use MULTI-CONTROL. |
| Pause a song | Press MULTI-CONTROL in FUNC1 (F1). |
| Select a repeat range | Press MULTI-CONTROL in FUNC2 (F2). |
| Select a random play method | Press and hold MULTI-CONTROL in FUNC2 (F2). |
| Switch the display | Press MULTI-CONTROL in FUNC3 (F3). |
| Scroll the title | Press and hold MULTI-CONTROL in FUNC3 (F3). |
| Switch between AUTO and MANUAL | Press MULTI-CONTROL in AUTO/MANUAL (A/M). |
Head unit group 3
| Controls | |
| Select iPod as a source | Press SOURCE. |
| Select a category | Touch BAND. |
| Select a list | Touch ▲ or ▼. |
| Skip back or forward to another song*1 | Touch ← or ▶. |
| Fast forward/re-verse*2 | Keep touching ← or ▷. |
| Select a function | Touch A.MENU and then touch FUNCTION. |
| Pause a song | Touch ▲▼ in FUNCTION1. |
| Controls | |
| Select a repeat range | Touch ▲▼ in FUNCTION2. |
| Select a random play method | Keep touching ▲▼ in FUNC-TION2. |
| Switch the display | Touch ▲▼ in FUNCTION3. |
| Scroll the title | Keep touching ▲▼ in FUNC-TION3. |
| Switch between AUTO and MANUAL | Touch ↓ or ▷ in AUTO/MANUAL. |
Head unit group 4
| Controls | |
| Select iPod as a source | Press SOURCE. |
| Select a category | Touch BAND. |
| Select a list | Touch ▲ or ▼. |
| Skip back or forward to another song*1 | Touch ← or >. |
| Fast forward/re-verse*2 | Keep touching ← or >. |
| Select a function | Touch A.MENU or press the joystick and then touch FUNCTION*3. |
| Pause a song | Touch SEND in FUNCTION1. |
| Select a repeat range | Touch SEND in FUNCTION2. |
| Select a random play method | Keep touching SEND in FUNCTION2. |
| Switch the display | Touch SEND in FUNCTION3. |
| Scroll the title | Keep touching SEND in FUNCTION3. |
| Switch between AUTO and MANUAL | Touch AUTO/MANUAL. |

1 You can use this function when you select AUTO in AUTO/MANUAL (A/M).
2 You can use this function when you select MANUAL in AUTO/MANUAL (A/M).
*3 In case of AVIC-D2, you can not use A.MENU.
Operating with different head units
Overview of playlist selection and preference modes
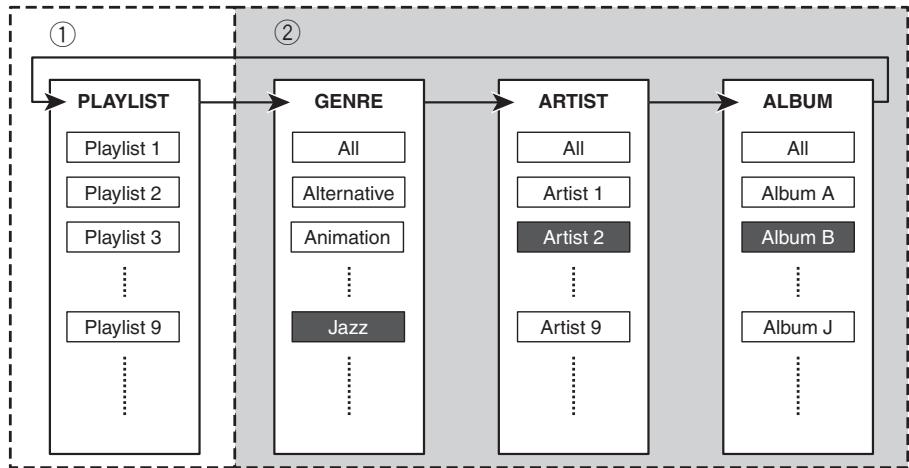
① Playlist Selection Mode
② Preference Mode
The iPod link-compatible head unit lets you select a list of tracks you want to listen to (album, albums, etc.) using the Playlist Selection Mode and Preference Mode. An overview of the Playlist Selection Mode and Preference Mode is provided above with reference to the illustrations.
Playback by selecting a playlist from PLAYLIST
Choose a favorite playlist in the Playlist Selection Mode.
Refer to Playback by selecting a playlist on page 11.
Searching for a desired track from GENRE (list of genres), ARTIST (list of artists) and ALBUM (list of albums)
Choose a favorite genre, artist or album in the Preference Mode. The Preference Mode lets you search for your favorite tracks from separate lists of genres, artists and albums in that order.
Refer to Searching for a desired track on the next page.
Operating with different head units
Searching for a desired track
You can select and play back tracks of your favorite artists and albums, etc. from GENRE,
ARTIST and ALBUM. As an example, the following provides an explanation of the procedure for selecting "Jazz" for GENRE,
"Artist 2" for ARTIST and "Album B" for
ALBUM using the illustration in the previous section entitled, Overview of playlist selection and preference modes.
1 Use BAND (BAND/ESC) to switch to GENRE.
GENRE is displayed for about two seconds.
Each time you press BAND (BAND/ESC) the display changes in the following order:
PLAYLIST (playlists)—GENRE (genres)—ARTIST (artists)—ALBUM (albums)
- ALL is set for the default setting of GENRE, ARTIST and ALBUM.
- Preference conditions are canceled when switching from ALBUM to PLAYLIST. However, the list currently being played (under the most recent preference conditions) continues to play until either of the following procedures are performed with the or (or MULTI-CONTROL) button.
A different list is selected
A new preference list has been started
2 Use or (or MULTI-CONTROL) to select "Jazz".
Playback of "Jazz" tracks will start.
3 Use BAND (BAND/ESC) to switch to ARTIST.
ARTIST is displayed for about two seconds.
4 Use or (or MULTI-CONTROL) to select "Artist 2".
Playback of tracks from "Album B" will start.
5 Use BAND (BAND/ESC) to switch to ALBUM.
ALBUM is displayed for about two seconds.
6 Use or (or MULTI-CONTROL) to select "Album B".
Playback of tracks from "Album B" will start.
7 Use or (or MULTI-CONTROL) to select the track you want to listen to.
Playback of the selected track will start.
Other preference setting procedures
Preferences can also be set starting from ARTIST or ALBUM.
When the genre of "Album B" is not known
First switch to GENRE in step 1 and then cancel the preference conditions. Next, continue the procedure starting from step 3.
When the genre and artist of "Album B" are not known
First switch to GENRE in step 1 and then cancel the preference conditions. Next, continue the procedure starting from step 5.

Notes
- If the genre has already been selected, only artists and albums of the selected genre can be selected. If you want to select artists and albums of a different genre, repeat the procedure starting from step 1.
- ALL is set for the default setting of GENRE, ARTIST and ALBUM.
Operating with different head units
- Preference conditions are canceled when switching from ALBUM to PLAYLIST. However, the list currently being played (under the most recent preference conditions) continues to play until either of the following procedures are performed with the or (or
MULTI-CONTROL) button.
A different list is selected
A new preference list has been started
Playback by selecting a playlist
You can select and play back a playlist you want to listen to from PLAYLIST of the iPod.
1 Use BAND (BAND/ESC) to switch to PLAYLIST.
PLAYLIST is displayed for about two seconds.
Each time you press BAND (BAND/ESC) the display changes in the following order:
PLAYLIST (playlists)—GENRE (genres)—ARTIST (artists)—ALBUM (albums)
2 Use or (or MULTI-CONTROL) to select the playlist you want to listen to.
Using (or pushing MULTI-CONTROL up) selects the previous playlist. Using (or pushing MULTI-CONTROL down) selects the next playlist.
The name of the playlist is displayed for about two seconds, then playback of the selected playlist starts.
3 Use or (or MULTI-CONTROL) to select the track you want to listen to.
Playback of the selected track will start.
Displaying text information on iPod
Text information recorded on the iPod can be displayed.
- Select the desired information.
Refer to Function compatibility charts on page 7.
Play time—Song title—Artist name—Album title—Repeat play status—Random play status
If the characters recorded on the iPod are not compatible with a head unit, those characters will not be displayed.

Notes
- When using this unit as an external unit, head units can display the first 8 letters of the song title, the artist name and the album title.
- You can scroll to the left the song title, the artist name and the album title.
Repeating play
For playback of the songs on the iPod, there are two repeat play ranges: TRK (repeat one song) and ALL (repeat all songs in the list).
While RPT is set to TRK, you cannot select the other songs.
- Select the repeat range.
Refer to Function compatibility charts on page 7.
- TRK - Repeat just the current song
ALL-Repeat all songs in the list
Operating with different head units
Playing songs in a random order (shuffle)
For playback of the songs on the iPod, there are two random play methods: TRK (play back songs in a random order) and ALBUM (play back albums in a random order).
- Select the random play method.
Refer to Function compatibility charts on page 7.
- TRK - Play back songs in a random order within the list
- ALBUM - Select an album randomly, and then play back all the songs in it in order
Connections

Important
- This unit is for vehicles with a 12-volt battery and negative grounding. Before installing it in a recreational vehicle, truck, or bus, check the battery voltage.
- To avoid shorts in the electrical system, be sure to disconnect the battery cable before beginning installation.
- Refer to the owner's manual for details on connecting the power amp and other units, then make connections correctly.
- Secure the wiring with cable clamps or adhesive tape. To protect the wiring, wrap adhesive tape around them where they lie against metal parts.
- Route and secure all wiring so it cannot touch any moving parts, such as the gear shift, handbrake and seat rails. Do not route wiring in places that get hot, such as near the heater outlet. If the insulation of the wiring melts or gets torn, there is a danger of the wiring short-circuiting to the vehicle body.
- Don't pass the yellow lead through a hole into the engine compartment to connect to the battery. This will damage the lead insulation and cause a very dangerous short.
- Do not shorten any leads. If you do, the protection circuit may fail to work when it should.
- Never feed power to other equipment by cutting the insulation of the power supply lead of the unit and tapping into the lead. The current capacity of the lead will be exceeded, causing overheating.
- When replacing the fuse, be sure to only use a fuse of the rating prescribed on the fuse holder.
- To prevent incorrect connection, the input side of the IP-BUS connector is blue, and the output side is black. Connect the connectors of the same colors correctly.
-
Connect only the dock connector to the iPod so that this unit works properly.
-
Before connecting the dock connector to the iPod, disconnect the headphones from the iPod.
Cords for this product and those for other products may be different colors even if they have the same function. When connecting this product to another product, refer to the supplied manuals of both products and connect cords that have the same function.
Connecting the units
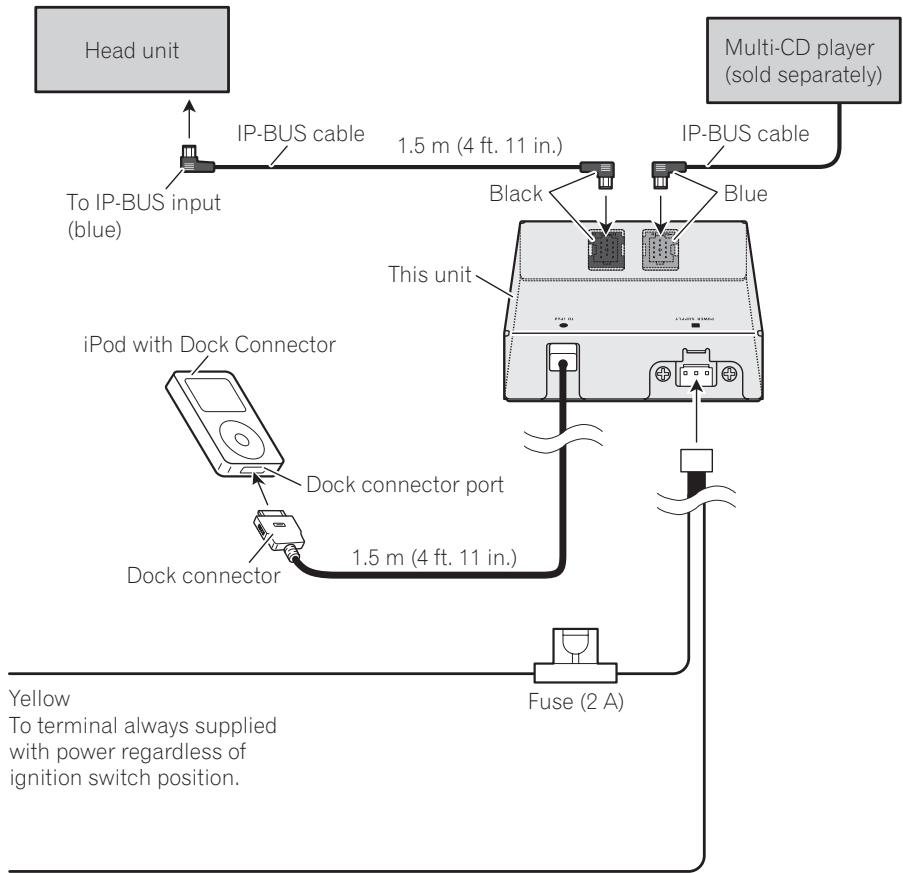
Black (ground)
To vehicle (metal) body.


Important
- Before making a final installation of the unit, temporarily connect the wiring to confirm that the connections are correct and the system work properly.
- Use only the parts included with the unit to ensure proper installation. The use of unauthorized parts can cause malfunctions.
- Consult with your nearest dealer if installation requires the drilling of holes or other modifications of the vehicle.
- Install the unit where it does not get in the driver's way and cannot injure the passenger if there is a sudden stop, like an emergency stop.
- When mounting this unit, make sure none of the leads are trapped between this unit and the surrounding metalwork or fittings.
- Do not mount this unit near the heater outlet, where it would be affected by heat, or near the doors, where rainwater might splash onto it.
- Before drilling any mounting holes always check behind where you want to drill the holes. Do not drill into the gas line, brake line, electrical wiring or other important parts.
- If this unit installed in the passenger compartment, anchor it securely so it does not break free while the vehicle is moving, and cause injury or an accident.
- If this unit is installed under a front seat, make sure it does not obstruct seat movement. Route all leads and cords carefully around the sliding mechanism so they do not caught or pinched in the mechanism and cause a short-circuit.
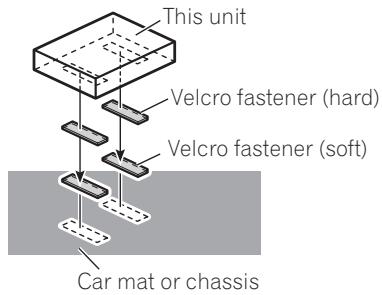
Installing this unit
Mounting with Velcro fasteners
Thoroughly wipe off the surface before affixing the Velcro fasteners.
- If the Velcro fasteners (hard) adhere to the car mat directly, you may install this unit without using the Velcro fasteners (soft).
- Mount this unit using the Velcro fasteners.

Additional Information
Troubleshooting
| Symptom | Cause | Action |
| iPod doesn't operate correctly. | Cables are incorrectly connected. | Disconnect the cable from iPod. Once iPod main menu is displayed, connect the cable again. Reset the iPod. |

Understanding error messages
When you contact your dealer or your nearest Pioneer Service Center, be sure to record the error message.
| Message | Cause | Action |
| ERROR-11 | Communication failure | Disconnect the cable from iPod. Once iPod main menu is displayed, connect the cable again. Reset the iPod. |
| ERROR-21 | Old version of iPod | Update the version of iPod. |
| ERROR-30 | iPod failure | Reset the iPod. |
| NO TRACK | No songs | Transfer the songs to iPod. |
| STOP | No songs in the current list | Select a list that contains the songs. |

Specifications
General
Power source 14.4 V DC (10.8 V to 15.1 V allowable)
Grounding system Negative type
Max. current consumption 2.0 A
Dimensions (W× H× D) ... 95× 25× 91mm
(3-3/4 × 1 × 3-5/8 in.)
Weight 0.33 kg (0.7 lbs)

Note
Specifications and the design are subject to possible modifications without notice due to improvements.
P4700MP, DEH-P3800MP, DEH-P940MP, DEHP670MP, DEH-P580MP, DEH-P480MP, DEHP470MP, DVH-P5850MP, DVH-P5650MP, DVHP580MP, FH-P9200MP, FH-P4200MP
Consommation maximaI ...2,0 A
Dimensions (L x H x P) 95 x 25 x 91 mm
Poids 0,33 kg

Remarque
Le unità principali riportate di seguito vengono controllate tramite il tasto FUNCTION o tramite tasto SOFT KEY.
DEH-P9450MP, DEH-P9400MP, DEH-P7700MP (modello europeo), DEH-P6880MP, DEH-P6800MP (modello europeo), DEH-P6750MP, DEH-P6700MP, DEH-P5850MP, DEH-P5850MPH, DEH-P5800MP, DEH-P5750MP, DEH-P5730MP, DEH-P5700MP, DEH-P4880MP, DEH-P4850MP, DEH-P4850MPH, DEH-P4800MP, DEH-P4770MP, DEH-P4750MP, DEH-P4700MP, DEH-P3800MP, DEH-P940MP, DEH-P670MP, DEH-P580MP, DEH-P480MP, DEH-P470MP, DVH-P5850MP, DVH-P5650MP, DVH-P580MP, FH-P9200MP, FH-P4200MP
PIONEER ELECTRONICS (USA) INC.
P.O. Box 1540, Long Beach, California 90801-1540, U.S.A.
TEL: (800) 421-1404
PIONEER EUROPE NV
Haven 1087, Keetbergraan 1, B-9120 Melsele, Belgium
TEL: (0) 3/570.05.11
PIONEER ELECTRONICS ASIACENTRE PTE. LTD.
253 Alexandra Road, #04-01, Singapore 159936
TEL: 65-6472-7555
PIONEER ELECTRONICS AUSTRALIA PTY. LTD.
178-184 Boundary Road, Braeside, Victoria 3195, Australia
TEL: (03) 9586-6300
PIONEER ELECTRONICS OF CANADA, INC.
300 Allstate Parkway, Markham, Ontario L3R OP2, Canada
TEL: 1-877-283-5901
PIONEER ELECTRONICS DE MEXICO, S.A. de C.V.
Blvd.Manuel Avila Camacho 138 10 piso
Col.Lomas de Chapultepec, Mexico, D.F. 11000
TEL: 55-9178-4270
先锋股份有限公司
總公司:台北市中山北路二段44號13樓
電話:(02)2521-3588
先鋒電子(香港)有限公司
香港九龍尖沙咀海港城世界商業中心
9樓901-6室
電話:(0852) 2848-6488
Published by Pioneer Corporation.
Copyright © 2005 by Pioneer Corporation.
All rights reserved.