Agressor - Headphones Sven - Free user manual and instructions
Find the device manual for free Agressor Sven in PDF.

User questions about Agressor Sven
0 question about this device. Answer the ones you know or ask your own.
Ask a new question about this device
Download the instructions for your Headphones in PDF format for free! Find your manual Agressor - Sven and take your electronic device back in hand. On this page are published all the documents necessary for the use of your device. Agressor by Sven.
USER MANUAL Agressor Sven
natural_image
Black and white photo of a joystick controller with control buttons (no visible text or symbols)text_image
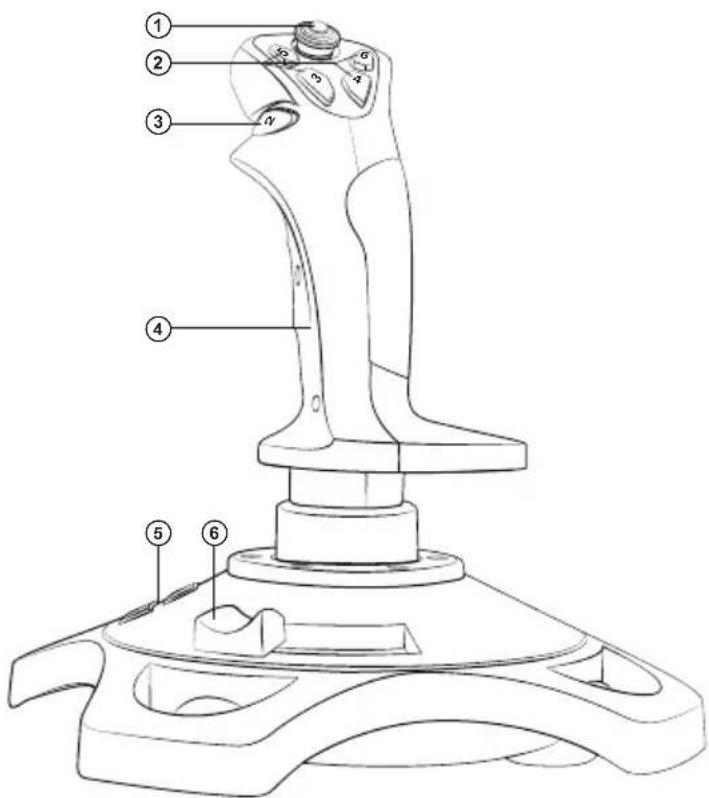
Technical diagram of a joystick controller with numbered parts labeled 1 through 6Рис. 1. Вид спереди

text_image
⑦ ① ⑤ ⑧ ⑧ 7 9 10 11Рис. 2. Вид сзади
text_image
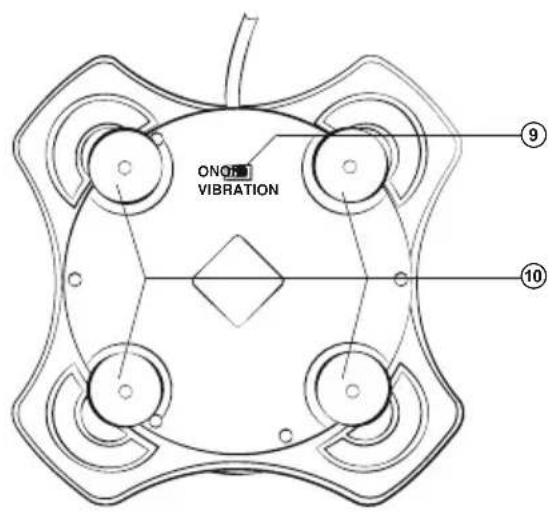
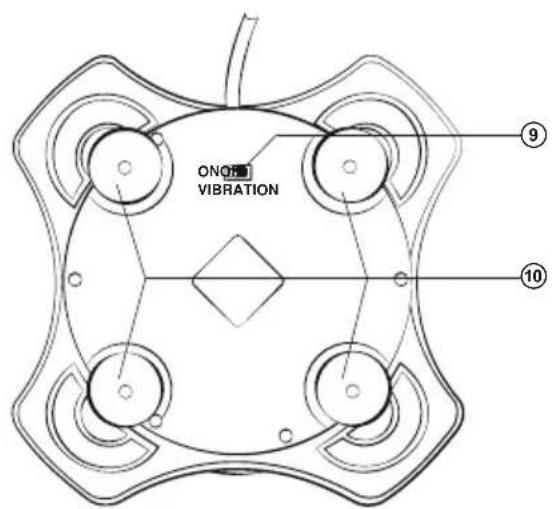
ONOR VIBRATION ⑨ ⑩Рис. 3. Вид снизу
text_image
Cbolectro: USB all-in-one game controller Test Key Map Vibration Adjustment About Period Default Auto Manual Mag. Left Right OK Other PreviewРис. 7

text_image
Свойства: USB all-in-one game controller Test Key Map Vibration Adjustment About X axis: Y axis As following steps: 1.Don't touch axis Check 2.Press "Check" Z axis RZ axis OK Отмена ПриценитьРис. 8
natural_image
Black and white photo of a joystick controller with control buttons (no visible text or symbols)text_image
Technical diagram of a joystick controller with numbered parts labeled 1 through 6text_image
Cboicera: USB all-in-one game controller Test Key Map Vibration Adjustment About Period Default Auto Manual Mag. Left Right OK Change PreviewМал. 7
natural_image
Black and white photo of a joystick controller with control buttons (no visible text or symbols)Operation Manual
AGGRESSOR
Congratulations on the purchase of Sven product!
Please read this Operation Manual before using the unit and retain this Operation Manual in safe place for future reference.
COPYRIGHT
© 2014. SVEN PTE. LTD. Version 1.0 (V 1.0).
This manual and information contained in it are copyrighted. All rights reserved.
TRADEMARKS
All trademarks are the property of their legal holders.
NOTICE OF RESPONSIBILITY RESTRICTION
Despite the exerted efforts to make this Manual more exact, some discrepancies may occur. The information of this Manual is given on “as is” terms. The author and the publisher do not bear any liability to a person or an organization for loss or damages which have arisen from the information, contained in the given Manual.
UNPACKING
Unpack the device carefully. Make sure there are no accessories left in the box. Check up the device for damages; if the product was damaged during transportation, address the firm which carried out the delivery; if the product functions incorrectly, address the dealer at once.
CONTENTS
RUS 1
UKR....8
ENG 16
- DESCRIPTION 18
- SAFETY PRECAUTIONS .... 18
- PACKAGE CONTENTS 18
- SPECIAL FEATURES 18
- SYSTEM REQUIREMENTS ...... 18
- DESCRIPTION OF THE CONSTRUCTION 19
- CONNECTION AND INSTALLATION 20
- TROUBLESHOOTING 22
Technical support is on www.sven.fi
1. DESCRIPTION
Aggressor Flight Joystick can be used in different games such as simulators, arcades, shooter games etc. This device supports Windows XP/Vista/7/8 and requires DirectX 7.0 and up. Drivers are not needed for operating this device, however, their installation is necessary for activating vibration feedback.
2. SAFETY PRECAUTIONS
- Do not disassemble or repair the device on your own. Maintenance and repairs should be carried out by qualified service centre staff only.
- Protect the device from direct impact of high humidity, dust, strong magnetic fields, vibrations, high temperatures, toxic liquids and gases.
- Instructions for device maintenance: for cleaning the case of the device please use clean soft cloth. Do not use such solvents as gasoline or spirit for cleaning, since these solvents can damage the surface of the device.
- Do not drop the device not to have it damaged.
3. PACKAGE CONTENTS
• Flight Joystick — 1 pc
- Software CD disk —1 pc
• Operation manual — 1 pc
- Warranty card — 1 pc
4. SPECIAL FEATURES
- Ergonomic design of the Flight Joystick
• Supports: DirectX 7.0 and higher, Windows XP/Vista/7/8 - USB Interface
• Vibration feedback for higher realistic effect - 4 axes, D-Pad and 12 additional buttons
• USB cable length 1.8 m - Rubber coating for superior comfort
- Rubber suction caps for secure fixation to the table
5. SYSTEM REQUIREMENTS
- USB port available
• Operational System Windows XP/Vista/7/8 - DirectX 7.0 Version and up
Operation Manual
AGGRESSOR
6. DESCRIPTION OF THE CONSTRUCTION
① D-Pad
② Buttons 3-6
③ Button 2
④ Handle
⑤ Buttons 7–12
⑥ Hand throttle control
⑦ Button 1
⑧ USB cable
⑨ On/Off VIBRATION switch
⑩ Rubber suction caps
text_image
Technical diagram of a joystick controller with numbered parts labeled 1 through 6Fig. 1. Front view

text_image
⑦ 1 ⑤ 8 10 12 7 9 11 ⑧Fig. 2. Back view
text_image
ONOR VIBRATION ⑨ ⑩Fig. 3. Bottom view
7. CONNECTION AND INSTALLATION
- Install the device on an even surface on its suction caps ⑩.
- Connect the device to an available USB port of the PC via the built-in USB cable ⑧. When connecting to your PC, the device is automatically detected as a game controller and is fully ready for use. However, for vibration feedback activation it is necessary to install drivers.
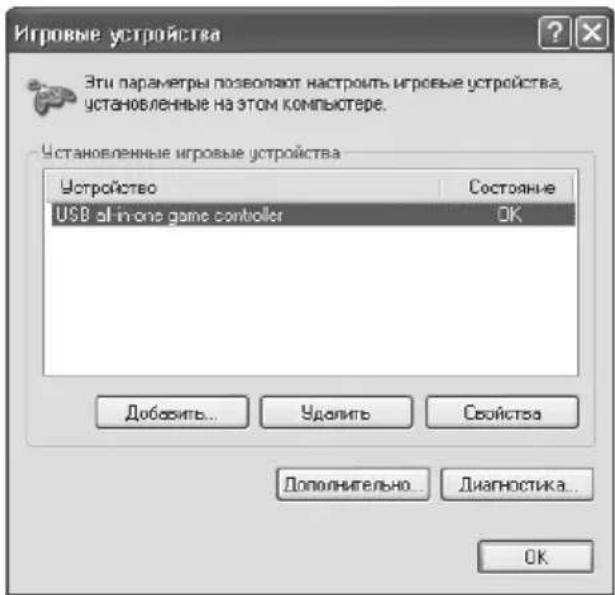
- Insert the Software CD disk into the drive of your PC and launch setup.exe for installation of drivers on your PC. For checking choose Start → Control Panel → Game Controller.
• After connecting the controller to your PC, Game Controllers window will automatically open up on your desktop, the driver will detect the device as USB all-in-one game controller (Fig. 4). - Press Properties button in order to test functioning of all features and control elements of the device. Properties: USB all-in-one game controller window will open up with the first tab Test (see Fig. 5).
Flight Joystick Test
- Buttons 1–12. Press buttons of the flight joystick from 1 to 12: a corresponding numerical button on Function Test bookmark of your PC interface will illuminate.
- Turbo function. Click Turbo on your PC interface (Fig. 5), the word Turbo will illuminate. Click the corresponding numerical button that you want to set up with Turbo function, and the outline border of this button will become white. If you press the button on the joystick, the corresponding button on the PC interface will light up. Turbo function setup is finished. To cancel this setup press Clear button.
- Fluctuating. Turn the joystick handle ④ forward, backward, left and right by pressing D-Pad ①, and the corresponding block of the X/Y axis will shift simultaneously. The cross sign in the X axis;
Y axis field will shift according to the position of the joystick handle.
- Revolving function. Revolve the handle of the joystick to the left or right, and the corresponding block of RZ axis will shift simultaneously. RZ axis scale will gradually fill with green color.
- Hand throttle control. Shift the hand throttle control ⑥ to the left or right, the corresponding block of Z axis will shift simultaneously. Z axis scale will gradually fill with green color.
- D-Pad. Revolve the D-pad ① in different directions to test 8-way direction inputs, which will be displayed in an 8-arrow circle located in the bottom left corner of the PC interface (Fig. 5).
- Reprogramming of buttons. Click KeyMap button in the menu (Fig. 6) on your PC interface to start programming keys in the setup window; then click the Set button in front of the digital buttons that need to be reprogrammed and press the same button on the flight joystick to confirm reprogramming.
Example: reprogramming of button 3 to button 5. Click the Set button in front of button 3, the Set button will flash, then press button 5 on the flight joystick and the button in the third green circle will change from 3 to 5.

text_image
Caoicera: USB all is one game controller Test Key Map Vibration Adjustment About Sel 1 1 Sel 7 7 Sel 2 2 Sel 8 8 Sel 3 3 Sel 9 9 Sel 4 4 Sel 10 10 Sel 5 5 Sel 11 11 Sel 6 6 Sel 12 12 Default Load Save OK OTMENO PresentFig. 6
Note! After programming you can save new settings or cancel them. Below the setup window there are three keys: Default, Load, and Save. The first key returns back to initial settings, the third key allows to save new settings to the key layout, while the second one allows to download the saved settings.
text_image
CBookista: USD all-in-one game controller Test Key Map Vibration Adjustment About Period Default Auto Manual Mag. Left Right OK Other PreviousFig. 7
text_image
Cookcray: USB all-in-one game controller Test Key Map Vibration Adjustment About X axis: Y axis As following steps: 1.Don't touch axis Check 2.Press "Check" Z axis RZ axis OK Others PreferencesFig. 8
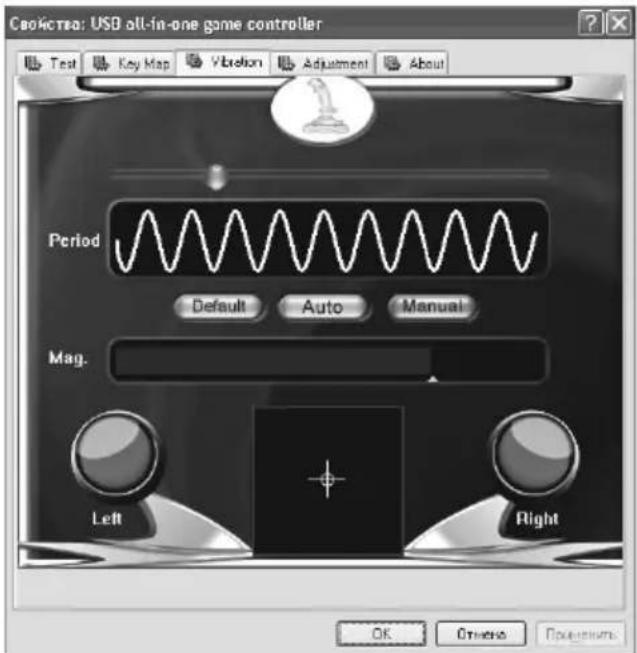
- Vibration feedback function. Enter Vibration tab (Fig. 7) to test vibration feedback function. Fluctuating and swaying action of the flight joystick corresponds to motor vibration; period (Period) and range (Mag.) of vibration can be adjusted during vibration test. In the center there is a field that shows shifting of joystick handle with vibration. Vibration indicators are on the left and on the right. Shifting to the left and right you activate Left indicator, while shifting up and down you activate Right indicator. Alternatively, you can click Auto for auto-test.
Note! Vibration feedback function turns on and off by ON/OFF VIBRATION switch ⑨ on the flight joystick.
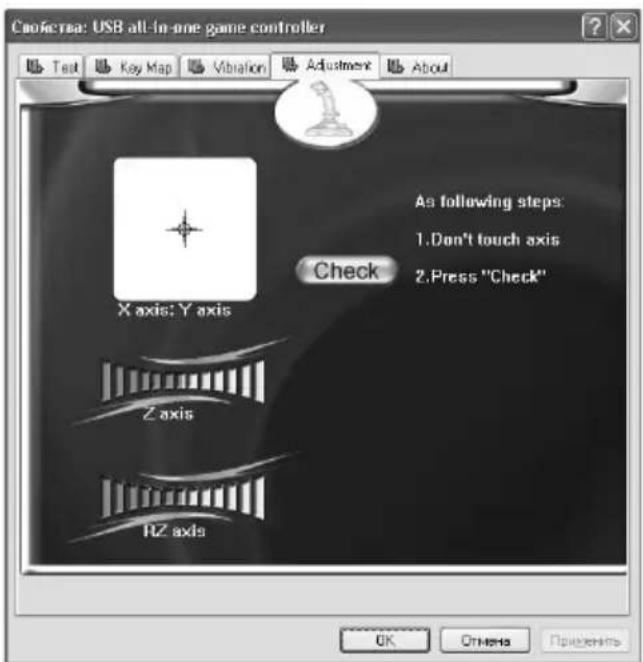
- D-pad calibration. If the indicating cursor of each axis does not return to the central position or does not fix in all the four sides during tests, please click Adjustment menu (Fig. 8) for calibration: Check → Next → Check → Next → Save.
Supplement for Vista operating system:
- The driver for Vista has been updated for compatibility with the operation system.
-
As Vista 32bit and 64bit are not compatible with each other, so the flight joystick is supplied with two separate setup drivers for your choice.
-
TROUBLESHOOTING
| Problem | Solution |
| After installation of the software, the game controller does not work normally. | A. Check whether the joystick is properly connected to your PC.B. Make sure that the installation was carried out correctly.C. Install DirectX 7.0 and up version.D. Restart your PC, if the controller still doesn’t work . |
| Some analog axis goes into effect automatically after you enter the game. | Calibrate the flight joystick and confirm the calibration. |
| Theflight joystick does not operate in the vibration mode. | After exiting the game, disconnect the controller from the USB port and connect it again. If it still can’t work normally, please restart the computer. |
| After connecting the flight joystick, its driving program can’t be found. | Check whether the previous installation of drivers was made correctly. Enter My computer → Properties → Hardware → Device manager and delete the corresponding equipment with «!» mark and reconnect the flight joystick to the PC. Then your PC will find the driving system. |
| After entering the game, vibration feedback operates automatically. | Enter Force Feedback and calibrate it. |
| During the game vibration feedback is insufficient. | Enter Force Feedback and set the force of feedback. |
If none of the above mentioned solutions removes the problem, please refer to nearest authorized service center for consultation by qualified specialist. Never try to repair the device on your own.
natural_image
Black and white toy joystick controller on a base (no text or symbols visible)Модель: Aggressor
Manufacturer: SVEN PTE. LTD, 176 Joo Chiat Road, N° 02-02, Singapore, 427447. Produced under the control of Oy Sven Scandinavia Ltd. 15, Kotolahdentie, Kotka, Finland, 48310. Made in China.
® Registered Trademark of Oy SVEN Scandinavia Ltd. Finland.