JetFlash 760 - USB Drive TRANSCEND - Free user manual and instructions
Find the device manual for free JetFlash 760 TRANSCEND in PDF.

User questions about JetFlash 760 TRANSCEND
0 question about this device. Answer the ones you know or ask your own.
Ask a new question about this device
Download the instructions for your USB Drive in PDF format for free! Find your manual JetFlash 760 - TRANSCEND and take your electronic device back in hand. On this page are published all the documents necessary for the use of your device. JetFlash 760 by TRANSCEND.
USER MANUAL JetFlash 760 TRANSCEND
System Requirements....2
Driver Installation 3
Driver Installation – Windows ^® Me, 2000, XP, 7 and Vista ....3
Driver Installation – Mac® OS 9.0, or Later ....3
Driver Installation – Linux ^® Kernel 2.4.2, or Later....3
Formatting the JetFlash ^® in Windows ^® 4
Safely remove the JetFlash ^® from your Computer.... 5
Proper JetFlash ^® Removal – Windows ^® Me, 2000, XP, 7 and Vista.....5
Proper JetFlash ^® removal – Mac ^® OS 9.0 or Later, Linux ^® Kernel 2.4.2 or Later...5
Introduction
Congratulations on purchasing Transcend's JetFlash®. This handy little device lets you connect to any desktop or notebook computer with a USB port for fast, easy data transfer. The JetFlash® is completely plug-and-play, and has a large storage capacity as well as fast transfer rates, making it perfect for storing and transporting your files, folders, documents, photos and other personal digital content. In addition, the JetFlash®'s small convenient size, superior data retention and impressive appearance will provide you with a brand-new data storage experience.
Package Contents
The JetFlash ^® package includes the following items:
- JetFlash® USB Flash Drive
- Quick Start Guide
● Software CD (certain models)
● Lanyard, strap, or key ring accessory (refer to package for specific type)
Features
● Hi-Speed USB 2.0 compliant and backwards compatible with USB 1.0/1.1
- Vista compatible
● Supports Windows ReadyBoost®(Hi-Speed series)
● Easy Plug and Play installation
- Driverless
● Powered via the USB port. No external power or battery needed
- Includes useful data-management software
System Requirements
Desktop or notebook computer with a USB port and one of following operating systems:
- Windows® Me
- Windows® 2000
- Windows® XP
- Windows Vista®
- Windows® 7
- Mac® OS 9.0, or later
- Linux® Kernel 2.4.2, or later
Driver Installation
Driver Installation – Windows® Me, 2000, XP, 7 and Vista
No drivers are required. Newer Windows operating systems have built-in drivers that support the JetFlash ^® . Simply plug your JetFlash ^® into an available USB port and Windows will automatically install the files needed to use your device. A “Removable Disk” with a newly assigned drive letter will appear in the My Computer window.
Driver Installation – Mac® OS 9.0, or Later
No drivers are required. Just plug the JetFlash ^® into an available USB port and your computer will automatically detect it.
Driver Installation – Linux ^® Kernel 2.4.2, or Later
No drivers are required. Just plug the JetFlash ^® into the USB port and mount it.
Example: 1. First create a directory for the JetFlash ^® :
"mkdir /mnt/jetflash"
- Mount the JetFlash ^® :
"mount -a -t msdos /dev/sda1 /mnt/jetflash"
Formatting the JetFlash ^® in Windows ^®
- Plug the JetFlash ^® into an available USB port.
- Open the "My Computer" window.
- Right-click on the "Removable Disk" icon that represents the JetFlash®.
- Select "Format" in the drop down menu.

WARNING! Formatting the disk will erase all of the data on your JetFlash®
- Click on the "Start" button and follow the on-screen instructions to format the JetFlash®.

text_image
My Computer File Edit View Favorites Tools Help Back Search Folders Address My Computer System Tasks Other Places Details 3½ Floppy (A:) Local Disk (C:) Local Disk (D:) CD-RW Drive (E:) Removable Disk (F:) Shared tommy hua's Documents Documents Open Explore Search... Sharing and Security... Secure Zip File to 'LDISKZIP' Folder Format... Eject Cut Copy Create Shortcut Rename Properties Formats the selected drive.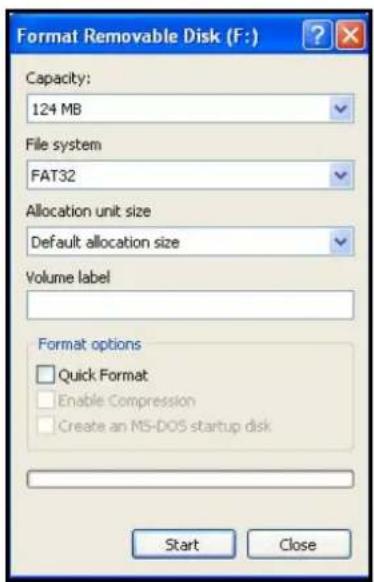
text_image
Format Removable Disk (F:) Capacity: 124 MB File system FAT32 Allocation unit size Default allocation size Volume label Format options □ Quick Format □ Enable Compression □ Create an MS-DOS startup disk Start Close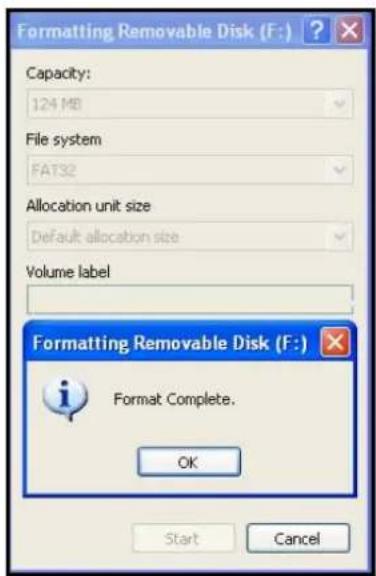
text_image
Formatting Removable Disk (F:) Capacity: 124 MB File system FA732 Allocation unit size Default allocation size Volume label Formatting Removable Disk (F:) Format Complete. OK Start CancelSafely remove the JetFlash ^® from your Computer
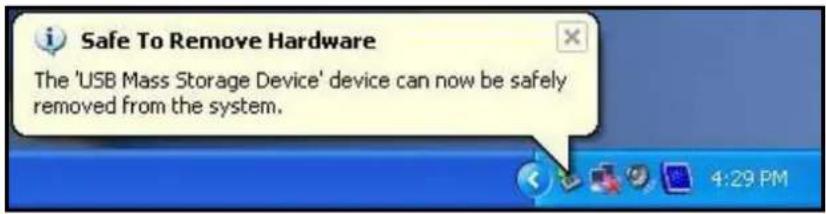
Proper JetFlash ^® Removal – Windows ^® Me, 2000, XP, 7 and Vista
- Click on the Removable Hardware icon in the system tray.
- The "Safely Remove Hardware" pop-up menu will appear. Select it to continue.

text_image
Safely remove USB Mass Storage Device - Drive(F:) 4:27 PM- A message box will appear stating: "The 'USB Mass Storage Device' device can now be safely removed from the system."
text_image
Safe To Remove Hardware The 'USB Mass Storage Device' device can now be safely removed from the system.- Unplug the JetFlash ^® from your computer.
Proper JetFlash ^® removal – Mac ^® OS 9.0 or Later, Linux ^® Kernel 2.4.2 or Later
First drag the Disk icon that corresponds to your JetFlash ^® into the trashcan, then unplug your JetFlash ^® from the USB port.

WARNING! Improper removal of the JetFlash®, unstable system power, or system hang-ups / hard re-boots while data is being written to the JetFlash® may cause file corruption or permanent damage to the drive. The best way to prevent this is to avoid opening and continuously editing files directly from the JetFlash®. It is strongly recommended that you copy files from the JetFlash® to your hard disk first, then edit the files from the hard disk instead. Transfer the files back to the JetFlash® after editing.