JetFlash elite 620 - USB Drive TRANSCEND - Free user manual and instructions
Find the device manual for free JetFlash elite 620 TRANSCEND in PDF.

User questions about JetFlash elite 620 TRANSCEND
0 question about this device. Answer the ones you know or ask your own.
Ask a new question about this device
Download the instructions for your USB Drive in PDF format for free! Find your manual JetFlash elite 620 - TRANSCEND and take your electronic device back in hand. On this page are published all the documents necessary for the use of your device. JetFlash elite 620 by TRANSCEND.
USER MANUAL JetFlash elite 620 TRANSCEND
natural_image
Icon depicting a folder with USB and a CD/DVD symbol (no text or labels)JetFlash®
SECUREDRIVE
Thank you for purchasing Transcend's USB Flash drive with built-in 256-bit AES encryption security. JetFlash® SecureDrive helps you safeguard data by creating a private, password-protected area on your JetFlash drive. Once enabled, nobody but you will be able to see or access files stored within the Private Zone.
Contents
System Requirements 2
Creating a Private Zone and Setting a Password.... 3
Using the Private Zone 7
Resizing Your Private Zone 10
Logging Out of Your Private Zone 12
Changing Your Password....13
Closing the Program.... 15
FAQ 16
More Help 17
System Requirements
Compatible Microsoft® operating systems:
- Windows ^® 7 Ultimate, Professional, Home Premium, Home Basic or Starter
- Windows Vista ® Home Basic, Home Premium, Business, or Ultimate (32-bit or 64-bit) with (or without) SP1
- Windows ^ XP Home, Professional, Media Center or Tablet PC with SP2 or SP3
- Windows ^ 2000 Professional, Server, or Advanced Server with SP4
- Windows Server ^ 2003 (or R2) Standard, Enterprise, or Datacenter (32-bit or 64-bit) with SP1
Note: You must have Administrator privileges to run the SecureDrive utility.
Back to top
Creating a Private Zone and Setting a Password
| CAUTION! When you create a Private Zone, SecureDrive will re-format your JetFlash drive—all data will be erased!Please backup all important data to a different drive before proceeding |
- Plug the JetFlash drive into your computer.
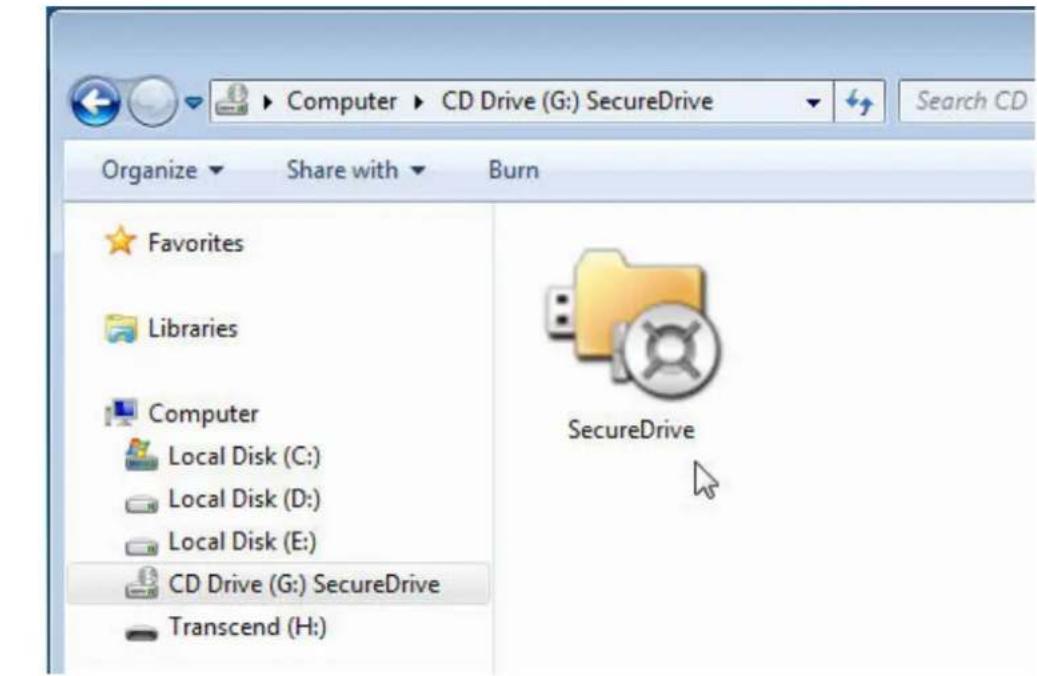
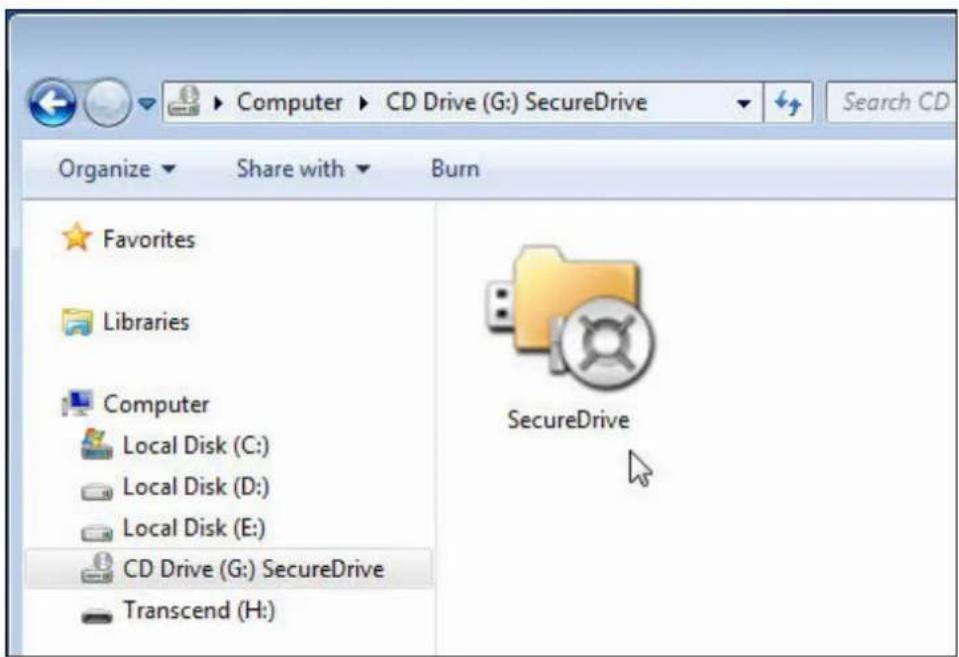
- Use Windows Explorer (My Computer) to open the CD-ROM drive labeled "SecureDrive" and double-click SecureDrive.exe
text_image
Computer CD Drive (G:) SecureDrive Search CD Organize Share with Burn Favorites Libraries Computer Local Disk (C:) Local Disk (D:) Local Disk (E:) CD Drive (G:) SecureDrive Transcend (H:) SecureDriveFigure 2-1
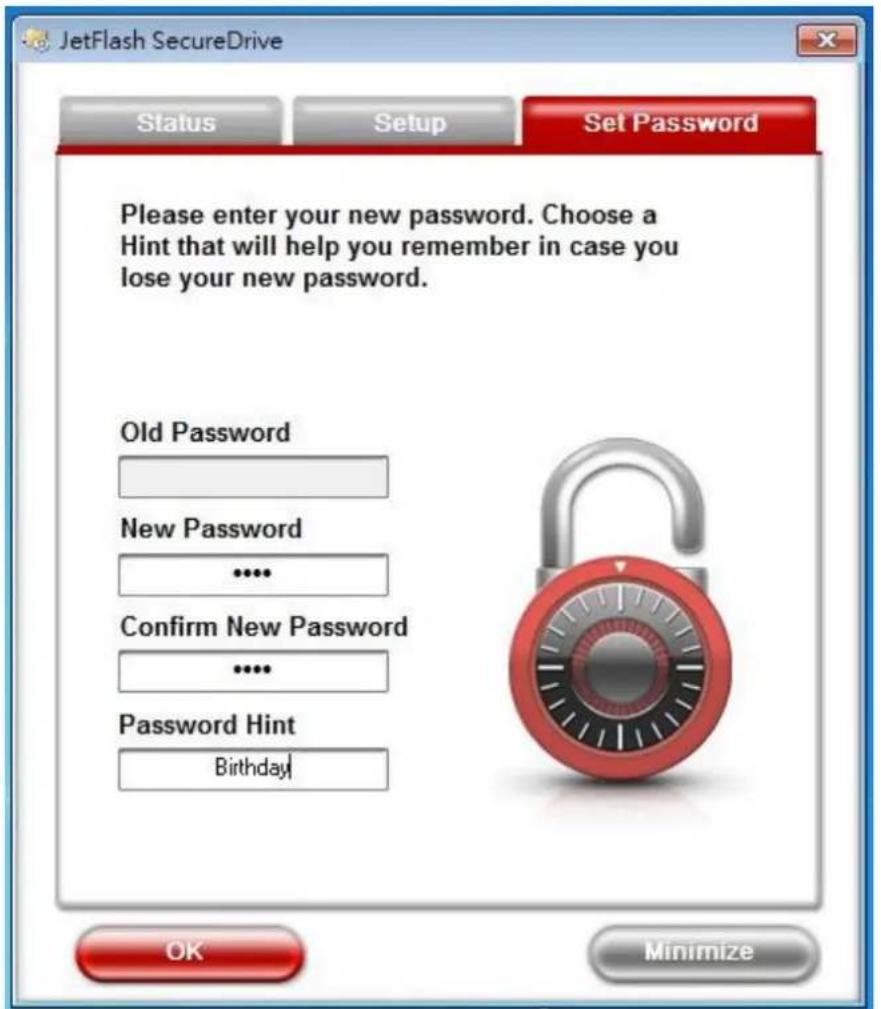
- Enter your desired password in the New Password field and enter it once more to confirm. You may also choose a hint to help you remember in case you forget your password (optional). Press "OK" to save your password information.
text_image
JetFlash SecureDrive Status Setup Set Password Please enter your new password. Choose a Hint that will help you remember in case you lose your new password. Old Password New Password **** Confirm New Password **** Password Hint Birthday! OK MinimizeFigure 2-2
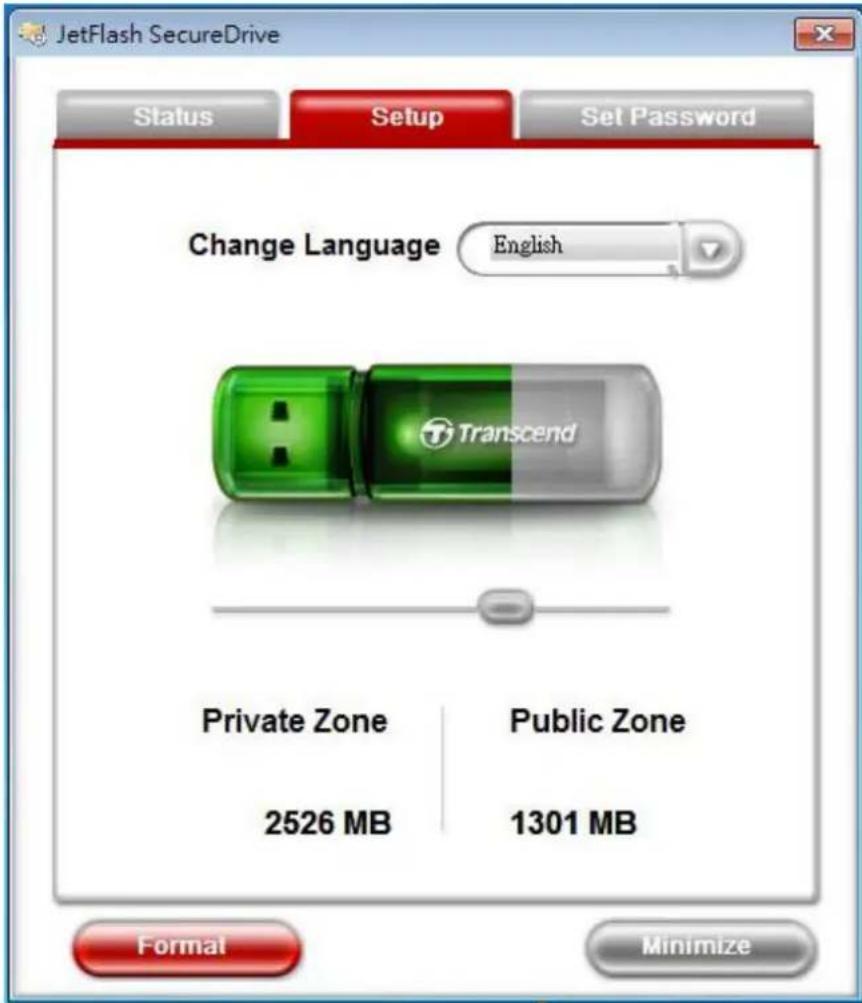
- The "Setup" screen will appear. Move the slider left or right to adjust the size of your Private Zone and click Format.

text_image
JetFlash SecureDrive Status Setup Set Password Change Language English Transcend Private Zone Public Zone 2526 MB 1301 MB Format MinimizeFigure 2-3
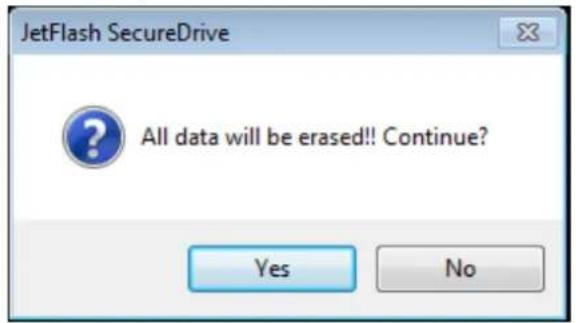
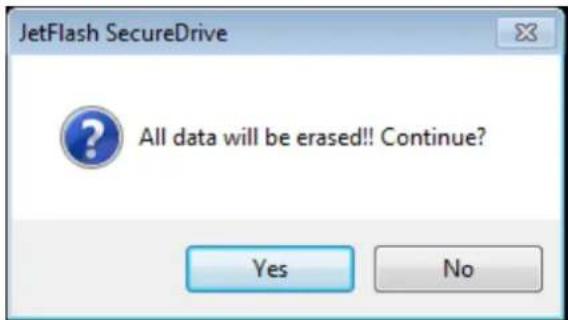
- A warning message will appear. If you have backed-up all of your files and are ready to continue, click Yes.
text_image
JetFlash SecureDrive All data will be erased!! Continue? Yes NoFigure 2-4
- During the format process, a progress bar will be displayed.

text_image
Setup Partition Formatting...Figure 2-5
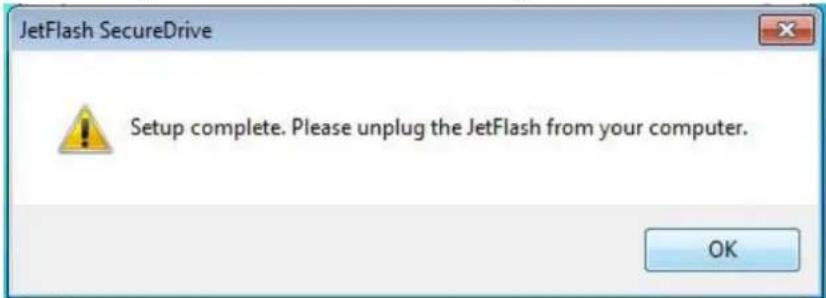
- A message will appear when the process is complete. Click OK to continue and unplug your JetFlash drive from the computer. Plug the drive back into your computer to start using the Private Zone.
text_image
JetFlash SecureDrive Setup complete. Please unplug the JetFlash from your computer. OKFigure 2-6
Note: You must unplug your JetFlash from the computer after formatting. Simply plug your JetFlash back into the computer to begin using your Private Zone.
Back to top
Using the Private Zone
- Once you have created a Private Zone, simply open My Computer, find the CD ROM drive titled "SecureDrive" and double-click the SecureDrive.exe file within.
text_image
Computer ▶ CD Drive (G:) SecureDrive Organize ▼ Share with ▼ Burn Favorites Libraries Computer Local Disk (C:) Local Disk (D:) Local Disk (E:) CD Drive (G:) SecureDrive Transcend (H:) SecureDriveFigure 3-1
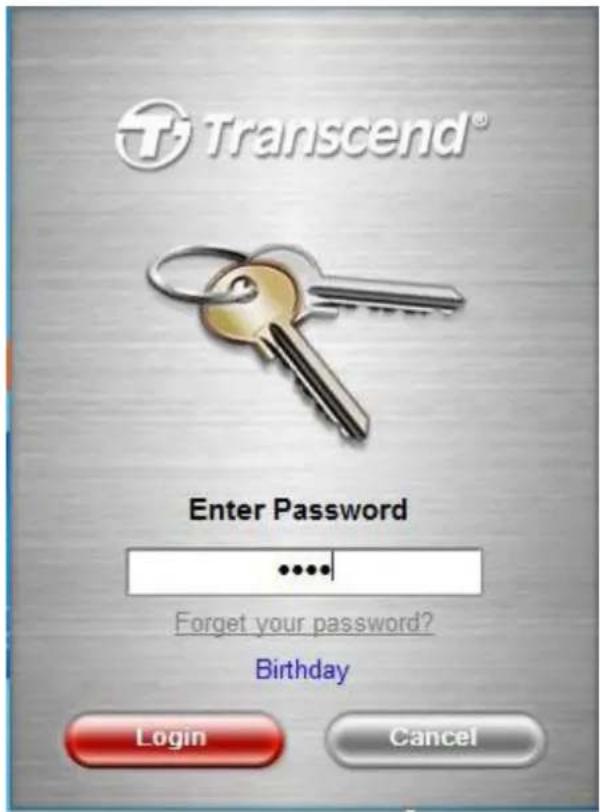
- To login your Private Zone, enter your password and click Login. If you cannot remember your password, click "Forget your password?" to display the hint text you entered when you first created your password.
text_image
Transcend® Enter Password ...... Forget your password? Birthday Login CancelFigure 3-2
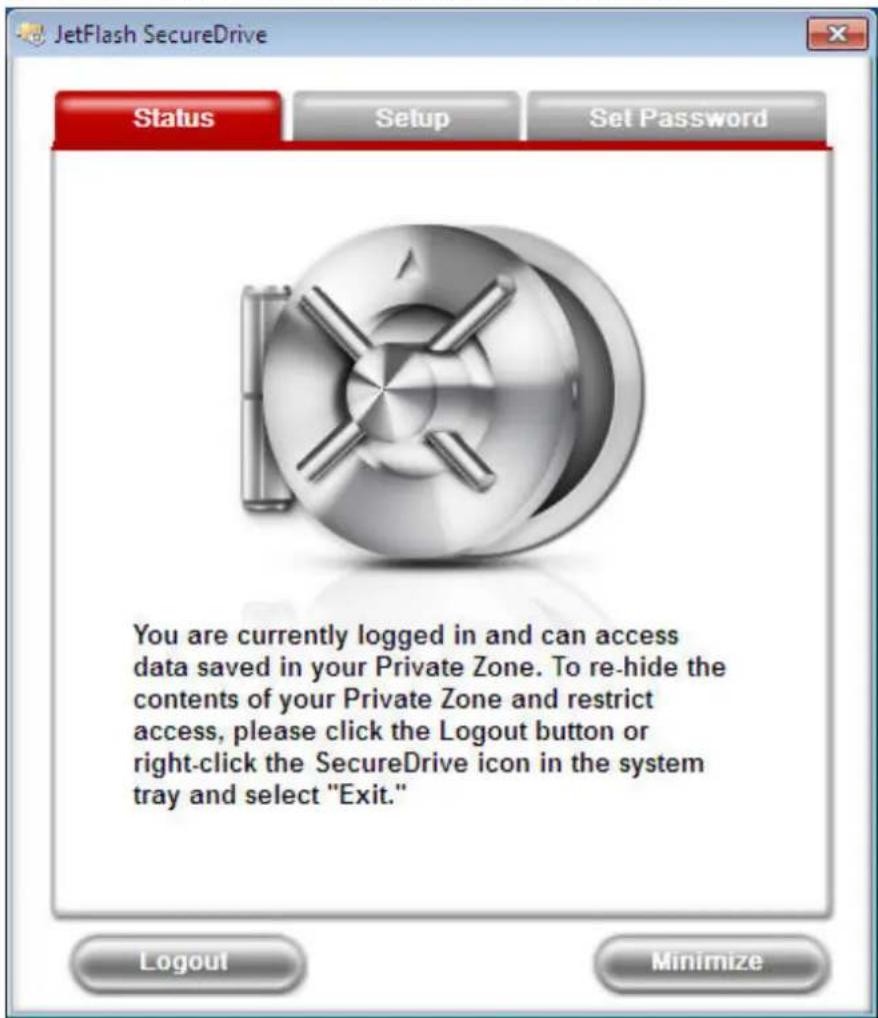
- When you log in successfully, SecureDrive will display a confirmation window and automatically open the contents of your Private Zone.

text_image
JetFlash SecureDrive Status Setup Set Password Favorites Name Libraries Computer Local Disk (C:) Local Disk (D:) Local Disk (E:) CD Drive (G:) SecureDrive Public (H:) Private (I:) Network You are currently logged in and can access data saved in your Private Zone. To re-hide the contents of your Private Zone and restrict access, please click the Logout button or right-click the SecureDrive icon in the system tray and select "Exit." Logout Minimize 0 itemsFigure 3-3
- Click the Minimize button or the "X" in the upper-right corner to temporarily close the SecureDrive window (your Private Zone will still be accessible).
- To re-open the SecureDrive window, simply double-click the JetFlash SecureDrive icon in the Windows System Tray.

text_image
JetFlash SecureDrive EN 下午 07:26Figure 3-4
Back to top
Resizing Your Private Zone
WARNING: Resizing your Private Zone will completely erase the drive. Please backup essential data to a different drive before proceeding
- Run the SecureDrive application and log in to your Private Zone.
- Close any applications that are currently accessing files stored in your Private Zone.
- Double-click the JetFlash SecureDrive icon in the windows system tray to open the SecureDrive window.
- Select the "Setup" tab. Move the slider left or right to adjust the size of your Private Zone and click Format.
text_image
JetFlash SecureDrive Status Setup Set Password Change Language English Transcend Private Zone Public Zone 2526 MB 1301 MB Format MinimizeFigure 4-1
- A warning message will appear .If you have backed-up all of your files and are ready to continue, click Yes.
text_image
JetFlash SecureDrive All data will be erased!! Continue? Yes NoFigure 4-2
- When the process is complete, a confirmation message will be displayed. Click OK to continue and unplug your JetFlash from the computer. Plug the JetFlash back into your computer to access your new Private Zone.

text_image
JetFlash SecureDrive Setup complete. Please unplug the JetFlash from your computer. OKFigure 4-3
Note: You must unplug your JetFlash from the computer after formatting. Simply plug your JetFlash back into the computer to begin using your Private Zone.
Back to top
Logging Out of Your Private Zone
- Save and close any files stored in your Private Zone that you are currently accessing.
- Double-click the JetFlash SecureDrive icon in the Windows system tray to open the SecureDrive window.
- Select the "Status" tab and click the Logout button.
text_image
JetFlash SecureDrive Status Setup Set Password You are currently logged in and can access data saved in your Private Zone. To re-hide the contents of your Private Zone and restrict access, please click the Logout button or right-click the SecureDrive icon in the system tray and select "Exit." Logout MinimizeFigure 5-1
Tip: You can also logout of your Private Zone by right-clicking the SecureDrive icon in the system tray and selecting "Exit."
- The moment you logout, all data stored in your Private Zone will be invisible and fully protected with powerful 256-bit AES encryption security.
Back to top
Changing Your Password
- Select the "Set Password" tab and enter your current password, your desired new password, the new password again to confirm, and a "hint" in case you forget the new password (optional).

text_image
JetFlash SecureDrive Status Setup Set Password Please enter your existing password, then your new password. Choose a Hint that will help you remember in case you lose your new password. Old Password **** New Password **** Confirm New Password **** Password Hint Birthday OK MinimizeFigure 6-1
- Click OK. A confirmation message will be displayed.
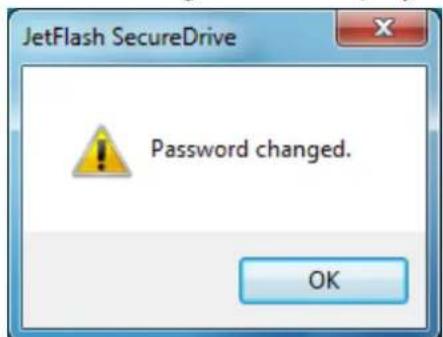
text_image
JetFlash SecureDrive Password changed. OKFigure 6-2
- Press OK to continue.
Back to top
Closing the Program
To close SecureDrive, right-click the “JetFlash SecureDrive” icon in the system tray and select “Exit”. Completely closing the program will also log you out of your Private Zone, which means you will no longer be able to access protected files unless you restart SecureDrive.exe and log back in.

Q: SecureDrive doesn't run when I double-click its icon. What's wrong?
A: You most likely are not using your own computer and do not have Administrator privileges on the computer you are using.
Q: When I exit the SecureDrive program, why do all the files in my "removable disk" disappear?
A: When you exit the program, all files and folders stored in the drive letter that represents the Private Zone will become hidden so other users will be unable to access them.
Q: Why are there two new drive letters in My Computer when I plug in my JetFlash?
A: SecureDrive divides your JetFlash into two separate drives: one for the Public Zone and one for the Private Zone.
Q: Why does my JetFlash drive show 0 bytes free space available?
A: If you do not run SecureDrive and login, the Private Zone on your JetFlash drive will appear to have 0 bytes available. To use the Private Zone and display the actual available free space of your Private Zone, just run SecureDrive.exe and login.
Q: I cannot find files that I copied to my JetFlash drive.
A: You may have copied them to the Private Zone of your JetFlash drive. To view the files, simply run SecureDrive.exe and enter your password.
Q: SecureDrive runs every time I plug in my JetFlash drive. Can I disable it?
A: You can prevent SecureDrive from running automatically by disabling the “autoplay” feature in Windows 2000 and XP (autoplay is disabled by default in Windows 7 and Vista).
Q: I don't want a Private Zone. How do I use my JetFlash drive without any password protection?
A: If you have already added a Private Zone to your JetFlash, you can remove it by simply setting the slider to 0% in the Create Partition window and clicking Format.
Back to top
More Help
If you cannot find the answer to your problem in this manual and are having difficulty with the SecureDrive software or your JetFlash USB flash drive, Please visit our Tech Support website at http://www.transcend.com.tw/
Back to top
© 2009 Transcend Information, Inc. All brand names are registered trademarks of their respective owners. Specifications subject to change without notice.