
MIGHTY MOUSE - ZML - Mouse APPLE - Free user manual and instructions
Find the device manual for free MIGHTY MOUSE - ZML APPLE in PDF.
User questions about MIGHTY MOUSE - ZML APPLE
0 question about this device. Answer the ones you know or ask your own.
Ask a new question about this device
Download the instructions for your Mouse in PDF format for free! Find your manual MIGHTY MOUSE - ZML - APPLE and take your electronic device back in hand. On this page are published all the documents necessary for the use of your device. MIGHTY MOUSE - ZML by APPLE.
USER MANUAL MIGHTY MOUSE - ZML APPLE
Apple Wireless Mighty Mouse
Setting Up Your Wireless Mighty Mouse
Congratulations on selecting the wireless Mighty Mouse as your input device.
Using the Wireless Mighty Mouse
Follow the steps on the following pages to install batteries in your mouse, set up your Mac, and use Setup Assistant to set up your mouse with your Mac.
Important: Don't turn on your mouse until just before you are ready to start up your Mac in step 3.
Step 1: Installing the Batteries
Follow the instructions below to install batteries in your wireless Mighty Mouse. You can install either one or both of the nonrechargeable AA lithium batteries that came with your mouse (see "About Your Batteries" on page 7 for more information).
To install batteries in your mouse:
1 Turn the mouse over and remove the bottom cover.
2 Slide the batteries into the battery compartment as shown in the illustration.
3 Replace the bottom cover and leave the mouse turned off.
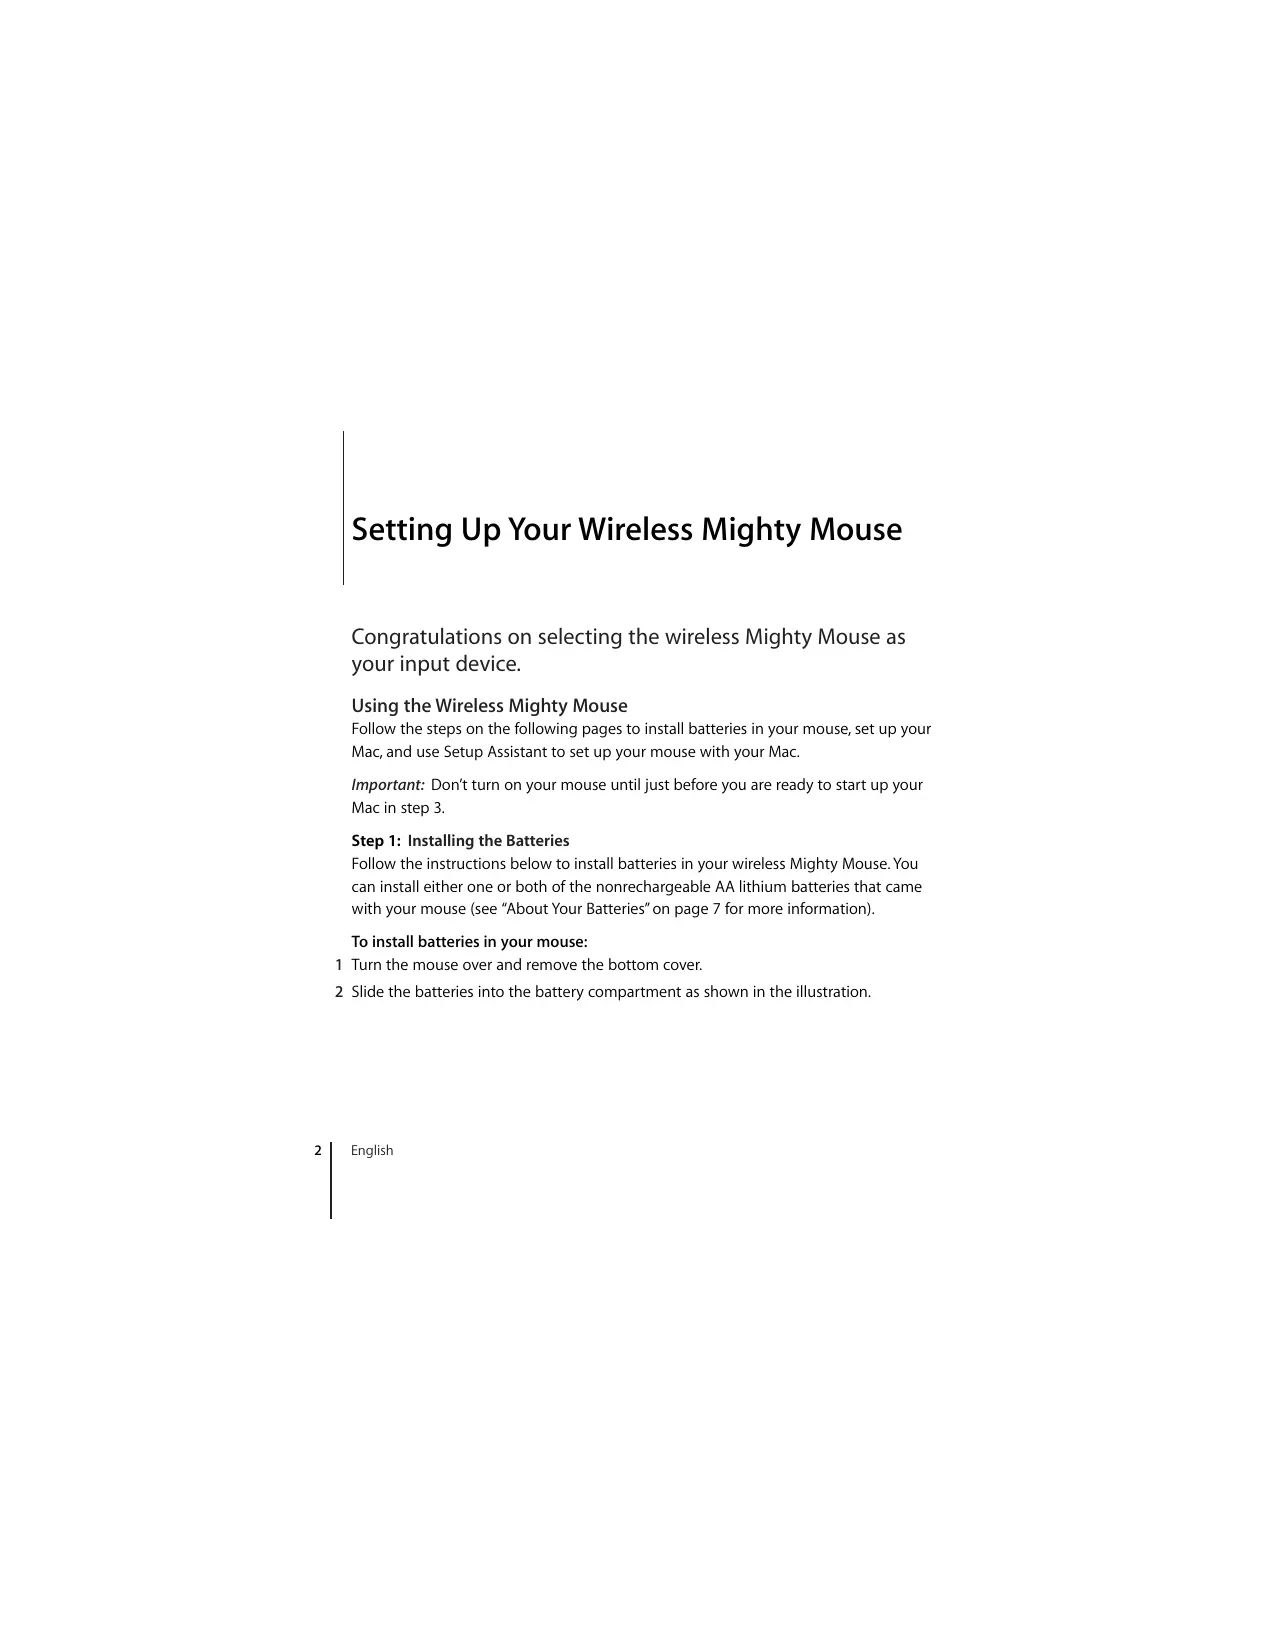
Slide the switch up to turn the mouse off.
Push the latch down to remove the bottom cover.
Insert one or both AA batteries with the positive (+) end up.

natural_image
Illustration of a hand holding a small electronic device with two buttons and wires (no text or symbols)
natural_image
Line drawing of a hand holding a battery with a screwdriver inserted (no text or symbols)Step 2: Setting Up Your Mac
Follow the instructions in the user's guide that came with your Mac to set it up. Because you have a wireless mouse, skip the instructions for connecting a USB mouse.
Wait to start up your Mac until instructed to do so in step 3.
Step 3: Pairing Your Mouse
Before you can use your wireless Mighty Mouse, you have to pair it with your Mac. Pairing allows your mouse and Mac to communicate wirelessly with each other. You only have to pair them once.
The first time you start up your Mac, Setup Assistant guides you in setting up your wireless Mighty Mouse and pairing it with your Mac.
To pair your mouse and your Mac:
1 Slide the switch down to turn the mouse on.
The laser used by the Mighty Mouse is not visible, but a small green indicator light on the bottom of the mouse blinks when the mouse is on and the batteries are charged.
2 Turn on your Mac.
3 When your Mac starts up, follow the onscreen instructions in Setup Assistant.
Using Your Mighty Mouse
The Mighty Mouse has laser tracking technology, so you can use it on most surfaces.
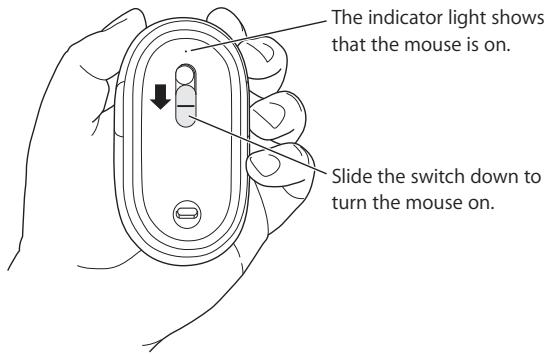
The Mighty Mouse comes with left and right buttons, a scroll ball (which can be clicked) and a button on either side. To use your Mighty Mouse:
- Click the left or right button.
- Press the side buttons.
- Click or roll the scroll ball.
Either the left or right button can function as the primary button. Use the primary button to click, double-click, and drag items. Either button can also function as the secondary button. Use the secondary button to display an item's shortcut menu. You can assign a function to the side buttons, which work together as a single button, and to the scroll ball, which also functions as a button.
Customizing Your Mighty Mouse
Use the Mouse pane of Keyboard & Mouse preferences to change the way your Mighty Mouse works.
To customize your mouse:
1 Choose Apple (✗) > System Preferences.
2 Click Keyboard & Mouse.
3 Click Mouse.
Use the pop-up menu to assign an action to each button. You can set any of the buttons to activate Dashboard, Exposé, Spotlight, switch applications, or open applications. You can enable or disable scrolling and screen zoom, and adjust the speed for tracking, scrolling, and double-clicking. You can also activate screen zoom by simultaneously pressing a key on the keyboard and scrolling.
More Information
For more information about using your wireless Mighty Mouse, open Mac Help and search for "Mighty Mouse."
Renaming Your Mouse
Your Mac automatically gives your wireless mouse a unique name the first time it's paired. You can rename your mouse using Keyboard & Mouse preferences. Choose Apple (✗) > System Preferences and click Keyboard & Mouse. Click the Bluetooth® tab and enter a name in the Name field.
Cleaning Your Mouse and Scroll Ball
Follow these guidelines to clean the outside of your mouse and the scroll ball:
- Remove the batteries.
- Use a lint-free cloth that's been lightly moistened with water to clean the mouse exterior and the scroll ball.
- Don't get moisture in any openings. Don't use aerosol sprays, solvents, or abrasives.
If your mouse stops scrolling or if scrolling becomes rough, clean the mouse scroll ball. Rotate the ball while cleaning for complete coverage. If scrolling feels rough, hold the mouse upside down and roll the ball vigorously while cleaning it to help remove any particles that may have collected.
About Your Batteries
Your Mighty Mouse comes with two nonrechargeable AA lithium batteries. Lithium batteries provide longer battery life, but you can also use alkaline or rechargeable AA batteries. Your mouse works with either one or two batteries installed. To reduce the weight of your mouse, install one battery; to extend the time between battery replacements, install two.
WARNING: When you replace the batteries, replace them all at the same time. Also, don't mix old batteries with new batteries or mix battery types (for example, don't mix alkaline and lithium batteries). Don't open or puncture the batteries, install them backwards, or expose them to fire, high temperatures, or water. Don't charge the nonrechargeable AA lithium batteries that came with your mouse. Keep batteries out of the reach of children.
Battery Disposal
Dispose of batteries according to your local environmental laws and guidelines.
Battery Indicator
You can use Keyboard & Mouse preferences to check the battery level. Choose Apple ( Apple ) > System Preferences. Click Keyboard & Mouse and click Bluetooth.
Note: To conserve battery power, turn your mouse off when you are not using it. If you are not planning to use your mouse for an extended period, remove the batteries.
Ergonomics
For information about ergonomics, health, and safety, visit the Apple ergonomics website at www.apple.com/about/ergonomics.
Support
For support and troubleshooting information, user discussion boards, and the latest Apple software downloads, go to www.apple.com/support.
natural_image
Illustration of a hand holding a small electronic device with two buttons and a pointer (no text or symbols)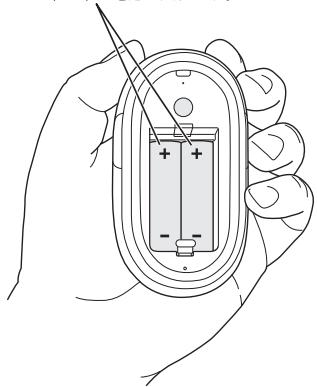
natural_image
Line drawing of a hand holding a battery with a screwdriver inserted (no text or symbols)手順 2:Mac を設置する
natural_image
Line drawing of hands holding a battery pack with a tool inserted (no text or symbols)natural_image
Line drawing of a hand holding an open electrical socket with two buttons and a pointer (no text or symbols)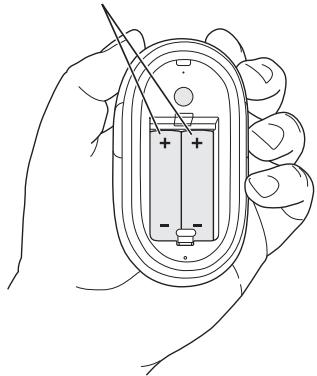
natural_image
Line drawing of a hand holding a battery pack with a tool inserted (no text or symbols)Regulatory Compliance Information
Compliance Statement
This device complies with part 15 of the FCC rules. Operation is subject to the following two conditions: (1) This device may not cause harmful interference, and (2) this device must accept any interference received, including interference that may cause undesired operation. See instructions if interference to radio or television reception is suspected.
Radio and Television Interference
The equipment described in this manual generates, uses, and can radiate radio-frequency energy. If it is not installed and used properly—that is, in strict accordance with Apple's instructions—it may cause interference with radio and television reception.
This equipment has been tested and found to comply with the limits for a Class B digital device in accordance with the specifications in Part 15 of FCC rules. These specifications are designed to provide reasonable protection against such interference in a residential installation. However, there is no guarantee that interference will not occur in a particular installation.
You can determine whether your computer system is causing interference by turning it off. If the interference stops, it was probably caused by the computer or one of the peripheral devices.
If your computer system does cause interference to radio or television reception, try to correct the interference by using one or more of the following measures:
- Turn the television or radio antenna until the interference stops.
- Move the computer to one side or the other of the television or radio.
- Move the computer farther away from the television or radio.
- Plug the computer into an outlet that is on a different circuit from the television or radio. (That is, make certain the computer and the television or radio are on circuits controlled by different circuit breakers or fuses.)
If necessary, consult an Apple Authorized Service Provider or Apple. See the service and support information that came with your Apple product. Or, consult an experienced radio or television technician for additional suggestions.
Important: Changes or modifications to this product not authorized by Apple Inc., could void the FCC compliance and negate your authority to operate the product. This product was tested for FCC compliance under conditions that included the use of Apple peripheral devices and Apple shielded cables and connectors between system components. It is important that you use Apple peripheral devices and shielded cables and connectors between system components to
reduce the possibility of causing interference to radios, television sets, and other electronic devices. You can obtain Apple peripheral devices and the proper shielded cables and connectors through an Apple-authorized dealer. For non-Apple peripheral devices, contact the manufacturer or dealer for assistance.
Responsible party (contact for FCC matters only):
Apple Inc., Product Compliance
1 Infinite Loop M/S 26-A
Cupertino, CA 95014-2084
Industry Canada Statements
Complies with the Canadian ICES-003 Class B specifications. Cet appareil numérique de la classe B est conforme à la norme NMB-003 du Canada. This device complies with RSS 210 of Industry Canada.
This Class B device meets all requirements of the Canadian interference-causing equipment regulations.
European Compliance Statement
This product complies with the requirements of European Directives 72/23/EEC, 89/336/EEC, and 1999/5/EC.
Bluetooth Europe–EU Declaration of Conformity
This wireless device complies with the specifications EN 300 328, EN 301-489, EN 50371, and EN 60950 following the provisions of the R&TTE Directive.
Mighty Mouse Class 1 Laser Information
The Mighty Mouse is a Class 1 laser product in accordance with IEC 60825-1 A1 A2 and 21 CFR 1040.10 and 1040.11 except for deviations pursuant to Laser Notice No. 50, dated July 26, 2001.
Caution: Modification of this device may result in hazardous radiation exposure. For your safety, have this equipment serviced only by an Apple Authorized Service Provider.
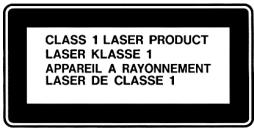
A Class 1 laser is safe under reasonably foreseeable conditions per the requirements in IEC 60825-1 AND 21 CFR 1040. However, it is recommended that you do not direct the laser beam at anyone's eyes.
Korea MIC Statement

Singapore Wireless Certification
Complies with
IDA Standards
DB00063
Taiwan Wireless Statement
於 2.4GHz 區域內操作之
無線設備的警告聲明
Taiwan Class B Statement
Class B 設備的警告聲明
NIL
VCCI Class B Statement
情報処理装置等電波障害自主規制について
Apple and the Environment
Apple Inc. recognizes its responsibility to minimize the environmental impacts of its operations and products.
More information is available on the web at:
www.apple.com/environment
中国
Disposal and Recycling Information
When this product reaches its end of life, please dispose of it according to your local environmental laws and guidelines.
For information about Apple's recycling programs, visit: www.apple.com/environment/recycling
Battery Disposal Information
Dispose of batteries according to your local environmental laws and guidelines.
European Union—Disposal Information

The symbol above means that according to local laws and regulations your product should be disposed of separately from household waste. When this product reaches its end of life, take it to a collection point designated by local authorities. Some collection points accept products for free. The separate collection and recycling of your product at the time of disposal will help conserve natural resources and ensure that it is recycled in a manner that protects human health and the environment.
© 2007 Apple Inc. All rights reserved. Apple, the Apple logo, Exposé, Mac, and Mac OS are trademarks of Apple Inc., registered in the U.S. and other countries. Spotlight is a trademark of Apple Inc.
Mighty Mouse © Viacom International Inc. All rights reserved. The Mighty Mouse trademark is used under license.
The Bluetooth® word mark and logos are registered trademarks owned by Bluetooth SIG, Inc. and any use of such marks by Apple is under license.
www.apple.com
Printed in XXXX


- Apple Wireless Mighty Mouse
- Setting Up Your Wireless Mighty Mouse
- Using the Wireless Mighty Mouse
- Step 1: Installing the Batteries
- To install batteries in your mouse:
- Replace the bottom cover and leave the mouse turned off.
- Step 2: Setting Up Your Mac
- Step 3: Pairing Your Mouse
- To pair your mouse and your Mac:
- Using Your Mighty Mouse
- Customizing Your Mighty Mouse
- To customize your mouse:
- More Information
- Renaming Your Mouse
- Cleaning Your Mouse and Scroll Ball
- About Your Batteries
- Battery Disposal
- Battery Indicator
- Ergonomics
- Support
- 手順 2:Mac を設置する
- Regulatory Compliance Information
- Compliance Statement
- Radio and Television Interference
- Industry Canada Statements
- European Compliance Statement
- Bluetooth Europe–EU Declaration of Conformity
- Mighty Mouse Class 1 Laser Information
- Korea MIC Statement
- Singapore Wireless Certification
- Taiwan Wireless Statement
- 於 2.4GHz 區域內操作之
- 無線設備的警告聲明
- Taiwan Class B Statement
- VCCI Class B Statement
- Apple and the Environment
- Disposal and Recycling Information
- Battery Disposal Information
- European Union—Disposal Information
Brand : APPLE
Model : MIGHTY MOUSE - ZML
Category : Mouse