MO-LS20D - Microwaves Imarflex - Free user manual and instructions
Find the device manual for free MO-LS20D Imarflex in PDF.

User questions about MO-LS20D Imarflex
0 question about this device. Answer the ones you know or ask your own.
Ask a new question about this device
Download the instructions for your Microwaves in PDF format for free! Find your manual MO-LS20D - Imarflex and take your electronic device back in hand. On this page are published all the documents necessary for the use of your device. MO-LS20D by Imarflex.
USER MANUAL MO-LS20D Imarflex
natural_image
Exterior view of a kitchen appliance with a microwave and oven, labeled 'UNDER-CABINET MOUNTING' (no other text or symbols visible)ONDEK-CVRIJEL-KODIUMC
Digital
PROGRAMMABLE
natural_image
Exterior view of a modern microwave oven with digital display and control buttons (no readable text or symbols)5 Microwave POWER LEVELS
20 Liter capacity

text_image
Stainless Steel CAVITYSPECIFICATION
Voltage : 230Va.c. \~ 60Hz
Input Power : 1150w
Rated Microwave Power Output : 800w
Microwave Frequency : 2450MHz
Outside Dimension : 458(W) x 295(H) x 379(D)
Oven Cavity Dimension : 301(W) x 208.5(H) x 308.9(D)
Oven Capacity : 20 liters/0.7 cu. ft.
- Microwave is a kind of high frequency electromagnetic wave, which is commonly distributed in the nature. But the existing form of microwave is dispersed so that it cannot be collected together for heating purpose. The key component of magnetron of microwave oven will transform the energy of electricity to microwave and huge energy of microwave field is established under the closed cavity. So the molecule of food is caused to vibrate at very high speed and the friction heat produced will cook the food in a fast way.
- There are 3 properties of microwave:
a. Absorbability: Microwave can cause the excess vibration of molecule on various food so as to obtain the heating purpose. But the infiltration ability is largely depending on the size, thickness and properties of the food.
b. Penetrability: Microwave can penetrate through ceramics, glass, temperature-resistant plastics. It is required to use the containers whose material have good microwave penetrability to achieve best heating result. Please see the Cookware Guide on the next page.
c. Reflectivity: Microwave would be reflected by the metal wall of interior cavity so as to establish an even magnetic field, thus can prevent the overheating of partial area.
INSTALLATION GUIDELINES
- Cupboard thickness for installation should be between 8.25mm and at least 16Kg(160N) load bearing capacity.
- Please keep all accessories attached with the unit.
- The microwave oven should be installed as guided in this manual.
- Do not put the microwave on top of any cooking appliance, it may cause abnormal performance or damage of the microwave oven. Do not place any objects on the top of microwave oven.
- Keep the microwave oven far from the TV, Radio or antenna as picture disturbance or noise may occur.
- Keep the plug accessible to the socket.
ACCESSORIES FOR INSTALLATION INCLUDE:
- Long screw: four (M5 x 30mm Typ.4)
- Gaskets: four ( 5.5 x 22 x 1.5mm Typ.4)
- Cupboard for installation: one for the size, please refer to the exterior dimension of the microwave oven: 0.295 (H) x 0.457 (W) x 0.376m (D)
INSTALLATION OF UNDERCABINET:
- Open the package carton, take out the microwave oven and put it on platform, remove four plastic end caps on loop of the shell.
- Drill four holes of 7mm with electric drill or the tools on the top of wall cupboard according to the position of four holes indicated on the paper
- Fasten four screws attached with appliance into the four long holes on the shell. Confirm that suspension setting as per the requirement and method indicated in the diagram below ensure the width between two sides of microwave and the inner side wall be at least 50mm, To obtain sufficient ventilation, the distance of
the back of microwave to the inner back wall should be at least 100mm and a ventilation opening (557x50mm) on the top of the cupboard is also necessary.
Note: The maximum weight of the food which can be placed in the cavity should not be more than 3.5kg. As
the weight of microwave oven is 12.5kg, the wall cupboard can only withstand 16kg load.

COOKWARE GUIDE
- Ideal material should be transparent to microwave. Use clear or plain white cookware. It allows energy to pass through the container and heat food.
- Do not use reflective materials such as stainless steel, aluminum foil, etc.
- Do not use recycled paper products as they may contain small metals that can cause sparks or fire.
- Use round containers rather than oblong and square containers because food in corners tend to be overcooked.
- Use the table below as reference.
| Material of container | Microwave | Notes |
| Ceramic Yes | Never use the ceramics which are decorated with metal rim or glazed | |
| Heat-resistant plastic | Yes Can not be used for long time microwave cooking | |
| Heat-resistant glass | Yes | |
| Plastic film Yes | It should not be used when cooking meat or chops as the over temperature may do damage to the film | |
IMPORTANT SAFEGUARDS
When using electrical appliance, basic safety precaution should be followed, including the following:
- Read all instructions carefully.
- Before using the unit, check if the voltage indicated corresponds with the convenience outlet (230Va.c.).
-
Do not use any appliance with a damaged cord or plug. If the cord is damaged it should be replaced with the same type and size or bring the unit to the nearest authorized service center.
-
Use the oven only for its intended use or as described in this manual. Do not use corrosive chemicals. This oven is not designed for industrial and laboratory use.
-
Do not operate the oven if empty.
-
Close supervision is necessary when any appliance is used by or near children.
-
To reduce the risk of fire in the oven cavity:
a. When heating food in plastic or paper containers, check the oven frequently for possible ignition.
b. Remove wire twist-ties from paper or plastic bags before placing the bag in the oven.
c. Do not use the Microwave Oven cavity for storage purposes.
d. Do not use sealed containers since they may burst, use only microwave containers.
-
Contents of feeding bottles and baby food jars are to be stirred or shaken and check the temperature before consumption, in order to avoid burns. Heat from the food may transfer to the container, use path holders to avoid burns.
-
Cookware/containers should be checked to ensure that they are suitable for microwave use.
DESCRIPTION OF PARTS

text_image
M5x20速有typ.4 Φ5.5xΦ22x1.5平型typ.4 Vent Φ4typ 4 door Ass'y door interl ock cavity Class rotating table turn axle turn ring Waveguide coverFig. 1
NOTES:
- Door interlock ensures the oven can only be activated when the door is properly closed, which would prevent microwave radiation.
- Control panel is illustrated in next page (the control panel is subject to change without prior notice).
- Do not remove the Waveguide cover during cleaning (see Fig.1).
- Glass turntable turns to make food be heated evenly.
- LED display will show the clock time, cooking mode and left operation time, which depends on the current set mode.
- LED Display : The LED ☐ will flash 3 times when plugged in the convenience outlet. Prompt you inputting the cooking menu and time.
-
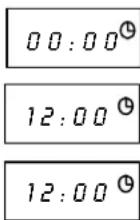
Clock: To set the Time.
-
Press the "Clock" key to set current time
-
For example: to set 12:00
-
Press the “1”, “2,” 0”, “0” keys
-
Press the "Clock" key again or wait for 5 secs.
-
This step can be skipped for simple operation if you do not use delayed Function/automatic start.
Display
- Pause Cancel : While cooking, press once to Pause. Press twice to Cancel inputs.
-
Auto Reminder: When your preset cooking procedure have finished, the LED Display will show End and three beeps sound will be heard to prompt you to take out food. If you do not press the key of Pause Cancel once or open the door the beep will be sounded at an interval of 3 minutes.
-
Child Lock Function : Use this feature to lock the Control Panel when cleaning or to prevent unsupervised use of children. All the keys are rendered inoperable in this mode. To set child lock, press and hold Pause Cancel key for about 3 seconds or until LED appears "OFF" and the "💡" icon will appear on the right bottom of the LED display. To cancel child lock, press and hold Pause Cancel key again for about 3 seconds or until "OFF" and the "💡" icon disappear on the LED display.
-
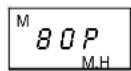
Power: To choose desired Power Level. Press Power key repeatedly, LED display will cycle to show 100P, 80P, 60P, 40P, 20P.
100P: High power, 100% microwave power. Applicable for quick and thorough cooking, such as meat, vegetable
80P: Medium High power, 80% microwave power. Applicable for medium express cooking, such as eggs, fish, congee, rice, soup
60P: Medium power, 60% microwave power. Applicable for steaming food
40P: Medium Low power, 40% microwave power. Applicable for defrosting food
20P: Low power, 20% microwave power. Applicable for keeping warm
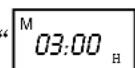
Example: To cook at 80P for 10 and half minutes.
- Plug in the convenience outlet, “:” will flash on the display, press Pause. Cancel key once.
- Press Power key repeatedly until 80P appears on the display.
- Set cooking time by pressing the number Key of "1", "0", "3", "0".
- Press Instant/start key to start, and LED will count down to show running time.
NOTE:
It is recommended to turn the food halfway, after you turn the food. Press Instant/start key once to continue.
Display


NOTE:
- The max time which can be set is 99 minutes and 99 seconds.
- Never operate the oven empty.
- If you turn the food during operation, press the Instant/start key once and the preset cooking procedure will continue.
-
If you intend to remove the food before the preset time, you must press Pause. Cancel key once to clear the preset procedure to avoid unintended operation of next time use.
-
Express: This function allows you to heat a cup of water or beverage omitting the steps of setting time. Press Express key LED Display will cycle to show 0:30, 1:00, 1:30.
0:30 default 30 sec operation time
1:00 default 1 minute operation time
1:30 default time is 1 and half minutes
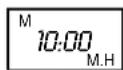
- Auto Defrost To defrost by food category. Press the key and the LED display will circle to show d.1 d.2 d.3.
d.1: for defrosting meat, the weight range from 0.1Kg to 2.0 Kg.
d.2: for defrosting poultry, the weight range from 0.2 to 3.0Kg.
d.3: for defrosting seafood, the weight range from 0.1 to 0.9Kg.
NOTE:
- It is necessary to turn over the food during operation to obtain uniform effect.
- Usually defrosting will need longer time than that of cooking the food.
- If the food can be cut by knife, the defrosting process can be considered completed.
- Observe the below Defrost guide to achieve best performance.
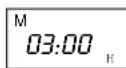
Example: To express cook for 1 minute
- Plug in the convenience outlet, “:” will flash on the display, press Pause. Cancel key once.
- Press Express key repeatedly to select desired menu
- Start cooking by pressing Instant/start key.
Display

1:00
Example: To defrost 0.2kg poultry
- Plug in the convenience outlet, ":" will flash on the display, press Pause. Cancel key once.
- Select food category by pressing Defrost key.
- Set defrosting weight by pressing the Number key of "1", "3".
- Start cooking by pressing Instant/start, and LED will count down to show running time. Half way during defrosting 3 beep sound will be heard two times to prompt you turn over the food. Open the door and turn over the food and shield the warm portion. Pressing Instant/start key again to continue.
Display

d^D.2.2

DEFROST GUIDE
Steaks chop
- Position the food with thinner parts in the center of a shallow dish. If pieces are stuck together, try to separate as soon as possible.
- When the oven beeps, it is to prompt you to turn over the food. Turn over, rearrange and shield the defrosted portions.
- Press Instant/start to continue defrosting.
• After defrost time, let it stand for 5-15 minutes.
Ground Beef
- Place frozen Ground Beef on a shallow dish.
- When the oven Beeps, it is to prompt you to turn over the food. Remove defrosted portions, turn over.
- Press Instant/start to continue defrosting.
• After defrosting time, let it stand for 5-15 minutes.
Roast Meat (Beef/pork/lamb)
- Place joint with lean side face upwards (if possible) on a shallow dish.
- When the oven beeps, it is to prompt you to turn over the food. Turn over.
- Press Instant/start to continue defrosting.
• After defrosting time, let it stand 10-30 minutes.
Poultry
- Remove from original wrapper.
- Place breast side down on a shallow dish.
- When the oven beeps, it is to prompt you to turn over the food. Turn over.
- Press Instant/start to continue defrosting.
• After defrost time, let it stand for 15-30 minutes.
NOTE: After standing run under cold water to remove giblets if necessary.
Chicken pieces (chicken wings and drumstick)
- Place chicken pieces on a shallow dish.
- When the oven beeps, turn over the food and rearrange.
-
Press Instant/start to continue defrosting.
• After defrosting time, let it stand for 5-30 minutes. -
Auto Cook The oven has default cooking menus for simple operation.
AUTO COOK TABLE
| Steps | Display on LED screen | Suitable for: | CookingTime |
 Press oncePress twice Press oncePress twice | 3.03.5 | Popping 3.0 ounce of corn per bagPopping 3.5 ounce of corn per bag | 2 mins. and 30 secs.2 mins. and 40 secs. |
 Press oncePress twice Press oncePress twice | 0.450.65 | Cooking 450g of potato stripsCooking 650g of potato strips | 7 mins. and 12 secs.10 mins. and 12 secs. |
 Press once Press once | 1.00 | Reheating 150g of pizza | 1 min. |
 Press once Press once | 0.45 | Cooking 450g of fish | 6 mins. and 30 secs. |
[CAAA]Press oncePr  e e | 2.505.00 | Heating 260ml of liquid (small cup)Heating 500ml of liquid (small cup) | 2 mins. and 20 secs.4 mins. and 40 secs. |
NOTE:
- The cooking time is based on the food in room temperature of 20-25°C. Results may vary defending on the temperature of the food.
-
The temperature, weight and shape of food may affect the cooking time.
-
Delayed Function: If you do not want the menu be started immediately, you can set the cooking menu and time, the preset menu will be automatically start at a set time. The setting will consist of 2 steps:
a. Setting the current clock.
b. Setting the cooking menu and time.
Example: You want the microwave oven to automatically start cooking with 80P Microwave Power for 12 minutes and 30 seconds at 14:20clock. Display
- Set the current time.
- Press the "Power" key to select desired microwave power.
- Set the operation time by pressing “1”, “2”, “3”, “0”.
- Press and hold “Clock” key for 3 seconds, then a short beep will be heard, display. Will return to the current clock, then set your delay time.
- Enter what time you expect to start, Press “1”, “4”, “2”, “0”. keys a long beep sound will be heard.
- After a few minutes, the display will return the current time, you can view the preset Time by pressing the "Clock" key.
Note: Delayed Function is not applicable for Auto Cook and Defrost.
Display


- Multi-Stage Cooking: To obtain best cooking result, some recipes call for different cook and time. You may program your personalized menu as follow:
Example: You want cook food with 100P Microwave for 3 minutes then with 20P for 9 minutes.
Display
- 100P microwave for 3min.

1.1. Press Power button to select menu
1.2. Press “0”, “3”, “0”, cooking time,
- 20P microwave for 9min
Display

2.1. Press Power button to select menu.

2.2. Press “0”, “9”, “0”, “0” to set cooking time
- Start cooking by pressing Instant/start
NOTE:
When 100P microwave power cooking is finished, microwave oven will begin 20P operation automatically. Max 4 sequence can be set per time repeat the steps 1.1. and 1.2. if you like to set more.
- Arrange food carefully, place thickest areas toward outside of dish.
- Watch cooking time, cook for the shortest amount of time indicated and add more time as needed.
-
Slightly cover foods before cooking, covers prevent spattering and help foods to cook evenly.
-
Check recipe for suggestions on proper use of paper towels, microwave plastic wrap or a lid.
- Stir foods from outside to center of dish once or twice during cooking, foods such as chicken, hamburgers or steaks should be turned over once during cooking.
- Rearrange foods, like meatballs halfway through cooking both from top to bottom and from the center of the dish to the outside.
- After cooking ensure adequate standing time, heated liquid or beverage may result in delayed eruptive boiling. Remove food from oven and stir if possible. Covered food during standing time allows the food to finish cooking without overcooking.
-
Check for the cooking status, look for signs indicating that cooking temperature has been reached. Doneness signs include:
-
Food steams throughout, not just at edge.
- Poultry thigh joints move easily.
- Pork and poultry show no pinkness.
- Fish is opaque and flakes easily with fork.
-
When using microwave safe plastic wrap as cover for cooking food with high fat content, do not allow the wrap touch the food as it may melt. Some microwave safe plastic cookware are not suitable for cooking foods with high fat and sugar content.
-
Potatoes, sausage must be pierced or peeled before cooking.
CLEANING and MAINTENANCE
- Unplug the oven from the wall socket before cleaning.
- Do not allow food splatters or spilled liquids adhere to oven walls. Baking soda may be used if the oven gets very dirty. Avoid using spray and other harsh cleaners as this may stain, streak, or dull the door surface.
- Use damp cloth in cleaning the glass window and the surface of the oven.
- Do not allow water to seep into the ventilation openings to avoid damages on the operating parts.
- Do not allow the control panel to become wet.
- When cleaning the control panel, leave oven door open to prevent oven from accidentally turning on.
- If the steam accumulates inside or around the oven door, dry it using soft cloth. This may occur when the oven is operated under high humid conditions, but this is normal.
- If the glass turntable becomes dirty, remove it and wash it with soap and water.
- The roller rest and oven floor should be cleaned regularly to avoid excessive noise. Simply wipe the bottom part of the oven with mild detergent. The roller ring can be washed with soap and water. If the roller rest is removed from the oven, be sure to return it properly.
TIP: When the microwave oven has been used for a long time, there may be some strange odors remain inside, do any of the following:
- Place several lemon slices in a cup, then heat with high power for 2-3 min.
- Place a cup of red tea in oven, then heat with high power for 1 minute.
- Put some orange peel into oven, then heat them with high power for 1 minute.