
L82470BI - Built-in washing machine AEG-ELECTROLUX - Free user manual and instructions
Find the device manual for free L82470BI AEG-ELECTROLUX in PDF.
| Product type | Built-in washing machine |
| Brand | AEG-ELECTROLUX |
| Model | L82470BI |
| Dimensions (W x H x D) | 600 x 820 x 630 mm |
| Total depth | 640 mm |
| Voltage | 220-230 V |
| Total power | 2000 W |
| Fuse | 10 A |
| Frequency | 50 Hz |
| Protection | IPX4 |
| Water pressure | 0.5 - 8 bar |
| Maximum capacity (cotton) | 7 kg |
| Maximum spin speed | 1400 rpm |
| Wash programmes | Cotton, Synthetics, Delicates, Wool, Outdoor, Anti-allergy, Spin, Drain, Rinse, Super Eco, 20 min, Cotton Eco, etc. |
| Options | Prewash, Stains, Gentle, Extra rinse, Time save, Delay start, Child lock, Night cycle, Full tank stop |
| Fill type | Cold water |
| Connection | 3/4" threaded faucet |
| Noise level | Not specified (see manual) |
| Maintenance | Regular cleaning of the seal, drum, detergent drawer, and pump |
| Safety | Anti-flood device, child lock, door lock |
| Spare parts | Use genuine AEG parts |
Frequently Asked Questions - L82470BI AEG-ELECTROLUX
User questions about L82470BI AEG-ELECTROLUX
0 question about this device. Answer the ones you know or ask your own.
Ask a new question about this device
Download the instructions for your Built-in washing machine in PDF format for free! Find your manual L82470BI - AEG-ELECTROLUX and take your electronic device back in hand. On this page are published all the documents necessary for the use of your device. L82470BI by AEG-ELECTROLUX.
USER MANUAL L82470BI AEG-ELECTROLUX
Recycle the materials with the symbol . Put the packaging in applicable containers to recycle it.
Help protect the environment and human health and to recycle waste of electrical and electronic appliances. Do not dispose appliances marked with the symbol with the household waste. Return the product to your local recycling facility or contact your municipal office.
VISIT OUR WEBSITE FOR:
- Products
- Brochures
-User manuals - Trouble shooter
- Service information
www.aeg.com
LEGEND
Warning - Important Safety information.
i General information and tips
Environmental information
Subject to change without notice.
FOR PERFECT RESULTS
Thank you for choosing this AEG product. We have created it to give you impeccable performance for many years, with innovative technologies that help make life simpler – features you might not find on ordinary appliances. Please spend a few minutes reading to get the very best from it.
ACCESSORIES AND CONSUMABLES
In the AEG webshop, you'll find everything you need to keep all your AEG appliances looking spotless and working perfectly. Along with a wide range of accessories designed and built to the high quality standards you would expect, from specialist cookware to cutlery baskets, from bottle holders to delicate laundry bags...

Visit the webshop at: www.aeg.com/shop
CUSTOMER CARE AND SERVICE
We recommend the use of original spare parts.
When contacting Service, ensure that you have the following data available. The information can be found on the rating plate.
Model
PNC
Serial Number

SAFETY INFORMATION
Before the installation and use, read this manual carefully:
- For your safety and the safety of your property
- To help the environment
- For the correct operation of the appliance.
Always keep these instructions with the appliance also if you move or give it to a different person.
The manufacturer is not responsible if an incorrect installation and use causes damage.
CHILDREN AND VULNERABLE PERSON SAFETY
- Do not let persons, children included, with reduced physical sensory, reduced mental functions or lack of experience and knowledge use the appliance. They must have supervision or instruction for the operation of the appliance by a person who is responsible for their safety. Do not let children play with the appliance.
- Keep all packaging away from children. There is the risk of suffocation or injury.
- Keep all detergents away from children.
- Keep children and pets away from the appliance when the door is open.
- Before you close the appliance door, make sure that children and pets are not into the drum.
- If the appliance has a child safety device, we recommend to activate it.
CHILD SAFETY DEVICE
- When you activate this device, you cannot close the door. This prevents children or pets to be closed in the drum. To activate the device, turn it clockwise, until the groove is horizontal. To deactivate the device, turn it counterclockwise, until the groove is vertical.
GENERAL SAFETY
- Do not use the appliance for professional use. The appliance is only for domestic use.
- Do not change the specifications of this appliance. There is the risk of injury and damage to the appliance.
- Do not put flammable products or items that are wet with flammable products in, near or on the appliance. Risk of explosion or fire.
- Obey the safety instructions on the detergent packaging to prevent burns to eyes, mouth and throat.
- Make sure that you remove all metal objects from the laundry. Hard and sharp material can cause damage to the appliance.
- Do not touch the glass of the door while a programme operates. The glass can be hot (only for front-loading appliances).
CARE AND CLEANING
- Deactivate the appliance and disconnect the mains plug from the mains socket.
- Do not use the appliance without the filters. Make sure that the installation of the filters is correct. An incorrect installation causes water leakages.
INSTALLATION
- The appliance is heavy, be careful when you move it.
-
Do not transport your appliance without the transit bolts, you can damage internal components and cause leakages or malfunctions.
-
Do not install and connect a damaged appliance.
- Make sure to remove all packaging and transport bolts.
- Make sure that the mains plug is disconnected from the mains socket during installation.
- Only a qualified person must do the electrical installation, the plumbing and the installation of the appliance. This to prevent the risks of structural damage or injury.
- Do not install or use the appliance where the temperature is less than 0^ .
- When you install the appliance on a carpet floor, make sure that there is air circulation between the appliance and the carpet. Adjust the feet to have the necessary space between the appliance and the carpet.
Water connection
- Do not connect the appliance with old hoses already used. Only use new hoses.
- Make sure not to cause damage to the water hoses.
- Do not connect the appliance to new pipes or pipes not used for a long time. Let the water flow for some minutes, then connect the inlet hose.
- The first time you use the appliance, make sure that the water hoses and the couplings do not have leakages.
Electrical connection
- Make sure that the appliance is earthed.
- Make sure that the electrical information on the rating plate agrees with the power supply.
Always use a correctly installed shockproof socket. - Do not use multiple plugs and extension cables. There is a risk of fire.
- Do not replace or change the mains cable. Contact the service centre.
- Make sure not to cause damage to the mains plug and cable.
- Connect the mains plug to the mains socket only at the end of the installation. Make sure that there is access to the mains plug after the installation.
- Do not pull the mains cable to disconnect the appliance. Always pull the mains plug.
DISCARD THE APPLIANCE
- Disconnect the mains plug from the mains socket.
- Cut off the mains cable and discard it.
- Discard the door catch. This prevents children or pets to be closed in the appliance. There is a risk of suffocation (only for front-loading appliances).
TECHNICAL INFORMATION
| Dimensions | Width / Height / Depth | 600 / 820 / 630 mm |
| Total depth | 640 mm | |
| Electrical connection: | Voltage | 220-230 V |
| Overall power | 2000 W | |
| Fuse | 10 A | |
| Frequency | 50 Hz | |
| Level of protection against ingress of solid particles and moisture ensured by the protective cover, except where the low voltage equipment has no protection against moisture | IPX4 | |
| Water supply pressure | Minimum | 0,5 bar (0,05 MPa) |
| Maximum | 8 bar (0,8 MPa) | |
| Water supply1) | Cold water | |
| Maximum load | Cotton | 7 kg |
| Spin speed | Maximum | 1400 rpm |
1) Connect the water inlet hose to a water tap with a 3/4'' thread.
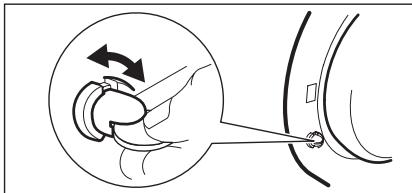
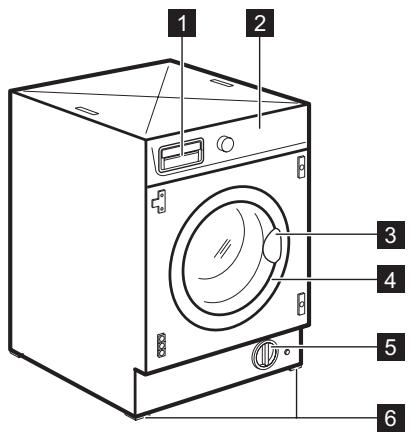
PRODUCT DESCRIPTION
1 Detergent dispenser
2 Control panel
3 Door handle
4 Rating plate
5 Drain pump
6 Feet for the appliance level
Water drain hose
8 Mains cable
Water inlet hose
10 Feet for the appliance level
ACCESSORIES
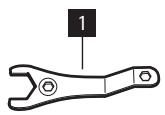
1 Spanner
To remove the transit bolts.
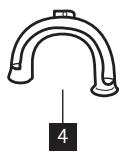
2 Plastic caps
To close the holes on the rear side of the cabinet after the removal of the transit bolts.
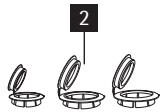
3 Anti-flood inlet hose
To prevent possible leakage
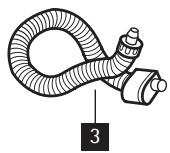
4 Plastic hose guide
To connect the drain hose on the edge of a sink.
CONTROL PANEL
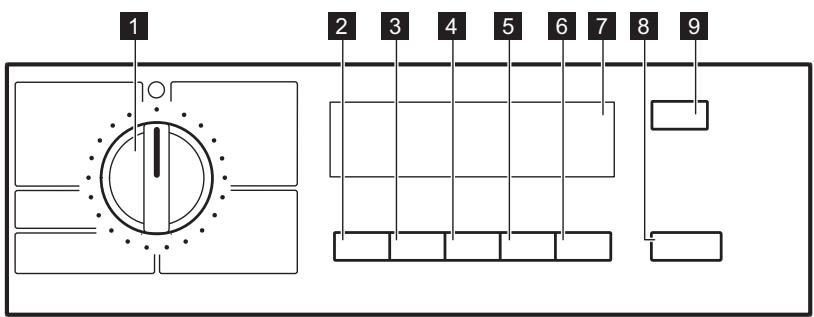
1 Programme selector dial
2 TEMPERATURE button (Temp.)
3 SPIN button (Centrif.)
4 OPTION button (Opciones)
5 OK button
6 TIME SAVING button (Ahorra Tiempo)
7 Display
8 START/PAUSE button (Start/Pausa)
9 DELAY START button (Inicio Diferido)
DISPLAY
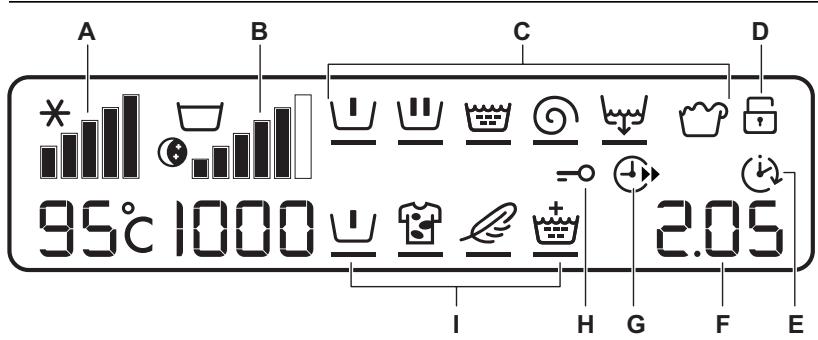
| A | Temperature indicator and COLD × symbol. |
| B | Spin Speed indicator, RINSE HOLD ☑, NIGHT CYCLE ☐ - symbols. |
| C | Programme progress display: PREWASH ☐, MAIN WASH ☑, RINSE ☑, SPIN ☓, DRAIN ☑, OVERDOSAGE ☐ · The programme progress display shows the different phases of the selected programme. · During washing, a black line blinks under the running phase symbol. At the end of each phase, the line stops blinking and remains on i If the symbol ☑ comes on, it indicates that too much detergent has been used. |
| D | CHILD SAFETY LOCK ☐ - symbol. |
| E | DELAY START ☑ - symbol. |
| F | The display shows the following information: ·Duration of the selected programme -After setting a programme, the duration is displayed in hours and minutes (for example 2.05). -After the programme has started, the remaining time is updated every minute. ·Delay start -When setting a delay start, the display shows the delay time (20 hours max.) for about 3 seconds (for example 90'), and then it shows again the programme duration. -The delay time value decreases by one unit every hour and then, one hour before the end of the programme, the time decreases every minute. ·Incorrect option setting -In case of wrong setting the display shows the message Err and the yellow light of the button 8 starts blinking. ·Alarm codes -If an operating problems occur, the display can show some alarm codes, for example E20 (see chapter «Troubleshooting»). ·End of the programme -At the end of the programme the display shows blinking zero 0, the symbol =0 disappears and the door can be opened. |
| G | TIME SAVING ① - option symbol. |
| H | DOOR =0 - symbol ·This symbol indicates if the door can be opened: - The symbol is on: the door cannot be opened. The appliance is performing a washing programme. - The symbol is off: the door can be opened. The washing programme is finished. |
| I | Available options: PREWASH ①, STAIN ②, SENSITIVE ③, EXTRA RINSE ④ |
ACOUSTIC SIGNALS
The machine is provided with an acoustic device, which sounds in the following cases:
- at the end of the cycle
- in the event of operating problems.
By pressing the 3 and 4 buttons simultaneously for some seconds, the acoustic signal is deactivated (except for the events of operating problems). By pressing these two buttons again, the acoustic signal is reactivated.
CHILD SAFETY LOCK
This device permits you to leave the appliance unsupervised and not to worry that children might be injured by or cause damage to the appliance.
This function remains able also when the washing machine is not working.
There are two different ways to set this option:
- Before pressing button 8: it will be impossible to start the machine.
- after pressing button 8: it will be impossible to change any other programme or option.
To enable or disable this option press simultaneously for about 6 seconds buttons
4 and 5 until the symbol comes on or disappears from the display.
EXTRA RINSE OPTION
With this function you can keep the extra rinse function permanently on when you set a new programme.
- To activate the function press button 2 and button 3 at the same time until the display shows the symbol ±
To deactivate the function press button 2 and button 3 at the same time until the symbol goes off.
WASHING PROGRAMMES
| Programme Maximum and Minimum Temperature Type of Laundry Maximum Load | Cycle De-scription | Options |
| Algodón 95° - Cold Max. load 7 kg - Reduced load 3 kg White and coloured cotton (normally soiled items). | Main wash Rinses Long spin | SPIN REDUCTION NIGHT CYCLE RINSE HOLD PREWASH1) STAIN2) SENSITIVE EXTRA RINSE TIME SAVING 3) |
| Sintéticos 60° - Cold Max. load 3 kg - Reduced load 2 kg Synthetic or mixed fabrics: underwear, col- oured garments, non-shrink shirts, blouses. | Main wash Rinses Short spin | SPIN REDUCTION NIGHT CYCLE RINSE HOLD PREWASH1) STAIN 2) SENSITIVE EXTRA RINSE TIME SAVING 3) |
| Plancha Fácil 60° - Cold Max. load 1 kg Synthetic fabrics to be gentle washed and spun. The laundry is gently washed and spun to avoid any creasing. Furthermore the machine will perform additional rinses. | Main wash Rinses Short spin | SPIN REDUCTION RINSE HOLD PREWASH1) EXTRA RINSE |
| Delicados 40° - Cold Max. load kg 3 - Reduced load kg 2 Delicate fabrics: acrylics, viscose, polyester. | Main wash Rinses Short spin | SPIN REDUCTION NIGHT CYCLE RINSE HOLD PREWASH1) STAIN2) EXTRA RINSE TIME SAVING3) |
| Lana/Seda 40° - Cold Max. load 2 kg Machine washable wool as well as for hand washable woollens and delicate fabrics. Note: A single or bulky item may cause imbalance. If the appliance doesn’t perform the final spin phase, add more items, redistribute the load manually and then select the spinning programme. | Main wash Rinses Short spin | SPIN REDUCTION NIGHT CYCLE RINSE HOLD |
| Outdoor 40° - Cold Max. load 2.5 kg Sport clothes. Do not use any additives. | Main wash Rinses Short spin | SPIN REDUCTION RINSE HOLD EXTRA RINSE |
| Anti-Alergia 60° Max. load 7 kg White cotton items. This programme removes micro-organisms thanks to the washing by 60°C and adds on rinse. In this way the wash is more effective. Put a special additive for hygiene in the com-partment LJJ and set the Stain function. | Main wash Rinses Long spin | SPIN REDUCTION RINSE HOLD PREWASH1) STAIN |
| Centrifugado Max. load 7 kg Separate spin for hand washed cotton gar- ments and after programmes with Night Cy- cle or Rinse Hold option set. Turn the programme dial to Off before set- ting this programme. Reduce the spin speed if needed. | Drain Long spin | SPIN REDUCTION |
| Descarga Max. load 7 kg For emptying out the water of the last rinse in programmes with Night Cycle or Rinse Hold option set. | Draining of water | |
| Aclarado delicados Max. load 7 kg Programme for rinsing and spinning items which have been washed by hand. The ma- chine performs some rinses, followed by a fi- nal spin. The spin speed can be reduced. | Rinses Long spin | SPIN REDUCTION NIGHT CYCLE RINSE HOLD EXTRA RINSE |
| Tejidos Gruesos 60° - Cold Max. load 3 kg All items in jeans. Jersey made items with hi- tech materials. | Main wash Rinses Short spin | SPIN REDUCTION NIGHT CYCLE RINSE HOLD PREWASH1) |
| 20 Min. — 3 kg 30° Max. load 3 kg Quick wash for sport items, or cotton and synthetic items lightly soiled or worn once. | Main wash Rinses Short spin | SPIN REDUCTION |
| Super Eco Cold Max. load 3 kg Mixed fabrics (cotton and synthetic items)4). | Main wash Rinses Short spin | SPIN REDUCTION RINSE HOLD EXTRA RINSE |
| Algodón Eco 60° Max. load 7 kg White and fast coloured cotton. Normally soiled cotton items. The appliance decreases the temperature and extends the washing time to obtain a good washing efficiency so saving energy. | Main wash Rinses Long spin | SPIN REDUCTION NIGHT CYCLE RINSE HOLD PREWASH1) STAIN SENSITIVE EXTRA RINSE |
| Algodón Eco 40° Max. load 7 kg Fast coloured cotton. Slightly soiled cotton items. The appliance decreases the temperature and extends the washing time to obtain a good washing efficiency so saving energy. | Main wash Rinses Long spin | SPIN REDUCTION NIGHT CYCLE RINSE HOLD PREWASH1) STAIN SENSITIVE EXTRA RINSE |
| Off For cancelling the running programme or to switch the machine off. |
1) If using liquid detergents, a programme without prewash must be selected..
2) Stain option can be selected only at the temperature of 40^ or higher.
3) If you select the Super Quick option by pressing button 6, we recommend that you reduce the maximum load as indicated. Full loading is possible however with somewhat reduced cleaning results.
4) Use a special detergent for very low temperature
CONSUMPTION VALUES
CONSUMPTION VALUES
| Programme1) | Energy consumption (KWh)2) | Water consump- tion (litre)2) |
| White Cottons 95 °C | 2.20 | 72 |
| Cottons 60 °C | 1.35 | 67 |
| Cottons 40 °C | 0.85 | 67 |
| Synthetics 40 °C | 0.55 | 42 |
| Delicates 40 °C | 0.55 | 63 |
| Wool/ Handwash 30 °C | 0.25 | 55 |
1) Refer to the display for the programme time.
2) The consumption information shown in this chart is indicative. It can vary depending on the quantity and the type of laundry, on the temperature of the water supply and on the ambient temperature.
Standard programmes for the Energy Label consumption values
The cotton 60^ economy and cotton 40 ^ C economy are the standard cotton programmes for normally soiled cotton laundry. They are suitable to clean normally
soiled cotton laundry and they are the most efficient programmes in terms of combined energy and water consumption for washing that type of cotton laundry. They agree with EN60456.

The actual water temperature may differ from the declared cycle temperature.
FIRSTUSE
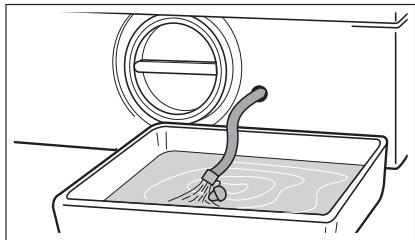
- To activate the drain system, put 2 litre of water in the main wash compartment of the detergent dispenser.
- Put a small quantity of detergent in the main wash compartment of the
detergent dispenser. Set and start a programme for cotton at the highest temperature without laundry. This removes all possible dirt from the drum and the tub.
DAILY USE
- Open the appliance door.
- Put the laundry in the drum, one item at a time. Shake the items before you put them in the appliance. Make sure
not to put too much laundry in the drum.
- Close the door.
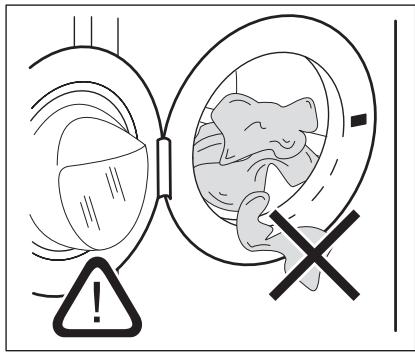
Make sure that no laundry stays between the seal and the door. There is a risk of water leakage or damage to the laundry.
FILLING THE DETERGENT AND ADDITIVES
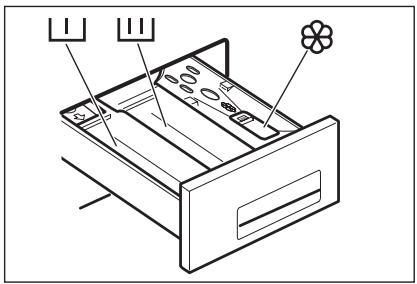
| L | The detergent compartment for the prewash phase, the soak pro- gramme and for the stain function. Add the detergent for prewash, soak and stain remover before the start of the programme. |
| U | The detergent compartment for the washing phase. If you use a liquid detergent, put it immediately before you start the programme. |
| O | Liquid additives compartment (fabric conditioner, starch). Put the product in the compartment before you start the pro- gramme. |
MAX
This is the maximum level for the quantity of liquid additives.

Always obey the instructions that you find on the packaging of the detergent products.
SETTING THE PROGRAMME (KNOB 1)
Turn the programme selector dial to the required programme.
The programme dial determines the type of washing cycle (e.g. water level, drum movement, number of rinses) and the washing temperature according to the type of laundry.
The pilot light of button 8 starts blinking. The programme dial can be turned either clockwise or anticlockwise.
O = Reset programme / switching OFF of the machine

If you turn the programme dial to another programme when the appliance is working, the yellow pilot light of button 8 blinks 3 times.
The display shows the message Err to indicate a wrong selection. The machine will not perform the new set programme.
SETTING THE TEMPERATURE (BUTTON 2)

When setting a programme, the appliance automatically proposes the default temperature provided for that programme.
Press the button 2 repeatedly to increase or decrease the temperature, if you want your laundry to be washed at a different temperature.
The cold wash is indicated with -- and the symbol .

For the maximum and the minimum available wash water temperature, see «Washing programmes».
SETTING THE SPIN SPEED (BUTTON 3)

When setting a programme, the appliance automatically proposes the maximum spin speed provided for that programme.
Press the button 3 repeatedly to change the spin speed.
RINSE HOLD
If setting this option the water of the last rinse is not emptied out to prevent the fabrics from creasing. At the end of the programme, and the symbol appear on the display, the symbol remains lit, the light of button 8 goes off and the door is blocked to indicate that the water must be emptied out.
NIGHT CYCLE
If setting this option, the appliance does not drain the water of the last rinse and the laundry is not wrinkled. All spinning phases are suppressed so the washing programme becomes noiseless and it can be set in the night or during the cheapest power rate hours. In some programmes the rinses are performed with more water.
At the end of the programme, and the symbol appear on the display, the symbol remains lit, the light of button 8 goes off and the door is blocked to indicate that the water must be emptied out.
To empty out the water, please read chapter «At the end of the programme».
SETTING THE OPTIONS (BUTTON 4)
Depending on the programme, different functions can be combined.

Not all the options are compatible among themselves. The symbols of the incompatible options disappear.
Anyway, if an option, which is not compatible with the set washing programme or any other option, is selected, the Err message is displayed for few seconds and the yellow pilot of button 8 light starts blinking.
Set the options after you have set the programme but before pressing the button
- Press the button 4: all the option symbols appear on the display.
To scroll all the available options, press the button 4. The relative symbol appears on the display and starts blinking.

For the compatibility among the options and the washing programmes see chapter «Washing Programmes».
Press the button 5 to activate and confirm your choice. A black dash appears under the selected symbol to indicate that this option has been set. Press the button 5 to deactivate the option.
After setting the options, wait about few seconds until the display gets back to the default status. The symbols of the set options appear on the display.
PREWASH OPTION
Set the PREWASH option to prewash your laundry at 30^ C before the main wash.
The prewash ends with a short spin in programmes for cotton and synthetic fabrics, whereas in the programmes for delicate fabrics the water is only drained.
The symbol appears on the display. The Prewash option is recommended for heavily soiled laundry.
STAIN OPTION 图
Set the STAIN option to treat heavily soiled or stained laundry with stain remover (extended main wash with time optimized stain action phase). The symbol appears on the display.
This option is not available with a temperature lower than 40^ .
If you wish to perform a programme with the STAIN option, put the stain remover in the compartment LJ.
The PREWASH option and the STAIN option cannot be selected together.
SENSITIVE OPTION
Set the SENSITIVE option to reduce the washing intensity. The symbol appears on the display. The appliance adds one rinse.
The SENSITIVE option cannot be selected with the EXTRA RINSE option.
The SENSITIVE option is recommended to wash non fast colored items and for frequently washed items.
EXTRA RINSE OPTION
This appliance is designed for saving water. However, for people with a very delicate skin (allergic to detergents) it may be necessary to rinse the laundry using an extra quantity of water. The symbol appears on the display.
SETTING THE TIME SAVING OPTION (BUTTON 6)
This option allows you to modify the washing time, automatically proposed by the appliance.
Press the button 6 once
The symbol ④ appears on the display. The washing duration will be reduced to wash daily soiled laundry.
Press the button 6 twice
The washing duration will be reduced to wash lightly soiled laundry or items that have been used or worn for a short time.
The display shows the decreased washing time.
STARTING THE PROGRAMME (BUTTON 8)
Press the button 8 to start the programme. The red light of the button 8 stops blinking.
The symbol appears on the display to indicate that the appliance has started operating and the door is locked.
To interrupt a programme which is running, press the button 8: the red light of the button 8 starts blinking.
To restart the programme from the point at which it was interrupted, press the button 8 again. If you have chosen a delayed start the machine will begin the countdown.
If an incorrect option is selected, the yellow light of the button 8 blinks 3 times and the message Err is displayed for a few seconds.
SETTING THE DELAY START (BUTTON 9)
Before you start the programme, if you wish to delay the start, press the button 9 repeatedly, to set the desired delay.
The symbol (出) appears on the display. The wash programme can be delayed from 30 min. -60 min. -90 min., 2 hours and then by 1 hour up to a maximum of 20 hours.
The set delay time value appears on the display for about 3 seconds, then the duration of the programme appears again. Set this option after you have set the programme and before you press the button 8.
You can modify or cancel the delay time at any moment, before you press the button 8.
The door will be locked throughout the delay time. If you wish to add laundry in the appliance during the delay time, press the button 8 to set the machine to pause.
When the symbol disappears, the door can be opened. Add the laundry, close the door and press the button 8 again.
Setting the delayed start.
- Set the programme and the required options.
- Set the delay start.
- Press button 8: the appliance starts its hourly countdown. The programme starts after the selected delay has expired.
Cancelling the delayed start
- Press the button 8 to set the appliance to PAUSE;
- Press button 9 until the symbol is displayed;
- Press the button 8 again to start the programme.

The set delay can be changed only after you have set the washing programme again.
The Delay Start cannot be set with Drain programme.
ALtering AN OPTION OR A RUNNING PROGRAMME
It is possible to change some options before the programme carries it out. Before
you make any change, you must press the button 8 to pause the appliance.
Changing a running programme is possible only by resetting it.
Turn the programme dial to O and then to the new programme position.
Press the 8 button again to start the new programme. The washing water in the tub will not emptied out.
INTERRUPTING A PROGRAMME
Press the button 8 to interrupt a programme which is running, the corresponding light starts blinking. Press the button again to restart the programme.
CANCELLING A PROGRAMME
Turn the selector dial to O to cancel a programme which is running. Now you can select a new programme.
OPENING THE DOOR AFTER THE PROGRAMME HAS STARTED
First press the button 8 to set the appliance to pause by.
- If the symbol disappears, the door can be opened;
- If the symbol doesn't go off, it means that the appliance is already heating or that the water level is too high. In this case the door cannot be opened;
- If you cannot open the door but you need to open it, you have to switch the appliance off by turning the selector dial to O / Off . After a few minutes the door can be opened (pay attention to the water level and temperature!).
After closing the door, it is necessary to set the programme again and to press the button 8.
AT THE END OF THE PROGRAMME
The appliance stops automatically, the light of button 8 goes off. A blinking 0 appears on the display and the acoustic
signal sounds for some minutes. The symbol disappears.
If you have chosen a programme or an option that ends with water in the tub, follow the below instruction to empty the water out. The drum continues to run at regular intervals until the water draining.
To empty the water out
- Turn the programme selector dial to 0 / 0
- Set the DRAIN or SPIN programme.
- If needed, press the button 3 to reduce the spin speed.
Stand by : once the programme has finished after a few minutes the energy saving system will be enabled. The bright-
- Press the button 8.
- When the programme has finished the display shows a blinking . The symbols disappears. The door can be opened.
Turn the programme selector dial to O/ Off to switch the appliance off. Remove the laundry from the drum and carefully check that the drum is empty.
If you do not intend to carry out another wash, close the water tap. Leave the door open to prevent the formation of mildew and unpleasant smells.
ness of the display is reduced. By pressing any button the appliance will come out of the energy saving status.
HELPFUL HINTS AND TIPS
THE LAUNDRY LOAD
- Divide the laundry in: white, coloured, synthetics, delicates and wool.
- Obey the washing instructions that are on the laundry care labels.
- Do not wash together white and coloured items.
- Some coloured items can discolour with the first wash. We recommend that you wash them separately for the first times.
- Button up pillowcases, close zippers, hooks and poppers. Tie up belts.
- Empty the pockets and unfold the items.
- Turn inside out multilayered fabrics, wool and items with painted illustrations.
- Remove hard stains.
- Wash with a special detergent heavy soil stains.
- Be careful with the curtains. Remove the hooks or put the curtains in a washing bag or pillowcase.
-
Do not wash in the appliance :
-
Laundry without hems or with cuts
- Underwired bras.
-
Use a washing bag to wash small items.
-
A very small load can cause balance problems with the spin phase. If this occurs, adjust manually the items in the tub and start the spin phase again.
STUBBORN STAINS
For some stains, water and detergent is not sufficient.
We recommend that you remove these stains before you put the items in the appliance.
Special stain removers are available. Use the special stain remover that is applicable to the type of stain and fabric.
DETERGENTS AND ADDITIVES
- Only use detergents and additives specially made for washing machines.
- Do not mix different types of detergents.
- To help the environment, do not use more than the correct quantity of detergent.
- Obey the instructions that you find on the on packaging of these products.
- Use the correct products for the type and colour of the fabric, the programme temperature and the level of soil.
- If you use liquid detergents, do not set the prewash phase.
- If your appliance has not the detergent dispenser with the flap device, add the liquid detergents with a dosing ball.
WATER HARDNESS
If the water hardness in your area is high or moderate, we recommend that you use a water softener for washing machines. In areas where the water hardness is soft it is not necessary to use a water softener.
To know the water hardness in your area, contact your local water authority.
Obey the instructions that you find on the packaging of the products.
Equivalent scales measure the water hardness:
- German degrees (°dH).
- French degrees (°TH).
mmol/l (millimol for each litre - international unit for the hardness of water). - Clarke degrees.
Water hardness table
| Level | Type | Water hardness | |||
| °dH | °T.H. | mmol/l | Clarke | ||
| 1 | soft | 0-7 | 0-15 | 0-1.5 | 0-9 |
| 2 | medium | 8-14 | 16-25 | 1.6-2.5 | 10-16 |
| 3 | hard | 15-21 | 26-37 | 2.6-3.7 | 17-25 |
| 4 | very hard | >21 | >37 | >3.7 | >25 |
CARE AND CLEANING

WARNING!
Disconnect the appliance from the mains supply before you clean it.
DESCALING
The water we use contains limescale. If it becomes necessary, use a water softener to remove limescales.
Use a special product made for washing machines. Obey the instructions that you
find on the packaging of the manufacturer.
Do this separately from the laundry wash.
EXTERNAL CLEANING
Clean the appliance only with soap and warm water. Fully dry all the surfaces.

CAUTION!
Do not use alcohol, solvents or chemical products.
DOOR SEAL
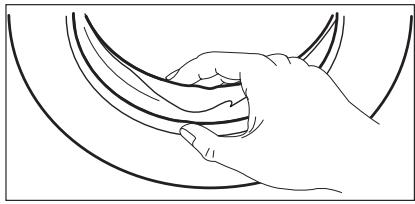
Regularly examine the seal and remove all objects from the inner part.
DRUM
Regularly examine the drum to prevent limescale and rust particles.
Only use special products to remove rust particles from the drum.
To do this:
- Clean the drum with special product for stainless steel.
- Start a short programme for cotton at the maximum temperature with a small quantity of detergent.
DETERGENT DISPENSER
To clean the dispenser:
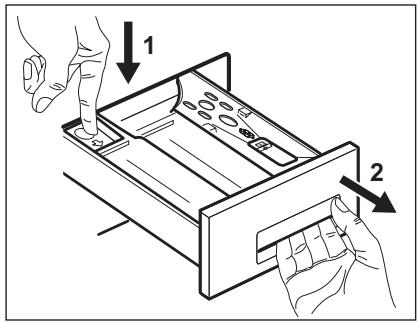

- Press the lever.
-
Pull the dispenser out.
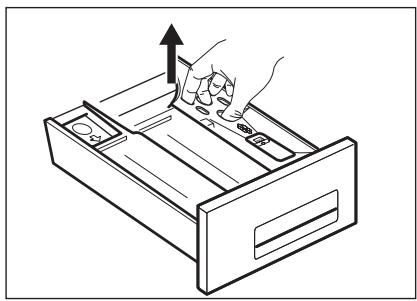
-
Remove the top part of the liquid additive compartment.
-
Clean all the parts with water.
-
Clean the dispenser recess with a brush.
- Put back the dispenser in the recess.
DRAIN PUMP
The pump should be inspected regularly and particularly if:
- the appliance does not empty and/or spin;
- the appliance makes an unusual noise during draining due to objects such as safety pins, coins etc. blocking the pump;
- a problem with water draining is detected (see chapter "Troubleshooting" for more details).

WARNING!
Before unscrewing the pump cover, switch the appliance off and remove the mains plug from the socket.
Proceed as follows:
- Unplug the appliance.
- If it is necessary, wait until the water has cooled down.
- Place a container close to the pump to collect any spillage.
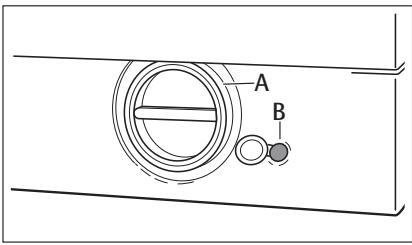
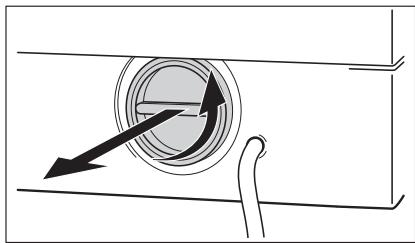
- Release the emergency emptying hose (B), place it in the container and remove its cap cover.
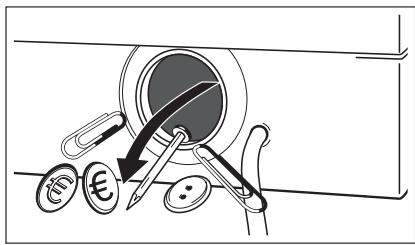
- When no more water comes out, unscrew the pump cover (A) by turning it anti-clockwise and remove the filter. Use pliers, if necessary.
Always keep a rag nearby to dry up any water spillages when removing the cover. Clean the filter under a tap, to remove any traces of fluff.
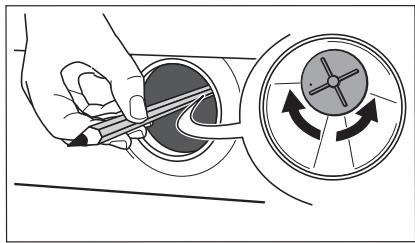
- Remove foreign bodies and fluff from the filter seat and from the pump impeller.
- Check carefully whether the pump impeller rotates (it rotates jerkily). If it doesn't rotate, please contact your Service Centre.

WARNING!
When the appliance is in use and depending on the programme selected there can be hot water in the pump.
Never remove the pump cover during a wash cycle, always wait until the appliance has finished the cycle, and is empty.
When refitting the pump cover, ensure it is securely re-tightened so as to stop leaks and young children being able to remove it.
THE INLET HOSE FILTER AND THE VALVE FILTER
It could be necessary to clean the filters when:
To clean the water inlet filters:
- Put the cap back on the emergency emptying hose and place the latter back in its seat.
-
Replace the filter into the pump by inserting it correctly into the special guides. Screw the pump cover firmly by turning it clockwise.
-
The appliance does not fill with water.
- The appliance fills with the water for a long time.
- The indicator of button 8 flashes and the display shows the related alarm. Refer to 'Troubleshooting'.

WARNING!
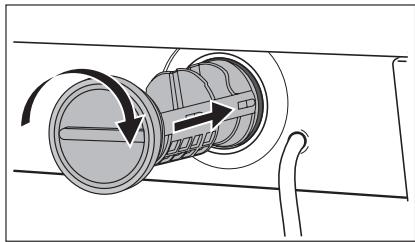
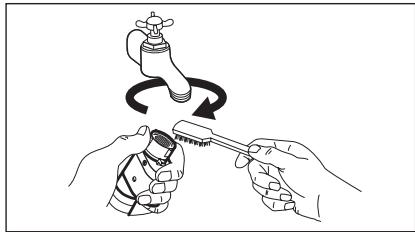
Disconnect the mains plug from the mains socket.
- Close the water tap.
- Remove the water inlet hose from the water tap.
- Clean the filter in the inlet hose with a stiff brush.
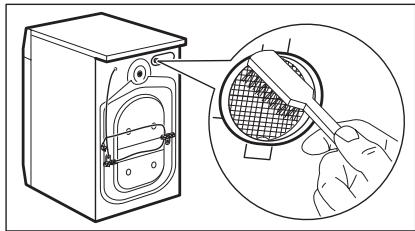
- Remove the inlet hose behind the appliance.
- Clean the filter in the valve with a stiff brush or a towel.
EMERGENCY EMPTYING OUT
If the water is not discharged, proceed as follows to empty out the appliance:
- pull out the plug from the power socket;
- close the water tap;
- if necessary, wait until the water has cooled down;
- place a bowl on the floor;
- place the end of the emergency emptying hose into the bowl;
- Remove its cap. The water should drain by gravity into the bowl. When the bowl is full, put the cap back on the hose. Empty the bowl; Repeat the procedure until water stops flowing out;
- clean the pump if necessary as previously described;
- replace the emergency emptying hose in its seat after having plugged it;
- screw the pump again.
TROUBLESHOOTING
Certain problems are due to lack of simple maintenance or oversights, which can be solved easily without calling out an engineer. Before contacting your local Service Centre, please carry out the checks listed below.
During machine operation it is possible that the yellow pilot light of button 8 blinks, one of the following alarm codes appears on the display and at the same time some acoustic signals sound every 20 seconds to indicate that the machine is not working:
- Install again the inlet hose. Make sure that the couplings are tight to prevent leakages.
- Open the water tap.
FROST PRECAUTIONS
If the machine is installed in a place where the temperature could drop below 0^ , proceed as follows:
- close the water tap;
- unscrew the water inlet hose from the tap;
- place the end of the emergency emptying hose and that of the inlet hose in a bowl placed on the floor. Let water drain out;
- screw the water inlet hose back on;
- put the cap on the emergency emptying hose again;
- reposition the emergency emptying hose.
By doing this, any water remaining in the machine is removed, avoiding ice forming and consequently damage to the appliance.
When you use the machine again, make sure that the ambient temperature is above 0^ .
- E10: problem with the water supply
- E20 : problem with the water draining
- E40: door open
- EFO: anti-flooding system has activa-ted
Once the problem has been eliminated, press the button 8 to restart the programme. If after all checks, the problem persists, contact your local Service Centre.
| Problem | Possible cause/Solution |
| The appliance does not start: | The door has not been closed. E40 • Close the door firmly. The plug is not properly inserted in the power socket. • Insert the plug into the power socket. There is no power at the socket. • Check your domestic electrical installation. The main fuse has blown. • Replace the fuse. The programme dial is not correctly positioned and the button 8 has not been pressed. • Please turn the programme dial and press the button 8 again. The delay start has been set. • If the laundry is to be washed immediately, cancel the delay start. The Child safety lock has been activated. • Deactivate this device. |
| The appliance does not fill: | The water tap is closed. E10 • Open the water tap. The inlet hose is squashed or kinked. E10 • Check the inlet hose connection. The filter in the inlet hose or the inlet valve filter are blocked. E10 • Clean the water inlet filters. The door is not properly closed. E40 • Close the door firmly. |
| The appliance fills then empties immediately: | The end of the drain hose is too low. • Refer to relevant paragraph in «Water drainage» section in «Water drainage» chapter. |
| The appliance does not empty and/or does not spin: | The drain hose is squashed or kinked. E20 • Check the drain hose connection. The drain filter is clogged. E20 • Clean the drain filter. You have set an option or a programme that ends with the water still in the tub or a that eliminates all the spinning phases. • Set the draining or the spinning programme. The laundry is not evenly distributed in the drum. • Redistribute the laundry. |
| There is water on the floor: | You have used too much detergent or unsuitable detergent (creates too much foam). • Reduce the detergent quantity or use another one. Check whether there are any leaks from one of the inlet hose fittings. It is not always easy to see this as the water runs down the hose; check to see if it is damp. • Check the water inlet hose connection. The drain or the inlet hose is damaged. • Replace it with a new one. The cap on the emergency emptying hose has not been replaced or the filter has not been properly screwed in after cleaning action. • Refit the cap on the emergency emptying hose or screw the filter fully in. |
| Unsatisfactory washing results: | You have used too little detergent or unsuitable detergent. • Increase the detergent quantity or use another one. Stubborn stains have not been treated prior to washing. • Use commercial products to treat the stubborn stains. The correct temperature was not selected. • Check if you have selected the correct temperature. Excessive laundry load. • Reduce the laundry load. |
| The door will not open: | The programme is still running. • Wait the end of washing cycle. The door lock has not been released. • Wait until the symbol =O has gone off. There is water in the drum. • Set drain or spin programme to empty out the water. |
| The appliance vibrates or is noisy: | You have not removed the transit bolts and packing. • Check the correct installation of the appliance. The support feet have not been adjusted. • Check the correct levelling of the appliance. The laundry is not evenly distributed in the drum. • Redistribute the laundry. Maybe there is very little laundry in the drum. • Load more laundry. |
| Spinning starts late or the machine does not spin: | The electronic unbalance detection device has cut in because the laundry is not evenly distributed in the drum. The laundry is redistributed by reverse rotation of the drum. This may happen several times before the unbalance disappears and normal spinning can resume. If, after some minutes, the laundry is still not evenly distributed in the drum, the machine will not spin. ·The laundry load is perhaps to little, add more items, redistribute the load manually and then select the spinning programme. |
| No water is visible in the drum: | Appliances based on modern technology operate very economically using very little water without affecting performance. |
| The display shows the alarm code EFO : | Anti-flooding system has activated. ·Pull out the plug from the power socket, close the water tap and contact the Service Force Centre. |
SERVICE
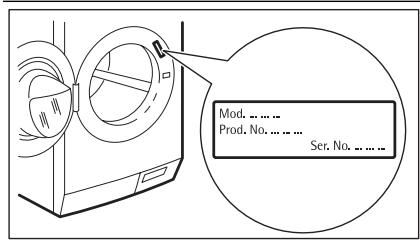
Refer to the information supplied with this appliance for guarantee condition and point of contact. The information to give to the service is on the rating plate.
We recommend that you write the information here:
Model (MOD.)
Product number (PNC)
Serial number (S.N.)
INSTALLATION
UNPACKING
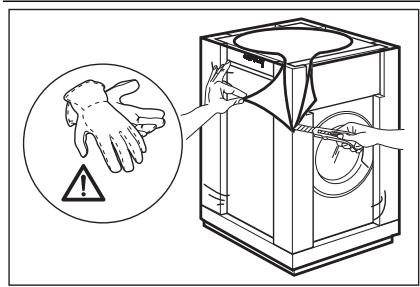
- Use the gloves. Remove the external film. If necessary, use a cutter.
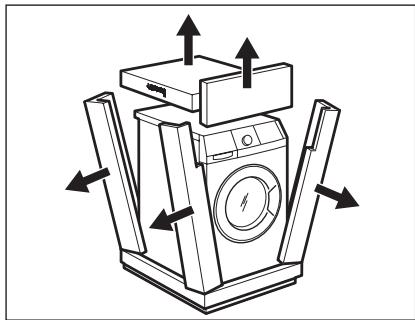
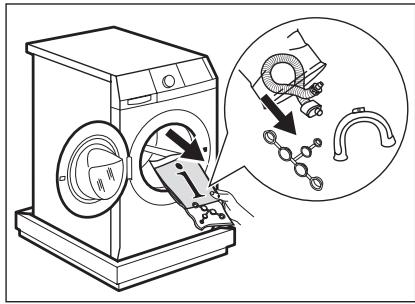
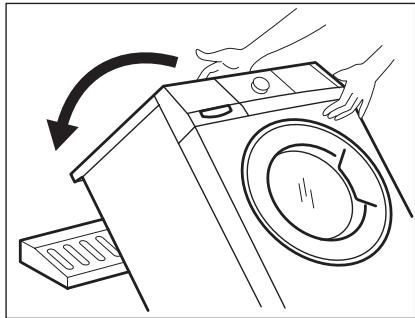
- Remove the cardboard top.
-
Remove the polystyrene packaging materials.
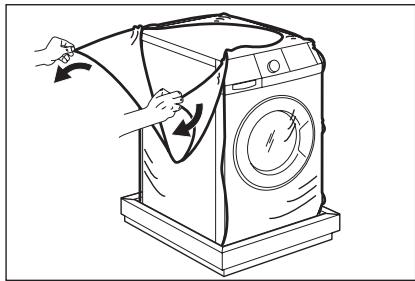
-
Remove the internal film.
- Open the door. Remove the polystyrene piece from the door seal and all the items from the drum.
- Put one of the polystyrene packaging elements on the floor behind the appliance. Carefully put down the appliance with the rear side on it. Make sure not to damage the hoses.
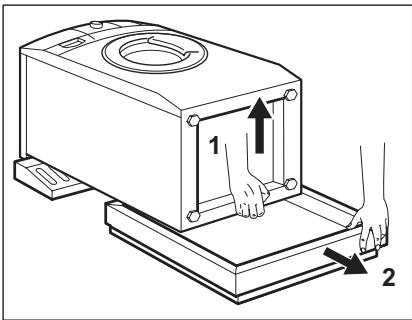
- Remove the polystyrene protection from the bottom.
- Pull up the appliance in vertical position.
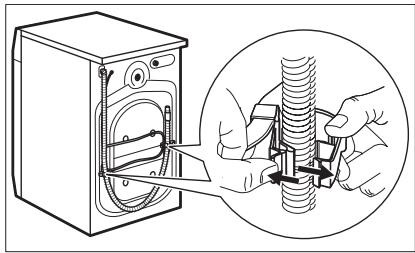
- Remove the power supply cable and the drain hose from the hose holders.
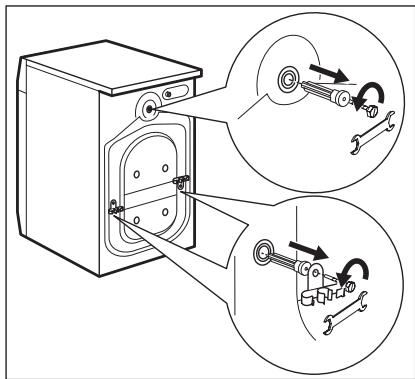
- Remove the three bolts. Use the key supplied with the appliance.
- Pull out the plastic spacers.
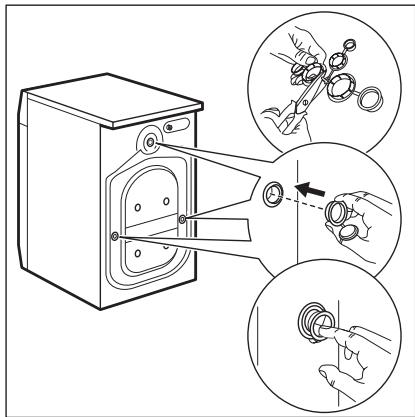
- Put the plastic caps in the holes. You can find these caps in the user manual bag.

WARNING!
Remove all the packaging and the transit bolts before you install the appliance.

We recommend that you keep the packaging and the transit bolts for when you move the appliance.
POSITIONING AND LEVELLING
Install the machine on a flat hard floor.
- Make sure that air circulation around the machine is not impeded by carpets, rugs etc.
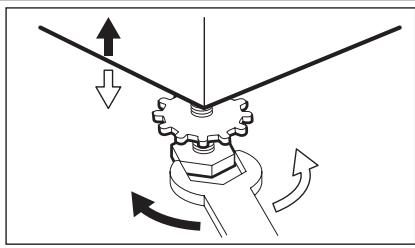
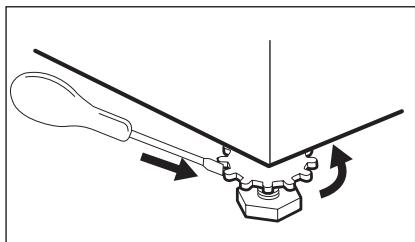
- Carefully level by screwing the adjustable feet in or out.
After having levelled the appliance, tighten the lock nuts.
- The appliance must be level and stable.

Never place cardboard, wood or similar materials under the machine to compensate for any unevenness in the floor.
If it is impossible to avoid positioning the machine next to a gas cooker or coalburning stove, an insulating panel covered with aluminium foil on the side facing the cooker or stove, must be inserted between the two appliances.
Before placing it on small tiles, apply a rubber coating. The water inlet hose and the drain hose must not be kinked.

CAUTION!
The machine must not be installed in rooms where the temperature can drop below 0^ .
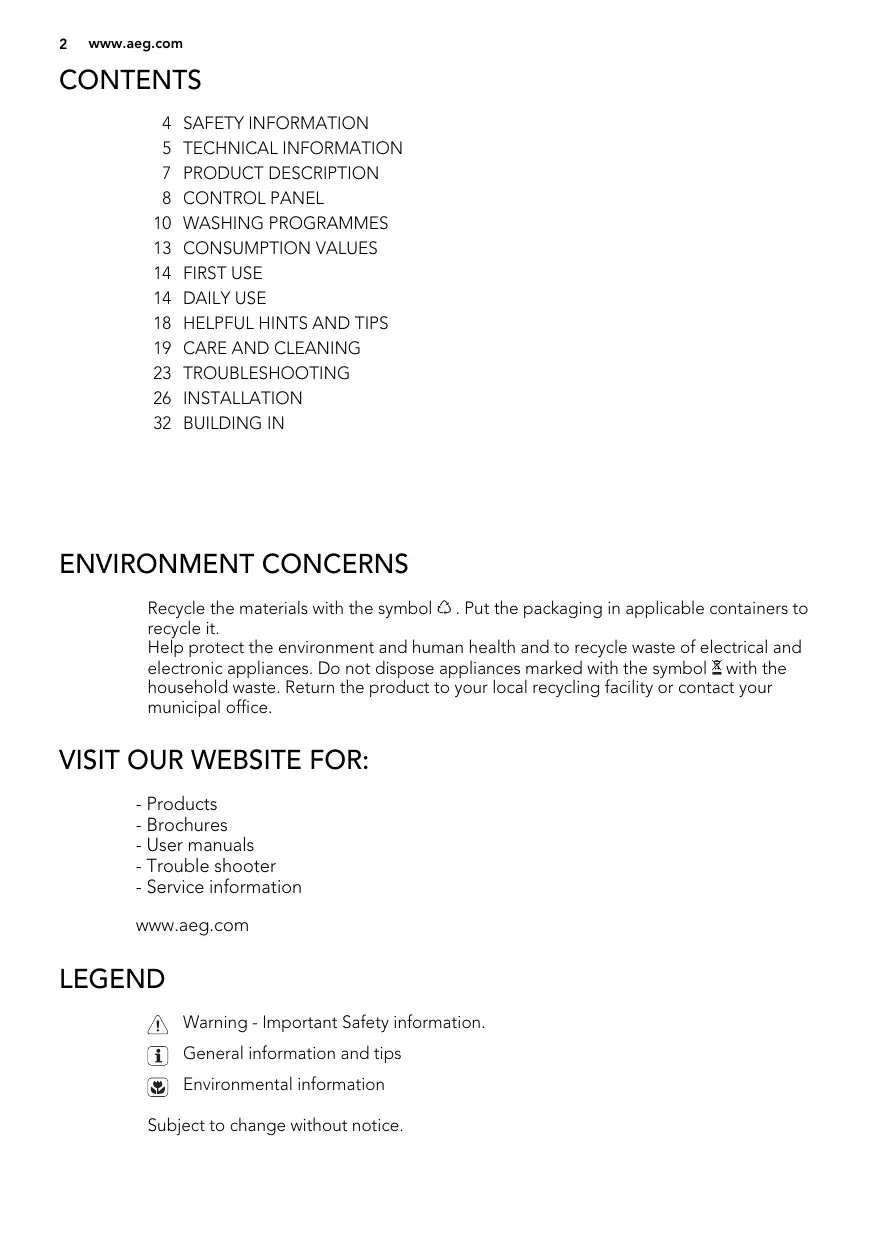
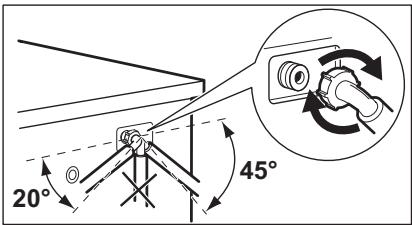
THE INLET HOSE
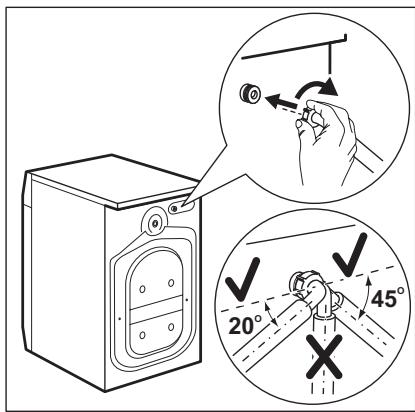
- Connect the hose to the appliance. Turn the inlet hose only left or right. Loose the ring nut to set it in the correct position.
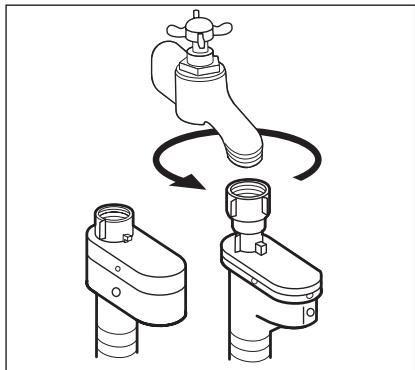
- Connect the water inlet hose to the cold water tap with 3/4 thread.

CAUTION!
Make sure that there are no leaks from the couplings.

Do not use an extension hose if the inlet hose is too short. Contact the service centre for the replacement of the inlet hose.
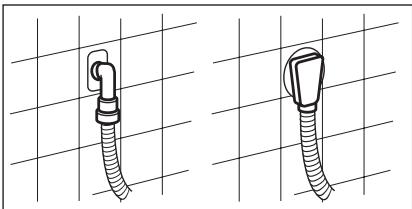
Water-stop device
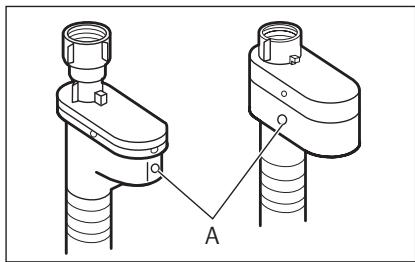
The inlet hose has a water stop device. This device prevents water leaks in the hose because of its natural ageing. The red sector in the window «A» shows this fault . If this occur, close the water tap and contact the service centre to replace the hose.
WATER DRAINAGE
There are different procedures to connect the drain hose:
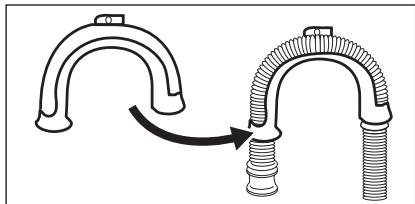
With the plastic hose guide.
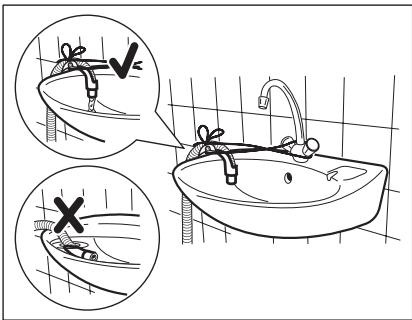
Without the plastic hose guide.
- On the edge of a sink.
-
Make sure that the plastic guide cannot move when the appliance drains. Attach the guide to the water tap or the wall.
-
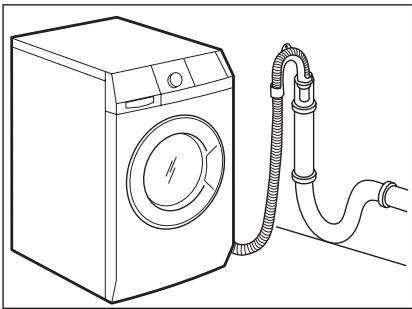
To a stand pipe with vent-hole.
Refer to the illustration. Directly into a drain pipe at a height of not less than 60~cm and not more than 100~cm . The end of the drain hose must always be ventilated, i.e. the inner diameter of the drainpipe must be larger than the external diameter of the drain hose.
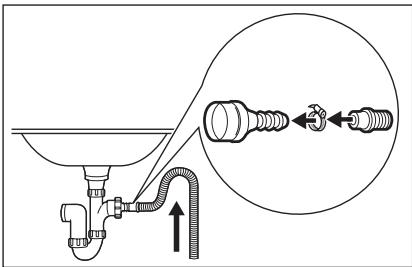
- To a sink spigot.
Refer to the illustration. Put the drain hose in the spigot and tighten it with a clip. Make sure that the drain hose makes a loop to prevent that remaining particles go in the appliance from the sink.
- Directly to a built-in drain pipe in the room wall and tighten it with a clip.

You can extend the drain hose to maximum 400 cm. Contact the service centre for the other drain hose and the extension.
BUILDING IN
OVERVIEW
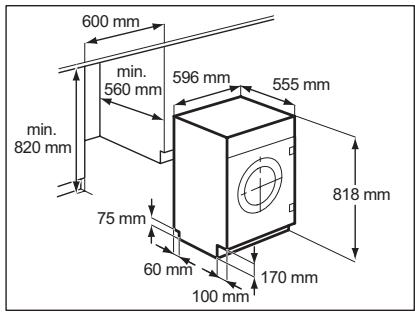
Fig.1
- This appliance has been designed to be built into the kitchen furniture. The recess should have the dimensions shown in Fig 1.
Preparation and assembly of the door
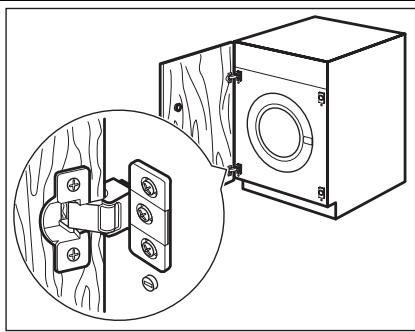
Fig. 2
- The machine is originally pre-arranged for the assembly of a door opening from right to left (Fig. 2).
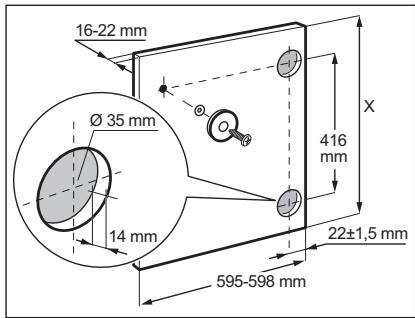
Fig. 3
Door
The dimensions of the door should be:
width 595-598 mm
-thickness 16-22 mm
- the height X depends on the height of the adjacent furniture's base (Fig. 3).
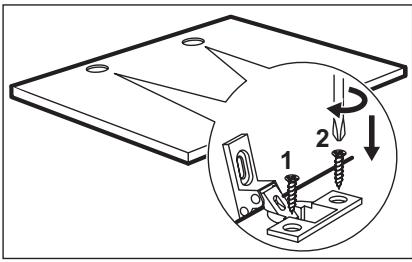
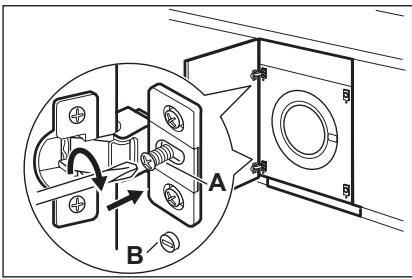
Fig. 4
Fig. 5

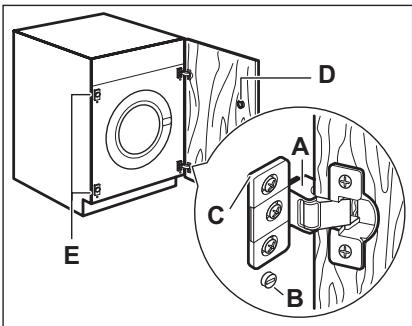
Fig. 6
- Hinges
To mount the hinges it is necessary to drill two holes (dia. 35 mm, depth 12.5-14 mm depending on the depth of door furniture) on the inner side of the door. The distance between the holes hobs fixing centres must be 416 mm.
The distance from upper edge of the door to the centre of the hole depends on the adjacent furniture's dimensions.
The hinges will be fixed to the door by means of screws for wood 1 and 2 (Fig. 4) supplied with the appliance.
- Mounting the door
Fix the hinges to the appliance by means of the M5x15 screws. The hinges can be adjusted to compensate for possible uneven thickness of the door. To align the door perfectly it is necessary to loosen the screw, adjust the door and tighten the screw A again (Fig. 5).

Do not remove the screw B (Fig. 5.
Counter-magnet
The appliance is prearranged for a magnetic closure of the door. To enable a correct operation of this device, it is necessary to screw the counter-magnet A (steel disk + rubber ring) into the inner side of the door.
Its position must correspond to the magnet B on the appliance (Fig. 6).

Do not remove the screw C.
If the door has to be opened from left to right, invert the position of the plates E, the magnet D and the plate C. Mount the counter-magnet D and the hinges A as previously described (Fig. 7)

CAUTION!
Do not remove the screw B.
Fig. 7
ÍNDCIDE MATERIALIAS
37 INFORMACION SOBRE SEGURIDAD
38 INFORMACION TECNICA
40 DESCRIPCION DEL PRODUCTO
41 PANEL DEMANDOS
43 PROGRAMAS DE LAVADO
46 VALORES DE CONSUMO
47 PRIMER USO
47 USO DIARIO
52 CONSEJOS UTILES
53 MANTENIMIENTO Y LIMPIEZA
57 SOLUCION DE PROBLEMAS
61 INSTALLACION
67 EMPOTRADO
- VISIT OUR WEBSITE FOR:
- LEGEND
- FOR PERFECT RESULTS
- ACCESSORIES AND CONSUMABLES
- CUSTOMER CARE AND SERVICE
- SAFETY INFORMATION
- CHILDREN AND VULNERABLE PERSON SAFETY
- CHILD SAFETY DEVICE
- GENERAL SAFETY
- CARE AND CLEANING
- INSTALLATION
- Water connection
- Electrical connection
- DISCARD THE APPLIANCE
- PRODUCT DESCRIPTION
- ACCESSORIES
- CONTROL PANEL
- DISPLAY
- ACOUSTIC SIGNALS
- CHILD SAFETY LOCK
- EXTRA RINSE OPTION
- WASHING PROGRAMMES
- CONSUMPTION VALUES
- Standard programmes for the Energy Label consumption values
- FIRSTUSE
- DAILY USE
- FILLING THE DETERGENT AND ADDITIVES
- MAX
- SETTING THE PROGRAMME (KNOB 1)
- SETTING THE TEMPERATURE (BUTTON 2)
- SETTING THE SPIN SPEED (BUTTON 3)
- RINSE HOLD
- NIGHT CYCLE
- SETTING THE OPTIONS (BUTTON 4)
- PREWASH OPTION
- STAIN OPTION 图
- SENSITIVE OPTION
- SETTING THE TIME SAVING OPTION (BUTTON 6)
- Press the button 6 twice
- STARTING THE PROGRAMME (BUTTON 8)
- SETTING THE DELAY START (BUTTON 9)
- Setting the delayed start.
- Cancelling the delayed start
- ALtering AN OPTION OR A RUNNING PROGRAMME
- INTERRUPTING A PROGRAMME
- CANCELLING A PROGRAMME
- OPENING THE DOOR AFTER THE PROGRAMME HAS STARTED
- AT THE END OF THE PROGRAMME
- To empty the water out
- HELPFUL HINTS AND TIPS
- THE LAUNDRY LOAD
- STUBBORN STAINS
- DETERGENTS AND ADDITIVES
- WATER HARDNESS
- WARNING!
- DESCALING
- EXTERNAL CLEANING
- CAUTION!
- DOOR SEAL
- DRUM
- DETERGENT DISPENSER
- To clean the dispenser:
- DRAIN PUMP
- THE INLET HOSE FILTER AND THE VALVE FILTER
- To clean the water inlet filters:
- EMERGENCY EMPTYING OUT
- TROUBLESHOOTING
- FROST PRECAUTIONS
- SERVICE
- UNPACKING
- POSITIONING AND LEVELLING
- THE INLET HOSE
- Water-stop device
- WATER DRAINAGE
- BUILDING IN
- OVERVIEW
- Preparation and assembly of the door
- Door
- - Hinges
- - Mounting the door
- Counter-magnet
- ÍNDCIDE MATERIALIAS
Brand : AEG-ELECTROLUX
Model : L82470BI
Category : Built-in washing machine