
STD-2001 - DVD player AKAI - Free user manual and instructions
Find the device manual for free STD-2001 AKAI in PDF.
Pick your language and provide your email: we'll send you a specifically translated version.
| Product type | DVD Player / DVB-T Set-Top Box |
| Brand and model | AKAI STD-2001 |
| Estimated dimensions (W x D x H) | 430 x 260 x 50 mm |
| Weight | 2.0 kg |
| Power supply | 110-230 V, 50/60 Hz, 20 W |
| Compatible disc formats | DVD, DVD+R/RW, DVD-R/RW, VCD, SVCD, CD, CD-R/RW (finalized), Kodak Photo CD, MP3, MPEG-4 |
| Video outputs | HDMI, SCART, S-Video, Composite, Component (Y, Pb/Cb, Pr/Cr) |
| Audio outputs | Analog stereo (RCA), coaxial digital, optical digital |
| Additional ports | USB 2.0 (front), memory card reader (front) |
| Main functions | Progressive Scan, zoom, multiple angle, subtitles, parental control, programming, A-B repeat, time search, CD->MP3 encoder |
| DVB-T reception | Integrated digital terrestrial tuner (DVB-T) |
| PVR recording | Direct and scheduled recording on USB key (FAT32 format) |
| USB multimedia playback | MP3, JPEG, MPEG-4 (AVI) |
| Built-in games | Boxman, Burning Tetris, Hit Rat |
| OSD languages | English, Spanish, Italian |
| DVD region | Region 2 |
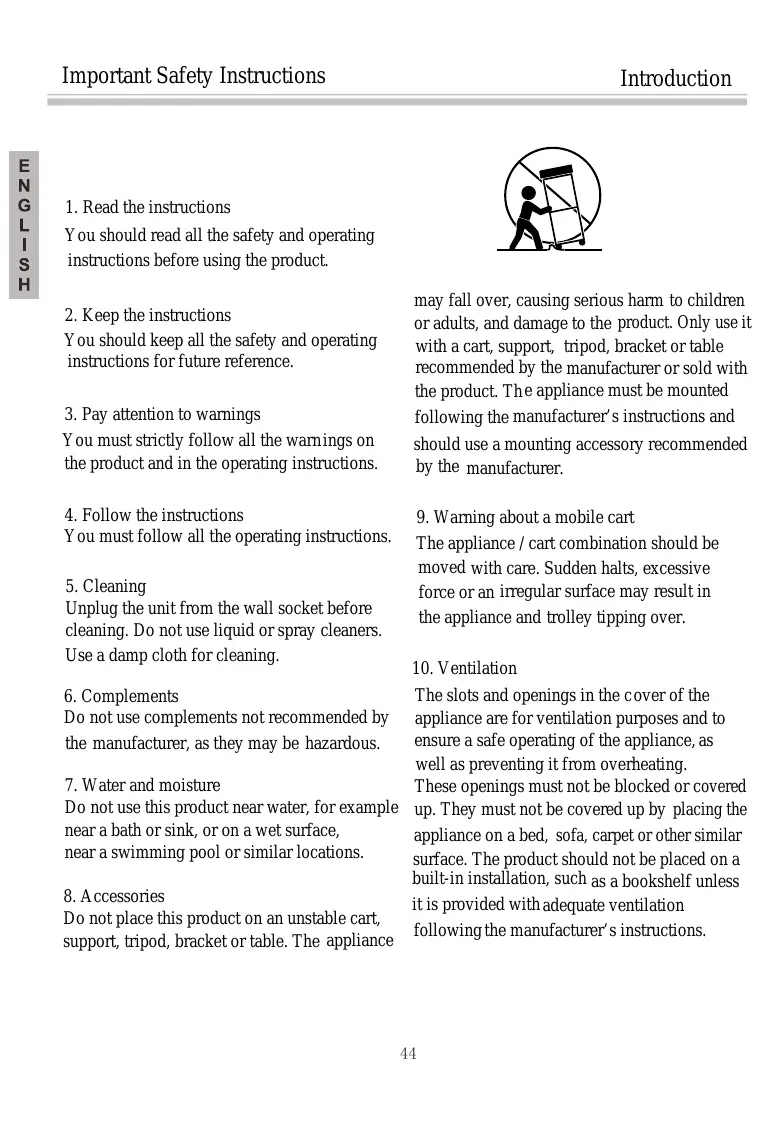
| Cleaning and maintenance | Unplug before cleaning; use a damp cloth; do not use solvents; clean discs from the center outward |
| Safety | Class 1 laser; do not open the casing; use only recommended parts |
| Spare parts and repairability | Contact a qualified technician; use parts identical to original specifications |
| Included accessories | Audio/video cable, remote control, user manual |
Frequently Asked Questions - STD-2001 AKAI
What types of discs can I play with the AKAI STD-2001 DVD player?
This player supports DVD, DVD+R/RW, DVD-R/RW, VCD, SVCD, CD, CD-R/RW (finalized), Kodak Photo CD, as well as MP3 and MPEG-4 files on CD. It is compatible with Region 2 discs.
How do I connect the player to my TV?
You can use one of the following connections: HDMI, SCART, S-Video, composite video, or component video (Y, Pb/Cb, Pr/Cr). Use the appropriate cable and select the corresponding source on your TV.
How do I play files from a USB key or memory card?
Insert the USB key into the front USB port or the memory card into the front card reader. Make sure no disc is in the tray. Multimedia files (MP3, JPEG, MPEG-4) will play automatically after a few seconds.
Can I record DVB-T broadcasts with this player?
Yes, the player has a PVR function. Connect a USB key (FAT32) to the front port to record live or schedule a recording via the 'Book list' menu. Recording stops automatically if the memory is full.
How do I set the parental control?
Access the setup menu (SETUP button), then the Parental Control section. You can set a password (default 0000) and block DVB-T channels or DVDs based on their rating.
What should I do if the remote control does not work?
Check that the batteries are installed correctly and not depleted. Point the remote directly at the player's infrared sensor. Remove any obstacles between the remote and the device. If necessary, replace the batteries with new LR03 (AAA) batteries.
How do I encode audio CDs to MP3 on a USB key?
Insert an audio CD, then insert a USB key. Press the SUBTITLE button on the remote to open the encoding menu. Select the speed and bitrate, choose the tracks, then start encoding. The files will be converted to MP3 on the key.
Why does the screen display 'Bad disc' or 'No disc'?
This message appears if the disc is scratched, dirty, warped, or placed upside down. Check that the disc is compatible (Region 2, finalized format) and clean it with a soft cloth from the center outward. Make sure the disc is properly inserted in the tray.
How do I set the HDMI output to 720p or 1080p?
Press the HDMI (or HD) button on the remote to toggle between 720P, 1080I, and 1080P modes. You can also do this via the setup menu: 'Settings' > 'System Settings' > 'HDMI Output'.
How do I clean the player and discs?
For the player, unplug it and use a damp cloth (no solvents). For discs, gently wipe from the center outward with a soft dry cloth. Avoid touching the playback surface. In case of moisture condensation, leave the player on without a disc for one hour.
User questions about STD-2001 AKAI
0 question about this device. Answer the ones you know or ask your own.
Ask a new question about this device
No questions yet. Be the first to ask one.
Download the instructions for your DVD player in PDF format for free! Find your manual STD-2001 - AKAI and take your electronic device back in hand. On this page are published all the documents necessary for the use of your device. STD-2001 by AKAI.
USER MANUAL STD-2001 AKAI
Lecture/Pause (PLAY/PAUSE)

Table of contents
Click a title to access it
Manual assistant
Powered by Anthropic
Waiting for your message
Product information
Brand : AKAI
Model : STD-2001
Category : DVD player