
APD 4011 - Air purifier AMICA - Free user manual and instructions
Find the device manual for free APD 4011 AMICA in PDF.


| Product Type | Air Purifier |
| Brand | Amica |
| Model | APD 4011 |
| Power Supply | 220V~240V / 50~60Hz |
| Speed Settings | 5 (Speed 1, 2, 3, 4, Auto) |
| Timer Settings | 2H, 4H, 6H, 8H |
| Filter Type | HEPA + Pre-filter |
| HEPA Filter Replacement Interval | Every 2160 hours |
| Pre-filter Cleaning Interval | Every 360 hours |
| UV Lamp Replacement Interval | Every 7300 hours |
| Air Quality Sensor | PM2.5 sensor |
| Light Ring Indicator | Blue (good), Purple (moderate), Red (bad) |
| Ionizer | Yes, releases negative ions |
| UV Lamp | Yes, for sterilization |
| Sleep Mode | Yes, quiet operation |
| Child Lock | Yes, press and hold SLEEP/LOCK for 3 seconds |
| Night Light | Yes, turns off display and light ring |
| Safety Features | Motor stall/over temperature protection (error E11) |
| Auto Shut-off | Yes, via timer |
| Display | PM2.5 value, status icons |
Frequently Asked Questions - APD 4011 AMICA
User questions about APD 4011 AMICA
0 question about this device. Answer the ones you know or ask your own.
Ask a new question about this device
Download the instructions for your Air purifier in PDF format for free! Find your manual APD 4011 - AMICA and take your electronic device back in hand. On this page are published all the documents necessary for the use of your device. APD 4011 by AMICA.
USER MANUAL APD 4011 AMICA
natural_image
White Amica air purifier with perforated grille and circular vent, no visible text or symbols on bodyPL INSTRUKCJA OBSŁUGI....6
EN OPERATING INSTRUCTIONS....13
CS NÁVOD K OBSLUZE....21
SK POUŽÍVATELŠKÁ PRÍRUČKA....30
1
GWARANCJA I OBSŁUGA POSPRZEDAŻOWA
Gwarancja
natural_image
Simple line drawing of a recycling symbol (three chasing arrows) with no text or labelsnatural_image
Simple line drawing of a trash bin with two crossed lines indicating no waste or discharge (no text or symbols)
THANK YOU FOR PURCHASING AN AMICA APPLIANCE
DEAR CUSTOMER,
Your Amica appliance is exceptionally easy to use and extremely efficient. Before being packaged and leaving the manufacturer, the appliance was thoroughly checked with regard to safety and functionality.
Before using the appliance, please carefully read these Operating Instructions
CONTENTS
Warranty and after sales service....13
Safety instructions for use....15
Description of the appliance....17
Cleaning and maintenance....19
Problem solving....19

The appliance is designed for household use only.
The manufacturer reserves the right to introduce changes, which do not affect operation of the appliance.
The pictures in this operating instructions are for illustration only.
WARRANTY AND AFTER SALES SERVICE
Warranty
Warranty service as stated on the warranty card.
The manufacturer shall not be held liable for any damage caused by improper use of the product.
Manufacturer's Declaration
The manufacturer hereby declares that this product meets the requirements of the following European directives:
• Low Voltage Directive 2014/35/EC
• Electromagnetic Compatibility (EMC) Directive 2014/30/EC
• ErP Directive 2009/125/EC
• Directive RoHS 2011/65/EC
and has thus been marked with the symbol and been issued with a declaration of compliance made available to market regulators.
UNPACKING

natural_image
Recycling symbol composed of three chasing arrows forming a triangle (no text or labels)During transportation, protective packaging was used to protect the appliance against any damage. After unpacking, please dispose of all elements of packaging in a way that will not cause damage to the environment.
All materials used for packaging the appliance are environmentally friendly; they are 100% recyclable and are marked with the appropriate symbol.
Important! Packaging materials (bags, polyethylene, polystyrene, etc.) should be kept away from children during unpacking.
DISPOSAL OF OLD APPLIANCE

natural_image
Symbol of a trash bin crossed out by a diagonal line, representing no waste or discharge (no text or labels)In accordance with European Directive 2012/19/EU and local legislation regarding used electrical and electronic goods, this appliance is marked with the symbol of the crossed-out waste container. This marking indicates that the appliance must not be disposed of together with other household waste after it has been used.

The user is obliged to hand it over to waste collection centre collecting used electrical and electronic goods. The collectors, including local collection points, shops and local authority departments provide recycling schemes.
Proper handling of used electrical and electronic goods helps avoid environmental and health hazards resulting from the presence of dangerous components and the inappropriate storage and processing of such goods.
SAFETY INSTRUCTIONS FOR USE
- Do not use this appliance in wet or high temperature environment (like bathroom, toilet and kitchen).
- Before replacing the filter, please stop this appliance and cut off power.
- Do not place other items on top of the appliance, and forbid sitting or standing on this appliance.
- Please use the original filter provided by the factory. In case of other filters, the best results cannot be achieved.
- Do not use damaged or aged power cords; Forbid replacing the power cord without authorization. If the power cord is damaged, it must be replaced by the manufacturer, its service department or professional from similar department to avoid danger
- Do not insert the fingers or objects into the air inlets or air outlets to prevent the product from physical damages or malfunction.
- Please unplug the power cord immediately and contact the service center in time when the appliance suffers abnormal sound or burnt smell or smoke.
- Do not spray flammable substances near the appliance; • Do not spray water directly on the appliance or use chemical cleaners like alcohol or hydrochloric acid, etc.; Do not place water containers, medicines, or flammable materials on the appliance.
- Do not block the air inlets/outlets of the appliance with any item;
- This appliance cannot replace natural ventilation and other appliances like the vacuum cleaner, kitchen ventilator, etc. When the appliance is working, it must be placed on a dry, flat and stable floor, with at least 30 cm space reserved around it.
- Do not put it in a place with direct sunlight.
- To prevent electromagnetic disturbance, the appliance must keep a certain distance from the TV, radio, microwave oven and others.
- The mist produced by the ultrasonic humidifier may affect the PM2.5 detection of this appliance, and both should maintain a certain distance.
SAFETY INSTRUCTIONS FOR USE
- Do not disassemble or modify this appliance without authorization to avoid accidents.
- Do not pull the power cord to move the appliance.
- Please take care of the children and make sure that the children do not touch the appliance to avoid accidents.
- This appliance can be used by children aged from 8 years and above and persons with reduced physical, sensory or mental capabilities or lack of experience and knowledge if they have been given supervision or instruction concerning use of the appliance in a safe way and understand the hazards involved.
• Children shall not play with the appliance.
DESCRIPTION OF THE APPLIANCE
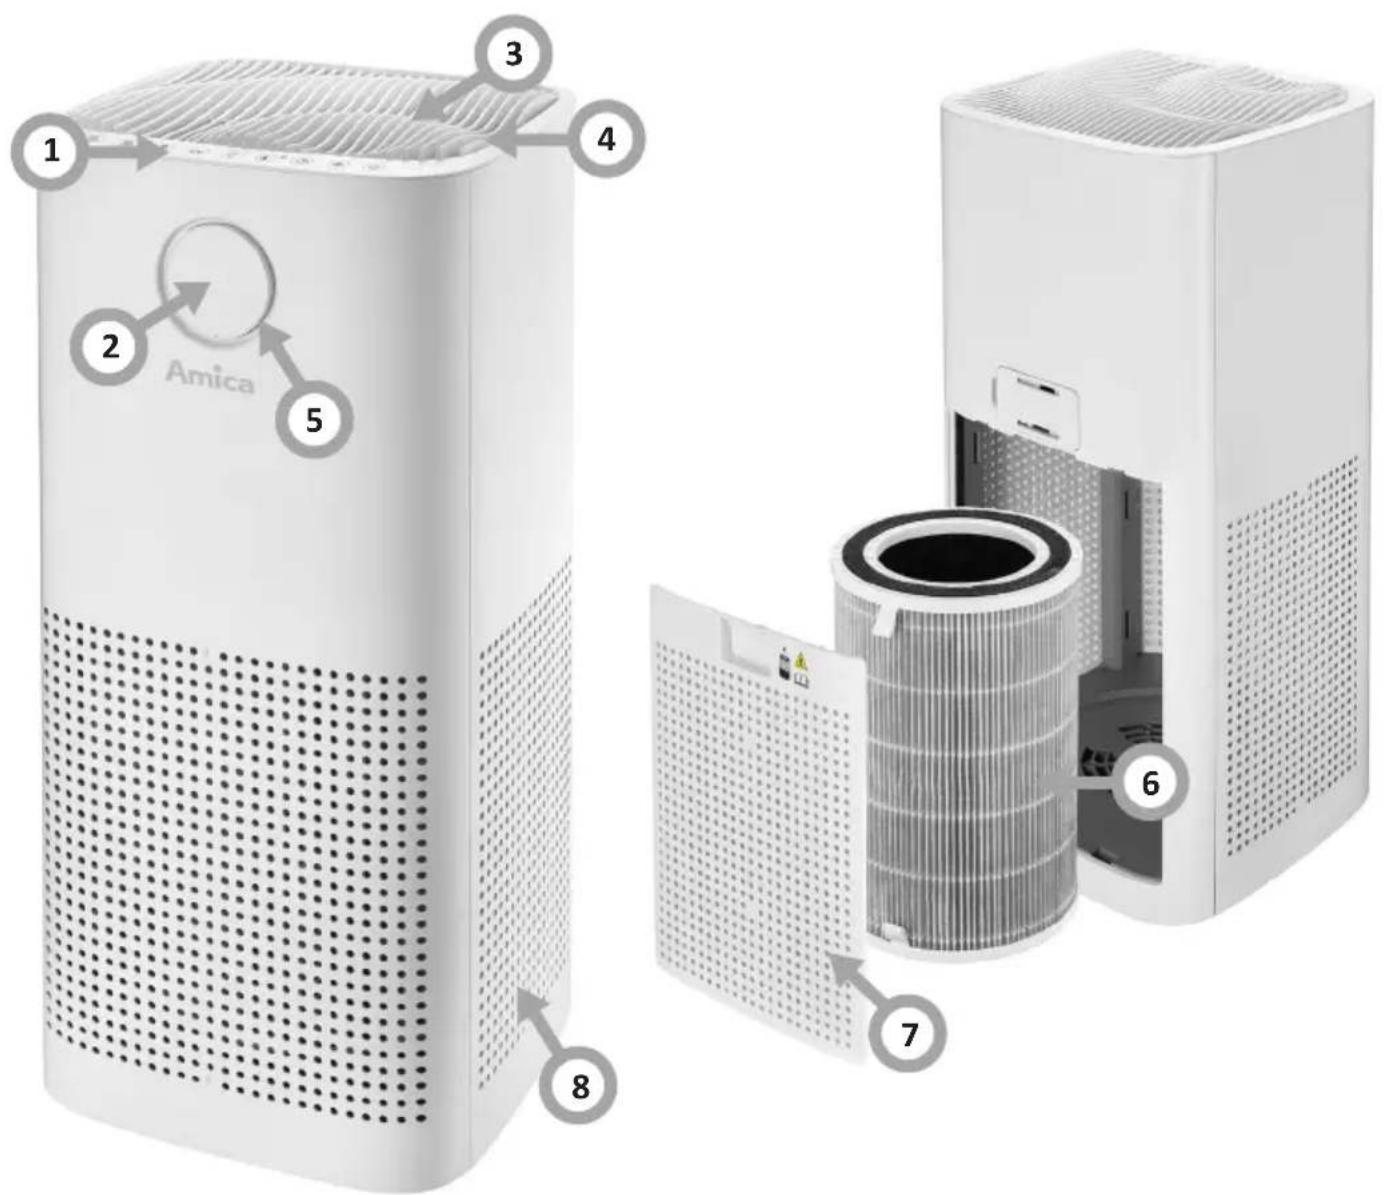
Features and components (Fig. 1)
- Control panel
- Display
- Filtered air outlet
- Top cover
- Light ring
- HEPA filter
- Filter cover
- Air inlet
Control panel (Fig. 2)
- PRE-FILTER

- HEPA RE-SET

- IONIZER

- UV

- NIGHT LIGHT

- SLEEP/LOCK

- TIMER

- SPEED/AUTO

- ON/OFF

Five Speed Settings

- There are five speed settings including Speed 1, Speed 2, Speed 3, Speed 4 and AUTO for selection. Press the "SPEED/AUTO" button on the control panel to select your desired speed. And the display will indicate the selected speed and its corresponding icon of selected speed will illuminate.
Timer

- There are four timing settings including 2H, 4H, 6H and 8H for selection. Press the “TIMER” button on the control panel to select your desired timing. And the display will indicate the selected timing and its corresponding icon of selected timing will illuminate.
Sleep
- The appliance will run under “Sleep” mode if the “Sleep” mode is activated so that the user can have a quite sleeping environment. Press the “SLEEP/LOCK” button on the control panel to enter into the “Sleep” mode, and the icon of “Sleep” mode shown in the display will illuminate.
Child lock

- All the buttons are invalid if the child lock function is activated. Hold and press the "SLEEP/LOCK" button on the control panel for 3 seconds to enter into the locking condition, and the icon of "Child lock" shown in the display will illuminate.
Night light

- The display and the light ring will turn off if the "Night light" mode is activated, and the middle part of the display will show "-". Press the "NIGHT LIGHT" button on the control panel to enter into "Night light" mode.
lonizer

- This appliance has an independent ionizer feature which, when turned on, releases negative ions into outgoing filtered air to help the air purification process, and the icon of ionizer shown in the display will illuminate.
UV lamp

- This appliance is equipped with a UV lamp, so that it has a strong bactericidal effect and the structure of microorganisms can be destroyed by the high energy of the ultraviolet spectrum. Press the “UV” button on the control panel to turn on the UV lamp and the icon of “UV” shown in the display will illuminate. The icon of “UV” shown in the display will illuminate in blue solidly to remind the user to eplace the UV lamp if the appliance has been operated for up to 7300 hours cumulatively.
HEPA reset

- The icon of "HEPA RE-SET" shown in the display will illuminate in red to remind the user to replace the filter if the appliance has been operated for up to 2160 hours cumulatively. After replace the filter, hold and press the "HEPA RE-SET" button for 3 seconds to reset the filter, and then the icon of "HEPA RE-SET" shown in the display extinguishes.
Filter cleaning
- The icon of "PRE-FILTER" shown in the display will illuminate in red to remind the user to clean the filter if the appliance has been operated for up to 360 hours cumulatively. After cleaning the filter, hold and press the "PRE-FILTER" button for 3 seconds to reset the filter, and then the icon of "PRE-FILTER" shown in the display extinguishes.
Air quality indicator
- There is a light ring equipped around the display to indicate the current air quality. When the value of PM2.5 is less than 35, the light ring is illuminated in blue, indicating that the air quality is very good. When the value of PM2.5 ranges between 36 and 115, the light ring is illuminated in purple, indicating that the air quality is good. When the value of PM2.5 is more than 115, the light ring is illuminated in red, indicating that the air quality is bad.
PRE-OPERATING INSTRUCTIONS
- Carefully unpack your air purifier.
- Select a firm level place where there are no obstructions to the air inlet or filtered air outlet.
- Press the tab of filter cover, and then pull the filter cover backwards to remove it.
- Detach the HEPA filter and then unpack the PE bag carefully.
- Replace the HEPA filter back in position, make sure that the primarily-efficient filter shall be pointed outwards.
- Replace the filter cover back in position.
IMPORTANT:
- Remove all PE bags from filters before use.
- Do not point filtered air outlet towards wall.
- Plug into a electrical outlet of 220V\~240/50\~60Hz, two beeps "Bi-Bi" can be heard.
- Press down the ON/OFF button, one beep "Bi" can be heard and its corresponding LED turns on, the light ring will illuminate in different color according to the current air quality and the display will show the value of PM2.5.
-
The air purifier starts to run under the default speed (AUTO setting). If you want to select other settings, you can press “SPEED/AUTO” button to select your desired speed setting. There are five speed settings including Speed 1, Speed 2, Speed 3, Speed 4 and AUTO for selection. After select, its corresponding LED will turn on.
-
You can activate the timer after turn on the air purifier and select your required speed setting by following the operation as below: press down "TIMER" button on the control panel, one beep "Bi" can be heard. There are 4 settings including 2H, 4H, 6H and 8H for selection. After select your required timing, its corresponding LED turns on. When the timer expires, the air purifier will power off automatically and the LED will extinguish.
- To activate the "Sleep" mode, press the "SLEEP/LOCK" button once to make the appliance enter into the "Sleep" mode, and then the corresponding icon of "Sleep" mode shown in the display illuminates.
- To activate the "Child lock" function, hold and press the "SLEEP/LOCK" button for 3 seconds to make the appliance enter into the locking condition, and then the corresponding icon of "Child lock" shown in the display illuminates.
- To make the appliance enter into "Night light" mode, press the "NIGHT LIGHT" button once, and then the display and the light ring turn off and the middle part of the display shows "-".
- To release negative ions into the filtered air, press the "IONIZER" button once, then the negative ions will be released into outgoing filtered air to help the air purification process, and the icon of ionizer shown in the display will illuminate.
- To activate the "UV lamp" function to sterilize, press the "UV" button on the control panel to turn on the UV lamp and the icon of "UV" shown in the display will illuminate. The icon of "UV" shown in the display will illuminate in blue solidly to remind the user to eplace the UV lamp if the appliance has been operated for up to 7300 hours cumulatively.
- If you want to make the air purifier stop running, just need to press “ON/OFF” button once. And the air purifier will stop working after hearing one beep “Bi”.
- Turn the air purifier off and unplug it before cleaning.
● The outside of the air purifier can be cleaned with a soft, clean and dampened cloth.
● The filtered air outlet and the filter cover can be cleaned of dust with a small, soft brush. - If you wish to clean the inside of the air purifier, please only use a dry, soft cloth to wipe it down.
- Do not wash the HEPA filter.
WARNING:
Do not allow moisture to come in contact with the main body of the air purifier.
FILTER REPLACEMENT INSTRUCTIONS
- On average, HEPA filter needs to be cleaned every 360 hours and replaced every 2160 hours. Filter life will vary depending on air quality and usage.
● Turn off and unplug the air purifier before attempting to replace the filter. - Press the tab of filter cover to open the cover and then remove the HEPA filter.
- Discard the old HEPA filter and do not attempt to clean. And then install a new HEPA filter well in position, make sure that the primarily efficient filter shall be pointed outwards.
- Replace the filter cover back in position.
TROUBLESHOOTING
| Problem Solution | |
| ● Unit will not operate. ● Decreased air flow. | ● Check to make sure the unit is plugged in. ● Check to make sure the unit is on. ● Make sure the filter is properly installed and firmly close the filter cover. ● Check condition of the filter and replace if necessary. ● Check to ensure nothing is blocking the air inlet and filtered air outlet. ● Please replace the HEPA filter if it has been operated for more than one year. ● Be sure the plastic bag has been removed from the filter. |
TROUBLESHOOTING
| ERROR CODE | DESCRIPTION OF THE FAULT | ACTION |
| E11 | At this time, the motor is in stall or over temperature protection state. | . After 10 minutes, it can be restarted by re plug the power supply. |
| E1 Motor locked or abnormal. | Need contact to the SERVICE CENTRE. | |
| E5 | The power supply is not connected due to the incorrect installation of the filter cover. | After the filter cover is covered again, the machine can return to the original operation mode. |
| E0 | The power supply is not connected because the filter is not installed properly. | After the filter is installed again, the machine can return to the original operation mode. |
| E2 | The dust sensor or the connecting line of the dust sensor is damaged. | Need contact to the SERVICE CENTRE. |
BLAHOPŘEJEME VÁM K VÝBĚRU ZNAČKY AMICA
natural_image
Recycling symbol composed of three chasing arrows forming a triangle (no text or labels)natural_image
Symbol of a trash bin crossed with diagonal lines, representing no waste or discharge (no text or labels)
natural_image
Simple line drawing of a three chasing recycling symbol (no text or labels)natural_image
Symbol of a trash bin crossed out by two diagonal lines (no text or numbers present)

- GWARANCJA I OBSŁUGA POSPRZEDAŻOWA
- Gwarancja
- THANK YOU FOR PURCHASING AN AMICA APPLIANCE
- DEAR CUSTOMER,
- CONTENTS
- WARRANTY AND AFTER SALES SERVICE
- Warranty
- Manufacturer's Declaration
- UNPACKING
- DISPOSAL OF OLD APPLIANCE
- SAFETY INSTRUCTIONS FOR USE
- DESCRIPTION OF THE APPLIANCE
- Features and components (Fig. 1)
- Control panel (Fig. 2)
- Five Speed Settings
- Timer
- Sleep
- Child lock
- Night light
- lonizer
- UV lamp
- HEPA reset
- Filter cleaning
- Air quality indicator
- PRE-OPERATING INSTRUCTIONS
- IMPORTANT:
- WARNING:
- FILTER REPLACEMENT INSTRUCTIONS
- TROUBLESHOOTING
- BLAHOPŘEJEME VÁM K VÝBĚRU ZNAČKY AMICA
Brand : AMICA
Model : APD 4011
Category : Air purifier