
Fixture Beam Analyzer - Lighting MARTIN - Free user manual and instructions
Find the device manual for free Fixture Beam Analyzer MARTIN in PDF.

| Product Type | Software for lighting fixture beam analysis |
| Brand | Martin (by Special Labs ApS) |
| Model | Fixture Beam Analyzer (FBA™) |
| Version | 2.6.0 (User Guide Revision B) |
| Platform | Microsoft Windows XP, Windows 7 |
| Required Port | USB 2.0 |
| Compatible Webcam | Logitech QuickCam Pro 9000 or Logitech Webcam Pro 9000 (Windows version) |
| Included Accessories | Filter holder, 4 attenuation filters (blue 7%, red 15%, green 25%, yellow 50%), license key |
| License Type | Single PC, requires internet for activation and transfer |
| Measurement Capabilities | Light intensity distribution, total lumens (cutoff 3%), one-tenth peak, half-peak intensities |
| Display Modes | Pseudo color, ISO, Gray, Gray pseudo |
| Export Formats | BMP, JPG, PNG (snapshots) |
| Distribution Curves | Horizontal and vertical cross-sections with color-coded intensity (green, red, orange) |
| Additional Tools | Cut lines, user measurement line, geometric center, help circles, half markers, rulers, grid |
| Peak Lumens Meter | Monitors peak cutoff, 1/10, and half-peak values; resettable |
| Gamma Correction | Adjustable (default 0.45) |
| Gray Correction | On/off for human vision realism |
| Number of Averages | Adjustable for measurement precision |
| Documentation | User guide in English, 22 pages |
| Language | English (manual available for download) |
Frequently Asked Questions - Fixture Beam Analyzer MARTIN
User questions about Fixture Beam Analyzer MARTIN
0 question about this device. Answer the ones you know or ask your own.
Ask a new question about this device
Download the instructions for your Lighting in PDF format for free! Find your manual Fixture Beam Analyzer - MARTIN and take your electronic device back in hand. On this page are published all the documents necessary for the use of your device. Fixture Beam Analyzer by MARTIN.
USER MANUAL Fixture Beam Analyzer MARTIN
Fixture Beam Analyzer™
User Guide

User Guide Revision B, covering Fixture Beam Analyzer™ version 2.6.0
©Special Labs ApS, 2010-2012
END-USER LICENSE AGREEMENT
IMPORTANT! PLEASE READ THE TERMS AND CONDITIONS OF THIS LICENSE AGREEMENT CAREFULLY BEFORE CONTINUING WITH THIS PROGRAM INSTALL.
SPECIAL LABS End-User License Agreement ("EULA") is a legal agreement between you (either an individual or a single entity) and SPECIAL LABS for the SPECIAL LABS FIXTURE BEAM ANALYZER software product which may include associated software components, media, printed materials, and "online" or electronic documentation. By installing, copying, or otherwise using FIXTURE BEAM ANALYZER, you agree to be bound by the terms of this EULA. This license agreement represents the entire agreement concerning the program between you and SPECIAL LABS, (referred to as "licenser"), and it supersedes any prior proposal, representation, or understanding between the parties. If you do not agree to the terms of this EULA, do not install or use FIXTURE BEAM ANALYZER.
FIXTURE BEAM ANALYZER is protected by copyright laws and international copyright treaties, as well as other intellectual property laws and treaties. FIXTURE BEAM ANALYZER is licensed, not sold. For every computer this software is installed on there MUST be a unique license.
1. GRANT OF LICENSE
FIXTURE BEAM ANALYZER is licensed as follows:
(a) Installation and Use.
SPECIAL LABS grants you the right to install and use copies of FIXTURE BEAM ANALYZER on your computer running a validly licensed copy of the operating system for which FIXTURE BEAM ANALYZER was designed [e.g., Windows XP, Windows Vista, Windows 7].
(b) Backup Copies.
You may also make copies of FIXTURE BEAM ANALYZER as may be necessary for backup and archival purposes.
2. DESCRIPTION OF OTHER RIGHTS AND LIMITATIONS
(a) Maintenance of Copyright Notices.
You must not remove or alter any copyright notices on any and all copies of FIXTURE BEAM ANALYZER.
(b) Distribution.
You may not distribute registered copies of FIXTURE BEAM ANALYZER to third parties. Evaluation versions if available for download from SPECIAL LABS' websites may be freely distributed. (c) Prohibition on Reverse Engineering, Decompilation, and Disassembly.
You may not reverse engineer, decompile, or disassemble FIXTURE BEAM ANALYZER, except and only to the extent that such activity is expressly permitted by applicable law notwithstanding this limitation. (d) Rental.
You may not rent, lease, or lend FIXTURE BEAM ANALYZER. (e) Support Services.
SPECIAL LABS may provide you with support services related to FIXTURE BEAM ANALYZER ("Support Services"). Any supplemental software code provided to you as part of the Support Services shall
be considered part of FIXTURE BEAM ANALYZER and subject to the terms and conditions of this EULA.
(f) Compliance with Applicable Laws.
You must comply with all applicable laws regarding use of FIXTURE BEAM ANALYZER.
3. TERMINATION
Without prejudice to any other rights, SPECIAL LABS may terminate this EULA if you fail to comply with the terms and conditions of this EULA. In such event, you must destroy all copies of FIXTURE BEAM ANALYZER in your possession.
4. COPYRIGHT
All title, including but not limited to copyrights, in and to FIXTURE BEAM ANALYZER and any copies thereof are owned by SPECIAL LABS or its suppliers. All title and intellectual property rights in and to the content which may be accessed through use of FIXTURE BEAM ANALYZER is the property of the respective content owner and may be protected by applicable copyright or other intellectual property laws and treaties. This EULA grants you no rights to use such content. All rights not expressly granted are reserved by SPECIAL LABS.
5. NO WARRANTIES
SPECIAL LABS expressly disclaims any warranty for FIXTURE BEAM ANALYZER. FIXTURE BEAM ANALYZER is provided 'As Is' without any express or implied warranty of any kind, including but not limited to any warranties of merchantability, non-infringement, or fitness of a particular purpose. SPECIAL LABS does not warrant or assume responsibility for the accuracy or completeness of any information, text, graphics, links or other items contained within FIXTURE BEAM ANALYZER. SPECIAL LABS makes no warranties respecting any harm that may be caused by the transmission of a computer virus, worm, time bomb, logic bomb, or other such computer program. SPECIAL LABS further expressly disclaims any warranty or representation to Authorized Users or to any third party.
6. LIMITATION OF LIABILITY
In no event shall SPECIAL LABS be liable for any damages (including, without limitation, lost profits, business interruption, or lost information) rising out of 'Authorized Users' use of or inability to use FIXTURE BEAM ANALYZER, even if SPECIAL LABS has been advised of the possibility of such damages. In no event will SPECIAL LABS be liable for loss of data or for indirect, special, incidental, consequential (including lost profit), or other damages based in contract, tort or otherwise. SPECIAL LABS shall have no liability with respect to the content of FIXTURE BEAM ANALYZER or any part thereof, including but not limited to errors or omissions contained therein, libel, infringements of rights of publicity, privacy, trademark rights, business interruption, personal injury, loss of privacy, moral rights or the disclosure of confidential information.
Contents
Introduction 4
License information 4
What does FBA™ measure and why? 4
Installing and setting up the webcam....5
Installing the webcam 5
Setting up the webcam 6
Installing FBA™ 7
Setting up FBA™ 7
Basic settings 7
Adjusting sensitivity....9
Setting up a reference for luminous intensity values....11
Setting up a length reference 13
Using FBA ^TM 14
Distribution panel display modes....14
Distribution Curves 16
Additional tools....18
Peak Lumens meter....19
Exporting images 19
Advanced FBA™ Settings 19
Other commands....20
Troubleshooting....20
Specifications 22
Introduction
Thank you for purchasing Fixture Beam Analyzer™ (FBA™).
FBA ^™ is a Windows application that gives numerical data, light distribution curves, distribution diagrams and ISO curves that you can export as images to provide an accurate analysis of the intensity of a lighting fixture at all points within its beam. It is especially useful for technicians, optics specialists and lighting developers who need to analyze fixtures and make lamp or other setup adjustments.
FBA™ uses a standard webcam (Logitech Webcam/QuickCam Pro 9000 recommended, not included) to analyze a lighting fixture's output projected onto almost any surface. FBA™ takes the guesswork out of correctly setting up lighting fixtures. It provides accurate data that is close to what you can normally only obtain using a very expensive goniophotometer. FBA™ allows virtually anyone to quickly optimize output and obtain an even beam. Fixtures that are correctly set up are brighter and more efficient, with optimal color rendition. Groups of fixtures that are set up with FBA™ – at the same time or at different times – are more closely matched.
FBA ^TM is supplied as a set that contains:
• A filter holder designed to clip onto the Logitech Webcam/QuickCam Pro 9000
- A set of four color-coded attenuation filters
- A license key
License information
Make a record of your license key (see the label under the lid of the FBA ^™ box) and keep it safe.
FBA™ can be run on one PC at a time. You will need to uninstall it by clicking the Uninstall menu item while your PC is connected to the Internet before you can install it on another PC.
What does FBA ^TM measure and why?
FBA ^™ measures the light intensity distribution in the projection from a light source. It gives you various types of distribution images as well as distribution curves along horizontal and vertical cross-sections of your choice. FBA ^™ gives figures for total lumens (also known as overall, cutoff or 3%), one-tenth peak (10%) and half-peak (50%) intensities.
In entertainment lighting (shows/stage/TV and movie studios/concerts, etc.), one-tenth peak and total lumens figures normally give the most useful data, because this
environment can be blacked out. When a space such as a theatre is blacked out, output from a fixture tends to be visible where intensity is above one-tenth of the peak level.
In architectural lighting, half-peak and total lumens figures normally give the most useful data, because ambient stray light in building environments generally cannot be controlled. When stray light (from other buildings and street lighting, for example) is present, output from a fixture tends to be visible only where intensity is above half the peak level.
Installing and setting up the webcam
Important! Connect and install your webcam BEFORE you install FBA ^™ .
FBA™ was designed for use with the Logitech Webcam Pro 9000 or QuickCam Pro 9000 (Windows version). This webcam, with its Carl Zeiss optics and software features, offers good quality and ease of use at an affordable price. It is possible to use other good-quality manually controllable webcams with FBA™, but we cannot guarantee satisfactory results or offer any guidance on using these devices.
Installing the webcam
- Obtain a Logitech Webcam Pro 9000 or QuickCam Pro 9000 (Logitech model number V-UBM46) for Windows
- Obtain Logitech Webcam Software version 2.31 that includes drivers for this webcam (the generic Windows webcam driver is not suitable because it does not contain features that you will need). The latest Logitech Webcam Software package is available for download from www.logitech.com.
- Connect the webcam to your PC via USB and install it using the Logitech Webcam Software package. You normally need to restart your PC after installing the webcam driver.
Setting up the webcam
To set up the webcam, open the Logitech Webcam Software Controls, open Advanced Settings and check that the following settings are selected as a starting point. You may need to come back and change some of them later, especially Exposure and Gain.
- Unmark the RightLight checkbox.
- Unmark the Auto checkbox for Exposure and Gain.
- Leave Brightness, Contrast and Color Intensity at their default settings.
- Unmark the Auto checkbox for White Balance and move the White Balance slider until it is approximately at the center of its range (this corresponds to approx. 5500 nm).
- Select the correct Anti Flicker radio button depending on the mains power frequency in your region: 50 or 60 Hz.
- Leave Image orientation at Normal.
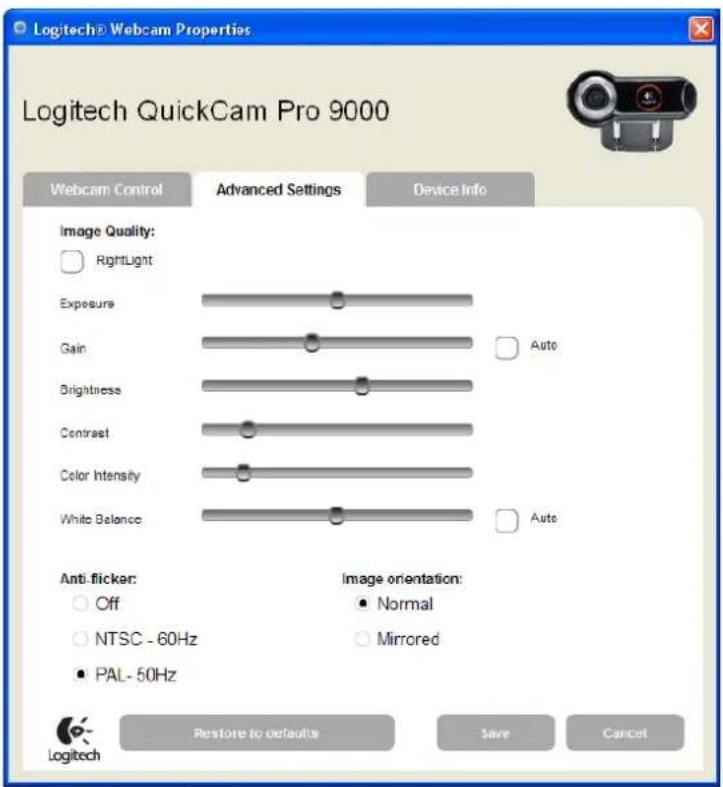
These are the settings in Logitech Webcam Software version 2.31. They are liable to change if a later version becomes available.
Important! Connect and install the webcam BEFORE you install FBA™.
To install FBA™:
- Go to www.speciallabs.com and navigate to 'Downloads' where you will find the FBATM installer file.
- Have your license key ready (see the label under the lid of the FBA™ box). Your PC must be connected to the Internet when you install FBA™ so that you can unlock the application with the license key.
- Run the FBA™ installer program and enter your license key when asked. Installation takes a few seconds.
Setting up FBA™
You need to set up FBA™ and the webcam before you can use it. This will only take a few minutes the first time you do it, and once you are familiar with FBA™ it is a very quick operation.
When you use FBA™ for the first time (or when you analyze a different fixture or change the distance to the projection surface, for example), you will probably need to adjust the sensitivity of the FBA™/webcam setup to match the intensity of the beam projection you want to analyze. The brighter the beam, and the nearer the fixture and webcam are to the projection surface, the more critical the setup becomes and the finer the sensitivity adjustments you will need to make.
Basic settings
To set up FBA™:
-
Start up the lighting fixture you want to analyze with its beam projecting directly onto a flat, even surface. Use a white surface with a matt finish. Avoid projecting at an angle.
-
Start your PC with the webcam positioned as close to the front lens as possible, making sure that it has a full view of the output from the lighting fixture. Position the webcam as close as possible to the center of the beam projection.

natural_image
Black remote light projector with thermal imaging display next to a laptop (no visible text or symbols)- Start FBA™. You will see this startup window:

- Click on Video Options in the top menu bar and select the webcam you will use together with FBA™:

Note that you cannot change the webcam's resolution while FBA™ is capturing video. If you want to change the resolution, click on Stop capturing in the top left of the window first.
- With the webcam working, the FBA™ window should look something like this:

The lumen values in this image are too high. You will correct this when you adjust sensitivity and set a reference length as described later.
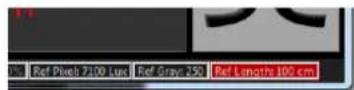
There are red boxes in the status bar at the bottom of the window. In the Fixt.-Scrn. Dist. box, enter the distance from the fixture to the projection surface in centimeters.
Adjusting sensitivity
The secret to good measurement is setting the system up so that the input signal is as strong as possible while at the same time avoiding saturation, and the easiest way to achieve this is to experiment with the supplied attenuation filters, webcam settings and FBA™ settings until you find the right combination. You should aim for the optimum amount of gain but avoid saturation:
- If gain is too low, the distribution curves in the side and bottom panes will be too low, with either a very small green intensity area or no green area at all. It will be difficult to see differences in intensity, or differences in intensity may not be displayed at all.
- If gain is too high, FBA™ intensity analysis will be saturated: the distribution curves in the side and bottom panes will be too high. They will look like wide, flat plateaus with steep sides and a very large red (highest) intensity area. It will be
difficult to see differences in intensity because these differences will be tightly packed into the edges of the curves.
Webcam/FBA™ setup sensitivity
To configure the sensitivity of your webcam/FBA™ setup, you experiment with the supplied attenuation filters and the Logitech Webcam Software Exposure and Gain settings to obtain the best sensitivity level:
- Clip the supplied filterholder onto the Logitech webcam so that you can place attenuation filters in front of the lens, and experiment with the supplied filters until you obtain the best results. Filters are color-coded as follows:
- Blue 7% transmission, darkest filter
o Red 15% transmission
o Green 25% transmission
o Yellow 50% transmission, lightest filter
- If necessary, open the Logitech Webcam Software. See 'Installing and setting up the webcam' on page 5. Unmark the RightLight checkbox and unmark the Auto checkbox for Exposure and Gain. Adjust Exposure and Gain sliders to obtain the most useable results:
o Exposure defines the time that each CCD pixel in the webcam is stimulated.
- Gain defines the sensitivity of each CCD pixel.
If you have difficulty getting access to the Logitech Webcam Software Advanced Settings window while FBA ^™ is running, see the solution in the Troubleshooting section at the end of this User Guide.
Setting up a reference for luminous intensity values

To give FBA™ a reference point so that it can give you accurate intensity data, you must place a light meter in a reference spot in the beam projection and take a reading in lux. You then enter this reading into FBA™:
- Mark a reference spot on the projection surface (it may help if you temporarily stick a post-it note, for example, to the surface).
- Hold a light meter facing the beam at this spot and measure the value in lux that you obtain.
- Now go back to your PC, hold CTRL on your keyboard pressed down and left-click on this spot in the image of the beam projection in the FBA™ main panel.

-
A countdown starts while FBA ^TM processes data. As the countdown number decreases, FBA ^TM displays the values and the overall average value it has measured for the pixel that you have selected.
-
When the countdown reaches zero, a pop-up box appears. Enter the value in lux that you measured using the meter at the reference point and click on OK. The Pixel Lux box at the bottom of the window will now show that value.
-
The Ref. Pixel Val. box will show the value from zero to 255 that FBA ^TM is now using for the maximum intensity. If this value reaches 255, FBA ^TM may be saturating, meaning that it cannot display high intensities correctly, so keep this figure at 253 or below. If Ref. Pixel Val. is over 253, put a filter with higher attenuation (lower transmission, a darker filter) into the filterholder in front of the webcam and repeat the process of setting up a reference point described above.
Setting up a length reference
Setting a 'length' reference allows FBA™ to calculate beam angles based on the size of the projection that the webcam captures. Before you set the length reference, check that you have correctly entered the distance from the webcam to the projection surface in the Cam.-Scrn. Dist. box.
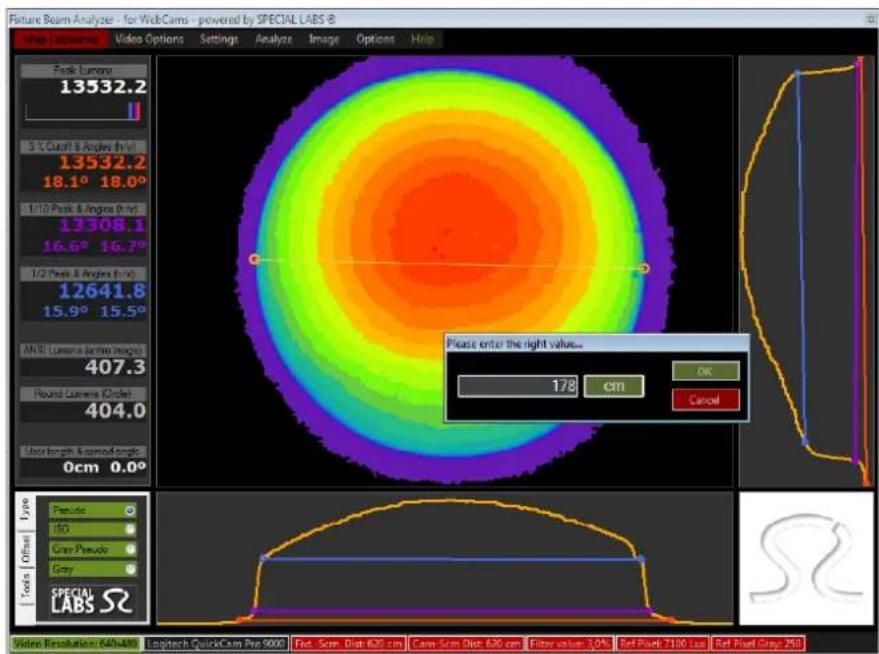
To set the 'length' reference:
-
Position an object with a known length on the projection surface.
-
View the object on your PC screen. Hold SHIFT on your keyboard pressed down and left-click on one end of the object to define the start position. Then right-click-and-drag the cursor arrow to the other end of the object and release the right mouse button.
-
The pop-up box below appears. Enter the actual length of the object in centimeters and click on OK.

Tip: It does not matter where you make this length reference measurement on the image. Its purpose is simply to set up FBA™ with a reference to use when calculating beam angles. The longer the object you use, the more accurately you can indicate its length on your PC screen.
Using FBA™
Before you use FBA ^™ to analyze a beam, make sure that the boxes in the status bar at the bottom of the screen contain the correct values:
- If a box is gray, FBA™ will use the values in the box.
- If a box is red, FBA is waiting for input from you. If the correct value is already in the box, just click on the box and then click on OK. The box will change from red to gray. If you enter a wrong value, simply repeat your action, entering the correct value.
Distribution panel display modes
FBA™ can display the light distribution of a fixture's beam in four different display modes:
- Pseudo colors
• ISO
- Gray and Gray Pseudo
Pseudo Color mode
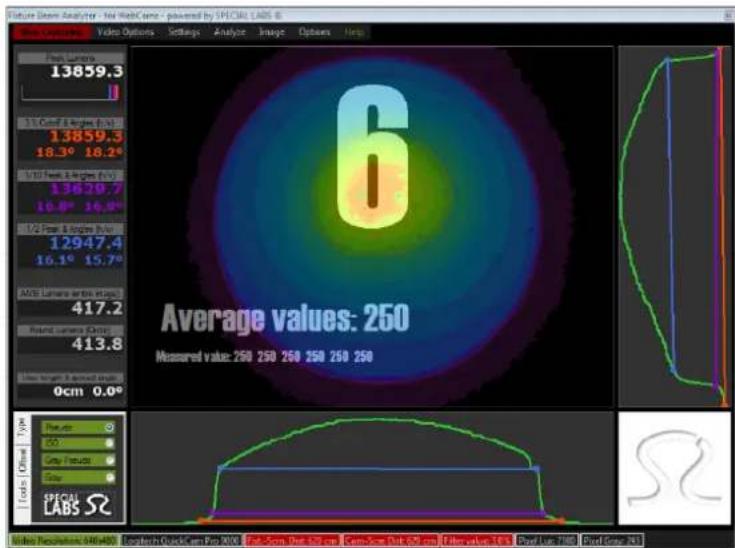
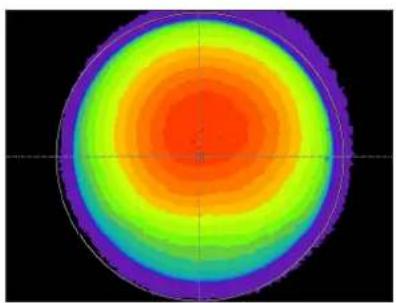
Pseudo Colors are colors from red to purple that FBA™ uses to give a visual representation of luminous intensity in the distribution panel. Each Pseudo Color band represents a 5% reduction in lumens value, starting with red (\~100%) and ending with purple (3%). Black is used to represent values below the cutoff value of 3%. The 3% cutoff value is especially useful when analyzing the beam from a wash fixture that does not have a sharp border.
Clicking on Legend in the Help menu displays the pseudo colors used and the intensity levels they represent.
Note that the pseudo colors used in the distribution panel are not related to the colors used for the distribution curves in the lower and right-hand panels and the cutoff, 1/10 and half-peak figures in the boxes on the left of the window.

ISO mode


The background color for the ISO display mode can be changed in the menu item Settings -> ISO Background. Changing the background color can be useful for matching the paper color in printed reports or background color in presentation software, for example.
Gray and gray pseudo modes

FBA™ carries out all colorizing operations and calculations in the CPU (and not in the graphics card's MCU). Gray and Gray pseudo modes are the least CPU-intensive and are fastest, allowing the highest frame rate.
Distribution Curves

natural_image
Color-coded concentric ring pattern with a 3D structural diagram below (no text or symbols)Curve shape
The distribution curves at the bottom and on the right of the FBA™ window are horizontal and vertical cross-sections of the beam. They give a graphic representation of distribution in the beam, and their shape shows distribution characteristics. For example:
- A distribution curve with a pointed peak indicates that the beam has a hot-spot.
- A distribution curve with a 'plateau' (i.e. a wide, flat area in the center of the beam) indicates an even intensity distribution in the center of the beam.
- A dip in the center of the distribution curve indicates that the beam has a cold-spot.
Curve color
The color of the distribution curves gives the following indications:
- If a distribution curve is green, FBA™ is receiving useable data, and the setup is working correctly. Check that the curve is high enough to provide a good range of data. If the curve is very low and flat, you may need to use a filter with lower attenuation (a lighter filter) or increase gain.
- If a distribution curve is red, the light input level is exceeding the maximum. Reduce the light input level by:
o. Placing a lower transmission (darker) filter in front of the webcam.
o. Adjusting the Time and Exposure settings in the Logitech Webcam Software
- Adjusting the gain settings in FBA.
- If a distribution curve is orange, FBA™ is measuring too many pixels at the same level. This is probably due to incorrect adjustment. Try adjusting gain and/or exposure to obtain more useable data.
Cut Lines
natural_image
Circular gradient heatmap pattern with concentric rings and a small inset diagram of a mechanical part (no text or symbols)
natural_image
Thermal or heat map visualization of a circular object with concentric rings and a small inset diagram (no text or symbols)
natural_image
Thermal or heat map visualization of a circular object with concentric rings and a small inset diagram below (no text or symbols)Cut Lines define the horizontal and vertical cross-sections of the beam that FBA ^TM uses to produce the Distribution Curves in the panels at the bottom and on the right of the FBA ^TM window (see above).
You can adjust the positions of the Cut Lines by clicking-and-dragging the ends of the lines. Move the cursor over the end of a line until the cursor icon changes to show that you have control over the line. Then left-click-and-drag to move the line with the mouse. Release the mouse button when you are happy with the position of the line.
Use Settings → Show Cut Lines → Zero Cut Lines to return the cut lines to their center positions.
Additional tools
natural_image
Circular gradient heatmap with concentric rings from red to purple, no text or symbols present
natural_image
Color gradient circular pattern with concentric rings and two marked points (no text or symbols)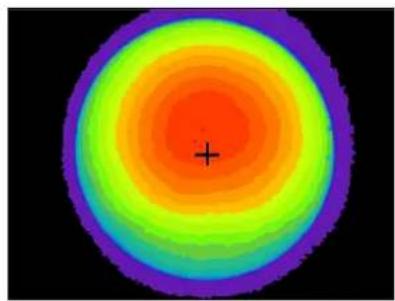
natural_image
Circular gradient pattern with concentric rings and a central crosshair (no text or symbols)Cut Lines User Measurement Geometric center
Besides the Cut Lines described above, other markup and display tools are available in the Settings menu:
- A User Measurement line can be drawn anywhere in the main panel by left-clicking and dragging. The values for this line are displayed in the left-hand panel.
- Geometric Center places a cross in the geometric center of the area inside the 3% cutoff angle. You can use this point to help you decide where to position the Cut Lines.
- Show Help Circles displays a circle in the distribution panel to help you assess how circular the beam projection is. If the fixture is not aimed at 90° to the projection surface, for example, Show Help Circles will help you see this.
- Half Markers displays horizontal and vertical lines that meet in the geometric center* of the beam projection in the distribution panel.
*The geometric center is the center with reference to the points that are furthest to the left, right, top and bottom of the beam projection.
• Show Rulers lets you draw a line on your screen in the distribution panel that FBA™ will then measure.
If you hold the Shift key pressed down while you left-click-and-drag, FBA™ lets you enter a new Reference length (or click on Cancel if you do not want to change the existing Reference length).
- Left-click-and-drag to draw a User measurement line. The length of this line and the beam angle that it corresponds to is displayed on the left of the window.
- Show grid displays 10% incremental lines in the Distribution Curves. You must also restart capturing (click on Stop Capturing, then Start Capturing) to activate/deactivate this feature.
Peak Lumens meter


The Peak Lumens meter constantly monitors the peak values of the cutoff (3%), one-tenth and half-peak lumens values:
- The peak figure (79758.8 and 13532.2 in the examples above) shows the peak cutoff value in lumens. The highest value measured is held. Press ENTER on your keyboard to reset this value.
- The cutoff, one-tenth and half-peak bars are displayed in the colors chosen for these values everywhere in the program. They move constantly when you adjust the fixture. To get the highest lumens output from the fixture, adjust it until these bars are as far to the right as possible.
Exporting images
Snapshots
You can capture snapshot images from FBA™ and export them to other programs (word-processing, spreadsheet, graphics or presentation programs, for example) to record or present data.
Snapshots of the distribution panel include all the elements (such as the rulers, for example) that you can see on your screen. If you do not want these elements to be included, hide them before you take the snapshot.
To take a snapshot of the current view in the distribution panel, press the space bar on your keyboard. The snapshot is held in memory FBA™ and can be saved as a BMP, JPG or PNG file using the Save as... command.
Advanced FBA™ Settings
The Analyze menu gives control over some advanced settings in FBA™:
- Nr. of averages shows the number of averaged measurements taken to find the intensity value of a certain point and lets you adjust this number. Increasing the number of averages will give more precise data, but it increases the number of calculations the CPU must make so FBA™ will run slower.
- Gamma correction shows the degree of gamma correction encoding applied to the intensity data from the webcam and lets you adjust this value. The default value is 0.45, which will normally give satisfactory results.
- Gray corrected, when applied, takes color reception on the retina of the human eye into account to give more realistic measurement of intensity in terms of human vision and intensity perception. Turning gray correction on or off will give a small difference in some cases.
Other commands
In the Help menu:
- Tips and Tricks displays a list of the main keyboard shortcuts available in FBA™.
- About gives information about FBA™.
- Legend displays the colors used to represent intensities in the main distribution panel (see 'Pseudo Color mode' on page 14).
- Uninstall FBA... lets you carry out a clean uninstall. Uninstall FBA™ while your PC is connected to the Internet if you want to install FBA™ on another PC.
Troubleshooting
I can't get usable results
You may not have adjusted your setup to match the light intensity of the beam correctly. You may need to experiment a little to obtain the best setup. See 'Adjusting sensitivity' on page 9.
I am having problems adjusting the sensitivity of the webcam
Adjusting the sensitivity of the setup involves experimentation until you find the levels that give the best results. Adjustment should not take long once you are familiar with the setup, but you may need to spend a little extra time experimenting in the beginning when you are new to the system. Here are a couple of tips that may help you:
- In the Logitech Webcam Software, open the RightLight Settings tab and turn on Automatic Settings in the Logitech Webcam Software by marking the Automatic Settings checkbox. The software will set the webcam's Exposure and Gain automatically.
-
Unmark the Automatic Settings checkbox to return to manual control. The Gain and Exposure sliders will stay in the positions they were set to automatically. You can now use these positions as starting points for manual adjustments.
-
In the Logitech Webcam Software Advanced Settings tab, make sure that the Auto checkbox by the White Balance slider is unmarked and that the slider is approximately in the middle of its range.
I am having problems accessing Logitech Webcam Software to adjust the webcam settings while I am running FBA.
Unlike previous versions, Logitech Webcam Software version 2.31 can sometimes become difficult to access while FBA is running. Here is the solution:
-
Press Ctrl+Alt+Del to open the Windows Task Manager. Open the Processes tab, select the process called CameraHelperShell.exe and then close it down by clicking on the End process button.
-
Find the Logitech icon in the Taskbar at the bottom right of your screen near the clock and right-click on it to open the Logitech© Webcam Software menu. Click on Logitech© Webcam Controller.
-
The Logitech© Webcam Controller window opens. Click on Webcam options to open the list of options at the bottom of the window.
-
Click on Advanced Settings at the bottom of the window to open the Logitech Webcam Properties mixer (see 'Setting up the webcam' on page 6). You can now make adjustments as described on page 6 while FBA is running.

Requirements
OS: Microsoft Windows XP, Windows 7
I/O: SB 2.0 port
Webcam: Logitech QuickCam Pro 9000 for Windows (minimum), Logitech Webcam Pro9000 for Windows (recommended)
Note that the Logitech Webcam Pro 9000 for Business is supplied with a wide lens.
Attenuation filters
- Blue 7% transmission, darkest filter
o Red 15% transmission
o Green 25% transmission
o Yellow 50% transmission, lightest filter
- Fixture Beam Analyzer™
- User Guide
- User Guide Revision B, covering Fixture Beam Analyzer™ version 2.6.0
- ©Special Labs ApS, 2010-2012
- END-USER LICENSE AGREEMENT
- GRANT OF LICENSE
- DESCRIPTION OF OTHER RIGHTS AND LIMITATIONS
- TERMINATION
- COPYRIGHT
- NO WARRANTIES
- LIMITATION OF LIABILITY
- Contents
- Introduction
- License information
- What does FBA TM measure and why?
- Installing and setting up the webcam
- Installing the webcam
- Setting up the webcam
- Setting up FBA™
- Basic settings
- Adjusting sensitivity
- Webcam/FBA™ setup sensitivity
- Setting up a reference for luminous intensity values
- Setting up a length reference
- Using FBA™
- Distribution panel display modes
- Pseudo Color mode
- ISO mode
- Gray and gray pseudo modes
- Distribution Curves
- Curve shape
- Curve color
- Cut Lines
- Additional tools
- Peak Lumens meter
- Exporting images
- Snapshots
- Advanced FBA™ Settings
- Other commands
- Troubleshooting
- I can't get usable results
- I am having problems adjusting the sensitivity of the webcam
- Requirements
- Attenuation filters
Brand : MARTIN
Model : Fixture Beam Analyzer
Category : Lighting