
FA40 - Network router OpenVox - Free user manual and instructions
Find the device manual for free FA40 OpenVox in PDF.

| Product Type | Failover Box for Analog PSTN Lines |
| Brand | OpenVox |
| Model | FA40 |
| Dimensions (L x W x H) | 285 mm x 110 mm x 34 mm |
| Weight | Approximately 500 g |
| Power Supply | USB bus-powered (USB 2.0/1.1, Type B connector) |
| Power Consumption | Low (USB bus power) |
| Number of Standby Telephones | Up to 4 analog phones |
| Automatic Failover | Switches PSTN to analog phone on server power loss or Asterisk failure |
| Software Watchdog | Supported via Asterisk module res_failover.so |
| Compatible Operating Systems | Linux distributions with FTDI driver support |
| Supported PBX Software | Asterisk (1.2/1.4/1.6), Elastix, Trixbox |
| Compatible Analog Cards | OpenVox, Digium, Sangoma, and other compatible cards |
| Power Indicators | 4 LED lights |
| Warranty | 5 years |
| Enclosure Material | Plastic |
| Maintenance | Clean with a dry, soft cloth; avoid liquids |
| Safety | Use only with compatible USB ports and within specified voltage range |
| Spare Parts and Repairability | Contact manufacturer for service; no user-serviceable parts inside |
Frequently Asked Questions - FA40 OpenVox
dmesg | grep FTDI or lsusb. Then install the Asterisk module as described in the manual./etc/asterisk/failover.conf file. Set the device name (e.g., [openvox_failover_1]), USB device path (e.g., device=/dev/ttyUSB0), and optionally adjust the watchdog interval and autorun settings.dmesg | grep FTDI to verify driver detection. If not detected, try a different USB port or check for missing FTDI drivers.failover start to start all devices (or failover start 1 for a specific unit), and failover stop to stop them. Use failover show to view status.User questions about FA40 OpenVox
0 question about this device. Answer the ones you know or ask your own.
Ask a new question about this device
Download the instructions for your Network router in PDF format for free! Find your manual FA40 - OpenVox and take your electronic device back in hand. On this page are published all the documents necessary for the use of your device. FA40 by OpenVox.
USER MANUAL FA40 OpenVox
OpenVox
OpenVox-Best Cost Effective Asterisk Cards
OpenVox Communication Co. Ltd.
Address: F/2, Building No.14, Shangsha Science & Technology Park, No.9283, Binhe
Road, Futian District, ShenZhen, Guangdong 518048, China
Tel:+86-755-82535095,82535461,
Fax:+86-755-82535174
Email for Sales: sales@openvox.com.cn
Email for Technical Support: support@openvox.com.cn
Business Hours: 9:00AM-18:00PM from Monday-Friday
Website: www.openvox.cn
Thank You for Choosing OpenVox Products!
Contents
FA40 Description....4
FA40 Features 4
FA40 Installation Guide....5
Hardware Connection ....5
Device Driver Detection 6
FA40 Working Instruction....7
FA40 Software Installation 9
Software Download....9
Software Installation....9
Explanation of Configuration Files....11
Steps to Use....11
Software Installation by the res_failover.so....12
Technical Support 13
Reference 13
FA40 Description
In most of the time, users need to reconnect the PSTN line to analog telephone to get it work when the PBX Server becomes power off. It may cause only a little extra work for people who use simple and small PBX servers. But for those who run complex PBXs in server rooms, it becomes real problems.
How to eliminate this problem? The release of OpenVox FA40 failover box for analog line answers it. The FA40 can automatically switch the PSTN line to analog telephone when the power of the PBX server has been cut off and will automatically switch back to normal when the power is on again. In this way, no more worries about getting the PSTN line connected to the telephone when the server is down.
FA40 is controlled through an Asterisk loadable module res_failover.so. This module keeps sending “running” signal to FA40 when Asterisk is running. Once Asterisk is down or system power is cut off, the module will not be able to send out the “running” signal to FA40 and thus FA40 will automatically switch to the standby telephone.
FA40 provides a reliable and flexible solution to Asterisk PBX.
FA40 Features
- Easy installation; uses USB to connect computer or server.
● Industry standard USB type B connector. - USB 2.0 and 1.1 compliant.
● Low power consumption, takes power from USB bus. - Standard length type A to type B cable provided.
● Supports software watchdog.
● Supports up to 4 standby telephones.
● Supports multiple FA40 devices in one system.
● Fully supports Asterisk (Version1.2/1.4/1.6).
● Supports Elastix, Trixbox.
● Small plastic enclosure: 285mm x 110mm x 34mm
● 4 power supply indicator lights. - 5 year warranty.
● Supports all OpenVox analog cards, Digium, Sangoma analog cards and other compatible analog cards.
FA40 Installation Guide
Hardware Connection
FA40 Connection Instruction:
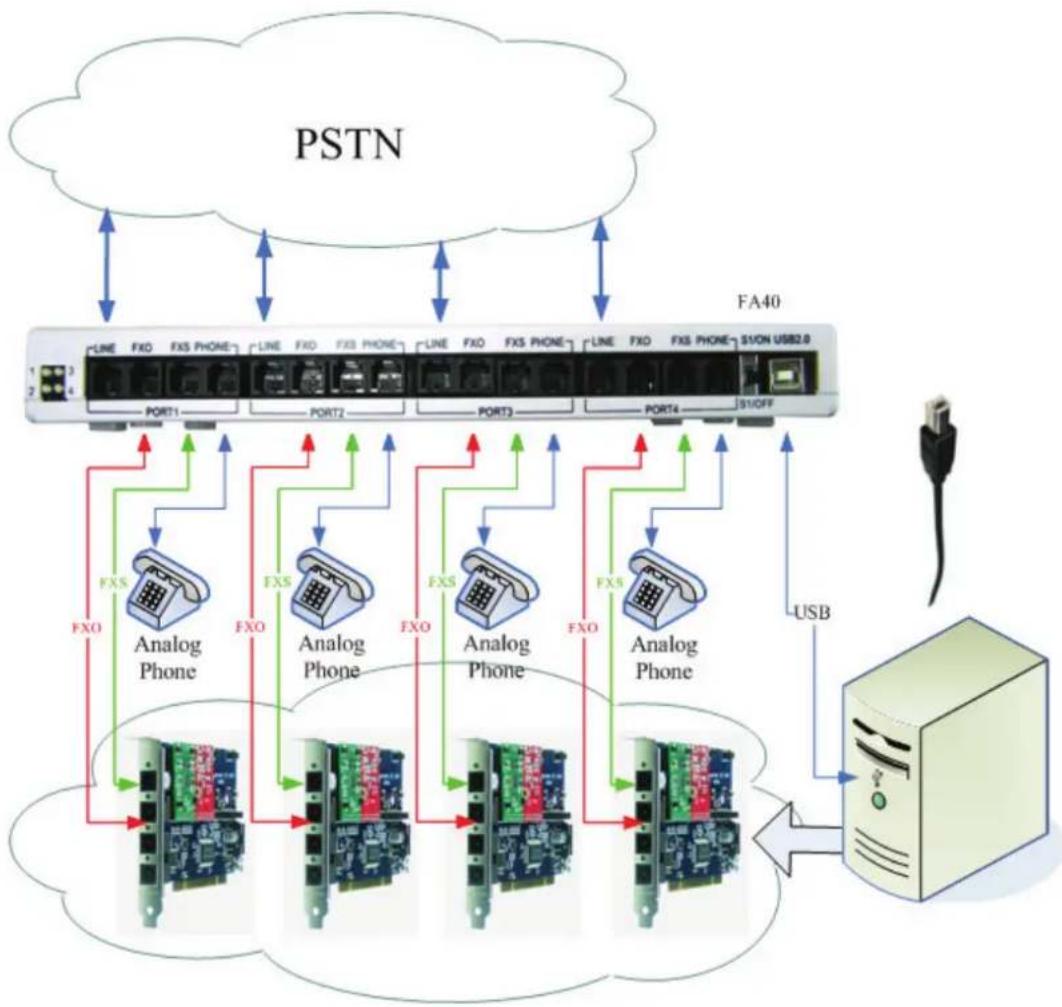
flowchart
graph TD
    PSTN[" PSTN "] <--> FA40[" FA40 "]
    FA40 -->|USB| Server[" Server "]
    FA40 -->|FXO| Multiple1[" Analog Phone 1"]
    FA40 -->|FXO| Multiple2[" Analog Phone 2"]
    FA40 -->|FXO| Multiple3[" Analog Phone 3"]
    FA40 -->|FXO| Multiple4[" Analog Phone 4"]
    FA40 -->|FXO| Multiple5[" Analog Phone 5"]
    FA40 -->|FXO| Multiple6[" Analog Phone 6"]
    FA40 -->|FXO| Multiple7[" Analog Phone 7"]
    FA40 -->|FXO| Multiple8[" Analog Phone 8"]
    FA40 -->|FXO| Multiple9[" Analog Phone 9"]
    FA40 -->|FXO| Multiple10[" Analog Phone 10"]
    FA40 -->|FXO| Multiple11[" Analog Phone 11"]
    FA40 -->|FXO| Multiple12[" Analog Phone 12"]
    FA40 -->|FXO| Multiple13[" Analog Phone 13"]
    FA40 -->|FXO| Multiple14[" Analog Phone 14"]
    FA40 -->|FXO| Multiple15[" Analog Phone 15"]
    FA40 -->|FXO| Multiple16[" Analog Phone 16"]
    FA40 -->|FXO| Multiple17[" Analog Phone 17"]
    FA40 -->|FXO| Multiple18[" Analog Phone 18"]
    FA40 -->|FXO| Multiple19[" Analog Phone 19"]
    FA40 -->|FXO| Multiple20[" Analog Phone 20"]
    FA40 -->|FXO| Multiple21[" Analog Phone 21"]
    FA40 -->|FXO| Multiple22[" Analog Phone 22"]
    FA40 -->|FXO| Multiple23[" Analog Phone 23"]
    FA40 -->|FXO| Multiple24[" Analog Phone 24"]
    FA40 -->|FXO| Multiple25[" Analog Phone 25"]
    FA40 -->|FXO| Multiple26[" Analog Phone 26"]
    FA40 -->|FXO| Multiple27[" Analog Phone 27"]
    FA40 -->|FXO| Multiple28[" Analog Phone 28"]
    FA40 -->|FXO| Multiple29[" Analog Phone 29"]
    FA40 -->|FXO| Multiple30[" Analog Phone 30"]
    FA40 -->|FXO| Multiple31[" Analog Phone 31"]
    FA40 -->|FXO| Multiple32[" Analog Phone 32"]
    FA40 -->|FXO| Multiple33[" Analog Phone 33"]
    FA40 -->|FXO| Multiple34[" Analog Phone 34"]
    FA40 -->|FXO| Multiple35[" Analog Phone 35"]
    FA40 -->|FXO| Multiple36[" Analog Phone 36"]
    FA40 -->|FXO| Multiple37[" Analog Phone 37"]
    FA40 -->|FXO| Multiple38[" Analog Phone 38"]
    FA40 -->|FXO| Multiple39[" Analog Phone 39"]
    FA40 -->|FXO| Multiple40[" Analog Phone 40"]
P1
Device Driver Detection
The device driver of FA40 has been integrated with many Linux distributions. Users can run the following command to see if the FA40 has been recognized or detected by the system. (Please connect the FA40 to the server with attached USB cable that comes together with the product. Note: Please make sure that all the lights are on by switching the on-of button when the FA40 is connected to the server.)
# dmesg | grep FTDI
![[root@lytest ~]# dmesg | grep FTDI drivers/usb/serial/usb-serial.c: USB Serial support registered for FTDI USB Serial Device ftdi_sio 3-1:1.0: FTDI USB Serial Device converter detected usb 3-1: FTDI USB Serial Device converter now attached to ttyUSBO drivers/usb/serial/ftdi_sio.c: v1.4.3:USB FTDI Serial Converters D river](/content/2026/06/1167155/images/664cbcb5384b71032f57d6b3cee11b57f9d13b805ac419ecb24f5f50c79caf98.jpg)
User can also run the Isusb command to check if the FA40 device is connected.
# Isusb
![[root@lytest ~]# lsusb Bus 003 Device 002: ID 0403:6001 Future Technology Devices Interna tional, Ltd FT232 USB-Serial (UART) IC Bus 003 Device 001: ID 0000:0000 Bus 005 Device 001: ID 0000:0000 Bus 004 Device 001: ID 0000:0000 Bus 002 Device 001: ID 0000:0000 Bus 001 Device 001: ID 0000:0000](/content/2026/06/1167155/images/a8d0e6b85fffbe1ee45523c60d571306df8ef4dd800e895e258fc88d0afd2bd7.jpg)
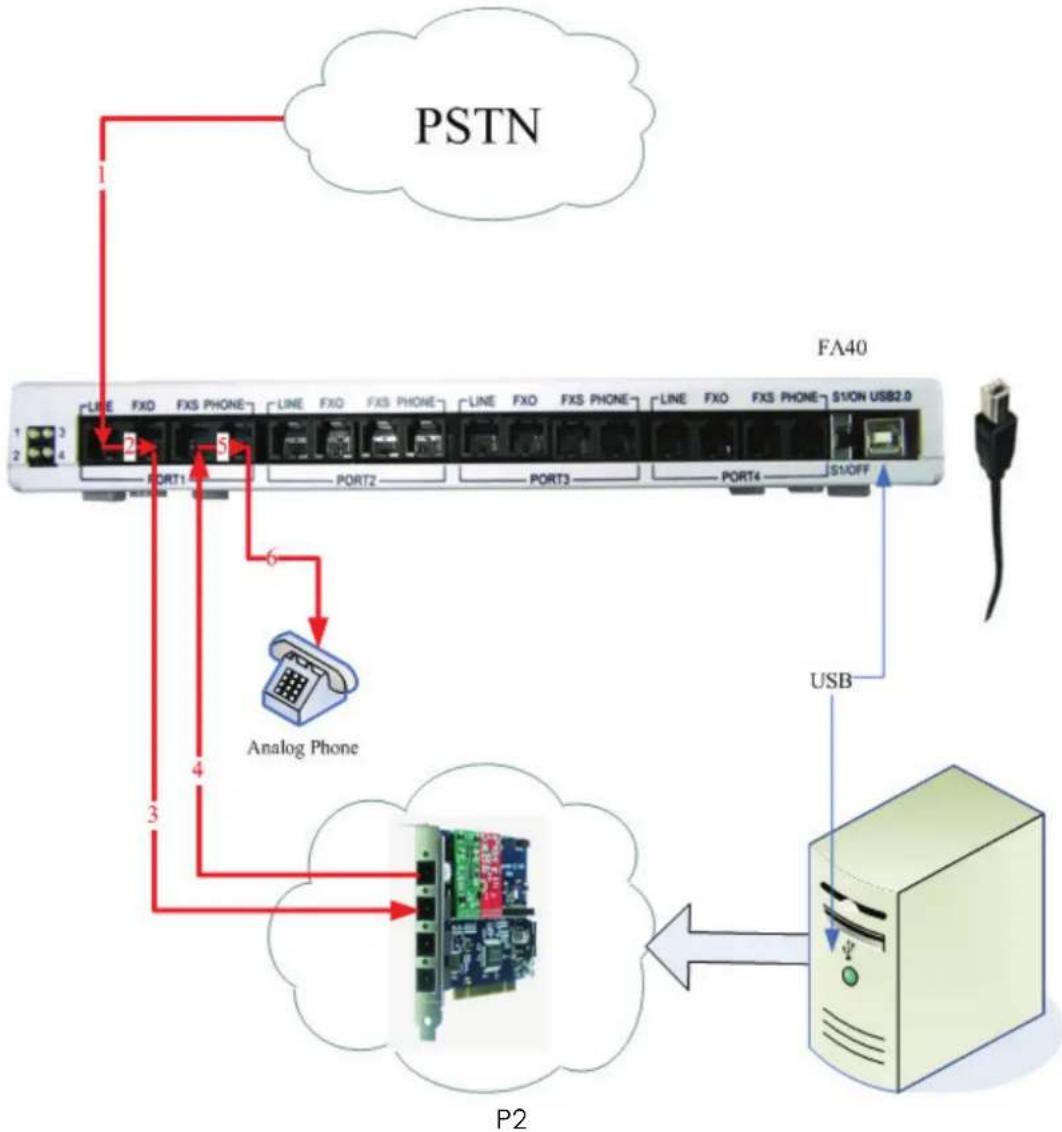
FA40 Working Instruction
The following picture shows how the FA40 works when the PBX Server is ON. The PSTN signal goes from: 1->2->3->4->5->6
flowchart
graph TD
    PSTN[" PSTN "] -->|1| FA40[" FA40 "]
    FA40 -->|2| A["Analog Phone"]
    FA40 -->|3| B["USB"]
    FA40 -->|4| C["P2"]
    FA40 -->|5| D["Analog Phone"]
    FA40 -->|6| E["USB"]
    FA40 -->|7| F["USB"]
    FA40 -->|8| G["USB"]
    FA40 -->|9| H["USB"]
    FA40 -->|10| I["USB"]
    FA40 -->|11| J["USB"]
    FA40 -->|12| K["USB"]
    FA40 -->|13| L["USB"]
    FA40 -->|14| M["USB"]
    FA40 -->|15| N["USB"]
    FA40 -->|16| O["USB"]
    FA40 -->|17| P["USB"]
    FA40 -->|18| Q["USB"]
    FA40 -->|19| R["USB"]
    FA40 -->|20| S["USB"]
When dial out from internal, the PSTN signal goes reverse.
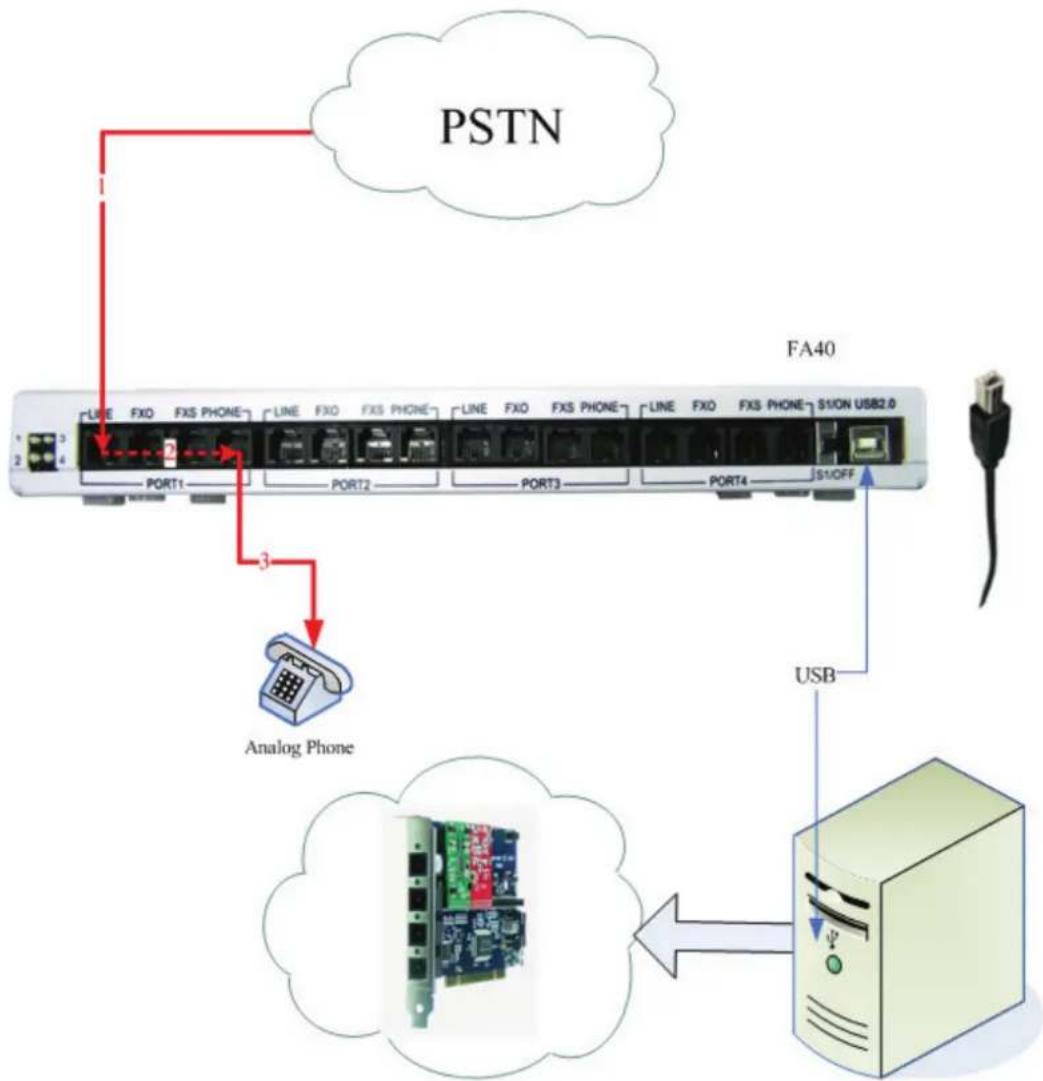
When the PBX Server stops working (poweroff), the PSTN signal goes from 1->2->3:
flowchart
graph TD
    PSTN[" PSTN "] --> FA40[" FA40 "]
    FA40 --> USB[" USB "]
    FA40 --> AnalogPhone[" Analog Phone "]
    FA40 --> Port1[" Port1 "]
    FA40 --> Port2[" Port2 "]
    FA40 --> Port3[" Port3 "]
    FA40 --> Port4[" Port4 "]
    FA40 --> S1ON[" S1ON USB2.0 "]
    FA40 --> S1OFF[" S1/OFF "]
    FA40 --> USB
    FA40 --> Link1[" Link1 "]
    FA40 --> Link2[" Link2 "]
    FA40 --> Link3[" Link3 "]
    FA40 --> Link4[" Link4 "]
    FA40 --> Link5[" Link5 "]
    FA40 --> Link6[" Link6 "]
    FA40 --> Link7[" Link7 "]
    FA40 --> Link8[" Link8 "]
    FA40 --> Link9[" Link9 "]
    FA40 --> Link10[" Link10 "]
    FA40 --> Link11[" Link11 "]
    FA40 --> Link12[" Link12 "]
    FA40 --> Link13[" Link13 "]
    FA40 --> Link14[" Link14 "]
    FA40 --> Link15[" Link15 "]
    FA40 --> Link16[" Link16 "]
    FA40 --> Link17[" Link17 "]
    FA40 --> Link18[" Link18 "]
    FA40 --> Link19[" Link19 "]
    FA40 --> Link20[" Link20 "]
    FA40 --> Link21[" Link21 "]
    FA40 --> Link22[" Link22 "]
    FA40 --> Link23[" Link23 "]
    FA40 --> Link24[" Link24 "]
    FA40 --> Link25[" Link25 "]
    FA40 --> Link26[" Link26 "]
    FA40 --> Link27[" Link27 "]
    FA40 --> Link28[" Link28 "]
    FA40 --> Link29[" Link29 "]
    FA40 --> Link30[" Link30 "]
    FA40 --> Link31[" Link31 "]
    FA40 --> Link32[" Link32 "]
    FA40 --> Link33[" Link33 "]
    FA40 --> Link34[" Link34 "]
    FA40 --> Link35[" Link35 "]
    FA40 --> Link36[" Link36 "]
    FA40 --> Link37[" Link37 "]
    FA40 --> Link38[" Link38 "]
    FA40 --> Link39[" Link39 "]
    FA40 --> Link40[" Link40 "]
    FA40 --> Link41[" Link41 "]
    FA40 --> Link42[" Link42 "]
    FA40 --> Link43[" Link43 "]
    FA40 --> Link44[" Link44 "]
    FA40 --> Link45[" Link45 "]
    FA40 --> Link46[" Link46 "]
    FA40 --> Link47[" Link47 "]
    FA40 --> Link48[" Link48 "]
    FA40 --> Link49[" Link49 "]
    FA40 --> Link50[" Link50 "]
    FA40 --> Link51[" Link51 "]
    FA40 --> Link52[" Link52 "]
    FA40 --> Link53[" Link53 "]
    FA40 --> Link54[" Link54 "]
    FA40 --> Link55[" Link55 "]
    FA40 --> Link56[" Link56 "]
    FA40 --> Link57[" Link57 "]
    FA40 --> Link58[" Link58 "]
    FA40 --> Link59[" Link59 "]
    FA40 --> Link60[" Link60 "]
    FA40 --> Link61[" Link61 "]
    FA40 --> Link62[" Link62 "]
    FA40 --> Link63[" Link63 "]
    FA40 --> Link64[" Link64 "]
    FA40 --> Link65[" Link65 "]
    FA40 --> Link66[" Link66 "]
    FA40 --> Link67[" Link67 "]
    FA40 --> Link68[" Link68 "]
    FA40 --> Link69[" Link69 "]
    FA40 --> Link70[" Link70 "]
    FA40 --> LinkedPort1[" PORT1 "]
P3
The Dashed shows the auto-switch line goes in FA40.
When dial out from internal, the PSTN signal goes reverse.
FA40 Software Installation
Software Download
# wget www.openvox.cn/download/drivers/failover/failover-1.0-current.tar.gz
Software Installation
Installation with asterisk 1.2.X
1) Unzip the file
2) Copy the file to res directory under asterisk
cp res\_failover.c \$asterisksource/res/
3) Copy the configuration file to /etc/asterisk directory
cp failover.conf /etc/asterisk/
4) Compile Makefile in res directory under asterisk
vi /usr/src/asterisk/Makefile
<h1 id="tar-xzvf-failover-10-currenttargz">tar -xzvf failover-1.0-current.tar.gz</h1>
<h1 id="cd-failover">cd failover</h1>
5) Modify Makefile
MODS=res_indications.so res_monitor.so res_adsi.so res_agi.so res_features.so
To:
MODS=res_indications.so res_monitor.so res_adsi.so res_agi.so res_features.so res_failover.so
6) If asterisk is installed, please compile it and re-install
<h1 id="cd-sasterisksource">cd Sasterisksource</h1>
# make
# make install
7) Configure the /etc/asterisk/failover.conf file on requirements.
8) Reboot asterisk
Installation with asterisk 1.4.X
1) Unzip the file
tar -xzvf failover-1.0-current.tar.gz
cd failover
2) Copy the file to res directory under asterisk
cp res\_failover.c \$asterisksource/res/
3) Copy the configuration file to /etc/asterisk directory
cp failover.conf /etc/asterisk/
4) If asterisk is installed, please compile it and re-install
cd \$asterisksource
make
make install
5) Configure the /etc/asterisk/failover.conf file on requirements.
6) Reboot asterisk
Installation with asterisk 1.6.X
1) Unzip the file
tar -xzyf failover-1.0-current.tar.gz
cd failover
2) Copy the file to res directory under asterisk
cp res\_failover.c \$asterisksource/res/
3) Copy the configuration file to /etc/asterisk directory
cp failover.conf /etc/asterisk/
4) If asterisk is installed, please compile it and re-install
cd \$asterisksource
make
make install
5) Configure the /etc/asterisk/failover.conf file on requirements.
6) Reboot asterisk
Explanation of Configuration Files
[openvox_failover_1]
device=/dev/ttyUSB0
;kick_time_interval=4000
;event_cmd=logger
;autorun=yes
[openvox_failover_2]
device=/dev/ttyUSB1
kick_time_interval=500
event_cmd=logger
autorun=no
- [openvox_failover_1]: Name of FA40 Device, to distinguish from different devices, a must to configuration;
● device=/dev/ttyUSB0: Name of USB device that FA40 uses, a must to configuration; - kick_time_interval: the time interval of software watch dog; the default time is 4000ms, user can customize the time with 100ms for Minimum and 9000ms for Maximum;
- event_cmd: event command, the default is logger, it will record the FA40 status in system log;
- autorun: this decides if FA40 will start when asterisk boots; the default is yes which means the FA40 starts when asterisk boots; if no, the FA40 will not start when asterisk boots and user may need manually boot the device by running failover start command.
Steps to Use
1) Start asterisk
asterisk -vvvgc
2) Start FA40 device
*CLI> failover start
or
*CLI> failover start 1
# This command can start all the FA40 devices.
# This command can be use to start the first FA40. A difference number means to start a specific FA40 in the server.
3) Stop FA40 device
*CLI>f ailover stop # This command can stop all the FA40 devices.
or
*CLI> failover stop 1 # This command can be use to stop the first FA40. A difference number means to stop a specific FA40 in the server.
4) Show FA40 device information
*CLI> failover show # Show FA40 device information
5) Reload FA40 device configuration file
*CLI> failover stop # All the FA40 device must be stopped before reloading the configuration file
*CLI> failover reload # Reload the configuration file
Software Installation by the res\_failover.so
If you do not have the gcc compiler and the source code of the asterisk, you can also download the res_failover.so and use it directly as below.
1) Download res_failover.so
Check the asterisk version
# asterisk -V
Download the suitable version from
http://www.openvox.cn/download/drivers/failover/
2) Unzip the file
# tar -xzvf res_failover-1.X.X.so-for-asterisk-1.X.X.tar.gz
# cd res_failover-1.X.X.so-for-asterisk-1.X.X
2) Copy the so module file to /usr/lib/asterisk/modules
# cp res_failover.so /usr/lib/asterisk/modules
3) Copy the configuration file to /etc/asterisk directory
# cp failover.conf /etc/asterisk/
4) Configure the /etc/asterisk/failover.conf file on requirements.
5) Reboot asterisk
Technical Support
If you meet any technical problems when using OpenVox products, you can check our Forum for help or contact us directly be the following ways:
I. Email Support
You can email your technical problems to the following emails:
support@openvox.com.cn
mark.liu@openvox.cn
Unless it is an emergency, this is always the most efficient way to get support.
II. Phone Support
If it is an emergency, the fastest way to have your problem solved is to call our technical department at
+86-755-82535362
+86-755-82535462
+86-755-82535095
Our work time is 9:30am to 17:30pm, from Monday to Friday, (GMT +8 Beijing Time).
Reference
www.openvox.cn
www.digium.com
www.asterisk.org
www.voip-info.org
www.asteriskguru.com
OpenVox is a trademark of OpenVox Communication Co. Ltd.
All other trademarks are of their respective owners.


- OpenVox
- OpenVox-Best Cost Effective Asterisk Cards
- Contents
- FA40 Description
- FA40 Features
- FA40 Installation Guide
- Hardware Connection
- Device Driver Detection
- FA40 Working Instruction
- FA40 Software Installation
- Software Download
- Software Installation
- Installation with asterisk 1.2.X
- cp res\_failover.c \$asterisksource/res/
- cp failover.conf /etc/asterisk/
- vi /usr/src/asterisk/Makefile
- Installation with asterisk 1.4.X
- tar -xzvf failover-1.0-current.tar.gz
- cd failover
- cd \$asterisksource
- make
- make install
- Installation with asterisk 1.6.X
- tar -xzyf failover-1.0-current.tar.gz
- Explanation of Configuration Files
- Steps to Use
- asterisk -vvvgc
- 4) Show FA40 device information
- 5) Reload FA40 device configuration file
- Software Installation by the res\_failover.so
- Technical Support
- Email Support
- Phone Support
- Reference
Brand : OpenVox
Model : FA40
Category : Network router