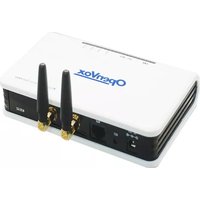
WGW1002G - Passerelle de communication OpenVox - Free user manual and instructions
Find the device manual for free WGW1002G OpenVox in PDF.


| Product Type | VoIP Gateway |
| Dimensions | 200 x 140 x 35 mm |
| Weight | 0.5 kg |
| Power Supply | AC 100-240V, 50-60Hz, 12V DC output |
| Power Consumption | Max 10W |
| Network Interfaces | 2 x RJ45 10/100/1000 Mbps, 2 x FXS ports |
| VoIP Protocols | SIP (RFC3261), IAX2 |
| Voice Codecs | G.711, G.729, G.723, G.726, GSM |
| Management | Web GUI, SSH, SNMP, TR-069 |
| Operating Temperature | 0°C to 40°C |
| Storage Temperature | -10°C to 60°C |
| Humidity | 10% to 90% non-condensing |
| Key Functions | Voice routing, NAT, firewall, QoS, DHCP server |
| Security Features | TLS, SRTP, Access control list, VPN passthrough |
| Maintenance | Clean with a dry cloth; avoid liquids |
| Safety | Use only provided power adapter; keep away from moisture |
| Spare Parts & Repairability | Contact authorized service center for repairs |
| Compliance | CE, FCC |
Frequently Asked Questions - WGW1002G OpenVox
User questions about WGW1002G OpenVox
0 question about this device. Answer the ones you know or ask your own.
Ask a new question about this device
Download the instructions for your Passerelle de communication in PDF format for free! Find your manual WGW1002G - OpenVox and take your electronic device back in hand. On this page are published all the documents necessary for the use of your device. WGW1002G by OpenVox.
USER MANUAL WGW1002G OpenVox
GSM/3G Gateway User Manual

Address: 10/F, Building 6-A, Baoneng Science and Technology Industrial Park, Longhua New District, Shenzhen, Guangdong, China 518109
Tel: +86-755-66630978, 82535461, 82535362
Business Contact: sales@openvox.cn
Technical Support: support@openvox.cn
Business Hours: 09:00-18:00(GMT+8) from Monday to Friday
URL: www.openvox.cn
Version1.0 (2016-05-12)
Full text
The overall layout adjustment
Condenality
Informaon contained herein is of a highly sensitive nature and is condenal and proprietary to OpenVox Inc. No part may be distributed, reproduced or disclosed orally or in written form to any party other than the direct recipients without the express written consent of OpenVox Inc.
Disclaimer
OpenVox Inc. reserves the right to modify the design, characteriscs, and products at any me without nocaon or obligaon and shall not be held liable for any error or damage of any kind resuling from the use of this document.
OpenVox has made every eort to ensure that the informaon contained in this document is accurate and complete; however, the contents of this document are subject to revision without noce. Please contact OpenVox to ensure you have the latest version of this document.
Trademarks
All other trademarks menoned in this document are the property of their respective owners.
Contents
1. Overview....6
What is GSM/3G Gateway?......6
Sample Applicaon 7
Main Features....9
Physical Informaon....10
Soware....10
How to do Cluster?......10
2. System....13
Status....13
Time 15
Login Sengs....16
General....17
Language Setngs 17
Scheduled Reboot....18
Cluster 18
Tools and Informaon....18
Reboot Tools....18
Update Firmware 19
Upload and Backup Conguraon 19
Add New SIP Endpoint 35
Main IAX2 Endpoint Setngs 41
Advanced SIP Sengs 45
Networking....45
Paesing and Compatibility....47
Security 48
Media 49
Advanced IAX2 Sengs 50
5. Roung....53
Call Roung Rule 53
Groups....56
MNP Sengs....57
- SMS 58
General....58
Sender Opons ....58
SMS to Email 58
SMS Control....60
HTTP to SMS....62
SMS to HTTP 62
SMS Sender 62
SMS Inbox....63
SMS Outbox....64
SMS Forwarding....64
- Network....66
Network Sengs....66
DDNS Sengs 67
Toolkit....68
Security Setngs....68
Firewall setngs 68
White List Sengs 69
Security Rules....71
- Advanced....72
Asterisk API 72
Asterisk CLI....74
Asterisk File Editor....74
- Logs 76
Appendix Feature List 79
Applicaon Diagrams 82
1. Overview
What is GSM/3G Gateway?
OpenVox GSM/3G Gateway is an open source asterisk-based VoIP Gateway solution for SMBs and SOHOs. With friendly GUI and unique modular design, users may easily setup their customized Gateway. Also secondary development can be completed through AMI (Asterisk Management Interface).
OpenVox GSM/3G Gateways have 4 models: WGW1002G, VS-GW1202, VS-GW1600 and VS-GW2120. VS-GW1002 suports 2 GSM Channels. VS-GW1202 supports 4/8 GSM/3G channels. VS-GW1600 support up to 20 GSM/3G channels. VS-GW2120 supports up to 44 GSM/3G channels. Both GSM and 3G/UMTS gateways are developed for interconnecting the GSM cellular networks with a wide selection of codecs and signaling protocol, including G.711A, G.711U, G.729, G.722, G.723, G.726 and GSM to quickly reduce communication expenses and maximize cost-savings. With the unique design of the VoxStack gateway, it can support hot-swap for both SIM cards and GSM/3G gateway modules. Users can simply add or remove the modules for hardware expansion or exchange.
The VoxStack gateway designs with 2 LAN switch boards to provide stack ability on the hardware upgrade, and each GSM/3G module is independent, so each one has a GUI configuration web. If you connect to ETH1, you can access Board 1 only and access other boards with different port numbers which can avoid IP conflict. Otherwise if you connect to ETH2, you can access different Boards with different IP addresses.
Our products support SMS messages sending, receiving, group sending and SMS to E-mail. The GSM gateway will be 100% compatible with Asterisk, Elastix, trixbox, 3CX, FreeSWITCH SIP server and VOS VoIP operating platform.
Sample Applicaon

flowchart
graph TD
    A["Satellite Network"] --> B["GSM/3G Gateway"]
    B --> C["Internet"]
    C --> D["SIP Phone"]
    C --> E["SIP Phone"]
    C --> F["Telephone"]
    C --> G["Elastix Server"]
    H["Soft SIP Phone"] --> C
    I["SIP Trunk"] --> C
Figure 1-1 TopologicalGraph
Product Appearance

natural_image
Front view of a network switchgear rack with multiple ports and connectors (no visible text or labels)Figure 1-2 Product Appearance of GSM

Figure 1-3 Front Panel of GSM
Network Data Switch Board: ETH1, ETH2.
- ETH1: Access Board 1 only, provide proxy access to other boards with different port numbers which can avoid IP conflict.
- ETH2: Access different Boards with different IP address.

natural_image
Front view of a network switch device with multiple Ethernet ports and connectors (no visible text or symbols)Figure 1-4 Product Appearance of 3G

Figure 1-5 Front Panel of 3G
Network Data Switch Board: ETH1, ETH2, ETH3.
- ETH1: Access Board 1 only, provide proxy access to other boards with different port numbers which can avoid IP conflict.
- ETH2: Access different Boards with different IP address.
• ETH3: Access different Boards with different IP address.
VoxStack provides 2 working modes: Stand-alone and Cluster.
- Stand-alone: A single IP address manages one GSM modules (4 ports).
Table 1-1 ETH2 IP Addresses
| Slot Num | IP | Username | Password |
| 1 | 172.16.99.1 | admin | admin |
| 2 | 172.16.99.2 | admin | admin |
| 3 | 172.16.99.3 | admin | admin |
| 4 | 172.16.99.4 | admin | admin |
| 5 | 172.16.99.5 | admin | admin |
| 6 | 172.16.99.6 | admin | admin |
| 7 | 172.16.99.7 | admin | admin |
| 8 | 172.16.99.8 | admin | admin |
| 9 | 172.16.99.9 | admin | admin |
| 10 | 172.16.99.10 | admin | admin |
| 11 | 172.16.99.11 | admin | admin |
- Cluster: A single IP address manages up to 5 GSM modules (up to 20 ports).
Default IP: 172.16.99.1

Figure 1-6 Front Panel
| LED Indicator | Color | Status |
| 6 Signal Status LED | Green and Flash | Module Initiating |
| Red and Flash | No SIM Card | |
| Red and No-flash | Worst Signal Quality | |
| Yellow and No-flash | Medium Signal Quality | |
| Green and No-flash | Best Signal Quality | |
| 7 Call Status LED | Flash (0.25s) | Communicating |
| Blind | Normal | |
| 8 9 Network Status LED | Green and Flash | Network Connected |
| 10 Running Status LED | Green and Flash(0.5s) | Work Normally |
| 11 Power LED | Always Green | Supply Power |
Figure 1-5 LED Indicator
Main Features
- Modular and VoxStack design
- Based on Asterisk®
- Editable Asterisk® configurationfile
- Wide selection of codecs and signaling protocol
• Support SMS sending, receiving, group sending
• Support transferring SMS to E-mail
• Support SMS automatically resend
• Support SMS remotely controlling gateway
• Support USSD service
• Support IMEI modification
• Support PIN identification - Support unlimited routing rules and flexible routing settings
• SIM cards and modules are all hot-swap
- Stable performance, flexible dialing, friendly GUI
• WCDMA/UMTS: 850/900/1900/2100 MHz
• GSM: 850/900/1800/1900 MHz
Physical Informaon
• Weight: 4301g(VS-GW1600-20G) 6144g(VS-GW2120-32w)
• Size: 44cm*30cm*4.5cm (VS-GW1600-20G) 44cm*34cm*9cm (VS-GW2120-32w)
• Temperature: -20\~70° C (Storage) 0\~40° C (Operation)
• Operation humidity: 10%\~90% non-condensing
• Max power: 46W(VS-GW1600-20G) 95W(VS-GW2120-32w)
• LAN port: 2(VS-GW1600-20G) 3(VS-GW2120-32w)
Soware
Default IP: 172.16.99.1
Username: admin
Password: admin
For first time, you can access WGW1002G using default IP 172.16.99.1. Then configure the module as you want.
For VS-GW2102, VS-GW1600, VS-GW2120 series of GSM/3G gateway, every VS-GWM400G/W is independent with each other. There are two RJ45 Network ports: ETH1 and ETH2. They are different.
- If you want each module to work stand-alone and access each of them, choose ETH2 please. Default IP of each module is 172.16.99.X (X is slot number).
- If you want to use one IP to master all the boards, choose ETH1, access board1 using default IP 172.16.99.1 and do the cluster. Then you can access to other boards with different port numbers but the same IP address, this will help to avoid IP conflict. Board1 work as master, and other boards work as slave.
How to do Cluster?
penVox GSM Gateway offers you two ways to cluster your gateway: Automatic Cluster or Manual Cluster. When you first time log in your gateway, you will only see 4 ports of one
module. Then you can press
Automatic Cluster button, the system
modules in the LAN and communicate.
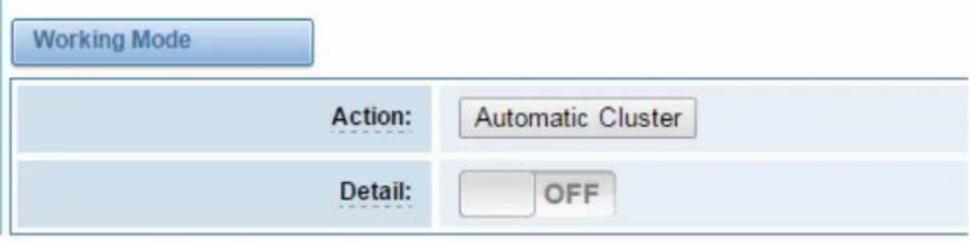
Figure 1-7 Automatic Cluster
If you want to choose Manual Cluster, you should switch Detail on first.
There are 3 kinds of cluster mode: stand-alone, Master and Slave.
• Stand-alone Mode: Run alone, total 4 ports.
- Master Mode: Run as master with two different IP, controlling up to 10 slaves. (The master can be accessed by the original IP. The target IP is used to communicate with the slaves.)
- Slave Mode: Run as slave with two different IP, controlled by the master. If the original IP is forbidden, the slave can be accessed by the master with inward IP only.

Notice: You can choose Remain Original IP address ON or OFF. If set it on, you can log in your getaway with Original IP and Target IP.
Notice: Log in

Figure 1-8 LOG Interface
2. System
Status
On the "Status" page, you will find all GSM, SIP, IAX2, Routing, Network information and status.
| Port | Signal | BER | Carrier | Registration Status | PDD(s) | ACD(s) | ASR(%) | Module Status | Remain Time |
| gam-1.1 | 0 | Undetected SIM Card | 0 | 0 | 0 | No Limit | |||
| gam-1.2 | 0 | Undetected SIM Card | 0 | 0 | 0 | No Limit | |||
| gam-1.3 | 0 | CHINA MOBILE | Registered (Home network) | 8 | 292 | 47 | READY | No Limit | |
| gam-1.4 | 0 | CHINA MOBILE | Registered (Home network) | 8 | 300 | 40 | READY | No Limit | |
| unita-2.1 | -1 | Undetected SIM Card | 0 | 0 | 0 | No Limit | |||
| unita-2.2 | -1 | Undetected SIM Card | 0 | 0 | 0 | No Limit | |||
| unita-2.3 | -1 | CHINA MOBILE | Registered (Home network) | 0 | 298 | 40 | READY | No Limit | |
| unita-2.4 | -1 | CHINA MOBILE | Registered (Home network) | 0 | 302 | 42 | READY | No Limit | |
| gam-3.1 | 0 | CHINA MOBILE | Registered (Home network) | 8 | 298 | 64 | READY | No Limit | |
| gam-3.2 | 0 | CHINA MOBILE | Registered (Home network) | 7 | 298 | 72 | READY | No Limit | |
| gam-3.3(66370) | 0 | CHINA MOBILE | Registered (Home network) | 6 | 297 | 47 | READY | No Limit | |
| gam-3.4 | 0 | CHINA MOBILE | Registered (Home network) | 8 | 302 | 62 | READY | No Limit | |
| unita-4.1 | -1 | CHINA MOBILE | Registered (Home network) | 0 | 0 | 0 | READY | No Limit | |
| unita-4.2 | -1 | CHINA MOBILE | Registered (Home network) | 0 | 0 | 0 | READY | No Limit | |
| unita-4.3 | -1 | CHINA MOBILE | Registered (Home network) | 0 | 292 | 68 | READY | No Limit | |
| unita-4.4 | -1 | CHINA MOBILE | Registered (Home network) | 0 | 0 | 0 | READY | No Limit | |
| unita-5.1 | -1 | CHINA MOBILE | Registered (Home network) | 0 | 0 | 0 | READY | No Limit | |
| unita-5.2 | -1 | Undetected SIM Card | 0 | 0 | 0 | No Limit | |||
| unita-5.3 | -1 | Notregistered | 0 | 0 | 0 | INIT | No Limit | ||
| unita-5.4 | -1 | Notregistered | 0 | 0 | 0 | INIT | No Limit |
| Endpoint Name | User Name | Host | Registration | SIP Status |
| 10027 | 10027 | 172.16.2.209 | none | Unmonitored |
| 10028 | 10028 | 172.16.33.101 | none | Unmonitored |
| test1001 | 1001 | (Unspecified) | server | UNKNOWN |
| 1002 | 1002 | (Unspecified) | server | UNKNOWN |
| Endpoint Name | User Name | Host | Registration | IAX2 Status |
| 1111 | 1111 | 172.16.2.209 | none | OK (2 ms) |
| 2112 | 2112 | (null) | server | UNKNOWN |
| 2113 | 2113 | 172.16.33.111 | client | UNREACHABLE |
| test3001 | 3001 | 0.0.0.0 | server | UNKNOWN |
| 2111 | 2111 | 172.16.33.111 | none | OK (2 ms) |
| Role Name | From | To | Rules |
| Incoming | grp-all | sip-10028 | |
| outgoing | sip-10027 | grp-parts | |
| test1 | sip-1001 | fax-2111 | Dial_pattern(>=1[=]) |
| test2 | sip-1001 | fax-2112 | Dial_pattern(>=2[=]) |
| test3 | sip-1001 | sax-2113 | Dial_pattern(>=3[=]) |
| test | grp-tax | gsm-1.3 umts-2.3 |
| Name | MAC Address | IP Address | Mask | Gateway | RX Packets | TX Packets |
| LAN | A098.05.01.08.63 | 172.16.179.1 | 255.255.0.0 | 172.16.0.1 | 12582903 | 6435114 |
Figure 2-1 System Status
Table 2-1 Description of System Status
| Options | Definition |
| Port | Number of GSM ports. GSM ports begin with "gsm-", such as gsm-1.1; 3G ports begin with "umts-", such as umts-2.1. |
| Signal | Display the signal strength of in each channels of GSM. |
| BER | Bit Error Rate. |
| Carrier | Display the network carrier of current SIM card. |
| Registration Status | Indicates the registration status of current GSM module. |
| PDD | Post Dial Delay (PDD) is experienced by the originating customer as the time from the sending of the final dialed digit to the point at which they hear ring tone or other in-band information.Where the originating network is required to play an announcement before completing the call then this definition of PDD excludes the duration of such announcements. |
| ACD | The Average Call Duration (ACD) is calculated by taking the sum of billable seconds (bill sec) of answered calls and dividing it by the number of these answered calls. |
| ASR | Answer Seizure Ratio is a measure of network quality. Its calculated by taking the number of successfully answered calls and dividing by the total number of calls attempted. Since busy signals and other rejections by the called number count as call failures, the ASR value can vary depending on user behavior. GSM Status Show the status of port, include blank space and “READY”. Black space means it is unavailable here and “Ready” means the port is available |
| Remain Time | This value is multiplied by to step length is a rest call time. |
Time
Table 2-2 Description of Time Settings:
| Options | Definition |
| System Time | Your gateway system time |
| Time Zone | The world time zone. Please select the one which is the same or the closest as your city |
| POSIX TZ String | Posix time zone strings. |
| NTP Server 1 | Time server domain or hostname. For example, [time.asia.apple.com]. |
| NTP Server 2 | The first reserved NTP server. For example, [time.windows.com]. |
| NTP Server 3 | The second reserved NTP server. For example, [time.nist.gov]. |
| Auto-Sync from NTP | Whether enable automatically synchronize from NTP server or not. ON is enable, OFF is disable this function. |
| Sync from NTP | Sync time from NTP server. |
| Sync from Client | Sync time from local machine. |
For example, you can configure like this:

Figure 2-2 Time Settings
You can set your gateway time Sync from NTP or Sync from Client by pressing different buttons.
Login Sengs
Your gateway doesn't have administration role. All you can do here is to reset what new username and password to manage your gateway. And it has all privileges to operate your gateway. You can modify "Web Login Settings" and "SSH Login Settings". If you have changed these settings, you don't need to log out, just rewriting your new user name and password will be OK. Also you can specify the web server port number.
Table 2-3 Description of Login Settings
| Options | Definition |
| User Name | Define your username and password to manage your gateway, without space here. Allowed characters "-+_+. <>&0-9a-zA-Z". Length: 1-32 characters. |
| Password | Allowed characters "-+_+. <>&0-9a-zA-Z". Length: 4-32 characters. |
| Confirm Password | Please input the same password as 'Password' above. |
| Login Mode | http and https: You can access gateway via link:http://gatewayIPorhttps://gatewayIPhttps: You can only access gateway via link:https://gatewayIP |
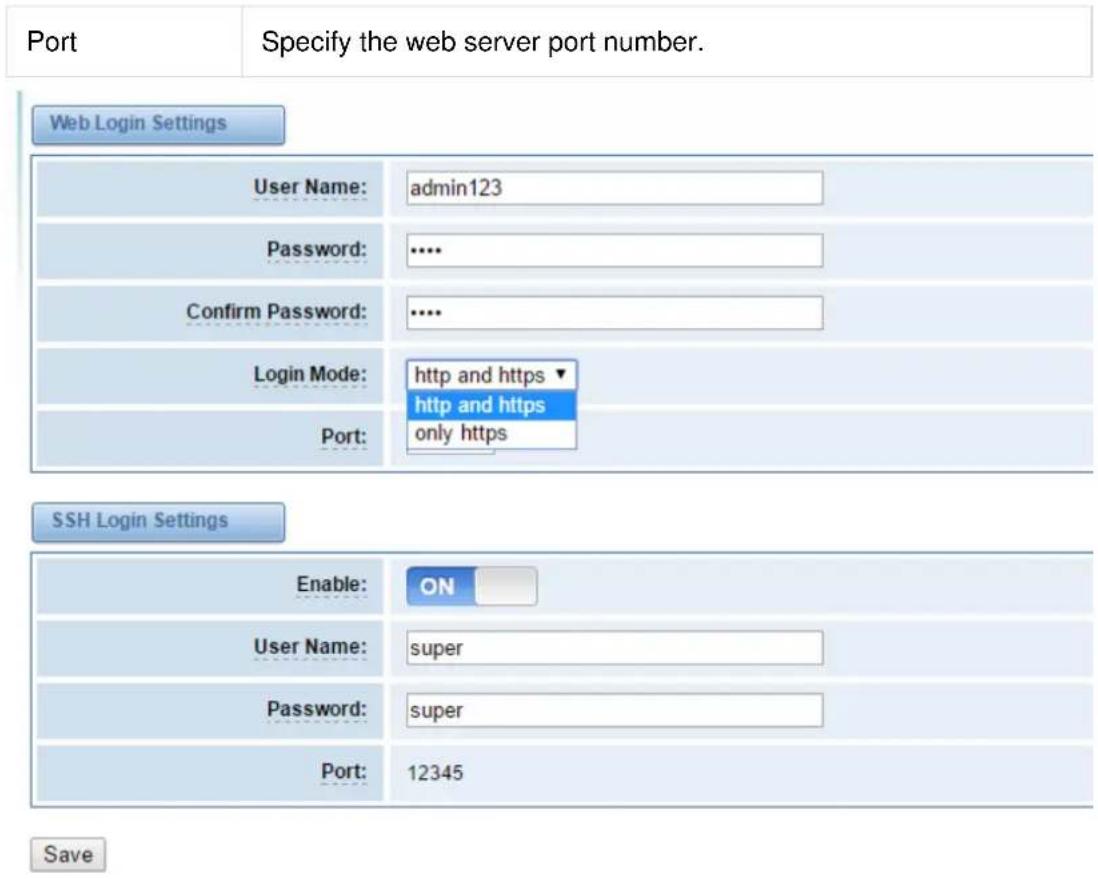
Figure 2-3 Login Settings
Notice: Whenever you do some changes, do not forget to save your configuration.
General
Language Sengs
You can choose different languages for your system. If you want to change language, you can switch "Advanced" on, then "Download" your current language package. After that, you can modify the package with the language you need. Then upload your modified packages, "Choose File" and "Add".

Figure 2-4 Language Settings
Scheduled Reboot
If switch it on, you can manage your gateway to reboot automatically as you like. There are four reboot types for you to choose, "By Day, By Week, By Month and By Running Time".

Figure 2-5 Reboot Types
If use your system frequently, you can set this enable, it can helps system work more efficient.
Cluster

Figure 2-6 cluster
Tools and Informaon
Reboot Tools
You can choose system reboot and asterisk reboot separately.

Figure 2-7 Reboot Tools
If you press "OK", your system will reboot and all current calls will be dropped. Asterisk Reboot is the same.
Update Firmware
We offer 2 kinds of update types for you, you can choose System Update or System Online Update. For System Update, you can update all the boards together or only update one of them to make sure all boards have same firmware version.

Figure 2-8 Update Firmware
Notice: In SYSTEM ---> Cluster page, you can find which board has different or incompatible firmware version.
| Board Name | Model Name | Modem Description | Softcare Version | Hardware Version | Build Time |
| master | VS-GGU-E2M0400 | 850/900/1800/1900MHz@GSM | 2.3.1 | Date 2012-11-09 FPGA 11 Hardware 00 | 2016-04-22 11:52:12 |
| slave2 | VS-GWM400W | 900/2100MHz@UMTS 900/1800MHz@GSM | 2.3.1 | Date 2012-11-09 FPGA 11 Hardware 00 | 2016-04-22 11:52:12 |
| slave3 | VS-GGU-E2M0400 | 850/900/1800/1900MHz@GSM | 2.3.1 | Date 2012-11-09 FPGA 11 Hardware 00 | 2016-04-22 11:52:12 |
| slave4 | VS-GWM405W | 900/2100MHz@UMTS 900/1800MHz@GSM | 2.3.1 | Date 2012-11-09 FPGA 11 Hardware 00 | 2016-04-22 11:52:12 |
| slave5 | VS-GWM405W | 900/2100MHz@UMTS 900/1800MHz@GSM | 2.3.1 | Date 2012-11-09 FPGA 11 Hardware 00 | 2016-04-22 11:52:12 |
Figure 2-9 Update Firmware
Upload and Backup Conguraon
If you want to update your system and remain your previous configuration, you can first backup configuration, then you can upload configuration directly. That will be very convenient for you.

Figure 2-10 Upload and Backup Configuration
Restore Conguraon
Sometimes there is something wrong with your gateway that you don't know how to solve it, mostly you will select factory reset. Then you just need to press a button, your gateway will be reset to the factory status.

Figure 2-11 Restore Configuration
Informaon
On the “Information” page, there shows some basic information about the GSM/3G gateway. You can see software and hardware version, storage usage, memory usage and some help information.
| Model Name: | VS-9GU-E2M0400 |
| Modem Description: | 850/900/1800/1900MHz@OSM |
| Software Version: | 2.3.1 |
| Hardware Version: | Date 2012-11-09 FPGA 11 Hardware 00 |
| Slot Number: | 1 |
| Storage Usage: | 1.9M/63.5M (3%) |
| Memory Usage: | 89.862 % Memory Clean |
| Build Time: | 2016-05-23 09:04:28 |
| Contact Address: | 10F, Building 6-A, Baoneng Science and Technology Industrial Park, Longhua New District, Shenzhen, Guangdong,China |
| Tel: | +66-755-92515481 |
| Fax: | +66-755-93823074 |
| E-Mail: | support@openvox.co |
| Web Site: | http://www.openvory.cn |
| Rebooting Counts: | 783 |
| System Time: | 2016-5-28 16:00:52 |
| System Uptime: | 0 days 22:15:49 |
Figure 2-12 Information
3. MODULE
You can see much information about your SIM cards on this page.
MODULE Sengs
| Port | Carrier | Registration Status | Module Status | Actions |
| gsm-1.1 | Undetected SIM Card | |||
| gsm-1.2 | Undetected SIM Card | |||
| gsm-1.3 | CHINA MOBILE | Registered (Home network) | READY | |
| gsm-1.4 | CHINA MOBILE | Registered (Home network) | READY | |
| umts-2.1 | Undetected SIM Card | |||
| umts-2.2 | Undetected SIM Card | |||
| umts-2.3 | CHINA MOBILE | Registered (Home network) | READY | |
| umts-2.4 | CHINA MOBILE | Registered (Home network) | READY | |
| gsm-3.1 | CHINA MOBILE | Registered (Home network) | READY | |
| gsm-3.2 | CHINA MOBILE | Registered (Home network) | READY | |
| gsm-3.3(06370) | CHINA MOBILE | Registered (Home network) | READY | |
| gsm-3.4 | CHINA MOBILE | Registered (Home network) | READY | |
| umts-4.1 | CHINA MOBILE | Registered (Home network) | READY | |
| umts-4.2 | CHINA MOBILE | Registered (Home network) | READY | |
| umts-4.3 | CHINA MOBILE | Registered (Home network) | READY | |
| umts-4.4 | CHINA MOBILE | Registered (Home network) | READY | |
| umts-5.1 | CHINA MOBILE | Registered (Home network) | READY | |
| umts-5.2 | CMCCA MOBILE | Registered (Home network) | READY | |
| umts-5.3 | Not registered | INIT | ||
| umts-5.4 | Not registered | INIT |
Figure 3-1 GSM/UTMS Settings
On this page, you can see your GSM module status and click action button to configure the port.
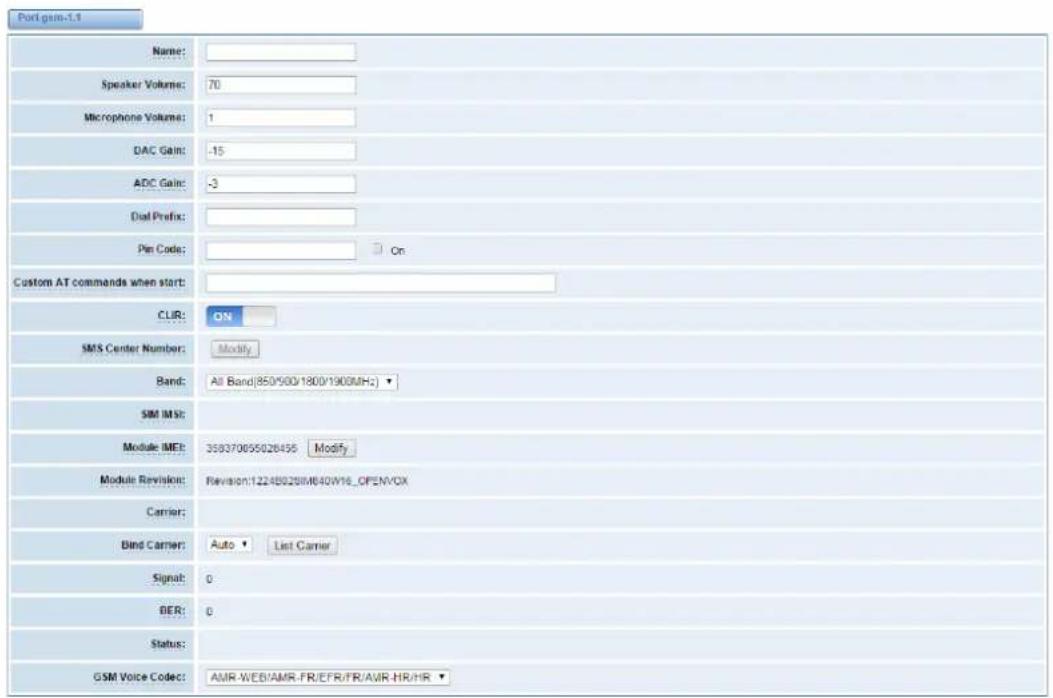
Figure 3-2 Port Configuration
As you see, we have offered "Band" option, you can select different bands easily and you have many options.

Figure 3-3 Band Binding
If you have set your Pin Code, you can check on like this:

Figure 3-4 PIN Code Application
Then input your password, system will identify numbers of SIM cards. It can help to prevent SIM card from being stolen and improve security.
If you want to hide your number when you call out, you can just switch CLIR "ON" (Of course you need your operator's support).

Figure 3-5 CLIR Application
OpenVox GSM/3G gateway support optional GSM Voice Codec. See picture below.


Figure 3-6 GSM Voice Codec
IMEI Modicaon
One more feature, we offer you IMEI automatically modification

Figure 3-7 Automatically IMEI Modify
We have offered you IMEI modification function. If you want to modify your IMEI number, please do as follows. You can log in your gateway and modify IP address as follows. Input web site below on your browser. http://172.16.99.1/cgi-bin/php/gsm-autoimei.php.
Then you will see the following picture. Don't forget to switch "Enable" to "ON", or you can't change your IMEI numbers.
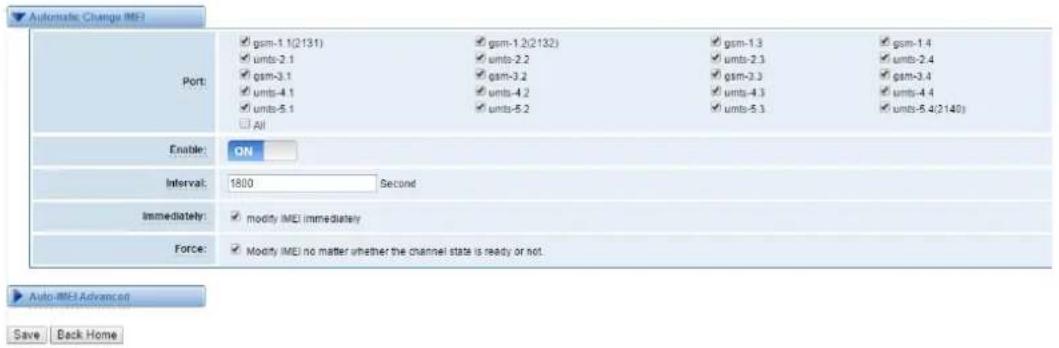
Figure 3-8 IMEI Modification
Also you can choose to modify one or more certain ports or all ports. You can set automatic modification interval by filling in the time you

If you choose "Immediately", then the ports you have chosen will modify IMEI numbers at once. On the contrary, system will keep time from now until the time of next modification. And If you choose "Force", System will hang up all your current calls, then modify IMEI.
▶ Auto-IMEI Advanced You can press to do some settings. We offer you two ways to modify your IMEI. You can choose Autogeneration or Manual.
| IME! Number Setting | TAC(6 digit) | FAC(2 digit) | SNR(6 digit) | SP(1 digit) | Current IMEI | Action |
| Set to All | 35xxxxx | 0x | xxxxxxx | Autogeneration | None | Set to All |
| gsm-1.1(2131) | 35xxxxx | 0x | xxxxxxx | Autogeneration | 358370055029455 | Manual |
| gsm-1.2(2132) | 35xxxxx | 0x | xxxxxxx | Autogeneration | 354328092244732 | Manual |
| gsm-1.3 | 35xxxxx | 0x | xxxxxxx | Autogeneration | 356312079759791 | Manual |
| gsm-1.4 | 35xxxxx | 0x | xxxxxxx | Autogeneration | 352267048448236 | Manual |
| umts-2.1 | 35xxxxx | 0x | xxxxxxx | Autogeneration | 353687055653106 | Manual |
| umts-2.2 | 35xxxxx | 0x | xxxxxxx | Autogeneration | 353221070949999 | Manual |
| umts-2.3 | 35xxxxx | 0x | xxxxxxx | Autogeneration | 353681038138394 | Manual |
| umts-2.4 | 35xxxxx | 0x | xxxxxxx | Autogeneration | 356882088687671 | Manual |
| gsm-3.1 | 35xxxxx | 0x | xxxxxxx | Autogeneration | 359772079048865 | Manual |
| gsm-3.2 | 35xxxxx | 0x | xxxxxxx | Autogeneration | 352825090577568 | Manual |
Figure 3-9 Advanced Settings
As you can see, you can set any number you want for every port. "X" means any digits from 0 to 9.
You just need to fill in "Set to All", then press "Set to All", you can see the interface as above. Don't forget to press "Save". Then "Current IMEI" will change. That means Autogeneration. If you want to set a certain number as your IMEI, you can press "Manual". Then you will be required to input a new IMEI.

Figure 3-10 Manual
After configuration, you can press "Back Home" to return your gateway interface.
Table 3-1 Definition of GSM Settings
| Options | Definition |
| Name | The alias of the GSM port. Input name without space here. Allowed characters "-+_+.<>&0-9a-zA-Z".Length: 1-32 characters. |
| Speaker Volume | The speaker volume level, the range is 0-100.This will adjust the loud speaker volume level by an AT command. |
| Microphone Volume | The microphone volume, range is: 0-15.This will change the microphone gain level by an AT command. |
| DAC Gain | The range is: -42 to +20 |
| ADC Gain | The range is: -42 to +20 |
| Dial Prefix | The prefix number of outgoing calls from this GSM channel |
| PIN Code | Personal identification numbers of SIM card. PIN code can be modified to prevent SIM card from being stolen. |
| Custom AT commads when start | User custom AT commands when start system, use “|” to split AT command. |
| CLIR | Caller ID restriction, this function is used to hidden caller ID of SIM card number. The gateway will add ‘#31#’ in front of mobile number. This function must support by Operator. |
| SMS Center Number | Your SMS center number of your local carrier. |
| GSM Module IMEI | You can click “Modify” button and automatically modify it. |
Call Duraon Limit Sengs
Now we can offer you two types of call duration limit, you can choose "Single Call Duration Limit" or "Call Duration Limitation" to control your calling time
- Single Call Duration Limit: This will limit the time of each call.
First you need to switch "Enable" on, then you can set "Step" and "Single Call Duration Limitation" any digits you want. When you make a call by this port, it will limit your calling time within the product of
Step \* Single Call Duration Limitation
And if your calling time overtops the value above, the system will hang up this call.
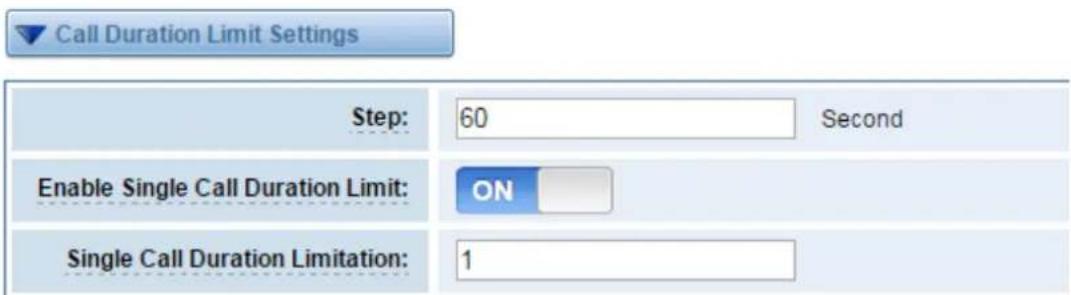
Figure 3-11 Single Settings
- Call Duration Limitation: This will limit your total calling time of this port. If remain time is 0, it will not send calls through this port.

Figure 3-12 Call Duration Limitation Settings
The same algorithm with single time limitation, the total calling time of this port can't beyond the product of "Step" and "Call Duration Limitation".
If the duration of a call is less than "Minimum Charging Time", it will be not included in "Call Duration".
You can set a digit for "Alarm Threshold", when the call minutes less than this value, the gateway will send alarm info to designated phone.
You can enable your Auto Reset, then choose by day, by week, or by month.

Figure 3-13 Auto Reset Settings
Table3-2 Description of Call Duration Limit Settings
| Options | Definition |
| Step | Step length value range is 1-120 s, step length multiplied by time of single call just said a single call duration time allowed. |
| Enable Single Call Duration Limit | Definite maximum call duration for single call. Example: if Time of single call set to 10, the call will be disconnected after talking 10*step seconds. |
| Enable Call Duration Limitation | This function is to limit the total call duration of GSM channel. The max call duration is between 1 to 65535 minutes. |
| Call Duration Limitation | The value of limitation single call, this value range is 1-65535. Step length multiplied by time of single call just said a single call duration time allowed. |
| Minimum Charging Time | A single call over this time, GSM side of the operators began to collect fees, unit for seconds. |
| Alarm Threshold | Define a threshold value of call minutes, while the call minutes less than this value, the gateway will send alarm information to designated phone. |
| Alarm Description | Alarm port information description, which will be sent to user mobile phone with alarm information. |
| Alarm Phone Number | Receiving alarm phone number, user will received alarm message from gateway. |
| Remain Time | This value is multiplied by to step length is a rest call time. |
| Enable Auto Reset | Automatic restore remaining talk time, that is, get total call minutes of GSM channel. |
| Auto Reset Type | Reset call minutes by date, by week, by month. |
| Next Reset Time | Defined next reset date, system will count start from that date and work as Reset Period setting |
You can save your configuration to other ports.

Figure 3-14 Save To Other Ports
If you have set like this, you will see many on the Web GUI, you can set whether to check.
Notice: When you do some changes, you need to Save and Apply, then "Remain Time" will show as you set.
Your calling status will show on the main interface.

Figure 3-15 GSM/UMTS Information
Call Forwarding
Sometimes it's not convenient for you to answer a call, if you don't want to lose some important calls, you can choose Call Forwarding. You can choose Call Forwarding Unconditional, Call Forwarding No Reply, Call Forwarding Busy or Call Forwarding on Not Reachable. If want to cancel your call forwarding settings, you can choose Cancel All.
| ☐ | Port | Select | Call Type | Call Number | Status |
| ☐ | gsm-1.1 | ○ | Call Forwarding Unconditional | ||
| ○ | ☐ Call Forwarding No Reply | ||||
| ☐ Call Forwarding Busy | |||||
| ☐ Call Forward on Not Reachable | |||||
| ○ | Cancel All | ||||
| ☐ | gsm-1.2 | ○ | Call Forwarding Unconditional | ||
| ○ | ☐ Call Forwarding No Reply | ||||
| ☐ Call Forwarding Busy | |||||
| ☐ Call Forward on Not Reachable | |||||
| ○ | Cancel All | ||||
| ☐ | umts-2.1 | ○ | Call Forwarding Unconditional | ||
| ○ | ☐ Call Forwarding No Reply | ||||
| ☐ Call Forwarding Busy | |||||
| ☐ Call Forward on Not Reachable | |||||
| ○ | Cancel All | ||||
| ☐ | umts-2.2 | ○ | Call Forwarding Unconditional | ||
| ○ | ☐ Call Forwarding No Reply | ||||
| ☐ Call Forwarding Busy | |||||
| ☐ Call Forward on Not Reachable | |||||
| ○ | Cancel All | ||||
Figure 3-16 Call Forwarding
Notice: Don't forget to save your settings. Please first press button, then press button..
Call Waing
You can turn on/off the call waiting function of the sim cards in the ports on this page.
Table3-3 Description of Call Waiting
| Options | Definition |
| Turn on call waiting | choose the ports you want to set, select "On", then click "Settings" button. |
| Turn off call waiting | choose the ports you want to set, select "Off", then click "Settings" button. |
| Status | It will show yo executing result. |
| Settings | used to turn on/off call waiting function |
| Query | used to query the status of call waiting. To see call waiting function of the ports you select is on or off. |
| ☐ | Port | Call Waiting Function | Status |
| ☐ | gsm-1.1 | ON OFF | |
| ☐ | gsm-1.2 | ON OFF | |
| ☐ | gsm-1.3 | ON OFF | |
| ☐ | gsm-1.4 | ON OFF | |
| ☐ | umba-2.1 | ON OFF | |
| ☐ | umba-2.2 | ON OFF | |
| ☐ | umba-2.3 | ON OFF | |
| ☐ | umba-2.4 | ON OFF | |
| ☐ | gsm-2.1 | ON OFF | |
| ☐ | gsm-2.2 | ON OFF | |
| ☐ | gsm-3.3(68370) | ON OFF | |
| ☐ | gsm-3.4 | ON OFF | |
| ☐ | umba-4.1 | ON OFF | |
| ☐ | umba-4.2 | ON OFF | |
| ☐ | umba-4.3 | ON OFF | |
| ☐ | umba-4.4 | ON OFF | |
| ☐ | umba-5.1 | ON OFF | |
| ☐ | umba-5.2 | ON OFF | |
| ☐ | umba-5.3 | ON OFF | |
| ☐ | umba-5.4 | ON OFF |
Figure 3-17 Call Waiting
DTMF
You can do some DTMF Detection Settings if you choose "GSM -> DTMF".
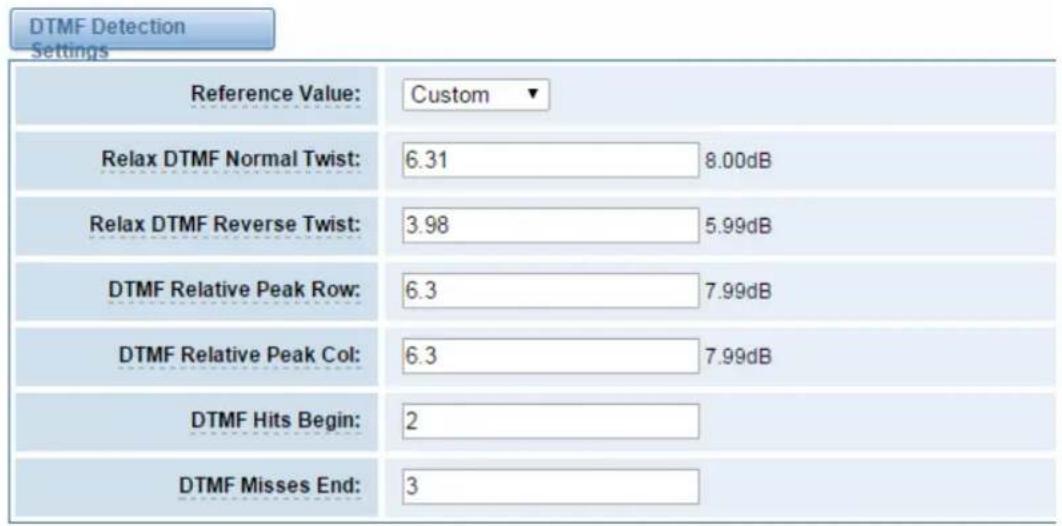
Figure 3-18 DTMF Detection Settings
Notice: If you don't have special need, you don't have to modify these settings. You can just choose "Default".
Table3-4 Description of DTMF Detection Settings
| Options | Definition |
| DTMF Normal Twist and Reverse Twist | It is the difference in power between the row and column energies. Normal Twist is where the Column energy is greater than the Row energy. Reverse Twist is where the Row energy is greater. |
| DTMF Relative Peak Row | The value is the smaller and the detection is easier. If you lost some numbers, you can try to put the value down. The adjustment range is 0.02 at a time. |
| DTMF Relative Peak Col | The value is smaller and the detection is easier. If you lost some numbers, you can try to put the value down. The adjustment range is 0.1 at a time. |
| DTMF Hits Begin | Sampling matching value. You can choose 2 or 3. |
| DTMF Misses End | The time interval between the two digits you input. Adjust the speed of input. The smaller value represents the shorter intervals. |
BCCH
| 0 | 1 | 2 | 3 | 4 | 5 | 6 | ||||||||||||||||||
| Port | Mode | LAC | BCCH | dbm | LAC | BCCH | dbm | LAC | BCCH | dbm | LAC | BCCH | dbm | LAC | BCCH | dbm | LAC | BCCH | dbm | LAC | BCCH | dbm | Status | Detail |
| gsm-1.1 | default | Detail | ||||||||||||||||||||||
| gsm-1.2 | default | Detail | ||||||||||||||||||||||
| gsm-1.3 | default | Detail | ||||||||||||||||||||||
| gsm-1.4 | default | Detail | ||||||||||||||||||||||
| umts-2.1 | Detail | |||||||||||||||||||||||
| umts-2.2 | Detail | |||||||||||||||||||||||
| umts-2.3 | Detail | |||||||||||||||||||||||
| umts-2.4 | Detail | |||||||||||||||||||||||
| gsm-3.1 | default | Detail | ||||||||||||||||||||||
| gsm-3.2 | default | Detail | ||||||||||||||||||||||
| gsm-3.3(66370) | default | Detail | ||||||||||||||||||||||
| gsm-3.4 | default | Detail | ||||||||||||||||||||||
| umts-4.1 | Detail | |||||||||||||||||||||||
| umts-4.2 | Detail | |||||||||||||||||||||||
| umts-4.3 | Detail | |||||||||||||||||||||||
| umts-4.4 | Detail | |||||||||||||||||||||||
| umts-5.1 | Detail | |||||||||||||||||||||||
| umts-5.2 | Detail | |||||||||||||||||||||||
| umts-5.3 | Detail | |||||||||||||||||||||||
| umts-5.4 | ||||||||||||||||||||||||
Figure 3-19 BCCH setting
You can click button, and you can change the BCCH Mode as bellow.
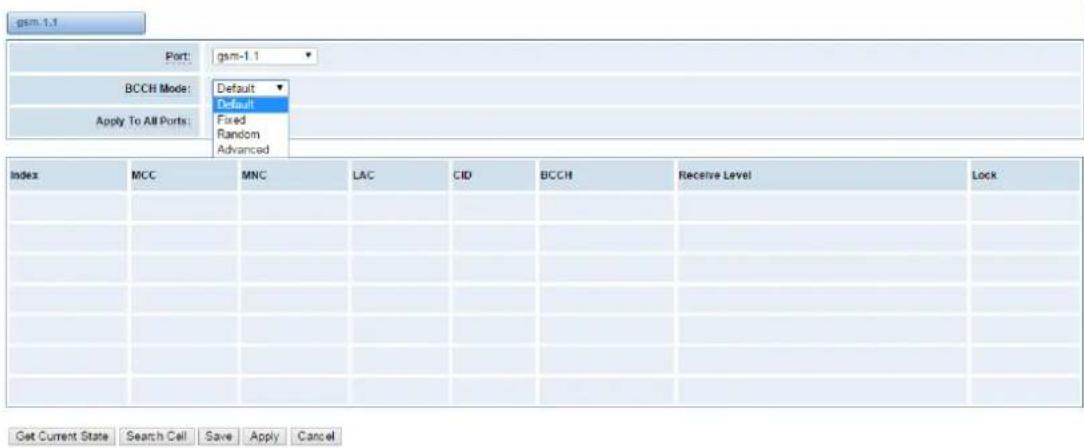
Figure 3-20 BCCH Mode
Toolkit
You can get USSD information, send AT command and check number with this module. When you have a debug of the GSM module, AT command is useful.

Figure 3-21 Function Options
Table3-5 Description of Definition of Functions
| Options | Definition |
| Check Number | Enter a known number (like your mobile phone) to check what number it is of the SIM card. Click "Execute", then the gateway will dial to the number you already input. It only rings for one time and hangs up at once. Not generating telephone charge during this procedure. |
| Get USSD | Enter a specific USSD number (For example,*142# to check your SIM card's balance. This USSD number is might be different from different carriers) to get the USSD information. The gateway will try to get by AT commands. |
| AT Command | To perform some specific AT commands. This is useful when you have a debug of the GSM modem. e.g. perform [ AT+CSQ ] to check what signal qualify it is. In AT commands, there is no difference between “a” and “A” |
If you want to send AT command, first you should input your command, then select certain ports and choose "Copy to Selected", finally choose "Execute".
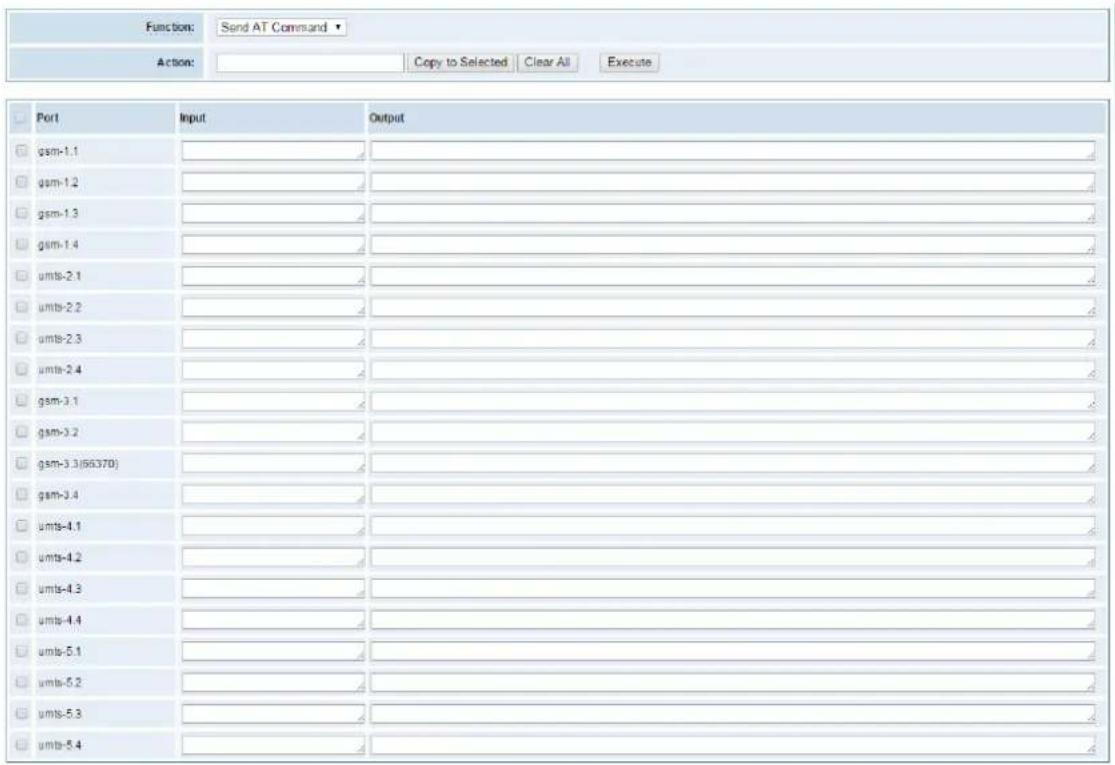
Figure 3-22 AT Command Example
4. VOIP
VOIP Endpoints
This page shows everything about your SIP&IAX2, you can see status of each SIP&IAX2.

Figure 4-1 SIP&IAX2 Endpoints
Add New SIP Endpoint
Main SIP Endpoint Sengs
You can click button to add a new SIP endpoint, and if you want to
modify existed endpoints, you can click button.
There are 3 kinds of registration types for choose. None, Server or Client.
You can configure as follows:
If you set up a SIP endpoint by registration "None" to a server, then you can't register other SIP endpoints to this server. (If you add other SIP endpoints, this will cause Outband Routes and Trunks confused.)

Figure 4-2 None Registration
For convenience, we have designed a method that you can register your SIP endpoint to your gateway, thus your gateway just work as a server.

Figure 4-3 Sever
Also you can choose registration by "This gateway registers with the endpoint", it's the same with "None", except name and password.
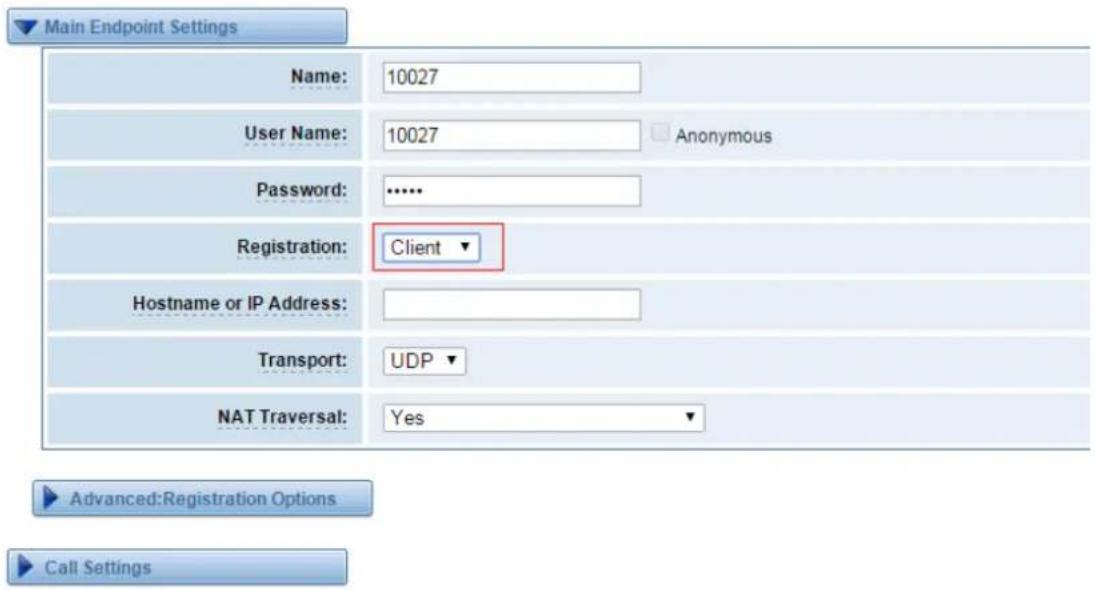
Figure 4-4 Client
table 4-1 Definition of SIP Options
| Options | Definition |
| Name | Display name |
| Username | Register name in your SIP server |
| Password | Authenticating with the gateway and characters are allowed. |
| Registration | None --- Not registering;Endpoint registers with this gateway --- When register as this type, it means the GSM gateway acts as a SIP server, and SIP endpoints register to the gateway;This gateway registers with the endpoint --- When register as this type, it means the GSM gateway acts as a client, and the endpoint should be register to a SIP server; |
| Hostname or IP Address | IP address or hostname of the endpoint or 'dynamic' if the endpoint has a dynamic IP address. This will require registration. |
| Transport | This sets the possible transport types for outgoing. Order of usage, when the respective transport protocols are enabled, is UDP, TCP,TLS. The first enabled transport type is only used for outbound messages until a Registration takes place. During the peer Registration, the transport type may change to another supported type if the peer requests so. |
| NAT Traversal | No --- Use Rport if the remote side says to use it. Force Rport on --- Force Rport to always be on. Yes --- Force Rport to always be on and perform comedia RTP handling. Rport if requested and comedia --- Use Rport if the remote side says to use it and perform comedia RTP handling. |
Advanced -- Registraon Opons
Table 4-2 Definition of Registration Options
| Options | Definition |
| Authentication User | A username to use only for registration. |
| Register Extension | When Gateway registers as a SIP user agent to a SIP proxy (provider), calls from this provider connect to this local extension. |
| From User | A username to identify the gateway to this endpoint. |
| From Domain | A domain to identify the gateway to this endpoint. |
| Remote Secret | A password which is only used if the gateway registers to the remote side. |
| Port | The port number the gateway will connect to at this endpoint. |
| Qualify | Whether or not to check the endpoint's connection status |
| Qualify Frequency | How often, in seconds, to check the endpoint's connection status. |
| Outbound Proxy | A proxy to which the gateway will send all outbound signalling instead of sending signalling directly to endpoints. |
Call Sengs
Table 4-3 Definition of Call Options
| Options | Definition |
| DTMF Mode | Set default DTMF Mode for sending DTMF. Default:rfc2833. Other options: 'info', SIP INFO message(application/dtmf-relay); 'Inband', Inband audio (require 64kbit codec -alaw, ulaw). |
| Trust Remote-Party-ID | Whether or not the Remote-Party-ID header should be trusted. |
| Send Remote-Party-ID | Whether or not to send the Remote-Party-ID header. |
| Remote Party ID Format | How to set the Remote-Party-ID header: from Remote-Party-ID or from P-Asserted-Identity. |
| Caller ID Presentation | Whether or not to display Caller ID. |
| Call Limit | Usually used when this sip work as a trunk. To limit number of maximum channels supported by the sip trunk. |
Advanced -- Signalling Sengs
Table 4-4 Definition of Signaling Options
| Options | Definition |
| Progress Inband | Set default DTMF Mode for sending DTMF. Default: rfc2833. Other options: 'info', SIP INFO message (application/dtmf-relay); 'inband', Inband audio (require 64kbit codec -alaw, ulaw). |
| Allow Overlap Dialing | Whether or not the Remote-Party-ID header should be trusted. |
| Append user=phone to URI | Whether or not to send the Remote-Party-ID header. |
| Add Q.850 Reason Headers | How to set the Remote-Party-ID header: from Remote-Party-ID or from P-Asserted-Identity. |
| Honor SDP Version | Whether or not to display Caller ID. |
| Allow Transfers | Whether or not to globally enable transfers. Choosing 'no' will disable all transfers (unless enabled in peers or users). Default is enabled. |
| Allow Promiscuous Redirects | Whether or not to allow 302 or REDIR to non-local SIP address. Note that promiscredir when redirects are made to the local system will cause loops since this gateway is incapable of performing a "hairpin" call. |
| Max Forwards | Setting for the SIP Max-Forwards header (loop prevention). Send TRYING on REGISTER Send a 100 Trying when the endpoint registers. |
| Outbound Proxy | A proxy to which the gateway will send all outbound signaling instead of sending signaling directly to endpoints. |
Advanced -- Timer Sengs
Table 4-5 Definition of Timer Options
| Options | Definition |
| Default T1 Timer | This timer is used primarily in INVITE transactions. The default for Timer T1 is 500ms or the measured run-trip time between the gateway and the device if you have qualify=yes for the device. |
| Call Setup Timer | If a provisional response is not received in this amount of time, the call will auto-congest. Defaults to 64 times the default T1 timer. |
| Session Timers | Session-Timers feature operates in the following three modes: originate, Request and run session-timers always; accept, run session-timers only when requested by other UA; refuse, do not run session timers in any case. |
| Minimum Session | Minimum session refresh interval in seconds. Default is 90secs. |
| Maximum Session Refresh Interval | Maximum session refresh interval in seconds. Defaults to 1800secs. |
| Session Refresher | The session refresher, uac or uas. Defaults to uas. |
Main IAX2 Endpoint Sengs
Add New IAX2 Endpoint
You can click button to add a new IAX2 endpoint, and if you

want to modify existed endpoints, you can click button.
There are 3 kinds of registration types for choose. You can choose None, Endpoint registers with this gateway(work as a Server) or This gateway registers with the endpoint(work as a Client).
You can configure as follows:
If you set up a IAx2 endpoint by registration "None" to a server, then you can't register other IAX2 endpoints to this server, just authenticate the username and password.

Figure 4-5 None Registration
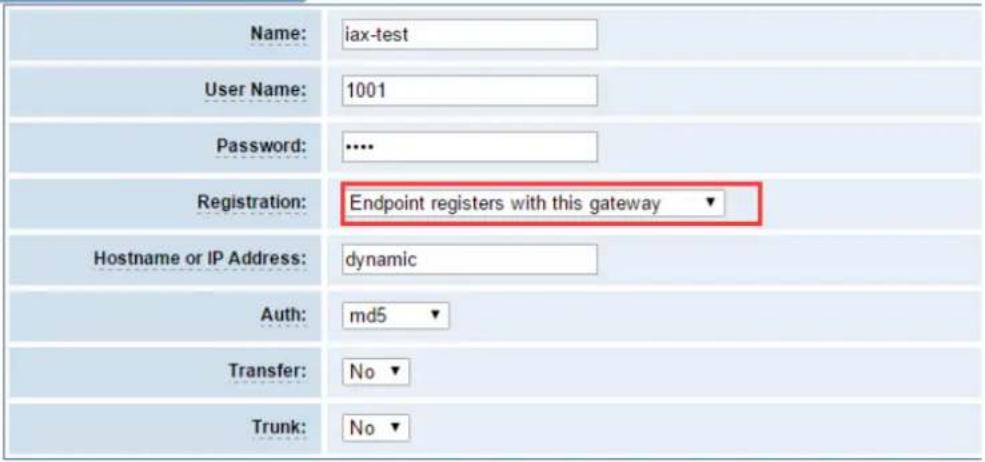
For convenience, we have designed a method that you can register your IAX2 endpoint to your gateway, thus your gateway just work as a server.
Edit IAX2 Endpoint "iax-test"
Main Endpoint Settings
Advanced:Registration Options
IAX2 Encryption
IAX2 Trunk settings
Save Apply Cancel
Figure 4-6 Endpoint Register With this Gateway
Also you can choose registration by "This gateway registers with the endpoint", it will work as a Client.
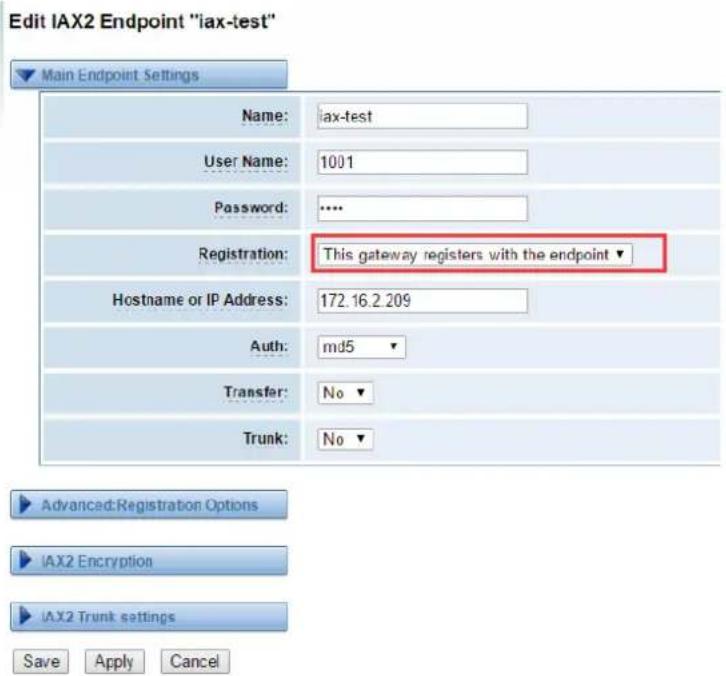
Figure 4-7 This Gateway Register With the Endpoint
Table 4-6 Definition of IAX2 Options
| Options | Definition |
| Name | Display name |
| Username | Authentication name in your IAX2 server |
| Password | Authenticating with the gateway and characters are allowed. |
| Registration | None --- Not registering;Endpoint registers with this gateway --- When register as this type, it means the GSM/3G gateway acts as a IAX2 server, and IAX2 endpoints register to the gateway;This gateway registers with the endpoint --- When register as this type, it means the GSM/3G gateway acts as a IAX2 client, and the endpoint should be register to a IAX2 server; |
| Hostname or IP Address | IP address or hostname of the endpoint or 'dynamic' if the endpoint has a dynamic IP address. This will require registration. |
| Auth | There are three authentication methods that are supported: md5, plaintext and rsa. The least secure is "plaintext", which sends passwords cleartext across the net. "md5" uses a challenge/response md5 sum arrangement, but still requires both ends have plain text access to the secret. "rsa" allows unidirectional secret knowledge through public/private keys. If "rsa" authentication is used, "inkeys" is a list of acceptable public keys on the local system that can be used to authenticate the remote peer, separated by the ":" character. "outkey" is a single, private key to use to authenticate to the other side. |
| Transfer | This application allows you to transfer calls. |
| Trunk | "trunk=yes" Purpose: To obtain a better chart of actual bandwidth usage per codec as seen "on-the-wire" when using IAX2 trunking between two Asterisk telephony servers. |
Advanced:Registraon Opons
Table 4-7 Definition of Registration Options
| Options | Definition |
| Qualify, Qualify Freq Ok, Qualify Freq Not Ok | The qualify, qualifyfreqok and qualifyfreqnotok settings are used to determine the status availability of an IAX peer. If a peer is considered to be in a reachable (OK or LAGGED) state, it is queried for availability every "qualifyfreqok" milliseconds. If it is considered to be in an UNREACHABLE state, it is queried for availability every "qualifyfreqnotok" milliseconds.The qualify= setting turns the qualify system on (if the "yes" or xxx options are used) or off (if qualify=no, which is by default). The millisecond value of the qualify= setting specifies the maximum response time of the availability acknowledgement before the peer is considered to be in a "LAGGED" state. |
| Qualify Smothing | Use an average of the last two PONG result to reduce falsely detected LAGGED host. The default is 'no'. |
| Port | The port number the gateway will connect to at this endpoint. |
IAX2 Encrypon
Table 4-8 Definition of Encryption Options
| Options | Definition |
| Encryption | Enable IAX2 encryption. The default is no. |
| Force Encryption | Force encryption insures no connection is established unless both sides support encryption. By turning this option on, encryption is automatically; turned on as well. The default is no |
IAX2 Trunk Sengs
Table 4-9 Definition of Trunk Options
| Options | Definition |
| Trunk Max Size | Defaults to 128000 bytes, which supports up to 800; calls of ulaw at 20ms a frame. |
| Trunk MTU | With a large amount of traffic on IAX2 trunk, there is a risk of bad voice quality when allowing the Linux system to handle fragmentation of UDP packets. Depending on the side of each payload, allowing the OS to handle fragmentation may not be very efficient. This setting sets the maximum transmission unit for AIX2 UDP trunking. The default is 1240 bytes which means if a trunk's payload is over 1240 bytes for every 20ms it will be broken into multiple 1240 bytes messages. Zero disables this functionality and let's the OS handle fragmentation. |
| Trunk Frequency | How frequently to send trunk msgs (in ms). This is 20ms by default. |
| Trunk Time Stamps | Should we send timestamps for the individual sub_frames within trunk frames? There is a small bandwidth use for these (less than 1kbps/call), but they ensure that frame timestamps get sent end-to-end properly. If both ends of all your trunks go directly to TDM, _and_your trunkfreq equals the frame length for your codecs, you can probably suppress these. The receiver must also need to have it enabled. |
| Min. RegExpire | Minimum amounts of time that IAX2 peers can request as a registration interval (in seconds). |
| Max. RegExpire | Maximum amounts of time that IAX2 peers can request as a registration expiration interval(in seconds). |
Advanced SIP Sengs
Networking
Table 4-10 Definition of Networking General Options
| Options | Definition |
| UDP Bind Port | UDP Bind Port |
| Enable TCP | Enable server for incoming TCP connection (default is no). |
| TCP Bind Port | Choose a port on which to listen for TCP traffic. |
| TCPAuthentication Timeout | The maximum number of seconds a client has to authenticate. If the client does not authenticate before this timeout expires, the client will be disconnected.(default value is: 30 seconds). |
| TCPAuthentication Limit | The maximum number of unauthenticated sessions that will be allowed to connect at any given time (default is: 50). |
| EnableHostname Lookup | Enable DNS SRV lookups on outbound calls Note: the gateway only uses the first host in SRV records Disabling DNS SRV lookups disables the ability to place SIP calls based on domain names to some other SIP users on the Internet specifying a port in a SIP peer definition or when dialing outbound calls with suppress SRV lookups for that peer or call. |
| Enable Internal SIP Call | Whether enable the internal SIP calls or not when you select the registration option "Endpoint registers with this gateway". |
| Internal SIP Call Prefix | Specify a prefix before routing the internal calls. |
Table 4-11 Definition of NAT Settings Options
| Options | Definition |
| Local Network | Format:192.168.0.0/255.255.0.0 or 172.16.0.0./12. A list of IP address or IP ranges which are located inside a NATed network. This gateway will replace the internal IP address in SIP and SDP messages with the external IP address when a NAT exists between the gateway and other endpoints. |
| Local Network List | Local IP address list that you added. |
| Subscribe Network Change Event | Through the use of the test_stun_monitor module, the gateway has the ability to detect when the perceived external network address has changed. When the stun_monitor is installed and configured, chan_sip will renew all outbound registrations when the monitor detects any sort of network change has occurred. By default this option is enabled, but only takes effect once res_stun_monitor is configured. If res_stun_monitor is enabled and you wish to not generate all outbound registrations on a network change, use the option below to disable this feature. |
| MatchExternal AddressLocally | Only substitute the externaddr or externhost setting if it matches. |
| DynamicExclude Static | Disallow all dynamic hosts from registering as any IP address used for statically defined hosts. This helps avoid the configuration error of allowing your users to register at the same address as a SIP provider. |
| Externally Mapped TCP Port | The externally mapped TCP port, when the gateway is behind a static NAT or PAT. |
| External Hostname | The external hostname (and optional TCP port) of the NAT. |
| HostnameRefresh Interval | How often to perform a hostname lookup. This can be useful when your NAT device lets you choose the port mapping, but the IP address is dynamic. Beware, you might suffer from service disruption when the name server resolution fails. |
Table 4-12 Definition of RTP Settings Options
| Options | Definition |
| Start of RTP Port Range | Start of range of port numbers to be used for RTP |
| End of RTP port Range | End of port numbers to be used for RTP |
Paesing and Compatibility
Table 4-13 Instruction of Parsing and Compatibility
| Options | Definition |
| Strict RFC Interpretation | Check header tags, character conversion in URIs, and multiline headers for strict SIP compatibility(default is yes) |
| Send Compact Headers | Send compact SIP headers |
| SDP Owner | Allows you to change the username filed in the SDP owner string. This filed MUST NOT contain spaces. |
| Disallowed SIP Methods | The external hostname (and optional TCP port) of the NAT. |
| Shrink Caller ID | The shrinkcallerid function removes '(', '', ')'', non-trailing '', and '-' not in square brackets. For example, the caller |
| id value 555.5555 becomes 5555555 when this option is enabled. Disabling this option results in no modification of the caller id value, which is necessary when the caller id represents something that must be preserved. By default this option is on. | |
| Maximum Registration Expiry | Maximum allowed time of incoming registrations and subscriptions (seconds). |
| Minimum Registration Expiry | Minimum length of registrations/subscriptions (default 60). |
| Default Registration Expiry | Default length of incoming/outgoing registration. |
| Registration Timeout | How often, in seconds, to retry registration calls. Default 20 seconds. |
| Number of Registration | Attempts Enter '0' for unlimited Number of registration attempts before we give up. 0 = continue forever, hammering the other server until it accepts the registration. Default is 0 tries, continue forever. |
Security
Table 4-14 Instruction of Security
| Options | Definition |
| Match Auth Username | If available, match user entry using the 'username' field from the authentication line instead of the 'from' field. |
| Realm | Realm for digest authentication. Realms MUST be globally unique according to RFC 3261. Set this to your host name or domain name. |
| Use Domain as Realm | Use the domain from the SIP Domains setting as the realm. In this case, the realm will be based on the request 'to' or 'from' header and should match one of the domain. Otherwise, the configured 'realm' value will be used. |
| Always Auth Reject | When an incoming INVITE or REGISTER is to be rejected, for any reason, always reject with an identical response equivalent to valid username and invalid password/hashinstead of letting the requester know whether there was a matching user or peer for their request. This reduces the ability of an attacker to scan for valid SIP usernames. This option is set to 'yes' by default. |
| Authenticate Options Requests | Enabling this option will authenticate OPTIONS requests just like INVITE requests are. By default this option is disabled. |
| Allow Guest Calling | Allow or reject guest calls (default is yes, to allow). If your gateway is connected to the Internet and you allow guest calls, you want to check which services you offer everyone out there, by enabling them in the default context. |
Media
Table 4-15 Instruction of Media
| Options | Definition |
| Premature Media | Some ISDN links send empty media frames before the call is in ringing or progress state. The SIP channel will then send 183 indicating early media which will be empty - thus users get no ring signal. Setting this to "yes" will stop any media before we have call progress (meaning the SIP channel will not send 183 Session Progress for early media). Default is 'yes'. Also make sure that the SIP peer is configured with progressinband=never. In order for 'noanswer' applications to work, you need to run the progress() application in the priority before the app. |
| TOS for SIP Packets | Sets type of service for SIP packets |
| TOS for RTP Packets | Sets type of service for RTP packets |
Codec Settings
Select codecs from the list below.
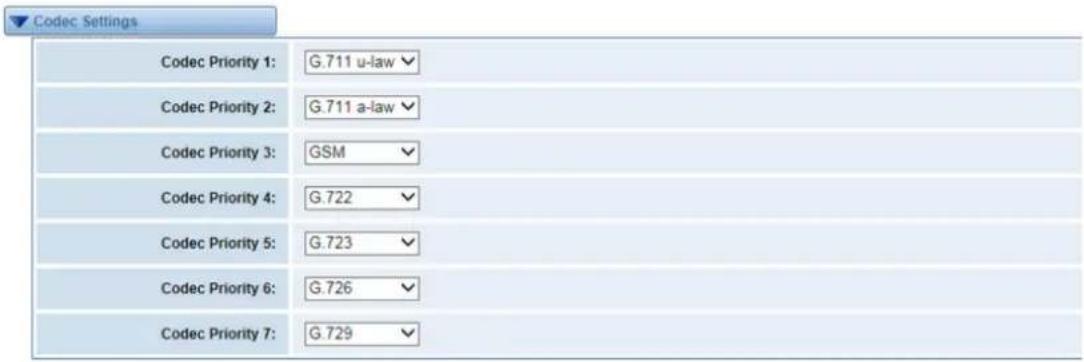
Figure 4-8 Codec Settings
Advanced IAX2 Sengs
Table 4-16 Instruction of General
| Options | Definition |
| Bind Port | Bind port and bindaddr may be specified |
| Enable IAXCompat | More than once to bind to multiple addresses, but the first will be the default. |
| Enable Nochecksums | Set iaxcompat to yes if you plan to use layered switches or some other scenario which may cause some delay when doing a lookup in the dialplan. It incurs a small performance hit to enable it. This option cause Asterisk to spawn a separate thread when it receives an IAX DPREQ (Dialplan Request) instead of blocking while it waits for a response. |
| Enable Delay Reject | Disable UDP checksums (if no checksums is set, then no checksums will be calculated/checked on system supporting the feature) |
| ADSI | ADSI (Analog Display Services Interface) can be enable if you have (or may have) ADSI compatible CPE equipment. |
| SRV Loopup | Whether or not to perform an SRV lookup on outbound calls |
| AMA Flags | You may specify a global default AMA flag for iaxtel calls. These flags are used in the generation of call detail records. |
| autokill | If we don't get ACK to our NEW within 2000ms,and autokill is set toyes, then we cancel the whole thing(that's enough time for one retransmission only ).This is used to keep things from stalling for a long time for a host that is not available for bad connections. |
| Language | You may specify a global default language for users. This can be specified also on a per-user basis. If omitted, will fallback to English(en) |
| Account Code | You may specify a default account for Call Detail Records (CDRs) in addition specifying on a per-user basis. |
Table 4-17 Instruction of Music on Hold
| Options | Definition |
| Mohsuggest | The ‘Mohsuggest’ option specifies which music on hold class to suggest to the peer channel when this channel place the peer on hold. It may be specified globally or on a per-user or per-peer basis. |
| Mohinterpret | You may specify a global default language for users. This can be specified also on a per-user basis. If omitted, will fall back to English(en) |
Table 4-18 Instruction of Codec Settings
| Options | Definition |
| Band Width | Specify bandwidth of low, medium, or high to control which codes are used in general |
| Disallow | Fine tune codes here using “allow” and “disallow” clause with specific codes |
| Allow | Fine tune codes here using “allow” and “disallow” clause with specific codes |
| Codec Priority | Codec priority controls the codec negotiation of an inbound IAX2 call. This option is inherited to all user entity separately which will override the setting in general. |
Table 4-19 Instruction of Jitter Buffer
| Options | Definition |
| Jitter Buffer | Global default as to whether you want the jitter buffer at all |
| Force Jitter Buffer | In the ideal world, when we bridge VoIP channels we don't want to jitter buffering on the switch, since the endpoints can each handle this. However, some endpoints may have poor jitter buffers themselves, so this option will force to always jitter buffer, even in this case. |
| Max Jitter Buffers | A maximum size for the jitter buffer |
| Resyncthreshold | When the jitter buffer notice a significant change in delay thatcontinue over a few frames, it will resync, assuming that the change in delay was caused by a timestamping mix-up. The threshold for noticing a change in delay is measured as twice the measured jitter plus this resync threshold. |
| Max Jitter Interps | The maximum number of interpolation frames the jitter buffer should return in a row. Since some clients do not send CNG/DTX frames to indicate silence, the jitter buffer will assume silence has begun after returning this many interpolations. This prevents interpolating throughout a long silence. |
| Jitter Target Extra | Number of milliseconds by which the new jitter buffer will pad its size. The default is 40, so without modification, the new jitter buffer will set its size to the jitter value may help if your network normally has low jitter, but occasionally has spikes. |
Table 4-20 Instruction of Misc Settings
| Options | Definition |
| IAX Thread Count | Establishes the number of iax helper thread to handle I/O |
| IAX Max Thread Count | Establishes the number of extra dynamic threads that may by spawned to handle I/O |
| Max Call Number | The ‘maxcallnumbers’ option limits the amount of call numbers allowed for each individual remote IP address. Once an IP address reaches its call number limit, no more new connections are allowed until the previous ones close. This option can be used in a peer definition as well, but only takes effect for the IP of a dynamic peer after it completes registration. |
| MaxCallNumbers_Nonvalidated | The ‘maxcallnumbers-nonvalidated’ is used to set the combined number of call numbers that can be allocated for connections where call token validation has been disabled. Unlike the ‘maxcallnumbers’ option, this limit is not separate for each individual IP address. Any connection resulting in a non-call token validated call number being allocated contributes to this limit. For use cases, see the call should be sufficient in most cases. |
Table 4-21 Instruction of Quality of Service
| Options | Definition |
| Tos | Type of service |
| Cos | Class of service |
5. Routing
| Move | Order | Rule Name | From | To | Rules | Actions |
| 1 | Incoming | grip-all | slp-10028 | |||
| 2 | Outgoing | slp-10027 | grip-parts | |||
| 3 | test1 | slp-1001 | lax-2111 | Dial_pattern (I+1(I)) | ||
| 4 | test2 | slp-1001 | lax-2112 | Dial_pattern (I+2(I)) | ||
| 5 | test3 | slp-1001 | lax-2113 | Dial_pattern (I+3(I)) | ||
| 6 | test | grip-lax | gem-1.3, units-2.3 |
New Call Routing Rule Save Orders
Figure 5-1 Routing Rules

you set. Shows current routing rules. Otherwise you can set up unlimited routing rules.
Call ROUNG Rule
You can click button to set up your routings.

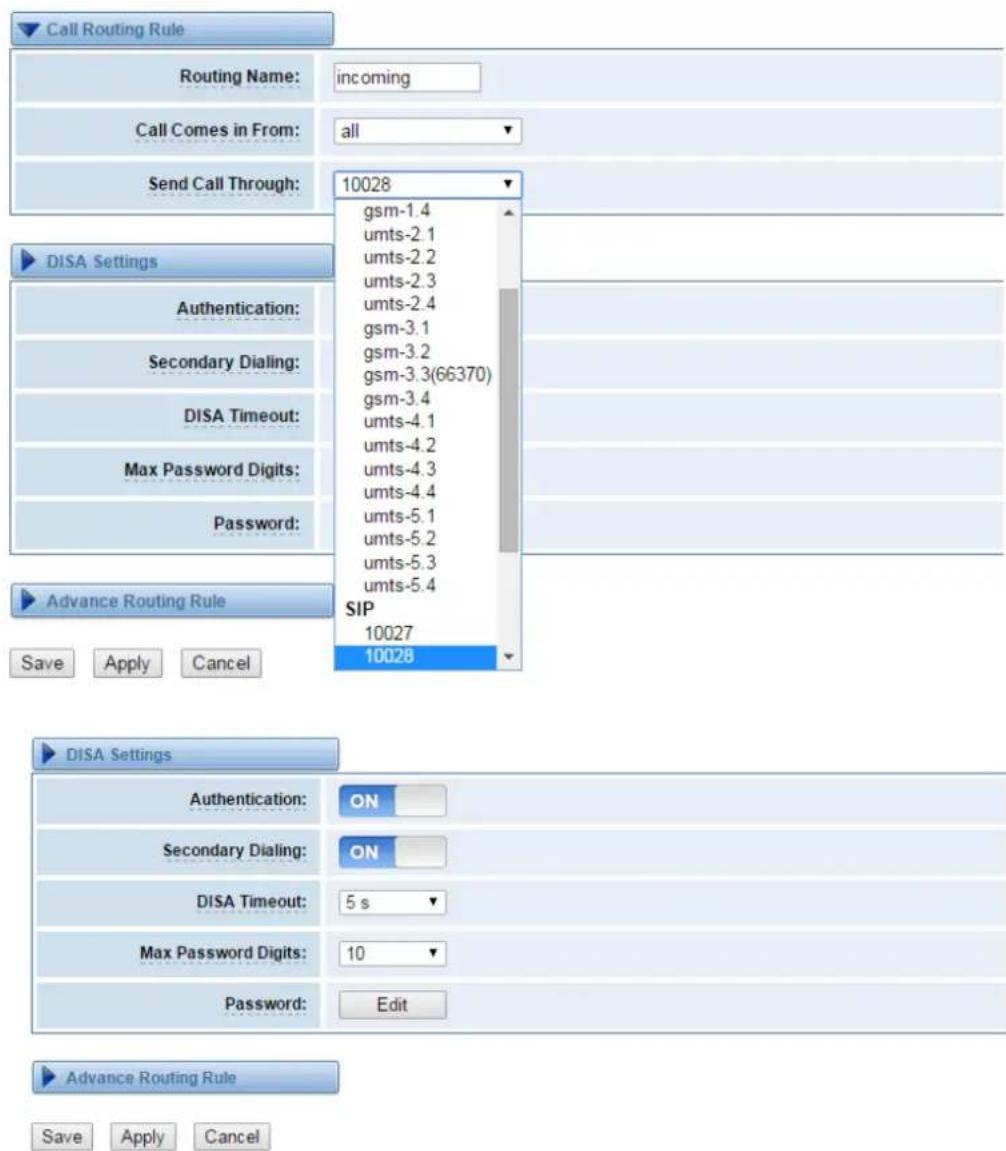
Figure 5-2 Example of Set up Routing Rule
The figure above realizes that calls from "1001" SIP endpoint switch you have registered will be transferred to Port-1. When "Call Comes in From" is T1/E1 Port, "prepend", "prefix" and "match pattern" in "Advanced Routing Rule" are ineffective, and just "CallerID" option is available.
Table5-1 Definition of Routing Options
| Options | Definition |
| Routing Name | The name of this route. Should be used to describe what types of calls this route matches (for example, 'SIP2GSM' or 'GSM2SIP'). |
| Call Comes in From | The launching point of incoming calls. |
| Send Call Through | The destination to receive the incoming calls. |
Table5-2 Description of Advanced Routing Rule
| Options | Definition |
| Dial Patterns that will use this Route | A Dial Pattern is a unique set of digits that will select this route and send the call to the designated trunks. If a dialed pattern matches this route, no subsequent routes will be tried. If Time Groups are enabled, subsequent routes will be checked for matches outside of the designated time(s).Rules:X matches any digit from 0-9Z matches any digit from 1-9N matches any digit from 2-9[1237-9] matches any digit in the brackets (example: 1,2,3,7,8,9). wildcard: matches one or more dialed digits.prepend: Digits to prepend to a successful matchIf the dialed number matches the patterns specified by the subsequent columns, then this will be prepended before sending to the trunksprefix: Prefix to remove on a successful matchThe dialed number is compared to this and the subsequent columns for a match. Upon a match, this prefix is removed from the dialed number before sending it to the trunks.match pattern: The dialed number will be compared against the prefix + this match pattern. Upon a match, the match pattern portion of the dialed number will be sent to the trunksCallerID: If CallerID is supplied, the dialed number will only match the prefix + match pattern if the CallerID has been transmitted matches this.When extensions make outbound calls, the CallerID will be their extension number and NOT their Outbound CID.The above special matching sequences can be used for CallerID matching similar to other number matches. |
| Set the Caller ID Name to | What caller ID name would you like to set before sending this call to the endpoint. |
| Set the Caller ID Number to | What caller number would you like to set before sending this call to the endpoint. |
| Forward Number | What destination number will you dial? This is very useful when you have a transfer call. |
| Failover Call Through Number | The gateway will attempt to send the call out each of these in the order you specify. You can create various time routes and use these time conditions to limit some specific calls. |

Figure 5-3 Time Patterns that will use this Route
If you configure like this, then from January to March, from the first day to the last day of these months, from Monday to Thursday, from 00:00 to 02:00, during this time (meet all above time conditions), all calls will follow this route. And the time will synchronize with your Sever time.
| Change Rules | |
| Set the Caller ID Name to | |
| Set the Caller ID Number to | |
| Forward Number | |
Figure 5-4 Failover Call Through Number
You can add one or more "Failover Call Through Numbers".
Groups
Sometimes you want to make a call through one port, but you don't know if it is available, so you have to check which port is free. That would be troublesome. But with our
product, you don't need to worry about it. You can combine many GSM or SIP to groups. Then if you want to make a call, it will find available port automatically.

Figure 5-5 Routing Group
MNP Sengs
Mobile Number Portability allows switching between mobile phone operators without changing the mobile number. Sounds simple, but there are loads of tasks performed behind the scene at the operator end.
The URL is shown in the password string way. So please type the url in other place such a txt file, check it, then copy it to the gateway. The outgoing number in the url should be replaced by the variables \${num}.
Here is an example of the MNP url:
https://s1.bichara.com.br:8181/chkporta.php?user=832700&pwd=sdsfdg&tn=8388166902
The 8388166902 is the outgoing phone number, when config the MNP url, should replace it with \${num}. Then it turns to
https://s1.bichara.com.br:8181/chkporta.php?user=832700&pwd=sdsfdg&tn=\${num}.

Figure 5-6 MNP Settings
6. SMS
General
You can choose enable SMS Received, SMS Local Stored and SMS Status Report or not.

Figure 6-1 SMS Settings
Sender Opons
You can change sender options here, include resend, times of resend.

Figure 6-2 Sender Options
Table 6-1 Description of Sender Options
| Options | Definition |
| Resend Failed Message | The times that you will attempt to resend your failed message. |
| Repeat Same Message | The times that you will resend the same message. |
SMS to Email
This is a tool that makes it available for you to email account to transmit the SMS to other email boxes. The following settings realize that received SMS through openvpnvoip@gmail.com transmit to openvpnvoip@yahoo.com.cn, openvpnvoip@hotmail.com and support@openvox.cn

Figure 6-3 SMS to Email
Table6-2 Types of E-mail Box
| E-mail Box Type | SMTP Server | SMTP Port | SMTP Security Connectivity |
| Gmail | smtp.gmail.com | 587 | √ |
| HotMail | smtp.live.com | 587 | √ |
| Yahoo! | smtp.mail.yahoo.co.in | 587 | × |
| smtp.163.com | 25 | × |
Table6-3 Definition of SMS to E-mail
| Options | Definition |
| Enable | When you choose on, the following options are available, otherwise, unavailable. |
| Email Address of Sender | To set the email address of an available email account. For example, openvpnvoip@gmail.com. |
| Domain | To set outgoing mail server. e.g. smtp.gmail.com |
| SMTP Port | To set port number of outgoing mail server. (Default is 25) |
| SMTP User Name | The login name of your existing email account. This option might be different from your email address. Some email client doesn't need the email postfix |
| SMTP Password | The password to login your existing email. |
| TLS Enable | When you choose Yahoo and 163 free e-mails, this option is not available. |
| SMTP Server | To set outgoing mail server. e.g. mail.openvox.cn. |
| Destination Email Address1 | The first email address to receive the inbox message. |
| Destination Email Address2 | The second email address to receive the inbox message. |
| Destination Email Address3 | The third email address to receive the inbox message. |
SMS Control
Allowing endpoints to send some specific KEY WORDS and corresponding PASSWORD to operate the gateway and message is case-sensitive. In default, this function is disabled.
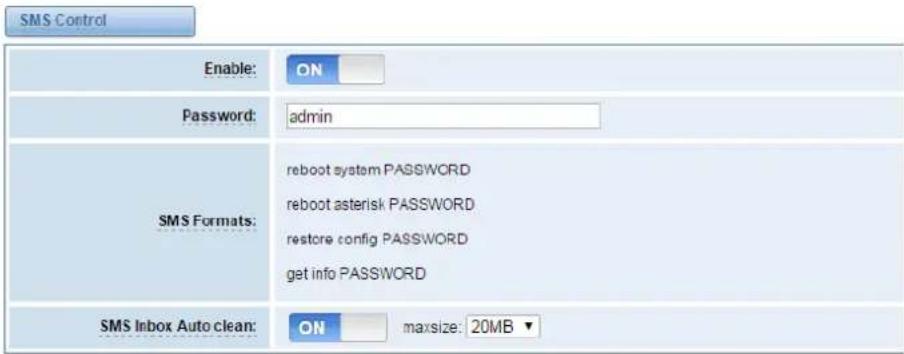
Figure 6-4 SMS Control
For example, SMS control password is 123456789 which has nothing to do with the login password, you can send “get info 123456789” to the GSM module’s phone number to get your gateway’s IP information.
Table6-4 Definition of SMS Control
| Options | Definition |
| Enable | ON(enable), OFF(disable) |
| Password | The password to confirm that SMS makes the gateway rebooted, shut down, restored configuration files and get info on this gateway. |
| SMS Format | For example, the message formats:reboot system PASSWORD: To reboot your whole gateway.The PASSWORD is referring to the PASSWORD you set up from option “PASSWORD” above.Reboot asterisk PASSWORD: To restart your gateway core.Restore configs PASSWORD: To reset the configuration files back to the default factory settings.Get info PASSWORD: To get your gateway IP address |
| SMS inboxAuto clean | switch on: When the size of the SMS inbox record file reaches the max size, the system will cut a half of the file. New record will be retained.switch off: SMS record will remain, and the file size will increase gradually. default on, max size = 20 MB |
HTTP to SMS
![HTTP to SMS Enable: ON URL: http://172.16.179.1.80/sandems?username=xxx&password=xxx&phonenumber=xxx&message=xxx&port=xxx&[report=xxx&[timeout=xxx] User Name: ###user Use default user and password Password: ****** Port: gem-1.1 gem-1.2 gem-1.3 gem-1.4 units-2.1 units-2.2 units-2.3 units-2.4 gem-3.1 gem-3.2 gem-3.3(66370) gem-3.4 units-4.1 units-4.2 units-4.3 units-4.4 units-5.1 units-5.2 units-5.3 units-5.4 All Report: JSON ▼ Advanced: ON Debug: 0 Timeout: 20 second Wait Timeout: 20 second GSM Send Timeout: 10 second Socket Timeout: 2 second](/content/2026/06/1373241/images/4537b3fa3e1aaeba11223b2b4f3522122ab39ccc5d5c96bc0cda515b0b2715c5.jpg)
Figure 6-5 HTTP to SMS
SMS to HTTP

Figure 6-6 SMS to HTTP setting
SMS Sender
You can choose one or more ports to send SMS to the destination number, different numbers should be separated by symbols: '\r', '\n', space character, semicolon and comma. Then you can see much feedback information.

Figure 6-7 SMS Sender
SMS Inbox
On this page, you are allowed to scan, delete, clean up, and export each port's received SMS. Also you are allowed to check messages by port, phone number, time order and message keywords.
| Port | Phone Number | Time | Message Keywords | ||
| all | from | to | |||
Filter Clean Filter
Total Records: 16
Delete Clean Up Export
Figure 6-8 SMS Inbox
SMS Outbox
On this page, you are allowed to scan, delete, clean up, and export each port's received SMS. Also you are allowed to check messages by port, phone number, time order and message keywords.

Figure 6-9 SMS Outbox
SMS Forwarding
Using this feature, you can forward incoming sms to your mobile. You can
click button to add new routing.
Such as:

SMS received by gsm-1.1 and gsm-1.2, will be transferred to phone number 13923704563 through port umts-2.1 or gsm-3.1.
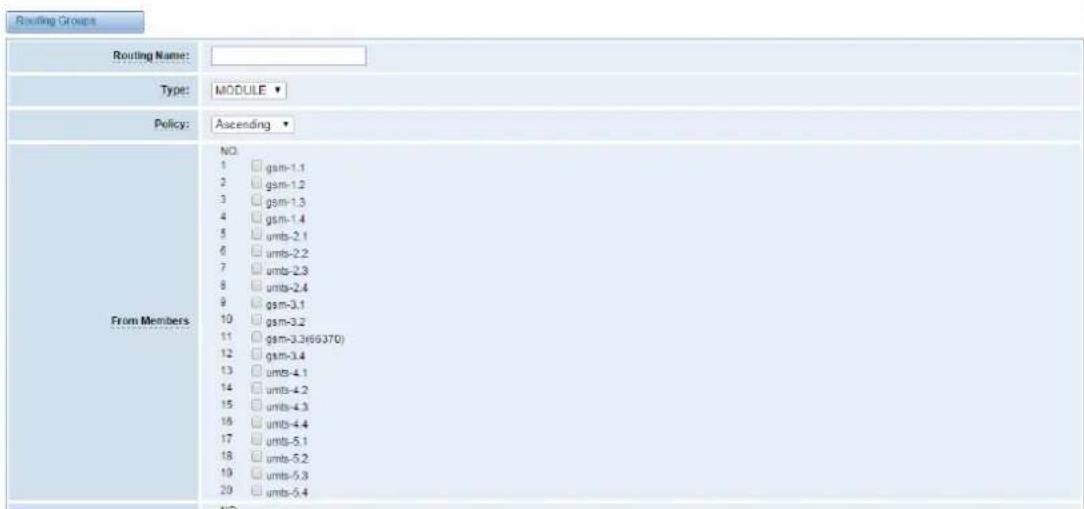
Figure 6-10 Create a routing
For "ascending" Policy, if you choose 2 or more ports members, it will use first available port to transfer sms. For this case, if umts-2.1 is available, it will always use umts-2.1 to trnasfer sms; Otherwise, it will use gsm-3.1 to transfer sms.
7. Network
On "Network" page, there are three sub-pages: "LAN Settings", "DDNS Settings", and "Toolkit".
Network Sengs
There are three types of WAN/LAN port IP, Factory, Static and DHCP. Factory is the default type, and it is 172.16.99.1. When you Choose LAN IPv4 type is "Factory", this page is not editable.
A reserved IP address to access in case your gateway IP is not available. Remember to set a similar network segment with the following address of your local PC.
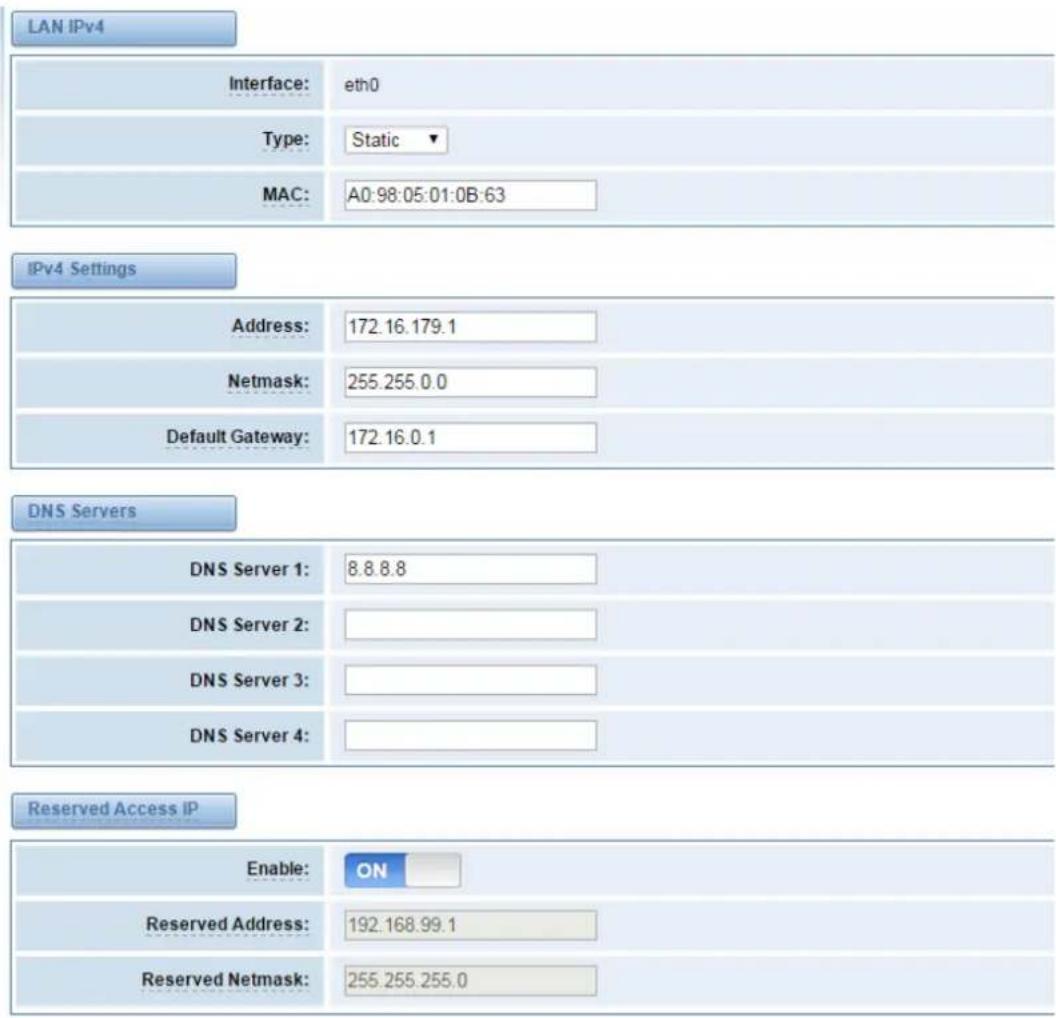
Figure 7-1 LAN Settings
Table7-1 Definition of LAN Settings
| Options | Definition |
| Interface | The name of network interface. |
| Type | The method to get IP. Factory: Getting IP address by Slot Number (System information to check slot number). Static: manually set up your gatewayIP. DHCP: automatically get IP from your local LAN. |
| MAC | Physical address of your network interface. |
| Address | The IP address of your gateway. |
| Netmsk | The subnet mask of your gateway. |
| Default Gateway | Default getaway IP address. |
Basically this info is from your local network service provider, and you can fill in four DNS servers.
- DNS Servers: A list of DNS IP address. Basically this info is from your local network service provider.
DDNS Sengs
You can enable or disable DDNS (dynamic domain name server).
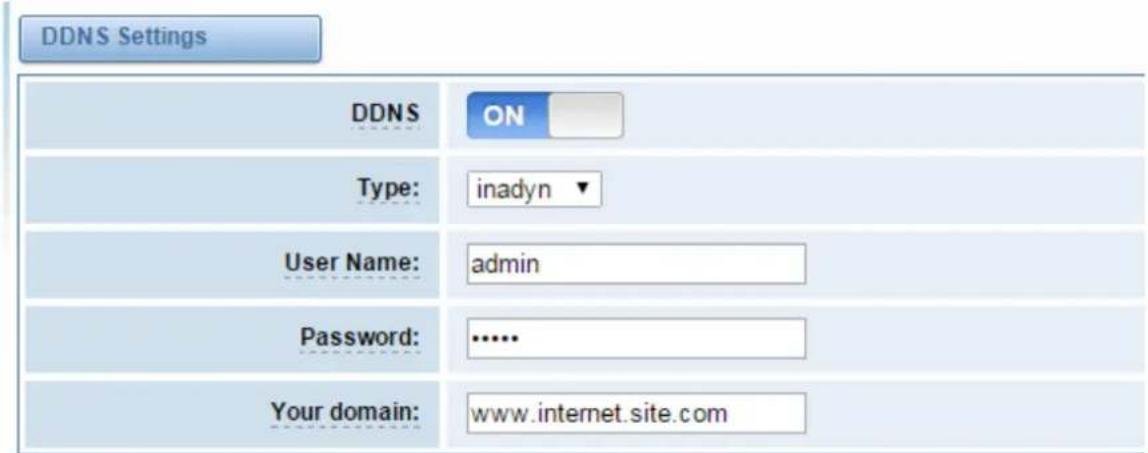
Figure 7-2 DDNS Settings
Table7-2 Definition of DDNS Settings
| Options | Definition |
| DDNS | Enable/Disable DDNS(dynamic domain name server) |
| Type | Set the type of DDNS server. |
| Username | Your DDNS account's login name. |
| Password | Your DDNS account's password. |
| Your domain | The domain to which your web server will belong. |
Toolkit
It is used to check network connectivity. Support Ping command on web GUI.

Report
| ping -l 172.16.179.1 -c 4 google.com |
| PING google.com (173.194.127.46) from 172.16.179.1: 56 data bytes 64 bytes from 173.194.127.46: icmp_seq=1 ttl=57 time=199.0 ms 64 bytes from 173.194.127.46: icmp_seq=2 ttl=57 time=195.1 ms 64 bytes from 173.194.127.46: icmp_seq=3 ttl=57 time=197.1 ms |
| -- google.com ping statistics --- 4 packets transmitted, 3 packets received, 25% packet loss round-trip min/avg/max = 195.1/197.0/199.0 ms |
| Result |
| Successfully ping [google.com]. |
Figure 7-3 Toolkit
Security Sengs
Firewall sengs
Table7-3 Definition of Firewall settings
| Options | Definition |
| Firewall Enale | If you want to use White/Black List, and security rules, you must enable this option. |
| Ping Enable | To disable ping or not. OFF: disable ping. This gateway will not allow to ping. |

Figure 7-4 Firewall Setting
White List Sengs
- White List Enbale: To enable white list or not.
- List IP Settings: IPs are separated only by "," character.

Click "Save" button to save configuration; Click "submit" button to submit and apply configuration.
If "List IP Settings" has no problem, you will see popup window like below. Please read the warning and tips carefully. And Click "Apply" button in 1 minute. If time runs out, this window will close automatically.

Figure 7-5 Firewall Rules Apply
If you see windows like below. It means your configuration has been applied successfully.

Figure 7-6 Firewall Rules Apply
Security Rules

Figure 7-7 Security Rules
Click "submit" button to submit and apply configuration.
If "List IP Settings" has no problem, you will see popup window like below. Please read the warning and tips carefully. And Click "Apply" button in 1 minute. If time runs out, this window will close automatically.

If you see windows like below. It means your configuration has been applied successfully.
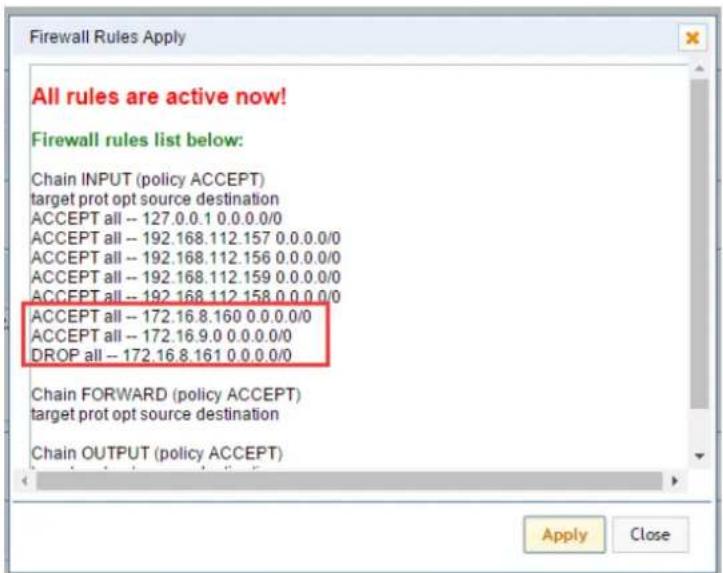
8. Advanced
Asterisk API
When you make "Enable" switch to "ON", this page is available.

Figure 8-1 Asterisk API Interface
Table8-1 Definition of Asterisk API
| Options | Definition |
| Port | Network port number |
| Manager Name | Name of the manager without space |
| Manager secret | Password for the manager. Characters: Allowed characters “-+_.<>&0-9a-zA-Z”. Length:4-32 characters. |
| Deny | If you want to deny many hosts or networks, use char & as separator.Example: 0.0.0.0/0.0.0.0 or 192.168.1.0/255.255.255.0&10.0.0.0/255.0.0.0 |
| Permit | If you want to permit many hosts or network, use char & as separator.Example: 0.0.0.0/0.0.0.0 or 192.168.1.0/255.255.255.0&10.0.0.0/255.0.0.0 |
| System | General information about the system and ability to run system management commands,such as Shutdown, Restart, and Reload. |
| Call | Information about channels and ability to set information in a running channel. |
| Log | Logging information. Read-only. (Defined but not yet used.) |
| Verbose | Verbose information. Read-only. (Defined but not yet used.) |
| Command | Permission to run CLI commands. Write-only. |
| Agent | Information about queues and agents and ability to add queue members to a queue. |
| User | Permission to send and receive UserEvent. |
| Config | Ability to read and write configuration files. |
| DTMF | Receive DTMF events. Read-only. |
| Reporting | Ability to get information about the system. CDR Output of cdr, manager, if loaded. Read-only. |
| Dialplan | Receive NewExten and Varset events. Read-only. |
| Originate | Permission to originate new calls. Write-only. |
| All | Select all or deselect all. |
Once you set like the above figure, the host 172.16.100.110/255.255.0.0 is allowed to access the gateway API. Please refer to the following figure to access the gateway API by putty. 172.16.179.1 is the gateway's IP, and 5038 is its API port.


Figure 8-2 Putty Access Gateway API
Asterisk CLI
In this page, you are allowed to run Asterisk commands.

GSM span 1: Power on, Provisioned, Up, Active, Standard
GSM span 2: Power on, Provisioned, Up, Active, Standard
GSM span 3: Power on, Provisioned, Up, Active, Standard
GSM span 4: Power on, Provisioned, Undetected SIM Card, Active, Standard
Figure 8-3 Asterisk CLI
Command: Type your Asterisk CLI commands here to check or debug your gateway.
Notice: If you type "help" or "?" and execute it, the page will show you the executable commands.
Asterisk File Editor
On this page, you are allowed to edit and create configuration files. Click the file to edit.
| Configuration Files | |
| File Name | File Size |
| agents.conf | 2136 |
| alarmreceiver.conf | 2227 |
| agencies.conf | 247 |
| sdr.conf | 672 |
| sdr_custom.conf | 388 |
| sdr_manager.conf | 59 |
| chan extra.conf | 56 |
| codecs.conf | 1655 |
| dmsing.conf | 245 |
| disc.conf | 1520 |

Figure 8-4 Asterisk File Editor
Click "New Configuration File" to create a new configuration file. After editing or creating, please reload Asterisk.
9. Logs
On the "Log Settings" page, you should set the related logs on to scan the responding logs page. For example, set "System Logs" on like the following, then you can turn to "System" page for system logs, otherwise, system logs is unavailable. And the same with other log pages.
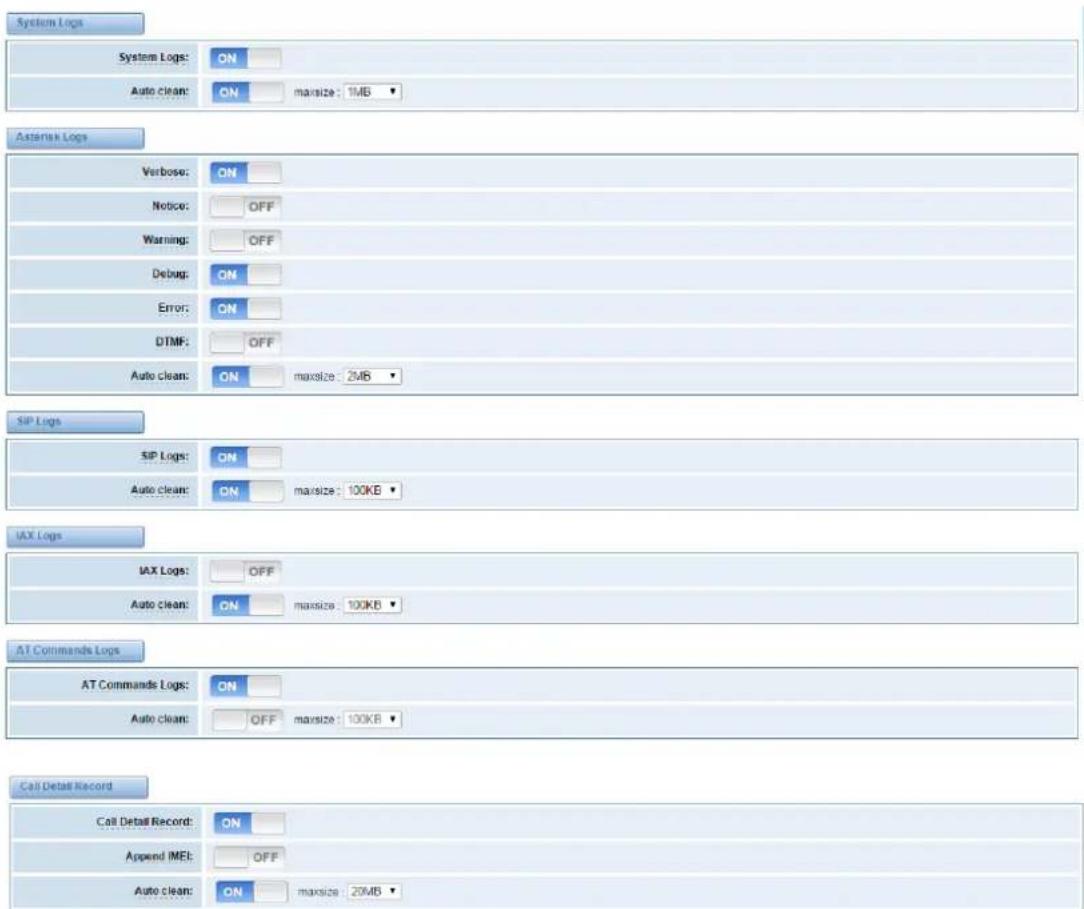
Figure 9-1 Log Settings
![[2014/12/19 16:38:30] Send SMS to 66100 by 1 (get ip) [2014/12/19 16:40:50] Reboot asterisk from SMS [2014/12/19 16:42:04] Restart asterisk (Keeper). [2014/12/19 16:44:54] Reboot asterisk from SMS [2014/12/19 16:49:10] Reboot system from SMS [2014/12/19 16:49:11] Power off [2014/12/19 16:49:50] Power on [2014/12/19 16:53:11] Restore config from SMS [2014/12/19 16:53:12] Power off [2014/12/19 16:54:07] Power on [2014/12/19 17:06:15] Reboot asterisk from SMS [2014/12/19 17:10:58] Reboot asterisk from SMS [2014/12/19 17:11:50] Reboot asterisk from SMS [2014/12/24 08:50:57] Restart astinamproxy (Keeper). [2014/12/29 09:32:55] Restart astinamproxy (Keeper). [2014/12/29 09:34:55] Restart astinamproxy (Keeper). [2014/12/29 10:58:56] Restart astinamproxy (Keeper). [2014/12/29 11:00:56] Restart astinamproxy (Keeper). [1970/01/01 08:00:27] Power on [2015/01/04 11:12:43] Power off [1970/01/01 08:00:34] Power on [1970/01/01 08:00:32] Power on [1970/01/01 08:00:31] Power on [2015/01/20 14:34:24] Power off [1970/01/01 08:00:29] Power on [2015/01/21 14:51:20] System Update [2015/01/21 14:51:48] Power off [1970/01/01 08:00:30] Power on [2015/01/22 10:13:13] System Update [1970/01/01 08:00:30] Power on Board-Ⅰ ▼ Refresh Rate Off ▼ Refresh Clean Up](/content/2026/06/1373241/images/aa599b1d93d48e6c4c769bf33ed1c7a3a095f93b363f46b1393bffda43e0911a.jpg)
Figure 9-2 System Logs
You can choose one specific board to see it related logs.
[1970/01/01 08:00:29] Power cn
[2015/01/21 14:51:20] System Update
[2015/01/21 14:51:45] Power off
[1970/01/01 08:00:30] Power cn
[2015/01/22 10:13:13] System Update
[1970/01/01 08:00:30] Power cn

Figure 9-3 Choose One Board
You can scan your CDR easily on web GUI, and also you can delete, clean up or export your CDR information.

Figure 9-4 CDR Output
Recently we have made our LOGS display richer, you can see your GSM Outbound of every port clearly.
| Port | All Calls | All Durations | Answered | Canceled | Busy | No Answer | No Dialtone | No Carrier | Other |
| gam-1.1 | 0 | 0 | 0 | 0 | 0 | 0 | 0 | 0 | 0 |
| gam-1.2 | 0 | 0 | 0 | 0 | 0 | 0 | 0 | 0 | 0 |
| gam-1.3 | 0 | 0 | 0 | 0 | 0 | 0 | 0 | 0 | 0 |
| gam-1.4 | 0 | 0 | 0 | 0 | 0 | 0 | 0 | 0 | 0 |
| gam-2.1 | 0 | 0 | 0 | 0 | 0 | 0 | 0 | 0 | 0 |
| gam-2.2 | 0 | 0 | 0 | 0 | 0 | 0 | 0 | 0 | 0 |
Figure 9-5 Time Patterns that will use this Route
Table9-1 definition of Logs
| Options | Definition |
| System Logs | Whether enable or disable system log. |
| Auto clean (System Logs) | switch on: when the size of log file reaches the max size, the system will cut a half of the file. New logs will be retained; switch off: logs will remain, and the file size will increase gradually. default on, maxsize=1M. |
| Verbose | Asterisk console verbose message switch. |
| Notice | Asterisk console notice message switch. |
| Warning | Asterisk console warning message switch. |
| Debug | Asterisk console debug message switch. |
| Error | Asterisk console error message switch. |
| DTMF | Asterisk console DTMF info switch. |
| Auto clean (asterisk logs) | switch on: when the size of log file reaches the max size, the system will cut a half of the file. New logs will be retained. switch off: logs will remain, and the file size will increase gradually. default on, maxsize=100KB. |
| SIP Logs | Whether enable or disable SIP log. |
| Auto clean (SIP logs) | switch on: when the size of log file reaches the max size, the system will cut a half of the file. New logs will be retained. switch off: logs will remain, and the file size will increase gradually. default on, maxsize=100KB. |
| IAX Logs | Whether enable or disable IAX log. |
| Auto clean( IAX logs) | switch on: when the size of log file reaches the max size, the system will cut a half of the file. New logs will be retained. switch off: logs will remain, and the file size will increase gradually. default on, maxsize=100KB. |
| Debug AT Command Logs | Displaying GSm module AT messages. |
| Auto clean (AT logs) | switch on: when the size of log file reaches the max size, the system will cut a half of the file. New logs will be retained. switch off: logs will remain, and the file size will increase gradually. default on, maxsize=100KB. |
| Call Detail Record | Displaying Call Detail Records for each channel. = |
| Auto clean (CDR logs) | switch on: when the size of log file reaches the max size, the system will cut a half of the file. New logs will be retained. switch off: logs will remain, and the file size will increase gradually. default on, maxsize=20MB. |
Appendix Feature List
General Info
| Size: VS-GW21(GSM) | 48.3cm*33.1cm*8.8cm |
| VS-GW1600(GSM) | 44cm*4.5cm*30cm |
| VS-GW1202(GSM) | 15cm*19cm*4.5cm |
| WGW1002G | 16cm*10.1cm*3.1cm |
| VS-GW2120(3G) | 44cm*34cm*9cm |
| VS-GW1600(3G) | 44cm*4.5cm*30cm |
| VS-GW1202(3G) | 15cm*19cm*4.5cm |
| VS-GW1002: 2 GSM channels |
| VS-GW1202: 4/8 GSM/UMTS channels |
| VS-GW1600: up to 20 GSM/UMTS channels |
| VS-GW2120: up to 44 GSM/UMTS channels |
| Power: VS-GW2120 | 88W |
| VS-GW1600 | 46W |
| VS-GW1202 | 18W |
| WGW1002G | 6W |
| Weight: VS-GW2120(GSM) 8624g | |
| VS-GW1600(GSM) | 4301g |
| VS-GW1202(GSM) | 1300g |
| WGW1002G | 237g |
| VS-GW2120(3G) | 6144g |
| VS-GW1600(3G) | 3682g |
| VS-GW1202(3G) | 502g |
LAN Port: 2
SIM Cards: Hot-Swap
GWM400G/GWM400W Module: Hot-Swap
➢ Operation Humidity Range:10%\~90% non-condensing
➢ Storage Temperature Range: -20\~70°C
➢ Operation Temperature Range: 0\~40°C
GSM/WCDMA Features
➢ CLID Display & Hide (Need operators' support)
WCDMA/UMTS: 850/900/1900/2100 MHz
➢ GSM: 850/900/1800/1900 MHz
➢ Real Open API Protocol (based on Asterisk)
➢ Call Duration Limitation
SMSC/SMS/USSD
Gain Adjustment
➢ PIN Identification
➢ IMEI Number Automatically Modify
▶ Band Binding
Bind Carrier
▶ Optional GSM/UMTS Voice Codec
▶ Call Waiting
➢ Call Forwarding (unconditional, no reply, busy, not reachable)
➢ GSM/UMTS Ports Group Management
➢ SMS Bulk Transceiver, Sent to Email and Automatically Resend
➢ SMS Coding/Detecting Automatically Identification
➢ SMS Remotely Controlling Gateway
➢ SMS Forwarding and Quick Reply
USSD transceiver
VOIP Characters
➢ Support SIP, IAX2 Protocol
▶ Add, Modify & Delete SIP/IAX2 Trunk
▶ SIP/IAX2 Registration with Domain
➢ Combine Different SIP/IAX2 Trunk into Group
DTMF Mode: RFC2833/Inband/SIPIInfo
▶ SIP V2.0 RFC3261 Compliance
Multiple SIP/IAX2 Registrations modes: None (No registration, just IP and Password authentication) Endpoint registers with this gateway (work as a SIP Sever) This gateway registers with the endpoint (work as a SIP/IAX2 client)
Network
IPv4, UDP/TCP, DHCP, TFTP, TELNET, HTTP/HTTPS, SMTP, POP3
▶ HTTP/SSH (Optical Telnet)
▶ Ping & Traceroute Command on the Web
▶ Two Types of IP Access
➢ Simple Security Strategy: white list, black list, security rules
System Features
Abundant Codecs:G.711A, G.711U, G.729, G.722, G.723, G.726, GSM
- Simple and convenient configuration via Web GUI
➢ Firmware Update by HTTP
▶ Automatically Reboot
➢ Extensible Automatic Callback and Speed Dial
➢ TTL Serial Port and Virtual Serial via TCP/IP Protocol
Support DISA
Customizable IVR
▶ Multiple Detailed LOG Output
▶ Call Status Display
PDD/ACD/ASR/BER Display
▶ Mobile number portability (MNP)
➢ CDR (More than 200,000 Lines CDRs Storage Locally)
➢ Support configuration files backup and upload
➢ Support for custom scripts, dialplans
Least Cost Routing(LCR), according to Time, Port, Calling Number
▶ Independent System for Each Module
Restore Factory Settings
➢ High Equipment Materials Specifications, Suitable for Long Distance Transportation
Application Diagrams
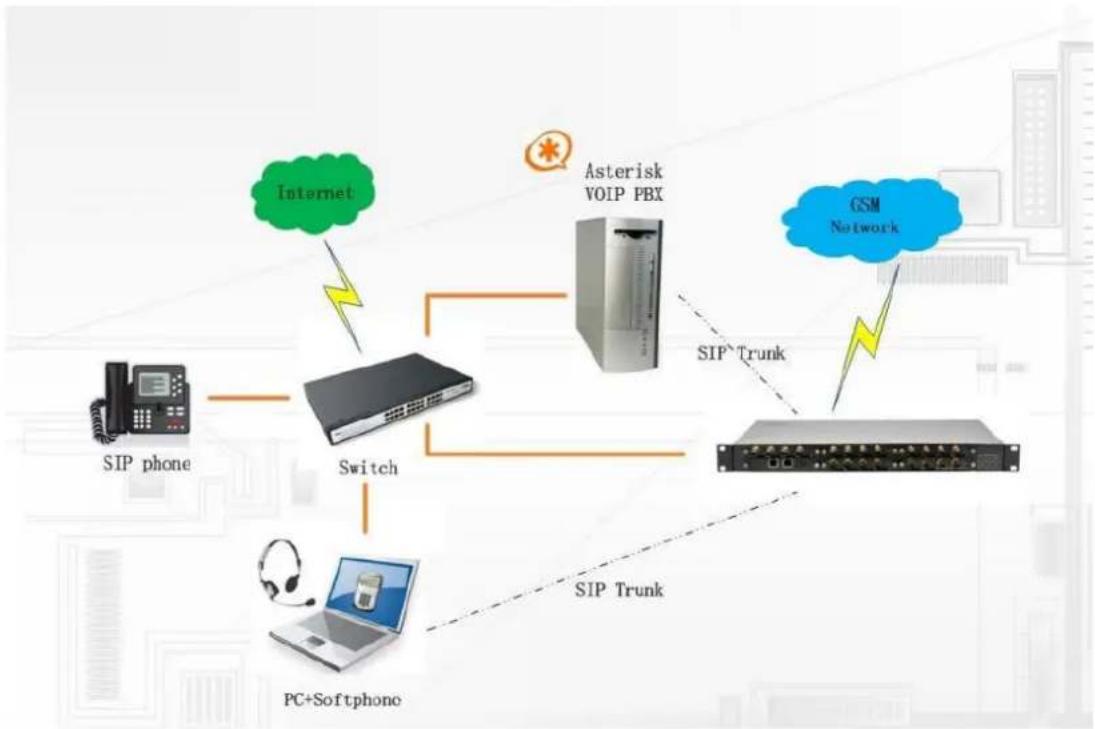
flowchart
graph TD
    A["SIP phone"] --> B["Switch"]
    B --> C["PC+Softphone"]
    D["Internet"] --> B
    E["Asterisk VOIP PBX"] --> B
    F["GSM Network"] --> G["SIP Trunk"]
    G --> H["Server"]
    B --> I["SIP Trunk"]


- GSM/3G Gateway User Manual
- Version1.0 (2016-05-12)
- Condenality
- Disclaimer
- Trademarks
- Contents
- Overview....6
- System....13
- Roung....53
- Overview
- Sample Applicaon
- Product Appearance
- Main Features
- Physical Informaon
- Soware
- How to do Cluster?
- System
- Status
- Time
- Login Sengs
- General
- Language Sengs
- Scheduled Reboot
- Cluster
- Reboot Tools
- Update Firmware
- Upload and Backup Conguraon
- Restore Conguraon
- Informaon
- MODULE
- MODULE Sengs
- IMEI Modicaon
- Call Duraon Limit Sengs
- Step \* Single Call Duration Limitation
- Call Forwarding
- Call Waing
- DTMF
- BCCH
- Toolkit
- VOIP
- VOIP Endpoints
- Add New SIP Endpoint
- Advanced -- Signalling Sengs
- Advanced -- Timer Sengs
- Main IAX2 Endpoint Sengs
- Add New IAX2 Endpoint
- Edit IAX2 Endpoint "iax-test"
- Networking
- Paesing and Compatibility
- Security
- Media
- Codec Settings
- Advanced IAX2 Sengs
- Routing
- Groups
- MNP Sengs
- SMS
- Sender Opons
- SMS to Email
- SMS Control
- HTTP to SMS
- SMS to HTTP
- SMS Sender
- SMS Inbox
- SMS Outbox
- SMS Forwarding
- Network
- Network Sengs
- DDNS Sengs
- Security Sengs
- Firewall sengs
- White List Sengs
- Security Rules
- Advanced
- Asterisk API
- Asterisk CLI
- Asterisk File Editor
- Logs
- Appendix Feature List
- General Info
- GSM/WCDMA Features
- VOIP Characters
- Network
- System Features
Brand : OpenVox
Model : WGW1002G
Category : Passerelle de communication