005026 - Electric bike Kayoba - Free user manual and instructions
Find the device manual for free 005026 Kayoba in PDF.

| Brand | Kayoba |
| Model | 005026 |
| Product Type | Electric Bike |
| Frame Material | Aluminum Alloy |
| Motor Type | Rear Hub Motor |
| Motor Power | 250W |
| Battery Type | Lithium-ion, 36V 10Ah |
| Battery Range | Up to 50 km (assist mode) |
| Charging Time | 4-6 hours |
| Max Speed | 25 km/h (assisted) |
| Display | LCD with speed, battery, and assist level |
| Assist Levels | 5 levels (Eco to Turbo) |
| Brakes | Disc brakes (mechanical) |
| Suspension | Front suspension fork |
| Tires | 26" x 2.0" |
| Weight | Approx. 22 kg (including battery) |
| Max Load | 120 kg |
| Dimensions (LxWxH) | 180 x 65 x 110 cm |
| Lighting | Front LED light, rear reflector |
| Warranty | 2 years (parts and labor) |
| Included Accessories | Charger, tool kit, user manual |
| Maintenance | Regular tire inflation; keep chain lubricated; store battery above 0°C |
Frequently Asked Questions - 005026 Kayoba
User questions about 005026 Kayoba
0 question about this device. Answer the ones you know or ask your own.
Ask a new question about this device
Download the instructions for your Electric bike in PDF format for free! Find your manual 005026 - Kayoba and take your electronic device back in hand. On this page are published all the documents necessary for the use of your device. 005026 by Kayoba.
USER MANUAL 005026 Kayoba
natural_image
Exterior view of a modern white WANO bicycle with black frame and wheels (no signage or text visible)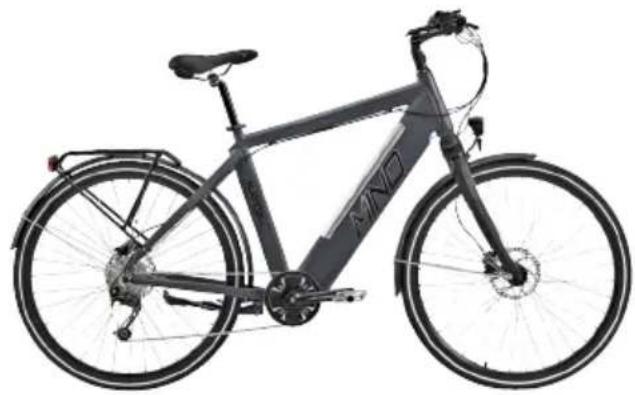
natural_image
Exterior view of a modern electric bicycle with 'MIND' branding on the front wheel (no additional text or symbols visible)
SE ELCYKEL
Operating instructions (Translation of the original instructions) Important! Read the user instructions carefully before use. Save them for future reference.
Värna om miljön!
Care for the environment!
Must not be discarded with household waste! This product contains electrical or electronic components that should be recycled. Leave the product for recycling at the designated station e.g. the local authority's recycling station.
Jula reserves the right to make changes. In the event of problems, please contact our customer service.
www.jula.com
Tillverkare/ Produsent/ Producenci/ Manufacturer
Jula AB, Box 363, 532 24 SKARA
Distributör/ Distributør/ Dystrybutor/ Distributor
Jula Poland Sp. z o.o., ul.
EC DECLARATION OF CONFORMITY
EG FÖRSÄKRAN OM ÖVERENSSTÄMMELSE
EF SAMSVARSERKLÆRING
DEKLARACJA ZGODNOŚCI WE

Jula AB, Box 363, SE-532 24 SKARA, SWEDEN
Machinery Directive 2006/42/EC
Low Voltage Directive 2014/35/EU
Electromagnetic Compatibility Directive 2014/30/EU
EN 15194:2009+A1, EN 50581:2012, EN 60335-1:2012+A11,
EN 60335-2-29:2004+A2, EN 55014-1:2006+A1+A2, EN 55014-2:2015
EN 61000-3-2:2014, EN 61000-3-3:2013, EN 62233:2008
This product was CE marked in year -18
Name and address of the person authorised to compile the technical file:
natural_image
Abstract blue line drawing with intertwined loops and a horizontal dashed line (no text or symbols)STEFAN LJUNGGREN
BUSINESS AREA MANAGER
CE
EC DECLARATION OF CONFORMITY EG FÖRSÄKRAN OM ÖVERENSSTÄMMELSE EF SAMSVARSERKLÆRING DEKLARACJA ZGODNOŚCI WE

Jula AB, Box 363, SE-532 24 SKARA, SWEDEN
This product was CE marked in year -18
natural_image
Close-up of a mechanical device's front panel showing a metallic component with a control knob and indicator lights (no readable text or symbols)3
natural_image
Close-up of a mechanical device with visible internal components and mounting brackets (no readable text or symbols)
natural_image
Close-up of a bicycle wheel being installed with a hand adjusting its seat (no visible text or symbols)5
6
123
7
8
9
123
10

1
2
3
11
12
13
14

SÄKERHETSANVISNINGAR
WARNING!
Girsystem Shimano Deore
Bremser
Foran Hydrauliske skivebremser
Bak Hydrauliske skivebremser
Batteri
Fabrikat Panasonic
Batterikapasitet 36 V, 8,7 Ah
- A bike is exposed to wear, like all mechanical equipment, when you use it. Different materials and components react in different ways to wear and stress. If the life span of any part of the bike (including the frame, forks and components) has been exceeded there is a risk of the part suddenly breaking, and that you lose control and fall off. Cracks, scratching or changes in colour in areas exposed to high levels of stress indicate that the component has reached the end of its useful life and should be replaced.
• The electric bike is a vehicle.
- Always follow local traffic regulations. Passengers are not allowed to ride on the electric bike. Reduce your speed and increase the distance to other road users in rain, snow or slippery conditions.
- You should not attempt to dismantle parts from the bike for maintenance. Contact a qualified service technician.
- Do not ride through pools of water or other accumulations of water. Water can penetrate into the hub motor and cause short-circuiting and irreparable damage.
- The two metal connector plates on the back of the battery box are the battery's positive and negative terminals. Do not touch the battery terminals, especially with wet hands. Make sure that metal objects do not come into contact with the battery terminals as this can cause short-circuiting and result in electric shock, severe burn injuries and damage to the battery.
- Never allow persons who are not familiar with electric bikes, or who have not read these instructions, to use this product.
- Do not make any modifications to the product.
CHECK BEFORE USE THAT:
- The tyres are in good condition and have the correct tyre pressure (3.5–5.3 kg).
- The battery is charged.
- The stem, handlebars and saddle post are correctly fitted and tightened.
- The axle nuts are correctly tightened.
- The bell is working.
- The rims are in good condition and undamaged. A worn rim is a safety risk and should be replaced.
- Screw unions and components are properly tightened and not worn or damaged.
- The seat is comfortably adjusted.
• The brakes work properly.
- The steering does not jam, or has too much play.
- The wheels are not warped and the wheel bearings are correctly adjusted.
- The wheels are properly attached in the back/front forks.
- The pedals fit properly in the crank arms.
• The gears are correctly adjusted.
- All the reflectors are fitted.
- After adjusting, check that all screw unions are correctly tightened and that the wires are undamaged and correctly drawn along the frame.
- The maximum load including cyclist and baggage is 130 kg.
- Use the brake handle on the left side of the handlebars to brake the front wheel, and use the brake handle on the right side to brake the back wheel.
- The electric bike works reliably in all kinds of weather, but the electrical components and/or motor can be damaged during prolonged or excessive exposure to water.
- Never touch the electrical components with wet hands. Do not touch the positive and negative terminals on the battery at the same time - short circuiting and personal injury.
- If there is a fault on any of the electrical components, consult a specialist. Do not attempt to repair the fault yourself.
- Do not use the battery when the temperature drops below 10^ .
- The electric bike is designed for normal roads and traffic, and for one person.
- Never use the electric bike for riding on extreme terrain, jumping, or carrying heavy loads. This can damage the electric bike and result in personal injury.
BATTERY AND CHARGER
- Only use the supplied charger of the model for the Kayoba e-legance electric bike.
- Your electric bike has a lithium-ion battery. Never charge the battery with any other charger than the one supplied with the battery. Using another charger to charge the battery can cause it to catch fire, or explode. If your charger is damaged or lost, contact the nearest Julia store for a replacement charger.
- The battery is half-charged when new. Charge the battery for 10-12 hours the first three times.
- Charge the battery when the battery charge is low.
- Make sure the charger voltage corresponds to the mains voltage.
- Do not open the charger, the charger is a high-voltage unit.
- Never touch the two battery terminals at the same time this can cause an electric shock.
- Never take the battery out of the electric bike when charging.
- Charge the battery for at least 2 hours every third month, otherwise the warranty will be invalidated.
- Never charge the battery with any other charger.
-
Protect the battery from liquids or metal objects.
-
Never charge the battery when small children or babies are nearby.
- Never use the charger in dirty, wet or damp conditions. Avoid charging the battery in direct sunlight.
- Do not use the charger during thunderstorms.
- Only use the charger in cool and well-ventilated areas.
- Do not expose the battery to heavy vibrations or knocks.
- Opening the battery will invalidate the warranty.
- Never short-circuit the battery's charging or discharging terminals.
- Never attempt to charge the battery via the discharging terminals or discharge the battery via the charging terminals.
- Do not expose the battery to excessive heat or naked flames. Do not burn the battery.
- Do not expose the battery to knocks and blows, or excessive vibration.
- Do not expose the battery to water or moisture. Protect the battery's charging and discharging terminals from rain, flooding or immersion in water.
- Store the battery out of the reach of children and animals.
- If the battery is not going to be used for some time, remove it from the battery holder and store separately.
- Contact your dealer if you have any questions concerning the battery.
- Never disassemble the batteries or cells.
- Follow the markings on the battery.
- The charger should be placed at least 1 m from computers, television receivers, whitegoods and other electrical equipment while charging is in progress.
-
The charger is only intended for indoor use. It must only be used in a dry and well-ventilated area with a maximum temperature of 45^ C.
-
Disconnect the charger immediately if it emits an abnormal smell during charging, and take it to your dealer.
- The battery must only be charged with the charger recommended by the manufacturer. The charger must only be used for the battery for which it is intended, not for other batteries from other manufacturers.
- Do not use the charger in dusty or damp conditions, or where it cannot remain stable.
- When the battery is fully charged, first disconnect the charger from the mains and then disconnect it from the battery.
• Make sure that nobody, especially children, touches the charger while charging is in progress. - Do not place any objects on the charger.
- Make sure your hands are not wet when connecting or disconnecting the charger.
- Do not turn or move the charger or battery while charging is in progress.
- Do not use the charger in direct sunlight.
- Do not disconnect the charger from the battery while charging is in progress.
- Do not carry out any maintenance on the bike while charging is in progress.
- Do not connect the charger to the mains if it is not connected to the battery.
SERVICE
- Only use identical spare parts when replacing parts that are essential for safety. Check Julia's department store for original parts. This will guarantee that the bike remains safe to use.
ROAD SAFETY
• Always wear an approved bike helmet.
- Follow local traffic regulations.
- Note that the safe braking distance in slippery conditions is longer than normal.
- Do not put anything on the bike that can get caught up and obstruct the functions of the bike.
- Use lights and reflectors when cycling in the dark.
- Do not ride on the same side as oncoming traffic.
- Do not ride alongside another bike.
- Do not give rides on bikes not intended for this.
- Do not swing out into traffic.
- Do not hang anything from the handlebars that makes it difficult to steer, or which could fasten in the front wheel.
- Do not hang onto another vehicle.
- Do not ride too close to a vehicle in front.
- The braking power is reduced by water and ice. Cycle more slowly in wet weather and brake earlier than in dry weather.
- Follow local regulations when cycling in the dark: The bike must have a front lamp with a white light and a back lamp with a red light, in addition to the reflectors already fitted on the bike.
- Wear bright clothes and a high-visibility jacket if possible.
- Check that the bike's reflectors are correctly positioned, properly attached, clean and not obscured. Replace damaged reflectors immediately.
- Any shock absorbers on the bike should be serviced at a bike shop.
SYMBOLS
 | Approved as per applicable directives. |
 | Recycle discarded product in accordance with local regulations. |

Read the instructions.
TECHNICAL DATA
| Wheel size 28" | |
| Frame | Aluminium |
| Rims | Aluminium |
| Front fork Steel fork with suspension | |
| Gears | 9 |
| Gear system Shimano Deore | |
Brakes
| Front Hydraulic disc brakes |
| Rear Hydraulic disc brakes |
Battery
| Manufacture | Panasonic |
| Battery capacity 36 V, 8.7 Ah | |
| Battery type, lights AAA | |
| Charging time approx. 6.5 h | |
| Maximumrange70km |
Weight 26 kg
Max total weight 130 kg
DESCRIPTION
- Frame
- Mudguards
- Saddle post
- Stand
- Tyre with rim
- Handlebars
- Adjustable head
-
Handle
-
Front fork with shock absorber
-
Saddle
- Disc brake, front
- Disc brake, rear
- Brake handle, front/rear
- Gears
- Gear selector
- Chain guard
- Chain sprocket and crank
- Chain
- Pedal
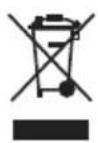
- Battery
- Power assistance motor
- Front lamp
- Back lamp
- Carrier rack
- Control panel
FIG. 1
ASSEMBLY
SADDLE AND SADDLE POST
Fit the saddle post in the frame and lock in place with the quick-release lock.
WARNING!
Do not put the saddle over the marking for the max height (Min insertion) on the saddle post. The marking means that at least one third of the saddle post must be inserted in the frame.
FRONT WHEEL
Fit the front wheel by aligning the wheel in the bottom part of the front fork, making sure that the brake disc goes in between the brake pads. Fit the axle with the quick-release and fasten the nut on the opposite side. Secure the wheel firmly in place with the quick-release.
HANDLEBARS
Put the handlebars in the column recess, clamp in place and tighten the four screws.
PEDALS
Screw the pedals onto the pedal arms. Make sure to fit them the right way round, they are threaded in different directions so they will not come loose. The pedals are marked with R for right and L for left.
LIGHTS
Use good quality batteries for the lights (see Technical data).
USE
BATTERY
The battery that drives the motor is not fully charged on delivery. Charge the battery for 10-12 hours the first few times the bike is used.
WARNING!
- This electric bike runs on a lithium-ion battery. Never charge the battery with any other charger than the one supplied with the bike – risk of fire or explosion.
- Never remove the battery from the bike when charging is in progress.
CHARGING THE BATTERY
NOTE:
The electrical system on the bike has a low voltage protection that switches off the power if the battery drops below a specific level.
To charge the battery on the bike, connect the charger to the outlet on the battery. To charge the battery when it is removed from the bike:
- Switch off the bike on the control panel and with the battery's ON/OFF button.
FIG. 2
- Turn the key to unlock the battery.
FIG. 3
- Remove the battery from the bike.
FIG. 4
Charge indicator
- The charger light turns red while charging is in progress.
- When the battery is fully charged the charger light turns green.
- A flashing red and green light indicates a fault. Contact an authorised service centre.
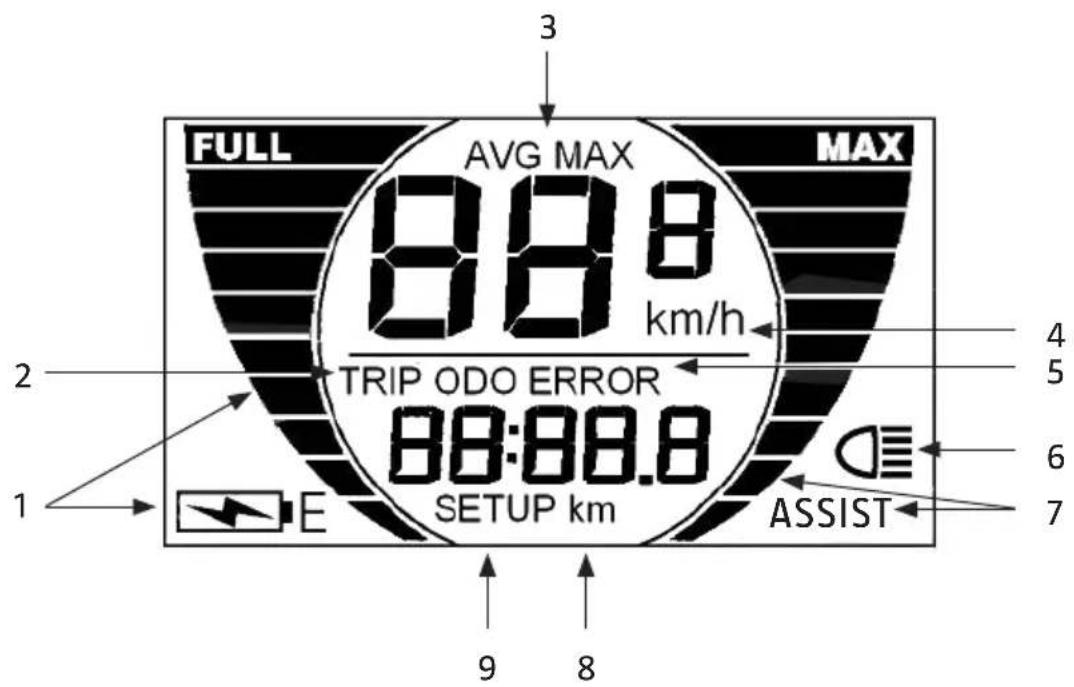
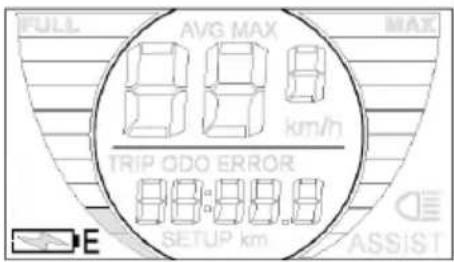
DISPLAY
Review of functions
- Battery charging indicator
- Trip meter
- Speedometer (shows instant speed, average speed and maximum speed)
- Speed unit
- Error code display
- Backlight ON/OFF
- Assistance level
- Distance unit
- Parameter settings, e.g. wheel diameter, backlight and top speed limit for assistance.
FIG. 5
Starting and switching off the display
Press the button for 2 seconds to start the display unit and the control unit. To switch off the display unit and the electric system on the
bike, press the button again for 2 seconds. The display and control unit switch off.
NOTE:
If the bike is not used for 10 minutes the display unit switches off automatically.
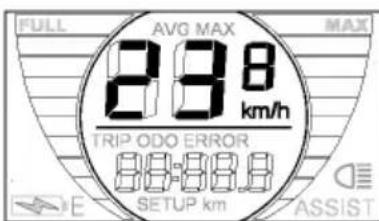
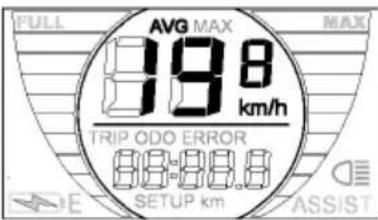
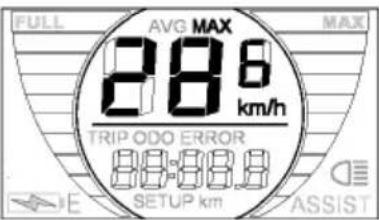
Speedometer
The speedometer can show the instant speed, average speed and maximum speed. The instant speed is shown automatically by default. To switch over, press the buttons and for 2 seconds. The following is then shown: instant speed (km/h) → average speed (km/h) → maximum speed (km/h).
- Instant speed
- Average speed
- Maximum speed
FIG. 6
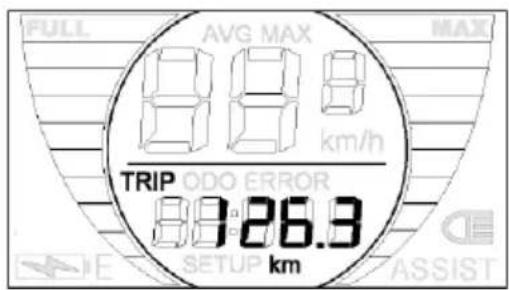
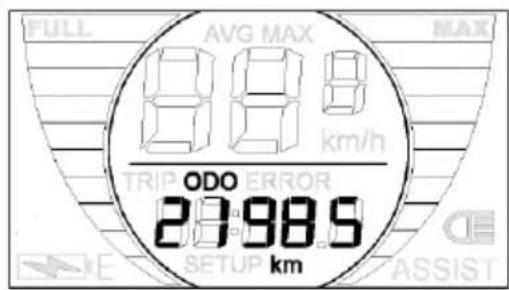
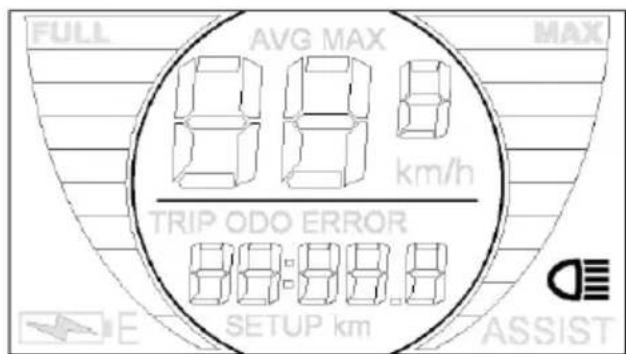
Odometer
When the display unit is started the odometer is shown as a standard trip distance. To switch over (trip meter/total distance) press the button. The display then shows: trip distance (km) → total distance (km). To reset the trip meter, press the buttons and .
- Trip distance (TRIP)
- Total distance (ODO)
FIG. 7
Backlight
Press the button for 2 seconds to switch on the backlight. The headlight goes on at the same time. To switch off the light, press the button for 2 seconds again.
FIG. 8
Selection of assistance level
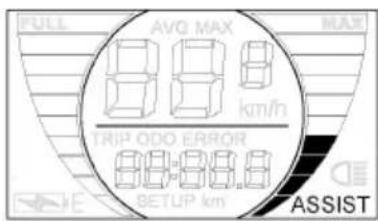
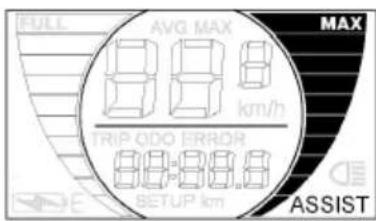
Press the button or to adjust the assistance power of the motor. There are five assistance levels, 1 to 5. 1 is the lowest and 5 is full power. The standard setting is assistance level 1. Three examples of how the assistance levels are shown on the display:
- Assistance level 1
- Assistance level 2
- Assistance level 5
FIG. 9
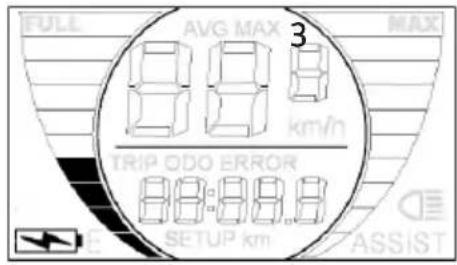
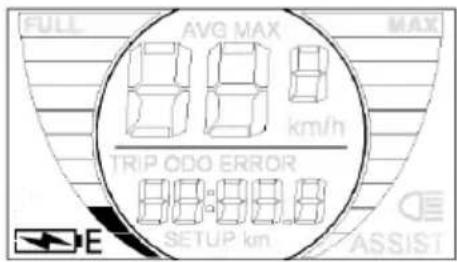
Battery indicator
The battery charge is shown on the display in 5 levels. FULL is shown at the top of the battery charge indicator when the battery is fully charged. When the battery is discharged (low battery voltage) the letter E is shown at the bottom of the battery indicator and the indicator flashes. The battery must then be charged.
- Fully charged battery
- Partially discharged battery
- Fully discharged battery (the indicator flashes)
FIG. 10
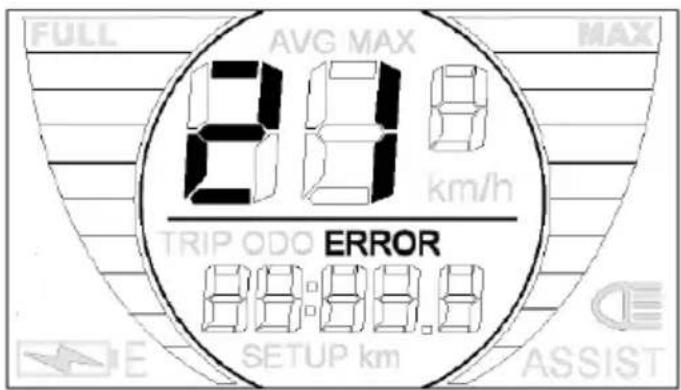
Error codes
Error codes are shown automatically if there is a fault in the control electronics. Check the part of the bike to which the error code refers, or hand in the display unit for repair.
Error code 21: circuit fault
Check that all connections are correct, undamaged and not short-circuited.
Error code 22: motor control fault
Check that motor's starter lever is in neutral.
Error code 23: motor circuit fault
Check that motor is correctly connected to the control unit and that all the connections are intact.
Error code 24: signal fault hall sensor for motor
For control unit without hall sensor, check that motor is correctly connected. For control unit with hall sensor, check that the hall sensor is correctly connected.
Error code 25: brake fault
Check that the brakes are not applied, and have gone fully back before switching the display unit on.
Error code 30: communication fault
Check that all the cables between the display unit and the control unit are correctly connected.
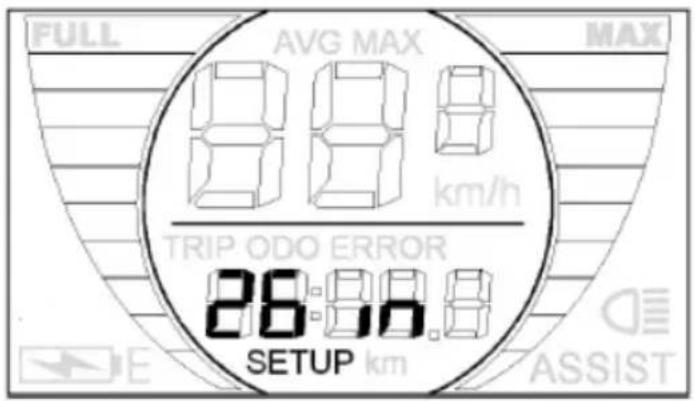
Settings
With the display unit switched on, press the buttons at the same time for 2 seconds to come to the settings menu. To leave the settings menu, press the button for 2 seconds.
Setting the wheel diameter
Press the button to set the correct wheel diameter. Wheel diameter settings: 16 inch, 18 inch, 20 inch, 22 inch, 24 inch, 26 inch, 700C, 28 inch. The standard setting is 26 inch. Press the button to confirm the wheel diameter setting and to go to the next setting.
FIG. 11
Setting the top speed limit
A top speed limit can be set for the power assistance as a safety function. The electric motor switches off when the speed goes over this limit. The top speed limit can be set from 12 to 40 km/h. The standard setting is 25 km/h. Press the button to set the required top speed limit. Press the button to confirm the setting. Go to next setting.
FIG. 12
Setting the backlight
"bL" stands for backlight. Level 1 is low brightness. Level 2 is medium brightness. Level 3 is high brightness. Press the button + or to set the required brightness. Press the button to confirm the setting.
FIG. 13
START CYCLING
- Start pedalling, the electric motor starts and assists while the pedalling continues.
- Adjust the assistance from the electric motor with the mode button. The power assistance stops when the rider stops pedalling, when the brake is used, or when the speed reaches over 25 km/h.
- The bike has three gears. Change gear by turning the inner part of the right handle.
Note:
- Be careful when using the power assistance the first time because the electric bike accelerates faster than a normal bike.
- Ride the bike on a smooth surface first to get used to the acceleration.
-
The electrical system on the bike has a low voltage protection that switches off the power if the battery drops below a certain level.
-
The total distance per full charge is measured on the horizontal at 20^ C, in calm conditions, at a speed of 25 km/h and with the bike loaded with a total weight of 75 kg.
- The actual real distance varies with the load, road conditions, wind speed, temperature, biking behaviour (number of starts etc.), tyre pressure and correct battery charging routines.
- To obtain the longest possible distance all the above factors should be checked and adjusted as far as is possible – avoid overloading, pedal smoothly and with the correct tyre pressure, and charge the battery regularly.
- Be careful when braking, brake first with the more gentle back brake.
- The power assistance works up to max 25 km/h and then switches off. When the speed drops below 25 km/h the power assistance starts again.
- Do not use the power assistance in slippery conditions, or on loose gravel or clay.
- Switch off the power assistance if the electric bike behaves "unusually" to avoid damaging the electrical system.
- The front and back lights have two modes: flashing and constant. Press the light button once for constant and twice to flash.
- Remember to switch off the lights after use.
SUSPENSION
The suspension on the front fork can be locked (switched off) with a knob on the front fork.
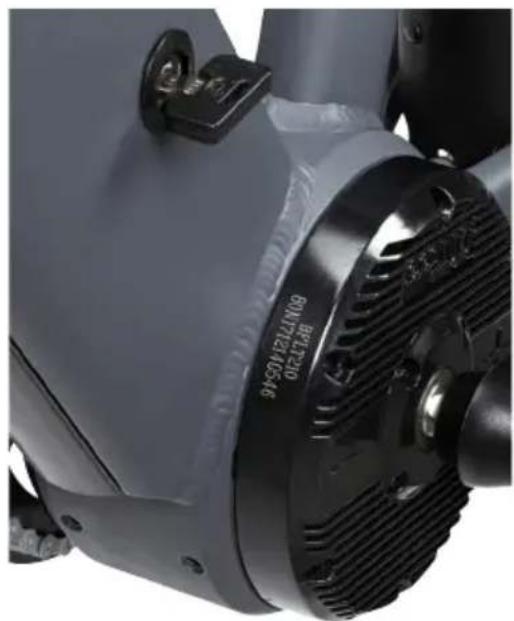
MAINTENANCE
- Use a damp sponge with a mild detergent when cleaning. Do not use acidic detergents, they can damage the bike.
-
Avoid leaving the bike unprotected in the rain or snow.
-
If the bike gets wet, wipe it with a towel after use.
- If the bike is used on a salted surface, clean it after use with fresh water.
- Do not clean the bike with a high-pressure washer – risk of water and moisture penetrating into the electrical components and motor.
BATTERY AND BATTERY CHARGER
- If the battery is not going to be used for some time it should be kept charged to about 50% (takes about 2–3 hours of charging for a fully discharged battery) and stored in a dry and well-ventilated place. Failure to do this will invalidate the warranty.
- Storage conditions for battery: temperature -20 to +35^ , relative humidity 5 to 65% .
- Do not immerse the battery in water. When transported the battery should be packed in its original packaging and protected from knocks and blows, vibration and direct sunlight.
- Disconnect the charger from the battery for storage.
CHAIN
Lubrication
The chain should be lubricated at regular intervals with a suitable chain oil. Never let the chain dry out. A dry chain wears more quickly, becomes stiff and can start to rust. Replace a damaged chain.
- Clean any dirt off the chain.
- Lubricate the chain.
- Pedal a few turns so that the oil comes in the links.
- Wipe the chain with a cloth or sponge.
Voltage
A chain that is not properly tensioned can be dangerous. It should not be possible to move the chain more than 1 cm "up or down" at the mid point, but neither should it be overtensioned.
- Undo the nuts on the back wheel and pull the back wheel backwards to stretch the chain.
- Tighten the nuts. Make sure the wheel is fitted straight.
- Check that the wheel is firmly in place.
HUB BEARINGS
Check for play in the hub bearings by holding the rim of the wheel on the bike and moving it from side to side. Adjust any play immediately, otherwise there is a risk of damaging the hub bearings and the wheel.
FRONT BRAKE
The wire tension for the front brake is adjusted with the adjuster screw on the brake handle.
FIG. 14
GEARS
The gear wire tension is adjusted with the adjuster screw on the hub of the back wheel.
FIG. 15
SPOKES
Spoke tension
The spokes should be equally tensioned round the wheel.
- Check the spoke tension by squeezing two adjacent spokes together.
-
Go round the wheel to check if any spokes are loose.
-
Check that the rim is not warped by turning the wheel and using the brake pad as a reference point.
Broken spoke
Note that a warped rim or broken spoke indicates that the wheel is damaged. Take the bike/wheel to a workshop to be repaired.
LUBRICATION
Lubricate regularly as instructed below to keep the electric bike in good working condition. Make sure not to use too much lubricant, otherwise there is a risk of it accumulating on the brakes and reducing the braking power. The speed control, brake pads and rims should be kept free of grease and other lubricants.
- Lubricate the chain and derailleur with transmission lubricant at 1 to 2 month intervals, or more often if necessary.
- Grease the saddle post and lubricate the eccentric brake screw, the front hub and pedals with grease at 1 to 2 month intervals, or more often if necessary, to avoid unnecessary friction and to prevent the saddle post fastening.
REGULAR MAINTENANCE (INTERVAL 1 TO 2 MONTHS)
Carry out the following checks.
- Check that the stem, handlebars and saddle post are correctly fitted and tightened.
- Check that the axle nuts on the wheels are correctly tightened.
- Check that the rims are not cracked and that the spokes are in good condition and well tensioned.
-
Check that the tyres are not worn or damaged.
-
Check that the tyre pressure is correct.
- Check that the battery contactors on the frame are clean and free from oxide.
- Check that the battery is sufficiently charged.
- Check that the lights are working properly.
- Check that the front and back brakes are working properly.
- Check that the wires are well lubricated and that the brake pads are in good condition.
• Make sure not to use too much lubricant, otherwise there is a risk of it accumulating on the brakes and reducing the braking power. - Check that the welds on the frame are in good condition and free from rust.
CLEANING
- Do not clean the bike with a high-pressure washer – risk of water and moisture penetrating into the electrical components and motor.
- Use a damp sponge with a mild detergent when cleaning. Do not use acidic detergents, they can damage the bike.