
SCAN 2.5 - Image scanning software NIKON - Free user manual and instructions
Find the device manual for free SCAN 2.5 NIKON in PDF.

| Product Type | Image scanning software |
| Brand | Nikon |
| Model | SCAN 2.5 |
| Available Languages | French, English, and many other languages (translation available) |
| Main Functions | Film scanning (positive and negative), curve and level adjustment, color management with ICC profiles, preview, cropping, rotation, sharpening, automatic contrast, analog gain (compatible scanners), scanner calibration |
| Color Management | Nikon CMS (Color Management System) with input, output, and color space profiles |
| Supported Color Spaces | Calibrated RGB (10 profiles), CMYK (customizable), Grayscale |
| Included RGB Profiles | sRGB, Bruce RGB, NTSC (1953), Adobe RGB (1998), CIE RGB, Wide Gamut RGB, Wide Gamut RGB (compensated), Apple RGB, ColorMatch RGB, Apple RGB (compensated) |
| Output Formats | Image data transferred to host application or saved via standalone interface |
| Compatibility | Windows and Macintosh, TWAIN and plug-in (Adobe Photoshop) compatible |
| Installation | RGB profile selection wizard during installation; choice via list or wizard |
| User Interface | Scanning window with drawers for settings, always visible tabs, slider and numeric input controls |
| Advanced Settings | Curves and levels in a resizable floating window (256x256 pixels max), white and black point control, automatic contrast only on current crop |
| Analog Gain | Adjustment from -2 EV to +2 EV for each channel (LS-2000 and COOLSCAN III scanners), applicable to negatives |
| Calibration | Manual calibration button for MA-20, SA-20, IA-20 adapters (LS-2000 and COOLSCAN III) |
| Negative Mode | Preview with options: Automatic, Low contrast highlights, Low contrast shadows, Low contrast neutral |
| System Information | Display of dimensions, file size, orientation, scanner accessory status, firmware version |
| Adapter Support | SA-20 (strips), IA-20 (IX-240), SF-200 (slide feeder for LS-2000) |
| Additional Features | User default settings for adapters, selective slide ejection (SF-200), adjustment history |
| Documentation | PDF manual available for free download |
Frequently Asked Questions - SCAN 2.5 NIKON
User questions about SCAN 2.5 NIKON
0 question about this device. Answer the ones you know or ask your own.
Ask a new question about this device
Download the instructions for your Image scanning software in PDF format for free! Find your manual SCAN 2.5 - NIKON and take your electronic device back in hand. On this page are published all the documents necessary for the use of your device. SCAN 2.5 by NIKON.
USER MANUAL SCAN 2.5 NIKON
Selecting a Color Space
The Status Display
The Curves and Levels Printer
The Settings Menu
Design Changes
Nikon Color Management
How Nikon CMS Works
Color Management Preferences
Scanning with Nikon CMS Off
About This Guide
Welcome to Nikon Scan 2.5! This electronic guide details improvements made to Nikon Scan since the release of Nikon Scan 2.1.
The information in this guide supplements and corrects the Nikon Scan 2.1 reference manuals. While you will still need to refer to the reference manuals for complete instructions on using Nikon Scan, be aware that these manuals do not describe the present version of the product, and that the illustrations and many of the instructions are no longer current. Where indicated, the information in this guide replaces relevant sections of the reference manuals.
This guide is divided into three chapters:
Installation
Nikon Scan 2.5 offers a choice of calibrated RGB color-space profiles with differing gamma values and color ranges. To accommodate this change, new steps, detailed in this chapter, have been added to the installation process to help you choose which of these color profiles will be used when you first start Nikon Scan.
The Scan Window
This chapter describes improvements to the scan window that make it easier to use, including more detailed crop information, a floating curves-and-levels drawer, improved drawer tabs and sliders, and user-specified default settings for multi-frame media. It also details new settings in the Preferences dialog that give the user more control over the auto-contrast function and over white-point and black-point settings.
Nikon Color Management
The Nikon Color Management System, or Nikon CMS, controls how the colors from your scanner will be reproduced on a monitor or color printer. In addition to describing improvements made to color management with the release of Nikon Scan 2.5, this chapter provides an in-depth look at the workings of Nikon CMS.
Installation
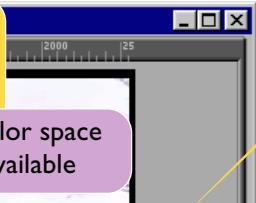
When images are scanned in RGB, Nikon CMS uses calibrated RGB profiles to ensure consistent color reproduction. In earlier versions of Nikon Scan 2, only one such profile (sRGB) was available. With Nikon Scan 2.5, however, the user can choose from a variety of profiles with varying color ranges (gamuts) and gamma values. As part of the installation process, you can choose which of these profiles will be used as the default for the calibrated RGB color space when you first start Nikon Scan. A new profile for the RGB color space can be chosen at any time from the Preferences dialog (see “The Scan Window: Selecting a Color Space,” below).
This chapter describes the steps that have been added to the installation process to allow you to choose the initial profile for the calibrated RGB color space.
"Profile"
To ensure accurate color reproduction, the Nikon Color Management System must have information about the color characteristics of your scanner, monitor, and the color space used when editing or printing images. This information is contained in files called "profiles." For more information, see "Nikon Color Management," below.
Selecting an Initial RGB Color Profile
Installation for Nikon Scan 2.5 proceeds as described on pages 7-11 of the Nikon Scan for Macintosh Reference Manual or pages 7-14 of the Nikon Scan for Windows Reference Manual. When the Install button is clicked to begin installation (Macintosh), or after installation progress meters have disappeared (Windows), a dialog similar to that shown below will be displayed.
This is a setup that determines the basic characteristics of output images.
If helps you to select one of ten standard RGB color spaces.
Do you wish to select a color space from the name list or use the Profile Selection Wizard?
Use name list
Use wizard
To choose a profile from a list, click Use name list and proceed to the next step, “Choosing a Profile from a List.” If you would like a wizard to guide you through the process of choosing a profile, click Use wizard and proceed to “The Profile Wizard.”
Choosing a Profile from a List
If you clicked Use name list in the preceding step, you will be presented with the following dialog.
Please select one of the following RGB color space profiles and press the OK button.
This selection will be used as the initial current setting when you launch Nikon Scan for the first time. The current setting can always be changed using the preferences dialog of Nikon Scan.
sRGB
Bruce RGB
NTSC (1953)
Adobe RGB (1998)
CIE RGB
Wide Gamut RGB
Wide Gamut RGB (compensated)
Apple RGB
Color Match RGB
Apple RGB (compensated)
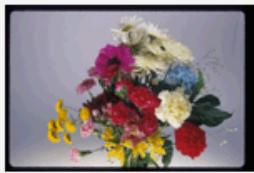
A sample image is being displayed using the selected color space profile.
The first seven color space tend to be used with the windows platform and the last three tend to be used with the Macintosh platform.
Back to the wizard
OK
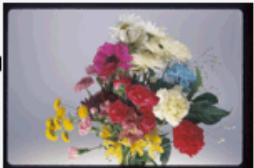
Choose a profile for use as the initial calibrated RGB color space. The effects of the color range and gamma setting for each profile can be seen in the image to the right of the profile list.
Tip
Choosing the profile that is right for you
When choosing a profile for the RGB color space, you should bear two things in mind: the gamma value for your platform and the gamut (range) of colors you need for the task at hand.
Gamma is a fundamental characteristic of imaging systems, used to adjust the brightness of scanned images so that they display correctly on your monitor. The value for gamma that will produce the best results depends on your computer system ("platform") and monitor. A point to remember when choosing a calibrated RGB color space is that the profiles are designed with preset values for gamma, and that choosing a profile with the wrong gamma value for your platform will produce images that are too dark or too bright.
The profiles in the profile list are separated into two groups, one containing seven profiles and the other three. Profiles in the first group have a gamma value of 2.2, the de facto standard for Windows operating systems. Profiles in the second group have a gamma value of 1.8, the default value for the Macintosh. When selecting a profile, choose one appropriate to the platform on which the image is to be displayed.
The other factor to bear in mind when selecting a profile is the gamut, or range of colors you will need for the task at hand. If you are not planning to make fine adjustments to color, a profile with a narrow range of colors is suitable. Note, however, that a narrow gamut may produce colors that are too "saturated," or vivid. If you intend to fine-tune color, contrast, and brightness using an editing tool such as the scan window curves-and-levels drawer, choose a profile that offers a wide range of colors. Without editing, however, such a profile may produce "flat," low-contrast images.
Profiles within each of the two groupings are ordered by the size of their gamut. Those with a narrow gamut are listed at the top, those with a wide gamut at the bottom.
More detailed information on these profiles can be found in “Color Management Preferences: The RGB Sheet” on pages 28-32 of this guide.
After choosing a profile, click OK to continue with the installation process as described on page 11 of the Nikon Scan for Windows Reference Manual or page 14 of the Nikon Scan for Macintosh Reference Manual. If you are still not sure which profile is right for you, click Back to the wizard and proceed to the following step.
The Profile Wizard
The Profile Wizard opens with the dialog shown below.

This choice reflects the differences in the standard settings for gamma on different platforms. Macintosh computers have a system gamma of 1.8, while the de facto standard for Windows platforms is 2.2. Choose Windows if the majority of the images that you scan will be edited on Windows platforms, or Macintosh if you do most of your editing on a Macintosh.
Wizard Macintosh:
There are three choices of color spaces here:
1.Apple RGB
2.Color Match RGB
3.Apple RGB (compensated)
1 gives you the most vivid color reproduction; However, it may be too saturated in places.
3 maintains the most tonal information possible, but it may look "flat". #2 represents values between these two extremes.
Please choose one and press the OK button.
Apple RGB
Color Match RGB
Apple RGB (compensated)
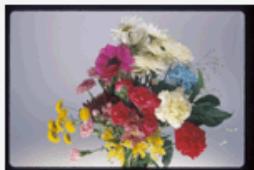
A sample image is being displayed using the selected color space profile.
If you think that all color spaces are still too dark, press the "too Dark" button.
Too Dark
OK
Macintosh profiles
(gamma 1.8)
Narrow gamut: vivid, "saturated" colors

Wide gamut: low-contrast, "flat" colors
Wizard Windows:
There are seven choices of color spaces here:
1.sRGB
2.Bruce RGB
-
NTSC (1953)
-
Adobe RGB (1998)
5.CIE RGB
6.Wide Gamut RGB 7.
Wide Gamut RGB (compensated)
1 gives you the most vivid color reproduction and it is recommended as the standard color space for web authoring; However, it may be too saturated in places.
7 maintains the most tonal information possible, but it may look "flat". #2 thru #6 represent values between these two extremes.
Please choose one and press the OK button.
sRGB
Bruce RGB
NTSC (1953)
Adobe RGB (1998)
CIE RGB
Wide Gamut RGB
Wide Gamut RGB (compensated)
A sample image is being displayed using the selected color space profile.
If you think that all color spaces are still too light, press the "too light" button.
Too light
OK
Windows profiles
(gamma 2.2)
Choose a profile from the list. The effects of the color range and gamma value for each profile can be previewed in the image to the right of the list. If the image seems too dark or too bright, click Too dark to choose from a list of Windows profiles, or Too light to choose from a list of Macintosh profiles. Click OK to choose the selected profile as the initial RGB color space. You can then continue installation as described from page 11 of the Nikon Scan for Windows Reference Manual or page 14 of the Nikon Scan for Macintosh Reference Manual.
The Scan Window
Nikon Scan 2.5 includes a number of improvements to the
centerpiece of the Nikon Scan interface, the scan window.
These changes are summarized in the illustration below.
Slides can be ejected from the SF-200 slide feeder (available separately for the LS-2000 film scanner only) without feeding a new slide
New options in the Settings menu make it possible to specify, recall, and delete user default settings
Drawer tabs are always visible, making drawers easier to use
Drawer controls feature larger sliders and enhanced keyboard entry
The RGB profile can beselected from a pop-upmenu in the Preferencesdialog The “HSL” co
When editing colors, you can compare "before" and "after" versions of the image by toggling this checkbox
Use this check-box to turn analog gain on or off before performing a preview (LS-2000 and COOLSCAN III only)
Information display shows orientation, file size, and current scan settings
Preview Area. A preliminary scan of the image can be displayed here.
Curves and levels can be edited in a separate window that can be enlarged for more precise control
Output levels for white and black points can be adjusted using these sliders
White-point and blackpoint output levels and auto contrast settings can be adjusted in the Preferences dialog
Auto contrast applies only to the current crop
The scan window
The "scan window," or main dialog for the Nikon Scan acquire plug-in or TWAIN source, is where the user:
- previews images from the scanner
- selects the portion of the image to be scanned
- adjusts scan settings for enhanced sharpness, color balance, and contrast
Once settings have been adjusted to the user's satisfaction, the image can be scanned and transferred to another imaging program or to an image window in Nikon Scan. More information on the scan window is available in the Nikon Scan reference manual for your platform.
Selecting a Color Space
This section summarizes changes to color space settings that accompany the release of Nikon Scan 2.5. The principle changes are as follows:
- the HSL color space has been eliminated
- the color profile used when “calibrated RGB” is selected from the color space menu can now be chosen from a variety of options in the Preferences dialog box
The HSL Color Space
A number of changes have been made to color-space settings with the release of Nikon Scan 2.5. The most obvious is that the HSL color space is no longer available. As a result, HSL options have been removed from the color-space menus shown in "Basic Operations" Step 3, "Choosing a Film Type and Color Space," "Preview: Film Type and Color Space Selection," and "Image Window Operations: Scan Window Settings" (Macintosh) or "Image Window Operations: the Nikon Scan Menu" (Windows) in the Nikon Scan reference manuals. Controls for editing colors in the HSL color space are no longer available in the curves-and-levels drawer, and consequently the operations described under the heading, "The Curves and Levels Printer: HSL Controls" in the Nikon Scan reference manuals can be ignored.
"Color space"
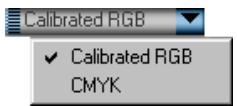
"Color space" refers to the model used when representing colors digitally. Nikon Scan 2.1 offered three basic types of color space: RGB, in which colors are represented as combinations of red, green, and blue; CMYK, in which colors are modeled by means of the colors used in printers'ink (cyan, magenta, yellow, and black); and HSL, in which colors are expressed using measures of hue, saturation, and luminance. Nikon Scan 2.5 offers a choice of calibrated RGB and CMYK color spaces when Nikon CMS is on; when Nikon CMS is off, images can be scanned as uncalibrated RGB or grayscale.
The "Calibrated RGB" Color Space
Additional changes affect the RGB color space. The Nikon Color Management System (Nikon CMS) provides a "calibrated" RGB color space, enabling colors to be reproduced more accurately in different applications or on different platforms. The characteristics of this color space, such as the colors it is capable of expressing, are defined in files called "profiles." In earlier versions of Nikon Scan 2, only one such profile — sRGB — was available. Nikon Scan 2.5 offers a choice of profiles for the calibrated RGB color space; to reflect this change, the "sRGB"
option in the color space menu has been renamed Calibrated RGB, as shown at right. The profile used can be chosen from the Preferences dialog box.
See also
For more information on choosing a color space, see:
Preview: Film Type and Color Space Selection Nikon Scan for Macintosh Reference Manual pages 53-54 Nikon Scan for Windows Reference Manual pages 56-57
- "Image Window Operations: Scan Window Settings" (Nikon Scan for Macintosh Reference Manual page 107) or "Image Window Operations: The Nikon Scan Menu" (Nikon Scan for Windows Reference Manual page 120)
Note that the "sRGB" option shown in the color space menus has been replaced by "Calibrated RGB," while any references to HSL can be ignored. These changes also apply to:
- "Basic Operations"
Nikon Scan for Macintosh Reference Manual page 16
Nikon Scan for Windows Reference Manual page 19
To choose the RGB profile used when Calibrated RGB is selected from the color space menu:
1 Open the Preferences dialog by clicking the pref (preferences) button in the scan window (when Nikon Scan is used as a
"stand-alone" application, you can also open the Preferences dialog by selecting Preferences from the Nikon Scan menu (Windows) or the Edit menu (Macintosh).
"Stand alone"
Nikon Scan is composed of two modules: a TWAIN source or acquire plug-in (the scan window) that allows images to be scanned directly into compatible programs such as Adobe ^® Photoshop ^TM , and a mini-program (the "main window" or "Nikon Scan applet") that serves as an interface with the scan window when no other program is available, or when you don't have the resources needed to run a more sophisticated imaging program. Nikon Scan is said to function as a "stand-alone application" when the mini-program is used.
2 Click color management (A) to display the Color Management tab, then click RGB (B) to view the RGB settings sheet (shown below).

3 Choose a profile for the calibrated RGB color space from the Color Space profile pop-up menu (C).
The chosen profile will be used when Nikon CMS is on and
Calibrated RGB is selected from the color space pop-up menu in the scan window.
For more information on choosing the profile that is right for you, see “Installation: Choosing a Profile from a List” on page 4 of this guide. Detailed information on the RGB profiles provided with Nikon Scan 2.5 can be found on pages 28–32.
See also
For more information on color management settings, see "Nikon Color Management" later in this guide. The RGB sheet shown above replaces the Main Scan sheet shown in "The Scan Window: Scan Window Preferences" in the Nikon Scan reference manuals.
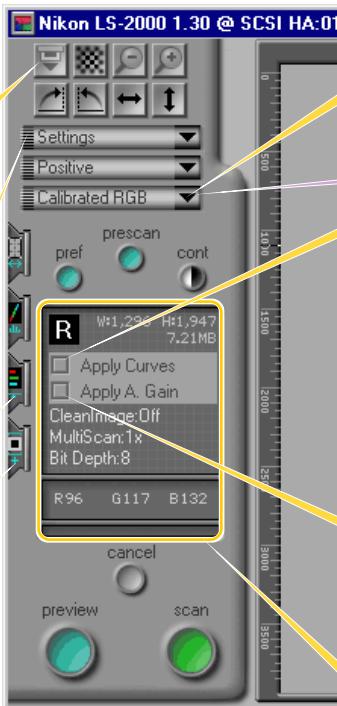
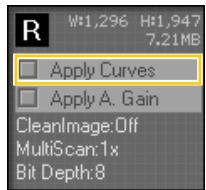
The Status Display
The "status display" is the area in the scan window that gives information about the current scan settings. In earlier versions of Nikon Scan 2, this display gave only the dimensions of the current crop. With Nikon Scan 2.5, the information shown includes:
- the orientation of the preview image after flips or rotations have been performed
- the width, height, and file size of the image that will result if the crop is scanned at current settings (output size)
- an "Apply Curves" check-box for quick "before-and-after" comparisons of color editing results
- an “Apply Analog Gain” check-box (LS-2000 and COOLSCAN III film scanners only), which can be toggled to turn analog gain on or off before you perform a preview (effects will not be visible until a preview scan has been performed)
- information on scanner extras
"Crop"
The current crop is the portion of the image currently selected in the preview area. By default it includes the entire image, but smaller rectangular areas can be selected by dragging the mouse over the preview area. See "Preview" in the Nikon Scan reference manual for information on selecting and manipulating crops.
See also
The changes to the status display described in this section affect the following section of the Nikon Scan reference manuals, where the status display is referred to as the "crop information display":
Preview: Selecting a Crop Nikon Scan for Macintosh Reference Manual page 61 Nikon Scan for Windows Reference Manual page 64
Image Orientation
The image orientation display takes the form of a capital letter "R." Any flips or rotations performed on the image are reflected in the orientation of the letter.
Output Size
The output size area shows the width, height, and file size of the image that will result if the crop is scanned at current settings. Height and width are expressed in pixels.
"Apply Curves"
The Apply Curves check-box is used to alternately hide and display changes to the curves that control contrast and color balance. This makes it easier to evaluate the results of any changes you have made.
See also
Output size is set using the controls in the scan-size drawer. For more information, see:
- "The Scan Size Printer"
Nikon Scan for Macintosh Reference Manual pages 71-72
Nikon Scan for Windows Reference Manual pages 74-75
If Apply Curves is not checked, changes will be hidden to show how the image appeared before editing. Check the box to view the effects of current settings. When the results of editing are visible, the box will be marked with a check-mark (Macintosh) or green dot (Windows).
The Apply Curves check-box also affects the final scan.
Apply Curves must be checked if changes to curves are to be reflected in the image passed to the host application when the scan button is clicked.
The Apply Curves check-box is only active when an auto-contrast operation has been performed or color information has been edited in the curves-and-levels or color-balance drawers. The button is dimmed when default settings are in effect.
"Host application"
When the scan window is opened from another program, such as Adobe ^® Photoshop ^TM , that program is said to be the "host application" for Nikon Scan. Images scanned when the scan button is pressed will be opened in windows in the host application. When Nikon Scan is used as a "stand-alone" application, the main window or Nikon Scan applet functions as the host application.
"Apply Analog Gain"
The Apply A. Gain (Apply Analog Gain) check-box is used to turn analog gain on or off before performing a preview or main scan. It is only active when changes have been made to analog gain settings in the scanner extras drawer.
Changes to analog gain will not be reflected in the preview image until the preview button is clicked to scan the image at the new settings. Consequently turning the Apply A. Gain check-box on or off will have no effect until a new preview scan is performed. If you turn the Apply A. Gain check-box on or off before clicking the scan button to scan the image into the host application, this change will be reflected in the final image.
Analog gain
Analog gain is a feature of the LS-2000 and COOLSCAN III film scanners that allows the user to adjust colors by directly altering the exposure value for each of the colored elements in the scanner's light source. See "Appendix A: Scanner Extras for the LS-2000 and COOLSCAN III" in the Nikon Scan reference manual for your platform, and "Design Changes" later in this chapter, for more information on analog gain.
Scanner Extras
The lower part of the status display shows the status of the principle scanner extras available for your scanner. The display for the LS- 2000 and COOLSCAN III film scanners shows the image bit depth (pixel data size) and the status
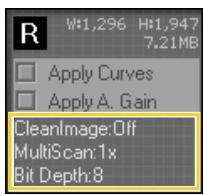
of the CleanImage function. The display for the LS-2000 also gives information on the multi-sample scan setting.
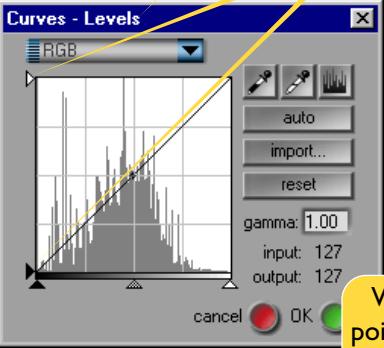
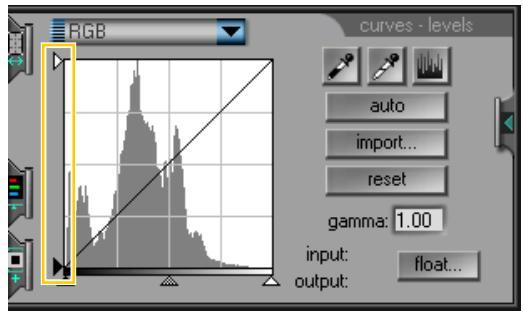
The Curves and Levels Printer
Changes to the curves-and-levels drawer with the release of Nikon Scan 2.5 include the following:
- a “float” button that opens the curves-and-levels controls in an independent window, which can be moved or resized for improved color editing
- changes to the histogram, which now gives information only on the current crop, rather than on the entire image
- new controls for white point, black point, and auto contrast
- the elimination of HSL editing controls with the removal of the HSL color space (see “The Scan Window: Selecting a Color Space,” above)
See also
The curves-and-levels drawer shown in this section replaces that shown in the reference manuals. For more information on the curves-and-levels drawer, see:
- "The Curves and Levels Printer"
- Nikon Scan for Macintosh Reference Manual pages 75-87
- Nikon Scan for Windows Reference Manual pages 78-90 Any references to the HSL color space can be ignored, including "The Curves and Levels Printer: HSL Controls" (Nikon Scan for Macintosh Reference Manual pages 88-91, Nikon Scan for Windows Reference Manual pages 91-94).
The Float Button
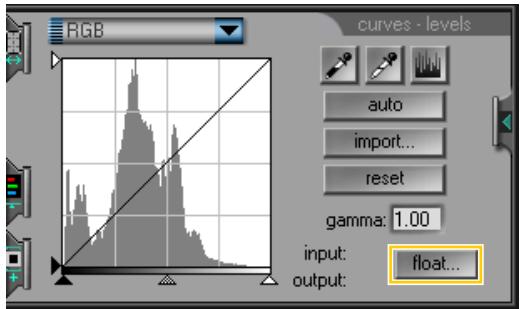
Clicking the float... button in the curves-and-levels drawer opens a new window containing the same controls (see right). This window "floats," meaning that it can be moved or resized as desired. The curves-and-levels display changes with the size of the
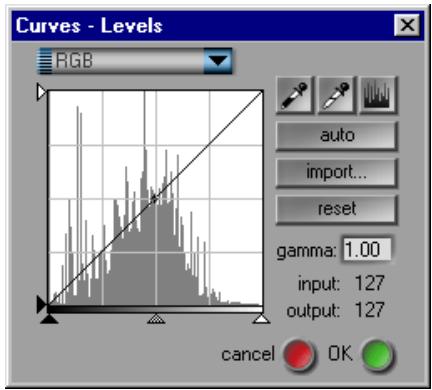
window, allowing you to enlarge the display to a maximum of 256 × 256 pixels. At this size, each of the 256 points on the curve is represented by a separate pixel, granting maximum precision when editing curves.
To close the window and apply changes to curves, click OK. Click cancel to exit without applying changes.
Black Point, White Point, and Auto Contrast
New controls for editing the white and black point in Nikon Scan 2.5 include white-point and black-point output sliders, as well as Preferences for setting defaults for auto contrast and the output levels for the white point and black point.
The White-Point and Black-Point Output Sliders
In earlier versions of Nikon Scan 2, while it was possible to set the input levels for the black and white points using the sliders at the bottom of the gamma curve window, the output levels could only be set by editing the curves directly. In Nikon Scan 2.5, sliders have been added to the left side of the gamma curve window. The top slider controls the output level for the white point, the bottom slider the output level for the black point.
See also
If you are unfamiliar with the terminology used in this section, refer to "The Curves and Levels Printer" in the Nikon Scan reference manual for your platform.
By default, the white point for the master curve is output as white, the black point as black. In an RGB color space with a bit depth of eight bits per pixel, white is represented by a value of 255 for each of the red, green, and blue channels, black by a value of zero for each channel.
To select a new output value for the current channel, click the desired output slider once to select it and then drag it into a new position. Moving the white output slider down will cause the whites in your image to darken, while moving it up will produce colors closer to a true white. Output levels for the black point are set by dragging the black output slider.
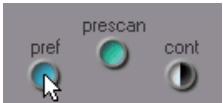
Auto Contrast
In earlier versions of Nikon Scan 2, auto contrast calculations were based on the entire image, with the result that the black point was frequently determined by the dark border at the edges of the frame. In Nikon Scan 2.5, auto contrast is calculated based on the pixels in the current crop only, producing results suited to the portion of the image that will be scanned. This change is reflected in the histogram, which now shows data for only those pixels in the current crop, rather than the entire image.
Auto contrast can be determined simultaneously for all component color channels using one of two methods: either click the cont (contrast) button in the control area, or select the master curve in the curves-and-levels drawer and click the auto button. In earlier versions of Nikon Scan 2, these auto contrast operations applied to the master curve. In Nikon Scan 2.5, auto contrast applies simultaneously to the curve for each component color, but not to the master curve. To set the white and black points for a specific component color, select the desired channel in the curves-and-levels drawer and click the auto button.
Note
The above section replaces the note on the following pages of the reference manuals:
- Nikon Scan for Macintosh Reference Manual page 82
- Nikon Scan for Windows Reference Manual page 85
The Color Sheet
The Miscellaneous tab in the Preferences dialog contains a new sheet, the Color sheet, where you can specify output colors for the black and white points and change the auto-contrast setting. The Color sheet is shown below.
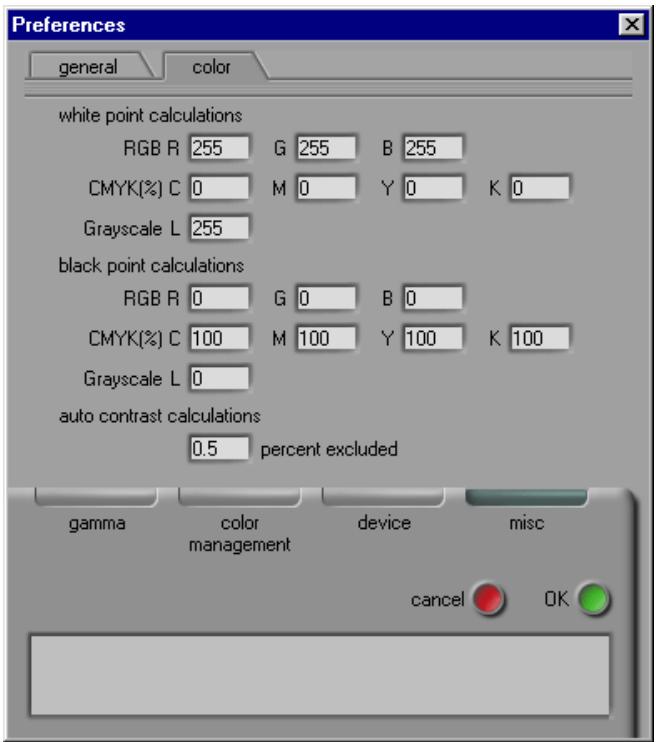
White-Point and Black-Point Calculations
You can specify default output values for white point and black point in each of the RGB, CMYK, and grayscale color spaces. The factory default settings for the white point in RGB and grayscale are 255 for each channel, which displays as white on most computer monitors. The factory defaults for the black point are zero for each channel, which displays as black. In the case of CMYK, the factory defaults for the white point are zero for each channel, which means that true whites will be the same color as the paper when printed on a four-color printer. The black point for CMYK defaults to 100% for each channel.
See also
The Miscellaneous tab of the Preferences dialog now consists of two sheets, the Color sheet, shown on the previous page, and the General sheet. The options available in the General sheet are the same as those in the Miscellaneous tab discussed in:
- "The Scan Window: Scan Window Preferences" Nikon Scan for Macintosh Reference Manual pages 42-44 Nikon Scan for Windows Reference Manual pages 45-47
Auto Contrast Calculations
A further option in the Color sheet allows you to specify how the auto contrast operation calculates the input values for the white point and black point. By default, the white point is set to a value that excludes 0.5% of the brightest pixels in the current crop, the black point to a value that excludes 0.5% of the darkest pixels in the crop. This produces an optimal dynamic range, with minimum loss of detail in shadows and highlights. To preserve detail at the expense of dynamic range, lower the "excluded" value for auto contrast (a value of zero will set the black and white point respectively to the darkest and brightest pixel in the crop). To increase the dynamic range at the expense of detail, raise the "excluded" value.
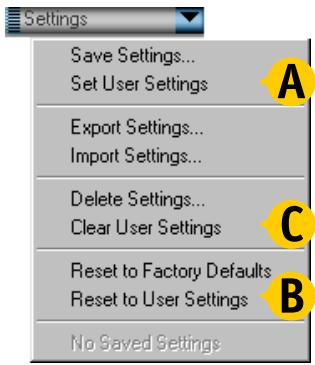
The Settings Menu
The Settings menu in the scan window contains three new options that allow you to create, restore, and delete default settings for scanning multi-frame media.
See also
The settings menu shown here replaces that shown in the reference manuals. For information on the other options available in the settings menu, see:
- "Saving and Loading Settings" Nikon Scan for Macintosh Reference Manual pages 94-97 Nikon Scan for Windows Reference Manual pages 97-100
Creating User Default Settings
To create user default settings:
Preview an image as described in "Preview" in the Nikon Scan reference manual for your platform.
2 Adjust scan settings to your satisfaction.
3 Choose Set user settings (A) from the Settings menu.
Settings created with a slide adapter or the SA-20 strip-film adapter will be used as the defaults for the SA-20, and will be restored automatically the next time the SA-20 is inserted in the scanner. Settings created with the IA-20 IX-240 film adapter (available separately for the LS-2000 and COOLSCAN III film scanners) will be restored automatically the next time the IA-20 is inserted in the scanner.
Restoring User Default Settings
- User default settings for the SA-20 can only be recalled when the SA-20 or a slide adapter is in place; similarly, user defaults for the IA-20 can only be recalled when the IA-20 is in place. To restore user default settings, choose Reset to user settings (B) from the Settings menu.
Deleting User Default Settings
To delete user default settings, choose Clear user settings (C) from the settings menu.
Design Changes
In addition to the changes described above, a number of general improvements have been made to the design of the scan window. These include the following:
- drawer tabs are always visible
- slides can now be ejected from the SF-200 slide feeder (available separately for the LS-2000 film scanner) without feeding a new slide
- the controls in the color-balance drawer and analog gain menu are easier to use
- analog gain can now be used when scanning film negatives; in addition, gain is expressed in terms of exposure compensation and measured in EVs, terminology familiar to camera users
- a scanner calibration option has been added to the scanner extras for the LS-2000 and COOLSCAN III
- the negative prescan setting for low-contrast scenes can now be chosen from "low-key," "neutral," and "high-key," according to the tone range of the image to be scanned (LS-2000 and COOLSCAN III only; firmware version 1.3 or later required)
Drawer Tabs
In earlier versions of Nikon Scan 2, drawer tabs were designed to "pop out" when the mouse was moved over them. In Nikon Scan 2.5, drawer tabs are always visible. This information replaces that on page 29 of the Nikon Scan for Macintosh Reference Manual and on page 32 of the Nikon Scan for Windows Reference Manual.
The thumbnail drawer tab is not affected by this change.
The Eject/Feed Button
When the optional SF-200 slide feeder is inserted in the LS-2000 film scanner, you can now eject a slide without feeding a new one. To do so, click the Eject/Feed button while holding down the Ctrl (Windows) or Option key (Macintosh). To feed the next slide, release the Ctrl or Option key and click the Eject/Feed button again.
See also
Drawers and drawer tabs are described more fully in:
- "The Scan Window: Parts of the Scan Window" Nikon Scan for Macintosh Reference Manual pages 29-30 Nikon Scan for Windows Reference Manual pages 32-33
Other functions of the Eject/Feed button are described in:
Preview: Setting and Ejecting Film Nikon Scan for Macintosh Reference Manual page 54 Nikon Scan for Windows Reference Manual page 57
Slider Controls
The sliders in the color-balance drawer and the analog gain menu are larger than those depicted in the Nikon Scan reference manuals. The new controls for the color-balance drawer are shown below, those for the analog gain menu at right.
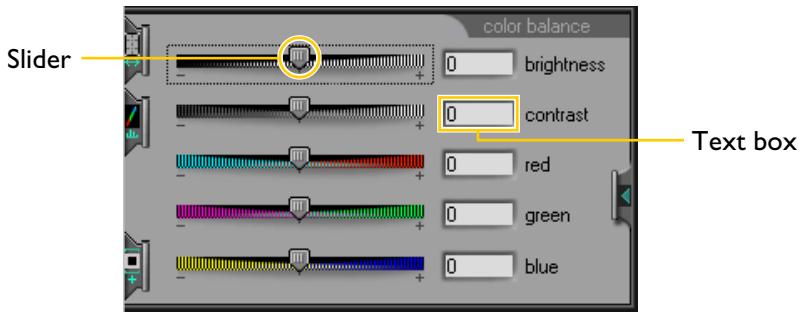
Values for settings can now be entered directly in the text boxes to the right of the sliders.
See also
For more information on the color-balance drawer, see:
The Color Balance Printer
Nikon Scan for Macintosh Reference Manual pages 92-93
Nikon Scan for Windows Reference Manual pages 95-96
Analog Gain
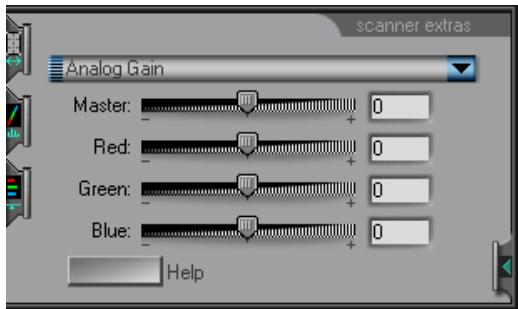
Analog gain can now be used when the media type is set to "negative"; in earlier versions of Nikon Scan 2, it could only be used with positive media. Gain is now measured in terms of exposure value (EV), the same unit used in adjusting exposure compensation on many cameras. The default value for each of the LEDs in the scanner's light source is ± 0EV ; the gain for all LEDs or for each LED separately can be set to values between -2EV and +2EV.
Changes to analog gain do not apply until a preview or main scan is performed, and only take effect when the Apply A.
Gain (Apply Analog Gain) check-box is on. See "The Scan Window: the Status Display," above.
See also
More information on using analog gain may be found in:
- "Appendix A: Scanner Extras for the LS-2000 and COOLSCAN III" Nikon Scan for Macintosh Reference Manual page 112 Nikon Scan for Windows Reference Manual page 125
Scanner Extras/Miscellaneous Settings
With the release of Nikon Scan 2.5 and firmware version 1.3 for the LS-2000 and COOLSCAN III scanners, a number of changes have been made to the "Miscellaneous" (Macintosh) or "Scanner Extras" (Windows) settings in the scanner extras drawer. Scanner Extras/Miscellaneous settings are shown below.
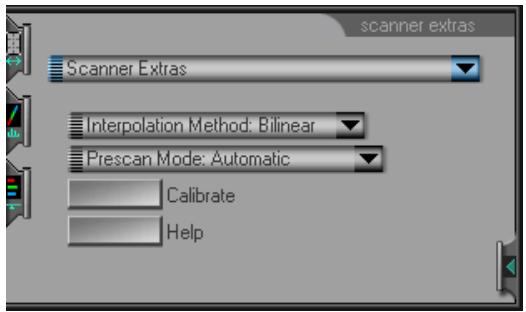
Changes from Nikon Scan 2.1 include the addition of a Calibrate button and more options for negative prescans.
See also
For more information on scanner extras, see:
- "Appendix A: Scanner Extras" Nikon Scan for Macintosh Reference Manual pages 109-116 Nikon Scan for Windows Reference Manual pages 122-129
Calibrate
With Nikon Scan 2.5, a Calibrate button has been added to the Scanner Extras/Miscellaneous settings for the LS-2000 and COOLSCAN III film scanners. Recalibration can be performed with the MA-20, SA-20, or optional IA-20 adapter inserted in the scanner (manual calibration is not necessary when the SF-200 slide feeder, available separately for the LS-2000, is inserted in the scanner). If you are using the MA-20, remove any holders from the adapter. If you are using the SA-20, the film will be ejected during the calibration and fed back into the scanner when calibration is complete. In the case of the IA-20, you will be prompted to rewind the film before calibration begins. To start calibration, click the Calibrate button.
Note
Under most circumstances, calibration is performed automatically at intervals when no media are inserted in the scanner. Manual calibration using the Calibrate button is only necessary when film has been left in the scanner for a long period of time.
Prescan Mode
When scanning film negatives, a prescan is necessary to obtain the best results. Selecting “negative” as the media type activates a menu of prescan options in the Scanner Extras/Miscellaneous settings sheet. Nikon Scan 2.5, in combination with firmware versions 1.3 or later, offers a choice of four prescan settings (shown at right) for different kinds of images.
Automatic
This is the recommended setting in most circumstances, suited to images that show a normal balance among shadows, mid-tones, and highlights. Use a different setting only if you experience problems scanning negatives using the automatic setting.
Note
The negative prescan mode menu shown above is only available when Nikon Scan 2.5 is used with LS-2000 or COOLSCAN III firmware versions I.3 or later. The current firmware version for your scanner is displayed in the title bar of the scan window. Nikon LS-2000 1.30 @ SCSI HA:01 ID:05
Lo-Cont. Highkey
This setting is suited to low-contrast images with clearly-defined white areas, but no clear shadows. An example of such an image would be a photograph of white clouds in a blue sky.

Lo-Cont. Lowkey
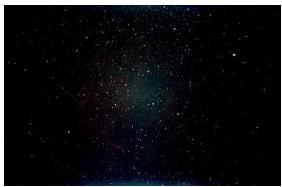
This setting is suited to low-contrast images with clearly-defined black areas, but no clear highlights. An example would be a photograph of the night sky.
Lo-Cont. Neutral
This setting is suited to low-contrast images in which mid-tones predominate, with no clearly-defined areas of black or white. An example would be a photograph of red rose against a green background.

Nikon Color Management
The Nikon Color Management System, or Nikon CMS, ensures that the image data from your Nikon scanner are reproduced faithfully on your system's monitor or printer. With this powerful tool, you can manipulate colors in either a CMYK or calibrated RGB color space before the data are passed to your imaging application. Profiles detailing the color characteristics of the chosen color space and the output device (monitor or printer) ensure that colors will be reproduced accurately in almost any operating environment.
The release of Nikon Scan 2.5 marks a number of improvements to the color-management system used in earlier versions of Nikon Scan 2. These include:
- profile information can be passed to the host application (Macintosh only), and is stored with images saved using the Nikon Scan applet or main window
- profiles for the RGB color space can be chosen from a list of options in the Preferences dialog
- because monitor and RGB profiles contain gamma settings specifically designed for a given monitor and platform, adjustments can now only be made to gamma when Nikon CMS is off (in earlier versions of Nikon Scan 2, it was possible to make further adjustments to gamma after selecting a profile)
In addition to detailing alterations to the Color Management and Gamma tabs of the Preferences dialog to accommodate these changes, this chapter offers an in-depth look at the workings of Nikon CMS.
How Nikon CMS Works
When image data are passed from an input device, such as a scanner, to an output device, such as a monitor or printer, color management ensures that the image displayed on the output device "looks the same" as the original. To accomplish this task, the color management system must have information about the color characteristics of both the input and output devices, as well as the color space used for editing. The files containing this information are called "ICC profiles." Nikon Scan uses the following three types of profile:
Input Profiles
Input profiles provide information on the input device, i.e., your Nikon scanner. Fixed profiles detailing the color characteristics of supported Nikon scanners are provided with Nikon Scan. An input profile is selected automatically based on the model of scanner used and the type of media (positive or negative) being scanned.
Color-Space Profiles
Separate profiles are available for the RGB and CMYK color spaces. Nikon Scan 2.5 comes with a selection of profiles for the RGB color space, while CMYK profiles for color printers are usually provided by the manufacturer. Color-space profiles are used when editing images in the scan window and when making the final scan.
Monitor Profiles
Monitor profiles are usually provided by the manufacturer, although profiles for some common monitor types may be included with your operating system. Monitor profiles apply when images are displayed on a monitor, for example when an image is displayed in the preview area or an image window.
The Scanning Process
The illustration below shows the role Nikon CMS plays in the scanning process. CMS profiles are shown in blue, user operations in red.
When Nikon CMS is on, uncalibrated RGB image data from the scanner are converted to CMYK or calibrated RGB, depending on which color space is selected in the scan window. CMYK data are processed according to a user-specified CMYK profile, while RGB data are processed according to the profile selected for the calibrated RGB color space. These data are stored in memory so that the color space can be changed without performing another preview scan. Any changes you make to color balance or contrast also apply to these data. When the image is displayed in the preview window, the monitor profile is used to ensure that the preview image is as true as possible to the data in memory.
When the scan button is clicked to perform the final scan, the scan data are processed according to the selected color-space profile and any changes that were made to curves and levels, color balance, or contrast in the scan window. The data are then transferred to the host application or opened in image windows in Nikon Scan. Where possible, the color-space profile is transferred to the host application together with the image data. The TWAIN interface used in Windows, however, does not allow profiles to be passed to another application, with the result that under Windows the profile is only saved when the image is opened in an image window in Nikon Scan. When images are displayed in Nikon Scan image windows, the monitor profile is used to ensure that the image on the screen reflects the original as closely as possible.

Color Management Preferences
The profiles used by the Nikon Color Management System are specified by means of the Color Management tab in the Preferences dialog, shown below.
use Nikon Color Management System
This check-box turns the Nikon Color Management System on and off. Changes to this setting only take effect after you have quit and restarted Nikon Scan.
When the check-box is on...
...images are processed to ensure consistent color reproduction, as described above under the heading "How Nikon CMS Works." Because color management profiles typically contain their own settings for gamma, the controls in the Gamma tab are dimmed and inactive.
When the check-box is off...
...monitor and color-space profiles are not used, and the controls in the Color Management tab are dimmed and inactive. The only tool available for ensuring that colors from the scanner will be displayed accurately on the monitor is the Gamma tab (see below). The only adjustments made to the image before it is passed to the host application are the gamma adjustment and changes to color balance and contrast made in the scan window.
Note
This section replaces the following passages in the Nikon Scan reference manuals:
- "Preferences: the Color Management Tab" in "The Scan Window" Nikon Scan for Macintosh Reference Manual pages 36-40 Nikon Scan for Windows Reference Manual pages 40-44
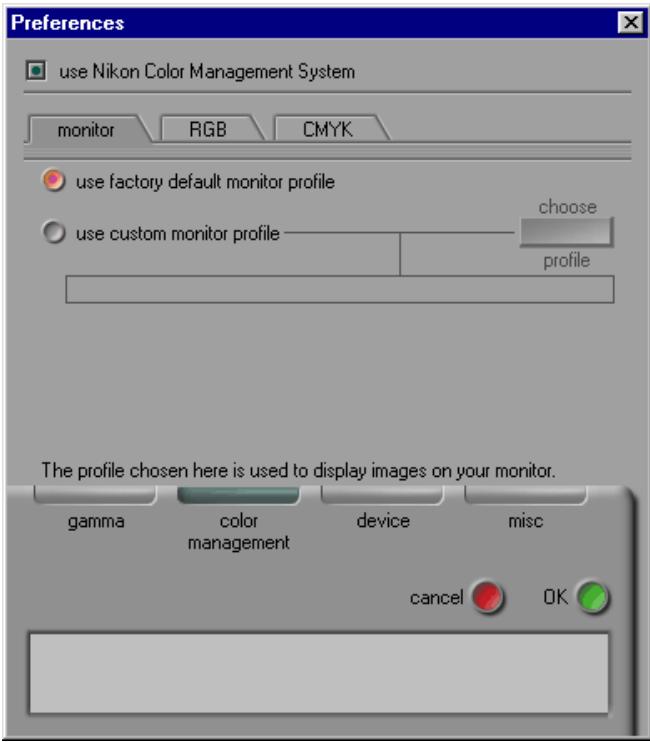
The Monitor Sheet
The Monitor sheet, shown below, replaces the Preview sheet shown in "The Scan Window: Scan Window Preferences" in the Nikon Scan reference manuals.
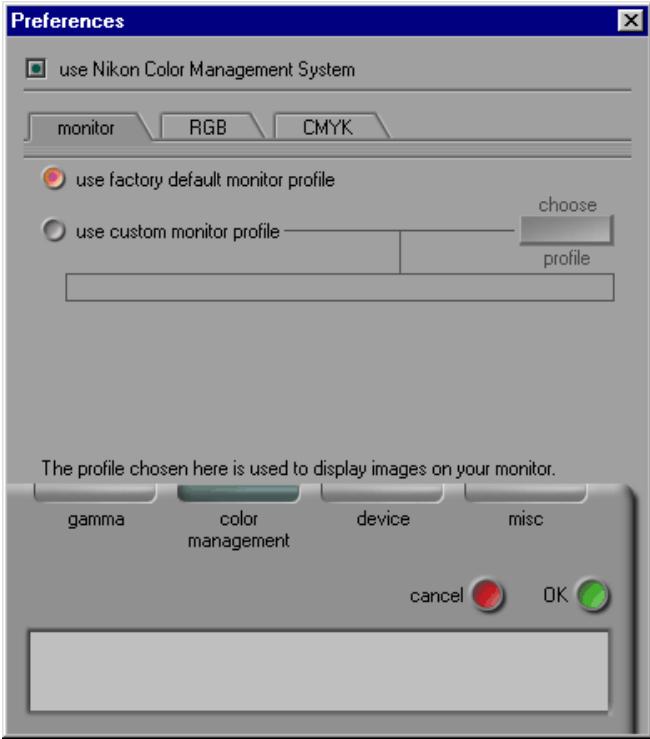
The Monitor sheet is where you can select the profile that will be used when images are displayed on your monitor, either in the scan window preview area or a Nikon Scan image window. Monitor profiles contain information about the color and gamma characteristics of your monitor, allowing images to be adjusted for more accurate color reproduction.
use factory default monitor profile (default)
Nikon Scan is supplied with default monitor profiles for use when no other profile is available. The default for the Windows version of Nikon Scan is an sRGB profile, that for the Macintosh version a profile designed for Apple 17" monitors with D50 white (see pages 30 and 32 for details). To use the default profile for your platform, select use factory default monitor profile.
use custom monitor profile
Use this option to select a profile supplied by the company that manufactured your monitor. When this option is selected, the choose profile button will be active. Clicking this button displays a standard open-file dialog, where you can navigate to the disk and folder containing the manufacturer's profile. The path to the selected profile will appear in the text box below the use custom monitor profile radio button.
The RGB Sheet
The RGB sheet replaces the Main Scan sheet discussed in “The Scan Window: Scan Window Preferences” in the Nikon Scan reference manuals.
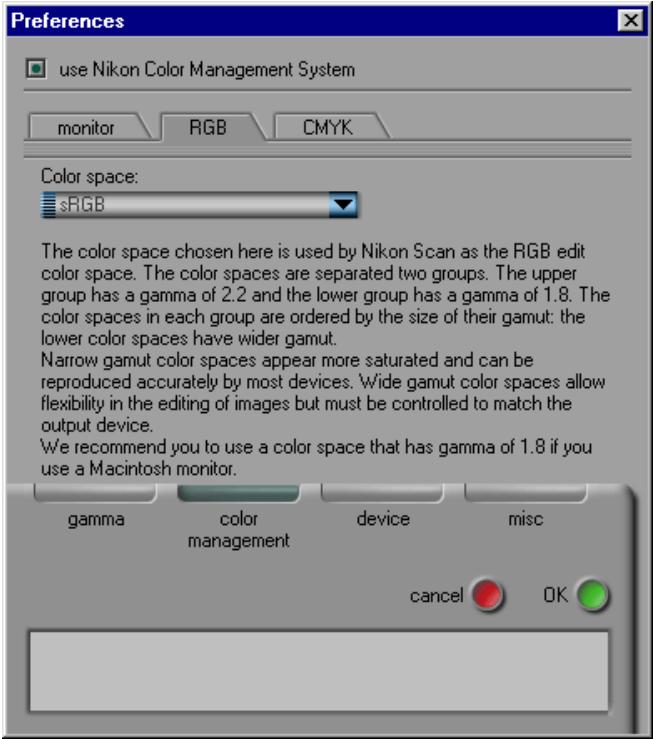
The RGB sheet is where you select the color profile used for the calibrated RGB color space. The profile used can be selected from the profile menu shown at right.
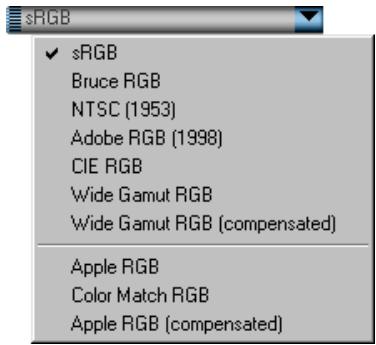
Each of the profiles listed may be classified according to its gamma value and gamut. Gamma is a fundamental characteristic of imaging systems which determines the intensity of the output signal relative to the input; in human terms, gamma controls the subjective brightness of images through alterations to the output level for mid-tones. Windows and Macintosh systems process video signals differently, and these differences are reflected in the difference in the standard gamma values for these platforms. The default system gamma for Macintosh computers is 1.8, the de facto standard for Windows systems, 2.2. Nikon CMS includes seven RGB profiles with a Windows gamma of 2.2 (sRGB, Bruce RGB, NTSC [1953], Adobe RGB [1988], CIE RGB, Wide Gamut RGB, and compensated Wide Gamut RGB), and three profiles with a gamma value of 1.8 (Apple RGB, ColorMatch RGB, and compensated Apple RGB), for use on the Macintosh. When scanning images, choose a profile with a gamma value suited to the system on which the image will be edited.
Profiles can be further classified according to their gamut, or the range of colors that can be expressed using the profile. Gamut is conventionally expressed by means of chromaticity, a measure of color developed by the Commission Internationale de l'Eclairage (CIE). The CIE system, which is modeled on human color perception, maps the physical wavelengths of light to three coordinates (known as CIE X, Y, and Z) that give unique numerical expression to the full range of color differences that can be perceived by humans. Chromaticity is a measure of color from which considerations of brightness have been factored out, giving a two-coordinate system.
In the chromaticity diagram at right, the complete gamut of colors visible to humans is in the area enclosed by the light blue line. The curved portion of the line gives the chromaticity of "pure," unmixed colors with wavelengths in the visible spectrum of 380 - 780nm . The blue end of the spectrum (380nm) is at the bottom left corner, the red end of the spectrum (780nm) at the bottom right corner. The straight diagonal line connecting these two points represents the different colors of purple created by combining red and blue light. The colors inside the area enclosed by these lines are created by mixing light of different wavelengths.
No color profile is capable of expressing the full range of colors that can be perceived by humans. The diagram below compares the gamut of colors visible to the naked eye with the colors that can be expressed in each of the RGB profiles provided with Nikon CMS. The gamut for each profile is contained in the triangle defined by the three points that mark the extremes of red, green, and blue for that profile (red is at the bottom right corner, green at the top of the triangle, and blue at the bottom left corner). The white point for each profile is shown by the symbol in the center of the triangle.
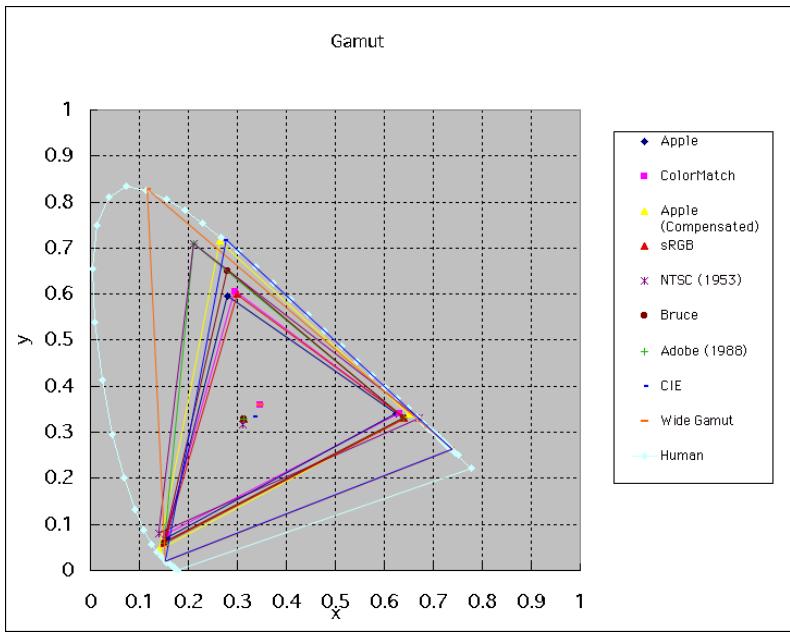
The following table shows the gamma value for the profiles included with Nikon CMS, together with the chromaticity values for the white point and for red, green, and blue.
| Profile | White Point | Gamma Value | Chromaticity (x,y) | ||||
| Name | Value | Name | R | G | B | ||
| Apple RGB | 6500K (D65) | x 0.3127159 | 1.8 | Trinitron | x 0.625 | x 0.28 | x 0.155 |
| y 0.3290015 | y 0.34 | y 0.595 | y 0.07 | ||||
| ColorMatch RGB | 5000K (D50) | x 0.3457029 | 1.8 | P22-EBU | x 0.63 | x 0.295 | x 0.155 |
| y 0.3585386 | y 0.34 | y 0.605 | y 0.077 | ||||
| Apple RGB (Compensated) | 6500K (D65) | x 0.3127159 | 1.8 | Custom | x 0.65 | x 0.265 | x 0.14 |
| y 0.3290015 | y 0.341 | y 0.717 | y 0.0454 | ||||
| sRGB | 6500K (D65) | x 0.3127159 | 2.2 | HDTV (CCIR 709) | x 0.64 | x 0.3 | x 0.15 |
| y 0.3290015 | y 0.33 | y 0.6 | y 0.06 | ||||
| NTSC (1953) | Std Illuminant C | x 0.3101 | 2.2 | NTSC (1953) | x 0.67 | x 0.21 | x 0.14 |
| y 0.3162 | y 0.33 | y 0.71 | y 0.08 | ||||
| Bruce RGB | 6500K (D65) | x 0.3127159 | 2.2 | Bruce RGB | x 0.64 | x 0.28 | x 0.15 |
| y 0.3290015 | y 0.33 | y 0.65 | y 0.06 | ||||
| Adobe RGB (1988) | 6500K (D65) | x 0.3127159 | 2.2 | Adobe RGB (1998) | x 0.64 | x 0.21 | x 0.15 |
| y 0.3290015 | y 0.33 | y 0.71 | y 0.06 | ||||
| CIE RGB | Std Illuminant E | x 0.3333333 | 2.2 | CIE RGB | x 0.735 | x 0.274 | x 0.167 |
| y 0.3333333 | y 0.265 | y 0.717 | y 0.009 | ||||
| Wide Gamut RGB | 5000K (D50) | x 0.3457029 | 2.2 | 700/525/450nm | x 0.7347 | x 0.1152 | x 0.1566 |
| y 0.3585386 | y 0.2653 | y 0.8264 | y 0.0177 | ||||
| Default Windows Monitor | 6500K (D65) | x | 0.3127159 | 2.2 | HDTV (CCIR 709) | x | 0.64 | x | 0.3 | x | 0.15 |
| y | 0.3290015 | y | 0.33 | y | 0.6 | y | 0.06 | ||||
| Default Macintosh Monitor | 5000K (D50) | x | 0.34570291 | 1.8 | Trinitron | x | 0.625 | x | 0.28 | x | 0.155 |
| y | 0.3585386 | y | 0.34 | y | 0.595 | y | 0.07 |
Notes on RGB Profiles Provided with Nikon Scan Apple RGB (gamma 1.8)
This profile is used in desk-top publishing applications and in Adobe® Photoshop™ versions 4.0 or earlier, and is the typical RGB profile for Macintosh monitors. The corresponding RGB setting in Photoshop™ 5.0 is “Apple RGB.” This profile is suitable for working with images displayed on the Macintosh.
ColorMatch RGB (gamma 1.8)
The ColorMatch® profile is native to Radius® PressView® monitors. It has a wider gamut than Apple RGB, with a particularly wide area devoted to the reproduction of blues. The corresponding RGB setting in Photoshop™ 5.0 is “Color Match RGB.”
Apple RGB (compensated) (gamma 1.8)
This profile defines tristimulus (red, green, and blue) chromaticity as the intersection of the curve that marks the limits of the visible gamut with lines drawn from the Apple RGB white point and passing through the points that define tristimulus chromaticity in the Apple RGB color-space profile. This profile is unique in that it preserves the characteristics of Apple RGB while allowing more saturated colors. It is not provided in the standard installment of Photoshop™ 5.0, but can be selected as the RGB color-space profile for Photoshop™ by importing the profile "NKA apple_CPS.icm".
sRGB (gamma 2.2)
This RGB profile is used in the majority of Windows monitors. It closely resembles the RGB commonly used in color television, and is also used in the digital television broadcasting system that is on its way to becoming the industry standard in the United States of America. Software and hardware manufacturers use it as a default color profile and guarantee operation when it used. It is also on its way to becoming the standard for images on the web. This profile is suited to users who plan to use their digital images “as is,” without editing or printing them. It however suffers from the drawback of a narrow gamut with a limited area available for reproducing blues. The corresponding RGB setting in Photoshop™ 5.0 is “sRGB.”
Bruce RGB (gamma 2.2)
This color profile attempts to expand on the ColorMatch® RGB gamut by defining the chromaticity for G as lying between the values for G in the Adobe RGB and ColorMatch® color-space profiles. It was proposed by Bruce Fraser, who claims that it includes most of the colors in the SWOP CMYK gamut. It is not provided in the standard install of Photoshop™ 5.0, but can be selected as the RGB color-space profile for Photoshop™ by importing the profile "NkBruce.icm".
NTSC (1953) (gamma 2.2)
This is the color space for video defined by the National Television Standards Committee (NTSC) in 1953 and used in early color televisions. The corresponding RGB setting in Photoshop™ 5.0 is "NTSC (1953)."
Adobe RGB (1988) (gamma 2.2)
A color-space profile defined in Photoshop™ 5.0. It has a wider gamut than sRGB and includes the colors found in most CMYK gamuts, making it suitable for users involved in desktop publishing. The corresponding RGB setting in Photoshop™ 5.0 is "Adobe RGB (1988)."
CIE RGB (gamma 2.2)
A video color-space profile established by the CIE. While it boasts a fairly wide gamut, it suffers from the drawback that the area devoted to the reproduction of cyan is relatively small. The corresponding RGB setting in Photoshop™ 5.0 is “CIE RGB.”
Wide Gamut RGB (gamma 2.2)
This color-space profile, designed by Adobe, incorporates most of the visible colors. This however has the consequence that most of the colors it can express can not be reproduced on standard monitors and printers. The corresponding RGB setting in Photoshop™ 5.0 is "Wide Gamut RGB."
Wide Gamut RGB (compensated) (gamma 2.2)
Nikon scanners can scan some colors that cannot be expressed using the Wide Gamut RGB color-space profile. The compensated Wide Gamut RGB profile redefines Wide Gamut RGB to include all the colors that can be output from the scanner.
Because many of the colors that can not be expressed in Wide Gamut RGB occur in the blue portion of the gamut, the level of detail in the blue area has been greatly increased (because the gamut has been expanded in a nonlinear fashion to incorporate just those colors that could not otherwise be expressed, it cannot be represented in chromaticity diagrams using a standard RGB triangle). As is the case with Wide Gamut RGB, most of the colors defined in this profile can not be reproduced on monitors and printers. It is output to the host application as Wide Gamut RGB. If you are scanning images into Photoshop™ 5.0 using this profile, you can set the Photoshop™ RGB profile to "Wide Gamut RGB."
Default Windows Monitor Profile (gamma 2.2)
The default Windows monitor profile ("NkMonitor_Win.icm") is identical to the sRGB profile.
Default Macintosh Monitor Profile (gamma 1.8)
The default Macintosh monitor profile ("NkMonitor_Mac.icm") is identical to the profile used for Apple 17" monitors with a D_50 white point (see table for details).
The CMYK Sheet
The CMYK sheet, shown below, is where you select a profile for use with the CMYK color space.
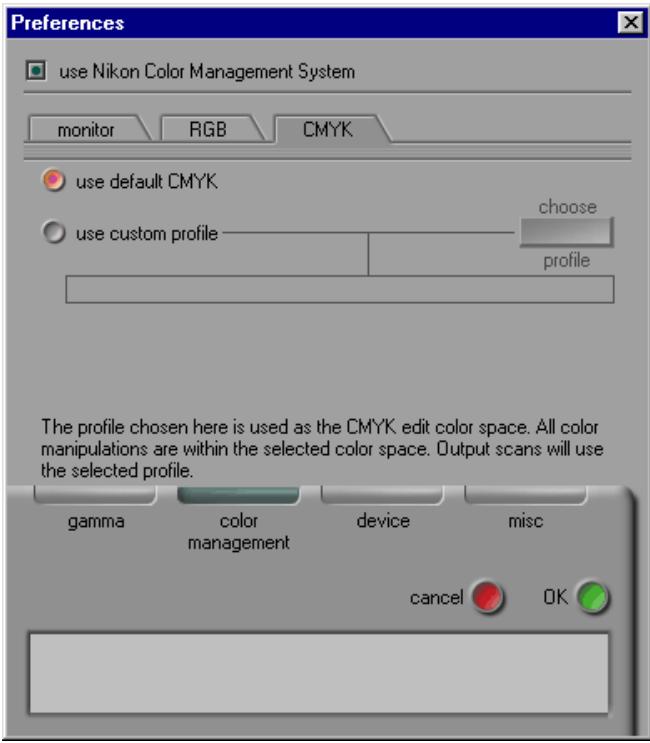
use default CMYK (default)
Nikon Scan is supplied with a default CMYK profile (the SWOP color library) for use when no other profile is available. This profile is used when use default CMYK is selected.
use custom profile
Use this option to select a profile supplied by the company that manufactured your printer. When this option is selected, the choose profile button will be active. Clicking this button displays a standard open-file dialog, where you can navigate to the disk and folder containing the manufacturer's profile. The path to the selected profile will appear in the text box below the use custom monitor profile radio button.
Scanning with Nikon CMS Off
If the use Nikon Color Management System check-box in the Color Management tab is off, profiles can not be used to ensure that the data from the scanner are reproduced accurately when passed to another application or displayed on the monitor. Because the color profiles required for a calibrated RGB or CMYK color space are not available when Nikon CMS is off, images can only be scanned as uncalibrated RGB or grayscale. Similarly, the absence of a monitor profile means that gamma adjustment must be used to correct the image for display on your monitor or for editing in another application. These adjustments to gamma are made in the Gamma tab of the Preferences dialog (see below).
The illustration below shows how scanning proceeds when Nikon CMS is off. The image shown in the preview window is adjusted for display on the monitor according to the value chosen for preview gamma in the Gamma tab. When the scan button is clicked, the main scan gamma and any changes to curves and levels, contrast, and color balance are passed to the scanner, where they are applied to scan data before the image is transferred to the host application (if Nikon Scan is used as a "stand-alone" application, the value for preview gamma is passed to the scanner instead of main scan gamma). No other modifications are made.

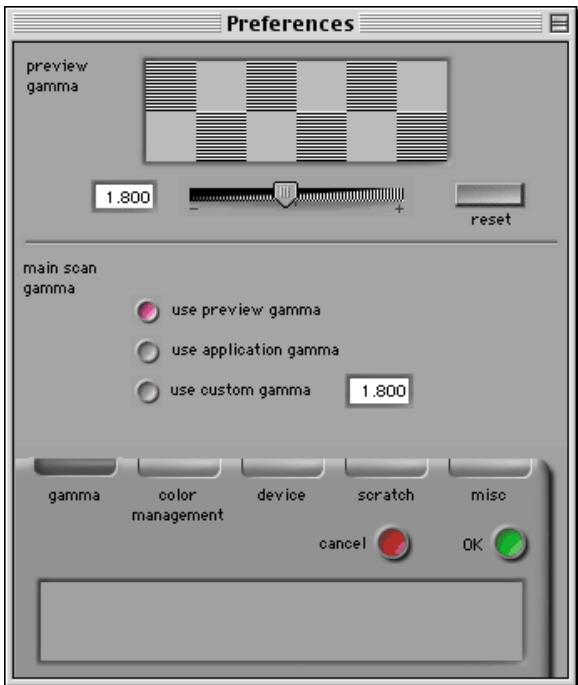
The Gamma Tab
The controls in the Gamma tab are only active if Nikon CMS is off, when they are used to adjust data from the scanner so that they display correctly when previewed on your monitor or opened in another application.
Note
This section replaces the following:
- "Preferences: the Gamma Tab" in "The Scan Window" Nikon Scan for Macintosh Reference Manual page 35 Nikon Scan for Windows Reference Manual page 39
overview gamma
Preview gamma applies to the image displayed in the preview area of the scan window. In general, preview gamma is solely for display in the preview area and does not apply to the image data that are passed to the host application when the scan button is clicked. There are two exceptions to this rule, however. The first is when Nikon Scan is used as a stand-alone application, the second when use preview gamma is selected as the main scan gamma option. In these cases preview gamma is applied to image data passed to the host application.
Preview gamma defaults to a value of 1.8 on the Macintosh, 2.2 on Windows computers. To choose a setting suited to your monitor, adjust the value so that the patterns of gray lines and dots above the slider match in density. Gamma can be set by entering a value directly into the text box or by moving the slider. When making this adjustment, set the resolution on your monitor to a low value such as 640 × 480 and sit as far away from the monitor as possible. To restore the default setting for your platform, click the reset button.
main scan gamma
Main scan gamma options are only visible when Nikon Scan is being used as a TWAIN source or acquire plug-in for another program (when Nikon Scan is used as a stand-alone application, preview gamma automatically applies to both to the preview image and to the final scan). Image data passed to the host application are modified according to the option chosen here. Three options are available:
use preview gamma
The gamma value chosen for preview gamma is applied before the data are passed to the host application. Use this setting when the host application does not support independent gamma settings and you want the final image to be modified for display on your monitor.
use application gamma
In some environments, a value for gamma can be chosen in the host application and passed to the Nikon Scan plug-in. When use application gamma is selected, this value is applied to the main scan data before they are passed to the host application.
Two conditions must be fulfilled if this option is to be effective. First, the interface between the application and Nikon Scan must allow the gamma value to be passed to the Nikon Scan plug-in. The TWAIN interface used under Windows does not, however, allow the gamma value to be passed to the TWAIN source (i.e., the Nikon Scan plug-in). Consequently, in the Windows version of Nikon Scan a default value of 2.2 is used for main scan gamma whenever use application gamma is selected. Second, the application must support gamma transfer. If use application gamma is selected with a Macintosh application that does not support this feature, Macintosh system gamma (1.8) will be used.
use custom gamma
When this option is selected, a value for main scan gamma can be entered in the text box.
Tip
When to use Nikon CMS?
In general, you can expect much better results with Nikon CMS on. You may however want to turn color management off if:
- your computer has a slow CPU
- On computers with a fast CPU, the processing required for Nikon CMS consumes less time than the scanner needs to scan an image. Consequently, turning Nikon CMS off will have no effect on overall scanning speed. On computers with a slow CPU, however, the scanner will have to stop and wait while Nikon CMS processes the image. If your computer has a slow CPU, you can try turning color management off to speed scanning.
- you want to edit data from the scanner directly Advanced users may want to turn Nikon CMS off to edit uncalibrated RGB or grayscale data from the scanner.
Trademark Information
Apple and Macintosh are registered trademarks of Apple Computer, Inc.
Microsoft and Windows are registered trademarks of Microsoft Corporation.
Adobe is a registered trademark, and Photoshop a trademark, of Adobe Systems, Inc.
Radius, ColorMatch, and TextView are registered trademarks of miro displays, inc.
Other brand or product names mentioned in this guide are the trademarks or registered trademarks of their respective holders.