
CONTROL MACINTOSH - To scan NIKON - Free user manual and instructions
Find the device manual for free CONTROL MACINTOSH NIKON in PDF.

| Product type | Control software for Nikon scanner |
| Brand | NIKON |
| Model | CONTROL MACINTOSH |
| Category | Scanner (software for digitizing) |
| Required operating system | Mac OS 7.1 or later (Power Mac: 7.1.2 or later) |
| Required processor | 68030 or higher |
| Minimum RAM | 8 MB (12 MB recommended) |
| Required hard disk space | 1 MB for installation (10 MB recommended while running) |
| Minimum screen | 640 × 400 pixels |
| Supported color depth | 16.7 million colors, 32,000 colors, 256 colors, 256 grayscale levels, 16 grayscale levels |
| Required software | QuickTime version 1.5 or later, Nikon Scan Macintosh or other plug-in |
| Main functions | Image acquisition, file opening and display, saving, rotation, zoom in/out, scrolling, horizontal/vertical flip, automatic sequential scanning with optional feeder |
| Supported file formats | PICT, PICT (JPEG), JPEG (JFIF), TIFF (PC), TIFF (Mac) |
| Power supply | Not applicable (software) |
| Dimensions | Not applicable (software) |
| Weight | Not applicable (software) |
| Maintenance and cleaning | Clean the computer screen with a soft, dry cloth. Avoid liquids. |
| Security | Do not copy documents protected by law (banknotes, stamps, passports, etc.). Respect copyright. |
| Spare parts and repairability | Software not user-repairable. Contact Nikon support in case of problems. |
| General information | User manual in French. 43-page manual. Compatible with Nikon LS-1000, AX-110, AX-210 scanners and optional SF-100/AF-10 feeders. |
Frequently Asked Questions - CONTROL MACINTOSH NIKON
User questions about CONTROL MACINTOSH NIKON
0 question about this device. Answer the ones you know or ask your own.
Ask a new question about this device
Download the instructions for your To scan in PDF format for free! Find your manual CONTROL MACINTOSH - NIKON and take your electronic device back in hand. On this page are published all the documents necessary for the use of your device. CONTROL MACINTOSH by NIKON.
USER MANUAL CONTROL MACINTOSH NIKON
2.1 System Requirements
2.2 Software Installation
- Getting Started
3.1 Launching and Quitting
3.2 File Menu
3.3 Edit Menu
3.4 Image Menu
3.5 Window Menu
3.6 Control Palette
3.7 Scanning Basics
- Preferences
4.1 Plug-in Selection
4.2 Monitor Gamma
4.3 Naming Files
4.4 Control Palette Size
4.5 Scratch Disk
4.6 Title Bar
-
Image Acquisition
-
Image Window Operations
6.1 Zoom in/Zoom out the Image
6.2 Rotating the Image
6.3 Scrolling the Image
6.4 Flipping the Image Horizontally
6.5 Flipping the Image Vertically
6.6 Get Info Dialog Box
6.7 Image Size Dialog Box
- Saving Images
7.1 Save Dialog Box
7.2 Quality Dialog Box
- Loading Images
- Sequential Image Acquisition
9.1 Sequential Scan Dialog Box
9.2 Scanning Log
- About Box
Index
Cautions
- The reproduction of all or part of this manual without our permission is prohibited.
- The information contained in this manual is subject to change without notice.
- We have made every effort to produce a perfect manual, but should you find any mistakes, we would be grateful if you would kindly let us know.
- We shall take no responsibility for consequences resulting from the operation of this product, despite the terms mentioned above.

Trademark Information
Apple, the Apple logo, Macintosh, and Quick Time are registered trademarks of Apple Computer, Inc.
Adobe and Adobe Photoshop are trademarks of Adobe Systems Incorporated.
All other brand or product names mentioned in this manual are the trademarks or registered trademarks of their respective holders.
Notice concerning prohibition of copying or reproduction
Note that simply being in possession of material which has been copied or reproduced by means of a scanner may be punishable by law.
- Items prohibited by law from being copied or reproduced
Do not copy or reproduce paper money, coins, securities, government bonds, or local government bonds, even if such copies or reproductions are stamped "Sample".
The copying or reproduction of paper money, coins, or securities which are circulated in a foreign country is prohibited.
The copying or reproduction of unused postage stamps or post cards issued by the government without obtaining approval from the government is prohibited.
The copying or reproduction of stamps issued by the government and certified documents stipulated by law is prohibited.
- Cautions on certain copies and reproductions
The government has issued cautions on copies or reproductions of securities issued by private companies (shares, bills, checks, gift certificates, etc.), commuter passes, or coupon tickets, except when a minimum of necessary copies are to be provided for business use by a company. Also, do not copy or reproduce passports issued by the government, licenses issued by public agencies and private groups, ID cards, and tickets, such as passes and meal coupons.
Comply with copyright notices
The copying or reproduction of works such as books, music, paintings, woodcut prints, maps, drawings, movies, and photographs which are copyrighted creative works is prohibited except when it is done for personal use at home or for similar restricted and non-commercial use.

I. Overview
Thank you for purchasing your Nikon scanner. This manual explains how to use Nikon scanners with the Nikon Control Macintosh application. Please read the documentation thoroughly to ensure proper operation and the best results from your scanner.
Nikon Control Macintosh is an application that runs on a Macintosh computer, and supports scanning and saving image files with Nikon scanners.
Nikon Control is extremely easy to operate, and offers the following functionality:
- Image scanning and display using the Nikon Scan Plug-in
- Opening and display of image files stored on disk
- Saving of the displayed image to disk
- Rotation, zoom in/zoom out, scrolling, and vertical or horizontal re-orientation of the displayed image
- Automated sequential scanning of a number of images using the optional Nikon SF-100 Auto Slide Feeder mounted on the LS-1000 or the optional AF-10 Auto Document Feeder mounted on the AX-110 or AX-210
2. BeforeYou Begin
2.1 System Requirements
To run Nikon Control Macintosh, the following minimum hardware and software is required:
- A Macintosh with a 68030 or higher-power CPU running System 7.1 or later, or a Power Macintosh running System 7.1.2 or later
- 8MB or more of RAM (more than 12MB is recommended)
- IMB or more of hard disk space for installation (I0MB or more is recommended when the program is running)
- 640 × 400 pixel monitor or larger
- Monitor with 16.7M colors, 32K colors, 256 colors, 256 grayscale, 16 grayscale (16.7M colors recommended for color scanning)
- QuickTime Version 1.5 or later
ColorSync filter (included in the Install disk) - Nikon Scan Macintosh or other plug-in
Note: The ColorSync plug-in filter is not supported by Nikon Control. If you need to use the ColorSync filter, please place it in your Adobe Photoshop Plug-ins folder, and launch (or re-launch) Adobe Photoshop.
2.2 Software Installation
The Install disks provided with this product contain the Nikon Scan Macintosh plug-in and the Nikon Control application.
Check the following before starting installation.
- Make sure that you have enough free space on the disk on which you are going to install the software.
Write-protect (lock) the Install disk. - Turn off any virus checking software, as this may prevent successful installation. To turn off the virus checking software, drag the virus checking software icon out of your System folder, then restart the Macintosh, or simply restart with the shift key down to temporarily prevent all Extensions from loading.
After checking the above points, begin installation as described below.
Step I
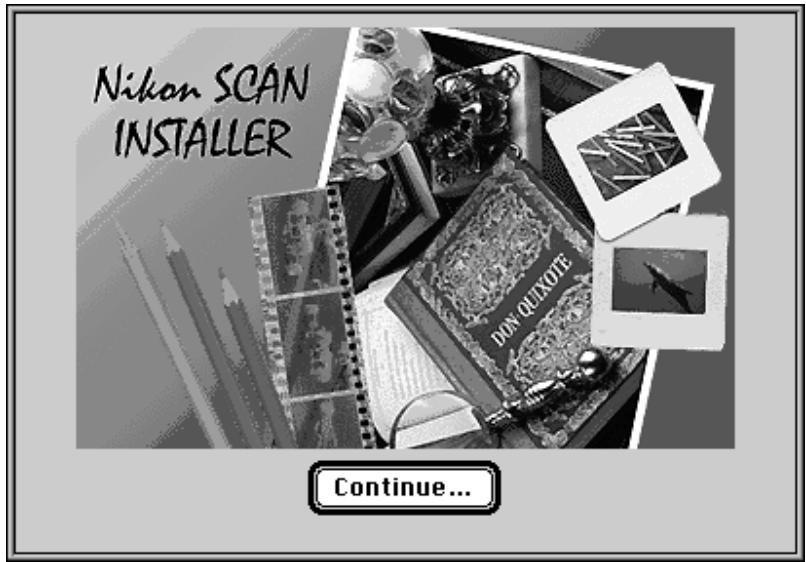
Insert the Install disk I in the floppy disk drive and double-click the Installer icon.


Nikon Scan Installer
The following dialog box will appear.
Step 2
Clicking the Continue... button brings up the Read Me dialog box, which may contain information not included in this manual. This information can be printed or saved as a file for later reference. If you would like to reread the Read Me dialog box before installation, you can return to the dialog box by clicking the Read Me... button at the top right corner of the Installer dialog box.
After reading the information, click the Continue button. The Installer dialog box will then appear.
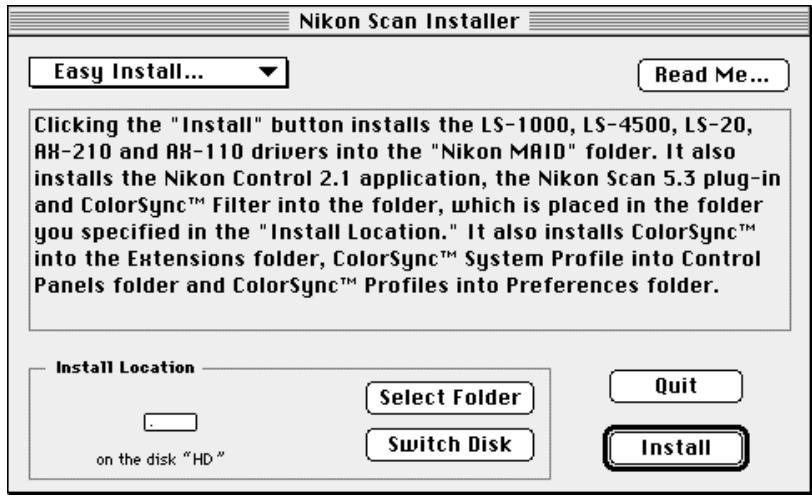
If you want to install all the items listed in the Installer dialog box, choose Easy Install... from the pop-up menu at the top left. If you have chosen Easy Install..., go directly to Step 4.
If you want to install only selected items, pull down the pop-up menu at top left and choose Custom Install.... If you have chosen Custom Install..., go to Step 3.
Step 3
If you choose Custom Install... in Step 2, the following dialog box will appear.
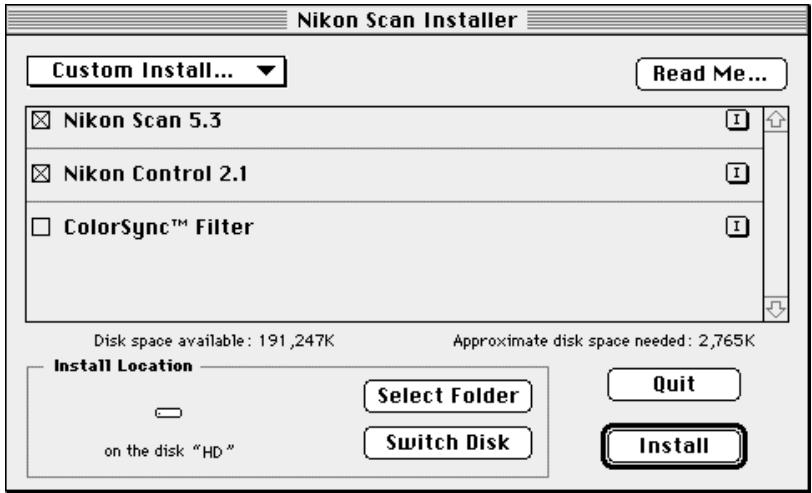
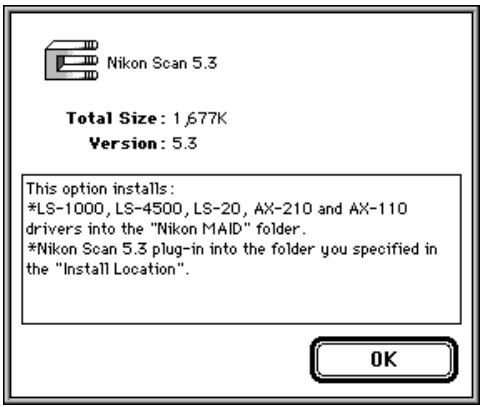
Click the check box × for the item(s) you want to install. If you need information about the software to be installed, click the Info button I.
Step 4
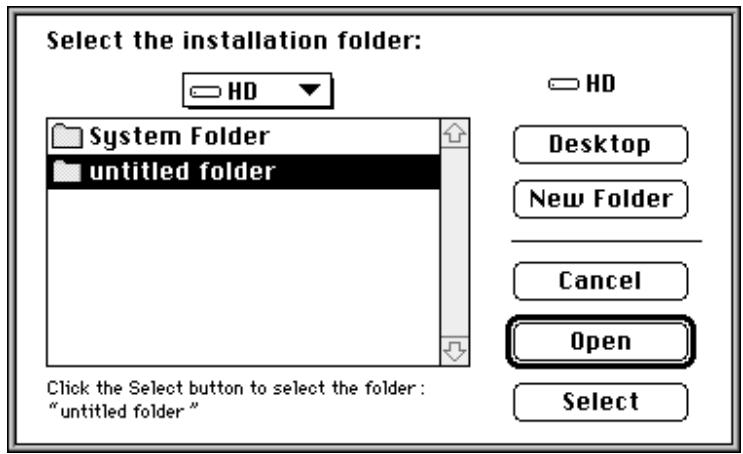
When you click the Select Folder button, the following dialog box appears. Specify the disk and folder in which you want to install the software, then click the Select button.
Step 5
- Clicking the Install button on the Install dialog starts installation.
During installation, the following progress dialog box is displayed.
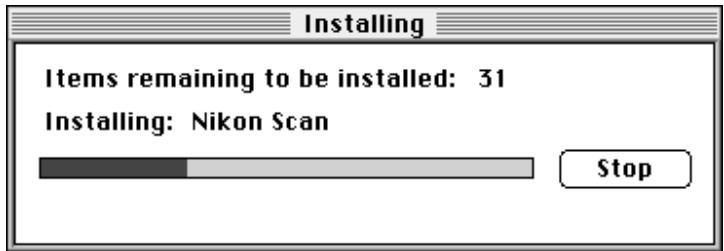
Installation can be stopped by clicking the Stop button.
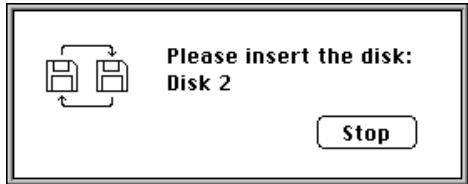
When the following dialog box appears, insert the Install disk 2 in the floppy disk drive.
Step 6
When installation ends successfully, one of the following messages is displayed.
When you did not install ColorSync

Installation was successful. If you are finished, click Quit to leave the Installer. If you wish to perform additional installations, click Continue.
Continue
Quit
If you want to continue with additional installations, click the Continue button to go back to Step 2. To finish, click the Quit button.
When you have ColorSync installed

Installation was successful. You have installed software which requires you to restart your computer. If you are finished, click Restart, or if you wish to perform additional installations, click Continue.
Continue
Restart
If you want to continue with additional installations, click the Continue button to go back to Step 2. To finish, click the Restart button to restart your Macintosh.
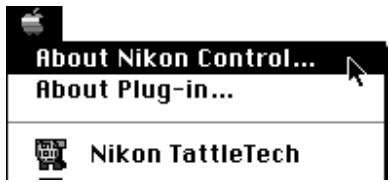
Note: For US customers only. After installation is finished, note the addition of the "Nikon TattleTech" icon in the Apple menu. This utility can help Nikon's technical support staff diagnose problems with your system, should you experience difficulties. Prior to contacting Nikon Technical support, run the utility to generate a system configuration report, which can either be printed and faxed, or sent via e-mail to Nikon Support staff.
Step 7
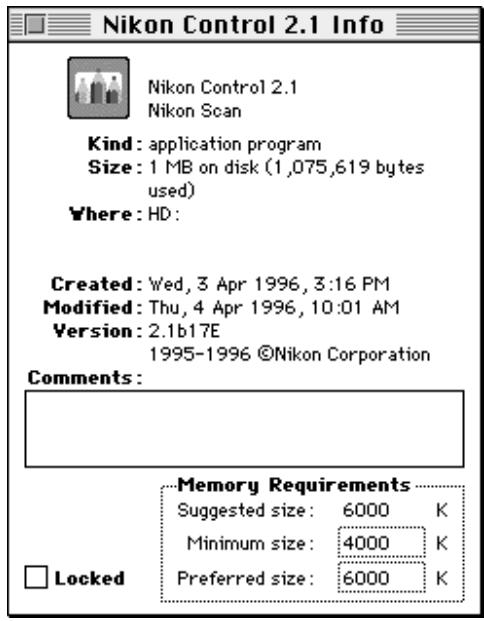
After installation is completed, click the Nikon Control icon and choose Get Info (☑) from the File menu.

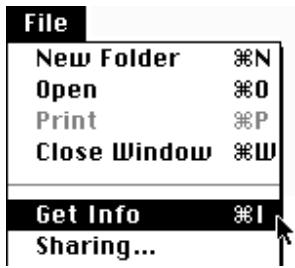
If possible, enter a value equal to or greater than the Suggested size value in the Preferred size box.
3. Getting Started
Before launching Nikon Control, connect the scanner as described in the hardware manual. First turn on any peripheral devices, including your scanner(s), then turn on the Macintosh.
3.1 Launching and Quitting
Launching
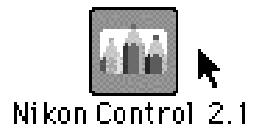
Double-click the Nikon Control icon.

Nikon Control 2.1
After Nikon Control is launched, the following Control palette will appear on the desktop, and File, Edit, Image, and Window menus appear in the menu bar. Nikon Control is controlled by means of these menus and the Control palette.

File Edit Image Window
Quitting
To quit Nikon Control, choose Quit (36Q) from the File menu.
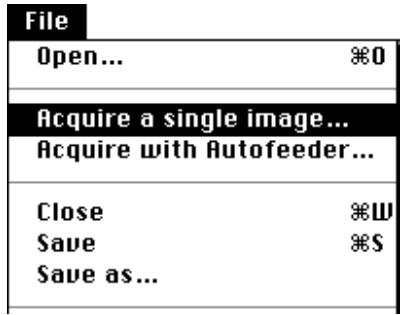
| File | |
| Open... | *0 |
| Acquire a single image... Acquire with Autofeeder... | |
| Close | *W |
| Save | *S |
| Save as... | |
| Print setup... Print... | *P |
| Preferences... | |
| Quit | *Q |
3.2 File Menu
| File | |
| Open... | *0 |
| Acquire a single image... Acquire with Autorfeeder... | |
| Close | *W |
| Save | *S |
| Save as... | |
| Print setup... Print... | *P |
| Preferences... | |
| Quit | *Q |
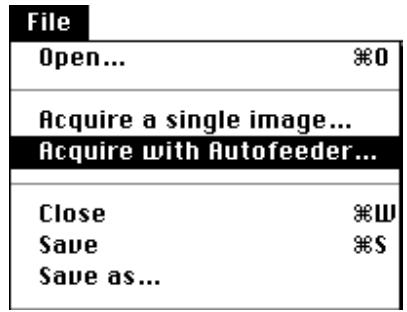
The File menu includes the following items.
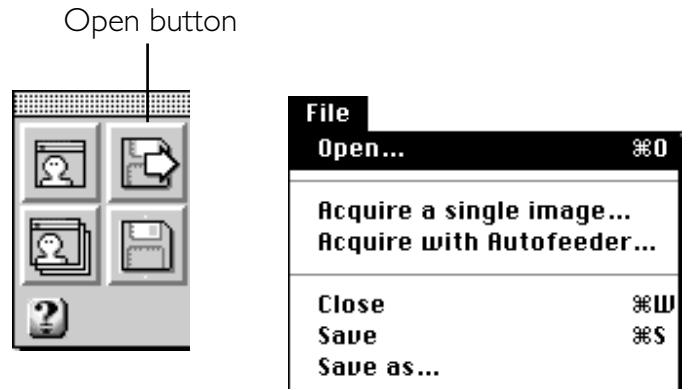
Open... (O): Opens an image file on disk and displays it on the monitor. This function is identical to that of the Open button on the Control palette.
Acquire a single image....
Performs a scan of one image. This function is identical to that of the Acquire button on the Control palette.
Acquire with Autofeeder....:
Performs sequential scan of images. This function is identical to that of the Sequential Acquire button on the Control palette.
Close (W): Closes the display window. The display window is also closed by clicking the
window's close box.
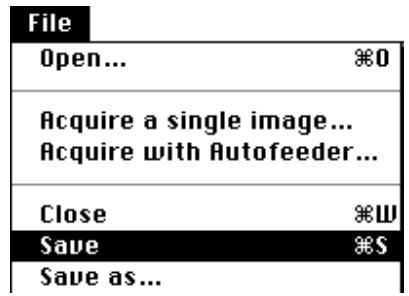
Save (S): Saves the displayed image to disk.
Save as...
Saves the displayed image to disk under a specified name. This function is identical to that of the Save as button on the Control palette.
Page setup....:
Sets up the print page. The dialog box for this command depends on the printer driver you are using. Please refer to your print driver documentation.
Print... (36P):
Prints the image to the printer. The dialog box for this command depends on the printer driver you are using. Please refer to your printer documentation.
Preferences....:
Used to specify and select the Acquire plugin, and to specify a gamma value, file naming procedure for multiple scans, palette size, scratch disk, and the information displayed in the window title.
Quit (Q):
Quits Nikon Control.
3.3 Edit Menu
| Edit | |
| Cut | #H |
| Copy | #C |
| Paste | #U |
| Clear | |
When a dialog box, such as the standard file input/output dialog, is open and a text input box is active, the Cut, Copy and Paste commands are enabled.
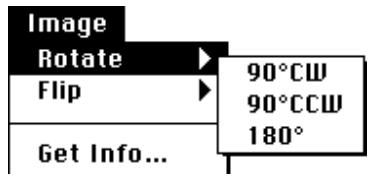
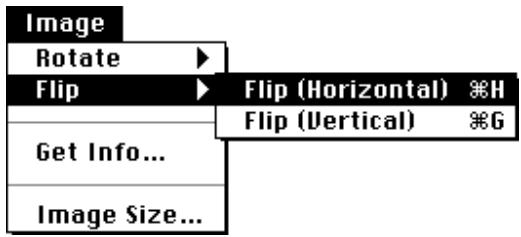
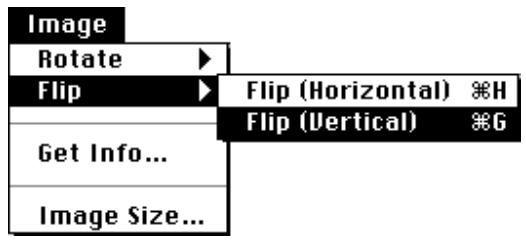
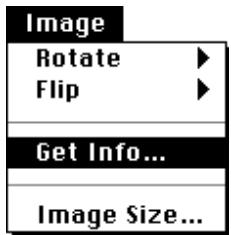
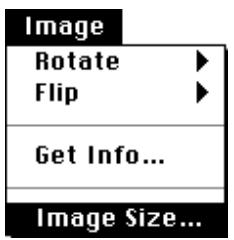
3.4 Image Menu
| Image |
| Rotate |
| Flip |
| Get Info... |
| Image Size... |
The Image menu includes the following items.
| Rotate: | This command has the following sub-items.90° CW: Rotates the image clockwise, 90 degrees at a time. This function is identical to that of the Rotate button on the Control palette.90° CCW: Rotates the image counterclockwise, 90 degrees at a time.I80°: Rotates the image 180 degrees at a time. |
| Flip: | This command has the following sub-items.Horizontal: Flips the image horizontally. This function is identical to that of the Horizontal Flip button on the Control palette.Vertical: Flips the image vertically. This function is identical to that of the Vertical Flip button on the Control palette. |
| Get Info...: | The Get Info dialog box appears. See Section 6.6. |
| Image Size...: | The Image Size dialog box appears. See Section 6.7. |
3.5 Window Menu
| Window |
| Zoom In ※+ |
| Zoom Out ※- |
| Tile Windows |
| Stack Windows |
| ✓Scan01 |
The Window menu includes the following items.
Zoom In (串) : Enlarges the view of an active image window. This function can also be performed by clicking the Zoom button on the Control palette.
Zoom Out: Reduces the view of an active image window. This function can also be performed by clicking the Zoom button on the Control palette while holding down the option key.
Tile Windows: Arranges all open images in windows that do not overlap on the screen.
Stack Windows: Arranges multiple image windows so they overlap.
If you pull down the menu after acquiring or opening images, you will see that the names have been added at the end of the menu.
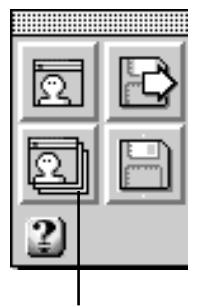
3.6 Control Palette
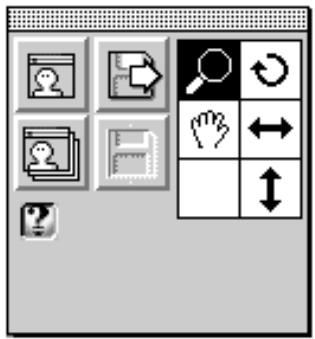
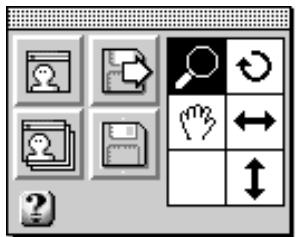
When Nikon Control is first launched after installation, the following Control palette appears. There are two palette sizes that can be displayed. The Large palette is shown below.
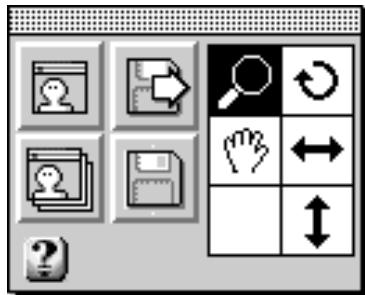
Buttons


Acquire: Performs a scan of one image, using the currently selected plug-in software. This function is identical to that of Acquire a single image... in the File menu.
Sequential Acquire: Performs sequential scanning of a number of images, using the currently selected plug-in software. This function is identical to that of Acquire with Autofeeder... in the File menu. If an auto feeder is not currently connected to your scanner, only one image will be scanned.
Open: Opens an image file on disk and displays it on the monitor. This function is identical to that of Open... in the File menu.

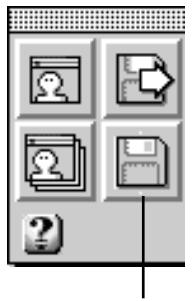
Save As: Saves the displayed image to disk. This function is identical to that of Save as... in the File menu.
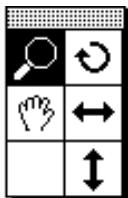
Tool Buttons
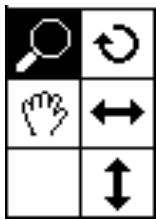
Five tools are provided to perform zoom in/zoom out, rotation, scrolling, and vertical or horizontal flip of the image.

Zoom: An image can be zoomed in or zoomed out by first clicking this button, then clicking the mouse button with the magnifier cursor located inside the image window.

Rotate: Clicking this button rotates the image clockwise, 90 degrees at a time. This function is identical to that of Rotate in the Image menu.

Scroll: The image is scrolled by clicking this button, then dragging the mouse inside the display window while holding down the mouse button.

Horizontal Flip: Clicking this button flips the image horizontally. This function is identical to that of Flip (Horizontal) in the Image menu.

Vertical Flip: Clicking this button flips the image vertically. This function is identical to that of Flip (Vertical) in the Image menu.
Help Button
Clicking the Help button at the bottom left of the Large Palette enables Interactive Help. Positioning the mouse cursor on a button will then display a Help message in the message display area.

The Interactive Help display disappears when the Help button is clicked again.
3.7 Scanning Basics
Basic operating procedure for Nikon Control is as follows.
Step I: Environment Set Up Select preferences, such as the plug-in to be used.
Step 2: Scan and display an image. Note: For sequential scanning, see Chapter 9. To load an image from disk, see Chapter 8.
Step 3: Save the displayed image to disk.
Step 4: Quit, or repeat the procedure from Step 2, above.
This section describes a simple procedure for scanning a single image and saving it to disk.
Step I
Specify the plug-in to be used by Nikon Control. To specify the plug-in, choose Preferences... from the File menu.
| File | |
| Open... | €0 |
| Acquire a single image... Acquire with Autofeeder... | |
| Close | €W |
| Save | €S |
| Save as... | |
| Print setup... Print... | €P |
| Preferences... | |
| Quit | €Q |
The Preferences dialog box appears.
When the Select button is clicked, the Plug-in Selection dialog box appears.

Select the required plug-in from this dialog box, and click the Select button. The selected plug-in is displayed after "Selected plug-in:" in the Preferences dialog box.
Selected plug-in: Nikon Scan
Select
Next, enter the Monitor Gamma value to be used. Acceptable values range from 1.0 to 3.0. The default value is 1.8.
Monitor gamma:
1.8
After entering a Gamma value, click the OK button in the Preference dialog box to return to the Control palette.
Step 2
Click the Acquire button on the Control palette, or choose Acquire a single image... from the File menu.
Acquire Button
If Nikon Scan is the selected plug-in, the following dialog will appear.
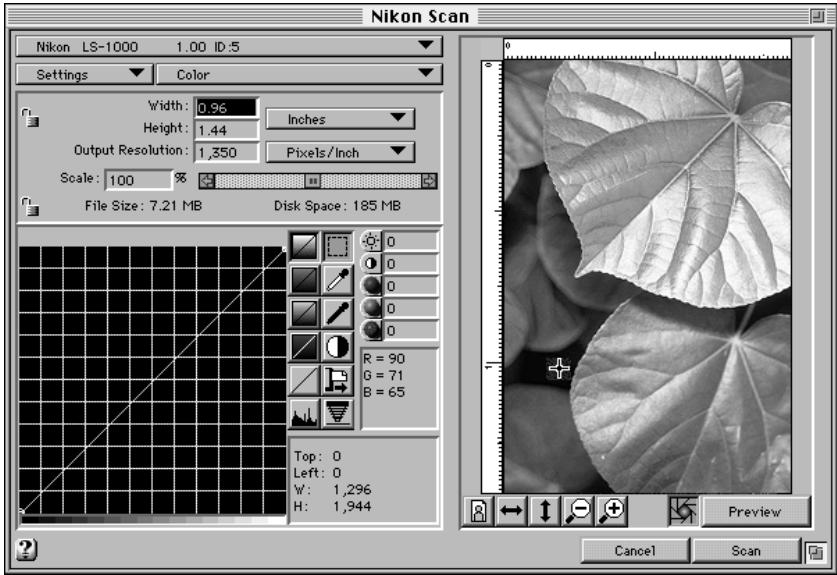
Note: The above dialog box is for the LS-1000 film scanner. The corresponding dialog box for other scanners may be different.
When the plug-in is operated to acquire an image, the acquired image appears in a window. (See the manual supplied with the plug-in for plug-in operating procedures.)

The image in the display window can be zoomed in/zoomed out, rotated, scrolled, or flipped vertically or horizontally by means of the five tools on the Control palette.
Step 3
Save the acquired image to disk. To save the image to disk, either click the Save As button on the Control palette or choose Save (S) from the File menu.
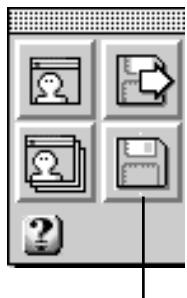
"Save As" button
| File | |
| Open... | #0 |
| Acquire a single image... | |
| Acquire with Autofeeder... | |
| Close | #W |
| Save | #S |
| Save as... | |
The Save dialog box shown below will appear.
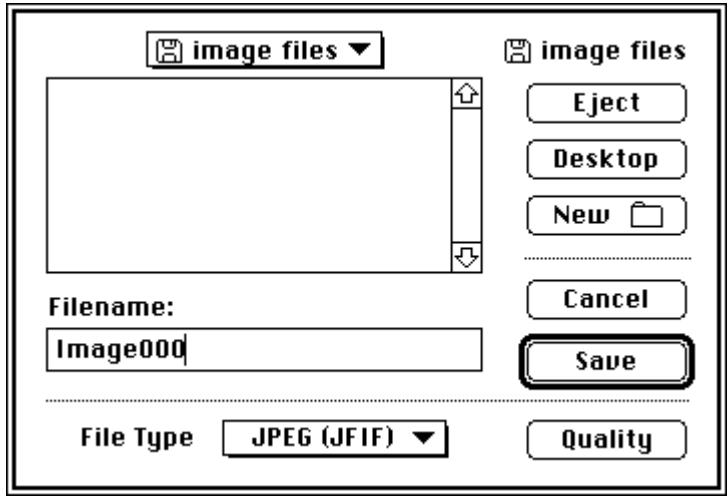
Locate and specify the drive and folder in which the image is to be saved, enter the file name, specify the file type, and click the Save button. The image is then saved.
The file type can be selected from the pop-up menu. The file types that can be specified are shown below.
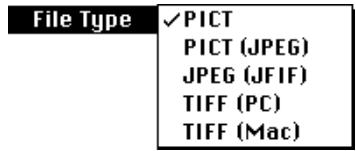
If PICT (JPEG) or JPEG (JFIF) is selected as the file type, the Quality button is enabled, and the compression quality (and resulting file size) can be changed. If any other file type is selected, the Quality button is dimmed and disabled. When the Quality button is clicked the Quality dialog box is displayed. For details concerning the Quality dialog box, see Section 7.2.
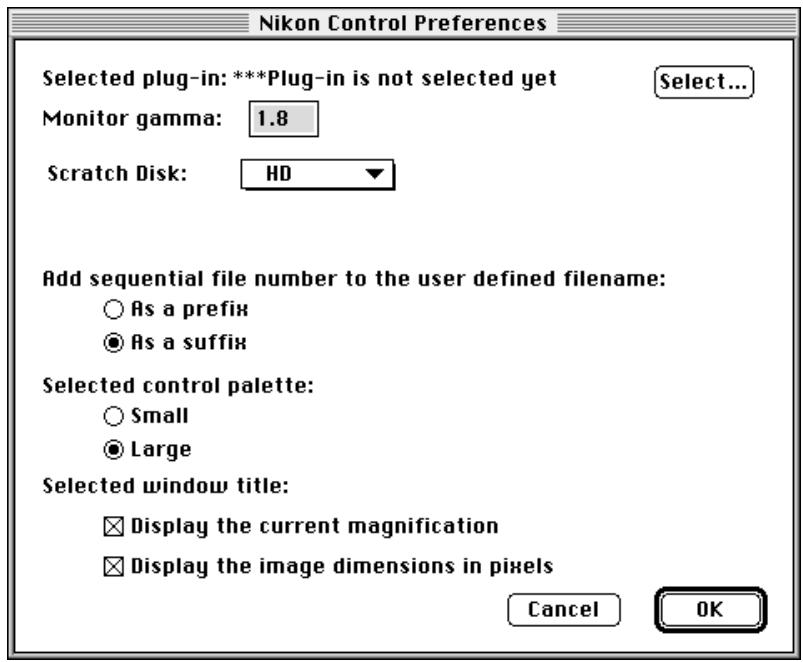
4. Preferences
The Preferences dialog box allows the user to specify settings for general control of scan operations. The following settings are possible.
- Select the plug-in software to be used for image acquisition.
- Set the gamma value of the monitor being used.
- Set the position of the serial number (as a prefix or suffix) in the file name when sequential image acquisition is carried out.
- Select the scratch disk used for virtual memory.
- Select the palette size to be displayed.
- Set the magnification ratio and/or pixel dimensions to be displayed in the image window's title bar.
Selections made in the Preferences dialog box are saved (path—System Folder: Preferences Folder: Nikon Control Prefix), after exiting the dialog. The settings are recalled every time Nikon Control is launched unless the Nikon Control Prefix file is deleted, in which case factory defaults are used until you enter new settings.
Preferences dialog box operations are described below.
First, choose the Preferences... command from the File menu.
| File | |
| Open... | *0 |
| Acquire a single image... Acquire with Autorfeeder... | |
| Close | *W |
| Save | *S |
| Save as... | |
| Print setup... Print... | *P |
| Preferences... | |
| Quit | *Q |
The Preferences dialog box appears.
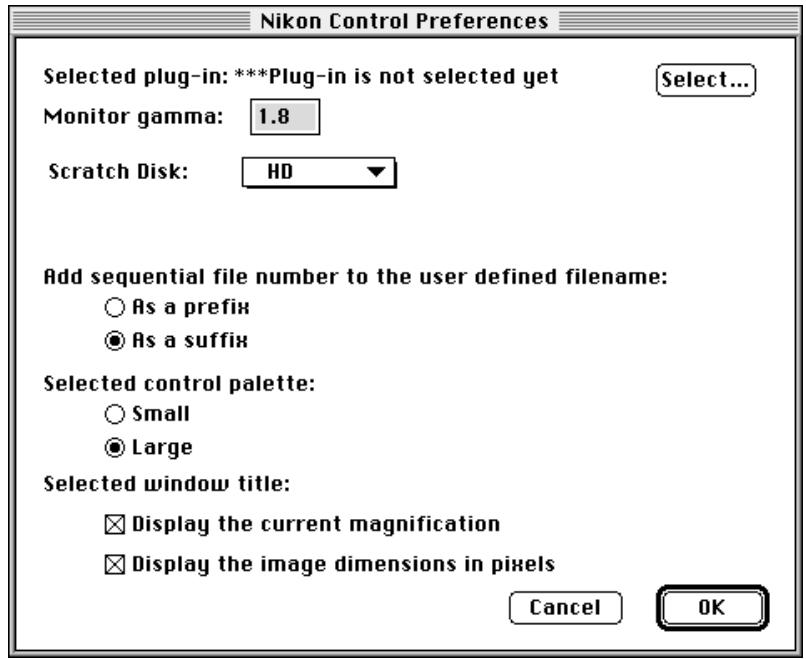
Description of items in the Preferences dialog box
Select: A Plug-in Selection dialog box lets you locate the plug-in you wish to use.
Monitor Gamma:
Allows you to set the Gamma value of the monitor being used.
Add sequential file number to the user defined filename:
Either of the radio buttons is selected to specify whether the numerical portion of the file name is to be appended before or after the fixed part of the file name when performing continuous image acquisition.
Scratch Disk: The disk drive used for virtual memory can be selected from this menu. After changing the drive, you must restart Nikon Control.
Control window:
Either of the radio buttons is selected to specify whether a Large or Small Control palette is used.
Window title bar:
You can display the current magnification and/ or pixel dimensions of an image in its window title bar, by checking either or both boxes.
Cancel:
Changes are discarded and the Preferences dialog box is closed.
OK:
Changes are saved and the Preferences dialog box is closed.
4.1 Plug-in Selection
If the plug-in has not been selected, or if you want to change to another plug-in, click the Select button, and the Plug-in Selection dialog box appears.
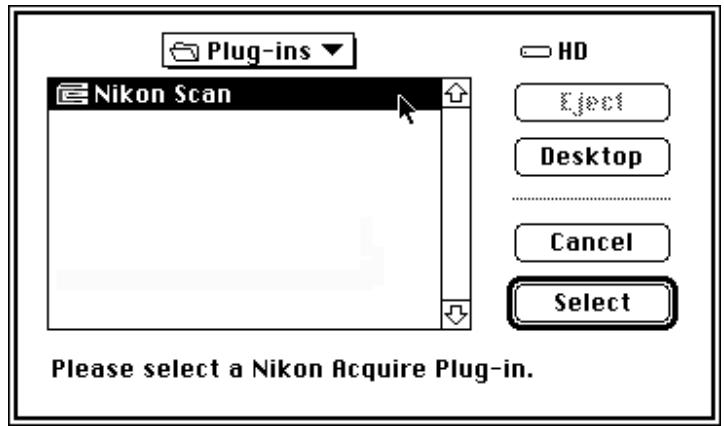
Select the required plug-in from the standard file dialog box, and click the Select button. The newly selected plug-in is displayed in the Preferences dialog box.
The Plug-in Selection dialog box will also be displayed if the selected plug-in is not found when image acquisition is attempted, or if no plug-in software at all has been specified.
The currently selected plug-in is displayed after "Selected plug-in:" in the Preferences dialog box.
Selected plug-in: Nikon Scan
Select
4.2 Monitor Gamma
Enter the Gamma value of the monitor to be used to ensure correct densities are displayed when you scan or open a file. Acceptable values range from 1.00 to 3.00. The default setting is 1.80 (Macintosh default gamma).
Monitor gamma:
1.8
After entering the Monitor Gamma value, click the OK button in the Preferences dialog box.
4.3 Naming Files
The names of individual files saved by means of sequential image scanning consist of a fixed part and a 3-digit serial number. This setting specifies whether the number is placed before or after the fixed part. The fixed part of the file name is specified in the Sequential Scanning Save dialog box as a "filename" when the image files are saved.
Add sequential file number to the user defined filename:
As a prefix
As a suffix
For example, if the As a suffix radio button is selected here, and the fixed part "ScanImage" is specified in the Save dialog box, the file names, in the order saved, will be "ScanImage001", "ScanImage002", "ScanImage003", and so on.
Naming Procedure Choices
As a prefix: The serial number precedes the fixed part.
As a suffix: The serial number follows the fixed part.
4.4 Control Palette Size
Nikon Control has two sizes of Control palette. You can select the palette type by clicking the appropriate radio button.
Selected control window:
Small
Large
Meaning of the Radio Buttons
Small: The small control palette is displayed.
Large: The large control palette is displayed.
Large control palette
Small control palette
4.5 Scratch Disk
The scratch disk drive used for virtual memory can be selected from the menu.
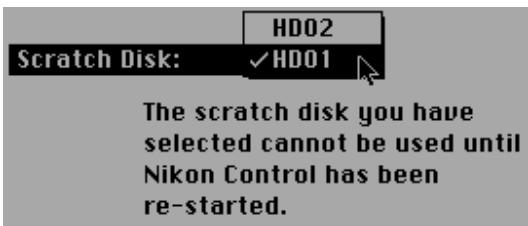
After changing the drive, you must restart Nikon Control to use the new drive for virtual memory.
4.6 Title Bar
The magnification and/or pixel dimensions of an image can be added to the image window's title bar.
Selected window title:
Display the current magnification
Display the image dimensions in pixels
Meaning of the Check Boxes
Display the current magnification:
The current magnification, or zoom level, of an image is displayed in its title bar when this box is checked.
Display the image dimensions in pixels:
The pixel dimensions of an image are displayed in its title bar when this box is checked.
When both boxes are checked, an image window's title bar will appear as shown below.
5. Image Acquisition
To acquire images one-by-one, click the Acquire button on the Control palette or choose Acquire a single image... from the File menu.
Aquire button

The plug-in software specified in the Preferences dialog box is launched, and the operating dialog for that software appears. If Nikon Scan has been selected, the following dialog will appear. See the instruction manual of the selected plug-in software for details on set up.
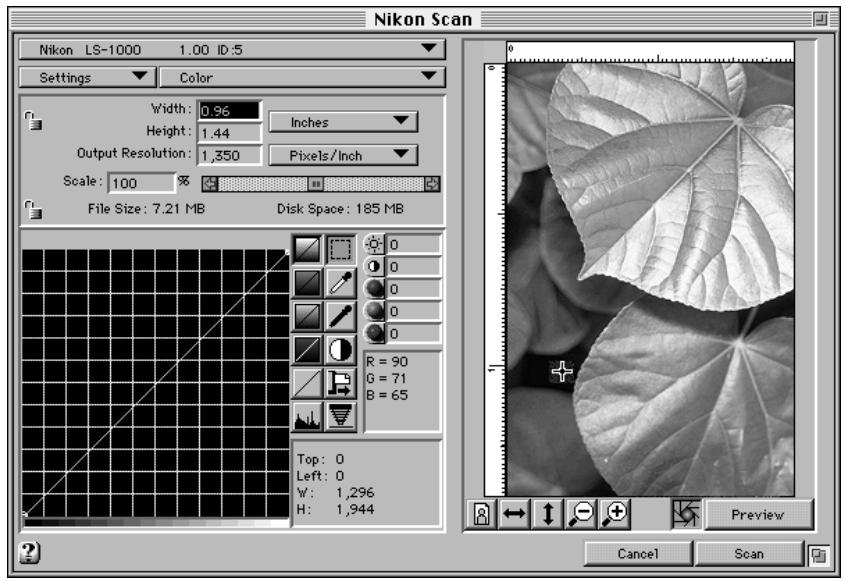
Note: The above dialog may differ depending on your scanner.
If the plug-in software selected in the Plug-in Selection dialog box cannot be found, or if no plug-in software at all has been specified, the Plug-in Selection dialog box will appear. You should then select the plug-in software.
After a Preview is made and cropped, setting adjusted, and the Scan button is clicked, the scanned image is displayed in a window.

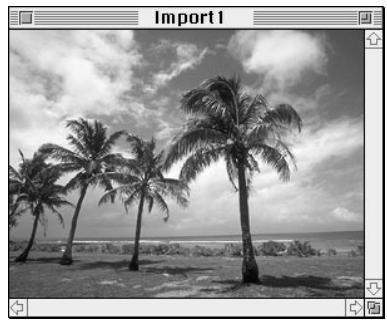
6. Image Window Operations
When an image is displayed, the image can be magnified or reduced, rotated, scrolled, or flipped vertically or horizontally by means of five tools or the Image menu.
6.1 Zoom in/Zoom out the Image

When the Zoom button is clicked, the mouse cursor changes to the shape of a magnifying glass. Clicking the magnifying cursor anywhere within the image display window will then zoom in the image. To zoom out, click the mouse button inside the display window while holding down the option key.

Zoom-in cursor

Zoom-out cursor
6.2 Rotating the Image

Clicking the Rotate button rotates the image in the active window clockwise, 90 degrees at a time.

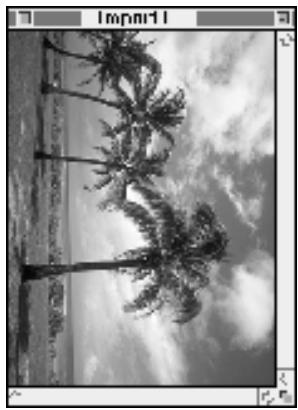
Rotating can be performed by choosing Rotate from the Image menu.
Meaning of the Items
90^ CW : Rotates the image clockwise, 90 degrees at a time.
90° CCW: Rotates the image counter-clockwise, 90 degrees at a time.
180°: Rotates the image 180 degrees at a time.
6.3 Scrolling the Image

The Hand tool can be used to pan or scroll the image if it is too large to be completely displayed within the display window.
When the Scroll button is clicked, the cursor changes to the shape of a hand.

The image can now be scrolled by dragging inside the display window with the mouse button held down.
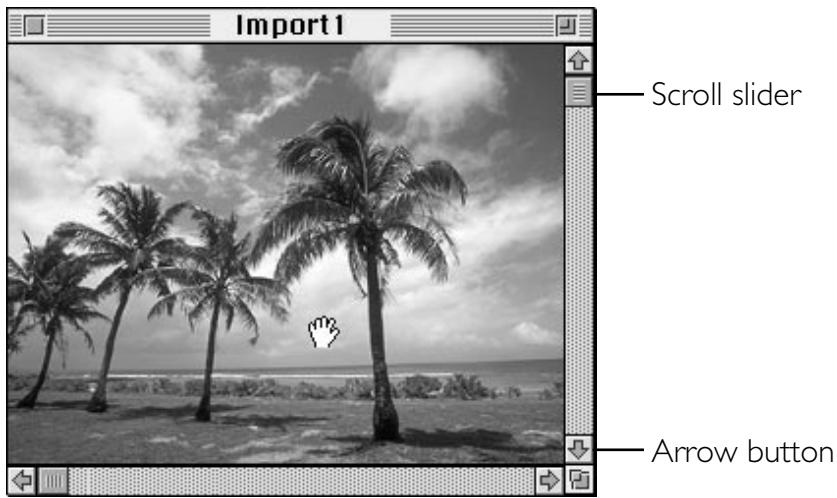
The image can also be scrolled by dragging the display window's scroll slider or clicking the arrow buttons at either end of the scroll bars.
6.4 Flipping the Image Horizontally

Clicking the Horizontal Flip button flips the image in the active window horizontally.
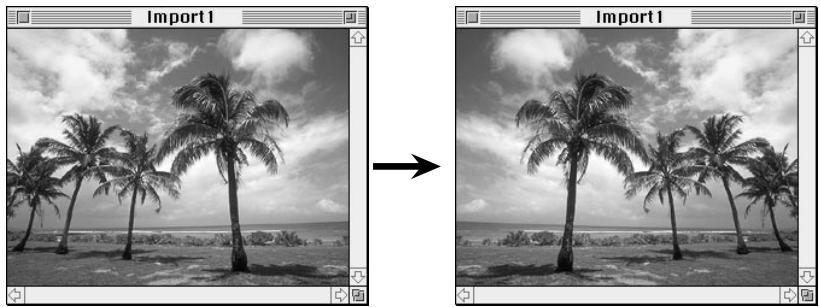
Flipping can also be performed by choosing Flip (Horizontal) from the Flip submenu.
6.5 Flipping the Image Vertically

Clicking the Vertical Flip button flips the image in the active window vertically.
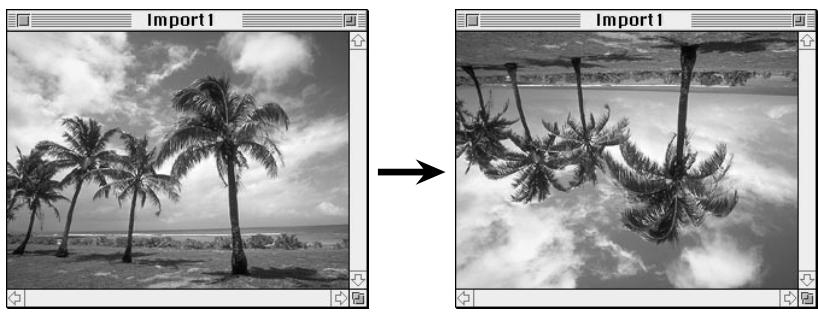
Flipping can also be performed by choosing Flip (Vertical) from the Flip submenu.
6.6 Get Info Dialog Box
Choosing the Get Info... command brings up the Get Info dialog box.
The Get Info dialog box shows information about the active window image.
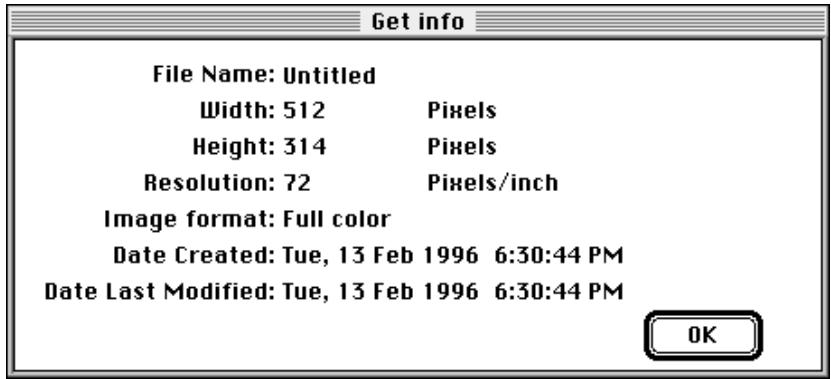
Click the OK button to close the dialog box.
6.7 Image Size Dialog Box
Choosing the Image Size... command brings up the Image Size dialog box.
The Image Size dialog box shows the size and the resolution of the active window image.
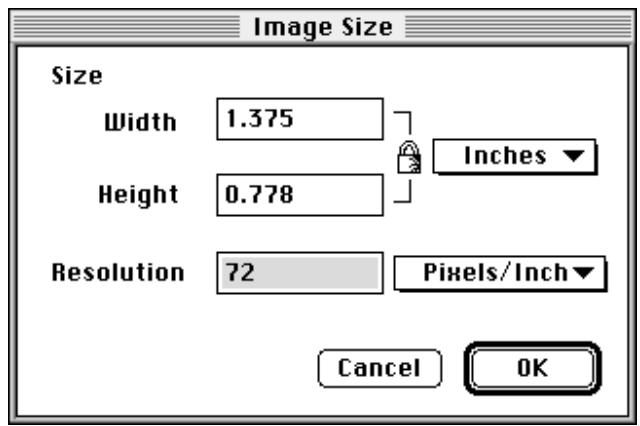
The width/height aspect is always locked. If either width or height is entered, the other value is proportionally calculated to maintain the locked width/height aspect, and the new value is displayed. The units for Width and Height can be selected from the pop-up menu. When this selection is changed, the values in the boxes are converted to the equivalent new units.

Entering a new value in the resolution box changes the image resolution. Using this function, you can print images to your printer at any size you want.
The unit for resolution can be selected from the pop-up menu. When this selection is changed, the values in the boxes are converted to the equivalent new units.

Note: When the printer and image resolutions are not the same, the actual printed image size differs from the original image size. For example, when 5'' × 5'' image acquired at 600dpi is printed to a 300dpi printer, a 10'' × 10'' image is printed. In this case, part of the image may be cropped out on letter size paper. To print the entire image, you should change the resolution of the printer or the image.
Note: When printing images to a color printer, the printed size may often be larger than the original image size. We recommend setting the image resolution lower than the printer resolution when printing to a color device.
7. Saving Images
The image displayed in the display window is saved using the Save dialog box which appears when you click the Save As button on the Control palette or choose Save (S) from the File menu. The Save dialog box will also appear when Save as... is chosen from the File menu.
Save As button
If the acquired image has not yet been saved and you attempt to close the image window by choosing Close (W) from the File menu or clicking the image window's close box, an alert message dialog box will appear, and you should then click the appropriate button.

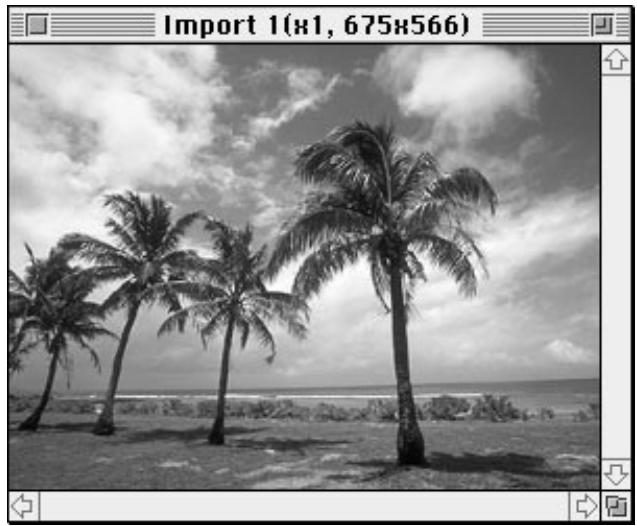
Save changes to the document Import 1 before closing?
Don't Save
Cancel
Save
7.1 Save Dialog Box
When the Save dialog box appears, specify the drive and folder in which the image is to be saved, the file name, and the file type, then click the Save button.

Meaning of Items in Save Dialog Box
Eject: Ejects removable media.
Desktop: Returns to the desktop.
New Folder: Creates a new folder.
File Type: PICT, PICT (JPEG), JPEG (JFIF), TIFF (PC), or TIFF (Mac) can be selected as the file type from the pop-up menu. The file type selected here is saved in thePrefs file, and is then recalled the next time the dialog box is opened.
File Type
√PICT
PICT (JPEG6)
JPEG6(JFIF)
TIFF (PC)
TIFF (Mac)
Quality: If PICT (JPEG) or JPEG (JFIF) is selected as the file type, the Quality button is enabled, and the compression quality (and resulting file size) can be changed. If any other file type is selected, the Quality button is dimmed and disabled. When the Quality button is clicked the Quality dialog box is displayed. For details concerning the Quality dialog box, see the Section 7.2.
Cancel: Changes are discarded and the Save dialog box is closed.
Save: The image is saved.
7.2 Quality Dialog Box
If PICT (JPEG) or JPEG (JFIF) is selected as the file type in the Save dialog box, and the Quality button is clicked, the Quality dialog box appears.
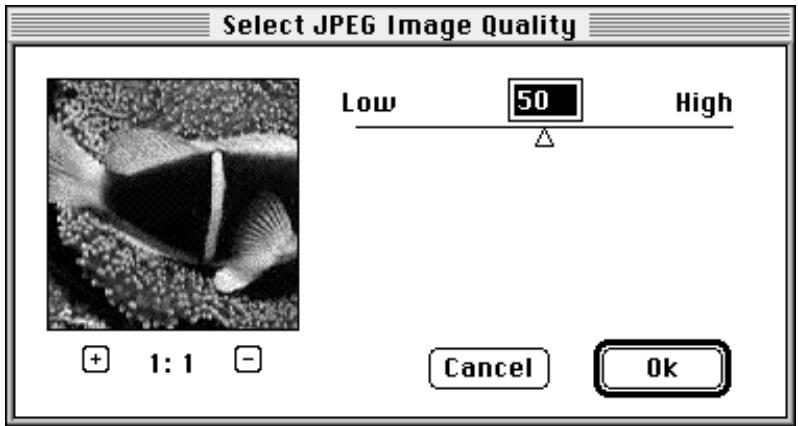
The compression setting value can be set by entering a value in the box or dragging the mark with the mouse. Moving the mark to the right decreases the compression and increases the image quality; moving the mark to the left has the opposite effect. Permissible values range from 0 to 100.
Note: “Dragging” means to hold down the mouse button while moving the mouse.
Meaning of Buttons
Cancel: Changes are discarded and Quality dialog box is closed.
OK: The value is saves and the Quality dialog box is closed.
The preview area shows a part of the image. Clicking the + / - button zooms in/zooms out the size of the preview.

If the mouse cursor is positioned on the preview image at the left of the Quality dialog box, the cursor changes to the shape of a hand, and the thumbnail image display area can be scrolled by dragging with the mouse button held down.
8. Loading Images
An image file saved to disk is loaded using the standard file dialog box which appears when you click the Open button on the Control palette or choose Open... (O) from the File menu.
When either operation is performed, the standard File Open dialog box appears.
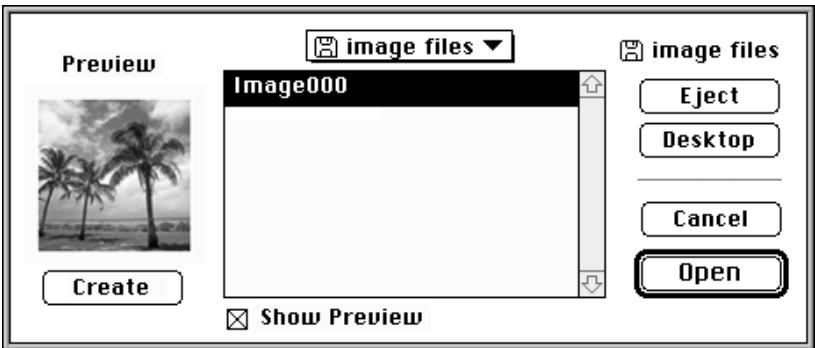
When the folder and image file are specified, the image is read and displayed in the display window.
You can see the preview image at the left of the dialog box when checking the Show Preview check box. When the preview image is not shown, clicking the Create button will create the preview image, if possible.
Meaning of Items in File Load Dialog Box
Eject: Ejects removable disk media.
Desktop: Returns to the desktop.
Cancel: Cancels operation and closes the open dialog box.
Open: Opens the selected image.
Show Preview:
Shows the preview image.
Create: Creates the preview image.
9. Sequential Image Acquisition
With the optional SF-100 Auto Slide Feeder mounted on the Nikon LS-1000 or optional AF-10 Auto Document Feeder mounted on the AX-110 or AX-210, images can be acquired sequentially, completely unattended.
Sequential acquisition is started by clicking the Sequential Acquire button on the Control palette or choosing Acquire with Autofeeder... from the File menu.
Sequential Acquire button
The plug-in software specified in the Preferences dialog box is launched, and the user interface for that software appears. If Nikon Scan has been selected, the following dialog will appear. See the instruction manual of the selected plug-in software for set up details.

Note: The above dialog box is for the LS-1000 film scanner. The corresponding dialog box for other scanners may be different.
If the plug-in software selected in the Plug-in Selection dialog box cannot be found, or if no plug-in software at all has been specified, the Plug-in Selection dialog box will appear. You should then select the plug-in.
9.1 Sequential Scan Dialog Box
When the Scan button is clicked, the Sequential Scan dialog box appears.
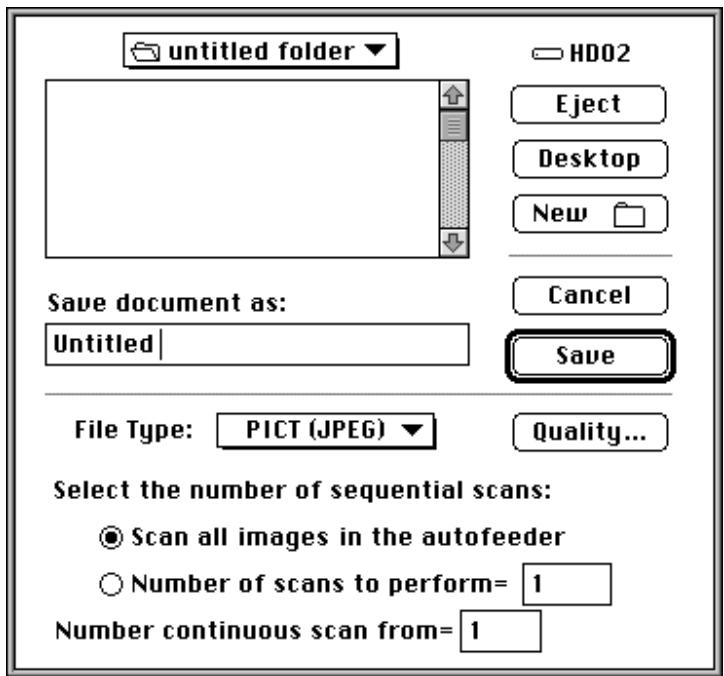
When the Save button on the Sequential Scan dialog box is clicked after specifying the drive and folder in which the image is to be saved, the file name, file type, and the number of scans, sequential scan operation is started.
Meaning of Items in the Sequential Scan Dialog Box
Eject: Ejects removable disk media.
Desktop: Returns to the desktop.
New Folder: Creates a new folder.
Filename: The name of each file saved during sequential image scanning consists of a fixed portion and a 3-digit serial number. The fixed part of the name is typed in here. For example, if the As a suffix radio button is selected in the Preference dialog box, and "ScanImage" is specified in the Sequential Scan dialog box, the sequentially saved file names will be "ScanImage001", "ScanImage002", "ScanImage003", and so on. See Section 4.3 for a description of how to indicate whether the number precedes or follows the user-input portion of the file name.
Number continuous scan from:
Specifies the starting point in the serial number sequence. For example, if "ScanImage" is specified and the number "5" is typed in this box, the files will be saved as "ScanImage005", "ScanImage006", "ScanImage007", and so on.
File Type:
PICT, PICT (JPEG), JPEG (JFIF), TIFF (PC), or TIFF (Mac) can be selected as the file type from the pop-up menu. The file type selected here is saved, and is recalled when this dialog box is next opened.
File Type
VICT
PICT(JPEG)
JPEG (JFIF)
TIFF (PC)
TIFF (Mac)
Quality:
If PICT (JPEG) or JPEG (JFIF) is selected as the file type, the Quality button is enabled, and the compression quality (and resulting file size) can be changed. If any other file type is selected, the Quality button is dimmed and disabled. When the Quality button is clicked the Quality dialog box is displayed. For details concerning the Quality dialog box, see Section 7.2.
Select the number of sequential scans:
Specifies the number of images to be scanned. If Scan all images in autofeeder is selected, all the images in the autofeeder will be scanned. If a number is set in the Number of scans to perform box, that number of images will be scanned.
Select the number of sequential scans:

Scan all images in autofeeder

Number of scans to perform=

Cancel:
Changes are discarded and the Save dialog box is closed.
Save:
Sequential acquisition is started in accordance with the settings.
If a file already exists with the file name specified here, a message dialog will be displayed. You should then take appropriate action as indicated by the message.
When the Save button on the Save dialog box is clicked, sequential scan operation is started, and the following message will appear.

Clicking the Abort button terminates the operation.
9.2 Scanning Log
When sequential scanning begins, the LogWindow appears and processing results are displayed image-by-image.
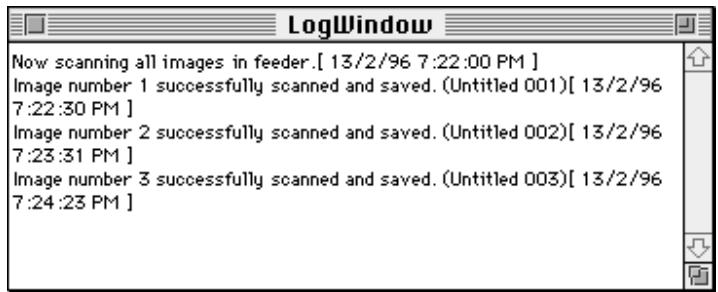
When you return after an unattended scanning session, consult the log first to get immediate feedback on scan completion. The contents of the LogWindow can be saved as a text file, and can be opened later using SimpleText, etc.
When the Log window's close box is clicked on completion of the sequential scan operation, the following message is displayed.
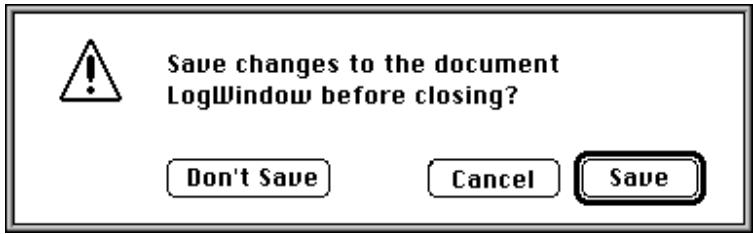
If the Save button is clicked the standard Save dialog box appears and the contents should be saved, specifying the folder and file name. If the Don't Save button is clicked the window contents are not saved.
10. About Box
When About Nikon Control... is chosen from the Apple menu, the About box appears.
The About box disappears when you click anywhere within the dialog box.

Index
A
About Nikon Control dialog box 42
Acquire a Single Image command 12, 19, 27
Acquire button 15, 19, 27
Acquire with Autofeeder command 12, 38
AF-10 auto document feeder 4,38
Arrange Icon command 14
As a prefix 25
As a suffix 25
Auto slide feeder 4, 38
AX-110 4,38
AX-210 4,38
C
Cascade command 14
Close command 12,34
ColorSync plug-in filter 5
Control palette 15 size of 25, 26
Custom install 7
D
Display the current magnification 26
Display the image dimensions in pixels 26
E
Easy install 6
Edit menu 13
F
File menu 12
File Open dialog box 37
File type 35
Flip
horizontal 30
vertical 31
Flip command 13
G
Get Info dialog box 31
H
Help button 16
Horizontal command 30
Horizontal Flip button 15, 30
1
Image acquisition 27
Image menu 13
Image Size dialog box 32
Image window operations 29
Install 5
L
Large control palette 25
Launching 11
Loading images 37
LS-1000 4,38
M
Monitor gamma 23, 24
N
Naming files 25
Nikon ControlPrefs 22
Nikon TattleTech 9
Number of sequential scans 40
0
Open button 15,37
Open command 12, 37
P
Plug-in selection 24
Plug-in Selection dialog box 24
Preferences 22
Preferences command 12, 17, 22
Preferences dialog box 17,23
Print command 12
Q
Quality button 35, 40
Quality dialog box 36
Quit command 11, 12
Quitting 11
R
Resolution 32
Rotate button 15, 29
Rotate command 13, 29
Rotating images 29
S
Save As button 15, 20, 34
Save As... command 12
Save command 12, 20, 34
Save dialog box 21, 35
Saving images 34
Scanning basics 16
Scanning log 41
Scratch disk 23, 26
Scroll button 15, 30
Sequential Acquire button 15,38
Sequential image acquisition 38
Sequential Scan dialog box 39
SF-100. See Auto slide feeder
Small control palette 25
Stack Windows command 14
System requirements 5
T
Tile command 14
Title bar 26
Tool buttons 15
V
Vertical command 31
Vertical Flip button 15, 31
W
Window menu 14
Z
Zoom button 15, 29
Zoom cursors 29
Zoom In command 14
Zoom Out command 14
- Cautions
- Trademark Information
- Notice concerning prohibition of copying or reproduction
- - Items prohibited by law from being copied or reproduced
- - Cautions on certain copies and reproductions
- Comply with copyright notices
- Overview
- BeforeYou Begin
- System Requirements
- Software Installation
- Step I
- Step 2
- Step 3
- Step 4
- Step 5
- Step 6
- When you have ColorSync installed
- Step 7
- Getting Started
- Launching and Quitting
- Launching
- File Edit Image Window
- Quitting
- File Menu
- Edit Menu
- Image Menu
- Window Menu
- Control Palette
- Buttons
- Tool Buttons
- Help Button
- Scanning Basics
- Preferences
- Description of items in the Preferences dialog box
- Add sequential file number to the user defined filename:
- Plug-in Selection
- Monitor Gamma
- Naming Files
- Naming Procedure Choices
- Control Palette Size
- Meaning of the Radio Buttons
- Scratch Disk
- Title Bar
- Meaning of the Check Boxes
- Image Acquisition
- Image Window Operations
- Zoom in/Zoom out the Image
- Rotating the Image
- Meaning of the Items
- Scrolling the Image
- Flipping the Image Horizontally
- Flipping the Image Vertically
- Get Info Dialog Box
- Image Size Dialog Box
- Saving Images
- Save Dialog Box
- Meaning of Items in Save Dialog Box
- File Type
- Quality Dialog Box
- Meaning of Buttons
- Loading Images
- Meaning of Items in File Load Dialog Box
- Sequential Image Acquisition
- Sequential Scan Dialog Box
- Meaning of Items in the Sequential Scan Dialog Box
- Number continuous scan from:
- Scanning Log
- About Box
- Index
- A
- C
- D
- E
- F
- G
- H
- 1
- L
- M
- N
- 0
- P
- Q
- R
- S
- T
- V
- W
- Z
Brand : NIKON
Model : CONTROL MACINTOSH
Category : To scan