
CAISSON ETANCHE WP-CP3-JUSQU-A 40 M DE PROFONDEUR - Waterproof camera case NIKON - Free user manual and instructions
Find the device manual for free CAISSON ETANCHE WP-CP3-JUSQU-A 40 M DE PROFONDEUR NIKON in PDF.

| Product type | Underwater camera housing |
| Brand | Nikon |
| Model | WP-CP3 |
| Compatibility | Nikon COOLPIX 4600, COOLPIX 5600 |
| Maximum operating depth | 40 meters |
| Dimensions (L × H × D) | 130.5 × 92.5 × 72.5 mm |
| Weight (empty) | 355 g |
| Operating temperature | 0 °C to 40 °C |
| Material | Corrosion-resistant plastic |
| Box contents | WP-CP3 underwater housing, replacement O-ring, COOLPIX O-ring grease, silica gel (5 packets), warranty card, user manual |
| Integrated controls | Shutter release, zoom in/out, mode selector, MENU button, multi selector, delete button, playback |
| Main function | Underwater and wet condition photography up to 40 m |
| Seal | Replaceable O-ring, to be lubricated with COOLPIX specific grease |
| Moisture absorber | Silica gel provided, to be placed inside to prevent condensation |
| Routine maintenance | Rinse with fresh water after each use, wipe and dry in the shade |
| O-ring replacement | At least once a year, or if cracked, deformed, or worn |
| Safety precautions | Do not dive with the housing, do not exceed 40 m depth, avoid temperatures above 40 °C, do not open in a dusty or humid environment |
| Optional accessories | Replacement O-ring WP-O1, O-ring grease WP-G1, silica gel WP-S1 |
| Recommended service | Once a year by an authorized Nikon service center (fee-based service) |
| Warranty | Manufacturer's warranty included (see manual) |
| Country of manufacture | China (indicated on product) |
Frequently Asked Questions - CAISSON ETANCHE WP-CP3-JUSQU-A 40 M DE PROFONDEUR NIKON
User questions about CAISSON ETANCHE WP-CP3-JUSQU-A 40 M DE PROFONDEUR NIKON
0 question about this device. Answer the ones you know or ask your own.
Ask a new question about this device
Download the instructions for your Waterproof camera case in PDF format for free! Find your manual CAISSON ETANCHE WP-CP3-JUSQU-A 40 M DE PROFONDEUR - NIKON and take your electronic device back in hand. On this page are published all the documents necessary for the use of your device. CAISSON ETANCHE WP-CP3-JUSQU-A 40 M DE PROFONDEUR by NIKON.
USER MANUAL CAISSON ETANCHE WP-CP3-JUSQU-A 40 M DE PROFONDEUR NIKON
natural_image
Technical illustration of a COOLPIX underwater camera module (no text or symbols on body)User's Manual
WATERPROOF CASE
WP-CP3
En
For Your Safety
To prevent damage to your Nikon product or injury to yourself or to others, read the following safety precautions in their entirety before using this equipment. Keep these safety instructions where all those who use the product will read them.
The consequences that could result from failure to observe the precautions listed in this section are indicated by the following symbol:

This icon marks warnings, information that should be read before using this Nikon product to prevent possible injury.
WARNINGS

Turn camera off immediately in the event of malfunction
Should you notice smoke or an unusual smell coming from the equipment, remove the batteries from the camera immediately, taking care to avoid burns. Continued operation could result in injury. After removing the batteries, take the equipment to a Nikon-authorized service representative for inspection.

Do not use in the presence of flammable gas
Do not use electronic equipment in the presence of flammable gas, as this could result in explosion or fire.

Observe caution when using the strap
Never place the strap around the neck of an infant or child.

Keep out of reach of children
Particular care should be taken to prevent infants from putting small parts into their mouths.

Do not disassemble
Failure to observe this precaution could result in injury or product malfunction. Should the product break as the result of a fall or other accident, take it to a Nikon-authorized service representative for inspection, being careful not to injure yourself on the broken parts.

Observe proper precautions when handling camera batteries
If improperly handled, batteries may emit gases that will collect inside the waterproof case, where they may cause explosion or fire. Observe the following precautions when handling camera batteries:
- Use only batteries approved for use in the camera.
- Batteries are prone to leakage when fully discharged. Remove the camera from the case when not in use.
- Should water enter the case, remove the batteries from the camera immediately.
- Keep the battery terminals dry. Failure to observe this precaution could result in injury or product malfunction.

Do not swallow silica gel or O-ring grease
The silica gel desiccant and O-ring grease used in this product are not edible.

Keep out of direct sunlight
Do not leave the WP-CP3 in direct sunlight. The case could focus sunlight, causing fire.

Do not dive while holding
To prevent injury caused by the case striking the body, do not jump or dive into water while holding the WP-CP3.

Do not use below 40m
Do not use at depths below 40 m (130'). Failure to observe this precaution could result in leakage or other malfunction.

Keep the case watertight
Do not clean the case with a high-pressure jet. Do not open the case where it would be exposed to dust or sand, and be sure to remove any foreign objects from the O-ring and any parts of the case that are in contact with the O-ring before closing the case. Failure to observe these precautions could result in leakage.

Do not exposure to high temperatures
Do not expose the product to temperatures over 40^ C ( 104^ F). Failure to observe this precaution could cause the product to warp, resulting in leakage.

Observe caution when operating the flash
Using the flash close to your subject's eyes could cause temporary visual impairment. Particular care should be observed if photographing infants, when the flash should be no less than one meter (39') from the subject.
To ensure continued enjoyment of your Nikon product, observe the following precautions when storing or using the device.
Preventing Leakage
WATER INSIDE THE CASE COULD NOT ONLY EXPOSE THE CAMERA TO IRREPARABLE DAMAGE BUT ALSO RESULT IN FIRE, ELECTRIC SHOCK, OR EXPOSURE TO POISONOUS GASES. THE ENTRY OF WATER INTO THE CASE CAN BE PREVENTED BY OBSERVING THE FOLLOWING PRECAUTIONS:
Before using the WP-CP3 in or near water, test for leaks as described on pages 6–7 and 12 of this manual.
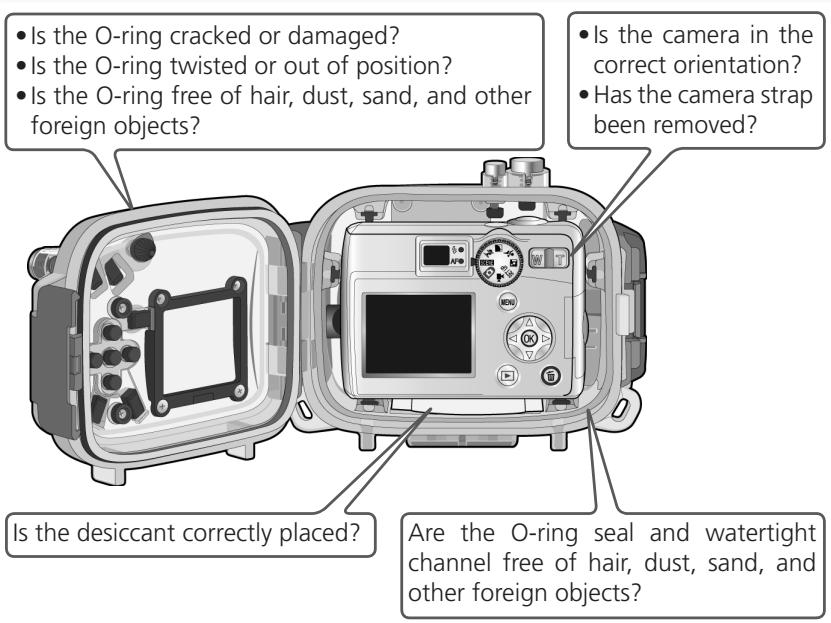
- Before sealing the case, examine the O-ring, watertight channel, and any parts of the case that are in contact with the O-ring carefully to ensure that they are free of dirt, hair, lint, dust, sand, and other foreign objects. Make sure that the O-ring is not twisted or out of position.
- The O-ring requires periodic replacement. Replace the O-ring immediately if it is damaged, cracked, warped, or has lost elasticity. O-rings should be replaced at least once a year; do not use a worn O-ring or a type of O-ring or O-ring grease not designated for use in this product. Do not use NIKONOS O-ring lubricant (grease).
- Be careful not to damage the O-ring when removing it from the case. Do not use metal objects or objects with sharp points when removing the O-ring.
- Do not use force when removing or positioning the O-ring. Excessive force may permanently stretch the ring, causing the case to leak.
- To prevent wear, use only COOLPIX O-ring grease designated for use with this product. Do not use NIKONOS O-ring lubricant (grease) or other types of O-ring grease.
- Do not open the waterproof case in areas exposed to spray, high winds, dust, or sand.
- Do not drop the case, place under heavy objects, or subject to excessive force. Failure to observe this precaution could cause the case to warp, resulting in leakage.
- In the event of leakage, stop use immediately, dry the camera and the interior of the case, and take the camera and case to a Nikon-authorized service representative.
Shock and Vibration
The waterproof case is not designed to protect the camera from blows or vibration. Do not drop the case, strike it against hard objects, throw it into the water, jump into the water holding the case, or leave the case in an area subject to extreme vibration. Failure to observe these precautions could result in damage to the camera.
Maximum Depth
The WP-CP3 is waterproof to 40m (130'). At greater depths, the case could leak, break, or change shape, resulting in damage to the camera.
Temperature
Do not leave the case in areas exposed to high temperatures, such as inside a car, near a heater, on a beach, or in direct sunlight. Failure to observe this precaution could weaken or warp the case, resulting in damage to the camera. Sudden changes in temperature could result in condensation inside the case, which could also damage the camera. To prevent condensation:
- Before exposing the case to sudden changes in temperature, place it in a sealed plastic bag. Do not open the bag until the case has reached the same temperature as its surroundings.
- Place the supplied desiccant (silica gel) in the case with the camera as directed on page 10 of this manual.
- Do not expose the case to high temperatures by leaving it on the beach or in direct sunlight before entering the water.
Chemicals
- Do not expose the case to volatile chemicals or their vapors. Failure to observe this precaution could result in damage to the case.
- Do not use chemical detergents, rust inhibitors, thinner, alcohol, or other volatile chemicals when cleaning the case. Wash in fresh water only.
- Use only desiccants designated for use with this product (see page 19).
- Use only COOLPIX O-ring grease designated for use with this product (see page 19). Do not use NIKONOS O-ring lubricant (grease).
- Do not use sealants or anti-fog chemicals.
- Do not handle the case after applying sunscreen. Sunscreen can damage the clear plastic parts of the case.
- Do not apply stickers to the case, as the adhesive could cause the case to deteriorate.
Travelling by Air
If possible, include the case in your carry-on baggage when travelling by air. When packing the case with checked luggage, leave the case open or remove the O-ring. If the case is sealed, changes in air pressure may damage the case or prevent the case from opening.
High Altitudes
When travelling from high to low altitudes, open the case periodically to equalize the pressure. If the case is kept sealed, changes in air pressure may damage the case or prevent the case from opening.
Table of Contents
For Your Safety ...... i
Cautions .... iii
Notices...... vi
Introduction 1
Package Contents.... 1
Parts of the WP-CP3 2
Overview 4
Step 1 Check for Leaks 6
Step 2 Insert the Camera 8
- Ready the Camera 8
- Insert the Camera.... 9
- Insert Desiccant.... 10
- Perform a Final Check 10
- Close the Case.... 11
Step 3 Check for Leaks Again 12
Step 4 Take Pictures 13
- Turn the Camera On.... 13
- Adjust Settings.... 13
- Take Pictures.... 14
Step 5 Clean the Case 15
Maintenance 17
Caring for the O-ring 17
Storage.... 19
Technical Notes 19
Specifications.... 19
Optional Accessories 19
Notices
- No part of the manuals included with this product may be reproduced, transmitted, transcribed, stored in a retrieval system, or translated into any language in any form, by any means, without Nikon's prior written permission.
-
Nikon reserves the right to change the specifications of the hardware and software described in these manuals at any time and without prior notice.
-
Nikon will not be held liable for any damages resulting from the use of this product.
- While every effort has been made to ensure that the information in these manuals is accurate and complete, we would appreciate it were you to bring any errors or omissions to the attention of the Nikon representative in your area (address provided separately).
√ Important: Use Only with Compatible Cameras
Use only with cameras that list the WP-CP3 in the “Optional Accessories” section of the camera manual. Do not place other objects in the WP-CP3. Additional compatibility information may be available from the websites listed below.
√ Important: Before Using This Product
Before using this product, be sure that the camera is functioning normally and that the case does not leak ⚙ 6–7, 12). Failure to check for leaks before using the product could result in irreparable damage to the camera, batteries, or memory card. Nikon will not be held liable for damages or lost profits that may result from leakage or product malfunction.
√ Important: Use Only Nikon Brand Electronic Accessories
Nikon COOLPIX cameras are designed to the highest standards and include complex electronic circuitry. Only Nikon brand electronic accessories (including battery chargers, batteries, and AC adapters) certified by Nikon specifically for use with this Nikon digital camera are engineered and proven to operate within the operational and safety requirements of this electronic circuitry.
For more information about Nikon brand accessories, contact a local authorized Nikon dealer.
Life-Long Learning
As part of Nikon's “Life-Long Learning” commitment to ongoing product support and education, continually-updated information is available on-line at the following sites:
- For users in the U.S.A.: http://www.nikonusa.com/
- For users in Europe and Africa: http://www.europe-nikon.com/support
- For users in Asia, Oceania and the Middle East: http://www.nikon-asia.com/
Visit these sites to keep up-to-date with the latest product information, tips, answers to frequently-asked questions (FAQs), and general advice on digital imaging and photography. Additional information may be available from the Nikon representative in your area. For contact information, visit http://nikonimaging.com/
Introduction
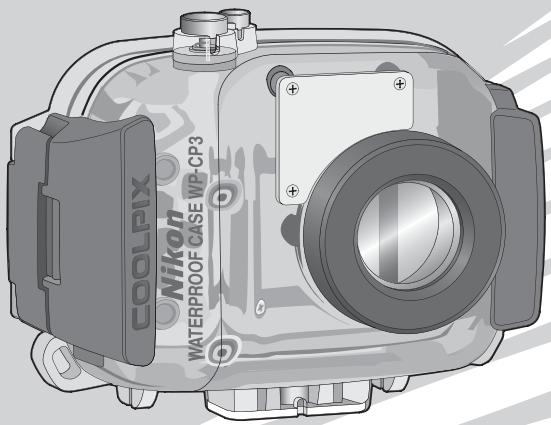
Thank you for your purchase of a WP-CP3 waterproof case for Nikon COOLPIX 5600 and 4600 digital cameras. The WP-CP3 is waterproof to a depth of 40 m (130'), allowing pictures to be taken underwater or in mist and rain. This manual has been written to help you enjoy taking pictures using the waterproof case. Keep this manual where all those who use the product will read it, and be sure to read both it and the camera manual thoroughly before use.
To make it easier to find the information you need, the following symbols and conventions are used:

This icon marks cautions, information that should be read before use to prevent damage to the camera.

This icon marks tips, additional information that may be helpful when using the camera.

This icon marks notes, information that should be read before using the camera.

This icon indicates that more information is available elsewhere in this manual.
Package Contents
Take the case and accessories out of the box and check that the package contains all the following items:
WP-CP3 (with O-ring in place; check that O-ring is undamaged before use)

COOLPIX O-ring grease
natural_image
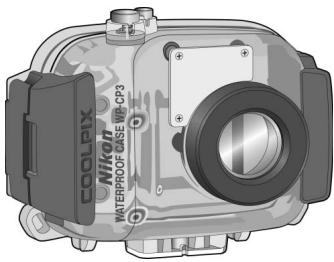
Illustration of a curved, looped tool or handle with a central knob (no text or symbols)WP-AN1 strap
natural_image
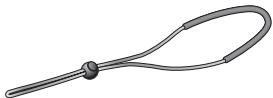
Simple gray oval shape with no text or symbolsSpare O-ring
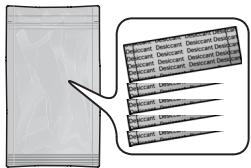
Silica gel desiccant (1 package of 5; reseal after opening)

Warranty

User's Manual (this booklet)
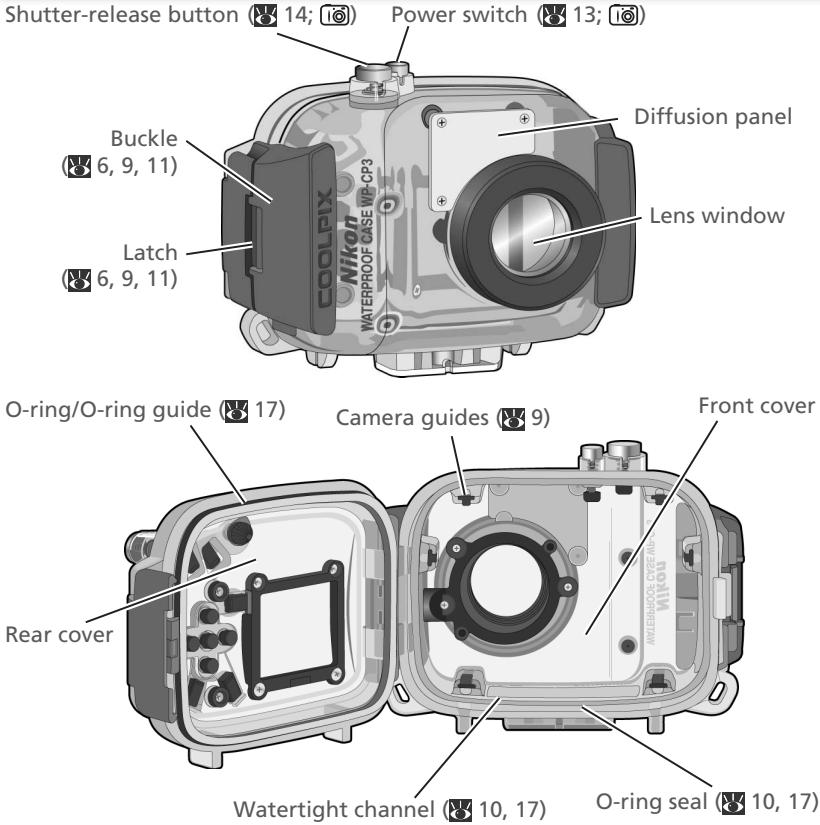
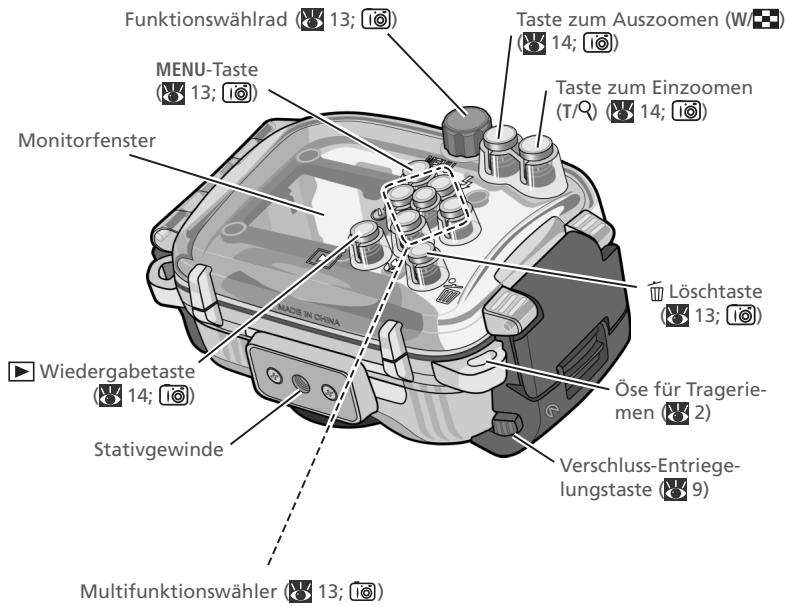
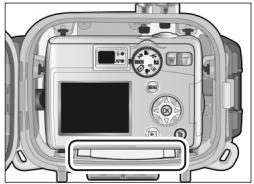
Parts of the WP-CP3

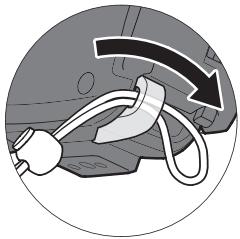
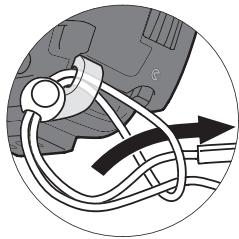
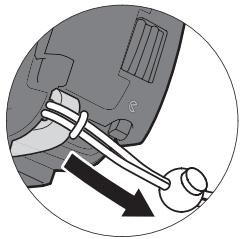
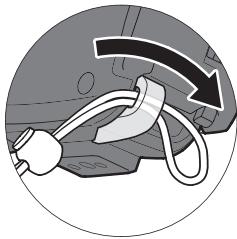
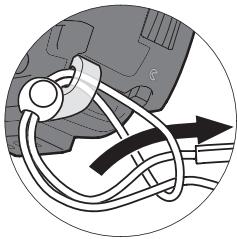
Attaching the Strap
natural_image
Diagram showing a car interior with a curved arrow indicating motion or force, no text or symbols present
natural_image
Close-up of a car's wheel and suspension system with directional arrows (no text or symbols)
natural_image
Diagram of a mechanical component with directional arrows indicating movement (no text or symbols)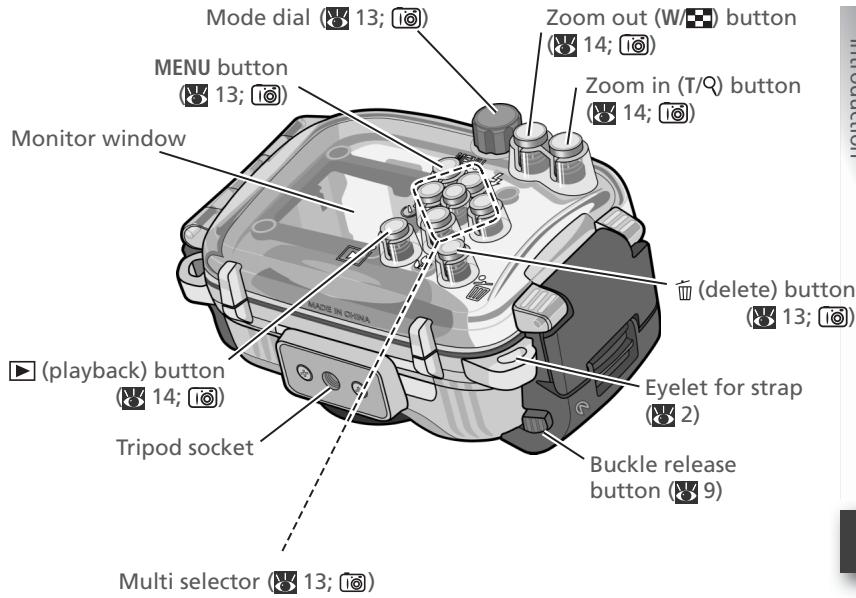
Performs same function as corresponding camera control. See camera Guide to Digital Photography for details.
Using the WP-CP3

Follow these steps when using the waterproof case:
Step 1 Check for Leaks

natural_image
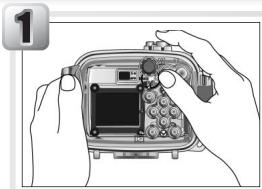
Illustration of hands holding a handheld gaming controller (no text or symbols visible)√ Important!
To prevent water damage to the camera, be sure to check for leaks before placing the camera in the case.
If water enters the case, check the O-ring and confirm that the case is properly sealed (10).
Step 2 Insert the Camera

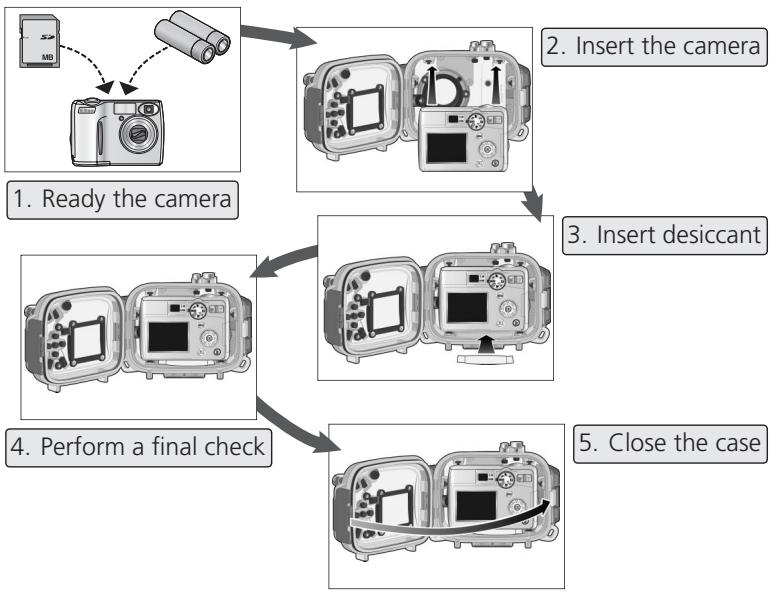
flowchart
graph TD
    A["1. Ready the camera"] --> B["2. Insert the camera"]
    B --> C["3. Insert desiccant"]
    C --> D["4. Perform a final check"]
    D --> E["5. Close the case"]
Step 3 Check for Leaks Again
(12)
natural_image
Illustration of hands holding a camera module with buttons and display (no text or symbols visible)If water enters the case, check the O-ring and confirm that the case is properly sealed (10). If the cause of the leak can not be determined, take the case to a Nikon-authorized service representative.
Step 4 Take Pictures
(13–14)
natural_image
Illustration of hands holding a camera module with a display and control panel (no text or symbols visible)- Turn the camera on
- Adjust settings
- Take pictures
Step 5 Clean the Case
(15–16)
natural_image
Illustration of hands holding a camera module with buttons and display (no text or symbols visible)- Wash the case in fresh water
- Wipe dry
- Remove the camera
- Soak the case in fresh water for 2–3 hours
- Wipe dry
- Let the case dry in the shade
Maintenance
(17–19)
natural_image
Line drawing of two hands holding a small object, no text or symbols present- Caring for the O-ring
- Storage
√ Important!
Before placing the camera in the case, be sure that the camera is functioning normally and that the case does not leak. Failure to check for leaks before use could result in irreparable damage to the camera. Note that leaks may result if the case is cracked or damaged. Check the case for cracking and other damage before use, and consult with a Nikon service representative in the event that any cracking or damage is found.
1
natural_image
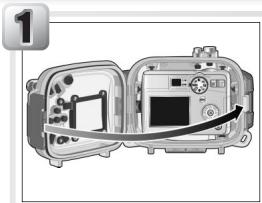
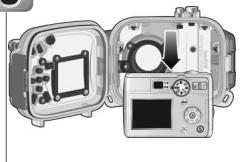
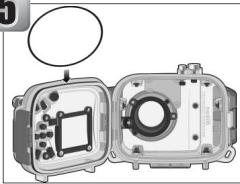
Cross-sectional diagram of an open electronic device casing with internal components (no text or symbols visible)Close the case
After making sure that the O-ring is in place, slowly close the case, being careful not to pinch your fingers in the gap.
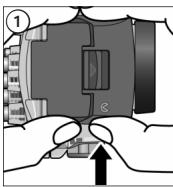
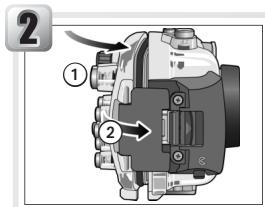
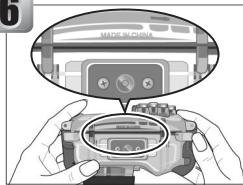
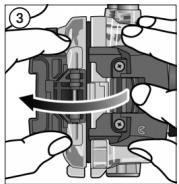
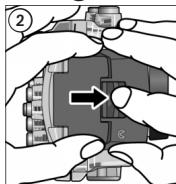
2
Latch the case
With front and rear halves of the case lightly touching but the case not fully closed (①), flip the buckle onto the front half of the case (②).
natural_image
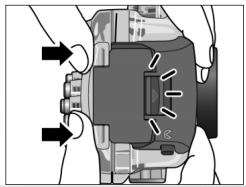
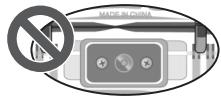
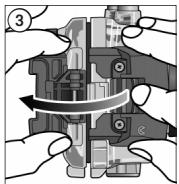
Mechanical component diagram showing internal components with arrows indicating motion (no text or symbols)Press the case closed until the latch clicks shut. Check that the case is properly sealed, that the O-ring is in place, and that no foreign objects are caught in the seal.
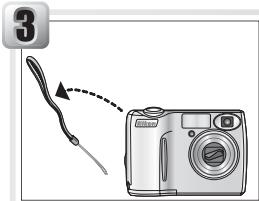
3

natural_image
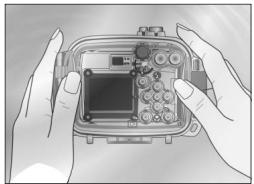
Illustration of hands holding a camera module with visible lens and buttons (no text or symbols)Immerse the case
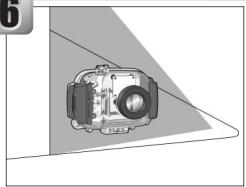
Slowly immerse the case in water, stopping if water enters the case. Test the case in a shallow area (1 m/3' or less) or in a tub or bucket. Do not use hot water, as this could exceed the operating temperature range of 0–40°C (32–104°F).

natural_image
Illustration of hands holding a game controller with a small display (no text or symbols visible)Check for leaks
Keep the case immersed and check whether any bubbles are emitted. After two to three seconds, take the case out of the water and check whether any droplets are inside.

natural_image
Illustration of hands holding a camera module with buttons and ports (no text or symbols visible)Test the shooting controls
Immerse the case and operate the controls underwater for two to three minutes, checking whether any bubbles are emitted or any water enters the case.
natural_image
Illustration of hands holding a game controller with a small display (no text or symbols visible)Check for water inside the case
Take the case out of the water and check for water inside the case. If water has entered the case, check the O-ring ⚡ 10, 17–18). If the cause of the leak can not be determined, take the case to a Nikon-authorized service representative.
After checking for leaks, dry the case thoroughly before inserting the camera.
1. Ready the Camera
flowchart
graph TD
    A["USB MB"] --> B["Lens"]
    B --> C["Cam/Camera"]
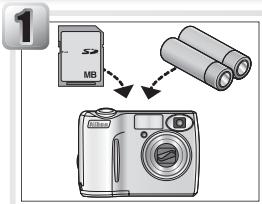
Insert the batteries and memory card
Before using the camera, check the battery level and number of exposures remaining.
Batteries
Make sure that the batteries are undamaged, are from the same pair, and have the same charge. Do not use damaged batteries or mix old and new batteries, batteries of different makes, or batteries with different charges. Failure to observe these precautions could result in fire or in damage to the batteries. For more information, see the camera Guide to Digital Photography.
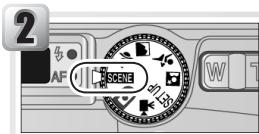
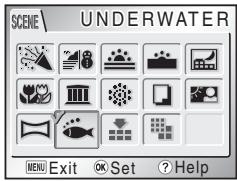
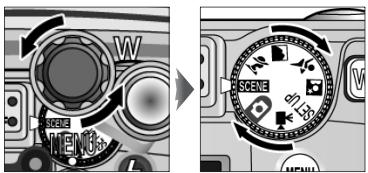
Select 🍻 (Underwater) mode
To optimize camera settings for underwater photography, rotate the mode dial to SCENE and select 🏠 (Underwater) mode. See the camera manual for details.
Remove the camera strap
To ensure that the camera strap does not get caught in the seal and cause a leak, be sure to remove the strap before placing the camera in the case.
2. Insert the Camera
1
Turn the camera off
2

Release the buckle
Pressing the buckle release button (①), slide the latch forward (②) and open the buckle (③).


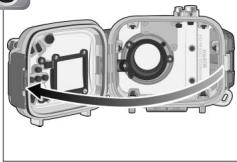
3

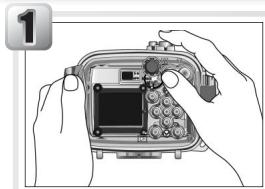
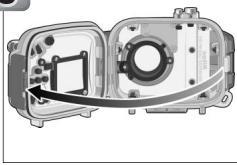
natural_image
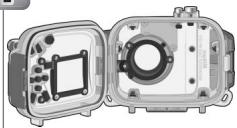
Cross-sectional diagram of a device showing internal components and a curved arrow indicating direction (no text or symbols)Open the case

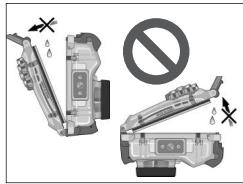
Opening the Case
Do not open the case in areas exposed to blown sand or spray. Keep the case upright; do not place the open case with the O-ring or O-ring seal face down.
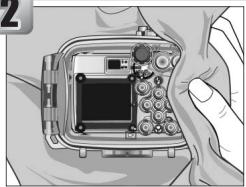
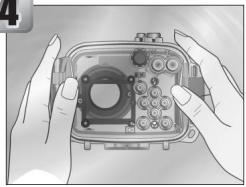
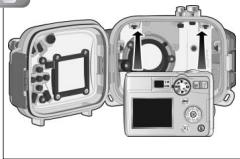
4
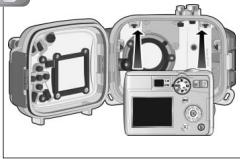
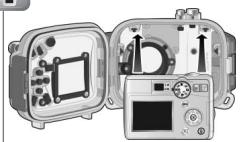
natural_image
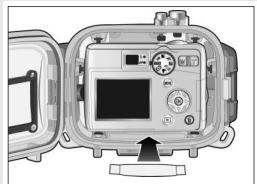
Illustration of a portable electronic device with open case, display panel, and control panel (no text or symbols visible)Insert the camera
Position the camera in the camera guides with the lens in the lens window.
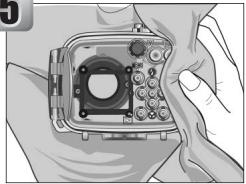
3. Insert Desiccant
natural_image
Interior view of a digital camera module with open case and control panel (no visible text or symbols)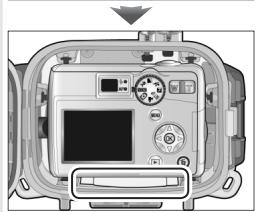
natural_image
Front view of a medical device casing with control panel and display (no visible text or symbols)To prevent condensation from forming inside the case, insert the silica gel desiccant between the bottom of the camera and the case. Slide the desiccant to the front of the case, where it will not interfere with proper closing of the case. Improper placement could cause the case to leak.
Replacing the Desiccant
Used desiccant loses its ability to absorb moisture. We recommend replacing the desiccant each time the case is used (19).
4. Perform a Final Check
5. Close the Case
natural_image
Illustration of a portable electronic device with ports and control panel (no text or symbols)Close the case
After making sure that the O-ring is in place, slowly close the case, being careful not to pinch your fingers in the gap.
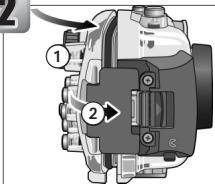
Latch the case
With front and rear halves of the case lightly touching but the case not fully closed (①), flip the buckle onto the front half of the case (②).
natural_image
Diagram of a device with arrows indicating motion or force direction (no text or symbols present)Press the case closed until the latch clicks shut. Check that the case is properly sealed, that the O-ring is in place, and that no foreign objects are caught in the seal.
Step 3 Check for Leaks Again

Important!
Before use, be sure that the camera is functioning normally and that the case does not leak. Failure to check for leaks before use could result in irreparable damage to the camera.
After sealing the case, perform a final check for leaks.
natural_image
Illustration of hands holding a transparent electronic device with a central module and connectors (no text or symbols visible)Immerse the case in water and check for leaks as described in Steps 3–6 of “Check the Case for Leaks” (6). Check that the desiccant stays dry and that no water enters the case. If a leak is detected, immediately remove the case from the water, dry the camera and case thoroughly, and check that the O-ring is intact and the case properly sealed. If the cause of the leak can not be determined, take the case to a Nikon-authorized service representative.
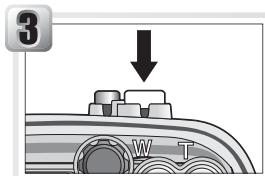
1. Turn the Camera On

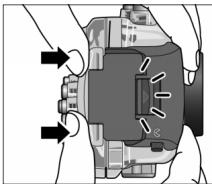
natural_image
Close-up of a mechanical component with a downward arrow and labeled parts (W, T), no readable text or symbols beyond basic markings.Press the power switch on the waterproof case. The camera power-on lamp will light and the monitor will turn on.
![5M AUTO [ 97 ]](/content/2024/12/115894/images/5486bea5c50d332532a3f9bdf8a5f257249f69620040bc230419f6bd089c9fea.jpg)
If you will be using the camera underwater, check that the camera is in ⚙ (Underwater) mode.
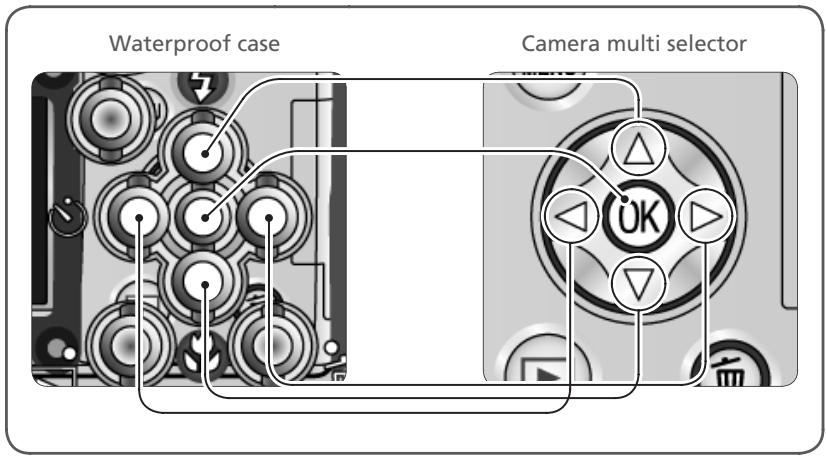
2. Adjust Settings
The controls on the case correspond to the following camera controls. For more information, see the camera Guide to Digital Photography.

* Direction of rotation is reversed.
3. Take Pictures
natural_image
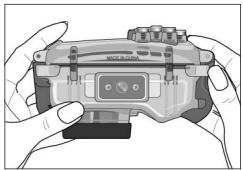
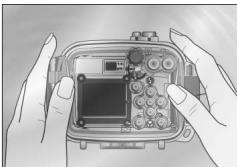
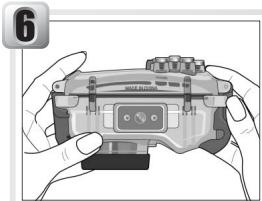
Illustration of hands holding a camera module with a screen and keypad (no text or symbols visible)Ready the camera
Hold the case steadily in both hands.
Don't Block the Shot
Keep fingers and other objects away from the lens window and diffusion panel.
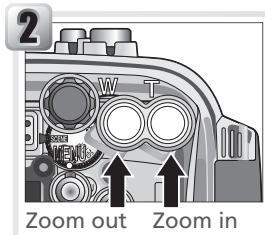
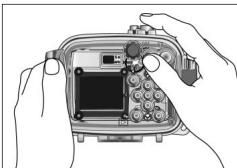
Frame the picture
Use the zoom buttons on the case to frame the subject in the monitor.
Use the Monitor
The viewfinder can not be used when the camera is in the case. Use the monitor to frame pictures.
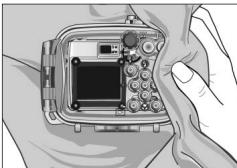
Focus and shoot
Press the shutter-release button on the case half-way to focus. Smoothly press the button the rest of the way down to shoot. Pictures can be played back using the ▶ button on the case.
Underwater Photography
The best time for underwater photography is when the sun is directly overhead (note that pictures taken underwater may have a blue cast). While shooting, avoid exhaling bubbles into the frame.
Shots can be taken at ranges of as little as 4 cm (1.6") when the camera is zoomed out to where the 🎨 icon in the monitor turns green. Note that the flash may be unable to light the entire subject when the camera is zoomed out, and its range may vary with depth and clarity. It may also reflect from suspended materials, producing bright spots in the picture. Take a test shot and view the results in the monitor.
Reactivating the Monitor
If the monitor has turned off to save power, it can be reactivated by pressing the power button or by pressing the shutter-release button halfway. By default, the monitor will turn off automatically if no operations are performed for one minute. The length of time the monitor remains active can be adjusted using the Auto off option in the camera setup menu.
1

natural_image
Illustration of hands holding a camera module with buttons and display (no text or symbols visible)Wash the case in fresh water
The case should be cleaned immediately after use. Before opening the case and removing the camera, wash the case in a basin of fresh water.
2
natural_image
Close-up of a camera module with a small screen and control knobs, held by hands (no visible text or symbols)Wipe dry
Dry the exterior of the case thoroughly with a soft, dry cloth.

Drying the Case
Be careful to remove water that may have collected in the buckle, controls, or strap eyelet.
3
natural_image
Illustration of a digital camera module with open case and control panel (no text or symbols visible)Remove the camera
Remove the camera and dry the inside of the case with a soft, dry cloth.

Removing the Camera
Do not open the case in areas exposed to blown sand or spray. When removing the camera, be careful not to drop the device and make sure that droplets from your hair, body, or other objects do not fall into the case or onto the camera. If water does fall on the camera, dry it off immediately.
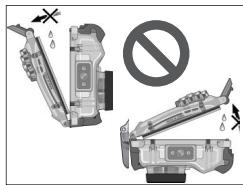
Keep the case upright; do not place the open case with the O-ring or O-ring seal face down.
4
natural_image
Illustration of hands holding a camera module with no visible text or symbolsSoak the case in fresh water
Reseal the case and leave it in a basin of fresh water for two to three hours. Operate each of the controls a few times to remove salt. If salt drys on the controls, they may cease to function or their metal parts may rust, causing leakage.
5
natural_image
Illustration of hands holding a camera module with no visible text or symbolsWipe dry
Dry the case thoroughly with a soft, dry cloth. Do not use a cloth to which salt has adhered.
6
natural_image
Diagram of a camera module with lens and frame, shown in 3D perspective view (no text or labels)Let the case dry in the shade
Leave the case out to dry in a shady, well-ventilated area.

Do Not Exposure to Sunlight or Heat
Do not use a hair dryer or other heat source or place the case in direct sunlight. Heat could cause the O-ring to deteriorate, resulting in leakage.

Cleaning the Interior of the Case
Use a blower or a soft, dry cloth to clean the interior of the case. Do not use water, detergents, or chemical agents of any kind. Water can damage the coating on the inside of the lens window.
Caring for the O-ring
The WP-CP3 uses an O-ring to form a watertight seal. Improper handling of the O-ring can produce leaks. Check the condition of the O-ring as described below before each use, and check for the presence of foreign matter on the O-ring each time the case is opened, however briefly.

natural_image
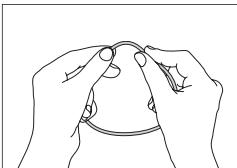
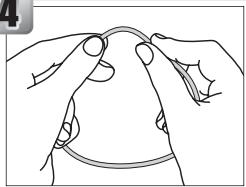
Illustration of hands assembling electronic components with a magnified inset showing detail (no text or symbols)Remove the O-ring
Pinch the O-ring lightly between two fingers to form a loop. Take hold of the loop and remove the O-ring from the case.
Do Not Use Force or Sharp Objects
The case may leak if the O-ring is forcibly stretched or damaged through the use of edged or pointed objects, including fingernails and metal tools.
Inspect the O-ring
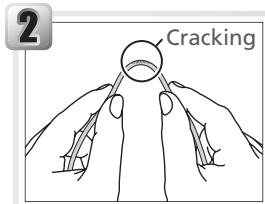
Remove old O-ring grease and other foreign matter with tissue paper or a soft, dry cloth, taking care not to leave tissue or threads on the O-ring. Gently bend the O-ring to check for cracking or other damage.
natural_image
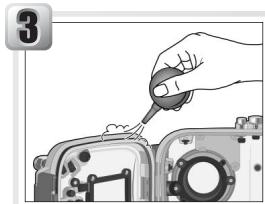
Illustration of a hand using a tool to adjust or install electronic components (no text or symbols visible)Inspect the O-ring guide
Use a blower or cotton swab to remove any foreign objects from the watertight channel and all parts of the case that come into contact with the O-ring. Be sure to remove any threads left behind by the swab.
Replacing the O-ring
The O-ring requires periodic replacement. Replace the O-ring immediately if it is damaged, cracked, warped, or has lost its elasticity. O-rings should be replaced at least once a year. Use only COOLPIX O-ring grease designated for use in this product; replacement O-rings and O-ring grease can be purchased from a Nikon camera retailer or Nikon-authorized service agent. Do not use NIKONOS O-ring lubricant (grease).
4
natural_image
Line drawing of hands holding a rope or cable, no text or symbols presentGrease the O-ring
If the O-ring is not properly greased, it may crack or peel, causing leaks. If the bottom of the O-ring appears dry, place a drop of O-ring grease on your index finger and spread grease on the O-ring by sliding it between your thumb and index finger, gently stretching the ring. Do not use cloth or paper, as these may leave fibers on the O-ring. Note that applying too much grease may cause foreign matter to adhere more readily to the ring, preventing the case from sealing properly.
5
natural_image
Cross-sectional diagram of a device housing with internal components and a circular component (no text or symbols)Replace the O-ring
Making sure the O-ring and guide are free of foreign objects, place the O-ring so that it runs evenly at the same level all the way round the O-ring guide, without undue stretching and without protruding from the guide.
6
Check the seal
Close the case and check that the case is fully sealed. If the O-ring does not form a perfect seal, open the case and adjust the O-ring to prevent leaks.

Cleaning
Do not use detergents or volatile chemicals such as alcohol or thinner when cleaning the case. Failure to observe this precaution could result in damage to the case or O-ring.
Storage
Store the case in a cool, well-ventilated area, leaving the case open to prevent the O-ring from deteriorating. When leaving the case unused for an extended period, remove the O-ring, wipe off any O-ring grease, and place the O-ring in a clean plastic bag to ensure that it maintains it elasticity. Do not store the case in direct sunlight or where it will be exposed to sudden changes in temperature or high levels of humidity. Do not store the case or O-ring under other objects, close to open flames, in the vicinity of flammable items, or with naptha or camphor moth balls.
Technical Notes
Specifications
| Supported cameras | COOLPIX 4600, COOLPIX 5600 |
| Maximum depth | 40 m (130') |
| Camera operating temperature | 0–40°C (32–104°F) |
| Dimensions | 130.5 × 92.5 × 72.5 mm/5.14" × 3.64" × 2.85" (W × H × D) |
| Approximate weight | 355 g (12.5 oz) when empty |
Optional Accessories
| O-ring set | WP-OG1 O-ring set (contains WP-O1 O-ring and WP-G1 O-ring grease) |
| Desiccant | WP-S1 silica gel desiccant |

Servicing
Nikon recommends that the case be serviced by a Nikon-authorized service representative at least once a year. A fee is charged for this service.
UNTERWASSERGEHÄUSE
WP-CP3

natural_image
Illustration of a Nikon Waterproof CASE WIP-CP3 camera module (no text or symbols on body)De
Sicherheitshinweise
natural_image
Illustration of a curved, looped tool or handle with a central knob (no text or symbols)Trageriemen WP-AN1

natural_image
Simple gray oval shape with no text or symbolsO-Ring (als Ersatz)

natural_image
Illustration of hands holding a handheld electronic device (no text or symbols visible)Wichtig
natural_image
Exploded view of a device showing internal components and control panel (no text or symbols visible)natural_image
Illustration of an open and closed electronic device with a screen, buttons, and display panel (no text or symbols visible)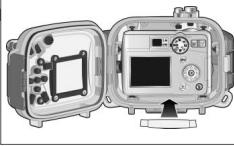
natural_image
Illustration of a portable camera module with open case and control panel (no text or symbols visible)natural_image
Illustration of a portable electronic device with control panel and display unit (no text or symbols visible)natural_image
Illustration of hands holding a camera module with control panel and display (no text or symbols visible)natural_image
Illustration of hands holding a camera module with a small screen and buttons (no text or symbols visible)natural_image
Illustration of hands holding a camera module with control knobs and display (no text or symbols visible)natural_image
Line drawing of two hands holding a small object, no text or symbols presentnatural_image
Cross-sectional diagram of an open industrial device showing internal components and mounting holes (no text or symbols)natural_image
Mechanical component diagram showing internal components with arrows indicating motion (no text or symbols)natural_image
Illustration of hands holding a camera module with buttons and a central display (no text or symbols visible)natural_image
Illustration of hands holding a game controller with a small logo, no text or symbols presentnatural_image
Illustration of hands holding a camera module with buttons and a keypad (no text or symbols visible)natural_image
Illustration of hands holding a handheld gaming controller (no text or symbols visible)
natural_image
Mechanical assembly diagram showing hands operating a valve mechanism (no text or labels visible)3
natural_image
Cross-sectional diagram of a device housing with internal components and an arrow indicating a component (no text or symbols present)4
natural_image
Illustration of a portable electronic device with open case and control panel (no text or symbols visible)natural_image
Interior view of a digital camera module with open case and control panel (no visible text or symbols)
natural_image
Front view of a digital camera module with display and control buttons (no visible text or symbols)natural_image
Exploded view diagram of a camera module showing internal components and wiring (no text or labels)natural_image
Illustration of a device with ports and cables, no visible text or symbolsnatural_image
Diagram of a device with arrows indicating motion or force direction (no text or symbols present)natural_image
Illustration of hands holding a transparent electronic device with buttons and a central display (no text or symbols visible)natural_image
Close-up of a mechanical component with a downward arrow and labeled parts (W, T), no readable text or symbols beyond basic markings.3. Fotografieren

natural_image
Illustration of hands holding a camera module with a display and control panel (no text or symbols visible)Auszoomen
Einzoomen
natural_image
Illustration of hands holding a camera module with buttons and display (no text or symbols visible)natural_image
Close-up of a camera module with a small screen and multiple buttons, held by hands (no visible text or symbols)natural_image
Illustration of a camera module with open case and control panel (no text or symbols)natural_image
Illustration of hands holding a camera module with no visible text or symbolsnatural_image
Illustration of hands holding a camera module with no visible text or symbolsnatural_image
Diagram of a camera module with lens and frame, shown in 3D perspective view (no text or labels)natural_image
Illustration of hands holding a camera lens with a magnified inset showing the lens detail (no text or symbols present)natural_image
Hand inserting a small component into a camera module (no text or symbols visible)natural_image
Line drawing of hands holding a curved object with circular markings (no text or symbols)natural_image
Cross-sectional diagram of a device housing with internal components and a circular annotation (no text or symbols)natural_image
Illustration of a curved, looped tool or handle with a central knob (no text or symbols)Dragonne WP-AN1

natural_image
Simple gray oval shape with no text or symbols(6, 9, 11)
Loquet
(6, 9, 11)

Fixation de la dragonne
natural_image
Diagram of a car's cable being inserted into a plug, showing mechanical components and motion direction (no text or symbols)
natural_image
Close-up of a car's seatbelt mechanism with arrows indicating clockwise motion (no text or symbols)

natural_image
Diagram of a mechanical component with directional arrows indicating movement or force (no text or symbols)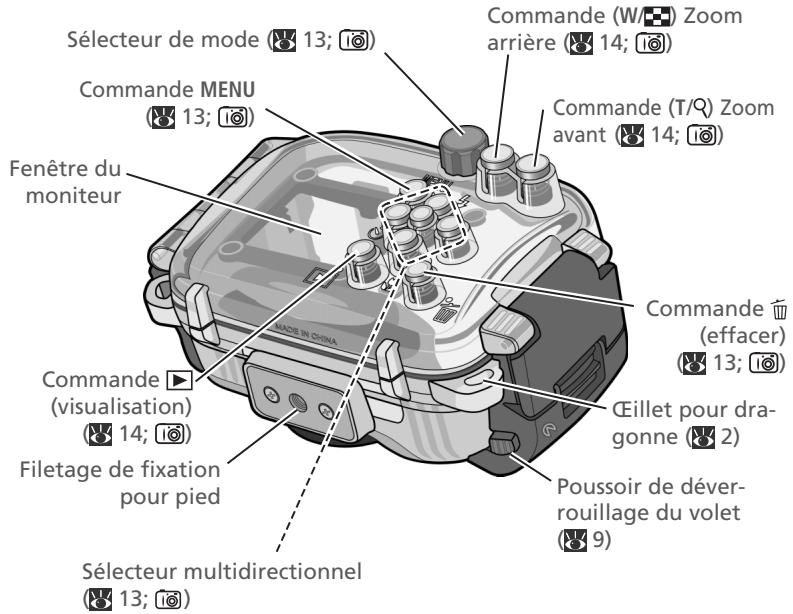
natural_image
Illustration of hands holding a handheld electronic device (no text or symbols visible)
Important!
natural_image
Exploded view of a device showing internal components and control panel (no text or symbols visible)natural_image
Interior view of a portable electronic device with open casing and control panel (no visible text or symbols)
natural_image
Illustration of a portable camera module with open case and control panel (no text or symbols)natural_image
Illustration of a device with labeled components and an arrow indicating direction (no text or symbols present)- Fermer le caisson
natural_image
Illustration of hands holding a camera module with control panel and display (no text or symbols visible)natural_image
Illustration of hands holding a camera module with a small screen and buttons (no text or symbols visible)natural_image
Illustration of hands holding a camera module with no visible text or symbolsnatural_image
Line drawing of two hands holding a circular object, no text or symbols presentnatural_image
Exploded view diagram of a mechanical device showing internal components (no text or symbols)Fermer le caisson
Verrouiller le caisson
natural_image
Illustration of hands holding a device with buttons and ports (no text or symbols visible)Immerger le caisson
natural_image
Illustration of hands holding a game controller with a small screen (no text or symbols visible)natural_image
Illustration of hands operating a camera module with buttons and dials (no text or symbols visible)natural_image
Illustration of hands holding a game controller with a small display (no text or symbols visible)natural_image
Illustration of a digital camera with a cable and pointer, no text or symbols presentSoulever le volet
natural_image
Mechanical assembly diagram showing hands operating a valve or actuator (no text or symbols visible)3
natural_image
Cross-sectional diagram of a device housing with internal components and an arrow indicating a component (no text or symbols present)Ouvrir le caisson

4
natural_image
Exploded view of a mechanical device showing internal components and control panel (no text or symbols visible)natural_image
Diagram showing a device open with a camera module, before and after assembly (no text or symbols present)natural_image
Illustration of a camera module with an open panel and cable, no visible text or symbolsFermer le caisson
Verrouiller le caisson
natural_image
Diagram of a mechanical device with arrows indicating motion or force direction (no text or symbols present)natural_image
Illustration of hands holding an open electronic device casing (no text or symbols visible)natural_image
Close-up of a mechanical component with a downward arrow and labeled parts (W, T), no readable text or symbols beyond basic markings.![5M AUTO [ 97 ]](/content/2024/12/115894/images/e5c6e23fc25dc447e33ea12e50f39ceec6f604df2f34269d011f9507a3bad119.jpg)
3. Photographier
natural_image
Illustration of hands holding a camera module with control panel and display (no text or symbols)natural_image
Illustration of hands holding a camera module with buttons and display (no text or symbols visible)natural_image
Close-up of a camera module with a small screen and control knobs, held by hands (no visible text or symbols)natural_image
Illustration of a camera module with open case and control panel (no text or symbols)natural_image
Illustration of hands holding a device casing with buttons and components (no text or symbols visible)natural_image
Illustration of hands holding a camera module with no visible text or symbolsnatural_image
Diagram of a camera module with lens and frame, shown in 3D perspective view (no text or labels)natural_image
Illustration of hands assembling a mechanical component with a magnified inset showing internal components (no text or symbols)Retirer le joint torique
Inspector le joint torique
natural_image
Hand inserting a small object into a device casing (no text or symbols visible)natural_image
Line drawing of hands holding a curved object, no text or symbols presentnatural_image
Exploded view of a mechanical device showing internal components and housing (no text or symbols visible)No reproduction in any form of this manual, in whole or in part (except for brief quotation in critical articles or reviews), may be made without written authorization from NIKON CORPORATION.
- WATERPROOF CASE
- WP-CP3
- For Your Safety
- WARNINGS
- Turn camera off immediately in the event of malfunction
- Do not use in the presence of flammable gas
- Observe caution when using the strap
- Keep out of reach of children
- Do not disassemble
- Observe proper precautions when handling camera batteries
- Do not swallow silica gel or O-ring grease
- Keep out of direct sunlight
- Do not dive while holding
- Do not use below 40m
- Keep the case watertight
- Do not exposure to high temperatures
- Observe caution when operating the flash
- Preventing Leakage
- Shock and Vibration
- Maximum Depth
- Temperature
- Chemicals
- Travelling by Air
- High Altitudes
- Table of Contents
- Introduction 1
- Step 1 Check for Leaks 6
- Step 2 Insert the Camera 8
- Step 3 Check for Leaks Again 12
- Step 4 Take Pictures 13
- Step 5 Clean the Case 15
- Maintenance 17
- Technical Notes 19
- Notices
- √ Important: Use Only with Compatible Cameras
- √ Important: Before Using This Product
- √ Important: Use Only Nikon Brand Electronic Accessories
- Life-Long Learning
- Introduction
- Package Contents
- Parts of the WP-CP3
- Using the WP-CP3
- √ Important!
- Step 3 Check for Leaks Again
- Step 4 Take Pictures
- Step 5 Clean the Case
- Maintenance
- 1
- Close the case
- 2
- Latch the case
- 3
- Immerse the case
- Check for leaks
- Test the shooting controls
- Check for water inside the case
- Ready the Camera
- Batteries
- Select 🍻 (Underwater) mode
- Remove the camera strap
- Insert the Camera
- Turn the camera off
- Release the buckle
- Open the case
- Opening the Case
- 4
- Insert the camera
- Insert Desiccant
- Replacing the Desiccant
- Perform a Final Check
- Close the Case
- Important!
- Turn the Camera On
- Adjust Settings
- Take Pictures
- Ready the camera
- Don't Block the Shot
- Frame the picture
- Use the Monitor
- Focus and shoot
- Underwater Photography
- Reactivating the Monitor
- Wash the case in fresh water
- Wipe dry
- Drying the Case
- Remove the camera
- Removing the Camera
- Soak the case in fresh water
- Let the case dry in the shade
- Cleaning the Interior of the Case
- Caring for the O-ring
- Remove the O-ring
- Do Not Use Force or Sharp Objects
- Inspect the O-ring
- Inspect the O-ring guide
- Replacing the O-ring
- Grease the O-ring
- Replace the O-ring
- Check the seal
- Cleaning
- Storage
- Technical Notes
- Servicing
- UNTERWASSERGEHÄUSE
- Sicherheitshinweise
- Wichtig
- Fotografieren
- Fermer le caisson
- Verrouiller le caisson
- Immerger le caisson
- Soulever le volet
- Ouvrir le caisson
- Photographier
- Retirer le joint torique
- Inspector le joint torique
Brand : NIKON
Model : CAISSON ETANCHE WP-CP3-JUSQU-A 40 M DE PROFONDEUR
Category : Waterproof camera case