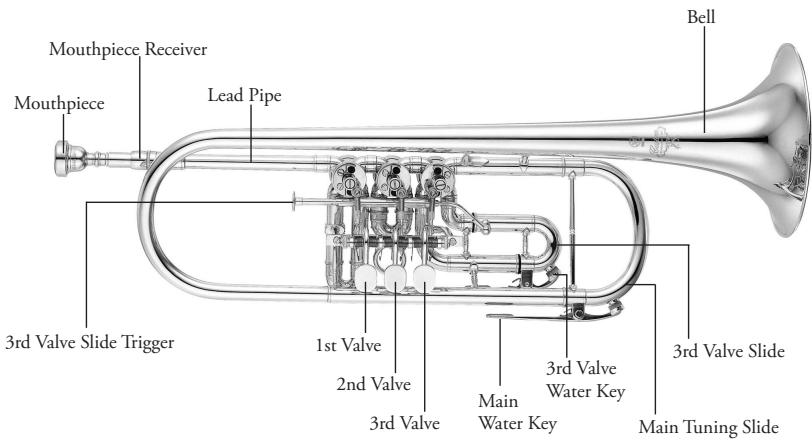
TRUMPETS - Musical instrument YAMAHA - Free user manual and instructions
Find the device manual for free TRUMPETS YAMAHA in PDF.

User questions about TRUMPETS YAMAHA
0 question about this device. Answer the ones you know or ask your own.
Ask a new question about this device
Download the instructions for your Musical instrument in PDF format for free! Find your manual TRUMPETS - YAMAHA and take your electronic device back in hand. On this page are published all the documents necessary for the use of your device. TRUMPETS by YAMAHA.
USER MANUAL TRUMPETS YAMAHA
Trumpet/Cornet/Flugelhorn/ Rotary Trumpet
Owner's Manual
You are now the owner of a high quality musical instrument. Thank you for choosing Yamaha. For instructions on the proper assembly of the instrument, and how to keep the instrument in optimum condition for as long as possible, we urge you to read this Owner's Manual thoroughly.
P.15
Trumpet/Cornet/ Fluegelhorn/Rotary Trumpet Owner's Manual
Precautions Please read before using
The precautions given below concern the proper and safe use of the instrument, and are to protect you and others from any damage or injuries. Please follow and obey these precautions.
If children are using the instrument, a guardian should clearly explain these precautions to the child and make sure they are fully understood and obeyed. After reading this manual, please keep it in a safe place for future reference.
About the Icons

: This icon indicates points which should be paid attention to.

: This icon indicates actions that are prohibited.
Caution
Disobeying the points indicated with this mark may lead to damage or injury.

Do not throw or swing the instrument when others are close by.
The mouthpiece or other parts may fall off hitting other people. Always treat the instrument gently.

Keep the oil, polish, etc., out of children's mouths.
Keep the oil, polish, etc., out of children's reach and do maintenance when children are not present.

Be aware of climatic conditions such as temperature, humidity, etc.
Keep the instrument away from heat sources such as heaters, etc. Also, do not use or store the instrument in any extreme conditions of temperature or humidity. Doing so may result in damage to key balance, linkage, or pads, resulting in problems during performance.

Never use benzene or thinner for maintenance on instruments with a lacquer finish.
Doing so may result in damage to the finish's top coat.

Take care not to disfigure the instrument.
Placing the instrument where it is unstable may cause the instrument to fall or drop resulting in disfigurement. Take care as to where and how you place the instrument.

Do not modify the instrument.
Besides voiding the warranty, modification of the instrument may make repairs impossible.
In regards to brass instruments with a plate finish, the color of the finish may change over time however, it should be of no concern in regards to the instrument's performance. Discoloration in its early stage can easily be removed with maintenance. (As discoloration progresses, it may be difficult to remove.)
- Please use the accessories that are specified for use with the particular type of finish found on the instrument. Also, metal polishes remove a thin layer of the finish's top coat which will make the finish thinner. Please be aware of this before using polish.
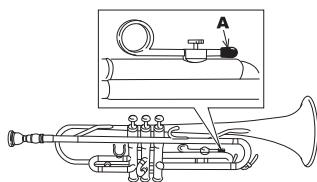
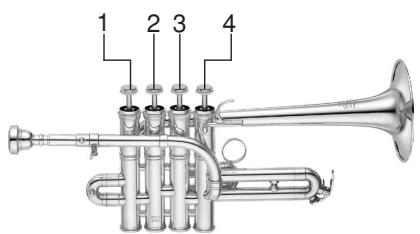
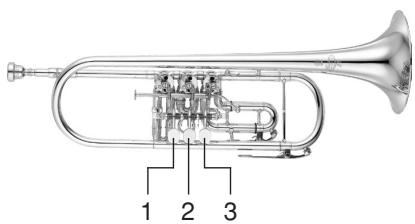
Some instruments are shipped with a black cap attached to the end of the 3rd valve slide ring (A in the diagram) to prevent the ring from being lost during shipping.
The cap can be removed before you start playing, but leaving it in place will not affect the operation of the instrument.
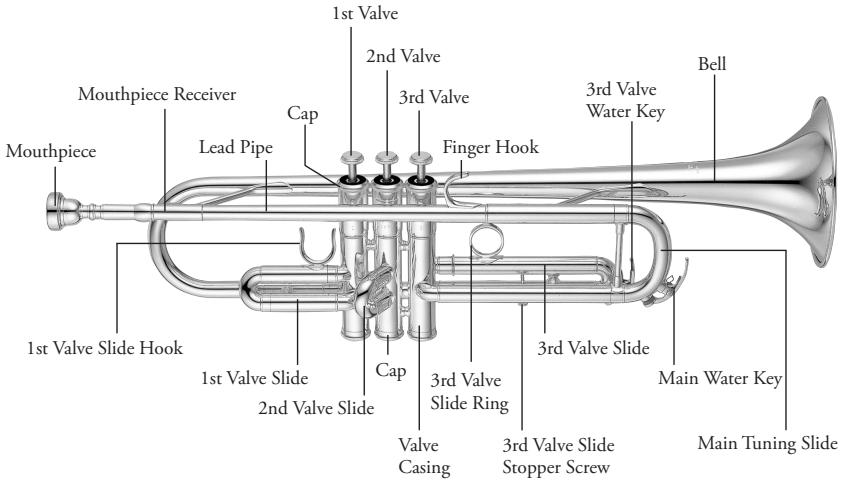
■ Trumpet
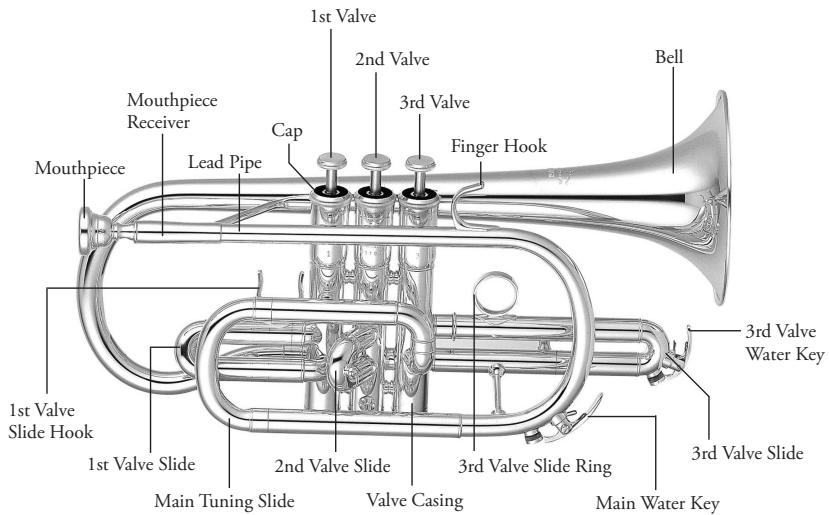
Cornet
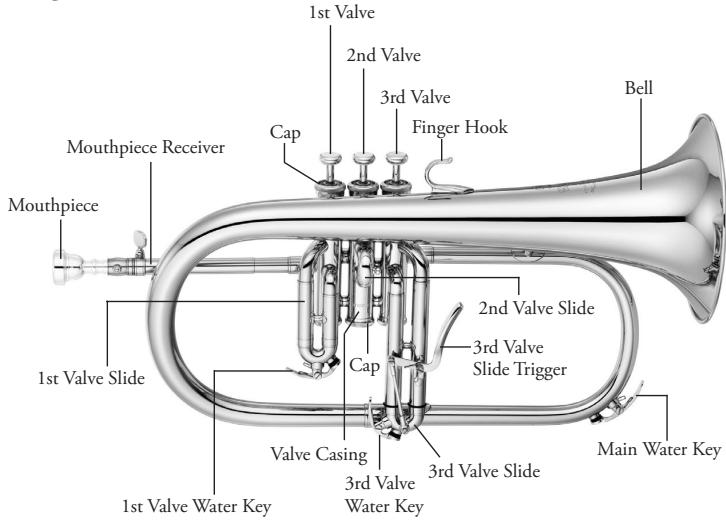
Flugelhorn
Rotary Trumpet
* Specifications and/or design may change for reasons of improvement without notice.
Handling the Instrument
As the trumpet is made of thin metal, handle the instrument carefully. Do not apply any excessive force, or bump the instrument so as to dent or damage it.
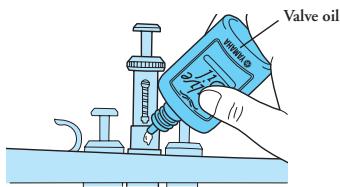
Applying Oil
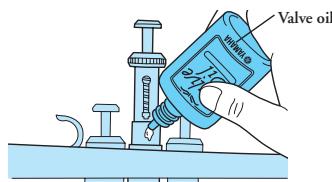
Apply oil to the pistons
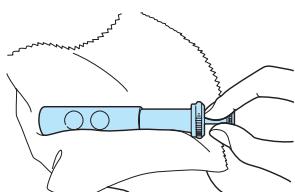
- Unscrew the valve cap and pull the piston straight out of the valve casing until about half of the valve piston is exposed.
- Apply a few drops of valve oil on the piston.
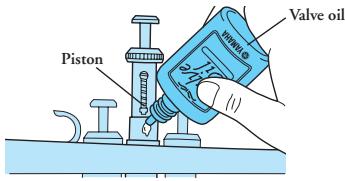
* Do not apply too much oil.
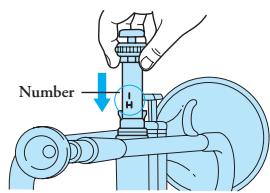
- Slowly, return the piston into the valve casing. At this time, make sure the number stamped on the piston is facing the mouthpiece. After the valve cap is tightened firmly, move the piston up and down a few times to distribute the oil over the piston evenly.
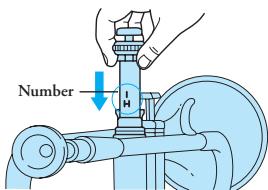
- If all pistons have been removed from the valve casings, make sure the number stamped on the piston matches the number stamped on the casing before returning the piston into the valve casing.
- The pistons must be oiled for them to function properly and smoothly.
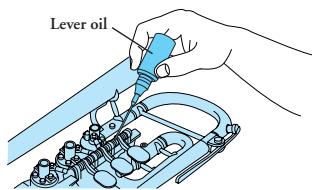
Applying Oil To The Rotors (Rotary Trumpets Only)
- Hold the lever down and remove the valve slide.
- If the valve slide is removed without holding the lever down, air pressure in the pipe drops creating a suction that can cause poor rotor function or damage to the inside of the pipe.
- Apply some rotor oil to the rotor and then move the lever a few times to distribute the oil evenly.
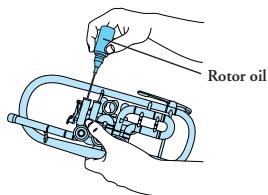
- To keep oil from mixing with the slide grease or dirt inside of the pipe, hold the oil container's spout so that is does not come into contact with the inner walls of the pipe.
-
Since the oil container's spout is metallic, be careful not to let the spout come into direct contact with the rotor.
-
Hold the lever down and replace the valve slide.
-
If you replace the valve slide without holding the lever down, pressure built up inside the pipe can cause poor rotor function or damage to the inside of the pipe.
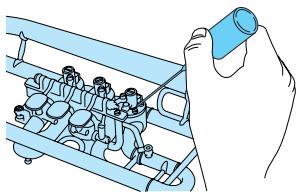
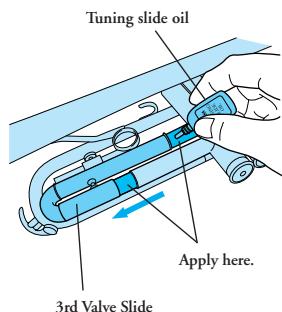
Applying Oil To The Valve Slides
- Depress the piston that corresponds to the slide that you want to apply oil and partially remove the slide. Apply a few drops of tuning slide oil.
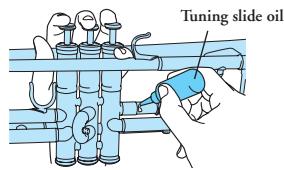
* Do not apply too much oil.
- Hold the piston down and move the slide in and out a few times.
- If you remove or replace the valve slide without holding the piston down, the drop or buildup of air pressure in the pipe can cause poor piston function or damage to the inside of the pipe.
- The pistons must be oiled for them to function properly and smoothly.
After applying slide oil to valve slides equipped with a spring type slide trigger, hold the piston down and move the slide in and out a few times as you did before to distribute the oil evenly.
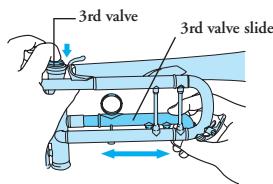
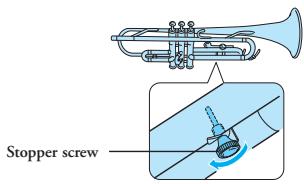
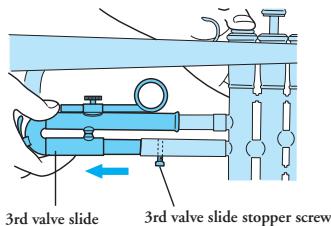
CAUTION—Preventing The 3rd Valve Slide From Falling Off.
On instruments fitted with a stopper screw, make sure the screw is tight.
Setting The Mouthpiece
Insert the mouthpiece into the mouthpiece receiver so that the mouthpiece is not loose in the receiver.
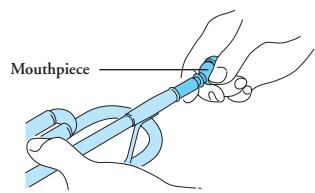
- Never force the mouthpiece into the mouthpiece receiver. The mouthpiece may become jammed making removal difficult.
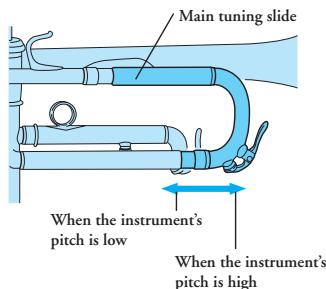
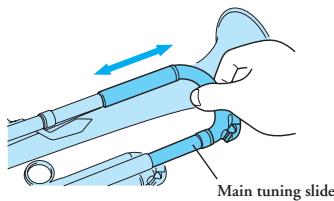
Tuning
Slide the main tuning slide in or out to tune the instrument. Since changes in temperature can have an effect on the pitch, blow some warm air into the instrument to warm it up before tuning.
Trumpet/Rotary Trumpet
Slide the main tuning slide in or out to tune the instrument.
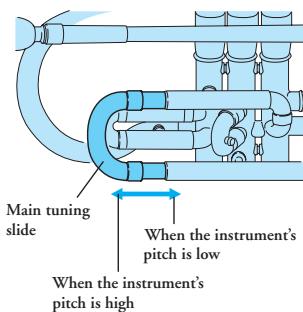
Cornet
Slide the main tuning slide in or out to tune the instrument.
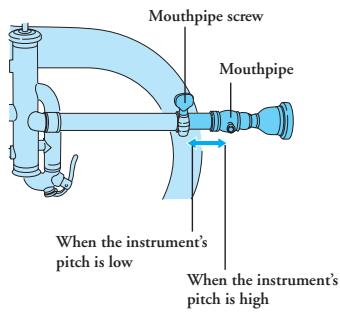
Flugelhorn/Piccolo Trumpet/
Eb Cornet
Loosen the mouthpipe screw and slide the mouthpipe in or out to tune the instrument.
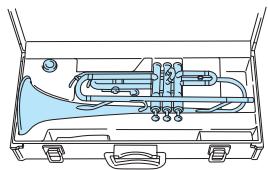
Always store the instrument in its case when taking a break, during transport, and after playing.
About the mouthpiece
The mouthpiece that is supplied with your instrument is a standard mouthpiece for the instrument. The mouthpiece is designed to fit into the mouthpiece receiver without being loose. Do not treat the mouthpiece roughly, drop, or damage it.
■ After playing
After playing, make sure that moisture or dirt is removed from the instrument using the method described below.
Please consult with a wind instrument technician in regard to disassembling and maintenance the spring trigger.
- Valve slide maintenance
- Depress the piston that corresponds to the valve slide you want to clean, and remove the slide.
- If you remove the valve slide without holding the piston down, air pressure in the pipe drops creating a suction that can cause poor piston function or damage to the inside of the pipe.
-
If the instrument is equipped with a slide stopper screw, loosen the screw before removing the slide.
-
Remove moisture from the slide. Also, remove moisture from the water key.
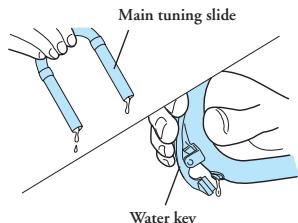
- Valve slides are made of brass or nickel silver that is excellent at resisting corrosion however, corrosion may appear if moisture is left in the instrument for an extended period of time. Please use caution.
Other maintenance
Apply some valve oil to the pistons and move the piston up and down a few times, the same as you do before playing the instrument.
Likewise, apply some rotor oil to the rotors on rotary trumpets and move the levers a few times.
- Do not apply too much oil.
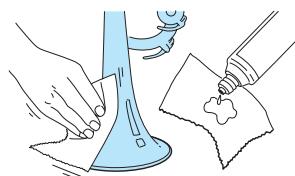
Body maintenance
Gently wipe the surface of the instrument with a polishing cloth. If dirt or tarnish is obvious, the following products can be used.
For lacquer finishes
Polishing cloth + lacquer polish
For silver plate
Silver cloth + silver polish
For a beautiful shine, polish the instrument with a silicone cloth.
Once a week maintenance
- Piston and valve casing maintenance
The trumpet's valves are designed with very little clearance between the piston and the casing therefore, it is very important that these precision parts be handled with care.
- Wrap the cleaning rod with gauze leaving no bare metal exposed.
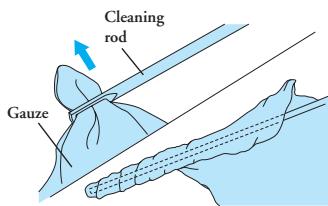
* Exposed metal can result in damaged valve casings or pistons.
- Remove dirt from the inside of the valve casings.
- Remove dirt from the pistons.
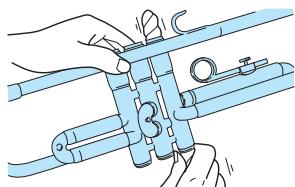
- Return the piston to its corresponding valve casing.
After confirming that the number stamped on the piston matches the number stamped on the valve casing, carefully insert the piston straight into the valve casing with the number stamped on the piston facing the mouthpiece. Do not rotate the piston in the valve casing.
- Apply valve oil to the piston.
- Do not apply too much oil.
- If air does not pass through the instrument when the piston is fully depressed, the piston may be placed in the wrong valve casing. Make sure that the numbers stamped on the piston and valve casing match.
The piston is the most important part of the trumpet.
Never treat the pistons roughly, drop the piston, or let the piston fall, etc. If the piston becomes damaged or dented, never return it to the valve casing. Contact the dealer from whom you purchased the instrument.
- Rotor maintenance (Rotary trumpets only)
- Remove the rotary valve cap and apply some rotor spindle oil to the place to the spindle in the center of the rotor.

- Apply some rotor spindle oil to point where the rotor rotates. Replace the rotary valve cap and move the lever a few times to distribute the oil evenly.
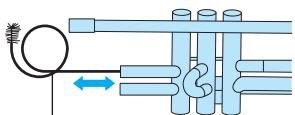
- Valve slide maintenance
- Apply a thin coating of slide grease to the main tuning slide, 2nd valve slide, and valve slides that are not equipped with a slide trigger.
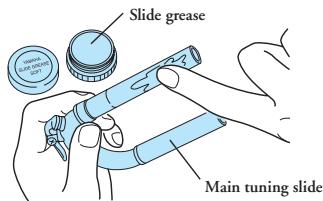
- Slide the main tuning slide back and forth a few times to distribute the grease evenly.
- On the 1st and 3rd valves, which are equipped with slide triggers, apply a small amount of tuning slide oil to the tuning slides.
Twice Yearly Maintenance
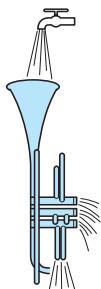
Cleaning the instrument
- Make a brass soap water solution. Prepare a brass soap water solution using between 10 to 15 parts warm water (30^ to 40^) and 1 part brass soap. Before putting the instrument into the soap water solution, remove the pistons, valve casing covers, slide valves.
- With the instrument removed from the water, apply some soap water solution to a flexible cleaner and use the cleaner to clean the inside of the instrument's pipes.
Flexible cleaner
- After cleaning the instrument, use clean water and thoroughly rinse out the brass soap water solution. After that, apply valve oil and slide grease and reassemble the instrument.
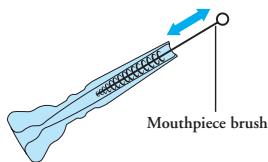
- Cleaning the mouthpiece
- Dip the mouthpiece brush in the brass soap water solution and clean the mouthpiece throat with the brush. Rinse the mouthpiece out with clean water.
- Rotor maintenance (Rotary trumpets only)
- Apply some lever oil to the lever shaft.
Tone is not clear and pitch is poor.
The valves are dirty.
Clean the valves.
- There is a large dent or air is leaking from the trumpet.
- The mouthpiece doesn't fit the mouthpiece receiver and air is leaking.
Contact the dealer from whom you purchased the instrument.
The felt or cork is damaged.
Contact the dealer from whom you purchased the instrument.
No sound.
- The holes in the piston are not aligned with the holes in the valve casing.
Make sure the number stamped on the piston matches the number stamped on the valve casing.
The pistons are sluggish.
- Dirt has accumulated between the pistons and valve casings.
Clean the inside of the valve casing. - Dropping or hitting the piston has damaged it.
Do not use the instrument with a damaged piston.
Contact the dealer from whom you purchased the instrument.
- The piston or valve casing is corroded.
Contact the dealer from whom you purchased the instrument.
The valve slide is stuck and cannot be removed. The slide is sluggish.
- Dirt has accumulated between the valve slide and inner tube.
Thoroughly remove dirt and apply some slide grease that matches the type of slide, or apply some tuning slide oil. - Dropping or hitting the slide has caused a dent, or the slide was bent while cleaning.
Contact the dealer from whom you purchased the instrument.
The screw is too tight and cannot be removed.
The screw is corroded.
- Dropping or hitting the instrument has damaged the screw.
Contact the dealer from whom you purchased the instrument.
Air does not pass thorough the instrument.
- The piston is in the wrong valve casing.
Set the piston into the proper valve casing.
The mouthpiece cannot be removed.
- The instrument was dropped or hit with the mouthpiece attached. Or, the mouthpiece was inserted with force.
- The instrument has been left for a long period of time with the mouthpiece inserted in the instrument.
Contact the dealer from whom you purchased the instrument.
The instrument makes a strange sound when played.
- Solder on the instrument has come loose, or a foreign object is inside it.
Contact the dealer from whom you purchased the instrument.
The piston makes a metallic noise when pressed.
The felt is torn or lost.
Please contact the dealer from whom you purchased the instrument.
- The cover on the piston valve or valve casing is loose.
Firmly tighten the covers.
The piston's shaft is bent.
Please contact the dealer from whom you purchased the instrument.
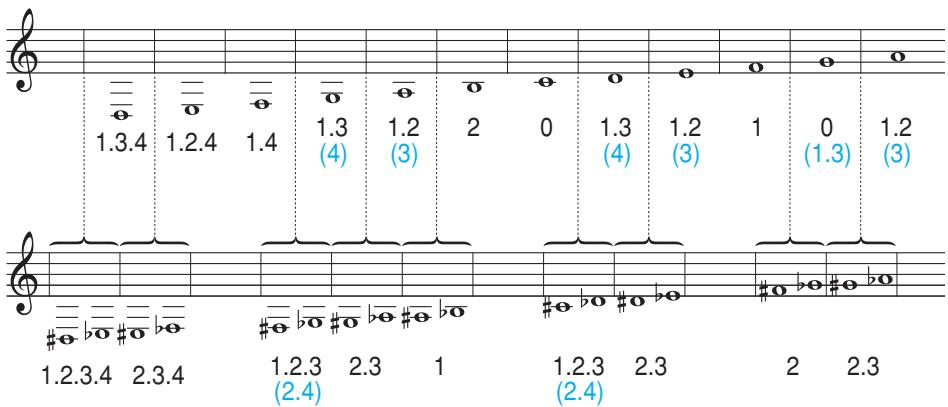
★()は加元指円寸。
Alternate fingerings are given in parenthesis ( ).
Alternative Griffe stehen in Klammern ( ).
Les autres doigts de remplacement sont indiqués entre parenthèse ( ).
Se muestran digitaciones alternativas entre parentesis ( ).
圆括号中的指法也可采用。
Донолнпельнааannnka typayka3aHa B Kpyrnbix ck06kax().
★ 樱図()安は扇記則は既の対応を認言。」
卜兰蒙特/Trumpet/Trompete/Trompette/Trompeta/小号/Tpy6a/三联英
□ルnell/ Cornet/Kornett/Cornet/ Corneta/ 短号/KopHeT/ 元贝
■ フリューダルルルル/ Flugelhorn/ Fligelhorn/Bugle/Fliscorno/ 富魯格号/Флговьгор/부류목원

■ ピッチロトーナル /Piccolo Trumpet/Piccolotrompete/Trompette Piccolo/Trompeta piccolo/高音小号 / Tpy6aПИKKOЛО/舌锵戟式彎贝
□一夕拉卜兰本口/
Rotary Trumpet/
Drehventiltrompete/
Trompette à palettes/
Trompeta de cilindros/
转阀式小号/
BeNTiMbHaT py6a/
LorTlRi TcIgO


YAMAHA
This document is printed on chlorine free (ECF) paper with soy ink.
This is a great idea.

XXXXXXX
2429030
1109PONK-B0