
CP-X2511NEF - Projector HITACHI - Free user manual and instructions
Find the device manual for free CP-X2511NEF HITACHI in PDF.


| Product Type | LCD Video Projector |
| Model | CP-X2511NEF |
| Brand | Hitachi |
| Projection Technology | 3LCD |
| Brightness | 2500 ANSI Lumens |
| Native Resolution | XGA (1024 x 768) |
| Contrast Ratio | 600:1 |
| Lamp Type | UHP 200W |
| Lamp Life (Normal/ECO) | 2000 / 3000 hours |
| Keystone Correction | Vertical +/-30° |
| Input Connectors | VGA, S-Video, Composite, Audio, USB |
| Dimensions (W x D x H) | 306 x 249 x 86 mm |
| Weight | 2.9 kg |
| Power Consumption (Normal/Standby) | 290W / <1W |
| Power Supply | AC 100-240V, 50/60Hz |
| Noise Level (Normal/ECO) | 34 / 30 dB |
| Projection Distance | 1.4 – 12.1 m |
| Screen Size | 40 – 300 inches |
| Main Functions | Presentation, Video playback, PC input, USB viewer |
| Maintenance Required | Filter cleaning, lamp replacement |
| Safety Features | Auto power off, key lock, overheating protection |
| Spare Parts Available | Lamp, filter, remote control |
| Repairability Index | 6.5/10 (estimated) |
Frequently Asked Questions - CP-X2511NEF HITACHI
User questions about CP-X2511NEF HITACHI
0 question about this device. Answer the ones you know or ask your own.
Ask a new question about this device
Download the instructions for your Projector in PDF format for free! Find your manual CP-X2511NEF - HITACHI and take your electronic device back in hand. On this page are published all the documents necessary for the use of your device. CP-X2511NEF by HITACHI.
USER MANUAL CP-X2511NEF HITACHI
/CP-X3011N/CP-X4011N
natural_image
Line drawing of a projector with ventilation grilles and control panel (no text or symbols)VOLUME, LUIDSPREKER, AUDIOBRON, HDMI AUDIO, MIC NIVEAU, MIC VOLUME
SCHERM menu 44
TAAL, POSITIE MENU, BLANK, OPSTARTEN, Mijn Scherm, Mijn Sch. VAST, M ELDING, NAAM VAN BRON, PATROON, G.B.
OPTIE menu 50
AUTOM. ZOEKEN, AUTO KEYSTONE, DIRECT AAN, AUTOM. UIT, USB TYPE B, LAMPTIJD, FILTERTIJD, MIJN KNOP, SIGNAALBRON, SERVICE
NETWERK menu 60
INSTELLEN, PROJECTORNAAM, MIJN BEELD, AMX D.D., PRESENTATIE, INFORMATIE, SERVICE
VEILIGHEID menu 67
VEILIGH. PASW. VERANDEREN, Mijn Scherm PASWOORD, P IN LOCK, TRANSITIE DETECTOR, WACHTW. MIJN TEKST, MIJN TEKST WEERG., MIJN TEKST BIJW.
natural_image
Diagram of an office layout with a desk, chair, printer, and monitor (no text or symbols)natural_image
Illustration of a projector with an attached plug, showing internal components and wiring (no text or symbols)AC IN Stroomdraad
natural_image
Diagram of a rectangular device with a 14-degree angle标注 and a small attached component (no text or symbols)natural_image
Illustration of a handheld device with a magnified inset showing a tool interacting with it (no text or symbols present)

natural_image
Line drawing of a projector with control panel and ventilation slots (no text or symbols)

natural_image
Technical line drawing of a mechanical device with heat exchanger and fan (no text or symbols)CP-X2011N/CP-X2511N /CP-X3011N/CP-X4011N
natural_image
Line drawing of a projector with ventilation grilles and control panel (no text or symbols)


1.2.2 "LiveViewer" updaten
■ Are you sure that you want to turn on the network adapter? (Weet u zeker dat u de netwerkadaptor in wilt schakelen?)
Enter PassCode (Voer de Passcode in)
natural_image
Diagram showing a projector connected to a laptop and a power cord, with a lightning bolt symbol nearby (no text or labels)3) Klik op [Connect].
1.6.1 Profielverbinding
natural_image
Diagram showing a projector connected to a laptop and a power cord, with a lightning bolt symbol nearby (no text or labels)Mode (modus): INFRASTRUCTURE

2) Klik op [Next].
4) Klik op [Connect].
2) Klik op [Connect].


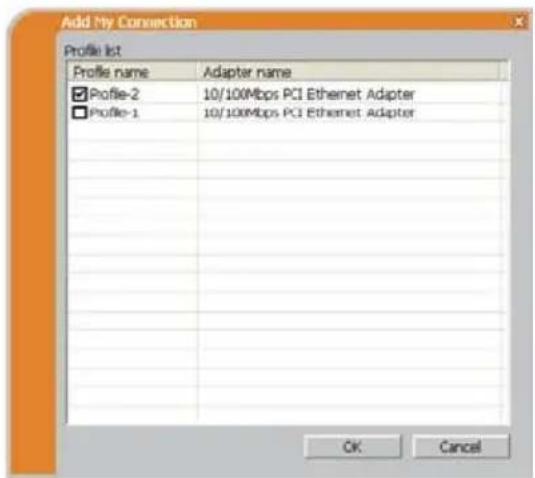
De verbinding is verbroken

Niet
aangesloten

Hold

① “Not displaying confirmation dialog for adding Network settings”
N.B. • Internet Explorer 6.0 of later is vereist.
IP Address <Projector
MAC Address <Projector
IP-adres>
MAC-ac
7.2 Projectorbeheer m.b.v. SNMP
CP-X2011N/CP-X2511N /CP-X3011N/CP-X4011N
Model nummer CP-X2011N, CP-X2511N, CP-X3011N, CP-X4011N
natural_image
Diagram of a room layout with a monitor, chair, and desk (no text or symbols)natural_image
Diagram of a rectangular device with a 14° angle indicator and a grid-patterned panel on top (no text or symbols)natural_image
Line drawing of a mechanical device with a fan and ventilation grille (no text or symbols)CP-X2011N/CP-X2511N /CP-X3011N/CP-X4011N
User's Manual (detailed) Operating Guide – Technical
Example of computer signal
| Resolution (H x V) | H. frequency (kHz) | V. frequency (Hz) | Rating Signal mode |
| 720 x 400 | 37.9 85.0 VESA TEXT | ||
| 640 x 480 31.5 | 59.9 VESA VGA (60Hz) | ||
| 640 x 480 37.9 | 72.8 VESA VGA (72Hz) | ||
| 640 x 480 37.5 | 75.0 VESA VGA (75Hz) | ||
| 640 x 480 43.3 | 85.0 VESA VGA (85Hz) | ||
| 800 x 600 35.2 | 56.3 VESA SVGA (56Hz) | ||
| 800 x 600 37.9 | 60.3 VESA SVGA (60Hz) | ||
| 800 x 600 48.1 | 72.2 VESA SVGA (72Hz) | ||
| 800 x 600 46.9 | 75.0 VESA SVGA (75Hz) | ||
| 800 x 600 53.7 | 85.1 VESA SVGA (85Hz) | ||
| 832 x 624 49.7 | 74.5 Mac 16" mode | ||
| 1024 x 768 48.4 | 60.0 VESA XGA (60Hz) | ||
| 1024 x 768 56.5 | 70.1 VESA XGA (70Hz) | ||
| 1024 x 768 60.0 | 75.0 VESA XGA (75Hz) | ||
| 1024 x 768 68.7 | 85.0 VESA XGA (85Hz) | ||
| 1152 x 864 67.5 | 75.0 VESA | 1152 x 864 (75Hz) | |
| 1280 x 768 47.7 | 60.0 VESA W-XGA (60Hz) | ||
| 1280 x 800 49.7 | 60.0 VESA | 1280 x 800 (60Hz) | |
| 1280 x 960 60.0 | 60.0 VESA | 1280 x 960 (60Hz) | |
| 1280 x 1024 | 64.0 60.0 VESA SXGA (60Hz) | ||
| 1280 x 1024 | 80.0 75.0 VESA SXGA (75Hz) | ||
| 1280 x 1024 | 91.1 85.0 VESA SXGA (85Hz) | ||
| 1400 x 1050 | 65.2 60.0 VESA SXGA+ (60Hz) | ||
| 1600 x 1200 | 75.0 60.0 VESA UXGA (60Hz) | ||
NOTE • Be sure to check jack type, signal level, timing and resolution before connecting this projector to a PC.
- Some PCs may have multiple display screen modes. Use of some of these modes will not be possible with this projector.
- Depending on the input signal, full-size display may not be possible in some cases. Refer to the number of display pixels above.
- Although the projector can display signals with resolution up to UXGA (1600x1200), the signal will be converted to the projector's panel resolution before being displayed. The best display performance will be achieved if the resolutions of the input signal and projector panel are identical.
- Automatic adjustment may not function correctly with some input signals.
- The image may not be displayed correctly when the input sync signal is a composite sync or a sync on G.
Initial set signals
The following signals are used for the initial settings. The signal timing of some computer models may be different. In such case, adjust the items V POSITION and H POSITION in the IMAGE menu.
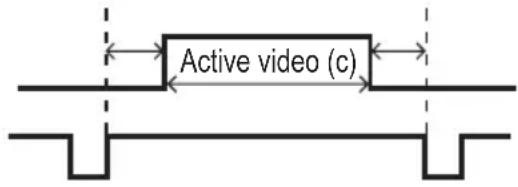
| Resolution (H x V) | Horizontal signal timing (μs) | Vertical signal timing (lines) | Signal mode | ||||||
| (A) (B) | (C) (D) | (a) (b) | (c) (d) | ||||||
| 720 x 400 | 2.0 | 3.0 | 20.3 | 1.0 | 3 | 42 | 400 | 1 | TEXT |
| 640 x 480 | 3.8 | 1.9 | 25.4 | 0.6 | 2 | 33 | 480 | 10 | VGA (60Hz) |
| 640 x 480 | 1.3 | 4.1 | 20.3 | 0.8 | 3 | 28 | 480 | 9 | VGA (72Hz) |
| 640 x 480 | 2.0 | 3.8 | 20.3 | 0.5 | 3 | 16 | 480 | 1 | VGA (75Hz) |
| 640 x 480 | 1.6 | 2.2 | 17.8 | 1.6 | 3 | 25 | 480 | 1 | VGA (85Hz) |
| 800 x 600 | 2.0 | 3.6 | 22.2 | 0.7 | 2 | 22 | 600 | 1 | SVGA (56Hz) |
| 800 x 600 | 3.2 | 2.2 | 20.0 | 1.0 | 4 | 23 | 600 | 1 | SVGA (60Hz) |
| 800 x 600 | 2.4 | 1.3 | 16.0 | 1.1 | 6 | 23 | 600 | 37 | SVGA (72Hz) |
| 800 x 600 | 1.6 | 3.2 | 16.2 | 0.3 | 3 | 21 | 600 | 1 | SVGA (75Hz) |
| 800 x 600 | 1.1 | 2.7 | 14.2 | 0.6 | 3 | 27 | 600 | 1 | SVGA (85Hz) |
| 832 x 624 | 1.1 | 3.9 | 14.5 | 0.6 | 3 | 39 | 624 | 1 | Mac 16" mode |
| 1024 x 768 | 2.1 | 2.5 | 15.8 | 0.4 | 6 | 29 | 768 | 3 | XGA (60Hz) |
| 1024 x 768 | 1.8 | 1.9 | 13.7 | 0.3 | 6 | 29 | 768 | 3 | XGA (70Hz) |
| 1024 x 768 | 1.2 | 2.2 | 13.0 | 0.2 | 3 | 28 | 768 | 1 | XGA (75Hz) |
| 1024 x 768 | 1.0 | 2.2 | 10.8 | 0.5 | 3 | 36 | 768 | 1 | XGA (85Hz) |
| 1152 x 864 | 1.2 | 2.4 | 10.7 | 0.6 | 3 | 32 | 864 | 1 | 1152 x 864 (75Hz) |
| 1280 x 768 | 1.7 | 2.5 | 16.0 | 0.8 | 3 | 23 | 768 | 1 | W-XGA (60Hz) |
| 1280 x 800 | 1.6 | 2.4 | 15.3 | 0.8 | 3 | 24 | 800 | 1 | 1280 x 800 (60Hz) |
| 1280 x 960 | 1.0 | 2.9 | 11.9 | 0.9 | 3 | 36 | 960 | 1 | 1280 x 960 (60Hz) |
| 1280 x 1024 | 1.0 | 2.3 | 11.9 | 0.4 | 3 | 38 | 1024 | 1 | SXGA (60Hz) |
| 1280 x 1024 | 1.1 | 1.8 | 9.5 | 0.1 | 3 | 38 | 1024 | 1 | SXGA (75Hz) |
| 1280 x 1024 | 1.0 | 1.4 | 8.1 | 0.4 | 3 | 44 | 1024 | 1 | SXGA (85Hz) |
| 1400 x 1050 | 1.2 | 2.0 | 11.4 | 0.7 | 3 | 33 | 1050 | 1 | SXGA+ (60Hz) |
| 1600 x 1200 | 1.2 | 1.9 | 9.9 | 0.4 | 3 | 46 | 1200 | 1 | UXGA (60Hz) |
Connection to the ports
NOTICE ▶ Use the cables with straight plugs, not L-shaped ones, as the input ports of the projector are recessed.

ⒶCOMPUTER IN1, ⒷCOMPUTER IN2, ⒸMONITOR OUT
• Video signal: RGB separate, Analog, 0.7Vp-p, 75Ω terminated (positive)
• H/V. sync. signal: TTL level (positive/negative)
- Composite sync. signal: TTL level
- Video signal:

-Y, Analog, 1.0±0.1Vp-p with composite sync, 75Ω terminated
-Cb/Pb, Analog, 0.7±0.1Vp-p, 75Ω terminated
-Cr/Pr, Analog, 0.7±0.1Vp-p 75Ω terminated
System: 480i@60, 480p@60, 576i@50, 720p@50/60, 1080i@50/60
| Pin | Signal Pin Signal | ||
| 1 | Video Red, Cr/Pr | 9 | (No connection) |
| 2 | Video Green, Y 10 Ground | ||
| 3 | Video Blue, Cb/Pb | 11 | (No connection) |
| 4 | (No connection) | 12 | A: SDA (DDC data), (No connection)B, C: (No connection) |
| 5 | Ground | ||
| 6 | Ground Red, Ground Cr/Pr | 13 | H. sync / Composite sync., (No connection) |
| 7 | Ground Green, Ground Y 14 V. sync., (No connection) | ||
| 8 | Ground Blue, Ground Cb/Pb | 15 | A: SCL (DDC clock), (No connection)B, C: (No connection) |
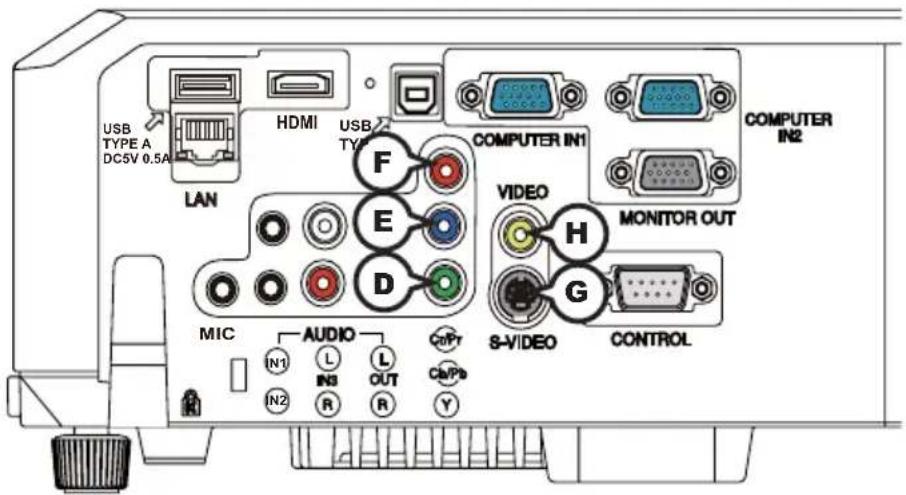
COMPONENT DY, E Cb/Pb F Cr/Pr
RCA jack x3
- System: 480i@60, 480p@60, 576i@50, 720p@50/60, 1080i@50/60, 1080p@50/60
| Port Signal | |
| Y | Component video Y, 1.0±0.1Vp-p with composite sync, 75Ω terminator |
| Cb/Pb | Component video Cb/Pb, 0.7±0.1Vp-p, 75Ω terminator |
| Cr/Pr | Component video Cr/Pr, 0.7±0.1Vp-p, 75Ω terminator |
GS-VIDEO
Mini DIN 4pin jack

• System: NTSC, PAL, SECAM, PAL-M, PAL-N, NTSC4.43, PAL(60Hz)
| Pin Signal | |
| 1 | Color signal 0.286Vp-p (NTSC, burst), 75Ω terminatorColor signal 0.300Vp-p (PAL/SECAM, burst) 75Ω terminator |
| 2 Brightness signal, 1.0Vp-p, 75Ω terminator | |
| 3 Ground | |
| 4 Ground | |
HVIDEO
RCA jack
• System: NTSC, PAL, SECAM, PAL-M, PAL-N, NTSC4.43, PAL(60Hz)
• 1.0±0.1Vp-p, 75Ω terminator
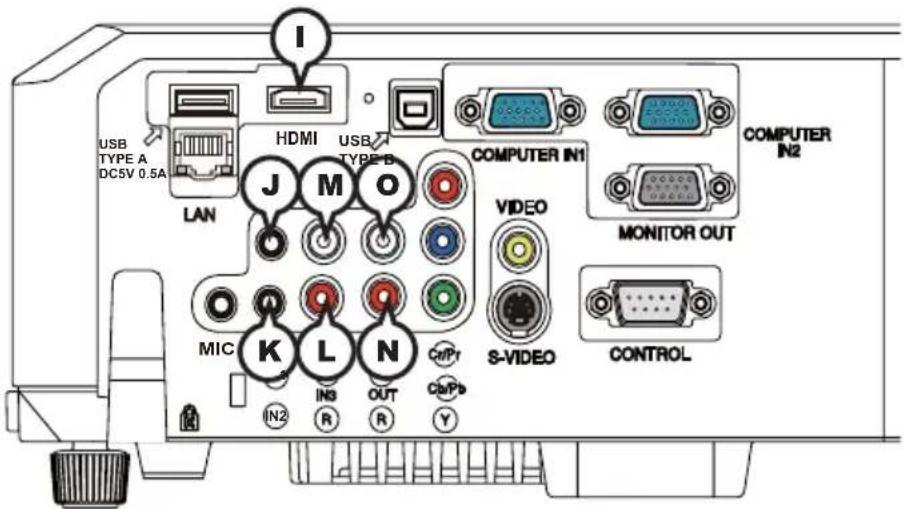
①HDMI
- Type :Digital audio/video connector
• Audio signal : Linear PCM (Sampling rate; 32/44.1/48 kHz)
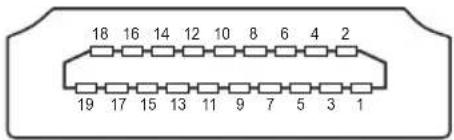
| Pin Signal Pin Signal Pin Signal | |||||
| 1 | T.M.D.S. Data2 + | 8 | T.M.D.S. Data0 Shield | 15 | SCL |
| 2 T. | M.D.S. Data2 Shield 9 T.M.D.S. Data0 - 16 SDA | ||||
| 3 | T.M.D.S. Data2 - | 10 | T.M.D.S. Clock + | 17 | DDC/CEC Ground |
| 4 | T.M.D.S. Data1 + | 11 | T.M.D.S. Clock Shield | 18 | +5V Power |
| 5 | T.M.D.S. Data1 Shield | 12 | T.M.D.S. Clock - | 19 | Hot Plug Detect |
| 6 T. | M.D.S. Data1 - 13 CEC | ||||
| 7 T. | M.D.S. Data0 + | 14 Reserved(N.C. on device) | |||
JAUDIO IN1, KAUDIO IN2
- About the details of RS-232C communication, please refer to the following page.

| Pin Signal Pin Signal Pin Signal | |||||
| 1 (No connection) 4 (No connection) 7 RTS | |||||
| 2 | RD | 5 | Ground | 8 | CTS |
| 3 TD 6 (No connection) 9 (No connection) | |||||
©SLAN
RJ-45 jack
| Pin | Signal Pin | Signal Pin | Signal | ||
| 1 | TX+ | 4 | - | 7 | - |
| 2 | TX- | 5 | - | 8 | - |
| 3 | RX+ | 6 | RX- |

To input component video signal to COMPUTER IN ports
ex.
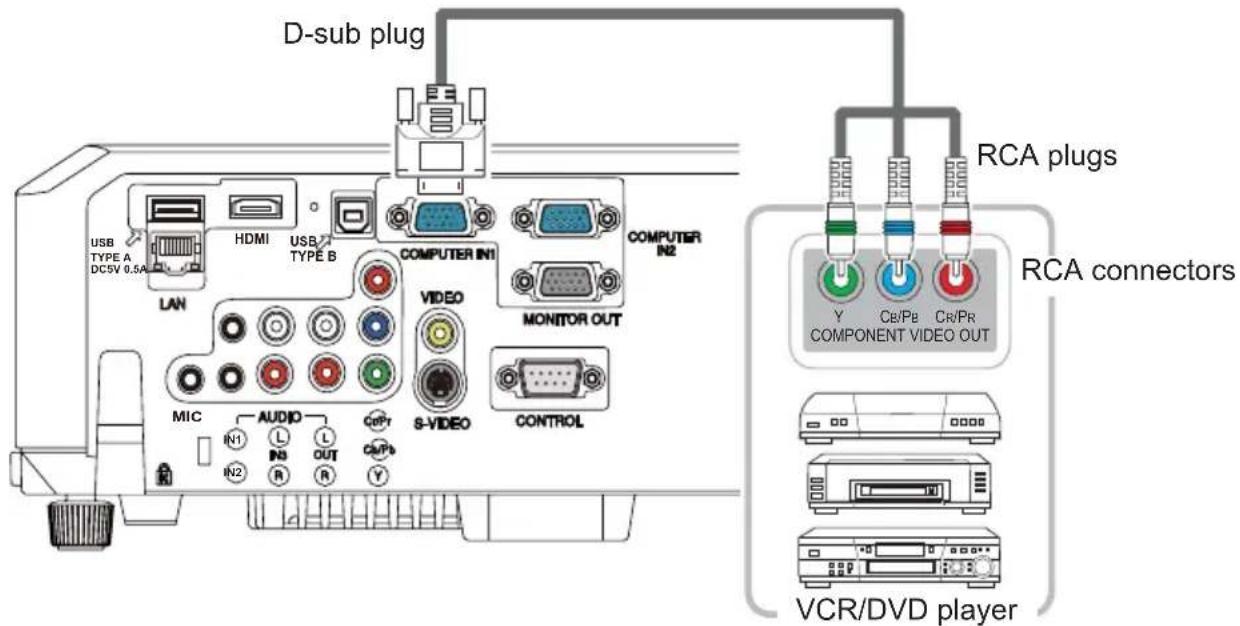
To input component video signal to the COMPUTER IN1 or IN2 port of the projector, use a RCA to D-sub cable or adapter.
For about the pin description of the required cable or adapter, refer to the descriptions about COMPUTER IN1 and IN2 port (3).
To input SCART RGB signal;
ex.
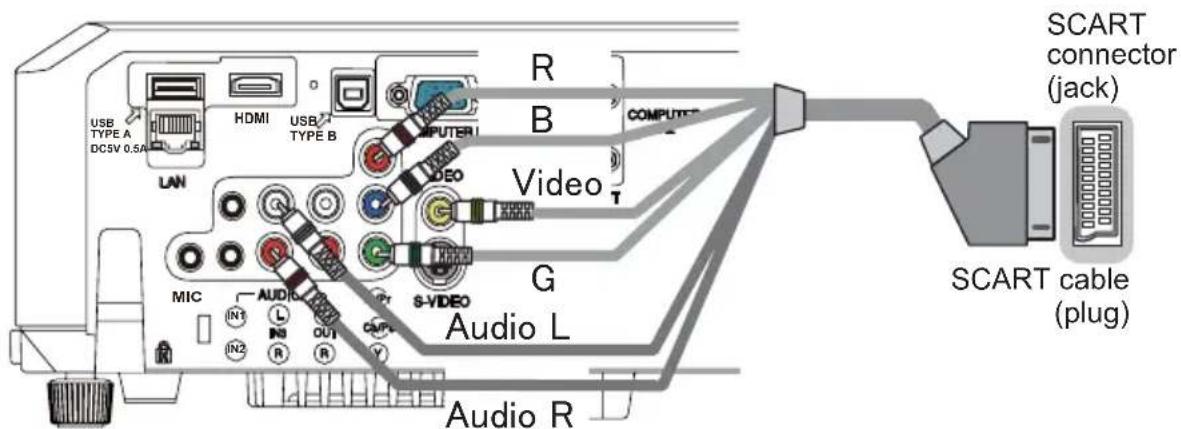
RCA plugs
To input SCART RGB signal to the projector, use a SCART to RCA cable. Connect the plugs refer to above ex.. For more reference, please consult your dealer.
RS-232C Communication
When the projector connects to the computer by RS-232C communication, the projector can be controlled with RS-232C commands from the computer. For details of RS-232C commands, refer to RS-232C Communication / Network command table (17).
Connection
- Turn off the projector and the computer.
- Connect the projector's CONTROL port and the computer's RS-232C port with a RS-232C cable (cross). Use the cable that fulfills the specification shown in figure
- Turn the computer on, and after the computer has started up turn the projector on.
- Set the COMMUNICATION TYPE to OFF. (OPTION menu - SERVICE - COMMUNICATION in the User's Manual - Operating Guide)
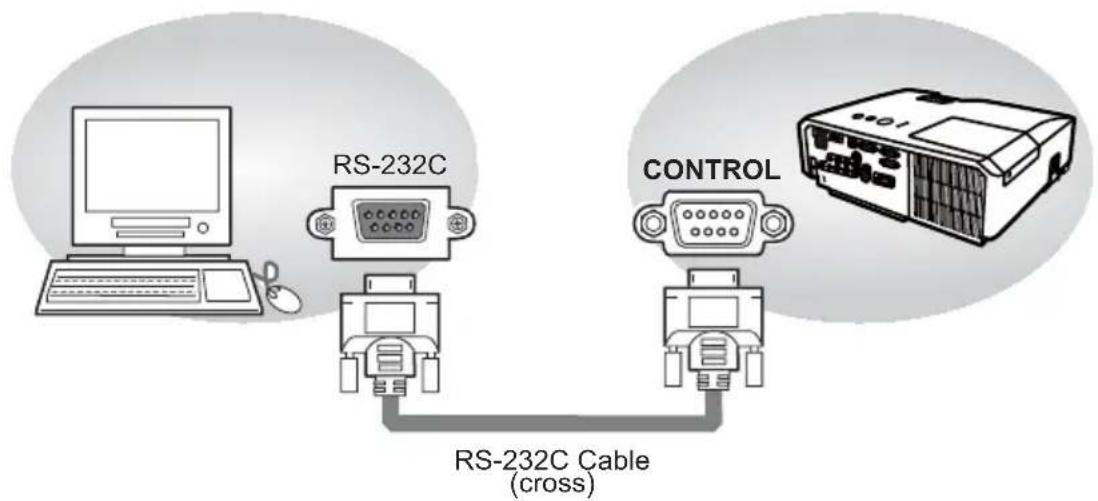
RS-232C port of the computer

CONTROL port of the projector


flowchart
graph TD
    CD["CD (1) (1)"] --> RD2["RD(2)"]
    RD2 --> TD2["TD (3)"]
    RD2 --> TD3["TD (3)"]
    RD2 --> TD4["TD (4)"]
    TD2 --> DTR["DTR (4)"]
    TD3 --> DTR2["DTR (4)"]
    TD4 --> DTR3["DTR (4)"]
    DTR --> GND["GND (5)"]
    GND --> GND2["GND"]
    GND2 --> DSR["DSR (6)"]
    GND2 --> DSR3["DSR (6)"]
    GND2 --> RTS["RTS (7)"]
    RTS --> RTS2["RTS"]
    RTS2 --> RTS3["RTS"]
    RTS3 --> RTS4["RTS"]
    RTS4 --> RTS5["RTS"]
    RTS5 --> RTS6["RTS"]
    RTS6 --> RTS7["RTS"]
    RTS7 --> RTS8["RTS"]
    RTS8 --> RTS9["RTS"]
    RTS9 --> RTS10["RTS"]
    RTS10 --> RI["RI (9)"]
    RTS10 --> RI1["RI (9)"]
    RT1 --> RI2["RI (9)"]
    RT2 --> RI3["RI (9)"]
    RT3 --> RI4["RI (9)"]
    RT4 --> RI5["RI (9)"]
    RT5 --> RI6["RI (9)"]
    RT6 --> RI7["RI (9)"]
    RT7 --> RI8["RI (9)"]
    RT8 --> RI9["RI (9)"]
    RT9 --> RI10["RI (9)"]
Communication settings
1. Protocol
19200bps,8N1
2. Command format ("h" shows hexadecimal)
| Byte Number | 0 1 | 2 3 4 | 5 6 | 7 | 8 | 9 | 1 | 0 | 1 | 1 | 2 | ||||
| CommandAction | Header Data | ||||||||||||||
| Header code | Packet | Data size | CRC flag | Action Type | Setting code | ||||||||||
| L | H | L | H | L | H | L | H | L | H | L | H | L | H | ||
| BEh | EFh 03h | 06h | 00h | (aL) | (aH) | 01h | 00h | (bL) | (bH) | (cL) | (cH) | ||||
| (aL) | (aH) | 02h | 00h | (bL) | (bH) | 00h | 00h | ||||||||
| (aL) | (aH) | 04h | 00h | (bL) | (bH) | 00h | 00h | ||||||||
| (aL) | (aH) | 05h | 00h | (bL) | (bH) | 00h | 00h | ||||||||
| (aL) | (aH) | 06h | 00h | (bL) | (bH) | 00h | 00h | ||||||||
[Header code] [Packet] [Data size]
Set [BEh, EFh, 03h, 06h, 00h] to byte number 0\~4.
[CRC flag]
For byte number 5, 6, refer to RS-232C Communication / Network command table (17).
[Action]
Set functional code to byte number 7, 8.
Refer to the Communication command table (above).
[Type] [Setting code]
For byte number 9\~12, refer to RS-232C Communication / Network command table (17).
3. Response code / Error code ("h" shows hexadecimal)
(1) ACK reply : 06h
When the projector receives the Set, Increment, Decrement or Execute command correctly, the projector changes the setting data for the specified item by [Type], and it returns the code.
(2) NAK reply : 15h
When the projector cannot understand the received command, the projector returns the error code.
In such a case, check the sending code and send the same command again.
(3) Error reply : 1Ch + 0000h
When the projector cannot execute the received command for any reasons, the projector returns the error code.
In such a case, check the sending code and the setting status of the projector.
(4) Data reply : 1Dh + xxxxh
When the projector receives the GET command correctly, the projector returns the response code and 2 bytes of data.
NOTE • For connecting the projector to your devices, please read the manual for each devices, and connect them correctly with suitable cables.
- Operation cannot be guaranteed when the projector receives an undefined command or data.
- Provide an interval of at least 40ms between the response code and any other code.
- The projector outputs test data when the power supply is switched ON, and when the lamp is lit. Ignore this data.
- Commands are not accepted during warm-up.
- When the data length is greater than indicated by the data length code, the projector ignore the excess data code. Conversely when the data length is shorter than indicated by the data length code, the projector returns the error code to the computer.
Command Control via the Network
When the projector connects network, the projector can be controlled with RS-232C commands from the computer with web browser.
For details of RS-232C commands, refer to RS-232C Communication / Network command table (17).
Connection
- Turn off the projector and the computer.
- Connect the projector's LAN port and the computer's LAN port with a LAN cable. Use the cable that fulfills the specification shown in figure (Use CAT-5 or greater LAN Cable when LAN ports are used)
- Turn the computer on, and after the computer has started up turn the projector on.

flowchart
graph TD
    A["LAN"] --> B["CAT-5 or greater"]
    C["LAN"] --> D["CAT-5 or greater"]
    E["Computer"] --> F["Pod"]
Communication Port
The following two ports are assigned for the command control.
TCP #23
TCP #9715
Configure the following items form a web browser when command control is used.
| Port Settings | ||
| Network Control Port1 (Port: 23) | Port open | Click the [Enable] check box to open [Network Control Port1 (Port: 23)] to use TCP #23. Default setting is “Enable”. |
| Authentication | Click the [Enable] check box for the [Authentication] setting when authentication is required. Default setting is “Disable”. | |
| Network Control Port2 (Port: 9715) | Port open | Click the [Enable] check box to open [Network Control Port2 (Port: 9715)] to use TCP #9715. Default setting is “Enable”. |
| Authentication | Click the [Enable] check box for the [Authentication] setting when authentication is required. Default setting is “Enable”. | |
When the authentication setting is enabled, the following settings are required.
| Security Settings | ||
| Network Control | Authentication Password | Enter the desired authentication password. This setting will be the same for [Network Control Port1 (Port: 23)] and [Network Control Port2 (Port: 9715)]. Default setting is blank. |
| Re-enter Authentication Password | ||
Command control settings
[TCP #23]
1. Command format
Same as RS-232C communication, refer to RS-232C Communicaton command format.
2. Response code / Error code ("h" shows hexadecimal)
Four of the response / error code used for TCP#23 are the same as RS-232C
Communication (1)\~(4). One authentication error reply (5) is added.
(1) ACK reply : 06h
Refer to RS-232C communication (10).
(2) NAK reoly : 15h
Refer to RS-232C communication (10).
(3) Error reply : 1Ch + 0000h
Refer to RS-232C communication (10).
(4) Data reply : 1Dh + xxxxh
Refer to RS-232C communication (10).
(5) Authentication error reply : 1Fh + 0400h
When authentication error occurred, the projector returns the error code.
[TCP #9715]
1. Command format
The commands some datum are added to the head and the end of the ones of TCP#9715 are used.
| Header Data | length RS-232 | command Check sum | Connection ID | |
| 0×02 0×0D | 13 bytes 1 byte | 1 byte |
[Header]
02, Fixed
[Data Length]
RS-232C commands byte length (0×0D, Fixed)
[RS-232C commands]
Refer to RS-232C Communication command format (10).
[Check Sum]
This is the value to make zero on the addition of the lower 8 bits from the header to the checksum.
[Connection ID]
Random value from 0 to 255 (This value is attached to the reply data).
NOTE • Operation cannot be guaranteed when the projector receives an undefined command or data.
- Provide an interval of at least 40ms between the response code and any other code.
- Commands are not accepted during warm-up.
2. Response code / Error code ("h" shows hexadecimal)
The connection ID is attached for the TCP#23's response / error codes are used. The connection ID is same as the sending command format.
(1) ACK reply : 06h + xxh
(××h : connection ID)
(2) NAK reoly : 15h + xxh
(3) Error reply : 1Ch + 0000h + xxh
(4) Data reply : 1Dh + xxxxh + xxh
(5) Authentication error reply : 1Fh + 0400h + xxh
(6) Projector busy reply: 1Fh + xxxxh + xxh
When the projector is too busy to receive the command, the projector returns the error code.
In such a case, check the sending code and send the same command again.
Automatic Connection Break
The TCP connection will be automatically disconnected after there is no communication for 30 seconds after being established.
Authentication
The projector does not accept commands without authentication success when authentication is enabled. The projector uses a challenge response type authentication with an MD5 (Message Digest 5) algorithm. When the projector is using a LAN, a random 8 bytes will be returned if authentication is enabled. Bind this received 8 bytes and the authentication password and digest this data with the MD5 algorithm and add this in front of the commands to send.
Following is a sample if the authentication password is set to "password" and the random 8 bytes are "a572f60c".
1) Select the projector.
2) Receive the random 8 bytes "a572f60c" from the projector.
3) Bind the random 8 bytes "a572f60c" and the authentication password "password" and it becomes "a572f60cpassword".
4) Digest this bind "a572f60cpassword" with MD5 algorithm.
It will be "e3d97429adffa11bce1f7275813d4bde".
5) Add this "e3d97429adffa11bce1f7275813d4bde" in front of the commands and send the data.
Send “e3d97429adffa11bce1f7275813d4bde”+command.
6) When the sending data is correct, the command will be performed and the reply data will be returned. Otherwise, an authentication error will be returned.
NOTE • As for the transmission of the second or subsequent commands, the authentication data can be omitted when the same connection.
Network Bridge Communication
This projector is equipped with NETWORK BRIDGE function.
When the projector connects to the computer by LAN communicaton, an external device that is connected with this projector by RS-232C communication can be controlled from the computer as a network terminal.
For details, see the 3.7 Controlling the external device via the projector(using the NETWORK BRIDGE function) - Network Guide.
Connection
- Connect the computer's LAN port and the projector's LAN port with a LAN cable.
- Connect the projector's CONTROL port and the RS-232C port of the devices that you want to control with a RS-232C cable.
- Turn the computer on, and after the computer has started up turn the projector on.
- Set the COMMUNICATION TYPE to NETWORK BRIDGE. (OPTION menu - SERVICE - COMMUNICATION in the User's Manual - Operating Guide)
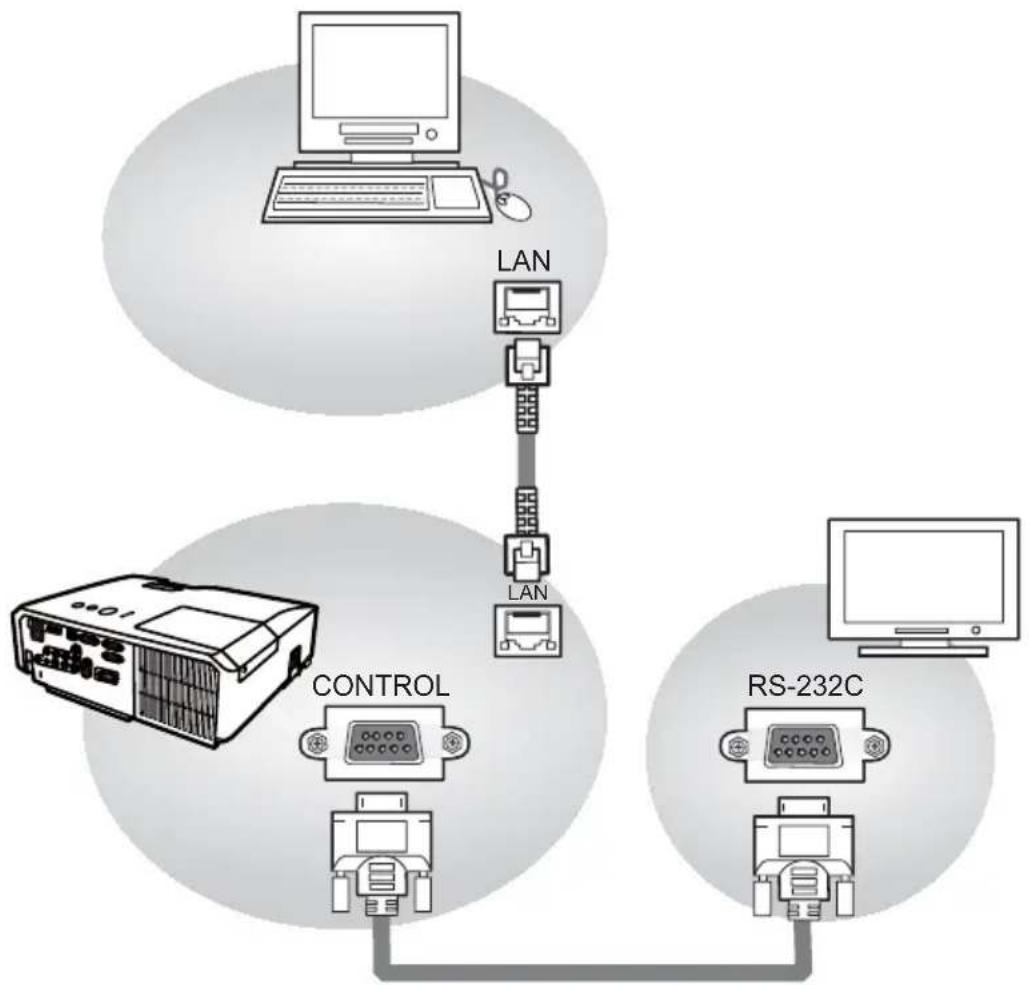
flowchart
graph TD
    A["控制 Unit"] --> B["Computer"]
    A --> C["Router"]
    A --> D["RS-232C"]
    B --> E["LAN"]
    C --> F["LAN"]
    D --> G["LAN"]
Communication settings
For communication setting, use the OPTION - SERVICE - COMMUNICATION menu. (OPTION menu - SERVICE - COMMUNICATION in the User's Manual - Operating Guide)
| Item Condition | |
| BAUD RATE 4800bps / 9600bps / 19200bps / 38400bps | |
| Data length 8 bit (fixed) | |
| PARITY NONE/ODD/EVEN | |
| Start bit 1 bit (fixed) | |
| Stop bit 1 bit (fixed) | |
| Transmission method HALF-DUPLEX/FULL-DUPLEX | |
NOTE • For connecting the projector to your devices, please read the manual for each devices, and connect them correctly with suitable cables.
- Turn off (the power of) both the projector and other devices and unplug, beore connecting them.
- For details of Transmission method, refer to 3.8.4 Transmission method-Network Guide.
RS-232C Communication / Network command table
| Names Operation Type Header | Command Data | ||||||||
| CRC Action Type Type | |||||||||
| Power | Set | Turn off BE EF 03 06 00 2A D3 01 00 00 60 00 00 | |||||||
| Turn on BE EF 03 06 00 BA D2 01 00 00 60 01 00 | |||||||||
| Get | BE EF 03 06 00 19 D3 02 00 00 60 00 00 | ||||||||
| [Example return]00 00 01 00 02 00[Off][On][Cool down] | |||||||||
| Input Source | Set | COMPUTER IN1 BE EF 03 06 00 FE D2 01 00 00 20 00 00 | |||||||
| COMPUTER IN2 BE EF 03 06 00 3E D0 01 00 00 20 04 00 | |||||||||
| HDMI | BE EF | 03 | 06 00 | 0E D2 | 01 00 | 00 20 | 03 00 | ||
| COMPONENT BE EF 03 | 06 00 AE D1 01 00 00 20 05 00 | ||||||||
| S-VIDEO BE EF 03 | 06 00 9E D3 01 00 00 20 02 00 | ||||||||
| VIDEO | BE EF | 03 | 06 00 | 6E D3 | 01 00 | 00 20 | 01 00 | ||
| USB TYPE A | BE EF | 03 | 06 00 | 5E D1 | 01 00 | 00 20 | 06 00 | ||
| LAN | BE EF | 03 | 06 00 | CE D5 | 01 00 | 00 20 | 0B 00 | ||
| USB TYPE B | BE EF | 03 | 06 00 | FE D7 | 01 00 | 00 20 | 0C 00 | ||
| Get | BE EF 03 06 00 CD D2 02 00 00 20 00 00 | ||||||||
| Error Status | Get | BE EF 03 06 00 D9 D8 02 00 20 60 00 00 | |||||||
| [Example return]00 00 01 00 02 00 03 00[Normal][Cover error] [Fan error] [Lamp error]04 00 05 00 07 00 08 00[Temp error][Air flow error] [Cold error] [Filter error] | |||||||||
| MAGNIFY | Get | BE EF | 03 | 06 00 | 7C D2 | 02 00 | 07 30 | 00 00 | |
| Increment BE EF | 03 06 00 1A D2 04 00 07 30 00 00 | ||||||||
| Decrement | BE EF | 03 06 00 CB D3 05 00 07 30 00 00 | |||||||
| FREEZE | Set | NORMAL | BE EF | 03 | 06 00 | 83 D2 | 01 00 | 02 30 | 00 00 |
| FREEZE | BE EF | 03 | 06 00 | 13 D3 | 01 00 | 02 30 | 01 00 | ||
| Get | BE EF | 03 | 06 00 | B0 D2 | 02 00 | 02 30 | 00 00 | ||
| PICTURE MODE | Set | NORMAL | BE EF | 03 | 06 00 | 23 F6 | 01 00 | BA 30 | 00 00 |
| CINEMA | BE EF | 03 06 00 B3 F7 01 00 BA 30 01 00 | |||||||
| DYNAMIC | BE EF | 03 | 06 00 | E3 F4 | 01 00 | BA 30 | 04 00 | ||
| BOARD(BLACK) BE EF 03 06 00 E3 EF 01 00 BA 30 20 00 | |||||||||
| BOARD(GREEN) | BE EF | 03 | 06 00 | 73 EE | 01 00 | BA 30 | 21 00 | ||
| WHITEBOARD | BE EF | 03 06 00 83 EE 01 00 BA 30 22 00 | |||||||
| DAYTIME | BE EF | 03 | 06 00 | E3 C7 | 01 00 | BA 30 | 40 00 | ||
| Get | BE EF | 03 | 06 00 | 10 F6 | 02 00 | BA 30 | 00 00 | ||
| [Example return]00 00 01 00 04 00 10 00[Normal][Cinema][Dynamic][Custom]20 00 21 00 22 00 40 00[BOARD(BLACK)][BOARD(GREEN)][WHITEBOARD][DAY TIME] | |||||||||
| BRIGHTNESS | Get | BE EF | 03 06 00 89 D2 02 00 03 20 00 00 | ||||||
| Increment BE EF | 03 06 00 EF D2 04 00 03 20 00 00 | ||||||||
| Decrement | BE EF | 03 | 06 00 | 3E D3 | 05 00 | 03 20 | 00 00 | ||
| BRIGHTNESS Reset | Execute BE EF | 03 06 00 58 D3 06 00 00 70 00 00 | |||||||
| CONTRAST | Get | BE EF | 03 06 00 FD D3 02 00 04 20 00 00 | ||||||
| Increment BE EF | 03 06 00 9B D3 04 00 04 20 00 00 | ||||||||
| Decrement | BE EF | 03 | 06 00 | 4A D2 | 05 00 | 04 20 | 00 00 | ||
RS-232C Communication / Network command table (continued)
| Names Operation Type Header | Command Data | |||||||||
| CRC Action Type | Type | |||||||||
| CONTRAST Reset | Execute BE EF | 03 06 00 | A4 D2 | 06 00 01 | 70 00 00 | |||||
| GAMMA | Set | 1 DEFAULT BE | EF 03 06 | 00 07 | E9 01 00 | 0 A1 30 20 | 00 | |||
| 1 CUSTOM BE | EF 03 06 | 00 07 | FD 01 00 | 0 A1 30 10 | 00 | |||||
| 2 DEFAULT BE | EF 03 06 | 00 97 | E8 01 00 | 0 A1 30 21 | 00 | |||||
| 2 CUSTOM BE | EF 03 06 | 00 97 | FC 01 00 | 0 A1 30 11 | 00 | |||||
| 3 DEFAULT BE | EF 03 06 | 00 67 | E8 01 00 | 0 A1 30 22 | 00 | |||||
| 3 CUSTOM BE | EF 03 06 | 00 67 | FC 01 00 | 0 A1 30 12 | 00 | |||||
| 4 DEFAULT BE | EF 03 06 | 00 F7 | E9 01 00 | 0 A1 30 23 | 00 | |||||
| 4 CUSTOM BE | EF 03 06 | 00 F7 | FD 01 00 | 0 A1 30 13 | 00 | |||||
| 5 DEFAULT BE | EF 03 06 | 00 C7 | EB 01 00 | 0 A1 30 24 | 00 | |||||
| 5 CUSTOM BE | EF 03 06 | 00 C7 | FF 01 00 | 0 A1 30 14 | 00 | |||||
| 6 DEFAULT BE | EF 03 06 | 00 57 | EA 01 00 | 0 A1 30 25 | 00 | |||||
| 6 CUSTOM BE | EF 03 06 | 00 57 | FE 01 00 | 0 A1 30 15 | 00 | |||||
| Get BE EF 03 | 06 00 F4 | F0 02 | 00 A1 30 | 00 00 | ||||||
| User Gamma Pattern | Set | Off BE EF | 03 06 00 | FB FA | 01 00 80 | 30 00 00 | ||||
| 9 steps gray scale | BE EF | 03 06 | 00 6B FB | 01 00 80 | 30 01 00 | |||||
| 15 steps gray scale | BE EF | 03 06 | 00 9B FB | 01 00 80 | 30 02 00 | |||||
| Ramp | BE EF | 03 06 | 00 0B FA | 01 00 80 | 30 03 00 | |||||
| Get BE EF 03 | 06 00 C8 | FA 02 | 00 80 30 | 00 00 | ||||||
| User Gamma Point 1 | Get BE EF 03 | 06 00 08 | FE 02 | 00 90 30 | 00 | 00 | ||||
| Increment | BE EF | 03 06 | 00 6E FE | 04 00 90 | 30 | 00 00 | ||||
| Decrement | BE EF | 03 06 | 00 BF FF | 05 00 90 | 30 | 00 00 | ||||
| User Gamma Point 1 Reset | Execute BE EF | 03 06 00 | 58 C2 | 06 00 50 | 70 | 00 00 | ||||
| User Gamma Point 2 | Get BE EF 03 | 06 00 F4 | FF 02 | 00 91 30 | 00 | 00 | ||||
| Increment | BE EF | 03 06 | 00 92 FF | 04 00 91 | 30 | 00 00 | ||||
| Decrement | BE EF | 03 06 | 00 43 FE | 05 00 91 | 30 | 00 00 | ||||
| User Gamma Point 2 Reset | Execute BE EF | 03 06 00 | A4 C3 | 06 00 51 | 70 00 00 | |||||
| User Gamma Point 3 | Get BE EF 03 | 06 00 B0 | FF 02 | 00 92 30 | 00 | 00 | ||||
| Increment | BE EF | 03 06 | 00 D6 FF | 04 00 92 | 30 | 00 00 | ||||
| Decrement | BE EF | 03 06 | 00 07 FE | 05 00 92 | 30 | 00 00 | ||||
| User Gamma Point 3 Reset | Execute BE EF | 03 06 00 | E0 C3 | 06 00 52 | 70 00 00 | |||||
| User Gamma Point 4 | Get BE EF 03 | 06 00 4C | FE 02 | 00 93 30 | 00 00 | |||||
| Increment | BE EF | 03 06 | 00 2A FE | 04 00 93 | 30 | 00 00 | ||||
| Decrement | BE EF | 03 06 | 00 FB FF | 05 00 93 | 30 | 00 00 | ||||
| User Gamma Point 4 Reset | Execute BE EF | 03 06 00 | 1C C2 | 06 00 53 | 70 00 00 | |||||
| User Gamma Point 5 | Get BE EF 03 | 06 00 38 | FF 02 | 00 94 30 | 00 | 00 | ||||
| Increment | BE EF | 03 06 | 00 5E FF | 04 00 94 | 30 | 00 00 | ||||
| Decrement | BE EF | 03 06 | 00 8F FE | 05 00 94 | 30 | 00 00 | ||||
| User Gamma Point 5 Reset | Execute BE EF | 03 06 00 | 68 C3 | 06 00 54 | 70 | 00 00 | ||||
| User Gamma Point 6 | Get BE EF 03 | 06 00 C4 | FE 02 | 00 95 30 | 00 00 | |||||
| Increment | BE EF | 03 06 | 00 A2 FE | 04 00 95 | 30 | 00 00 | ||||
| Decrement | BE EF | 03 06 | 00 73 FF | 05 00 95 | 30 | 00 00 | ||||
| User Gamma Point 6 Reset | Execute BE EF | 03 06 00 | 94 C2 | 06 00 55 | 70 | 00 00 | ||||
RS-232C Communication / Network command table (continued)
| Names Operation Type Header | Command Data | |||||||
| CRC Action Type | Type | |||||||
| User Gamma Point 7 | Get BE EF 03 | 06 00 80 | FE 02 00 96 30 | 00 00 | ||||
| Increment BE EF | 03 06 00 | E6 FE 04 00 96 | 30 00 00 | |||||
| Decrement BE EF | 03 06 00 | 37 FF 05 00 96 | 30 00 00 | |||||
| User Gamma Point 7 Reset | Execute BE EF | 03 06 00 | D0 C2 | 06 00 56 | 70 00 00 | |||
| User Gamma Point 8 | Get BE EF 03 | 06 00 7C | FF 02 00 97 30 | 00 00 | ||||
| Increment BE EF | 03 06 00 | 1A FF 04 00 97 | 30 00 00 | |||||
| Decrement BE EF | 03 06 00 | CB FE 05 00 97 | 30 00 00 | 00 | ||||
| User Gamma Point 8 Reset | Execute BE EF | 03 06 00 | 2C C3 | 06 00 57 | 70 00 00 | |||
| COLOR TEMP | Set | 1 HIGH | BE EF 03 06 | 00 0B F5 | 01 00 B0 | 30 03 00 | ||
| 1 CUSTOM | BE EF 03 06 | 00 CB F8 | 01 00 B0 | 30 13 00 | ||||
| 2 MID BE EF | 03 06 00 | 9B F4 01 00 B | 0 30 02 00 | |||||
| 2 CUSTOM | BE EF 03 06 | 00 5B F9 | 01 00 B0 | 30 12 00 | ||||
| 3 LOW | BE EF 03 06 | 00 6B F4 | 01 00 B0 | 30 01 00 | ||||
| 3 CUSTOM | BE EF 03 06 | 00 AB F9 | 01 00 B0 | 30 11 00 | ||||
| 4 Hi-BRIGHT-1 | BE EF 03 06 | 00 3B F2 | 01 00 B0 | 30 08 00 | ||||
| 4 CUSTOM | BE EF 03 06 | 00 FB FF | 01 00 B0 | 30 18 00 | ||||
| 5 Hi-BRIGHT-2 | BE EF 03 06 | 00 AB F3 | 01 00 B0 | 30 09 00 | ||||
| 5 CUSTOM | BE EF 03 06 | 00 6B FE | 01 00 B0 | 30 19 00 | ||||
| 6 Hi-BRIGHT-3 | BE EF 03 06 | 00 5B F3 | 01 00 B0 | 30 0A 00 | ||||
| 6 CUSTOM | BE EF | 03 | 06 00 | 9B FE | 01 00 | B0 30 | ||
| Get BE EF 03 | 06 00 C8 | F5 02 | 00 B0 30 | 00 | 00 | |||
| COLOR TEMP GAIN R | Get BE EF 03 | 06 00 34 | F4 02 | 00 B1 30 | 00 00 | |||
| Increment BE EF | 03 06 00 | 52 F4 | 04 00 B1 | 30 00 00 | ||||
| Decrement BE EF | 03 06 00 | 83 F5 | 05 00 B1 | 30 00 00 | ||||
| COLOR TEMP GAIN R Reset | Execute BE EF | 03 06 00 | 10 C6 | 06 00 46 | 70 00 00 | |||
| COLOR TEMP GAIN G | Get BE EF 03 | 06 00 70 | F4 02 | 00 B2 30 | 00 00 | |||
| Increment BE EF | 03 06 00 | 16 F4 | 04 00 B2 | 30 00 00 | ||||
| Decrement BE EF | 03 06 00 | C7 F5 | 05 00 B2 | 30 | 00 00 | |||
| COLOR TEMP GAIN G Reset | Execute BE EF | 03 06 00 | EC C7 | 06 00 47 | 70 00 00 | |||
| COLOR TEMP GAIN B | Get BE EF 03 | 06 00 8C | F5 02 | 00 B3 30 | 00 | 00 | ||
| Increment BE EF | 03 06 00 | EA F5 | 04 00 B3 | 30 | 00 00 | |||
| Decrement BE EF | 03 06 00 | 3B F4 | 05 00 B3 | 30 00 00 | 00 | |||
| COLOR TEMP GAIN B Reset | Execute BE EF | 03 06 00 | F8 C4 | 06 00 | 48 70 00 | 00 | ||
| COLOR TEMP OFFSET R | Get BE EF 03 | 06 00 04 | F5 02 | 00 B5 30 | 00 00 | |||
| Increment BE EF | 03 06 00 | 62 F5 | 04 00 B5 | 30 00 00 | 00 | |||
| Decrement BE EF | 03 06 00 | B3 F4 | 05 00 B5 | 30 00 00 | 00 | |||
| COLOR TEMP OFFSET R Reset | Execute BE EF | 03 06 00 | 40 C5 | 06 00 4A | 70 00 00 | |||
| COLOR TEMP OFFSET G | Get BE EF 03 | 06 00 40 | F5 02 | 00 B6 30 | 00 00 | |||
| Increment BE EF | 03 06 00 | 26 F5 | 04 00 B6 | 30 00 00 | 00 | |||
| Decrement BE EF | 03 06 00 | F7 F4 | 05 00 B6 | 30 00 00 | 00 | |||
| COLOR TEMP OFFSET G Reset | Execute BE EF | 03 06 00 | BC C4 | 06 00 4B | 70 | 00 00 | ||
RS-232C Communication / Network command table (continued)
| Names Operation Type Header | Command Data | ||||||||
| CRC Action Type | Type | ||||||||
| COLOR TEMP OFFSET B | Get BE EF 03 | 06 00 BC | F4 02 | 00 B7 | 30 00 00 | ||||
| Increment BE EF | 03 06 00 | DA F4 | 04 00 B7 | 30 00 00 | |||||
| Decrement BE EF | 03 06 00 | 0B F5 | 05 00 B7 | 30 00 00 | |||||
| COLOR TEMP OFFSET B Reset | Execute BE EF | 03 06 00 | C8 C5 | 06 00 40 | 70 00 00 | ||||
| COLOR | Get BE EF 03 | 06 00 B5 | 72 02 | 00 02 22 | 20 00 | ||||
| Increment BE EF | 03 06 00 | D3 72 | 04 00 02 | 22 00 00 | |||||
| Decrement BE EF | 03 06 00 | 02 73 | 05 00 02 | 22 00 00 | |||||
| COLOR Reset | Execute BE EF | 03 06 00 | 80 D0 | 06 00 0A | 70 00 00 | ||||
| TINT | Get BE EF 03 | 06 00 49 | 73 02 | 00 03 22 | 20 00 | ||||
| Increment BE EF | 03 06 00 | 2F 73 | 04 00 03 | 22 00 00 | |||||
| Decrement BE EF | 03 06 00 | FE 72 | 05 00 03 | 22 00 00 | |||||
| TINT Reset | Execute BE EF | 03 06 00 | 7C D1 | 06 00 0B | 70 00 00 | ||||
| SHARPNESS | Get BE EF 03 | 06 00 F1 | 72 02 | 00 01 22 | 20 00 | ||||
| Increment BE EF | 03 06 00 | 97 72 | 04 00 01 | 22 00 00 | |||||
| Decrement BE EF | 03 06 00 | 46 73 | 05 00 01 | 22 00 00 | |||||
| SHARPNESS Reset | Execute BE EF | 03 06 00 | C4 D0 | 06 00 09 | 70 00 00 | ||||
| ACTIVE IRIS | SET | OFF | BE EF | 03 06 | 00 0B 22 | 01 00 04 | 33 00 00 | ||
| THEATER | BE EF | 03 06 | 00 CB 2F | 01 00 04 | 33 | 10 00 | |||
| PRESENTATION | BE EF | 03 | 06 00 | 5B 2E | 01 00 | 04 33 | 11 00 | ||
| Get BE EF 03 | 06 00 38 | 22 02 | 00 04 33 | 00 | 00 | ||||
| NOTE) ACTIVE IRIS is available only for CP-X2511N, CP-X3011N, and CP-X4011N. | |||||||||
| MY MEMORY Load | Set | 1 | BE EF | 03 | 06 00 | 0E D7 | 01 00 | 14 20 | 00 00 |
| 2 | BE EF | 03 06 | 00 9E D6 | 01 00 14 | 20 | 01 00 | |||
| 3 | BE EF | 03 | 06 00 | 6E D6 | 01 00 | 14 20 | 02 00 | ||
| 4 | BE EF | 03 06 | 00 FE D7 | 01 00 14 | 20 | 03 00 | |||
| MY MEMORY Save | Set | 1 | BE EF | 03 | 06 00 | F2 D6 | 01 00 | 15 20 | 00 00 |
| 2 | BE EF | 03 06 | 00 62 D7 | 01 00 15 | 20 01 00 | ||||
| 3 | BE EF | 03 06 | 00 92 D7 | 01 00 15 | 20 02 00 | ||||
| 4 | BE EF | 03 06 | 00 02 D6 | 01 00 15 | 20 03 00 | ||||
| ASPECT | Set | 4:3 BE EF | 03 06 00 | 9E D0 | 01 00 08 | 20 | 00 00 | ||
| 16:9 | BE EF | 03 06 | 00 0E D1 | 01 00 08 | 20 01 00 | ||||
| 14:9 | BE EF | 03 06 | 00 CE D6 | 01 00 | 08 20 09 | 00 | |||
| 16:10 | BE EF | 03 06 | 00 3E D6 | 01 00 08 | 20 0A 00 | ||||
| NORMAL | BE EF | 03 | 06 00 | 5E DD | 01 00 | 08 20 | 10 00 | ||
| Get BE EF 03 | 06 00 | AD D0 | 02 00 08 | 20 | 00 00 | ||||
| OVER SCAN | Get BE EF 03 | 06 00 91 | 70 02 | 00 09 22 | 00 | 00 | |||
| Increment BE EF | 03 06 00 | F7 70 | 04 00 09 | 22 | 00 00 | ||||
| Decrement BE EF | 03 06 00 | 26 71 | 05 00 09 | 22 | 00 00 | ||||
| OVER SCAN Reset | Execute BE EF | 03 06 00 | EC D9 | 06 00 | 27 70 | 00 00 | |||
| V POSITION | Get BE EF 03 | 06 00 0D | 83 02 | 00 00 21 | 100 00 | ||||
| Increment BE EF | 03 06 00 | 6B 83 | 04 00 00 | 21 00 00 | |||||
| Decrement BE EF | 03 06 00 | BA 82 | 05 00 00 | 21 | 00 00 | ||||
| V POSITION Reset | Execute BE EF | 03 06 00 | E0 D2 | 06 00 02 | 70 | 00 00 | |||
RS-232C Communication / Network command table (continued)
| Names Operation Type Header | Command Data | |||||||||
| CRC Action Type Type | ||||||||||
| H POSITION | Get BE EF 03 | 06 00 F1 | 82 02 | 00 01 2 | 1 00 00 | |||||
| Increment BE EF | 03 06 00 | 97 82 | 04 00 01 | 21 00 00 | ||||||
| Decrement BE EF | 03 06 00 | 46 83 | 05 00 01 | 21 00 00 | ||||||
| H POSITION Reset | Execute BE EF | 03 06 00 | 1C D3 | 06 00 03 | 70 00 00 | |||||
| H PHASE | Get BE EF 03 | 06 00 49 | 83 02 | 00 03 2 | 1 00 00 | |||||
| Increment BE EF | 03 06 00 | 2F 83 | 04 00 03 | 21 00 00 | ||||||
| Decrement BE EF | 03 06 00 | FE 82 | 05 00 03 | 21 00 00 | ||||||
| H SIZE | Get BE EF 03 | 06 00 B5 | 82 02 | 00 02 2 | 1 00 00 | |||||
| Increment BE EF | 03 06 00 | D3 82 | 04 00 02 | 21 00 00 | ||||||
| Decrement BE EF | 03 06 00 | 02 83 | 05 00 02 | 21 00 00 | ||||||
| H SIZE Reset | Execute BE EF | 03 06 00 | 68 D2 | 06 00 04 | 70 00 00 | |||||
| AUTO ADJUST EXECUTE | Execute BE EF | 03 06 00 | 91 D0 | 06 00 0A | 20 00 00 | |||||
| PROGRESSIVE | Set | OFF BE EF | 03 06 00 | 4A 72 | 01 00 07 | 22 00 00 | ||||
| TV | BE EF 03 | 06 00 DA 73 | 01 00 07 | 22 01 00 | ||||||
| FILM BE EF | 03 06 00 | 2A 73 | 01 00 07 | 22 02 00 | ||||||
| Get BE EF 03 | 06 00 79 | 72 02 | 00 07 2 | 20 00 00 | ||||||
| VIDEO NR | Set | LOW BE EF | 03 06 00 | 26 72 | 01 00 06 | 22 01 00 | ||||
| MID | BE EF 03 | 06 00 D6 72 | 01 00 06 | 22 02 00 | ||||||
| HIGH | BE EF 03 | 06 00 46 73 | 01 00 06 | 22 03 00 | ||||||
| Get BE EF 03 | 06 00 85 | 73 02 | 00 06 2 | 20 00 00 | ||||||
| COLOR SPACE | Set | AUTO | BE EF 03 | 06 00 E 72 | 01 00 04 | 22 00 00 | ||||
| RGB BE EF | 03 06 00 | 9E 73 | 01 00 04 | 22 01 00 | ||||||
| SMPTE240 | BE EF 03 | 06 00 E 73 | 01 00 04 | 22 02 00 | ||||||
| REC709 | BE EF 03 | 06 00 FE 72 | 01 00 04 | 22 03 00 | ||||||
| REC601 | BE EF 03 | 06 00 CE 70 | 01 00 04 | 22 04 00 | ||||||
| Get BE EF 03 | 06 00 3D | 72 02 | 00 04 2 | 20 00 00 | ||||||
| COMPONENT | Set | COMPONENT BE | EF 03 06 | 00 4A | D7 01 | 00 17 20 | 00 00 | |||
| SCART RGB | BE EF 03 | 06 00 DA D6 | 01 00 17 | 20 01 00 | ||||||
| Get BE EF 03 | 06 00 79 | D7 02 | 00 17 2 | 20 00 00 | ||||||
| S-VIDEO FORMAT | Set | AUTO | BE EF 03 | 06 00 E6 70 | 01 00 12 | 22 0A 00 | ||||
| NTSC BE EF | 03 06 00 | 86 74 | 01 00 12 | 22 04 00 | ||||||
| PAL | BE EF 03 | 06 00 16 75 | 01 00 12 | 22 05 00 | ||||||
| SECAM | BE EF 03 | 06 00 16 70 | 01 00 12 | 22 09 00 | ||||||
| NTSC4.43 | BE EF 03 | 06 00 26 77 | 01 00 12 | 22 02 00 | ||||||
| M-PAL | BE EF 03 | 06 00 86 71 | 01 00 12 | 22 08 00 | ||||||
| N-PAL | BE EF 03 | 06 00 76 74 | 01 00 12 | 22 07 00 | ||||||
| Get BE EF 03 | 06 00 75 | 76 02 | 00 12 2 | 20 00 00 | ||||||
| C-VIDEO FORMAT | Set | AUTO | BE EF | 03 | 06 00 | A2 70 | 01 00 | 11 22 | 0A 00 | |
| NTSC BE EF | 03 06 00 | C2 74 | 01 00 11 | 22 04 00 | ||||||
| PAL | BE EF | 03 | 06 00 | 52 75 | 01 00 | 11 22 | 05 00 | |||
| SECAM | BE EF 03 | 06 00 52 70 | 01 00 11 | 22 09 00 | ||||||
| NTSC4.43 | BE EF 03 | 06 00 62 77 | 01 00 11 | 22 02 00 | ||||||
| M-PAL | BE EF | 03 | 06 00 | C2 71 | 01 00 | 11 22 | 08 00 | |||
| N-PAL | BE EF | 03 | 06 00 | 32 74 | 01 00 | 11 22 | 07 00 | |||
| Get BE EF 03 | 06 00 31 | 76 02 | 00 11 22 | 20 00 00 | ||||||
| HDMI FORMAT | Set | AUTO BE EF | 03 06 00 | BA 77 | 01 00 13 | 22 00 00 | ||||
| VIDEO BE EF | 03 06 00 | 2A 76 | 01 00 13 | 22 01 00 | ||||||
| COMPUTER BE | EF 03 06 | 00 DA | 76 01 00 | 13 22 02 00 | ||||||
| Get | BE EF 03 06 00 | 89 77 02 | 00 13 22 | 00 00 | ||||||
| HDMI RANGE | Set | AUTO BE EF | 03 06 00 | 86 D8 | 01 00 22 | 20 00 00 | ||||
| NORMAL | BE EF 03 06 00 | 0 16 D9 01 | 1 00 22 20 | 01 00 | ||||||
| ENHANCED | BE EF 03 06 00 | E6 D9 | 01 00 22 | 20 02 00 | ||||||
| Get | BE EF 03 06 00 | B5 D8 | 02 00 22 | 20 00 00 | ||||||
| COMPUTER IN1 | Set | AUTO | BE EF | 03 | 06 00 | CE D6 | 01 00 | 10 20 | 03 00 | |
| SYNC ON G OFF | BE EF | 03 | 06 00 | 5E D7 | 01 00 | 10 20 | 02 00 | |||
| Get | BE EF | 03 | 06 00 | 0D D6 | 02 00 | 10 20 | 00 00 | |||
| COMPUTER IN2 | Set | AUTO | BE EF | 03 | 06 00 | 32 D7 | 01 00 | 11 20 | 03 00 | |
| SYNC ON G OFF | BE EF | 03 | 06 00 | A2 D6 | 01 00 | 11 20 | 02 00 | |||
| Get | BE EF | 03 | 06 00 | F1 D7 | 02 00 | 11 20 | 00 00 | |||
| FRAME LOCK - COMPUTER IN1 | Set | OFF | BE EF | 03 | 06 00 | 3B C2 | 01 00 | 50 30 | 00 00 | |
| ON | BE EF | 03 | 06 00 | AB C3 | 01 00 | 50 30 | 01 00 | |||
| Get | BE EF | 03 | 06 00 | 08 C2 | 02 00 | 50 30 | 00 00 | |||
| FRAME LOCK - COMPUTER IN2 | Set | OFF | BE EF | 03 | 06 00 | 0B C3 | 01 00 | 54 30 | 00 00 | |
| ON | BE EF | 03 | 06 00 | 9B C2 | 01 00 | 54 30 | 01 00 | |||
| Get | BE EF | 03 | 06 00 | 38 C3 | 02 00 | 54 30 | 00 00 | |||
| FRAME LOCK - HDMI | Set | OFF | BE EF 03 06 00 | 7F C2 01 | 1 00 53 30 | 00 00 | ||||
| ON | BE EF | 03 | 06 00 | EF C3 | 01 00 | 53 30 | 01 00 | |||
| Get | BE EF | 03 | 06 00 | 4C C2 | 02 00 | 53 30 | 00 00 | |||
| AUTO KEYSTONE V EXECUTE | Execute | BE EF | 03 | 06 00 | E5 D1 | 06 00 | 0D 20 | 00 00 | ||
| KEYSTONE V | Get | BE EF | 03 | 06 00 | B9 D3 | 02 00 | 07 20 | 00 00 | ||
| Increment | BE EF | 03 | 06 00 | DF D3 | 04 00 | 07 20 | 00 00 | |||
| Decrement | BE EF | 03 | 06 00 | OE D2 | 05 00 | 07 20 | 00 00 | |||
| KEYSTONE V Reset | Execute | BE EF | 03 | 06 00 | 08 D0 | 06 00 | 0C 70 | 00 00 | ||
| AUTO ECO MODE | Set | OFF | BE EF 03 06 00 | FB 27 01 | 1 00 10 33 | 00 00 | ||||
| ON | BE EF 03 06 00 | 6B 26 01 | 1 00 10 33 | 01 00 | ||||||
| Get | BE EF 03 06 00 | C8 27 02 | 2 00 10 33 | 00 00 | ||||||
| ECO MODE | Set | NORMAL | BE EF | 03 | 06 00 | 3B 23 | 01 00 | 00 33 | 00 00 | |
| ECO | BE EF | 03 | 06 00 | AB 22 | 01 00 | 00 33 | 01 00 | |||
| Get | BE EF | 03 | 06 00 | 08 23 | 02 00 | 00 33 | 00 00 | |||
| MIRROR | Set | NORMAL | BE EF | 03 | 06 00 | C7 D2 | 01 00 | 01 30 | 00 00 | |
| H:INVERT | BE EF | 03 | 06 00 | 57 D3 | 01 00 | 01 30 | 01 00 | |||
| V:INVERT | BE EF | 03 | 06 00 | A7 D3 | 01 00 | 01 30 | 02 00 | |||
| H&V:INVERT | BE EF | 03 | 06 00 | 37 D2 | 01 00 | 01 30 | 03 00 | |||
| Get | BE EF | 03 | 06 00 | F4 D2 | 02 00 | 01 30 | 00 00 | |||
| STANDBY MODE | Set | NORMAL | BE EF | 03 | 06 00 | D6 D2 | 01 00 | 01 60 | 00 00 | |
| SAVING | BE EF | 03 | 06 00 | 46 D3 | 01 00 | 01 60 | 01 00 | |||
| Get | BE EF | 03 | 06 00 | E5 D2 | 02 00 | 01 60 | 00 00 | |||
| MONITOR OUT - COMPUTER IN1 | Set | COMPUTER IN1 | BE EF | 03 | 06 00 | 3E F4 | 01 00 | B0 20 | 00 00 | |
| OFF | BE EF | 03 | 06 00 | CE B5 | 01 00 | B0 20 | FF 00 | |||
| Get | BE EF | 03 | 06 00 | OD F4 | 02 00 | B0 20 | 00 00 | |||
| MONITOR OUT - COMPUTER IN2 | Set | COMPUTER IN2 | BE EF | 03 | 06 00 | CE F7 | 01 00 | B4 20 | 04 00 | |
| OFF | BE EF | 03 | 06 00 | FE B4 | 01 00 | B4 20 | FF 00 | |||
| Get | BE EF | 03 | 06 00 | 3D F5 | 02 00 | B4 20 | 00 00 | |||
| MONITOR OUT - COMPONENT | Set | COMPUTER IN1 BE EF 03 | 06 00 | F2 F4 01 | 00 B5 20 | 00 00 | ||||
| COMPUTER IN2 BE EF 03 | 06 00 | 32 F6 01 | 00 B5 20 | 04 00 | ||||||
| OFF BE EF 03 06 00 | 02 B5 | 01 00 B5 | 20 FF 00 | |||||||
| Get BE EF 03 | 06 00 C1 | F4 02 | 00 B5 20 | 00 00 | ||||||
| MONITOR OUT - S-VIDEO | Set | COMPUTER IN1 BE EF 03 | 06 00 | 86 F5 01 | 00 B2 20 | 00 00 | ||||
| COMPUTER IN2 BE EF 03 | 06 00 | 46 F7 01 | 00 B2 20 | 04 00 | ||||||
| OFF BE EF 03 06 00 | 76 B4 | 01 00 B2 | 20 FF 00 | |||||||
| Get BE EF 03 | 06 00 B5 | F5 02 | 00 B2 20 | 00 00 | ||||||
| MONITOR OUT - VIDEO | Set | COMPUTER IN1 BE EF 03 | 06 00 | C2 F5 01 | 00 B1 20 | 00 00 | ||||
| COMPUTER IN2 BE EF 03 | 06 00 | 02 F7 01 | 00 B1 20 | 04 00 | ||||||
| OFF BE EF 03 06 00 | 32 B4 | 01 00 B1 | 20 FF 00 | |||||||
| Get BE EF 03 | 06 00 F1 | F5 02 | 00 B1 20 | 00 00 | ||||||
| MONITOR OUT - HDMI | Set | COMPUTER1 | BE EF | 03 | 06 00 | 7A F4 | 01 00 | B3 20 | 00 00 | |
| COMPUTER2 | BE EF | 03 | 06 00 | BA F6 | 01 00 | B3 20 | 04 00 | |||
| COMPUTER IN 3 | BE EF | 03 | 06 00 | 4A F6 | 01 00 | B3 20 | 07 00 | |||
| OFF | BE EF | 03 | 06 00 | 8A B5 | 01 00 | B3 20 | FF 00 | |||
| Get | BE EF | 03 | 06 00 | 49 F4 | 02 00 | B3 20 | 00 00 | |||
| MONITOR OUT - LAN | Set | COMPUTER1 | BE EF | 03 | 06 00 | 1A F6 | 01 00 | BB 20 | 00 00 | |
| COMPUTER2 | BE EF | 03 | 06 00 | DA F4 | 01 00 | BB 20 | 04 00 | |||
| OFF | BE EF | 03 | 06 00 | EA B7 | 01 00 | BB 20 | FF 00 | |||
| Get | BE EF | 03 | 06 00 | 29 F6 | 02 00 | BB 20 | 00 00 | |||
| MONITOR OUT- USB TYPE A | Set | COMPUTER1 | BE EF | 03 | 06 00 | B6 F4 | 01 00 | B6 20 | 00 00 | |
| COMPUTER2 | BE EF | 03 | 06 00 | 76 F6 | 01 00 | B6 20 | 04 00 | |||
| OFF | BE EF | 03 | 06 00 | 46 B5 | 01 00 | B6 20 | FF 00 | |||
| Get | BE EF | 03 | 06 00 | 85 F4 | 02 00 | B6 20 | 00 00 | |||
| MONITOR OUT - USB TYPE B | Set | COMPUTER1 | BE EF | 03 | 06 00 | 6E F7 | 01 00 | BC 20 | 00 00 | |
| COMPUTER2 | BE EF | 03 | 06 00 | AE F5 | 01 00 | BC 20 | 04 00 | |||
| OFF | BE EF | 03 | 06 00 | 9E B6 | 01 00 | BC 20 | FF 00 | |||
| Get | BE EF | 03 | 06 00 | 5D F7 | 02 00 | BC 20 | 00 00 | |||
| MONITOR OUT - STANDBY | Set | COMPUTER IN1 BE EF 03 | 06 00 | 2A F7 01 | 00 BF 20 | 00 00 | ||||
| COMPUTER IN2 BE EF 03 | 06 00 | EA F5 01 | 00 BF 20 | 04 00 | ||||||
| OFF BE EF 03 06 00 | DA B6 | 01 00 BF 20 FF 00 | ||||||||
| Get BE EF 03 | F7 02 | 00 BF 20 00 00 | ||||||||
| VOLUME - COMPUTER IN1 | Get BE EF 03 | CD CC | 02 00 | 60 20 00 | 00 | |||||
| Increment | BE EF | 03 | 06 00 | AB CC | 04 00 | 60 20 | 00 00 | |||
| Decrement | BE EF | 03 | 06 00 | 7A CD | 05 00 | 60 20 | 00 00 | |||
| VOLUME - COMPUTER IN2 | Get BE EF 03 | CD | 02 00 64 | 20 | 00 00 | |||||
| Increment | BE EF 03 06 | 00 9B CD | 04 00 64 | 20 | 00 00 | |||||
| Decrement | BE EF | 03 | 06 00 | 4A CC | 05 00 | 64 20 | 00 00 | |||
| VOLUME - COMPONENT | Get BE EF 03 | CC 02 | 00 65 | 20 | 00 00 | |||||
| Increment | BE EF | 03 | 06 00 | 67 CC | 04 00 | 65 20 | 00 00 | |||
| Decrement | BE EF | 03 06 | 00 B6 CD | 05 00 65 | 20 | 00 00 | ||||
| VOLUME - S-VIDEO | Get | BE EF | 03 | 06 00 | 75 CD | 02 00 | 62 20 | 00 00 | ||
| Increment | BE EF | 03 | 06 00 | 13 CD | 04 00 | 62 20 | 00 00 | |||
| Decrement | BE EF | 03 | 06 00 | C2 CC | 05 00 | 62 20 | 00 00 | |||
| VOLUME - VIDEO | Get | BE EF | 03 | 06 00 | 31 CD | 02 00 | 61 20 | 00 00 | ||
| Increment | BE EF | 03 | 06 00 | 57 CD | 04 00 | 61 20 | 00 00 | |||
| Decrement | BE EF | 03 | 06 00 | 86 CC | 05 00 | 61 20 | 00 00 | |||
| VOLUME - HDMI | Get BE EF 03 | 06 00 89 | CC 02 | 00 63 20 | 00 00 | |||||
| Increment BE EF | 03 06 00 | EF CC | 04 00 63 | 20 00 00 | ||||||
| Decrement BE EF | 03 06 00 | 3E CD | 05 00 63 | 20 00 00 | ||||||
| VOLUME - LAN | Get BE EF 03 | 06 00 E9 | CE 02 | 00 6B 20 | 00 00 | |||||
| Increment BE EF | 03 06 00 | 8F CE | 04 00 6B | 20 00 00 | ||||||
| Decrement BE EF | 03 06 00 | 5E CF | 05 00 6B | 20 00 00 | ||||||
| VOLUME - USB TYPE A | Get BE EF 03 | 06 00 45 | CC 02 | 00 66 20 | 00 00 | |||||
| Increment BE EF | 03 06 00 | 23 CC | 04 00 66 | 20 00 00 | ||||||
| Decrement BE EF | 03 06 00 | F2 CD | 05 00 66 | 20 00 00 | ||||||
| VOLUME - USB TYPE B | Get BE EF 03 | 06 00 9D | CF 02 | 00 6C 20 | 00 00 | |||||
| Increment BE EF | 03 06 00 | FB CF | 04 00 6C | 20 00 00 | ||||||
| Decrement BE EF | 03 06 00 | 2A CE | 05 00 6C | 20 00 00 | ||||||
| VOLUME - STANDBY | Get | BE EF | 03 | 06 00 | D9 CF | 02 00 | 6F 20 | 00 00 | ||
| Increment | BE EF | 03 | 06 00 | BF CF | 04 00 | 6F 20 | 00 00 | |||
| Decrement | BE EF | 03 | 06 00 | 6E CE | 05 00 | 6F 20 | 00 00 | |||
| MUTE | Set | OFF | BE EF | 03 | 06 00 | 46 D3 | 01 00 | 02 20 | 00 00 | |
| ON | BE EF | 03 | 06 00 | D6 D2 | 01 00 | 02 20 | 01 00 | |||
| Get | BE EF | 03 | 06 00 | 75 D3 | 02 00 | 02 20 | 00 00 | |||
| SPEAKER | Set | ON | BE EF | 03 | 06 00 | FE D4 | 01 00 | 1C 20 | 01 00 | |
| OFF | BE EF | 03 | 06 00 | 6E D5 | 01 00 | 1C 20 | 00 00 | |||
| Get | BE EF | 03 | 06 00 | 5D D5 | 02 00 | 1C 20 | 00 00 | |||
| AUDIO SOURCE - COMPUTER IN1 | Set | AUDIO IN1 | BE EF | 03 | 06 00 | 6E DC | 01 00 | 30 20 | 01 00 | |
| AUDIO IN2 | BE EF | 03 | 06 00 | 9E DC | 01 00 | 30 20 | 02 00 | |||
| AUDIO IN3 | BE EF | 03 | 06 00 | 0E DD | 01 00 | 30 20 | 03 00 | |||
| OFF | BE EF | 03 | 06 00 | FE DD | 01 00 | 30 20 | 00 00 | |||
| Get | BE EF | 03 | 06 00 | CD DD | 02 00 | 30 20 | 00 00 | |||
| AUDIO SOURCE - COMPUTER IN2 | Set | AUDIO IN1 | BE EF | 03 | 06 00 | 5E DD | 01 00 | 34 20 | 01 00 | |
| AUDIO IN2 | BE EF | 03 | 06 00 | AE DD | 01 00 | 34 20 | 02 00 | |||
| AUDIO IN3 | BE EF | 03 | 06 00 | 3E DC | 01 00 | 34 20 | 03 00 | |||
| OFF | BE EF | 03 | 06 00 | CE DC | 01 00 | 34 20 | 00 00 | |||
| Get | BE EF | 03 | 06 00 | FD DC | 02 00 | 34 20 | 00 00 | |||
| AUDIO SOURCE LAN | Set | OFF | BE EF | 03 06 00 | DA DF | 01 00 3B 20 | 00 00 | |||
| AUDIO1 | BE EF | 03 06 00 | 4A DE 01 | 00 3B 20 | 01 00 | |||||
| AUDIO2 | BE EF | 03 06 00 | BA DE 01 | 1 00 3B 20 | 02 00 | |||||
| AUDIO3 | BE EF | 03 06 00 | 2A DF 01 | 1 00 3B 20 | 03 00 | |||||
| Get BE EF 03 | 06 00 E9 | DF 02 | 00 3B 20 | 00 00 | ||||||
| AUDIO SOURCE - USB TYPE A | Set | OFF | BE EF | 03 06 00 | 76 DD 01 | 1 00 36 20 | 00 00 | |||
| AUDIO1 | BE EF | 03 06 00 | E6 DC 01 | 1 00 36 20 | 01 00 | |||||
| AUDIO2 | BE EF | 03 06 00 | 16 DC 01 | 1 00 36 20 | 02 00 | |||||
| AUDIO3 | BE EF | 03 06 00 | 86 DD 01 | 1 00 36 20 | 03 00 | |||||
| Get BE EF 03 | 06 00 45 | DD 02 | 00 36 20 | 00 00 | ||||||
| AUDIO SOURCE USB TYPE B | Set | OFF | BE EF | 03 06 00 | AE DE 01 | 1 00 3C 20 | 00 00 | |||
| AUDIO1 | BE EF | 03 06 00 | 3E DF 01 | 1 00 3C 20 | 01 00 | |||||
| AUDIO2 | BE EF | 03 06 00 | CE DF 01 | 1 00 3C 20 | 02 00 | |||||
| AUDIO3 | BE EF | 03 06 00 | 5E DE 01 | 1 00 3C 20 | 03 00 | |||||
| Get BE EF 03 | 06 00 9D | DE 02 | 00 3C 20 | 00 00 | ||||||
| AUDIO SOURCE - HDMI | Set | OFF BE EF | 03 06 00 | BA DD | 01 00 33 | 20 00 00 | ||||
| AUDIO1 BE EF | 03 06 00 | 2A DC | 01 00 33 | 20 01 00 | ||||||
| AUDIO2 BE EF | 03 06 00 | DA DC | 01 00 33 | 20 02 00 | ||||||
| AUDIO3 BE EF | 03 06 00 | 4A DD | 01 00 33 | 20 03 00 | ||||||
| AUDIO_HDMI BE | EF 03 06 | 00 7A | C4 01 00 | 33 20 20 | 00 | |||||
| Get BE EF 03 | 06 00 89 | DD 02 | 00 33 20 | 00 00 | ||||||
| AUDIO SOURCE - COMPONENT | Set | AUDIO IN1 | BE EF | 03 | 06 00 | A2 DC | 01 00 | 35 20 | 01 00 | |
| AUDIO IN2 | BE EF | 03 | 06 00 | 52 DC | 01 00 | 35 20 | 02 00 | |||
| AUDIO IN3 | BE EF | 03 | 06 00 | C2 DD | 01 00 | 35 20 | 03 00 | |||
| OFF | BE EF | 03 | 06 00 | 32 DD | 01 00 | 35 20 | 00 00 | |||
| Get | BE EF | 03 | 06 00 | 01 DD | 02 00 | 35 20 | 00 00 | |||
| AUDIO SOURCE - S-VIDEO | Set | AUDIO IN1 | BE EF | 03 | 06 00 | D6 DD | 01 00 | 32 20 | 01 00 | |
| AUDIO IN2 | BE EF | 03 | 06 00 | 26 DD | 01 00 | 32 20 | 02 00 | |||
| AUDIO IN3 | BE EF | 03 | 06 00 | B6 DC | 01 00 | 32 20 | 03 00 | |||
| OFF | BE EF | 03 | 06 00 | 46 DC | 01 00 | 32 20 | 00 00 | |||
| Get | BE EF | 03 | 06 00 | 75 DC | 02 00 | 32 20 | 00 00 | |||
| AUDIO SOURCE - VIDEO | Set | AUDIO IN1 | BE EF | 03 | 06 00 | 92 DD | 01 00 | 31 20 | 01 00 | |
| AUDIO IN2 | BE EF | 03 | 06 00 | 62 DD | 01 00 | 31 20 | 02 00 | |||
| AUDIO IN3 | BE EF | 03 | 06 00 | F2 DC | 01 00 | 31 20 | 03 00 | |||
| OFF | BE EF | 03 | 06 00 | 02 DC | 01 00 | 31 20 | 00 00 | |||
| Get | BE EF | 03 | 06 00 | 31 DC | 02 00 | 31 20 | 00 00 | |||
| AUDIO SOURCE STANDBY | Set | AUDIO IN1 | BE EF | 03 | 06 00 | 7A DF | 01 00 | 3F 20 | 01 00 | |
| AUDIO IN2 | BE EF | 03 | 06 00 | 8A DF | 01 00 | 3F 20 | 02 00 | |||
| AUDIO IN3 | BE EF | 03 | 06 00 | 1A DE | 01 00 | 3F 20 | 03 00 | |||
| OFF | BE EF | 03 | 06 00 | EA DE | 01 00 | 3F 20 | 00 00 | |||
| Get | BE EF | 03 | 06 00 | D9 DE | 02 00 | 3F 20 | 00 00 | |||
| HDMI AUDIO | Set | 1 | BE EF | 03 06 00 | AE C6 | 01 00 40 20 | 01 00 | |||
| 2 | BE EF | 03 06 00 | 5E C6 | 01 00 40 20 | 02 00 | |||||
| Get BE EF 03 | 06 00 0D | C7 02 | 00 40 20 | 00 00 | ||||||
| MIC LEVEL | Set | LOW | BE EF | 03 | 06 00 | 02 F1 | 01 00 | A1 20 | 00 00 | |
| HIGH | BE EF | 03 | 06 00 | 92 F0 | 01 00 | A1 20 | 01 00 | |||
| Get BE EF 03 | 06 00 31 | F1 02 | 00 A1 | 20 00 00 | ||||||
| MIC VOLUME | Get BE EF 03 | 06 00 75 | F1 02 | 00 A2 | 20 00 00 | |||||
| Increment | BE EF | 03 | 06 00 | 13 F1 | 04 00 | A2 20 | 00 00 | |||
| Decrement | BE EF | 03 | 06 00 | C2 F0 | 05 00 | A2 20 | 00 00 | |||
| LANGUAGE | Set | ENGLISH | BE EF | 03 | 06 00 | F7 D3 | 01 00 | 05 30 | 00 00 | |
| FRANÇAIS | BE EF | 03 | 06 00 | 67 D2 | 01 00 | 05 30 | 01 00 | |||
| DEUTSCH | BE EF | 03 | 06 00 | 97 D2 | 01 00 | 05 30 | 02 00 | |||
| ESPAÑOL | BE EF | 03 | 06 00 | 07 D3 | 01 00 | 05 30 | 03 00 | |||
| ITALIANO | BE EF | 03 | 06 00 | 37 D1 | 01 00 | 05 30 | 04 00 | |||
| NORSK | BE EF | 03 | 06 00 | A7 D0 | 01 00 | 05 30 | 05 00 | |||
| NEDERLANDS | BE EF | 03 | 06 00 | 57 D0 | 01 00 | 05 30 | 06 00 | |||
| PORTUGUÊS | BE EF | 03 | 06 00 | C7 D1 | 01 00 | 05 30 | 07 00 | |||
| 日本語 | BE EF | 03 | 06 00 | 37 D4 | 01 00 | 05 30 | 08 00 | |||
| 简体中文 | BE EF | 03 | 06 00 | A7 D5 | 01 00 | 05 30 | 09 00 | |||
| 繁體中文 | BE EF | 03 | 06 00 | 37 DE | 01 00 | 05 30 | 10 00 | |||
| 한글 | BE EF | 03 | 06 00 | 57 D5 | 01 00 | 05 30 | 0A 00 | |||
| SVENSKA | BE EF | 03 | 06 00 | C7 D4 | 01 00 | 05 30 | 0B 00 | |||
| РУССКИЙ | BE EF | 03 | 06 00 | F7 D6 | 01 00 | 05 30 | 0C 00 | |||
| SUOMI | BE EF | 03 | 06 00 | 67 D7 | 01 00 | 05 30 | 0D 00 | |||
| NOTE) Not all of the languages in this table are supported. | ||||||||||
| LANGUAGE | Set | POLSKI BE EF 03 06 00 97 D7 01 00 05 30 0E 00 | ||||||||
| TÜRKÇE BE EF 03 06 00 07 D6 01 00 05 30 0F 00 | ||||||||||
| DANSK BE EF 03 06 00 A7 DF 01 00 05 30 11 00 | ||||||||||
| ČESKY BE EF 03 06 00 57 DF 01 00 05 30 12 00 | ||||||||||
| MAGYAR BE EF 03 06 00 C7 DE 01 00 05 30 13 00 | ||||||||||
| ROMÂNĂ BE EF 03 06 00 67 DD F7 DC 01 00 05 30 15 00 | ||||||||||
| SLOVENSKI BE EF 03 06 00 67 DD 01 00 05 30 15 00 | ||||||||||
| HRVATSKI BE EF 03 06 00 67 DD 01 00 05 30 15 00 | ||||||||||
| ΕΛΛΗΝΙΚΑ BE EF 03 06 00 07 DC 01 00 05 30 17 00 | ||||||||||
| LIETUVIŲ BE EF 03 06 00 67 DD F7 D9 01 00 05 30 19 00 | ||||||||||
| EESTI BE EF 03 06 00 67 DD 01 00 05 30 19 00 | ||||||||||
| LATVIEŠU BE EF 03 06 00 67 DD 01 00 05 30 18 00 | ||||||||||
| Inyu BE EF 03 06 00 67 DD 01 00 05 30 18 00 | ||||||||||
| هیب رعلا ئغللا BE EF 03 06 00 37 DB 01 00 05 30 1C 00 | ||||||||||
| کسراک BE EF 03 06 00 A7 DA 01 00 05 30 1D 00 | ||||||||||
| PORTUGUÈS BRA BE EF 03 06 00 57 DA 01 00 05 30 1E 00 | ||||||||||
| Get | BE EF 03 06 00 C4 D3 02 00 05 30 00 00 | |||||||||
| NOTE) Not all of the languages in this table are supported. | ||||||||||
| MENU POSITION H | Get | BE EF 03 06 00 04 D7 02 00 15 30 00 00 | ||||||||
| Increment | BE EF 03 06 00 62 D7 04 00 15 30 00 00 | |||||||||
| Decrement | BE EF 03 06 00 B3 D6 05 00 15 30 00 00 | |||||||||
| MENU POSITION H Reset | Execute BE EF 03 06 00 DC C6 06 00 43 70 00 00 | |||||||||
| MENU POSITION V | Get | BE EF 03 06 00 40 D7 02 00 16 30 00 00 | ||||||||
| Increment | BE EF 03 06 00 26 D7 04 00 16 30 00 00 | |||||||||
| Decrement | BE EF 03 06 00 F7 D6 05 00 16 30 00 00 | |||||||||
| MENU POSITION V Reset | Execute BE EF 03 06 00 A8 C7 06 00 44 70 00 00 | |||||||||
| BLANK | Set | MyScreen | BE EF 03 06 00 FB E2 01 00 00 30 40 00 | |||||||
| ORIGINAL | BE EF 03 06 00 FB E2 01 00 00 30 40 00 | |||||||||
| BLUE | BE EF 03 06 00 FB E2 01 00 00 30 40 00 | |||||||||
| WHITE | BE EF 03 06 00 FB E2 01 00 00 30 40 00 | |||||||||
| BLACK | BE EF 03 06 00 FB E2 01 00 00 30 40 00 | |||||||||
| Get | BE EF 03 06 00 FB E2 02 00 00 30 00 00 | |||||||||
| BLANK On/Off | Set | OFF | BE EF 03 06 00 FB E2 01 00 20 30 00 00 | |||||||
| ON | BE EF 03 06 00 FB E2 01 00 20 30 01 00 | |||||||||
| Get | BE EF 03 06 00 FB E2 02 00 20 30 00 00 | |||||||||
| START UP | Set | MyScreen | BE EF 03 06 00 FB E2 01 00 20 30 40 00 | |||||||
| ORIGINAL | BE EF 03 06 00 FB E2 01 00 20 30 40 00 | |||||||||
| OFF | BE EF 03 06 00 FB E2 01 00 20 30 40 01 00 | |||||||||
| Get | BE EF 03 06 00 FB E2 02 00 04 30 00 00 | |||||||||
| MyScreen Lock | Set | OFF | BE EF 03 06 00 FB E2 01 00 20 30 40 00 | |||||||
| ON | BE EF 03 06 00 FB E2 01 00 20 30 40 01 00 | |||||||||
| Get | BE EF 03 06 00 FB E2 02 00 20 30 40 01 00 | |||||||||
| MESSAGE | Set | OFF | BE EF 03 06 00 FB E2 8F D6 01 00 17 30 00 00 | |||||||
| ON | BE EF 03 06 00 FB E2 1F D7 01 00 17 30 01 00 | |||||||||
| Get | BE EF 03 06 00 FB E2 BC D6 02 00 17 30 00 00 | |||||||||
RS-232C Communication / Network command table (continued)
| Names Operation Type Header | Command Data | |||||||||
| CRC Action Type Type | ||||||||||
| TEMPLATE | Set | TEST PATTERN BE EF 03 06 00 43 D9 01 00 22 30 00 00 | ||||||||
| DOT-LINE1 BE EF 03 06 00 D3 D8 01 00 22 30 01 00 | ||||||||||
| DOT-LINE2 BE EF 03 06 00 23 D8 01 00 22 30 02 00 | ||||||||||
| DOT-LINE3 BE EF 03 06 00 B3 D9 01 00 22 30 03 00 | ||||||||||
| DOT-LINE4 BE EF 03 06 00 83 DB 01 00 22 30 04 00 | ||||||||||
| CIRCLE 1 BE EF 03 06 00 13 DA 01 00 22 30 05 00 | ||||||||||
| CIRCLE 2 BE EF 03 06 00 E3 DA 01 00 22 30 06 00 | ||||||||||
| MAP 1 BE EF 03 06 00 06 00 83 D4 01 00 22 30 10 00 | ||||||||||
| MAP 2 BE EF 03 06 00 06 00 13 D5 01 00 22 30 11 00 | ||||||||||
| Get | BE EF 03 06 00 70 D9 02 00 22 30 00 00 | |||||||||
| TEMPLATE On/Off | Set | OFF | BE EF 03 06 00 BF D8 01 00 23 30 00 00 | |||||||
| ON | BE EF 03 06 00 2F D9 01 00 23 30 01 00 | |||||||||
| Get | BE EF 03 06 00 8C D8 02 00 23 30 00 00 | |||||||||
| C. C. - DISPLAY | Set | OFF | BE EF 03 06 00 FA 62 01 00 00 37 00 00 | |||||||
| ON | BE EF 03 06 00 6A 63 01 00 00 37 01 00 | |||||||||
| AUTO | BE EF 03 06 00 9A 63 01 00 00 37 02 00 | |||||||||
| Get | BE EF 03 06 00 C9 62 02 00 00 37 00 00 | |||||||||
| C. C. - MODE | Set | CAPTIONS BE EF 03 06 00 06 63 01 00 01 37 00 00 | ||||||||
| TEXT | BE EF 03 06 00 96 62 01 00 01 37 01 00 | |||||||||
| Get | BE EF 03 06 00 35 63 02 00 01 37 00 00 | |||||||||
| C. C. - CHANNEL | Set | 1 | BE EF 03 06 00 06 00 D2 62 01 00 02 37 01 00 | |||||||
| 2 | BE EF 03 06 00 22 62 01 00 02 37 02 00 | |||||||||
| 3 | BE EF 03 06 00 06 00 B2 63 01 00 02 37 02 00 | |||||||||
| 4 | BE EF 03 06 00 82 61 01 00 02 37 04 00 | |||||||||
| Get | BE EF 03 06 00 71 63 02 00 02 37 00 00 | |||||||||
| AUTO SEARCH | Set | OFF | BE EF 03 06 00 B6 D6 01 00 16 20 00 00 | |||||||
| ON | BE EF 03 06 00 26 D7 01 00 16 20 01 00 | |||||||||
| Get | BE EF 03 06 00 85 D6 02 00 16 20 00 00 | |||||||||
| AUTO KEYSTONE | Set | OFF | BE EF 03 06 00 EA D1 01 00 0F 20 00 00 | |||||||
| ON | BE EF 03 06 00 7A D0 01 00 0F 20 01 00 | |||||||||
| Get | BE EF 03 06 00 D9 D1 02 00 0F 20 00 00 | |||||||||
| DIRECT POWER ON | Set | OFF | BE EF 03 06 00 3B 89 01 00 20 31 00 00 | |||||||
| ON | BE EF 03 06 00 AB 88 01 00 20 31 01 00 | |||||||||
| Get | BE EF 03 06 00 08 89 02 00 20 31 00 00 | |||||||||
| AUTO POWER OFF | Get | BE EF 03 06 00 08 86 02 00 10 31 00 00 | ||||||||
| Increment | BE EF 03 06 00 6E 86 04 00 10 31 00 00 | |||||||||
| Decrement | BE EF 03 06 00 BF 87 05 00 10 31 00 00 | |||||||||
| USB TYPE B | Set | MOUSE | BE EF 03 06 00 06 00 FF 23 01 00 50 26 00 00 | |||||||
| USB DISPLAY | BE EF 03 06 00 6F 22 01 00 50 26 01 00 | |||||||||
| Get | BE EF 03 06 00 6F 22 01 00 50 26 00 00 | |||||||||
| LAMP TIME | Get | BE EF 03 06 00 C2 FF 02 00 90 10 00 00 | ||||||||
| LAMP TIME Reset | Execute BE EF | 03 06 00 58 DC 06 00 30 70 00 00 | ||||||||
| FILTER TIME | Get | BE EF 03 06 00 C2 F0 02 00 A0 10 00 00 | ||||||||
| FILTER TIME Reset | Execute BE EF | 03 06 00 98 C6 06 00 40 70 00 00 | ||||||||
RS-232C Communication / Network command table (continued)
| Names Operation Type Header | Command Data | ||||||||
| CRC Action Type Type | |||||||||
| MY BUTTON-1 | Set | COMPUTER IN1 BE EF 03 06 00 3A 33 01 00 00 36 00 00 | |||||||
| COMPUTER IN2 BE EF 03 06 00 FA 31 01 00 00 36 04 00 | |||||||||
| LAN BE EF 03 06 00 0A 34 01 00 00 36 0B 00 | |||||||||
| USB TYPE A BE EF 03 06 00 9A 30 01 00 00 36 06 00 | |||||||||
| USB TYPE B BE EF 03 06 00 3A 36 01 00 00 36 0C 00 | |||||||||
| HDMI BE EF 03 06 00 CA 33 01 00 00 36 03 00 | |||||||||
| COMPONENT BE EF 03 06 00 6A 30 01 00 00 36 05 00 | |||||||||
| S-VIDEO BE EF 03 06 00 5A 32 01 00 00 36 02 00 | |||||||||
| VIDEO BE EF 03 06 00 AA 32 01 00 00 36 01 00 | |||||||||
| SLIDESHOW BE EF 03 06 00 9A 2B 01 00 00 36 22 00 | |||||||||
| MY IMAGE BE EF 03 06 00 5A 3D 01 00 00 36 16 00 | |||||||||
| MESSENGER BE EF 03 06 00 6A 29 01 00 00 36 25 00 | |||||||||
| INFORMATION BE EF 03 06 00 6A 3E 01 00 00 36 10 00 | |||||||||
| AUTO KEYSTONE V BE EF 03 06 00 6A 3F 01 00 00 36 11 00 | |||||||||
| MY MEMORY BE EF 03 06 00 9A 3F 01 00 00 36 12 00 | |||||||||
| ACTIVE IRIS * BE EF 03 06 00 AA 3D 01 00 00 36 15 00 | |||||||||
| PICTURE MODE BE EF 03 06 00 0A 3E 01 00 00 36 13 00 | |||||||||
| FILTER RESET BE EF 03 06 00 3A 3C 01 00 00 36 14 00 | |||||||||
| AV MUTE BE EF 03 06 00 AA 38 01 00 00 36 19 00 | |||||||||
| TEMPLATE BE EF 03 06 00 CA 39 01 00 00 36 1B 00 | |||||||||
| RESOLUTION BE EF 03 06 00 9A 3A 01 00 00 36 1E 00 | |||||||||
| MIC VOLUME BE EF 03 06 00 9A 24 01 00 00 36 36 00 | |||||||||
| ECO MODE BE EF 03 06 00 0A 25 01 00 00 36 37 00 | |||||||||
| Get | BE EF 03 06 00 09 33 02 00 00 36 00 00 | ||||||||
| NOTE) * ACTIVE IRIS is available only for CP-X2511N. CP-X3011N, and CP-X4011N. | |||||||||
| MY BUTTON-2 | Set | COMPUTER IN1 BE EF 03 06 00 C6 32 01 00 01 36 00 00 | |||||||
| COMPUTER IN2 BE EF 03 06 00 06 30 01 00 01 36 04 00 | |||||||||
| LAN BE EF 03 06 00 F6 35 01 00 01 36 0B 00 | |||||||||
| USB TYPE A BE EF 03 06 00 66 31 01 00 01 36 06 00 | |||||||||
| USB TYPE B BE EF 03 06 00 C6 37 01 00 01 36 0C 00 | |||||||||
| HDMI BE EF 03 06 00 36 32 01 00 01 36 03 00 | |||||||||
| COMPONENT BE EF 03 06 00 96 31 01 00 01 36 05 00 | |||||||||
| S-VIDEO BE EF 03 06 00 A6 33 01 00 01 36 02 00 | |||||||||
| VIDEO BE EF 03 06 00 56 33 01 00 01 36 01 00 | |||||||||
| SLIDESHOW BE EF 03 06 00 66 2A 01 00 01 36 22 00 | |||||||||
| MY IMAGE, BE EF 03 06 00 A6 3C 01 00 01 36 16 00 | |||||||||
| MESSENGER BE EF 03 06 00 56 28 01 00 01 36 25 00 | |||||||||
| INFORMATION BE EF 03 06 00 06 3F 01 00 01 36 10 00 | |||||||||
| AUTO KEYSTONE V BE EF 03 06 00 96 3E 01 00 01 36 12 00 | |||||||||
| MY MEMORY BE EF 03 06 00 66 3E 01 00 01 36 12 00 | |||||||||
| ACTIVE IRIS * BE EF 03 06 00 56 3C 01 00 01 36 15 00 | |||||||||
| PICTURE MODE BE EF 03 06 00 F6 3F 01 00 01 36 13 00 | |||||||||
| FILTER RESET BE EF 03 06 00 C6 3D 01 00 01 36 14 00 | |||||||||
| AV MUTE BE EF 03 06 00 56 39 01 00 01 36 19 00 | |||||||||
| TEMPLATE BE EF 03 06 00 66 3B 36 38 01 00 01 36 1E 00 | |||||||||
| RESOLUTION BE EF 03 06 00 66 3B 01 00 01 36 1E 00 | |||||||||
| MIC VOLUME BE EF 03 06 00 66 25 01 00 01 36 36 00 | |||||||||
| ECO MODE BE EF 03 06 00 F6 24 01 00 01 36 37 00 | |||||||||
| Get | BE EF 03 06 00 F5 32 02 00 01 36 00 00 | ||||||||
| NOTE) * ACTIVE IRIS is available only for CP-X2511N. CP-X3011N, and CP-X4011N. | |||||||||
| MY SOURCE | Set | COMPUTER IN1 BE EF 03 06 00 FA 38 01 00 20 36 00 00 | |||||||
| COMPUTER IN2 BE EF 03 06 00 3A 3A 01 00 20 36 04 00 | |||||||||
| LAN BE EF 03 06 00 CA 3F 01 00 20 36 0B 00 | |||||||||
| USB TYPE A | BE EF 03 06 00 5A 3B 01 00 20 36 06 00 | ||||||||
| USB TYPE B | BE EF 03 06 00 FA 3D 01 00 20 36 0C 00 | ||||||||
| HDMI | BE EF 03 06 00 0A 38 01 00 20 36 03 00 | ||||||||
| COMPONENT BE EF 03 06 00 AA 3B 01 00 20 36 05 00 | |||||||||
| S-VIDEO BE EF 03 06 00 9A 39 01 00 20 36 02 00 | |||||||||
| VIDEO | BE EF 03 06 00 6A 39 01 00 20 36 01 00 | ||||||||
| Get | BE EF 03 06 00 C9 38 02 00 20 36 00 00 | ||||||||
| Magnify Position H | Get | BE EF | 03 | 06 00 | C8 D7 | 02 00 | 10 30 | 00 00 | |
| Increment | BE EF | 03 | 06 00 | AE D7 | 04 00 | 10 30 | 00 00 | ||
| Decrement | BE EF 03 06 00 7F D6 05 00 10 30 00 00 | ||||||||
| Magnify Position V | Get | BE EF | 03 | 06 00 | 34 D6 | 02 00 | 11 30 | 00 00 | |
| Increment | BE EF | 03 | 06 00 | 52 D6 | 04 00 | 11 30 | 00 00 | ||
| Decrement | BE EF | 03 | 06 00 | 83 D7 | 05 00 | 11 30 | 00 00 | ||
| REMOTE FREQ. NORMAL | Set | OFF | BE EF 03 06 00 FF 3D 01 00 30 26 00 00 | ||||||
| ON | BE EF 03 06 00 6F 3C 01 00 30 26 01 00 | ||||||||
| Get | BE EF 03 06 00 CC 3D 02 00 30 26 00 00 | ||||||||
| REMOTE FREQ. HIGH | Set | OFF | BE EF 03 06 00 03 3C 01 00 31 26 00 00 | ||||||
| ON | BE EF 03 06 00 93 3D 01 00 31 26 01 00 | ||||||||
| Get | BE EF 03 06 00 30 3C 02 00 31 26 00 00 | ||||||||
| MY IMAGE | Set | OFF | BE EF | 03 | 06 00 | 3A C3 | 01 00 | 00 35 | 00 00 |
| IMAGE-1 | BE EF | 03 | 06 00 | AA C2 | 01 00 | 00 35 | 01 00 | ||
| IMAGE-2 | BE EF 03 06 00 5A C2 01 00 00 35 02 00 | ||||||||
| IMAGE-3 | BE EF | 03 | 06 00 | CA C3 | 01 00 | 00 35 | 03 00 | ||
| IMAGE-4 | BE EF 03 06 00 FA C1 01 00 00 35 04 00 | ||||||||
| Get | BE EF | 03 | 06 00 | 09 C3 | 02 00 | 00 35 | 00 00 | ||
| MY IMAGE IMAGE-1 Delete | Execute | BE EF | 03 | 06 00 | 71 C3 | 06 00 | 01 35 | 00 00 | |
| MY IMAGE IMAGE-2 Delete | Execute | BE EF | 03 | 06 00 | 35 C3 | 06 00 | 02 35 | 00 00 | |
| MY IMAGE IMAGE-3 Delete | Execute | BE EF | 03 | 06 00 | C9 C2 | 06 00 | 03 35 | 00 00 | |
| MY IMAGE IMAGE-4 Delete | Execute | BE EF | 03 | 06 00 | BD C3 | 06 00 | 04 35 | 00 00 | |
PJLink command
| Commands | Control Description Parameter or Response | |
| POWR Power Control | Power Contorol | 0 = Standby |
| 1 = Power On | ||
| POWR ? Power Status inquiry | Power Status inquiry | 0 = Standby |
| 1 = Power On | ||
| 2 = Cool Down | ||
| INPT Input Source selection | Source selection | 11 = COMPUTER IN 1 |
| 12 = COMPUTER IN 2 | ||
| 21 = COMPONENT | ||
| 22 = S-VIDEO | ||
| 23 = VIDEO | ||
| 31 = HDMI | ||
| 41 = USB TYPE A | ||
| 51 = LAN | ||
| 52 = USB TYPE B | ||
| INPT ? Input Source inquiry | Source inquiry | 11 = COMPUTER IN 1 |
| 12 = COMPUTER IN 2 | ||
| 21 = COMPONENT | ||
| 22 = S-VIDEO | ||
| 23 = VIDEO | ||
| 31 = HDMI | ||
| 41 = USB TYPE A | ||
| 51 = LAN | ||
| 52 = USB TYPE B | ||
| AVMT AV | Mute | 10 = BLANK off |
| 11 = BLANK on | ||
| 20 = Mute off | ||
| 21 = Mute on | ||
| 30 = AV Mute off | ||
| 31 = AV Mute on | ||
| AVMT ? AV | Mute inquiry | 10 = BLANK off |
| 11 = BLANK on | ||
| 20 = Mute off | ||
| 21 = Mute on | ||
| 30 = AV Mute off | ||
| 31 = AV Mute on | ||
| ERST ? Error Status inquiry | 1st byte: Refers to Fan error; one of 0 to 2 | |
| 2nd byte: Refers to Lamp error; one of 0 to 2 | ||
| 3rd byte: Refers to Temptrature error; one of 0 to 2 | ||
| 4th byte: Refers to Cover error; one of 0 to 2 | ||
| 5th byte: Refers to Filter error; one of 0 to 2 | ||
| 6th byte: Refers to Other error; one of 0 to 2 | ||
| The meaning of 0 to 2 is as given below | ||
| 0 = Error is not detected; 1 = Warning; 2 = Error | ||
| LAMP ? Lamp Status inquiry | 1st number (digits 1 to 5): Lamp Time | |
| 2nd number : 0 = Lamp off, 1 = Lamp on | ||
| INST ? Input Source List inquiry 11 12 | 21 22 23 31 41 51 52 | |
| NAME ? Projector Name inquiry | Responds with the name set in "PROJECTOR NAME" of "NETWORK" | |
| INF1 ? | Manufacturer's Name inquiry | HITACHI |
| INF2 ? Model Name inquiry | CP-X2011N | |
| CP-X2511N | ||
| CP-X3011N | ||
| CP-X4011N | ||
| INFO ? Other Information inquiry | Responds with the factory information and so on | |
| CLSS ? Class Information inquiry 1 | ||
NOTE • The password used in PJLink™ is the same as the password set in the Web Brouwser Comtrol. To use PJLink™ without authentication, do not set any password in Web Browser Control.
- For specifications of PJLink™, see the web site of the Japan Business Machine and Information System Industries Association.
NOTE • The information in this manual is subject to change without notice. • The manufacturer assumes no responsibility for any errors that may appear in this manual. • The reproduction, transfer or copy of all or any part of this document is not permitted without express written consent.
Digital Media Division
900 Hitachi way, Chula Vista
CA 91914-3556 USA CANADA
Tel: +1 -800-225-1741
Fax: +1 -619-591-5418
http://www.hitachi.us/digitalmedia
Hitachi Europe Ltd., Consumer Affairs Department
PO Box 3007
Maidenhead
Berkshire SL6 8ZE UNITED KINGDOM
Tel: 0870 405 4405
Email: consumer.mail@hitachi-eu.com
Hitachi Europe S.A.S., Digital Media Group
Level 3, 82 Waterloo Road
North Ryde N.S.W 2113 AUSTRALIA
Tel: +61 -2-9888-4100
Fax: +61 -2-9888-4188
http://www.hitachi.com.au
Hitachi (Hong Kong), Ltd.
18/F., Ever Gain Centre, 28 On Muk Street.,
Shatin, N.T. HONG KONG
Tel: +852 -2113-8883
Fax: +852 -2783-4178
http://www.hitachi-hk.com.hk
Hitachi Sales (Malaysia) Sdn. Bhd.
Lot 12, Jalan Kamajuan, Bangi Industrial Estate,
43650 Bandar Baru Bangi, Selangor Darul Ehsan
MALAYSIA
Tel: +60 -3-8926-4168
Fax: +60 -3-8926-3013
http://www.hitachiconsumer.com.my
Hitachi Home Electronics Asia, (S) Pte Ltd.
438A Alexandra Road #01-01/02/03
Alexandra Technopark, 119967 SINGAPORE
Tel: +65 -6536-2520
Fax: +65 -6536-2521
http://www.hitachiconsumer.com.sg
Hitachi Sales Corp. of Taiwan
2 ^nd Floor, No.65, Nanking East Road, Section 3,
Taipei 104 TAIWAN
Tel: +886-2-2516-0500
Fax: +886-2-2516-1501
http://www.hsct.com.tw
Hitachi Sales (Thailand), Ltd.
994, Soi Thonglor, Sukhumvit 55 Road,
Klongtonnua, Vadhana, Bangkok 10110
THAILAND
Tel: +66 -2381-8381-98
Fax: +66 -2381-0210/2381-0021
http://www.hitachi-th.com
Hitachi Consumer Electronics Co., Ltd.
292 Yoshida-cho, Totsuka-ku
Yokohama 244-0817 JAPAN
Tel: +81-45-415-2625
Fax: +81-45-866-5821
- /CP-X3011N/CP-X4011N
- SCHERM menu 44
- OPTIE menu 50
- NETWERK menu 60
- VEILIGHEID menu 67
- CP-X2011N/CP-X2511N /CP-X3011N/CP-X4011N
- "LiveViewer" updaten
- Enter PassCode (Voer de Passcode in)
- Profielverbinding
- N.B. • Internet Explorer 6.0 of later is vereist.
- Projectorbeheer m.b.v. SNMP
- User's Manual (detailed) Operating Guide – Technical
- Initial set signals
- Connection to the ports
- ⒶCOMPUTER IN1, ⒷCOMPUTER IN2, ⒸMONITOR OUT
- COMPONENT DY, E Cb/Pb F Cr/Pr
- GS-VIDEO
- HVIDEO
- ①HDMI
- JAUDIO IN1, KAUDIO IN2
- ©SLAN
- To input component video signal to COMPUTER IN ports
- To input SCART RGB signal;
- RS-232C Communication
- Connection
- Communication settings
- Protocol
- Command format ("h" shows hexadecimal)
- [Header code] [Packet] [Data size]
- [CRC flag]
- [Action]
- [Type] [Setting code]
- Response code / Error code ("h" shows hexadecimal)
- ACK reply : 06h
- NAK reply : 15h
- Error reply : 1Ch + 0000h
- Data reply : 1Dh + xxxxh
- Command Control via the Network
- Communication Port
- Command control settings
- [TCP #23]
- Command format
- Response code / Error code ("h" shows hexadecimal)
- [TCP #9715]
- [Header]
- [Data Length]
- [RS-232C commands]
- [Check Sum]
- [Connection ID]
- Automatic Connection Break
- Authentication
- Network Bridge Communication
Brand : HITACHI
Model : CP-X2511NEF
Category : Projector