SDCP6 - Uncategorized SEADA - Free user manual and instructions
Find the device manual for free SDCP6 SEADA in PDF.

User questions about SDCP6 SEADA
0 question about this device. Answer the ones you know or ask your own.
Ask a new question about this device
Download the instructions for your Uncategorized in PDF format for free! Find your manual SDCP6 - SEADA and take your electronic device back in hand. On this page are published all the documents necessary for the use of your device. SDCP6 by SEADA.
USER MANUAL SDCP6 SEADA
Program buttons to send TCP/IP and RS232 commands to control projectors, screens and other third-party devices.
SEADA
Showing the World
User Manual
VER 1.0
Thank you for purchasing this product
For optimum performance and safety, please read these instructions carefully before connecting, operating or adjusting this product. Please keep this manual for future reference.
Surge protection device recommended
This product contains sensitive electrical components that may be damaged by electrical spikes, surges, electric shook, lighting strikes, etc. Use of surge protection systems is highly recommended in order to protect and extend the life of your equipment.
Table of Contents
- Introduction....1
1.1 Introduction to SDCP6....1
1.2 Features .... 1
1.3 Package List....1
- Panel Description....2
- System Connection....4
- Control Panel Software....5
4.1 Basic Setting....5
4.2 Panel Set....8
4.3 Action List 9
4.4 Event setting....10
4.4.1 RS232 Setting 10
4.4.2 IR Setting....12
4.4.3 TCP/IP Setting....15
4.4.4 Delay setting....16
4.4.5 Compare Setting....17
4.4.6 LED setting....18
4.4.7 Toggle Setting....19
4.5 Event List....21
- Specification ......22
- Panel Drawing ......23
1. Introduction
1.1 Introduction to SDCP6
The Wallplate Control Panel has (3) built-in programmable RS232 connectors and (2) Infrared (IR) connectors.
The Programmable Control Panel can fully control the compatible switches, as well as third-party devices such as matrix switcher, compact scaler switcher, projectors, screens, etc. Use the device for presentations in showrooms, classrooms, and boardrooms.
1.2 Features
☆ Each button can be programmed to send bi-directional RS232 commands simultaneously to control third party devices.
☆ Each button can be programmed to send the infrared codes simultaneously to control the third-party devices and support infrared code learning function.
☆ The unit may be programmed through the ETHERNET port, via the Control Software.
☆ Crystal and backlit buttons with easy user-friendly customizable changeable labels.
☆ The backlit brightness is controllable.
☆ Dimension: 70mm long and 41mm wide.
1.3 Package List
① 1x SDCP6
② 1x Button label
③ 3x 2-pin pluggable terminal blocks
④ 1x 5-pin pluggable terminal block
⑤ 1x Power adapter (12VDC 1A)
⑥ 6x Button caps
⑦ 1x 3-pin pluggable terminal block
⑧ 1x User Manual
- Panel Description
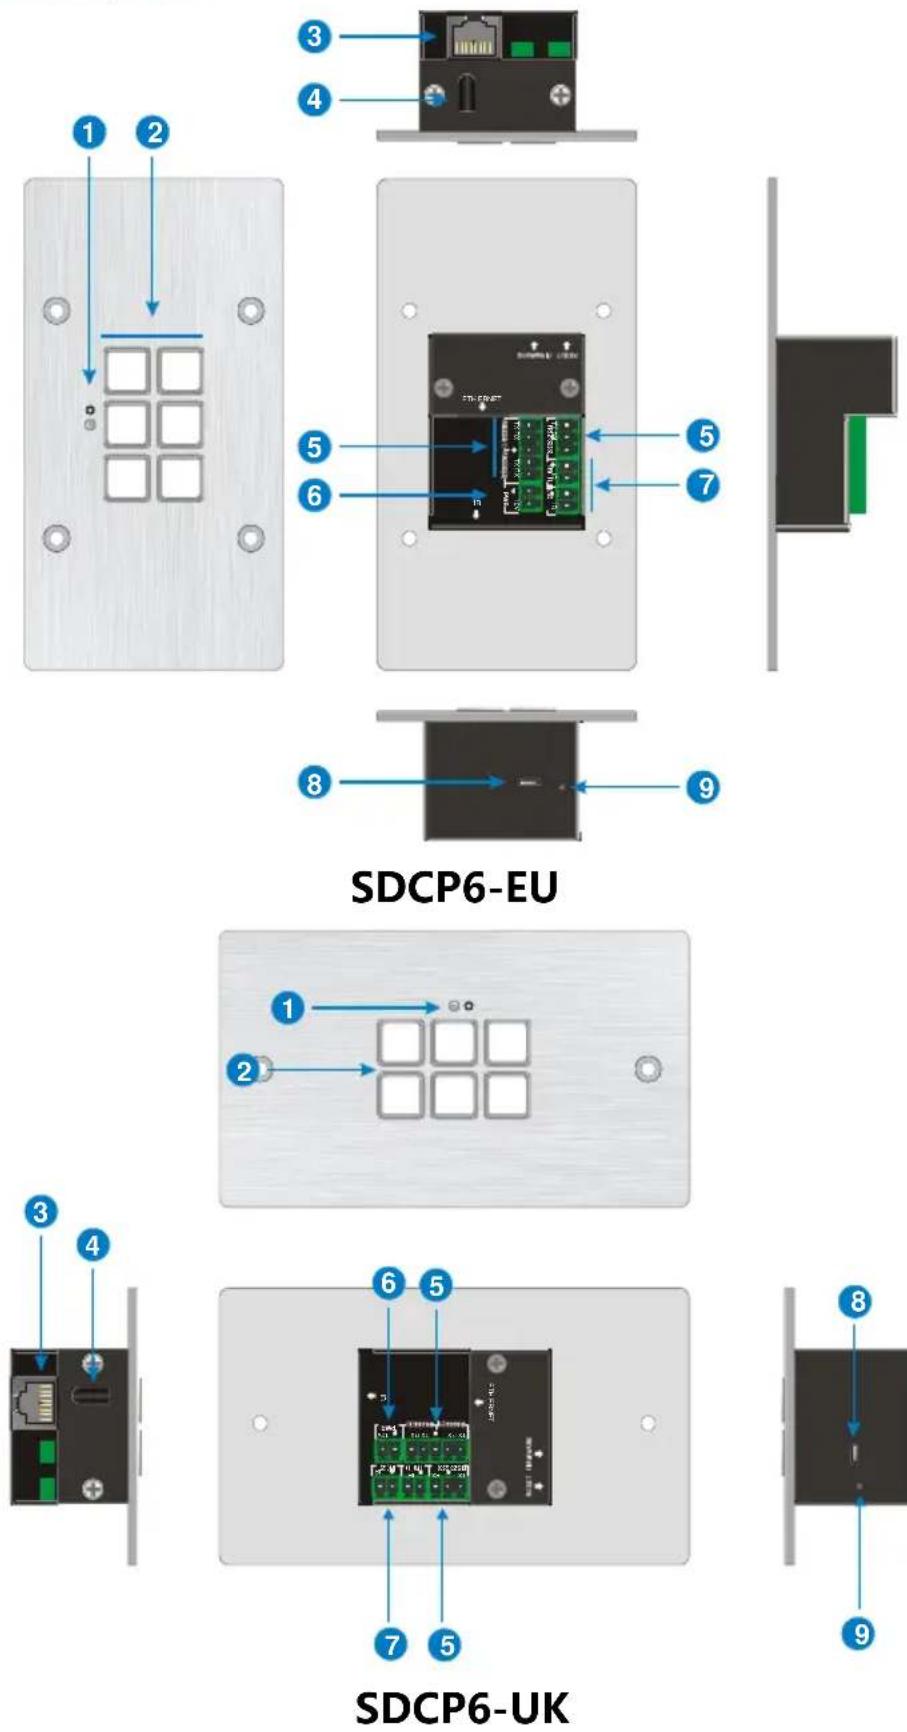
| No. | Name | Description |
| 1 | Power LED | Illuminates red when powered on. |
| 2 | Button | (6) crystal and luminescent programmable buttons:Each button can be programmed with the Control Panel Software.Each label within a button can be easily changed. Simply select the label you need and change it as shown below: |
| 3 | ETHERNET | RJ45 connector. Connects with PC to run the Control Panel Software to customize button control. After setting button functions, the port can be connected to the third-party device to control it by buttons. |
| 4 | IR Sensor | Receives and learns the IR code to build the IR database. |
| 5 | RS232(1) ~ RS232(3) | Total 3 RS232 ports. Connect the third-party devices, which are needed to be controlled via the Control Panel Software. |
| 6 | PWR(12V) | Connects with 12V DC power adaptor. |
| 7 | IR (1) ~ IR (2) | 2 IR output ports. Connect with IR Emitter to control other devices via the Control Panel Software. |
| 8 | FIRMWARE | Micro USB port for updating firmware. |
| 9 | RESET | Long-press this button 3 seconds until the power LED goes out to start to the restore factory defaults, and then the LED will light up while the resetting is successful. |
3. System Connection
The SDCP6 can activate different ports at one time. It means every button can send the RS232 commands, IR code at the same time.
The demo system diagram as below:

flowchart
graph TD
    A["Laptop"] --> B["Wireless Route"]
    B --> C["Matrix Switcher"]
    C --> D["Compact Scaler Switcher"]
    D --> E["Projector"]
    E --> F["IR Emitter"]
    F --> G["IR Remote"]
    G --> H["IR Emitter"]
    H --> I["Projector"]
    style A fill:#f9f,stroke:#333
    style B fill:#ccf,stroke:#333
    style C fill:#cfc,stroke:#333
    style D fill:#fcc,stroke:#333
    style E fill:#cff,stroke:#333
    style F fill:#ffc,stroke:#333
    style G fill:#cfc,stroke:#333
    style H fill:#fcc,stroke:#333
    style I fill:#fff,stroke:#333
① Connect the SDCP6 to the LAN port of Wireless Router, or control device (such as PC) to ETHERNET port.
② Connect the third-party devices (such as Matrix Switcher, Compact Scaler Switcher or Projector) that need to be controlled to RS232 (1) \~RS232 (3) ports.
③ Connect the IR Emitters to IR (1) \~ IR (2) ports.
4. Control Panel Software
4.1 Basic Setting
You can use Control Panel Software to easily set functions for every button.
① Connect the control PC to the ETHERNET port.
② The default IP of SDCP6 is 192.168.0.178 (modifiable), the control PC should be set its network segment to the same as the SDCP6's.
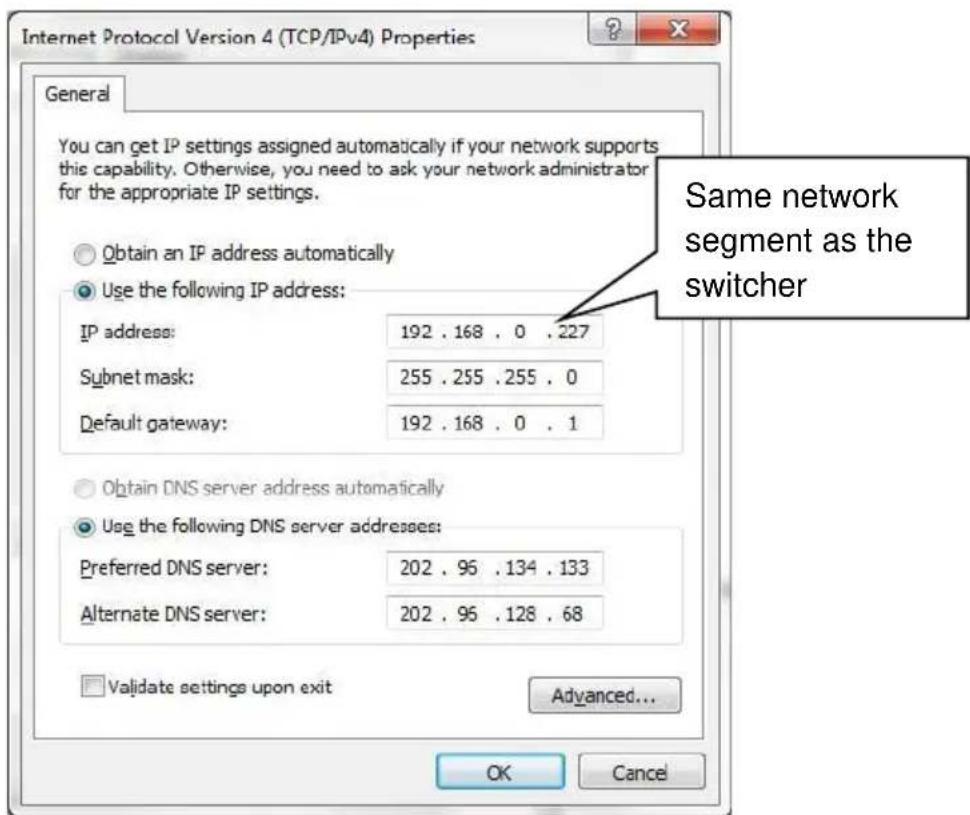
text_image
Internet Protocol Version 4 (TCP/IPv4) Properties General You can get IP settings assigned automatically if your network supports this capability. Otherwise, you need to ask your network administrator for the appropriate IP settings. Obtain an IP address automatically Use the following IP address: IP address: 192 . 168 . 0 . 227 Subnet mask: 255 . 255 . 255 . 0 Default gateway: 192 . 168 . 0 . 1 Obtain DNS server address automatically Use the following DNS server addresses: Preferred DNS server: 202 . 95 . 134 . 133 Alternate DNS server: 202 . 95 . 128 . 68 Validate settings upon exit Advanced... OK Cancel Same network segment as the switcherModify the IP of PC
③ Installation/uninstallation of Control Panel Software:
Installation: Copy the software file to the computer connected with SDCP6.
Uninstallation: Delete all the software files in corresponding file path.
④ Double-click the below software icon to run this software:

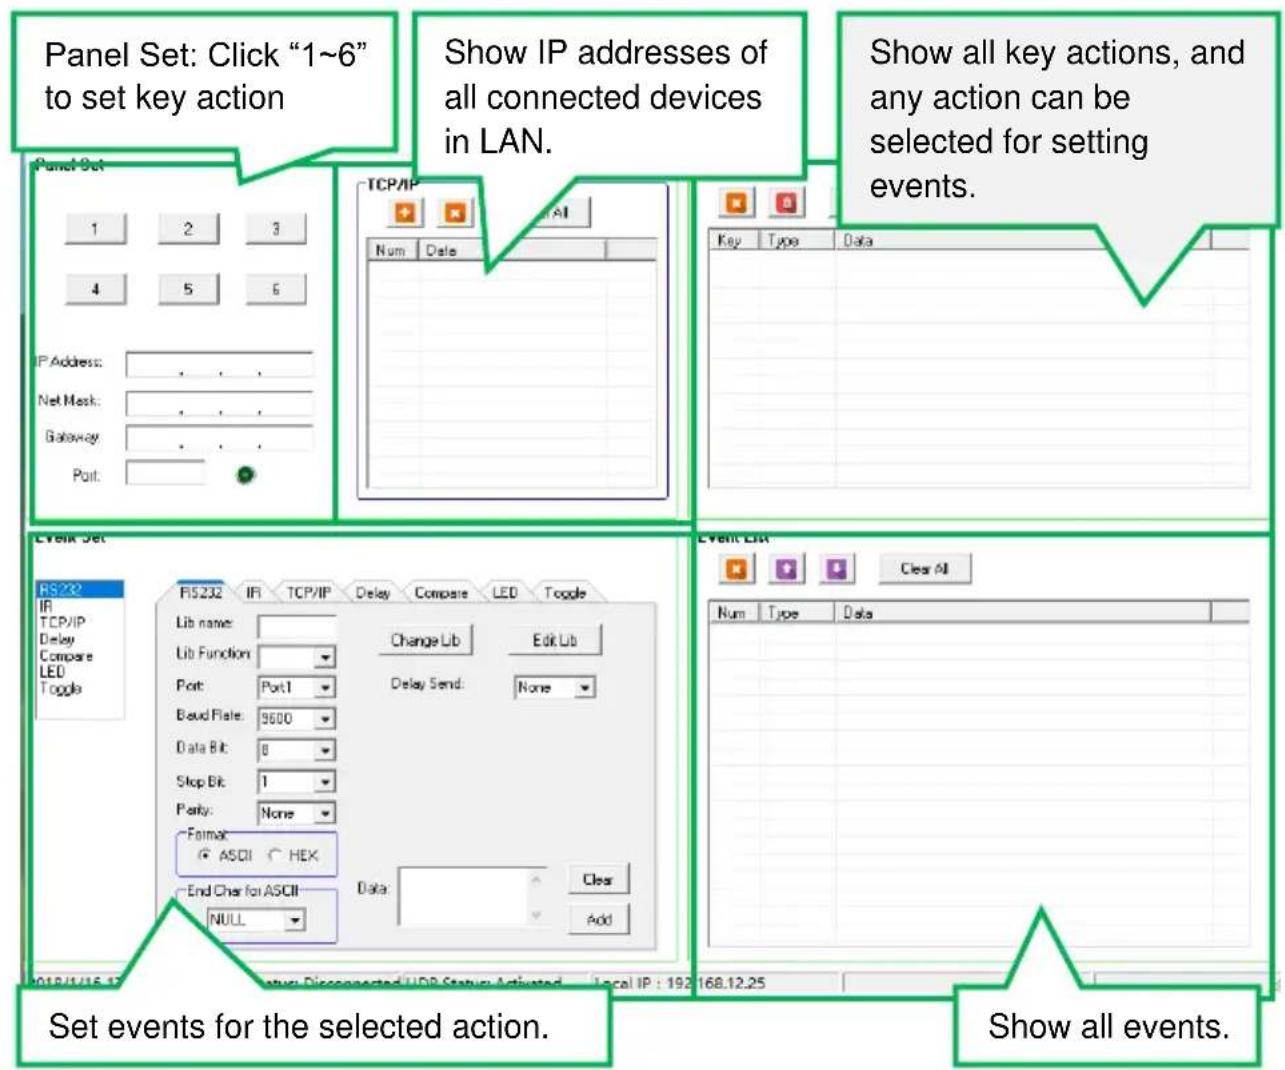
The main window of the Control Panel Software has five parts: Panel Set, TCP/IP, Action List, Event Set and Event List.
The main window of Control Panel Software is shown as below:
text_image
Panel Set: Click "1~6" to set key action Show IP addresses of all connected devices in LAN. Show all key actions, and any action can be selected for setting events. Panel Set 1 2 3 4 5 6 IP Address: Net Mask: Gateway: Port: TCP/IP Num Date Key Type Data Event List RS232 IR TCP/IP Delay Compare LED Toggle Lib name: Lib Function Change Lib Edit Ub Port: Port1 Delay Send: None Baud Rate: 9600 Data Bit: 0 Stop Bit: 1 Parity: None Format: ASCII HEK End Char for ASCII NULL Data Clear Add 01/8/1/15 17 Setup Disconnected UDB Status Activated Local IP : 192 168.12.25 Set events for the selected action. Show all events.The header of the main window has four titles including File, System, Connection and Help.
- Click "File" → "Save" to save the current setting.
- Click "File" → "Save as" to save all configuration information as a file.
- Click "File" → "Open" to open a configuration file.
- Click "System" → "Version" to query the current software version.
- Click “System” → “Message” to query the Link Status, Machine Type, Software Version, IP Information, MAC address.
- Click "File" → "Software Update"
Hold the button "3" and power on system until the button lights up to enable update mode → Open upgrade Web page (http://192.168.0.178:4001/) on IE → Type User ID (admin) and Password (123456) → upload update file → Click "Upload"
- Click “System” → “Factory Defaults” to restore factory defaults.
- Click “Connection” → “TCP/IP” → “Reconnect” to reconnect all SDCP6.
- Click “Connection” → “Upload” → to load the MCU information from the selected SDCP6 to control software.
- Click “Connection” → “Download” → to download the current setting information to the selected SDCP6 from the control software.
4.2 Panel Set
Total 6 customizable buttons on the front panel can be set via this software. Add a button action to show on the action list, and then add events to make this action execute the events.
Here set one button for example:
Panel Set
text_image
1 2 3 4 5 6
text_image
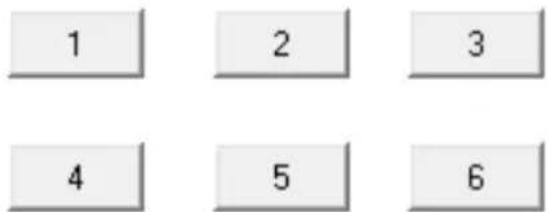
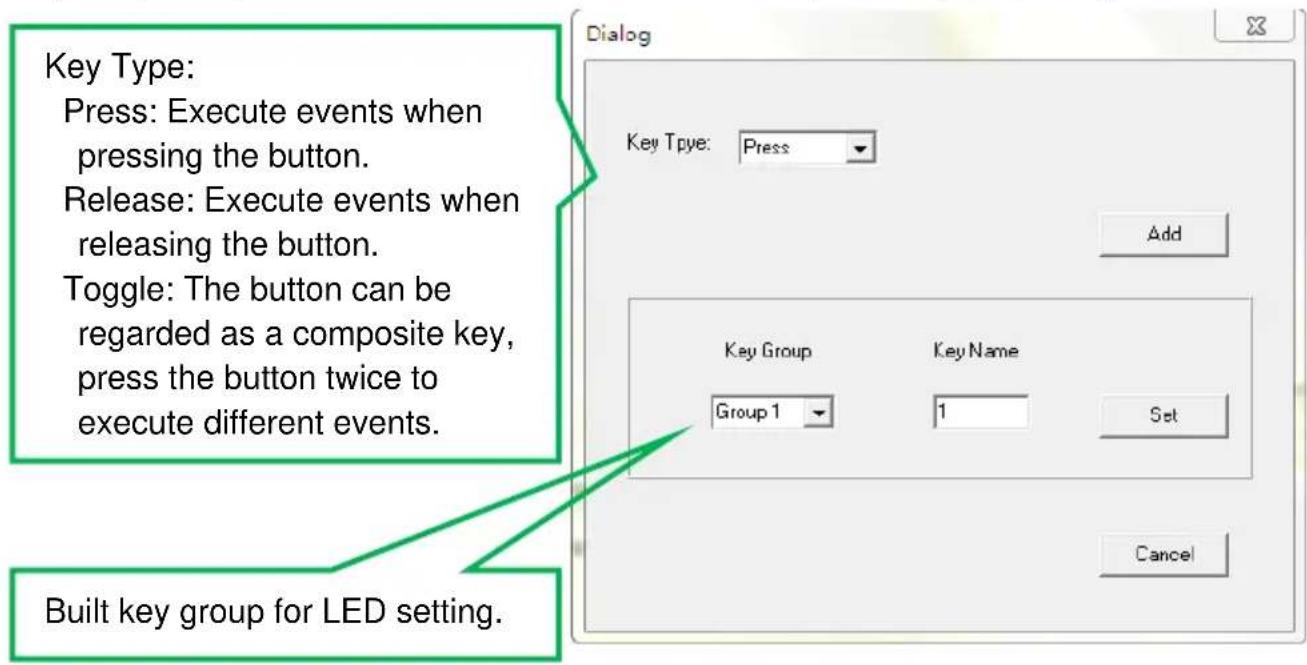
IP Address: Net Mask: Gateway: Port:Keys 1-6, correspond to the buttons on SDCP6. Click the key 1, it will pop up dialog as below:
text_image
Key Type: Press: Execute events when pressing the button. Release: Execute events when releasing the button. Toggle: The button can be regarded as a composite key, press the button twice to execute different events. Built key group for LED setting.4.3 Action List
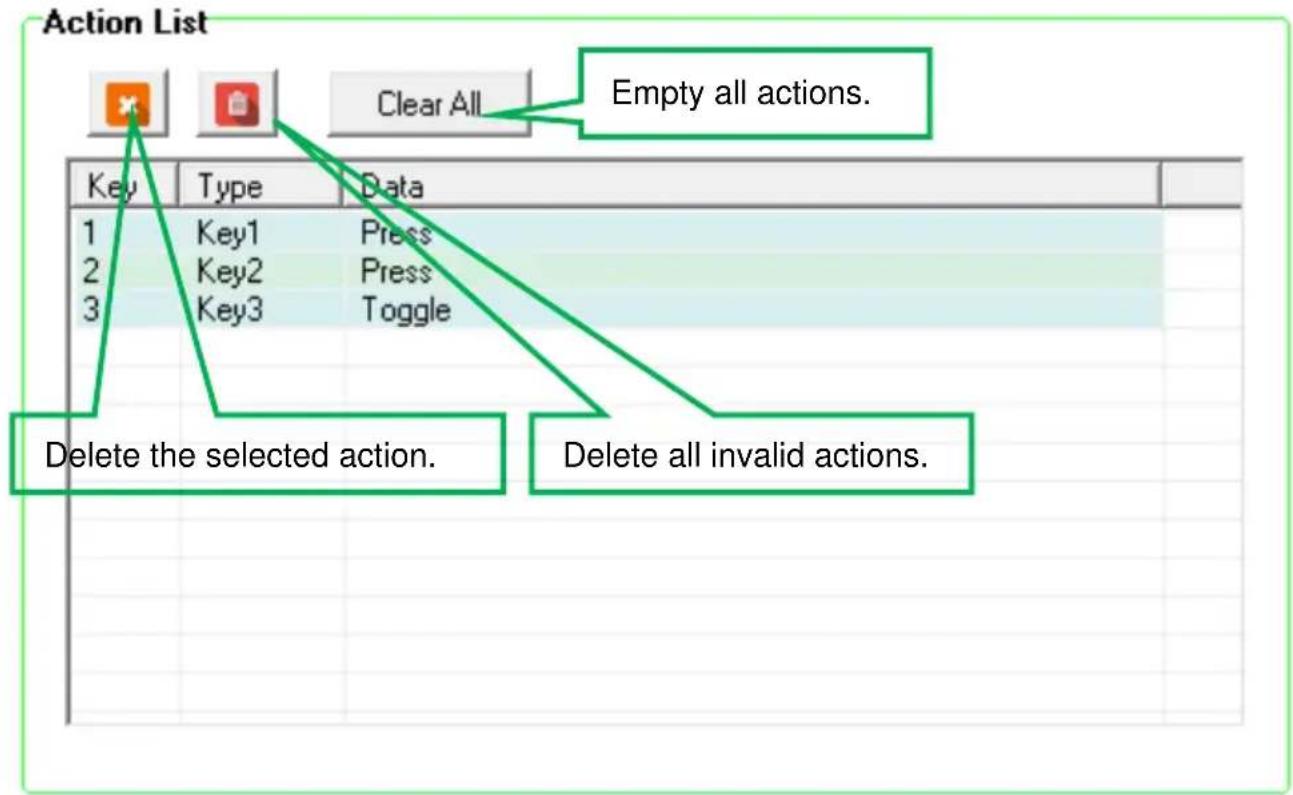
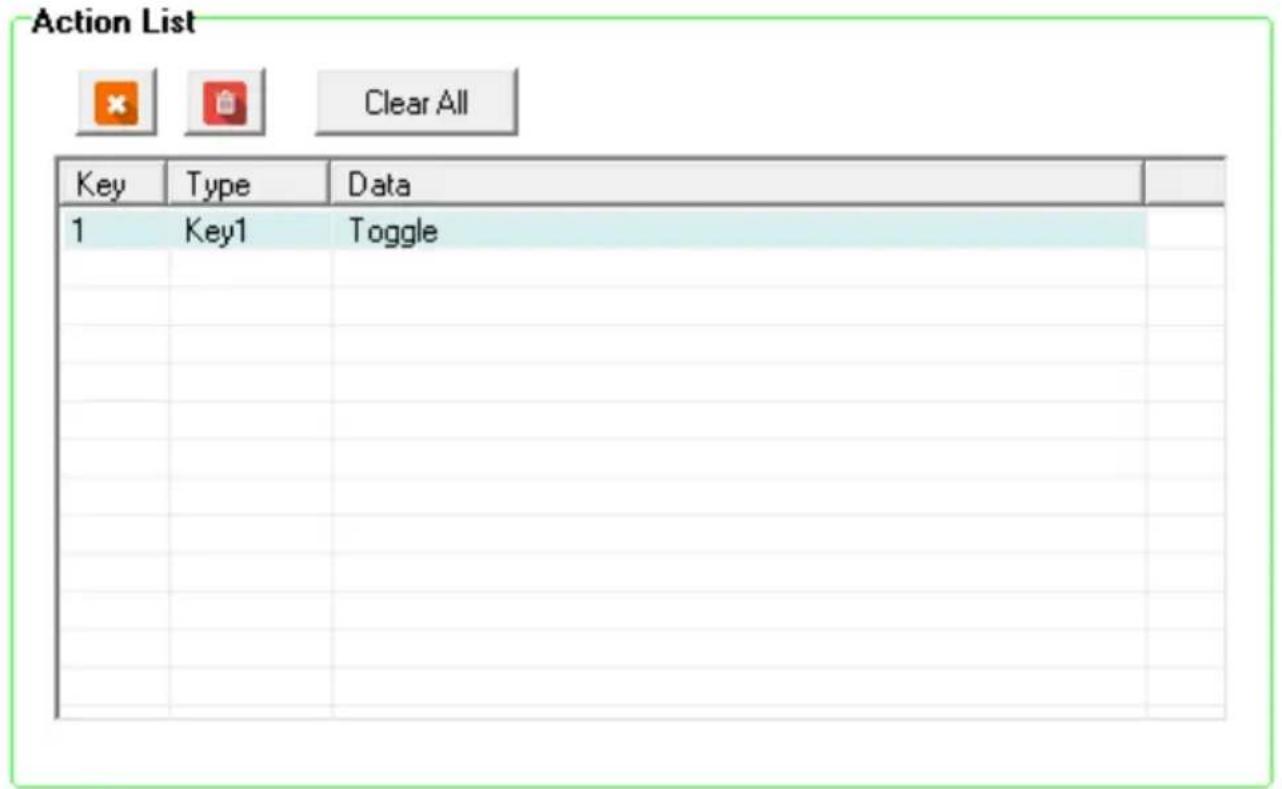
All Panel Set actions will be shown on the action list and available actions must be added to the list. The action list is as the picture below:
text_image
Action List Clear All Empty all actions. Key Type Data 1 Key1 Press 2 Key2 Press 3 Key3 Toggle Delete the selected action. Delete all invalid actions.4.4 Event setting
Event Set part includes RS232, IR, TCP/IP, Delay, Compare, LED and Toggle setting. Before set events, an action must be added first. The following introduction is about how to set events for each action.
4.4.1 RS232 Setting
This item is used for setting the events for RS232 (1) \~ RS232 (3) ports. Click "RS232", it will show as below:
Event Set
RS232
IR
TCP/IP
Delay
Compare
LED
Toggle
RS232
Lib name:
Lib Function:
Port:
Baud Rate:
Data Bit:
Stop Bit:
Parity:
Format

ASCII

HEX
End Char for ASCII
NULL

Data:

text_image
Clear AddOperation procedure:
① Select the button action in action list.
② Set the "Lib name" and "Lib Function". It is an optional function, not necessary.
③ Select the RS232 port. The port must be same as model setting, otherwise the event cannot be added.
④ Confirm and set the baud rate, data bit, stop bit and parity.
⑤ Enter RS232 command in data box, and then press "add" to save setting.
⑥ The RS232 data also can be selected from library. Click "Change Lib" to select a library file and open it, or Click "Edit Lib" to create a library file as below:
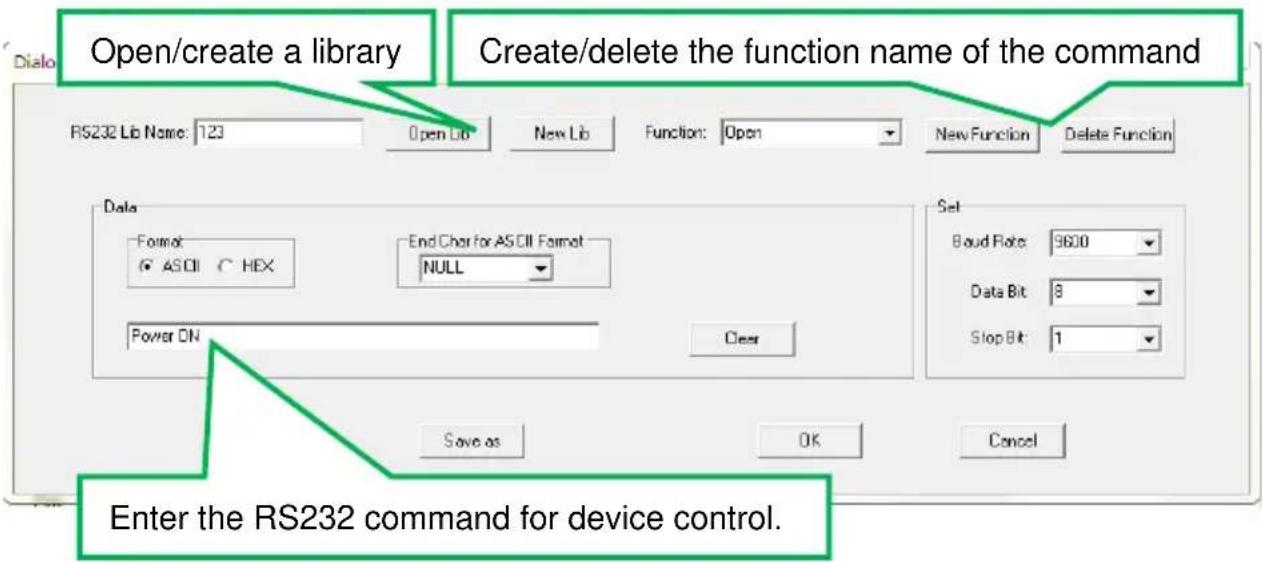
text_image
Open/create a library Create/delete the function name of the command RS232 Lib Name: 123 Open Lib New Lib Function: Open New Function Delete Function Data Format: ASCII C HEX End Chor for ASCII Format NULL Power ON Clear Set Baud Rate: 9600 Data Bit: 8 Stop Bit: 1 Enter the RS232 command for device control. Save as OK CancelNote: Once set up, please press "Save" to save the editing or "Save as" to save as a file, and then press "OK".
⑦ There are two delay send: Set and None. When select "Set", the number of sending strings and the delay time between strings can be set.
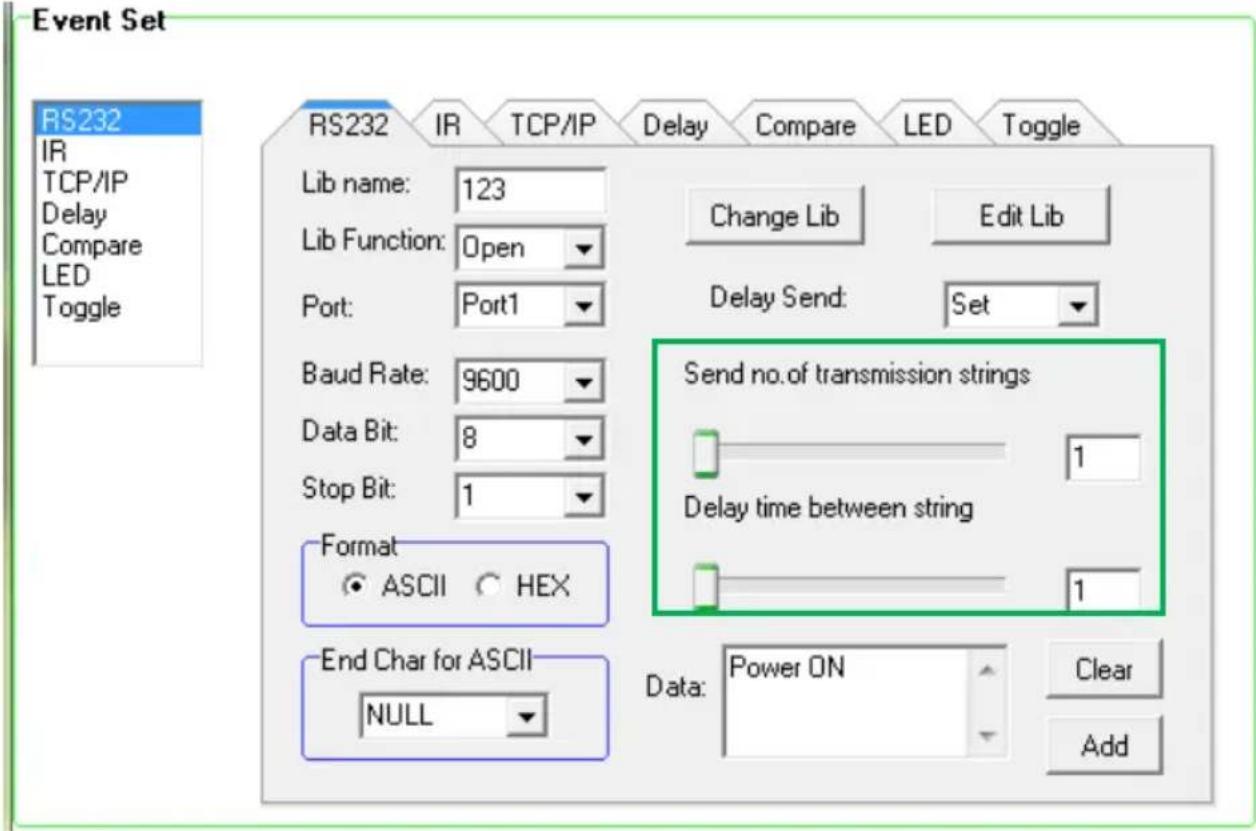
text_image
Event Set RS232 IR TCP/IP Delay Compare LED Toggle RS232 IR TCP/IP Delay Compare(LED Toggle Lib name: 123 Lib Function: Open Port: Port1 Change Lib Edit Lib Delay Send: Set Baud Rate: 9600 Data Bit: 8 Stop Bit: 1 Send no.of transmission strings 1 Delay time between string Format ASCII HEX End Char for ASCII NULL Data: Power ON Clear Add4.4.2 IR Setting
This item is used for setting the events for IR (1) \~ IR (2) ports. Click "IR", it will show as below:
Event Set
RS232
IR
TCP/IP
Delay
Compare
LED
Toggle
RS232
IR
TCP/IP
Delay
Compare
LED
Toggle
Lib name:
OPEN
Delay Send:
Set
▼
Lib Function:
CEC ON

Send no.of transmission strings
Port:
Port1


1
Delay time between string
Carrier:
On


1
Change Lib
Edit Lib
Add
Operation procedure:
① Select the button action in action list.
② Set the "Lib name" and "Lib Function". It is optional function, not necessary.
③ Select the IR port. The port must be same as model setting, otherwise the event cannot be added.
④ Set the IR carrier mode: On/Off
⑤ The IR data need to be selected from library. Click “Change Lib” to select a library file and open it. Click “Edit Lib” to create or edit a library file as below:

text_image
Create/open a library Create/delete/rename the function name of the IR data IR Lib Name: OPEN Open Lib Create Lib Edit New Function Delete Function Rename For Function No. name Data 1 CEC ON FFFFFFFFFFFFFFFFFFFFFFFFFFFFFFFFFFFFFFFFFFFF Show IR data. Learn Save Edit Save as ExitIR Learning Procedure:
Click "learn" to enter IR learning mode.
Put the IR Remote close to the IR sensor of SDCP6
Press any button on the IR Remote to send the IR code to IR sensor, and it will refresh the IR data.
Follow the same steps can learn any function of the remote buttons.
Note: The IR learning mode will exit automatically if no operation within 3 seconds.
Note: Once set up, please press "Save Edit" to save the editing or "Save as" to save as a file, and then press "OK".
⑥ There are two delay send options: Set and None. When select "Set", the number of sending strings and the delay time between strings can be set.
Event Set
RS232
IR
TCP/IP
Delay
Compare
LED
Toggle
RS232
IR
TCP/IP
Delay
Compare
LED
Toggle
Lib name:
OPEN
Delay Send:
Set

Lib Function:
CECON

Send no. of transmission strings

1
Port:
Port1

Delay time between string

1
Carrier:
On

Add
Change Lib
Edit Lib
4.4.3 TCP/IP Setting
The Ethernet port supports pass-through function. You can set the events for different IP port via commands.
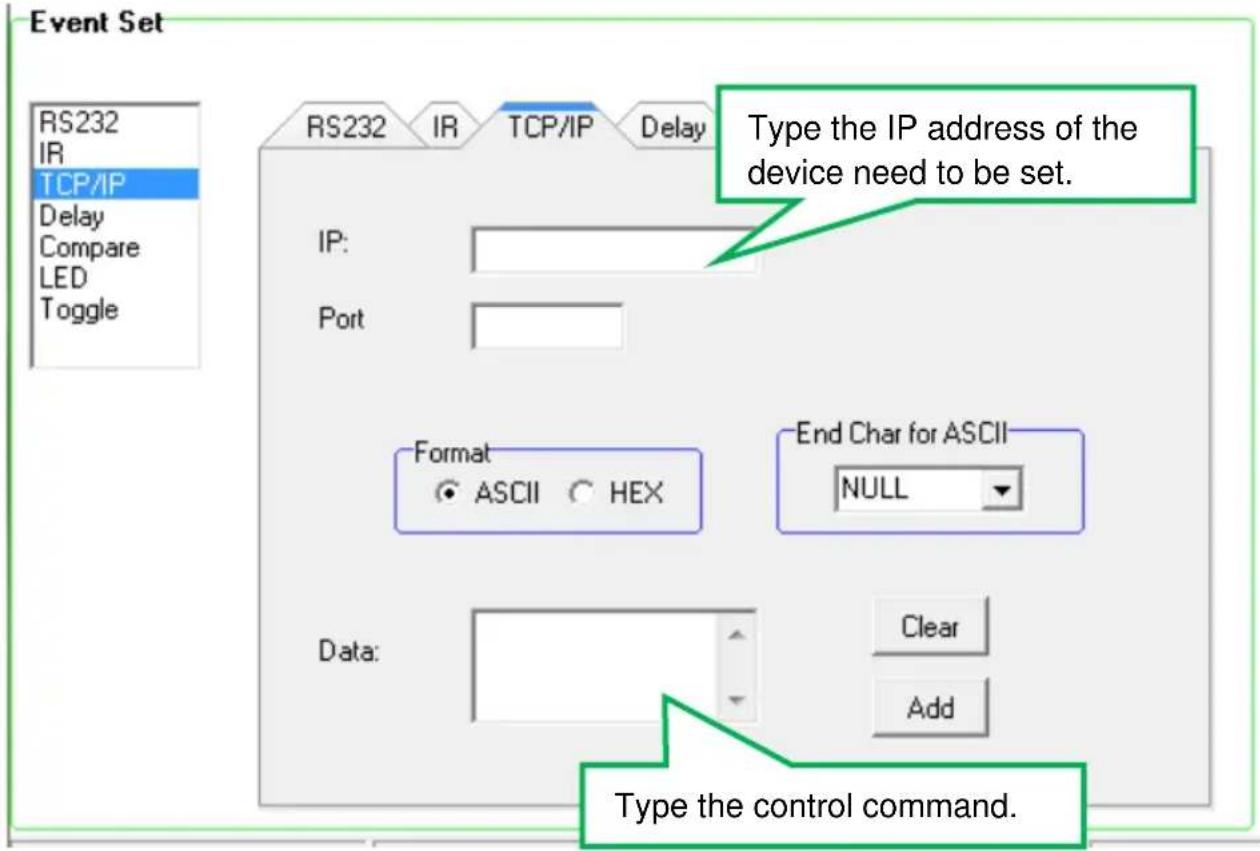
text_image
Event Set RS232 IR TCP/IP Delay Compare LED Toggle RS232 IR TCP/IP Delay Type the IP address of the device need to be set. IP: Port Format ASCII HEX End Char for ASCII NULL Data: Clear Add Type the control command.4.4.4 Delay setting
This item is to add a delay between two events; so when one event is finished, it will delay a certain time then start next event. The delay setting is as picture below:
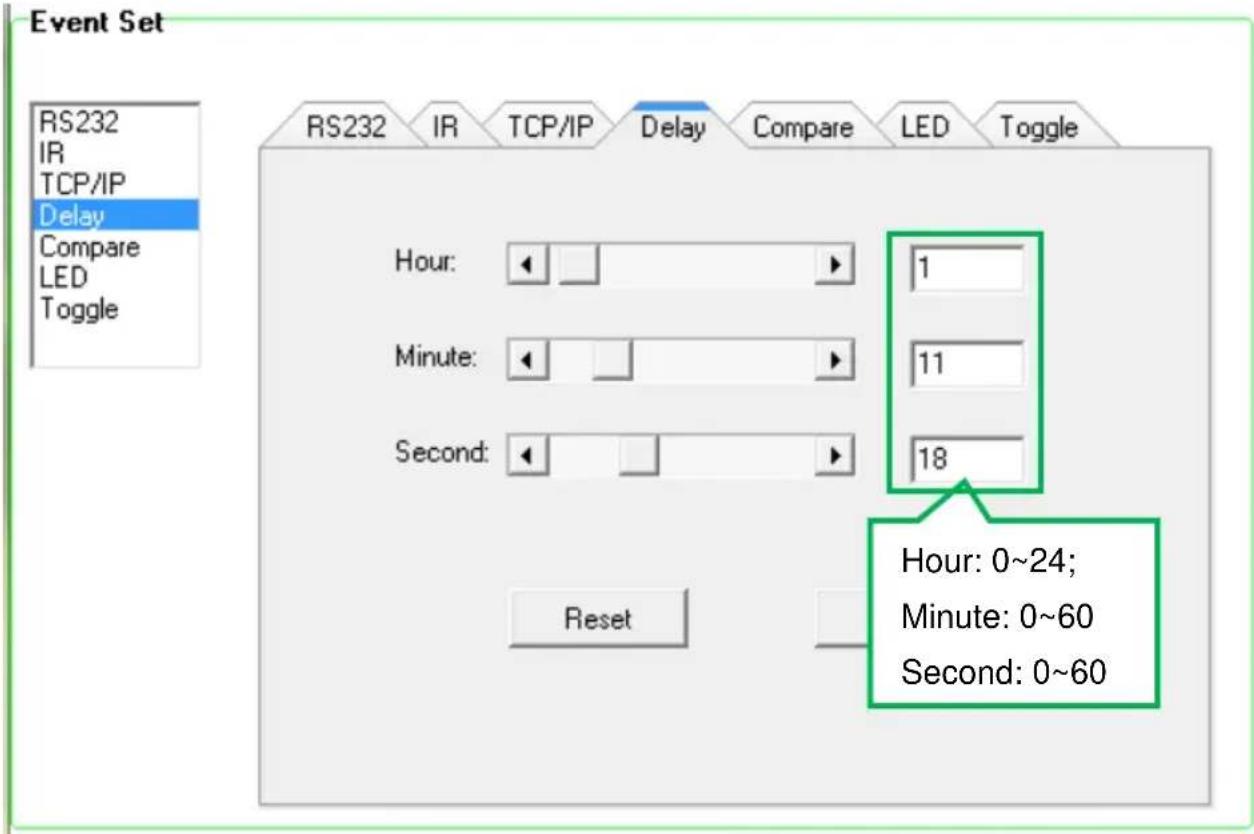
text_image
Event Set RS232 IR TCP/IP Delay Compare LED Toggle RS232 IR TCP/IP Delay Compare(LED Toggle Hour: 1 Minute: 11 Second: 18 Reset Hour: 0~24; Minute: 0~60 Second: 0~604.4.5 Compare Setting
This item is used to compare the feedback of RS232 commands. When SDCP6 sends an RS232 command to the controlled device, the device will send back a feedback. If we add the correct feedback in the data, SDCP6 will compare it with the feedback received from controlled device, to verify the command is working or not. The compare setting is as the picture below:
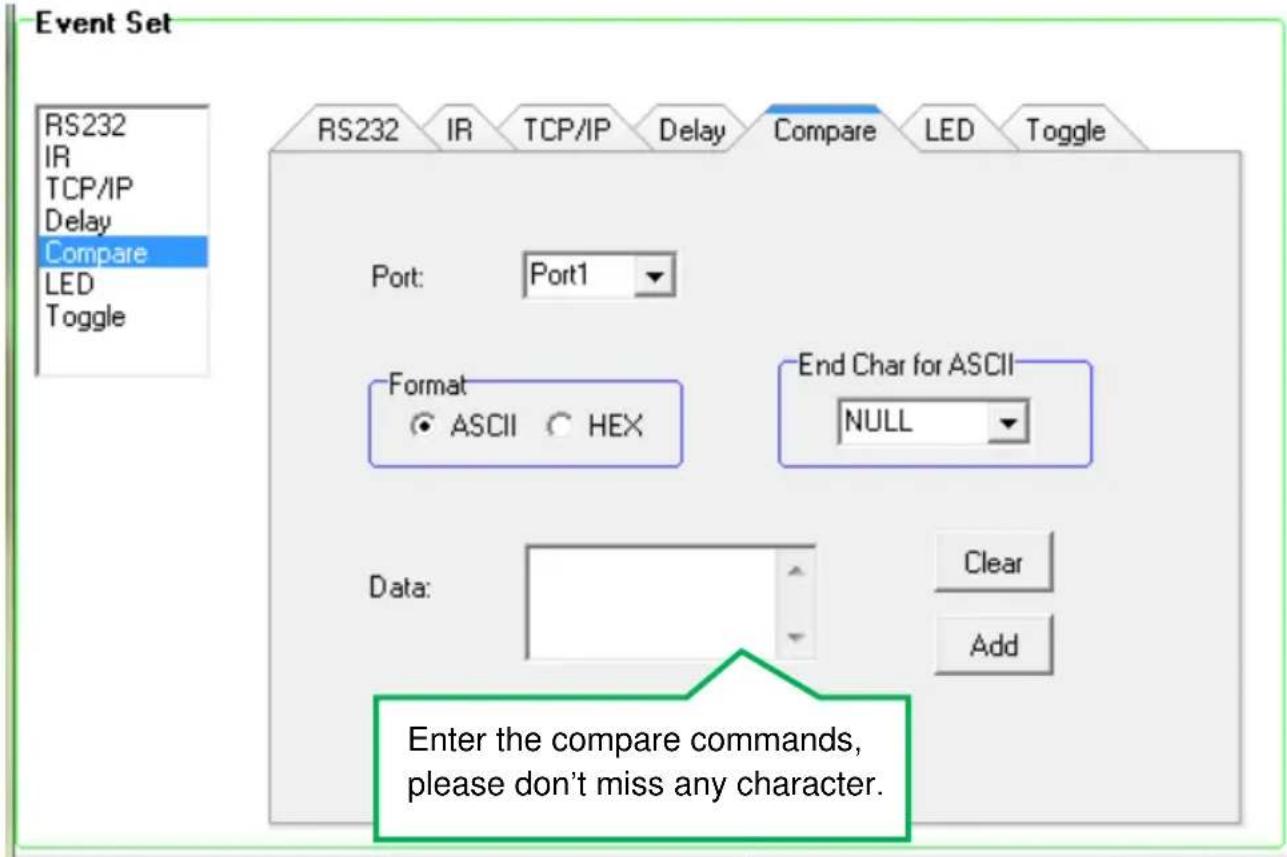
text_image
Event Set RS232 IR TCP/IP Delay Compare LED Toggle Port: Port1 Format ASCII HEX End Char for ASCII NULL Data: Clear Add Enter the compare commands, please don't miss any character.Operation procedure:
① Select the button action in action list.
② Select the RS232 port. The port must be same as model setting, otherwise the event cannot be added.
③ Set the command format ASCII or Hex, and then set the terminator for ASCII.
④ Enter the RS232 command needed to be compared in data box, and then press "add" to save setting.
⑤ Add an event that the LED lights up to indicate the comparative result.
⑥ For the events in one event list have priority, from top to bottom, so that the compare function can be used in action which with three or more events.
4.4.6 LED setting
This item is used for setting the button LEDs in SDCP6 to turn on/off. The setting is as below:
Event Set
text_image
RS232 IR TCP/IP Delay Compare LED Toggle
text_image
RS232 IR TCP/IP Delay Compare LED Toggle Key: Key1 Light Action: OnOn: Turn on the LED of button 1;
Off: Turn off the LED of button 1;
On/Other Off: Turn on the LED of button 1, and turn off others.
On/Group Off: Turn on the LED of button 1, and turn off others in same group.
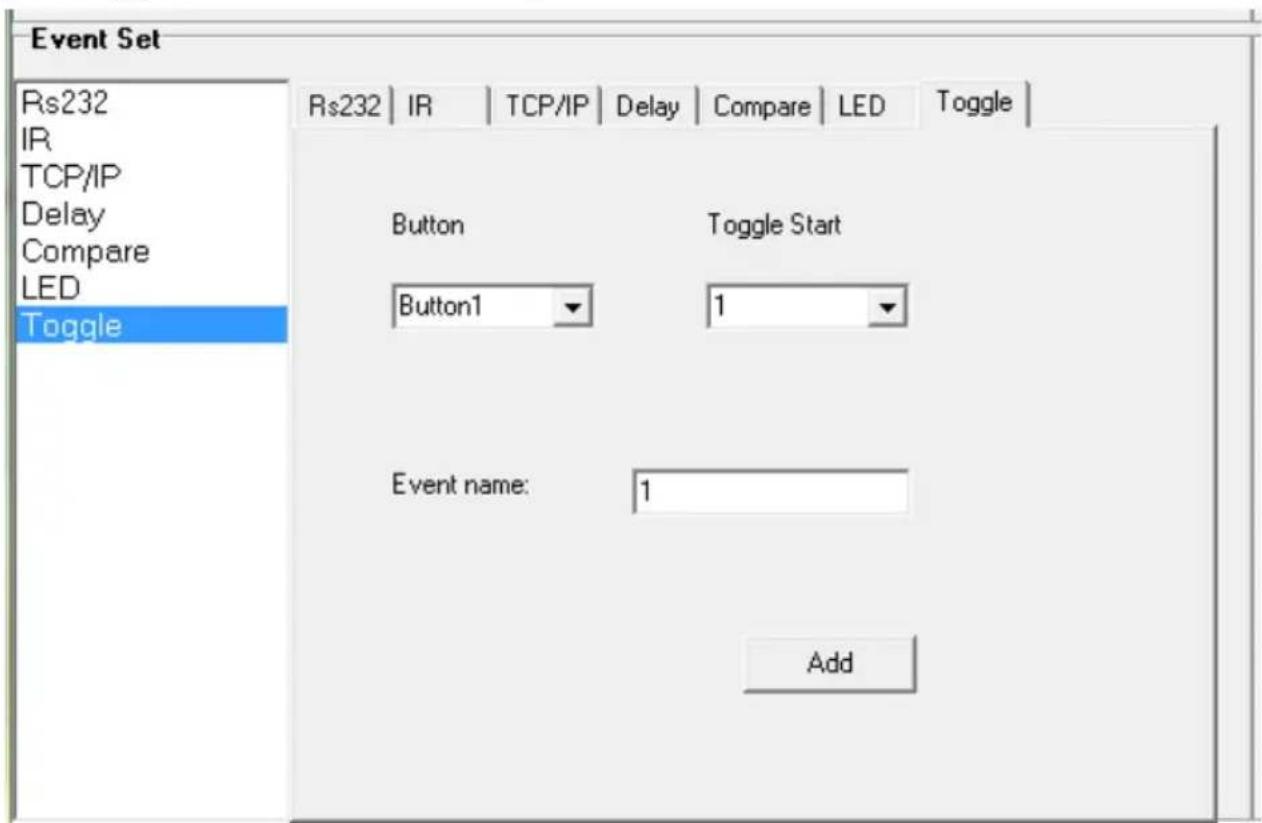
4.4.7 Toggle Setting
The key type can be set as "Toggle", in this type, the button can be regarded as a composite key. Here is an example to show you the use of this function:
Operation procedure:
① Take Key 1 for example, click "1" and select the action type "Toggle".
text_image
Action List Clear All Key Type Data 1 Key1 Toggle② Add toggle & RS232 events for the Key 1.
text_image
Event Set Rs232 | IR | TCP/IP | Delay | Compare | LED | Toggle | IR TCP/IP Delay Compare LED Toggle Button Toggle Start Button1 1 Event name: 1 AddEvent List


| Num | Type | Data | |
| 1 | Toggle | Key1, Toggle Start No.1 | |
| 2 | RS232 | Lib name: 123 Function: Open Port: 1,9600bps 8 1,Send No.... | |
| 3 | Toggle | Key1, Toggle Start No.2 | |
| 4 | RS232 | Lib name: 456 Function: Open Port: 1,9600bps 8 1,Send No.... | |
③ Press the Key 1, the event of Num 2 will be executed, and then press Key 1 again, the event of Num 4 will be executed.
4.5 Event List
The event list shows all events of the selected action. The executing priority abides by the serial number, see the picture below. If there is an event execute incorrectly, all the events behind it will not be executed.
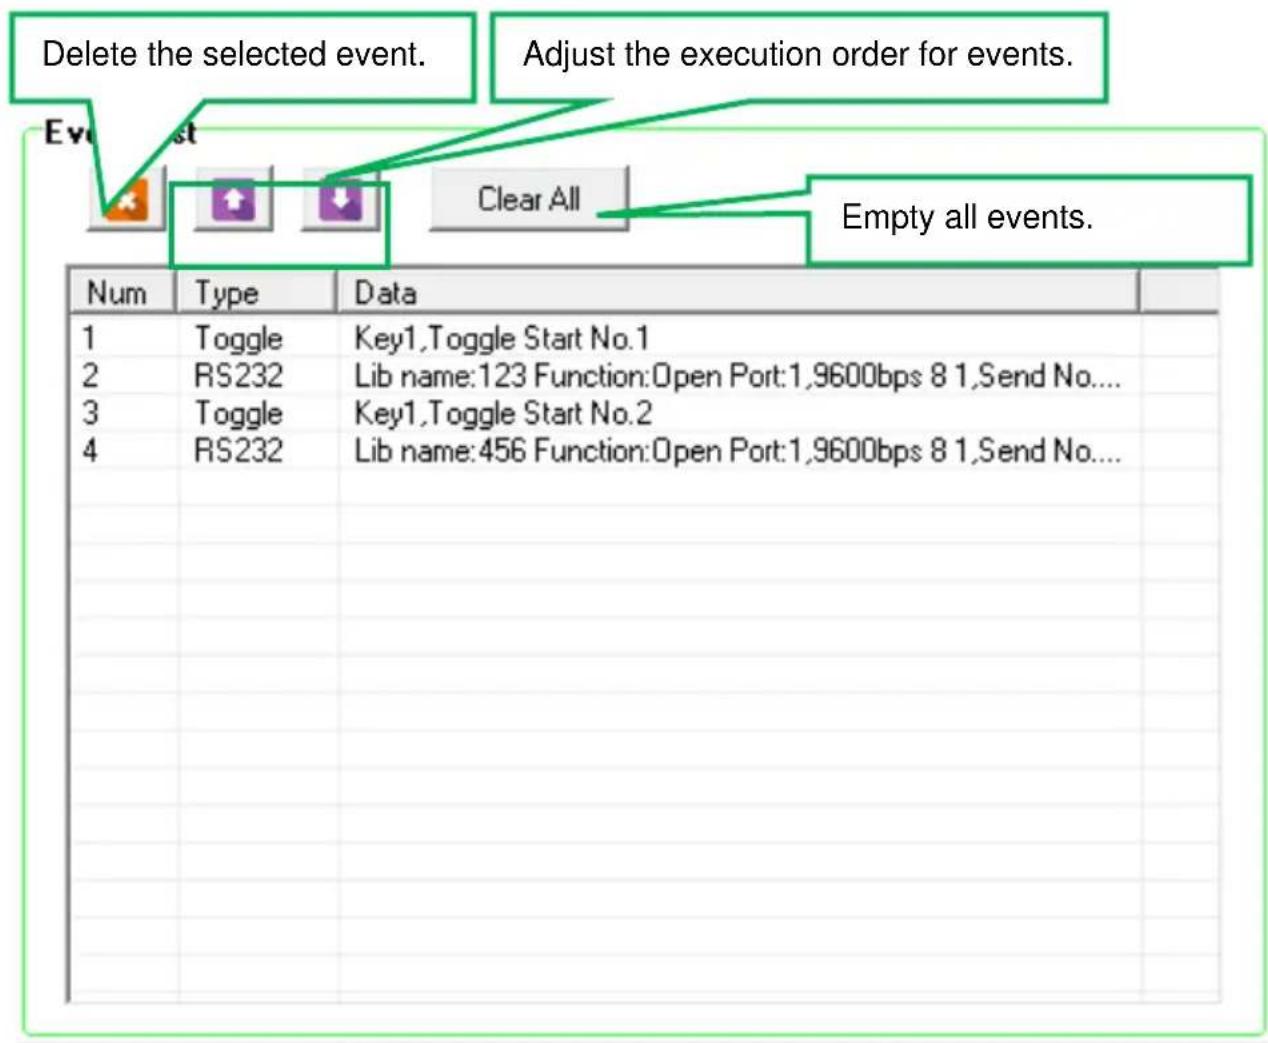
text_image
Delete the selected event. Adjust the execution order for events. Eve Clear All Empty all events. Num Type Data 1 Toggle Key1, Toggle Start No.1 2 RS232 Lib name:123 Function:Open Port:1,9600bps 8 1,Send No.... 3 Toggle Key1, Toggle Start No.2 4 RS232 Lib name:456 Function:Open Port:1,9600bps 8 1,Send No...- Specification
| Program Port | TCP/IP | |
| Output Port | 3 x RS232, 2 x IR | |
| Output Connector | 3 x 3-Pin Pluggable terminal blocks, 2 x 2-Pin Pluggable terminal blocks, | |
| Baud Rate and Protocol | 9600 baud, 8 data bits, 1 stop bit, no parity | |
| Software | SDCP6 | |
| Power Consumption | 1W (Max) | |
| Operation Temperature | 0 ~ +40°C | |
| Storage Temperature | -10 ~ +55°C | |
| Relative Humidity | 10% ~ 90% | |
| Power Supply | Input: 100VAC~240VAC, 50/60 Hz; Output: 12VDC 1A | |
| Net Weight | About 200g | |
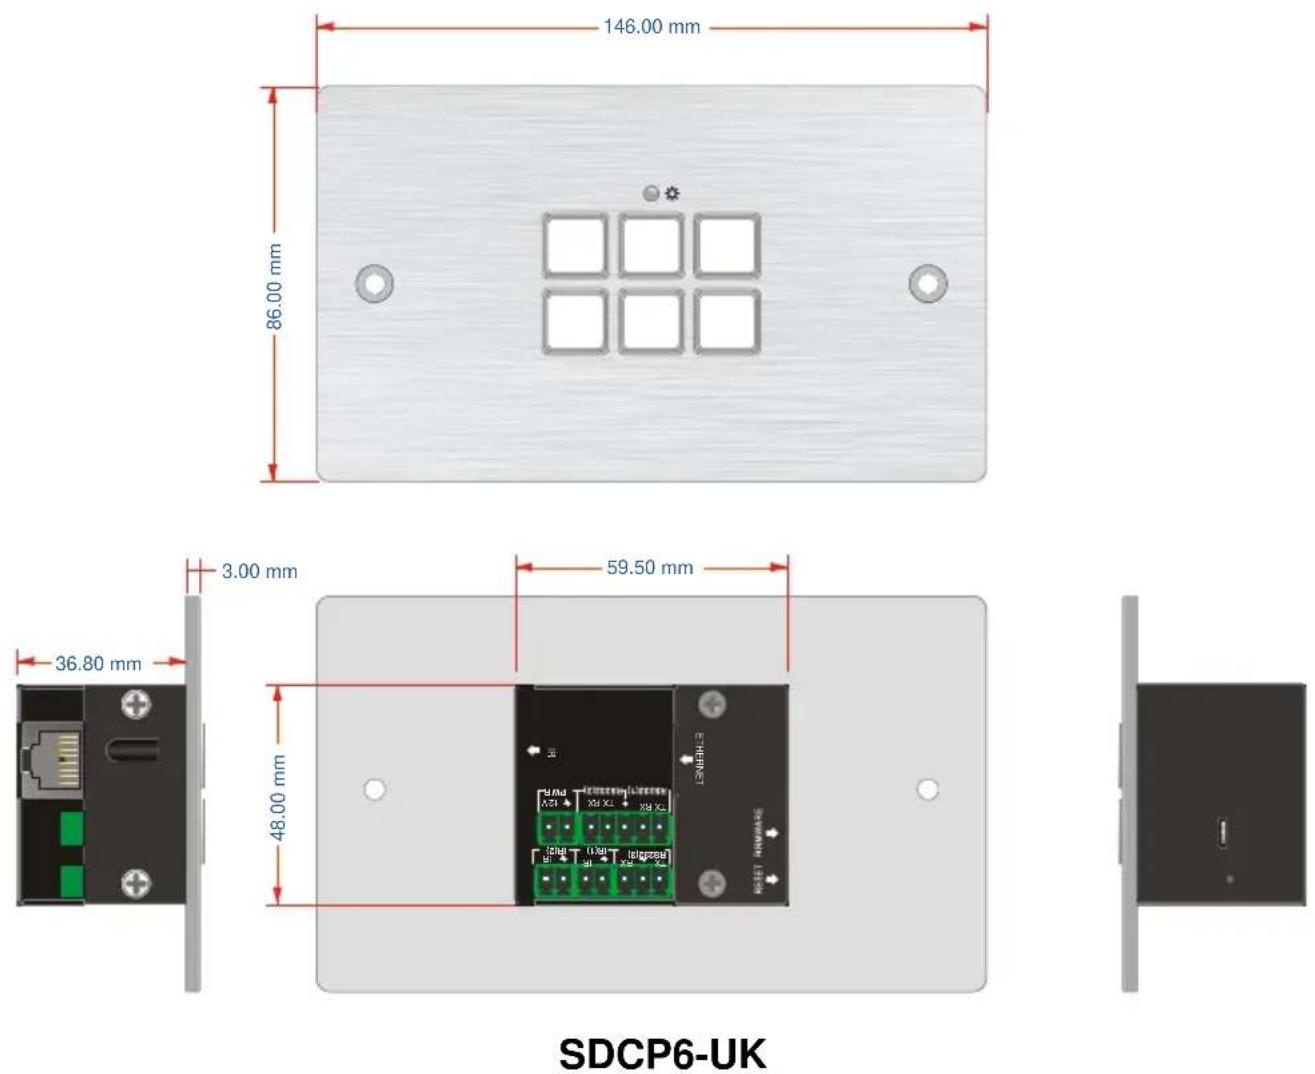
| Dimension (W*H*D) | 80mm x 151mm x 41mm (EU) 86mm x146mm x 36.8mm (UK) |
- Panel Drawing
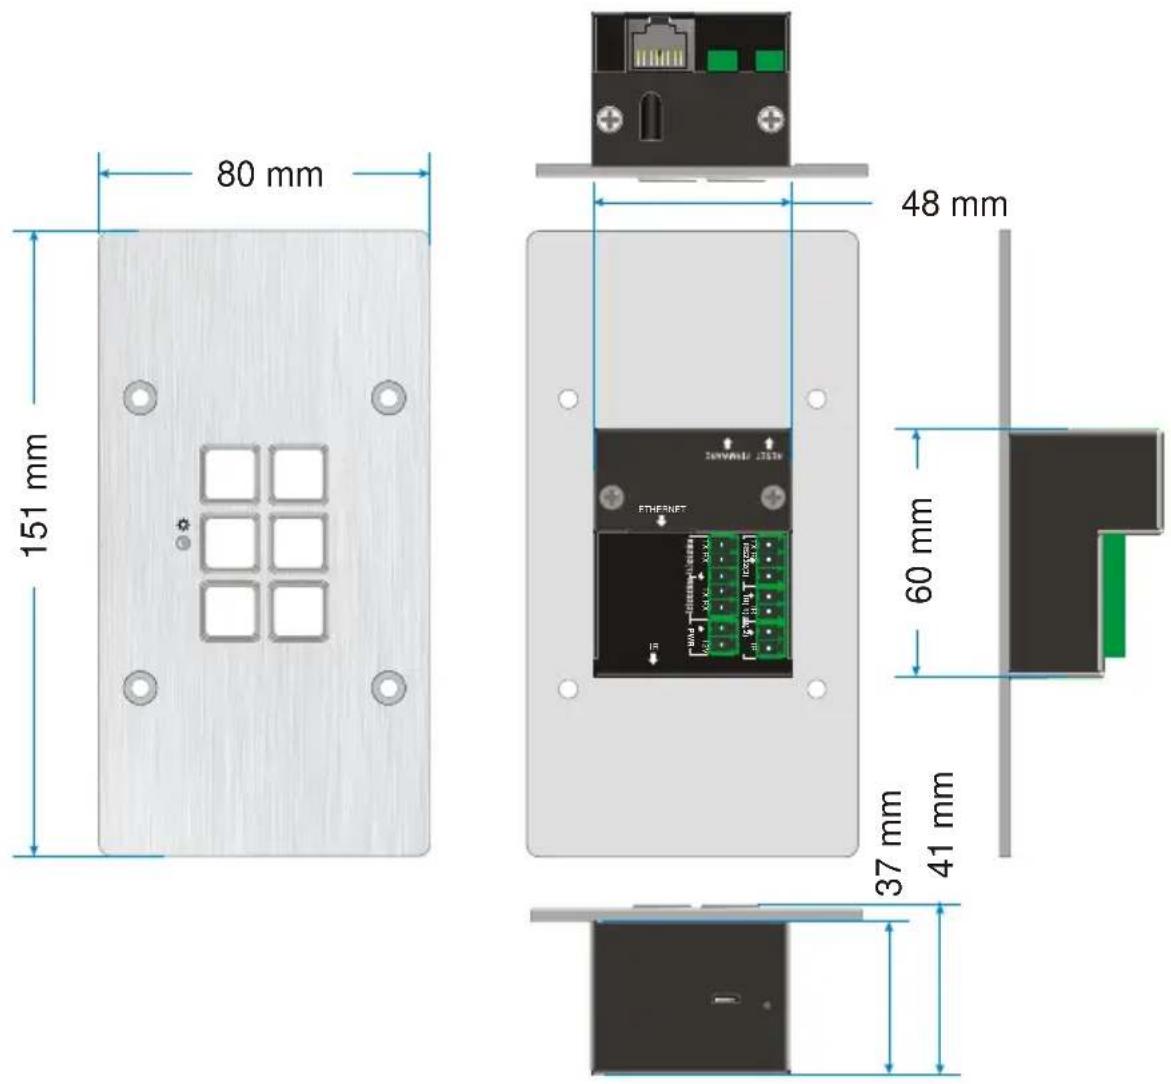
text_image
80 mm 151 mm 48 mm 60 mm 37 mm 41 mmSDCP6-EU