TV-32LE91T2W - TV Vivax - Free user manual and instructions
Find the device manual for free TV-32LE91T2W Vivax in PDF.

| Product Type | LED TV |
| Screen Size | 32 inches (81 cm) |
| Resolution | 1366 x 768 (HD Ready) |
| Refresh Rate | 60 Hz |
| Aspect Ratio | 16:9 |
| Dimensions (with stand) | 732 x 482 x 180 mm |
| Dimensions (without stand) | 732 x 432 x 80 mm |
| Weight (with stand) | 5.2 kg |
| Weight (without stand) | 4.8 kg |
| Power Consumption (typical) | 50 W |
| Power Consumption (standby) | 0.5 W |
| Power Supply | AC 110-240 V, 50/60 Hz |
| HDMI Inputs | 2 x HDMI (HDMI 1 with ARC) |
| USB Ports | 1 x USB 2.0 |
| Composite Video Input | 1 x AV (shared with component) |
| Component Video Input | 1 x YPbPr |
| RF Input | 1 x Antenna (VHF/UHF) |
| Audio Output | 1 x Digital Optical, 1 x Headphone Jack |
| Built-in Speakers | 2 x 10 W (SRS) |
| Remote Control | Infrared (batteries included) |
| Stand Type | Plastic base (included) |
| Wall Mount Pattern | 200 x 200 mm (M6 screws) |
| Repairability Index | 5.5 / 10 |
| Operating Temperature | 0°C to 40°C |
Frequently Asked Questions - TV-32LE91T2W Vivax
User questions about TV-32LE91T2W Vivax
0 question about this device. Answer the ones you know or ask your own.
Ask a new question about this device
Download the instructions for your TV in PDF format for free! Find your manual TV-32LE91T2W - Vivax and take your electronic device back in hand. On this page are published all the documents necessary for the use of your device. TV-32LE91T2W by Vivax.
USER MANUAL TV-32LE91T2W Vivax
natural_image
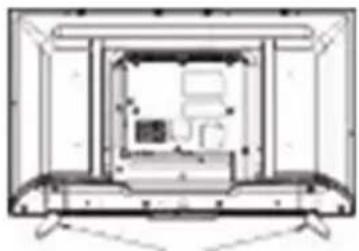
Technical line drawing of a device interior with labeled components and directional arrows (no text or symbols)- Postavite kućište TV
natural_image
Architectural cross-section diagram of a room with furniture and storage areas (no text or labels)-
Pričvrstite stalak i kućište i pomoću 4 priložena vijka (vijci bez gumene podloge).
-
Oprezno postavite TV prijamnik u uspravan položaj
TV-40LE91T2W
natural_image
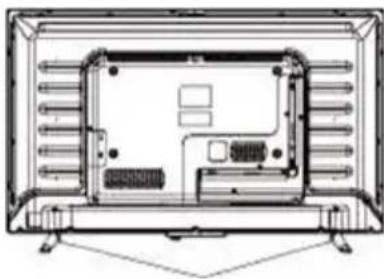
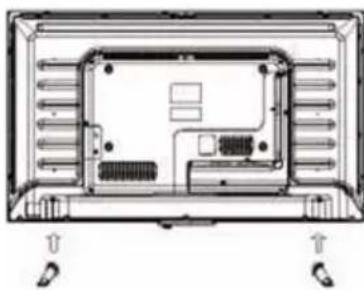
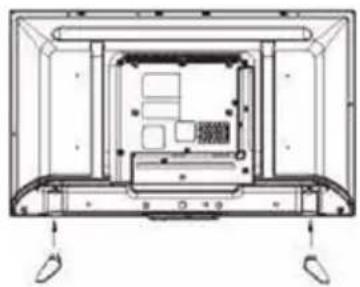
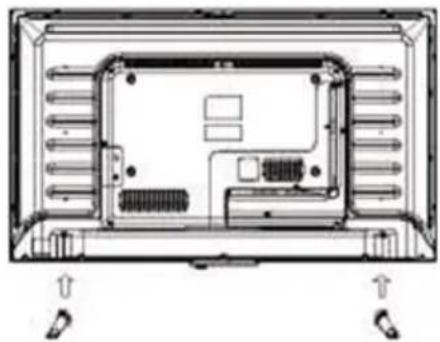
Top-down schematic of a device rear panel with internal components and mounting feet (no text or symbols)- Postavite kućište TV prijamnika na ravnu površinu te postavite stalak televizora na odgovarajuće mjesto. Osigurajte da se rupe vijaka poklapaju.
natural_image
Technical line drawing of a front-mounted TV or audio equipment unit with no visible text or symbols-
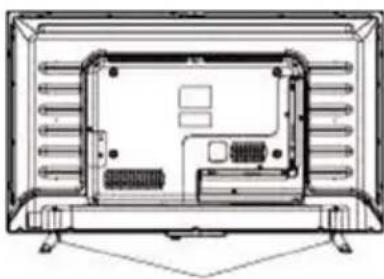
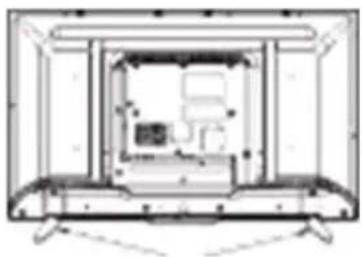
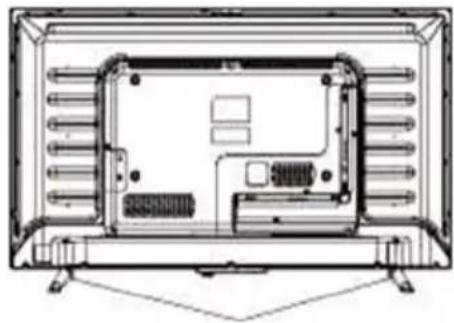
Pričvrstite stalak i kućište i pomoću 4 priložena vijka (vijci bez gumene podloge).
-
Oprezno postavite TV prijamnik u uspravan položaj
DOBRODOŠLI
Ovaj uređaj zadovoljava najviše standarde, inovativnu tehnologiju te visoku udobnost korištenja.

text_image
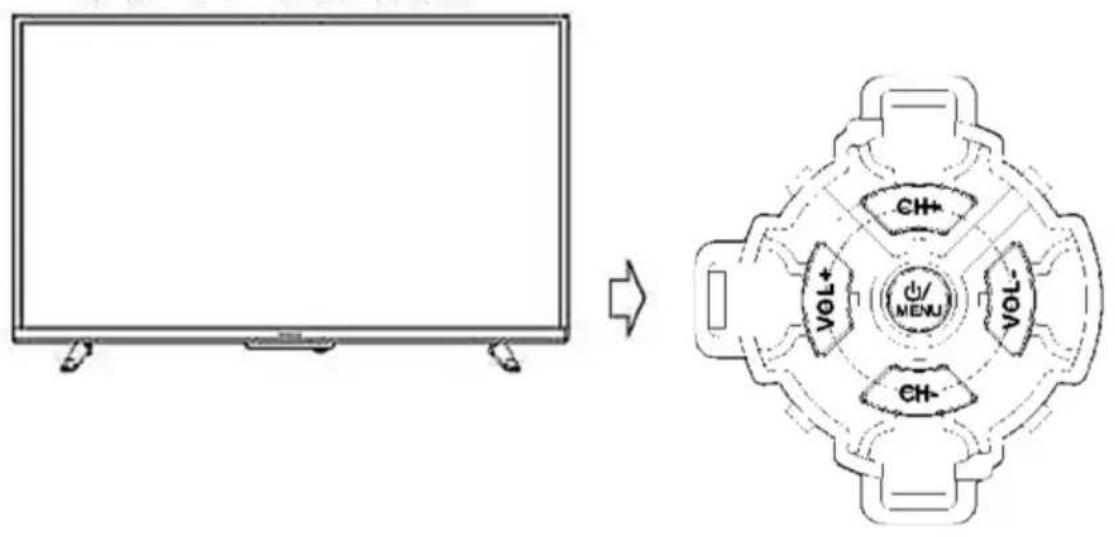
Diagram showing a monitor before and after transformation, with labeled ports including CH+, VOL+, and CH- around a central dial.1. ⏻ / MENU
- Pritisnite tipku za uključenje TV prijamnika (iz moda pripravnosti).
- Pritisnite i držite tipku pritisnutu dulje od 5 sekundi za prebacivanje u mod pripravnosti (Standby)
- Pritisnite tipku (TV prijamnik je u modu: uključeno) za prikaz ili izlaz Glavnog izbornika.
- Pritisnite i držite tipku pritisnutu dulje od 3 sekunde za ulaz u izbornik odabira IZVORA (SOURCE MENU)
2 VOL-
Tipka za smanjanje jačine zvuka; ulaz u slijedeći izbornik i ugađanje OSD opcija (umanjenje vrijednosti opcije).
3 VOL +
Tipka za povečanje jačine zvuka; ulaz u prethodni izbornik i ugađanje OSD opcija (povečanje vrijednosti opcije).
4 CH-
text_image
TV-40LE91T2W VIA SCART RFIN SFOF ③ ④ ③ ⑦ ① ⑨ ⑤ ⑥ ⑩ HOLD HOLD2 HOLD3 N16331. USB:
Korisnik može pristupiti multimedijskim datotekama pohranjenima na USB uređaju.
text_image
Input Source DTV ATV PC SCART HDMI1 HDMI2 Media Move OK Select EXIT Exittext_image
First Time Installation Language English Country UK Environment On OK Auto Tuning
text_image
Tuning Setup Tune Type DTV + ATV Digital Type DVB-T Scan Type Full Network ID Auto Frequency Auto Symbol Rate Auto MENU Back OK StartAutomatsko ugađanje
text_image
Do you want to skip ATV tuning?
text_image
Channel Tuning TV : 2 Programme DTV : 0 Programme Radio : 0 Programme Data : 0 Programme 52 % UHF CH 23 (DTV) Please press MENU key to exit
text_image
Do you want to exit tuning?text_image
CHANNEL Auto Tuning ATV Manual Tuning DTV Manual Tuning Programme Edit Schedule List Signal Information CI Informationtext_image
Do you want to skip ATV tuning?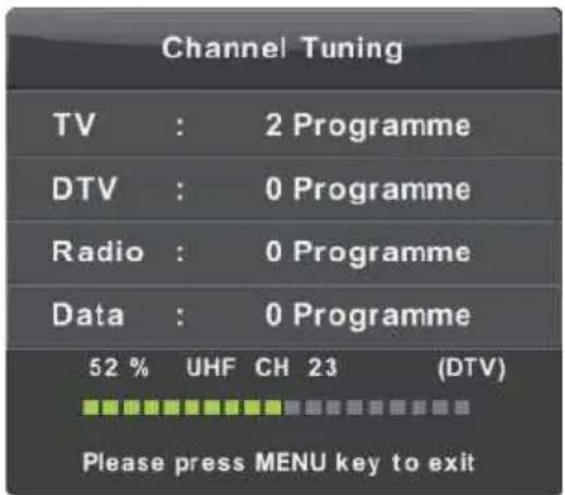
text_image
Channel Tuning TV : 2 Programme DTV : 0 Programme Radio : 0 Programme Data : 0 Programme 52 % UHF CH 23 (DTV) Please press MENU key to exit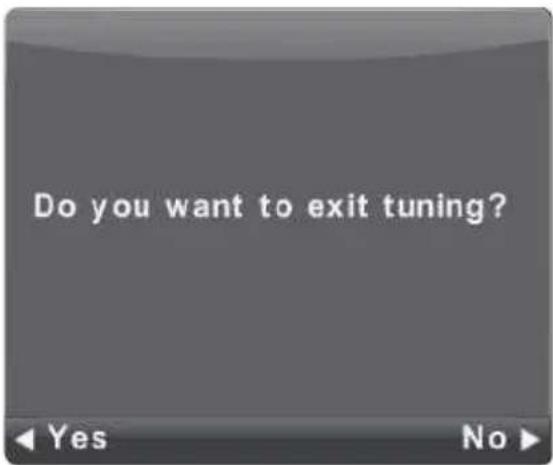
text_image
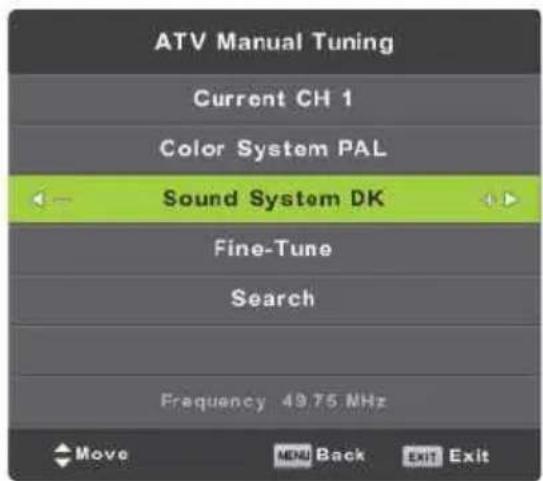
Do you want to exit tuning?ATV Ručno ugađanje
Current CH (Trenutni kanal)
Postavite broj kanala.
Color System (Sustav boja)
Odaberite sustav boja
Sound System (Audio sustav)
Odaberite Audio sistem
Fine Tune (Fino ugađanje)
text_image
ATV Manual Tuning Current CH 1 Color System PAL Sound System DK Fine-Tune Search Frequency 49.75 MHz Move Ctrl Back Exit ExitDTV Manual Tuning (DTV Ručno ugađanje)
Schedule List (Raspored programa)
text_image
Signal Information Channel: 32 (562.00MHz) Network Crystal Palac Modulation 64QAM Quality 0 (Poor) Strength 100 (Strong)text_image
Time conflict error Recorder:19:00~19:30 on CH.1 Will conflict with Recorder:19:01~19:31 on CH.1 EXIT Exit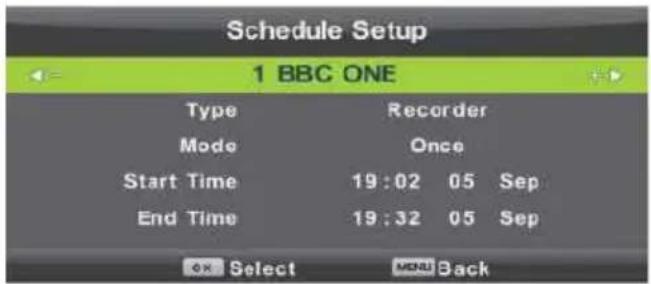
text_image
Schedule Setup 1 BBC ONE Type Recorder Mode Once Start Time 19:02 05 Sep End Time 19:32 05 Sep OK Select MENU BackPICTURE (Izbornik slike)
text_image
Picture Mode Contrast Brightness Colour Tint Sharpness Colour Temp Noise Reduction HDMI Mode Standard 50 50 50 Normal Middle Auto MOV Return OK Select Exit Exittext_image
Noise Reduction Off Low Middle High Default OK Select MENU BackSOUND (Izbornik zvuka)
text_image
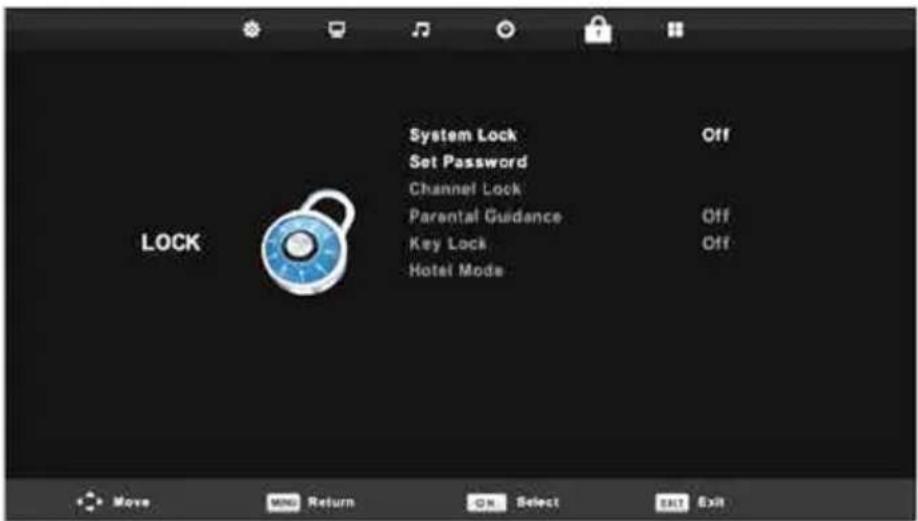
System Lock Set Password Channel Lock Parental Guidance Key Lock Hotel Mode OFF OFF Off OFF LOCK Move MNG Return ON Select EXIT ExitLock System (Zaključavanje sustava)
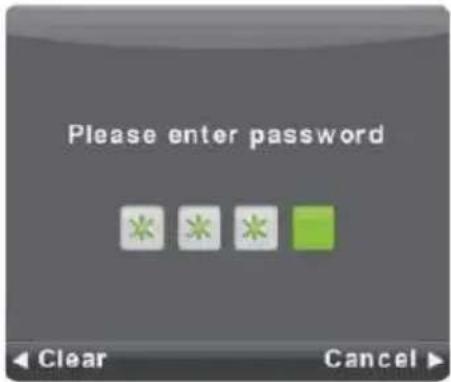
text_image
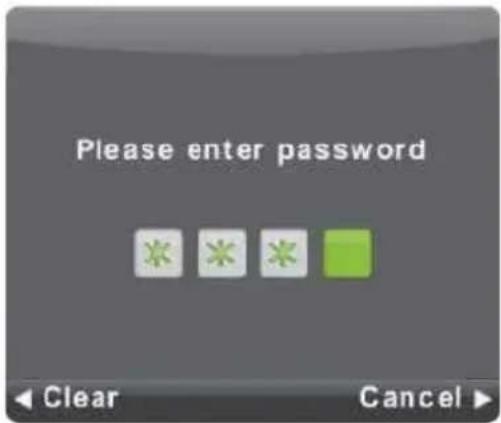
Please enter password Clear Canceltext_image
Please enter old password Please enter new password Confirm new password Clear Canceltext_image
Language TT Language Audio Languages Subtitle Language Hearing Impaired PVR File System Aspect Ratio Blue Screen First Time Installation Reset Software Update (USB) Environment HDMI CEC English East Hrvatski Hrvatski Off 4:3 On Home Mode Move MSS Return OK Select Add Exittext_image
TT Language West East Russian Arabic Farsi OK Select NEW BackAudio Language (Audio Jezik)
text_image
HDMI CEC CEC Control On Audio Receiver Off Device Auto Power Off Off TV Auto Power On Off Device List Device Menu MENU Backtext_image
Play 10:00C 5 kHz 02:09:00 / 00:02:51 Place PS FF Playx. Next Drop RepeatALL MOTOMOVIE (FILM)
text_image
26_TAVC_1460x800_2422K.Vor_55_44K_2chJLt 00:00:01 / 00:03:26 Pi#u## FB FF Prev Next Stop ChardSet RepeatALLTEXT (Tekst)
natural_image
Technical line drawing of a mechanical or electronic component with no visible text or symbols- Postavite kućište TV prije mnika na ravnu površinu te postavite stalak televizora na odgovarajuće mesto. Osigurajte da se rupe za šrafe poklapaju.
natural_image
Architectural cross-section diagram of a room with furniture and structural elements (no text or labels)- Pričvrstite stalak i kućište pomoću 4 priložena šrafa (šrafi bez gumene podloge).
- Oprezno postavite TV prijemnik u uspravan položaj
TV-40LE91T2W
Uputstva za instalaciju stalka
natural_image
Top-down schematic of a device rear panel with ventilation slots and internal components (no text or labels)- Postavite kućište TV prijemnika na ravnu površinu te postavite stalak televizora na odgovarajuće mesto. Osigurajte da se rupe za šrafe poklapaju.
natural_image
Technical line drawing of a front-mounted electronic device with internal components and ventilation slots (no text or symbols)- Pričvrstite stalak i kućište pomoću 4 priložena šrafa (šrafi bez gumene podloge).
- Oprezno postavite TV prijemnik u uspravan položaj
DOBRODOŠLI
Ovaj uređaj zadovoljava najviše standarde, inovativnu tehnologiju te omogućava visoku udobnost korišćenja.

Pomoću ovog TV prijemnika, u udobnosti vaše dnevne sobe, sve radnje možete da izvršavate brzo i jednostavno.

BITNA SIGURNOSNA UPUTSTVA
1. Pročitajte i pridržavajte se uputstava.
Pročitajte sva sigurnosna i operativna uputstva o televizoru. Sačuvajte ih za buduću upotrebu. Rukujte uređajem u skladu sa uputstvima!
UPOZORENJE: Osobe (uključujući i decu) sa smanjenim fizičkim, živčanim ili mentalnim smetnjama ili koji nemaju dovoljno iskustva i/ili znanja za sigurno korišćenje uređaja ne dozvolite korišćenje električnih uređaja bez nadzora!
text_image
Diagram showing a monitor before and after transformation, with labeled ports including CH+, VOL+, and CH- around a central device.1. ⏻ /MENU
- Pritisnite taster za uključenje TV prijemnika (iz moda mirovanja (Standby)).
- Pritisnite i držite taster pritisnut duže od 5 sekundi za prebacivanje u mod mirovanja (Standby)
- Pritisnite taster (TV prijemnik je u modu: uključeno) za prikaz ili izlaz iz Glavnog menija.
- Pritisnite i držite taster pritisnut duže od 3 sekunde za ulaz u meni odabira IZVORA (SOURCE MENI)
2 VOL-
text_image
Input Source DTV ATV PC SCART HDMI1 HDMI2 Media Move OK Select EXIT Exittext_image
First Time Installation Language English Country UK Environment On OK Auto Tuning
text_image
Tuning Setup Tune Type DTV + ATV Digital Type DVB-T Scan Type Full Network ID Auto Frequency Auto Symbol Rate Auto MENU Back OK StartAutomatsko podešavanje
Pri prvom podešavanju odaberite meni te pritisnite taster leve strelice kako bi preskočili podešavanje ATV programa. Isto važi ako želite da preskočite podešavanje DTV programa.
text_image
Channel Tuning TV : 1 Programme DTV : 0 Programme Radio : 0 Programme Data : 0 Programme 1 % 67.25 MHz (ATV) Please press MENU key to skip
text_image
Do you want to skip ATV tuning?
text_image
Channel Tuning TV : 2 Programme DTV : 0 Programme Radio : 0 Programme Data : 0 Programme 52 % UHF CH 23 (DTV) Please press MENU key to exit
text_image
Do you want to exit tuning?Korišćenje menija
CHANNEL (Meni kanala)
text_image
CHANNEL Auto Tuning ATV Manual Tuning DTV Manual Tuning Programma Edit Schedule List Signal Information CI Information Move MEN Return OK Select EXIT Exittext_image
Do you want to skip ATV tuning?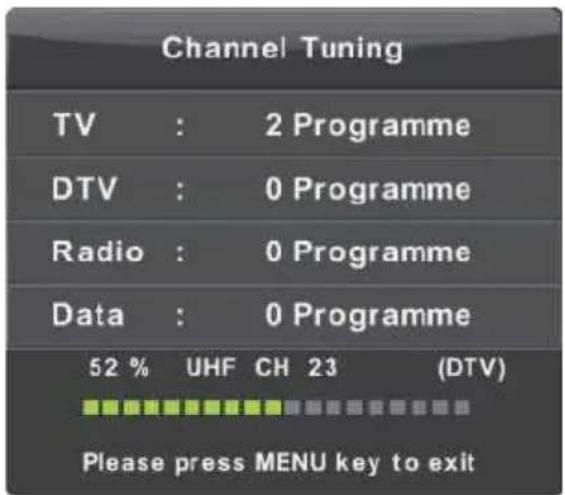
text_image
Channel Tuning TV : 2 Programme DTV : 0 Programme Radio : 0 Programme Data : 0 Programme 52 % UHF CH 23 (DTV) Please press MENU key to exit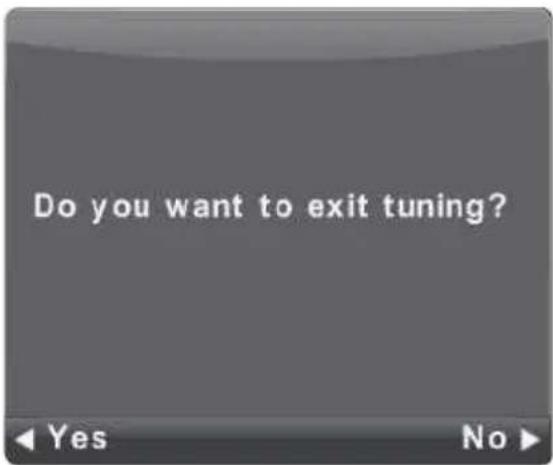
text_image
Do you want to exit tuning?Schedule List (Raspored programa)
text_image
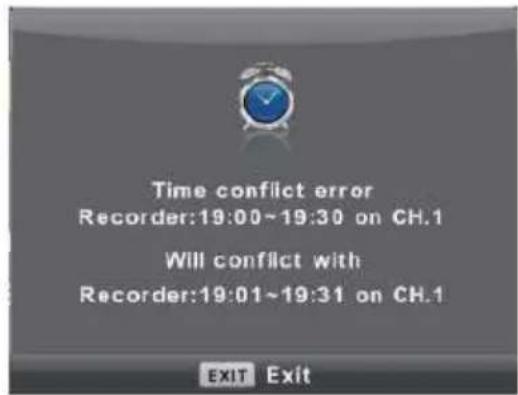
Signal Information Channel: 32 (562.00MHz) Network Crystal Palac Modulation 64QAM Quality 0 (Poor) Strength 100 (Strong)Ako se vreme Tajmera preklapa sa već postojećim događajem u Tajmeru, pojaviti će se upozorenje.
text_image
Time conflict error Recorder:19:00~19:30 on CH.1 Will conflict with Recorder:19:01~19:31 on CH.1 EXIT Exit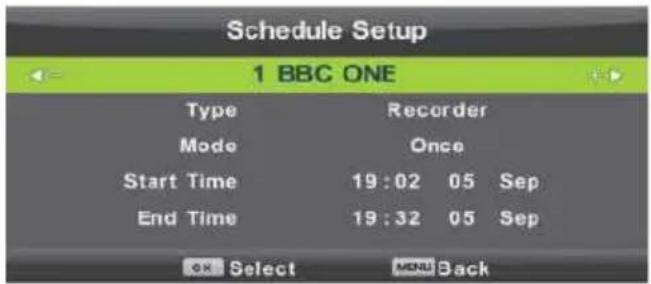
text_image
Schedule Setup 1 BBC ONE Type Recorder Mode Once Start Time 19:02 05 Sep End Time 19:32 05 Sep OK Select MENU BackPICTURE (Meni slike)
Pritisnite taster MENU za prikaz glavnog menija.
text_image
Picture Mode Contrast Brightness Colour Tint Sharpness Colour Temp Noise Reduction HDMI Mode Standard 50 50 50 50 Normal Middle Auto- Pritisnite ▼ / ▲ kako bi odabrali opciju koju želite podešavati u meniju SLIKA.
- Pritisnite OK za podešavanje opcije.
- Nakon završetka podešavanja, pritisnite taster MENU da bi sačuvali promene i vratili se na prethodnii meni.
Picture Mode (Mod Slike)
Pritisnite ▼ / ▲ da bi odabrali Mod slike, zatim pritisnite OK kako bi ušli u podmeni. Možete da promenite vrednost kontrasta, svetline, boje, oštrine i nijanse kada je odabrana opcija Moda slike Personal (Lično).
Kontrast / Svetlina / Boja / Nijansa / Oštrina
Pritisnite ▼ / ▲ da bi odabrali opciju, zatim ◀ / ▶ kako bi podesili.
Kontrast Podesite kontrast slike dok je senka slike nepromenjena.
text_image
Noise Reduction Off Low Middle High Default OK Select MENU BackSOUND (Meni zvuka)
text_image
OSD Timer 5 S 15 S 30 S OK Select Forward BackOSD Timer (OSD Vrijeme prikaza)
text_image
System Lock Set Password Channel Lock Parental Guidance Key Lock Hotel Mode OFF OFF OFF LOCK Move MNG Return OK Select Exit ExitLock System (Zaključavanje sustava)
text_image
Please enter password Clear Canceltext_image
Please enter old password Please enter new password Confirm new password Clear CancelPritisnite ▼ / ▲ da bi unjeli lozinku te zatim OK za potvrdu.
Zaključavanje programa (Channel Lock)
Pritisnite ▼ / ▲ da bi odabrali Zaključavanje programa, zatim OK za ulazak u podmeni.
Pritisnite Zeleni taster za zaključavanje ili otključavanje programa.
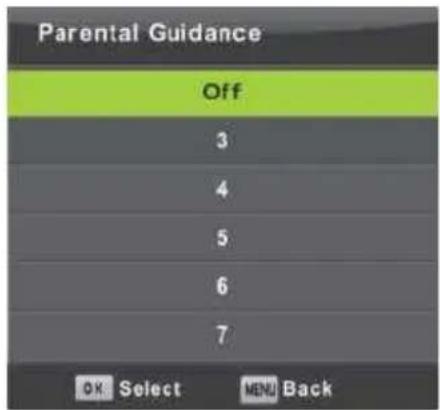
Roditeljski nadzor (Parental Guidance)
Pritisnite ▼ / ▲ da bi odabrali Roditeljski nadzor, zatim OK da bi ušli u podmeni za biranje dobi prikladne za Vašu decu.
text_image
Parental Guidance Off 3 4 5 6 7 OK Select MENU Back
text_image
Channel Lock 1 BBC ONE 2 BBC TWO 3 BBC CHOICE 4 BBC NEWS 24 5 BBC TEXT 1 BBC PARLMNT LOCK OK Select 1/1 MENU BackZaključavanje tastera (Key Lock)
Pritisnite ▼ / ▲ da bi odabrali Zaključavanje tastera na kućištu, zatim ◀ / ▶ da bi odabrali Uključeno ili Isključeno. Kada je Zaključavanje tastera uključeno ne možete da koristite tastere na kućištu uređaja.
HOTEL (Hotelski mod)
text_image
Hotel Mode On Source Lock Default Source Off Default Prog 1 Default Volume Off Max Volume 100 Import Database Export Database Clear Locktext_image
Language TT Language Audio Languages Subtitle Language Hearing Impaired PVR File System Aspect Ratio Blue Screen First Time Installation Reset Software Update (USB) Environment HDMI CEC English East Hrvatski Hrvatski Off 4:3 On Home Mode Move MSS Return OK Select Finish Exit- Pritisnite ▼ / ▲ da bi odabrali opcije koje želite podeisti u meniju Podešenja.
- Pritisnite OK za podešavanje.
- Nakon završetka pritisnite OK da bi sačuvali promene i vratili se na prethodni meni.
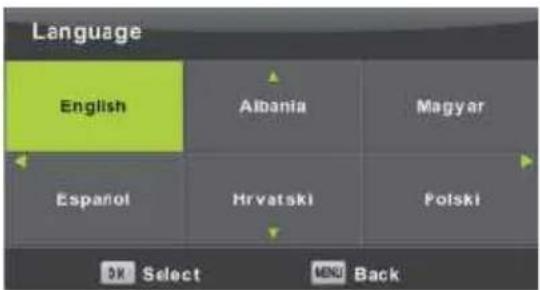
Language (Jezik)
Odaberite meni OSD jezika. Fabrički podešeni jezik je engleski koji je odabran kao jezik menija.
Pritisnite ▼ / ▲ / ◀ / ▶ da bi odabrali meniizbornik Jezik.
text_image
Language English Albania Magyar Espanol Hrvatski Polski OK Select MENU BackTT Language (TT Jezik)
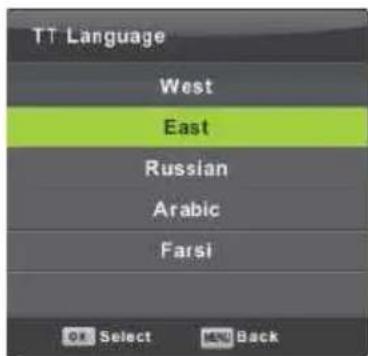
Pritisnite ▼ / ▲ da bi odabrali Teletekst Jezik, zatim OK kako bi ušli u podmeni.
Pritisnite ▼ / ▲ / ◀ / ▶ da bi odabrali TT jezik.
text_image
TT Language West East Russian Arabic Farsi OK Select Add BackAudio Language (Audio Jezik)
Aspect Ratio (Omer slike)
text_image
HDMI CEC CEC Control On Audio Receiver Off Device Auto Power Off Off TV Auto Power On Off Device List Device Menu MENU Backtext_image
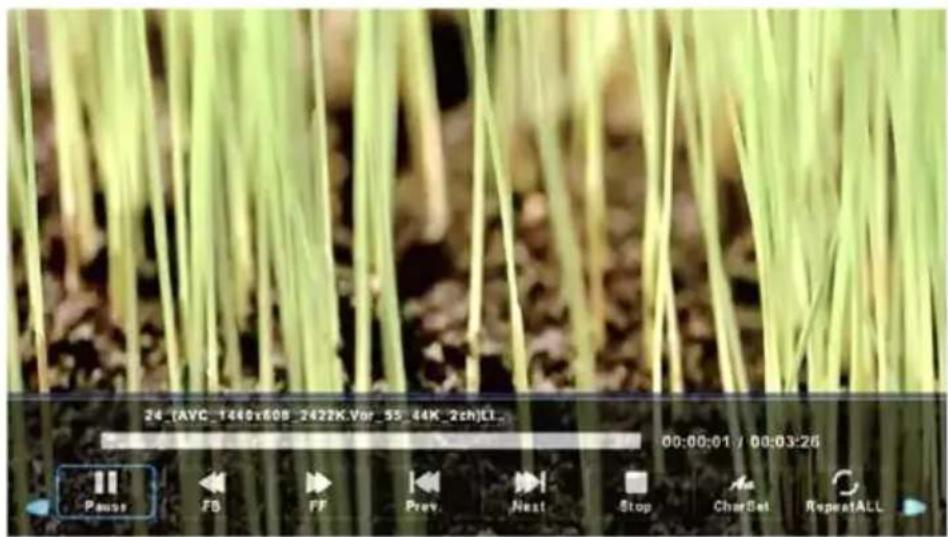
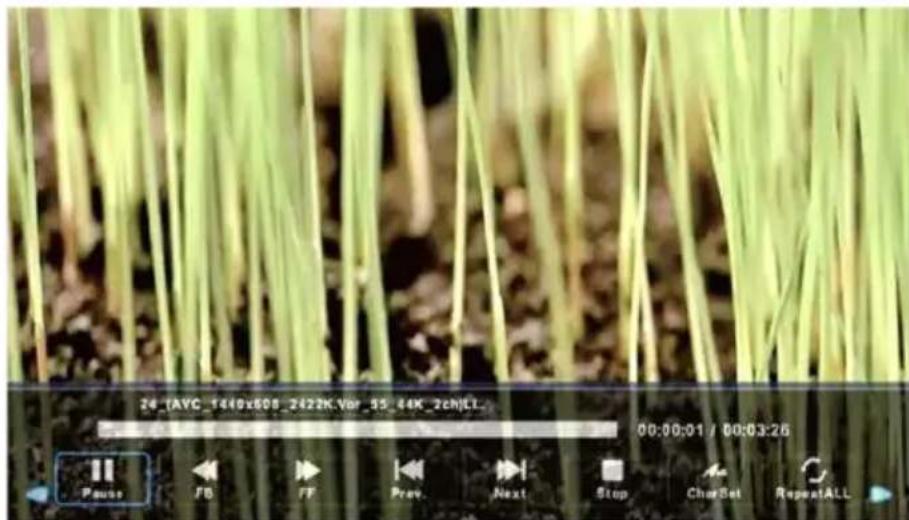
Play 18:00:3.mHz 90:09:00 / 00:02:51 Process FD FF Prev Next Grap RepeatALL NOTEMOVIE (FILM)
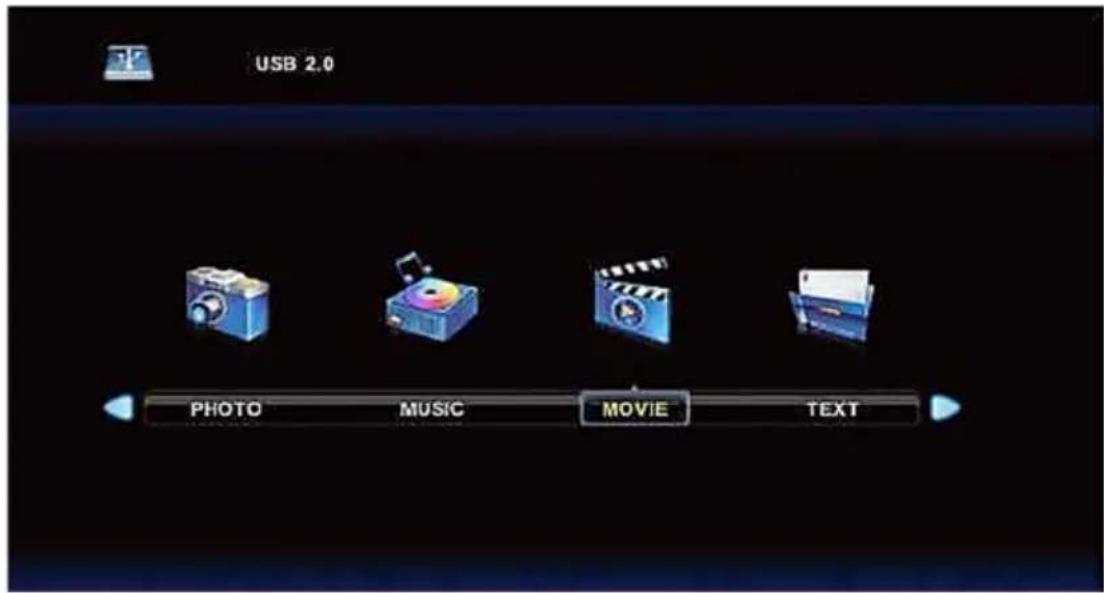
Pritisnite ◀ / ▶ da bi odabrali FILM u glavnom meniju, zatim OK za potvrdu.
Pritisnite Exit da bi se vratili na prethodni meni i izašli iz menija.

text_image
USB 2.0 PHOTO MUSIC MOVIE TEXTPritisnite ◀ / ▶ da bi odabrali video zapis koji želite reprodukovati, zatim OK za potvrdu.
Pritisnite OK za pokretanje odabranog video zapisa.
Pritisnite OK za odabir menija na dnu, zatim OK za njegovo korišćenje.
Pritisnite Exit da bi se vratili na prethodni meni i izašli iz menija.
text_image
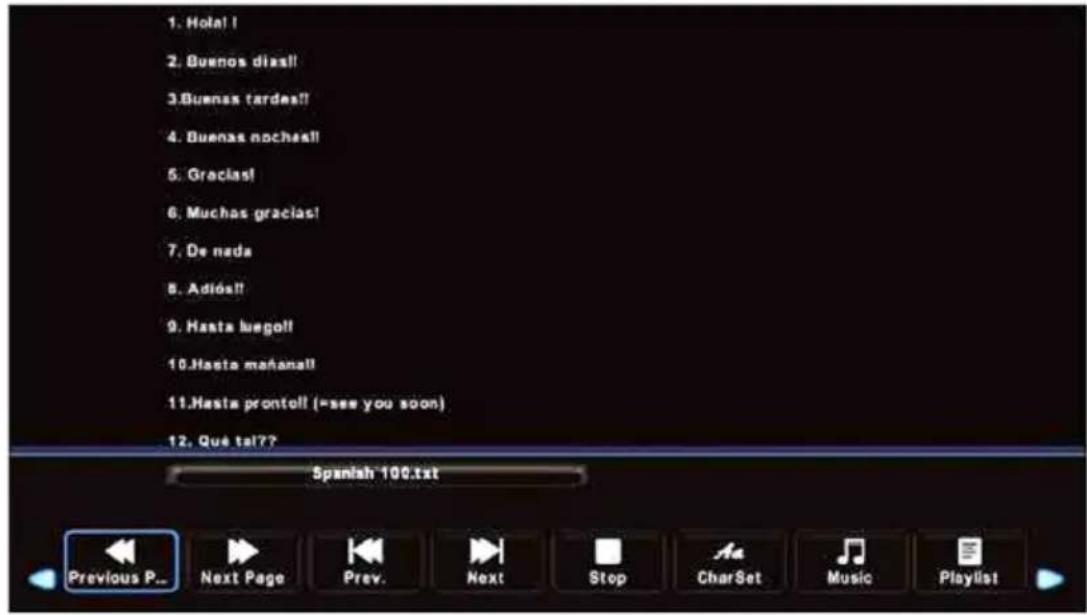
24_(AVC_1460x609_2422K.Vor_55_44K_2ch)L1_ 00:00:01 / 00:03:26 Power F8 FF Prev. Next Stop CharBet RepeatALLTEXT (Tekst)
Pritisnite ◀ / ▶ da bi odabrali TEKST u glavnom meniju, zatim OK za potvrdu. Pritisnite Exit da bi se vratili na prethodni meni i izašli iz menija.

natural_image
Technical line drawing of a device interior with no visible text or symbolsnatural_image
Architectural cross-section diagram of a room with furniture and storage (no text or labels)natural_image
Top-down schematic of a device rear panel with internal components and connectors (no text or symbols)natural_image
Top-down line drawing of a flat-screen TV or audio device showing internal components and ventilation slots (no text or symbols)text_image
TV-40LE91T2W VDA BCART RF IN SPDF ③ ④ ③ ⑦1. USB:
text_image
Input Source DTV ATV PC SCART HDMI1 HDMI2 Media Move Select Exit Exittext_image
First Time Installation Language English Country UK Environment On OK Auto Tuning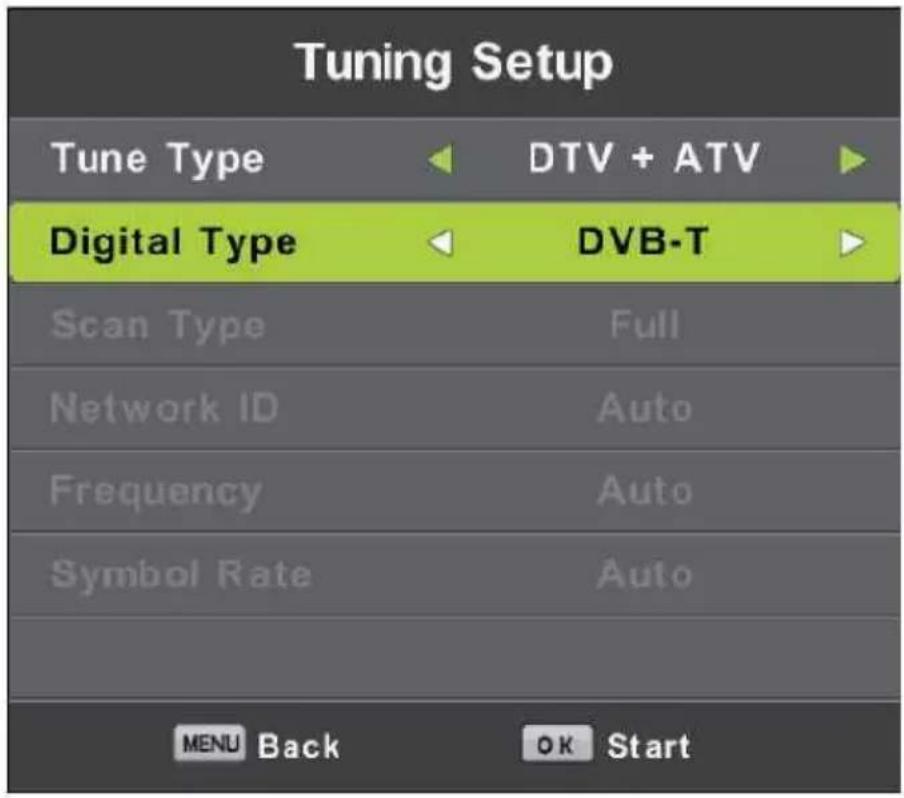
text_image
Tuning Setup Tune Type DTV + ATV Digital Type DVB-T Scan Type Full Network ID Auto Frequency Auto Symbol Rate Auto MENU Back OK Starttext_image
Do you want to skip ATV tuning?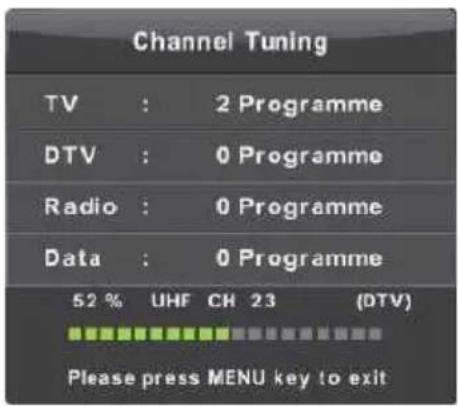
text_image
Channel Tuning TV : 2 Programme DTV : 0 Programme Radio : 0 Programme Data : 0 Programme 52 % UHF CH 23 (DTV) Please press MENU key to exit
text_image
Do you want to exit tuning?Користење на менито
CHANNEL (Мени канал)
text_image
CHANNEL Auto Tuning ATV Manual Tuning DTV Manual Tuning Programme Edit Schedule List Signal Information CI Information Move MOV Return OK Select Exit Exittext_image
Do you want to skip ATV tuning?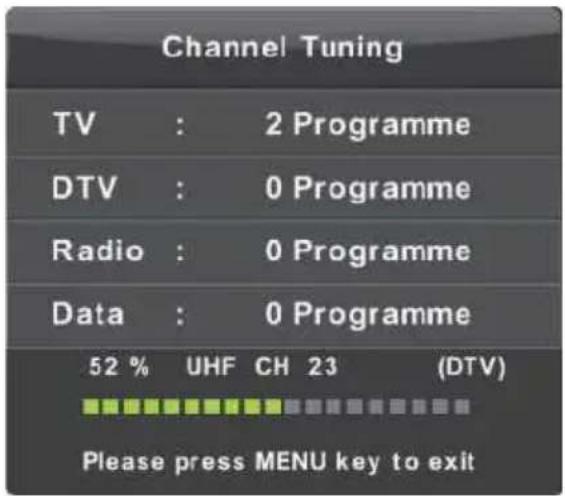
text_image
Channel Tuning TV : 2 Programme DTV : 0 Programme Radio : 0 Programme Data : 0 Programme 52 % UHF CH 23 (DTV) Please press MENU key to exit
text_image
Do you want to exit tuning?text_image
ATV Manual Tuning Current CH 1 Color System PAL Sound System DK Fine-Tune Search Frequency 49.75 MHz Move MDI Back Exit ExitМоментален програм
text_image
Signal Information Channel: 32 (562.00MHz) Network Crystal Palac Modulation 64QAM Quality 0 (Poor) Strength 100 (Strong)text_image
Time conflict error Recorder:19:00~19:30 on CH.1 Will conflict with Recorder:19:01~19:31 on CH.1 EXIT Exit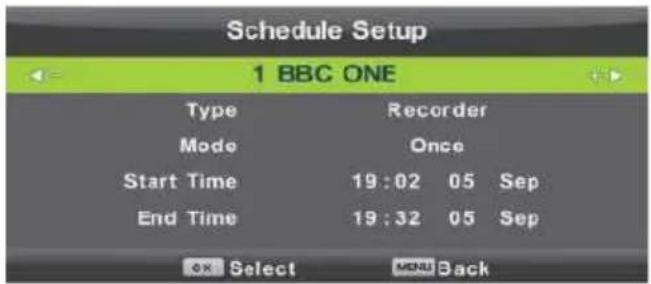
text_image
Schedule Setup 1 BBC ONE Type Recorder Mode Once Start Time 19:02 05 Sep End Time 19:32 05 Sep OK Select MENU Backtext_image
Picture Mode Contrast Brightness Colour Tint Sharpness Colour Temp Noise Reduction HDMI Mode Standard 50 50 50 50 Normal Middle Autotext_image
OSD Timer 5 S 15 S 30 S OK Select MNG Backtext_image
System Lock Set Password Channel Lock Parental Guidance Key Lock Hotel Mode OFF OFF OFF LOCK Move MNG Return OK Select Exit Exittext_image
Please enter password Clear Canceltext_image
Please enter old password Please enter new password Confirm new password Clear Canceltext_image
SETUP Language English TT Language East Audio Languages Hrvatski Subtitle Language Hrvatski Hearing Impaired Off PVR File System Aspect Ratio 4:3 Blue Screen On First Time Installation Reset Software Update (USB) Environment Home Mode HDMI CEC Move OK Return OK Select Helptext_image
TT Language West East Russian Arabic Farsi OK Select MEN Backtext_image
HDMI CEC CEC Control On Audio Receiver Off Device Auto Power Off Off TV Auto Power On Off Device List Device Menu MENU Backtext_image
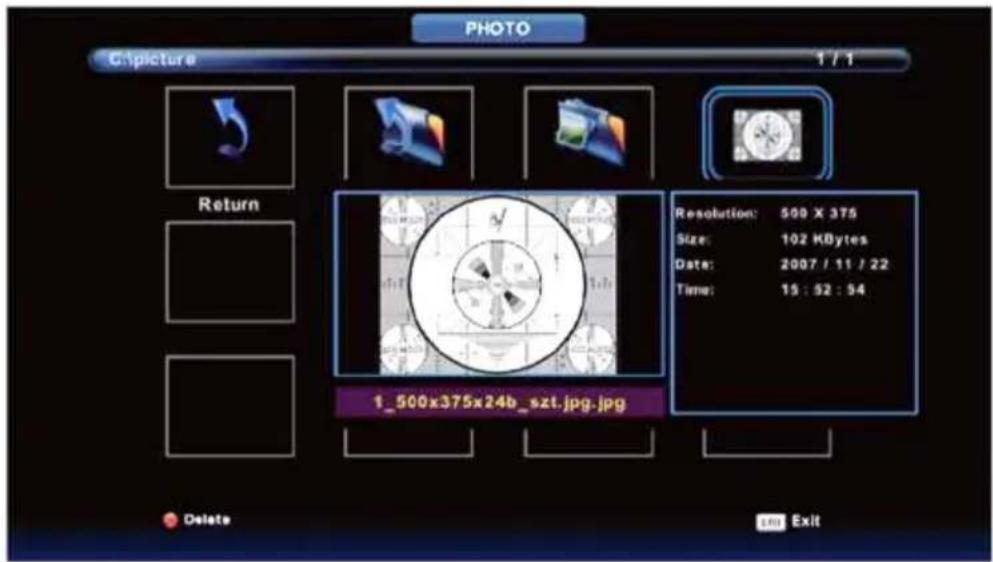
PHOTO C:\picture 1 / 1 Return Resolution: 500 X 375 Size: 102 KBytes Date: 2007 / 11 / 22 Time: 15 : 52 : 54 1_500x375x24b_sxt.jpg.jpg Delete ExitMUSIC (Музика)
text_image
Play 10:34K 3.64K 00:09:06 / 01:02:51 Piano FD FP Prev Next Drop RepeatALL NOTEMOVIE (Филм)
text_image
24_TAYC_1440x609_2422K.Vbr_55_44K_2cNJLL 00:00:01 / 00:03:26 Pause FB FF Prev. Next Stop CherSet RepeatALLTEXT (Текст)
natural_image
Technical line drawing of a mechanical or electronic component with no visible text or symbolsnatural_image
Technical line drawing of a mechanical assembly or enclosure with no visible text or symbolsnatural_image
Top-down schematic of a device rear panel with ventilation slots and internal components (no text or labels)natural_image
Top-down schematic of a TV rear panel showing internal components and ventilation slots (no text or labels)text_image
Diagram showing a monitor before and after transformation, with labeled ports including CH+, VOL+, and MENU.1. ⏻ /POWER
text_image
Input Source DTV ATV PC SCART HDMI1 HDMI2 Media Move OK Select EXIT Exittext_image
First Time Installation Language English Country UK Environment On OK Auto Tuning
text_image
Tuning Setup Tune Type DTV + ATV Digital Type DVB-T Scan Type Full Network ID Auto Frequency Auto Symbol Rate Auto MENU Back OK StartVendosje automatike
text_image
Do you want to skip ATV tuning?
text_image
Channel Tuning TV : 2 Programme DTV : 0 Programme Radio : 0 Programme Data : 0 Programme 52 % UHF CH 23 (DTV) Please press MENU key to exit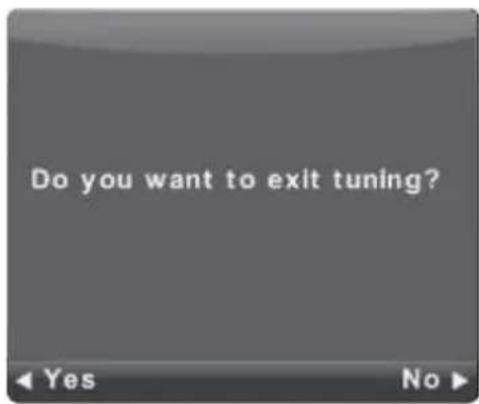
text_image
Do you want to exit tuning?Përdorimi I menusë
CHANNEL (Menuja e kanaleve)
text_image
CHANNEL Auto Tuning ATV Manual Tuning DTV Manual Tuning Programme Edit Schedule List Signal Information CI Information Move MI Return OK Select Exit Exittext_image
Do you want to skip ATV tuning?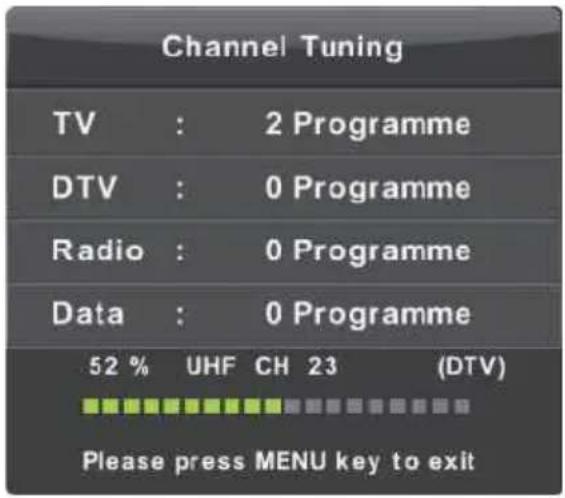
text_image
Channel Tuning TV : 2 Programme DTV : 0 Programme Radio : 0 Programme Data : 0 Programme 52 % UHF CH 23 (DTV) Please press MENU key to exit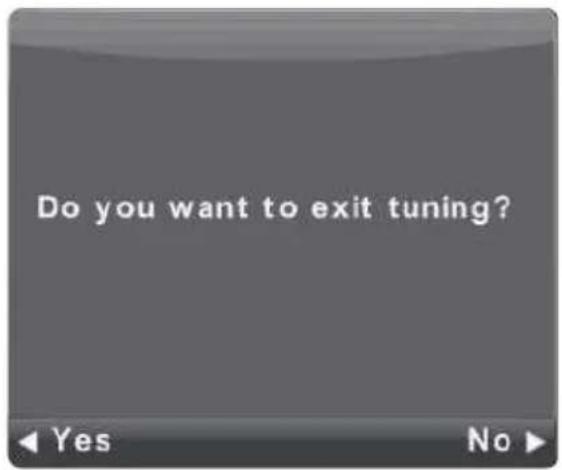
text_image
Do you want to exit tuning?ATV Vendosje manuale
Programi I tanishëm
Vendosni numrin e kanalit
Sistemi I ngjyrave
Zgjidhni sistemin e ngjyrave
Sistemi I zërit
text_image
ATV Manual Tuning Current CH 1 Color System PAL Sound System DK Fine-Tune Search Frequency 49.75 MHz Move Back Exit ExitDTV Manual Tuning (DTV Vendosje manuale)
Program Edit (Rregullimi I programeve)

text_image
Programme Edit 1 BBC ONE 2 BBC TWO 3 BBC CHOICE 4 BBC NEWS 24 5 BBC TEXT 1 BBC PARLMNT Delete Move Skip OK Select 1/1 Fav MEL Backtext_image
Schedule List 1/1 Programme Title Date 1 SBC ONE Manual Timer Set 05/09/2001 Manual Timer Set 18:01-19:31 +→Move Add Edit Add Exit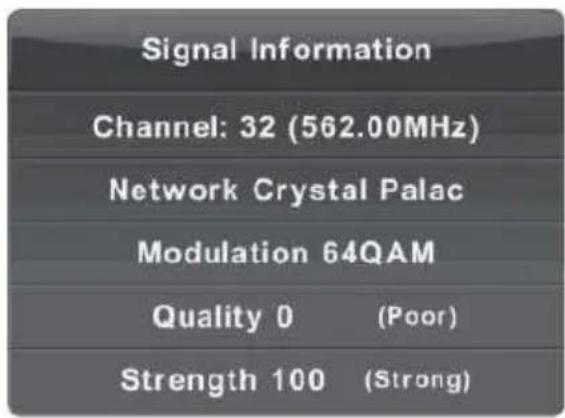
text_image
Signal Information Channel: 32 (562.00MHz) Network Crystal Palac Modulation 64QAM Quality 0 (Poor) Strength 100 (Strong)text_image
Time conflict error Recorder:19:00~19:30 on CH.1 Will conflict with Recorder:19:01~19:31 on CH.1 EXIT Exit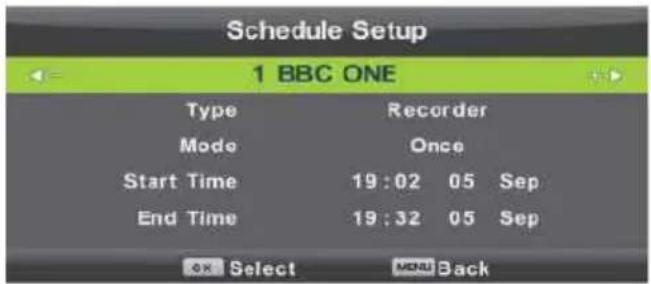
text_image
Schedule Setup 1 BBC ONE Type Recorder Mode Once Start Time 19:02 05 Sep End Time 19:32 05 Sep OK Select MENU BackPICTURE (Menuja e figurës)
text_image
Picture Mode Contrast Brightness Colour Tint Sharpness Colour Temp Noise Reduction HDMI Mode Standard 50 50 50 50 Normal Middle AutoNoise Reduction (Zvogëlimi I zhurmave)
text_image
Noise Reduction Off Low Middle High Default OK Select MENU BackSOUND (Menuja e zërit)
text_image
System Lock Set Password Channel Lock Parental Guidance Key Lock Hotel Mode OFF OFF OFF LOCK Move MNG Return OK Select EDIT ExitLock System (Kyçja e sistemit)

text_image
Please enter password Clear Canceltext_image
Please enter old password Please enter new password Confirm new password Clear CancelMbikqyrja prindërore (Parental Guidance)
text_image
Language TT Language Audio Languages Subtitle Language Hearing Impaired PVR File System Aspect Ratio Blue Screen First Time Installation Reset Software Update (USB) Environment HDMI CEC English East Hrvatski Hrvatski Off 4:3 On Home Mode Move MENU Return OK Select Add Exittext_image
TT Language West East Russian Arabic Farsi OK Select Add BackAudio Language (Audio e Gjuhëve)
text_image
HDMI CEC CEC Control On Audio Receiver Off Device Auto Power Off Off TV Auto Power On Off Device List Device Menu MENU Backtext_image
Play 18_FDC_3_mits 00:00:00 / 00:02:51 Focus FD TP Prev. Next Stop RepeatALL NOTEMOVIE (Menuja e filmit)
Attaching the Stand to the TV
1 Assemble the stand
Before attaching/detaching the stand, –make sure to turn off the TV. Before performing work spread cushioning over the base area to lay the LED TV on. This will prevent it from being damaged.
TV-32LE90T2W
Stand installation Instruction
natural_image
Technical line drawing of a mechanical or electronic component with no visible text or symbols- Place the TV body on a flat table, and put the TV base on it, ensure the screw holes matching.
natural_image
Architectural cross-section diagram of a room with furniture and structural elements (no text or labels)- Fix the TV body and TV base with another 4 pcs of screws (The on without gasket on it).
- Finished
TV-40LE90T2W
Stand installation Instruction
natural_image
Top-down schematic of a device rear panel with internal components and connectors (no text or symbols)- Place the TV body on a flat table, and put the TV base on it, ensure the screw holes matching.
natural_image
Technical line drawing of a flat-screen TV unit with ventilation grilles and internal components (no text or symbols)- Fix the TV body and TV base with another 4 pcs of screws (The one without gasket on it).
- Finished
WELCOME
This device lives up to the highest standards, innovative technology and high user comfort.

With this TV you can do it fast and simple, whilst in the comfort of your living room.

Media player — access your music, pictures and videos from your network or USB storage media and play them directly on your TV.

Everything works with one remote control now. Connect your TV directly to your terrestrial, satellite antenna or cable and enjoy contents in high quality without loss.
The Accessories
When opening the box and installing the machine, make sure you have get all the necessary accessories:
- User manual with warranty statement
- Remote Control
- Battery x2
- Screws for stand
Images are for reference only

The flash with the symbol of arrowhead, inside an equilateral triangle alerts the user about the presence of a dangerous tension not isolated inside the product which can be sufficiently powerful to constitute a risk of electrocution.

The point of exclamation inside an equilateral triangle alerts the user about the presence of important operating instructions and maintenance in the document enclosed in the package.

CAUTION

RISK OF ELECTRIC SHOCK DO NOT OPEN
Do not open the back cover. In no case the user is allowed to operate inside the TV set. Only a qualified technician from the manufacture is entitled to operate.
Main plug is used as the disconnect device, the disconnect device shall remain ready for operating.
Incorrect replacement of the battery may lead to the risk, including the replacement of another similar or the same type. Do not expose batteries to heat such as sun or fire or something like that.
The device should not be exposed to dripping and spraying and it can not be placed under objects filled with liquids.
Please read the following safeguards for your TV and retain for future reference. Always follow all warnings and instructions marked on the television.
Do not open the back cover. In no case the user is allowed to operate inside the TV set. Only a qualified technician from the manufacture is entitled to operate.
IMPORTANT SAFETY INSTRUCTIONS
1. Read, Retain, Follow All Instructions
Read all safeties and operations about the TV. Retain them safely for future reference. Follow all operations and instructions accordingly.
2. Heed Warnings
Adhere to all warnings on the appliance and in the operating instructions.
3. Cleaning
Unplug the TV from the wall outlet before cleaning. Do not use liquid, abrasive, or aerosol cleaners. Cleaners can permanently damage the cabinet and screen. Use a soft dampened cloth for cleaning.
4. Attachments and Equipment
Never add any attachment and/or equipment without approval of the manufacturer as such additions may result in the risk of fire, electric shock or other personal injury.
5. Water and Moisture
The apparatus shall not be exposed to dripping of splashing and that no objects filled with liquids, such as vases, shall be placed on the apparatus.
6. Setting
Do not place this TV on an unstable cart, stand or table. Placing the TV on an unstable base can cause the TV to fall, result in serious personal injuries as well as damage to the TV. Use only a cart, stand, bracket or table recommended by the manufacturer or salesperson.
7. Ventilation
Slots and openings in the cabinet are provided for ventilation and to ensure reliable operation for the TV and to protect it from overheating. Do not cover the ventilation openings in the cabinet and never place the set in a confined space such as built-in cabinet unless proper
ventilation is provided. Leave a minimum 10 cm gap all around the unit.
8. Power Source
This TV should be operated only from the type of power source indicated on the marking label. If you are not sure of the type of power supplied to your home, consult your appliance dealer or local power company.
9. Grounding or Polarization

This TV is equipped with a polarized alternating current line plug. The unit has a double insulation (Class II Protection), and no need additional grounding. If you are unable to insert the plug fully into the outlet, try reversing the plug. If the plug should still fail to fit, contact your electrician to replace your obsolete outlet. Do not defeat the safety purpose of the polarized plug.
10. Lightning
For added protection for this TV during a lightning storm, or when it is left unattended and unused for long periods of time, unplug it from the wall outlet and disconnect the antenna or cable system. This will protect the TV from damage due to lightning and power-line surge.
11. Power Lines and Antenna cables
An outside antenna system should not be located in the vicinity of overhead power lines or other electric light or power circuits, or where it can fall into such power lines or circuits. Where installing an outside antenna system, extreme care should be taken to keep from touching such power lines or circuits as contact with them might be fatal.
12. Overloading
Do not overload wall outlets and extension cords as this can result in a risk of fire or electric shock.
13. Object and Liquid Entry
Never push any kinds of object into this TV through openings as they may come up against dangerous voltage points or short-out parts that could result in fire or electric shock. Never spill any kinds of liquid on or into the TV.
14. Outdoor Antenna Grounding
If an outside antenna or cable system is connected with the TV, be sure the antenna or cable system is grounded so as to provide protection against voltage surges and built-up static charges. Section 810 of the National Electric Code, ANSI/NFPA No. 70-1984, provides information with respect to proper grounding of the mast and supporting structure, grounding of the lead in wire to an antenna discharge unit, connection to grounding electrodes, and requirements for the grounding electrode.
15. Servicing
Do not attempt to service this TV yourself as opening or removing covers may expose you to dangerous voltage or other hazards. Refer all servicing to qualified service personnel.
16. Damage Requiring Service
Unplug the TV from the wall outlet and refer servicing to qualified service personnel under the following conditions:
- When the power-supply cord or plug is damaged.
- If liquid has been spilled, or objects have fallen into the TV.
- If the TV has been exposed to rain or water.
- If the TV operates abnormally by following the operating instructions. Adjust only those controls that are covered by the operating instructions as an improper adjustment of other controls may result in damage and will often require extensive work by a qualified technician to restore the TV to its normal operation.
- If the TV has been dropped or the cabinet has been damaged.
17. Replacement Parts
When replacement parts are required, be sure the service technician has used replacement parts specified by the manufacturer or have the same characteristics as the original part. Unauthorized substitutions may result in fire, electric shock or other hazards.
18. Safety Check
Upon completion of any service or repair to the TV, ask the service technician to perform safety checks to determine that the TV is in safe operating condition.
19. Heat

natural_image
Symbolic illustration of a candle crossed with a flame, representing fire or smoke (no text present)The product should be situated away from heat sources such as radiators, heat registers, stoves, or other products (including amplifiers) that product heat.
The TV should not be placed near open
flames and sources of intense heat.
20. Earphones use - Attention

Excessive sound pressure from earphones and headphones can cause hearing loss. If you notice any disturbance or hum noise in your ears, stop using the headset or earphones.
-
Power cord and Plug should be easily accessible. Do not put a TV or furniture on the power cord. A damaged power cord or plug can cause fire or electric shock. Do not bend or squeeze the power cord. Unplug your TV from main supply to hold the plug and pull it from the power outlet. Never pull the power cord. Never touch a power cord / plug with wet hands, it could cause a short circuit or electric shock. Never make a knot in the cord or tie it with other cables
-
The instructions for installation or use provided with non-floor standing televisions likely to be used in the home and weighing over 7 kg shall contain the following information or equivalent:
WARNING
Never place a television set in an unstable location. A television set may fall, causing serious personal injury or death. Many injuries, particularly to children, can be avoided by taking simple precautions such as:
- Using cabinets or stands recommended by the manufacturer of the television set.
- Only using furniture that can safely support the television set.
- Ensuring the television set is not overhanging the edge of the supporting furniture.
- Not placing the television set on tall furniture (for example, cupboards or bookcases) without anchoring both the furniture and the television set to a suitable support. -Not placing the television set on cloth or other materials that may be located between the television set and supporting furniture.
- Educating children about the dangers of climbing on furniture to reach the television set or its controls.
If your existing television set is being retained and relocated, the same considerations as above should be applied.
This appliance is not intended for use by persons (including children) with reduced physical, sensory or mental capabilities, or lack of knowledge and experience to use the appliance, unless they are supervised by a person who is responsible for their safety or you're not received training on the use of appliances
Children do not always correctly recognize possible danger situations.
Swallowing batteries can be fatal. Keep batteries out of the reach of small children. If the battery is swallowed, immediate contact medical help.
Packaging equipment and protective bags keep away from children. There is a risk of suffocation.
Table of Content
Table of Contents ....
Control Panel ......
Terminal Wiring Diagram
Remote Control ....
Picture Menu ....
Sound Menu ....
Channel Menu ....
Lock System ....
Setup Menu ......
USB Opreation ....
Media Menu ....
Congratulations! You have chosen the latest generation high definition liquid crystal television. Endowed with high display quality and light weight, it is power-saving and radiationless with high sensitivity television reception. The new generation liquid crystal television will bring you safe&comfortable brand new visual experience.
Applying color active matrix TFT with brand new technologies.the product can provide high quality display image flicker free television .VCD&DVD programs.
In addition.it can be used as definition digital television or computer display.
We believe the product will surely make you satisfied.
Thank you for purchasing and using our products!
Control panel
The control button for front panels
Controls are located from the right back side of the TV cabinet
text_image
Diagram showing a blank screen transforming into a multi-ring device with labeled ports including CH+, VOL+, and MENU.1. /POWER
- Press the button to turn on the TV set (from Standby mode).
- Press and hold the button for longer than 5 seconds to switch to standby mode.
- Press the button (TV set is in the ON mode) to Enter or Exit from Main Menu.
- Press and hold the button for longer than 3 seconds to enter SOURCE menu.
2. VOL-
Volume decreasing short cut key; enter into the next menu and adjust OSD options (decreasing).
3. VOL +
Volume increasing short cut key; enter into the next menu and adjust OSD options(increasing).
4. CH-
Channel decreasing short cut key; decrease the channel No. and select the last option in the menu.
5. CH+
Channel increasing short cut key; increase the channel No. and select the next option in the menu.
Terminal wiring Diagram
Connecting Cables
text_image
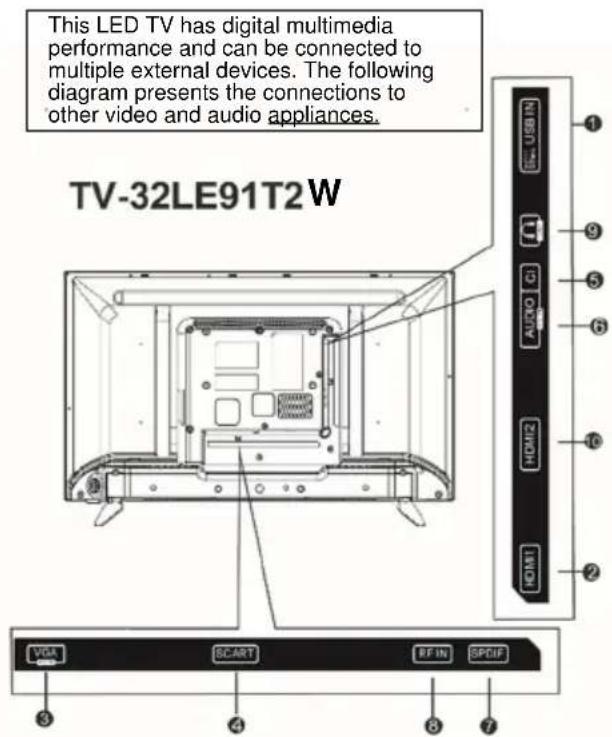
This LED TV has digital multimedia performance and can be connected to multiple external devices. The following diagram presents the connections to other video and audio appliances. TV-32LE91T2W VIAI SCART RF IN SPCIF 1 2 3 4 5 6 7 AUTO USB HDMI HOM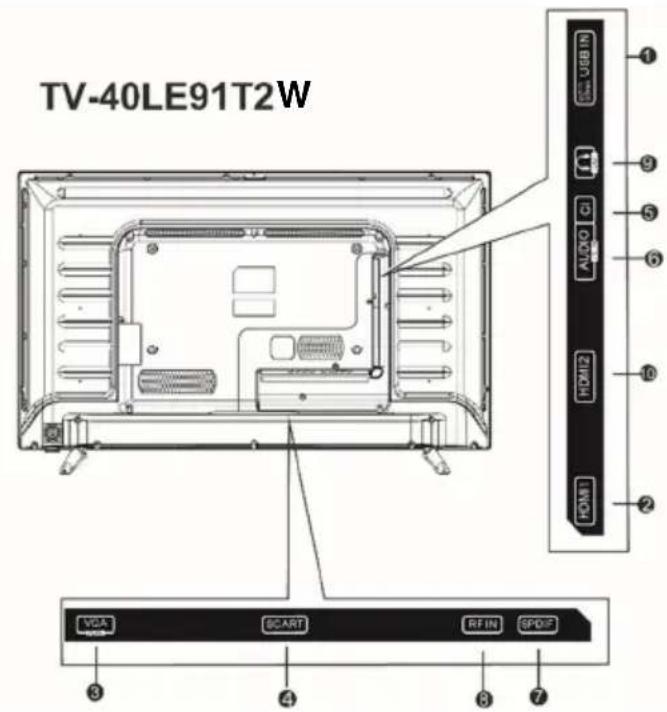
text_image
TV-40LE91T2W VGA SCART RFIN SPDIF USB1N AUDIO CI HDMI2 HOMA ① ② ③ ④ ⑤ ⑥ ⑦1. USB:
User can access multi-media files stored in the USB device.
The supported format includes:
*.dat, *.vob, *.mpg and *.avi video formats. Besides, *.jpg, *.bmp and *.mp3 (DTV1080P hd programs burn, you must use more than streaming system of speed or move hard disk).
It is used to updating the software of the DVB-T/C and DTV, and it should only be operated by a qualified TV technician.
2/10. HDMI1/HDMI2:
High-definition multimedia interface.
Note: Acceptable video signal 480P/576P/720P/1080i/1080P
3. VGA:
This can be connected with the D-sub 15 pin signal cable to your PC.
4.SCART:
Scart input
5. Cl: Cl input.
6. AudioPC
PC audio input.
7SPDIF:
Digital TV sound output.
8. RF In
Antenna/close circuit TV or Digital TV terminal.
9. Headphone
Headphone input.
Descriptions of Television Remote Control
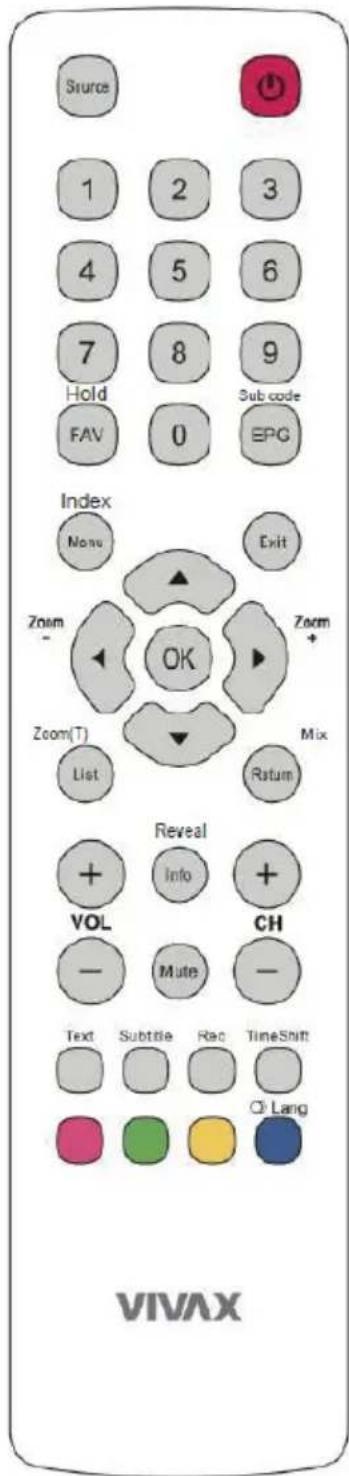
Most of your television's functions are available via the menus that appear on the screen. The remote control supplied with your set can be used to navigate through the menus and to configure all the general settings.
text_image
Source 1 2 3 4 5 6 7 8 9 Hold Sub code FAV 0 EPG Index None Exit Zoom - OK Zoom+ Zoom(T) Mix List Return Reveal + Info + VOL CH - Mute - Text Subtle Rec TimeShift ○ Lang VIVAX(MUTE) Reduce the TVs volume to Its minimum level. Press again to restore the volume.
(On/Off button) Turns the TV on or off.
0-9: (numeric buttons) Enters channel numbers.
Info / Reveal Display the status Information.
TXT mode: Press to reveal the hidden information
Return / Mix Return you to the previous channel in TV mode.
TXT mode: Press to enter mix mode picture/teletext.
Source Press to select signal source.
Menu / Index Bring up the menu system.
TXT mode: Press to open Index Teletext page
Direction b. Highlights different items In the menu system and adjusts the menu controls.
OK To open the corresponding submenu and activate a setting menus; to enter into Channel list.
List / Zoom Press to select the Recorded List or Timer.
TXT mode: Press to resize Teletext page view.
Exit Exits the menu system.
VOL +/- Increase or decreases the TVs volume.
Zoom +/- Scan up or down through the current channel list.
Press to select the desired screen format. (In USB mode, it is unavailable.)
FAV / Hold Press the FAV button to browse the channels set in your favorite list.
TXT mode: Press to hold teletext page auto listing
EPG/Subcode Toggles the Electronic Program Guide between on and off. (Only applicable for digital channels. (not available for some models.)
TXT mode: Press to enter into sub teletext pages.
Text Teletext
Subtitle Press to display the Subtitle Language menu.
Rec Press to record the TV program you are watching in DTV mode.
TimeShift Press the Time Shift button to pause the program you are watching to activate Time Shift function.
RED b. In corresponding mode, press It to enter the right function as hint.
GREEN b. In corresponding mode, press It to enter the right function as hint.
YELLOW b. In corresponding mode, press It to enter the right function as hint.
BLUE b. In corresponding mode, press It to enter the right function as hint.
LANG Change audio language.
Notes
-
Do not mix old and new batteries or different types.
-
When the batteries are to be exhausted, the leakage may occur and cause the damage to the remote.
-
If the device is not to be used for a long period of time, remove the batteries to battery leakage.
-
WARNING: The batteries shall not be exposed to excessive heat such as sunshine, fire or the like.
First Installation
text_image
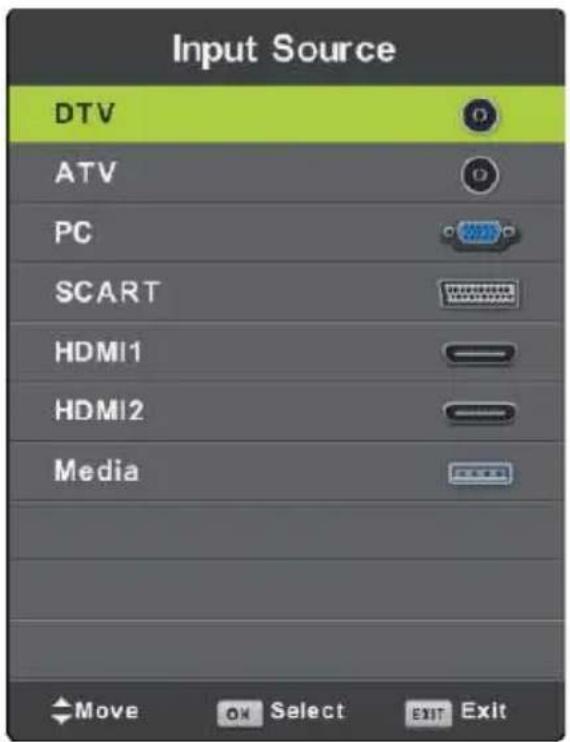
Input Source DTV ATV PC SCART HDMI1 HDMI2 Media Move OK Select EXIT ExitPress SOURCE button to display the input source list,
Press ▼ / ▲ or OK button to select the input source you want to enter,
Press OK button to enter the input source,
Press EXIT button to quit.
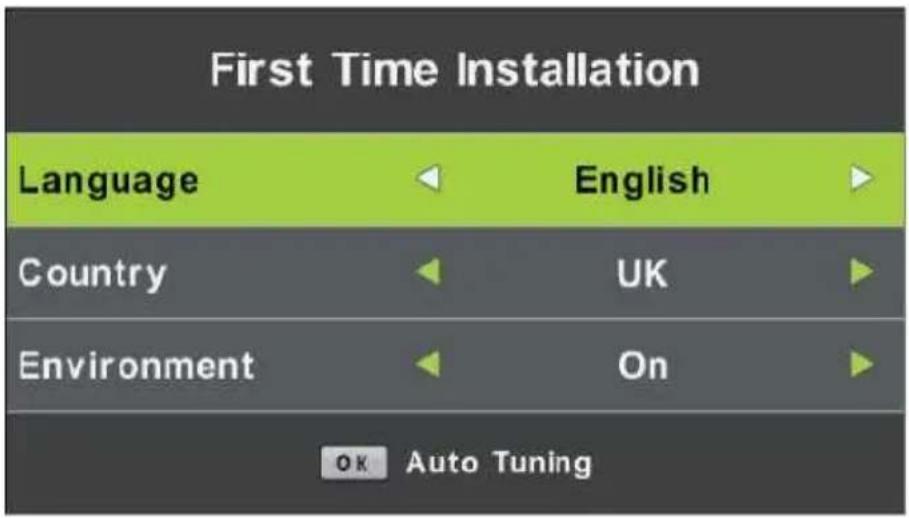
Connect an RF cable from the TV's input called "RF-In" and to your TV Aerial socket. Select Language
Press ◀ / ▶ button to select the language to be used for menus and message.
Select Country
Press ▼ / ▲ button to highlight country menu.
Press ◀ / ▶ button to select the country you want to enter.
text_image
First Time Installation Language English Country UK Environment On OK Auto Tuning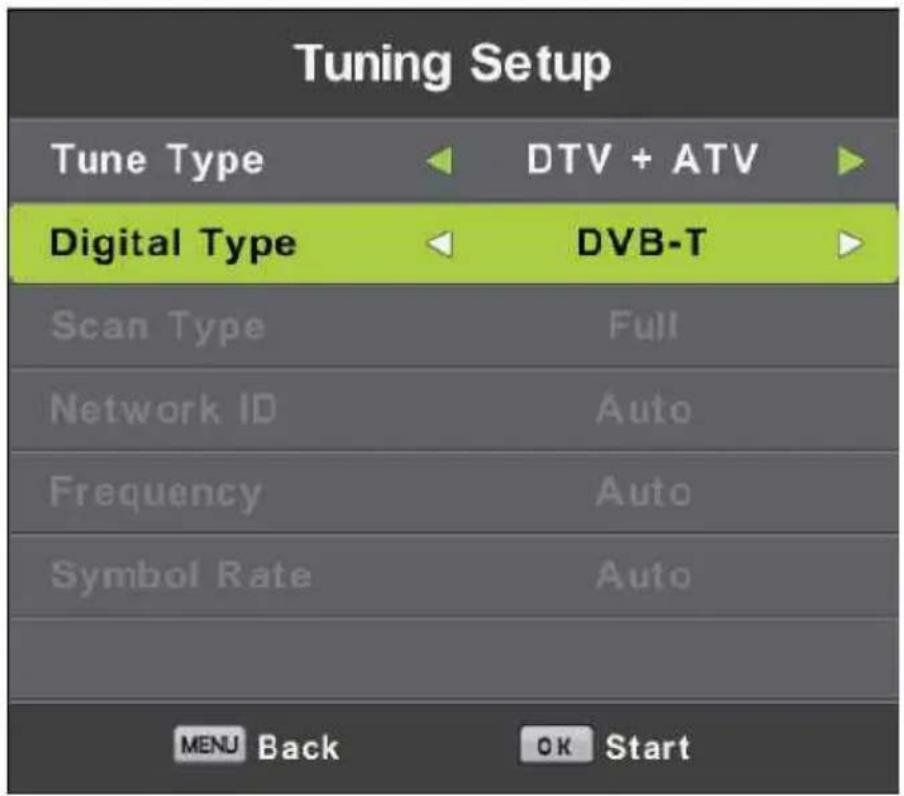
text_image
Tuning Setup Tune Type DTV + ATV Digital Type DVB-T Scan Type Full Network ID Auto Frequency Auto Symbol Rate Auto MENU Back OK StartAuto Tuning
First tuning ATV, press Menu and left arrow button to skip ATV tuning, Second tuning DTV, press Menu and left arrow button to skip DTV tuning.
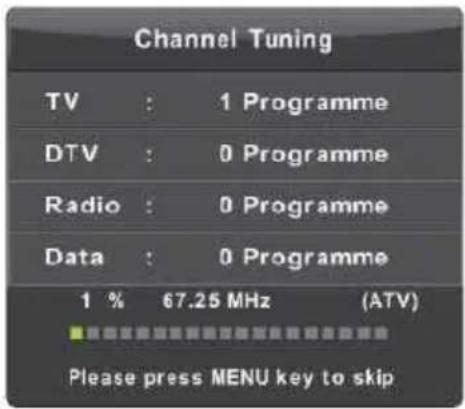
text_image
Channel Tuning TV : 1 Programme DTV : 0 Programme Radio : 0 Programme Data : 0 Programme 1 % 67.25 MHz (ATV) Please press MENU key to skip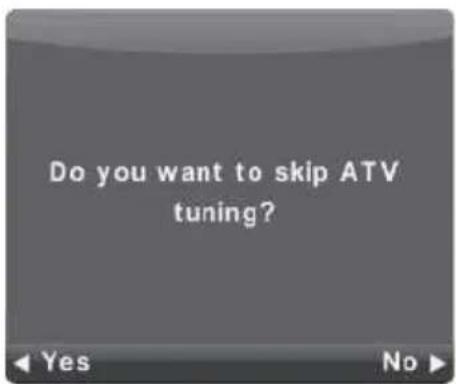
text_image
Do you want to skip ATV tuning?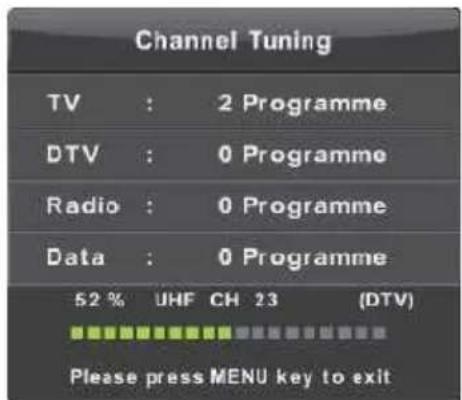
text_image
Channel Tuning TV : 2 Programme DTV : 0 Programme Radio : 0 Programme Data : 0 Programme 52 % UHF CH 23 (DTV) Please press MENU key to exit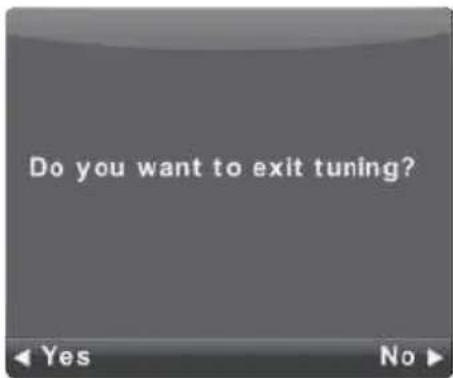
text_image
Do you want to exit tuning?Menu Operation
Channel Menu
Press MENU button to display the main menu.
Press ◀ / ▶ button to select CHANNEL in the main menu.
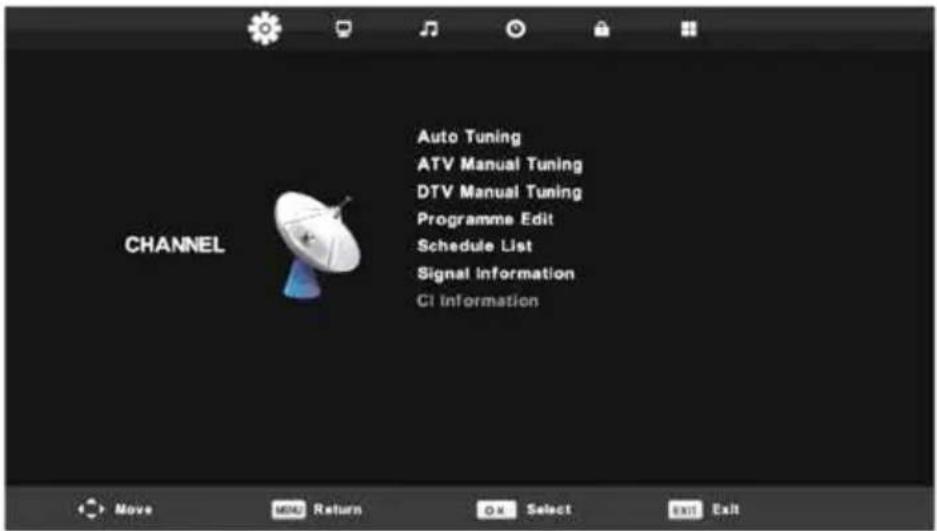
text_image
CHANNEL Auto Tuning ATV Manual Tuning DTV Manual Tuning Programme Edit Schedule List Signal Information CI Information- Press ▼ / ▲ button to select the option that you want to adjust in the CHANNEL menu.
- Press OK button to adjust.
- After finishing your adjustment, Press OK button to save and return to the previous menu.
Auto Tuning
Press ▼ / ▲ button to select Auto Tuning, then press OK/▶ button to enter.
text_image
Tuning Setup Country Croatia Tune Type DTV + ATV Digital Type DVB-T Scan Type Full Network ID Auto Frequency Auto Symbol Rate Auto OK Start MENU Back
text_image
Channel Tuning TV : 1 Programme DTV : 0 Programme Radio : 0 Programme Data : 0 Programme 1 % 67.25 MHz (ATV) Please press MENU key to skip
text_image
Do you want to skip ATV tuning?
text_image
Channel Tuning TV : 2 Programme DTV : 0 Programme Radio : 0 Programme Data : 0 Programme 52 % UHF CH 23 (DTV) Please press MENU key to exit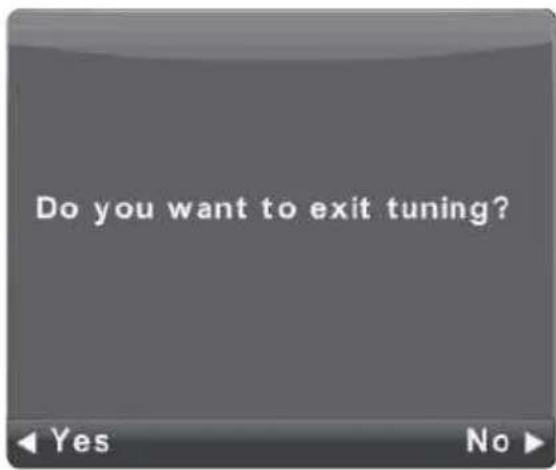
text_image
Do you want to exit tuning?ATV Manual Tuning
Current CH
Set the channel number.
Color System
Color System Select the color system
Sound System
Sound System Select the Sound system
Fine-Tune
Adjust the frequency of the channel finely. Search
Search
Start searching channel
text_image
ATV Manual Tuning Current CH 1 Color System PAL Sound System DK Fine-Tune Search Frequency 49.75 MHz Move Cancel Back Exit ExitDTV Manual Tuning
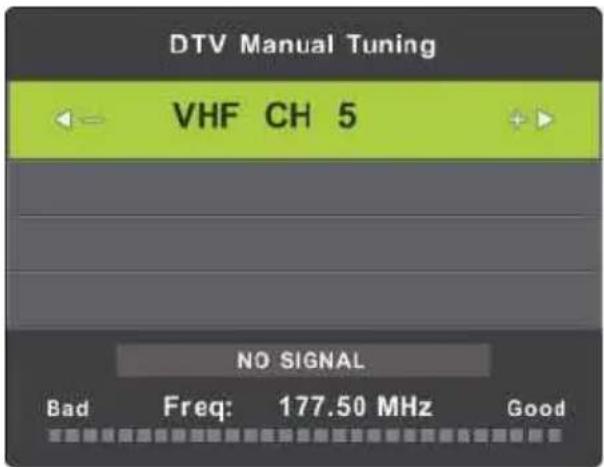
Press ▼ / ▲ button to select DTV Manual Tuning, then press OK button to enter sub-menu. Press ◀ / ▶ button to select channel, then press OK button to search program.
text_image
DTV Manual Tuning VHF CH 5 NO SIGNAL Bad Freq: 177.50 MHz GoodProgramme Edit
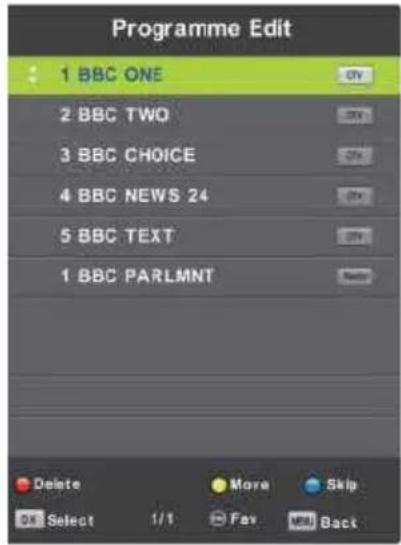
Press ▼ / ▲ button to select Programme Edit, then press OK button to enter sub-menu.
text_image
Programme Edit 1 BBC ONE 2 BBC TWO 3 BBC CHOICE 4 BBC NEWS 24 5 BBC TEXT 1 BBC PARLMNT Delete More Skip Select 1/1 Fav Back
The three colored key is the shortcut key for programming the channel.
First press ▼ / ▲ to highlight the channel
you want to select, then: Press the Red button to delete the program in the list.
Press the Yellow button to move the channel in the list.
Press the Blue button to skip the selected channel.
Press Fav button to add or remote the channel to your favorite list. (Your TV set will skip the channel automatically when using CH+/- to view the channels.)
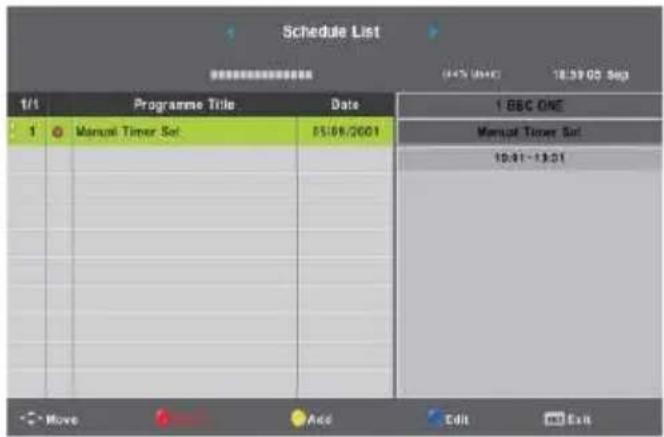
Schedule List
Press ▼ / ▲ button to select Schedule List, then press OK button to enter sub-menu. It is available in DTV source.
Signal Information
Press ▼ / ▲ button to select Signal Information, press the OK button to see the detail information about the signal. Only available when there is signal in DTV.
Press the YELLOW button to enter the
text_image
Schedule List Programme Title Date 1 BBC ONE Manual Timer Set 25:09/2001 10:31-12:31 Move Add Edit Add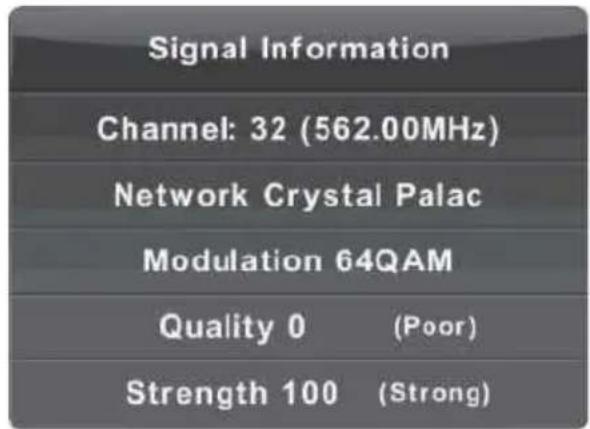
text_image
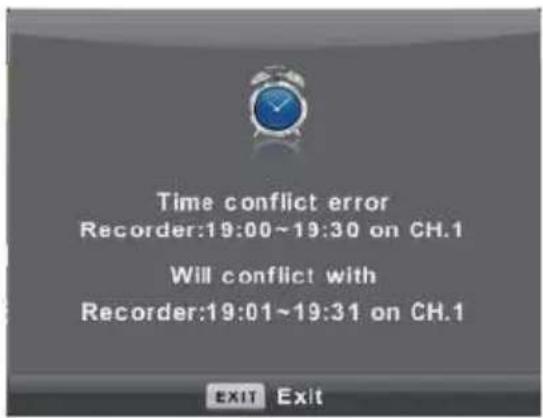
Signal Information Channel: 32 (562.00MHz) Network Crystal Palac Modulation 64QAM Quality 0 (Poor) Strength 100 (Strong)When the time appointment is conflict it will produce a warning message.
text_image
Time conflict error Recorder:19:00~19:30 on CH.1 Will conflict with Recorder:19:01~19:31 on CH.1 EXIT Exit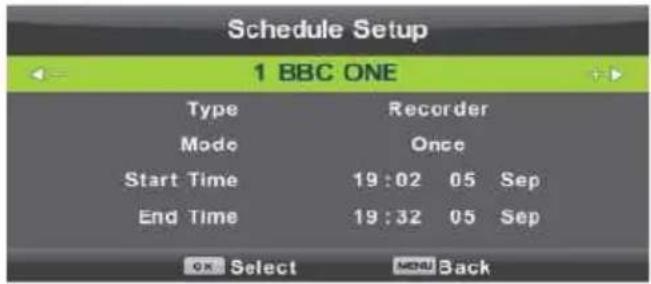
text_image
Schedule Setup 1 BBC ONE Type Recorder Mode Once Start Time 19:02 05 Sep End Time 19:32 05 Sep OK Select MON BackPicture Menu
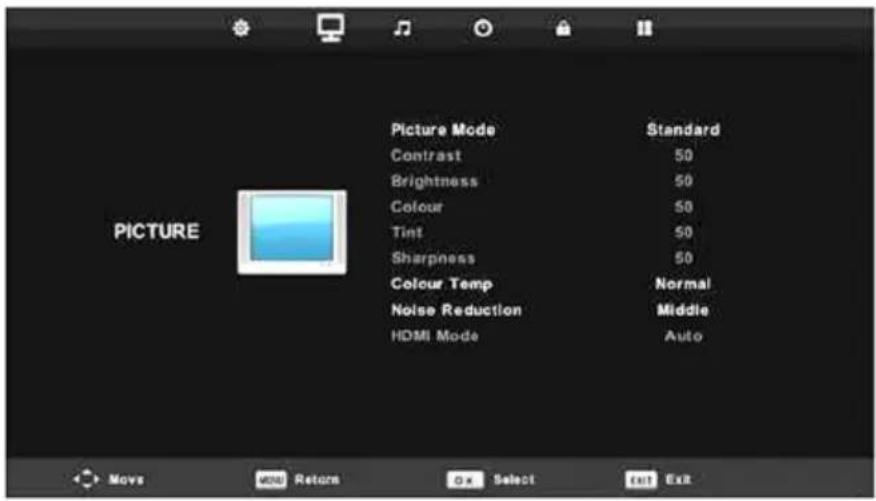
Press MENU button to display the main menu.
Press ◀ / ▶ button to select PICTURE in the main menu.
text_image
Picture Mode Contrast Brightness Colour Tint Sharpness Colour Temp Noise Reduction HDMI Mode Standard 50 50 50 Normal Middle Auto- Press ▼ / ▲ button to select the option that you want to adjust in the PICTURE menu.
- Press OK button to adjust.
- After finishing your adjustment, Press MENU button to save and return back to the previous menu.
Picture Mode
Press ▼ / ▲ button to select Picture Mode, then press OK button to enter sub-menu.
You can change the value of contrast, brightness, color, sharpness and tint when the picture is in Personal mode.
Contrast/ Brightness/ Color/ Tint / Sharpness
Press ▼ / ▲ button to select option, then press ◀ / ▶ button to adjust.
Contrast Adjust the highlight intensity of the picture, but the shadow of the picture is invariable.
text_image
Picture Mode Dynamic Standard Mild Personal OK Select MID BackBrightness Adjust the optical fiber output of the entire picture, it will effect the dark region of the picture.
Color Adjust the saturation of the color based on your own like.
Tint Use in compensating color changed with the transmission in the NTSC code.
Sharpness Adjust the peaking in the detail of the picture.
Colour Temp
Change the overall color cast of the picture.
Press ▼ / ▲ button to select Colour, Temperature, then press OK button to enter sub-menu. Press ◀ / ▶ button to select. (Available Picture mode: Cold, Normal, Warm).
Cold Increase the blue tone for the white.
Normal Increase the sex-linked colors for the white.
Warm Increase the red color for the white.

text_image
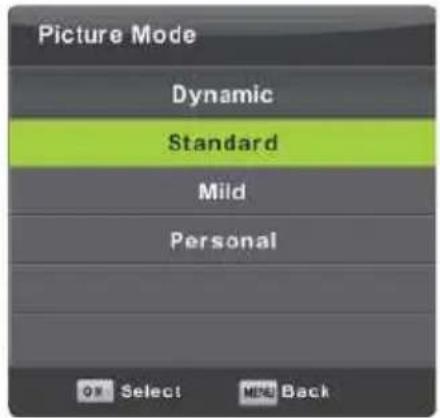
Colour Temp Cold Normal Warm OK Select MENU BackNoise Reduction
To filter out and reduces the image noise and improve picture quality.
Press T/ ▲ button to select Noise Reduction, then press OK button to enter sub-menu
Off Select to turn off video noise detection.
Low Detect and reduce low video noise.
Middle Detect and reduce moderate video noise. High Detect and reduce enhanced video noise.
Default Set as Default.
text_image
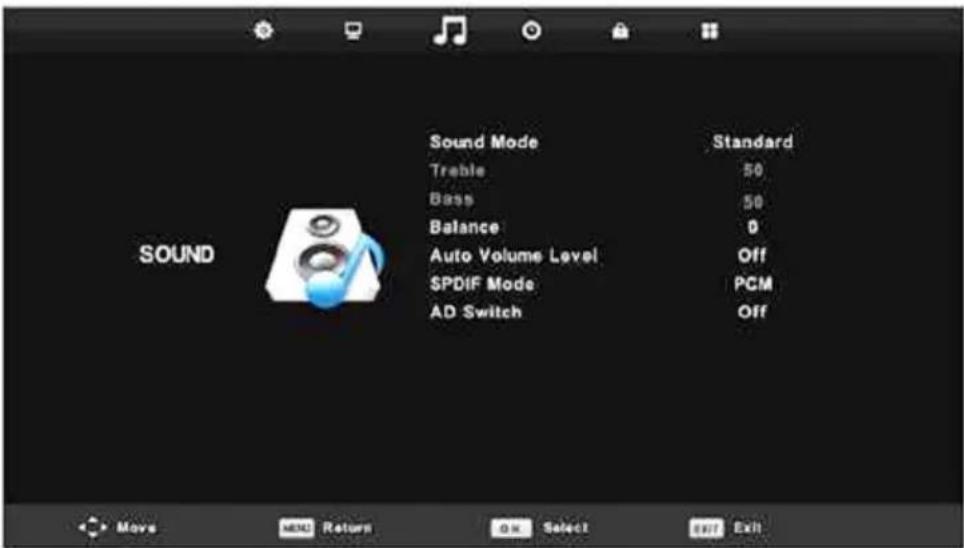
Noise Reduction Off Low Middle High Default OK Select MENU BackSound Menu
Press MENU button to display the main menu.
Press ◀ / ▶ button to select SOUND in the main menu
text_image
Sound Mode Treble 50 Bass 50 Balance 0 Auto Volume Level Off SPDIF Mode PCM AD Switch Off SOUND Move MENU Return OK Select Exit Exit- Press ▼ / ▲ button to select the option that you want to adjust in the SOUND menu.
- Press Enter button to adjust.
- After finishing your adjustment, Press OK button to save and return to the previous menu.
Sound Mode

text_image
Sound Mode Standard Music Movie Sports Personal OK Select Forward BackPress ▼ / ▲ button to select Sound Mode, then press
OK button to enter sub-menu. Press ▼ / ▲ button to select.
Standard Produces a balanced sound in all environments.
Music Preserves the original sound. Good for musical programs.
Movie Enhances treble and bass for a rich sound experience.
Sports Enhances vocals for sports
Note:The treble and bass are only available in
Personal mode, you can adjust them as you like
You can change the value of Treble and Bass when the sound is in Personal mode
Balance
Press ▼ / ▲ button to select option, Press ◀ / ▶ button to adjust.
Auto Volume level
Press ▼ / ▲ button to select Auto Volume Level, then press ◀ / ▶ button to select On or Off.
SPDIF Mode
Press ▼ / ▲ button to select SPDIF Mode, then press ◀ / ▶ button to select Off / PCM / Auto.
AD Switch
Press ▼ / ▲ button to select AD Switch, then press ◀ / ▶ button to select On or Off.
Amblyopia function for the blind, the tracks will be mixed describe the current screen. It need codestream to support.
NOTE: Balance: This item can adjust the speaker's output, it enables you to listen to best at your position.
Auto Volume Level: This item is used for reducing the difference between channel and program's volume automatically
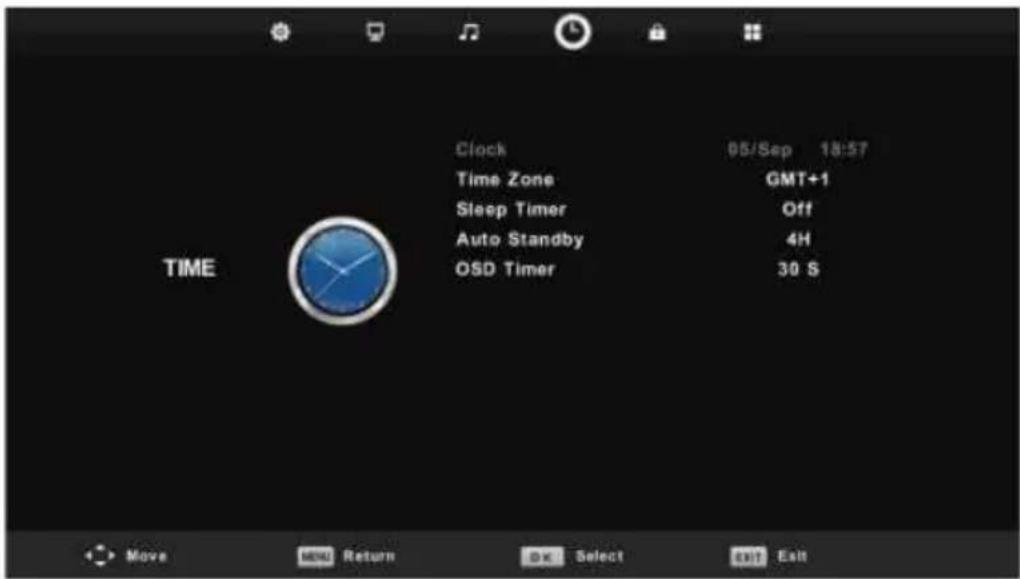
Time Menu
Press MENU button to display the main menu.
Press ◀ / ▶ button to select TIME in the main menu.
text_image
Clock 05/Sep 18:57 Time Zone GMT+1 Sleep Timer Off Auto Standby 4H OSD Timer 30 S TIME- Press ▼ / ▲ button to select the option that you want to adjust in the TIME menu.
- Press Enter button to adjust.
- After finishing your adjustment, Press OK button to save and return to the previous menu.
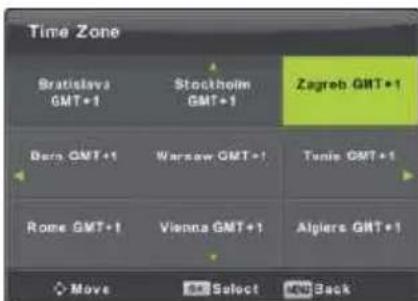
Time Zone
Press ▼ / ▲ button to select Time Zone, then press OK button to enter sub-menu.
text_image
Time Zone Bratislava GMT+1 Stochloim GMT+1 Zagreb GMT+1 Bera GMT+1 Warsaw GMT+1 Tunis GMT+1 Rome GMT+1 Vienna GMT+1 Algiers GMT+1 Move Select BackPress ▼ / ▲ / ◀ / ▶ button to select time zone.
Sleep Timer

text_image
Sleep Timer Off 15Min 30Min 45Min 60Min 90Min Off Select BackPress ▼ / ▲ button to select Sleep Timer, then press OK button to enter sub-menu.
Press ▼ / ▲ button to select. (Available options are:0ff,15min,30min,45min,60min,90min,120min,240min).
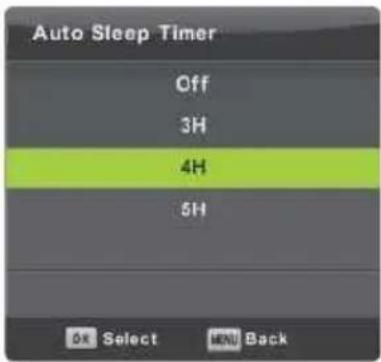
Auto Standby
text_image
Auto Sleep Timer Off 3H 4H 5H OK Select MENU BackPress ▼ / ▲ button to select Auto Standby, then press OK button to enter sub-menu.
Press ▼ / ▲ button to select.
Tips: The remote control does not make any operation in the hypothesis time, it will close down automatically. If you do any operation, it will reset the time.
text_image
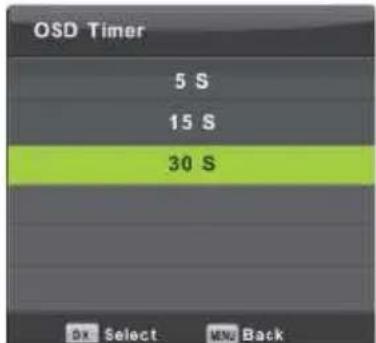
OSD Timer 5 S 15 S 30 S OK Select MNO BackPress ▼ / ▲ button to select OSD Timer, then press OK button to enter sub-menu.
Press ◀ / ▶ button to select.
Lock Menu
Press MENU button to display the main menu.
Press ◀ / ▶ button to select LOCK in the main menu.
- Press ▼ / ▲ button to select the option that you want to adjust in the LOCK menu.
- Press OK/ ◀ / ▶ button to adjust.
- After finishing your adjustment, Press MENU button to return back to the previous menu.
text_image
System Lock Set Password Channel Lock Parental Guidance Key Lock Hotel Mode OFF OFF OFF LOCK Move MIND Return OK Select EXIT ExitSystem Lock
text_image
Please enter password Clear CancelPress ▼ / ▲ button to select System Lock, then press OK button to make the following 3 options
Default password is 0000, and if forget what you set, please call the service center.
Select Set Password, to enter sub-menu to set new
Set Password
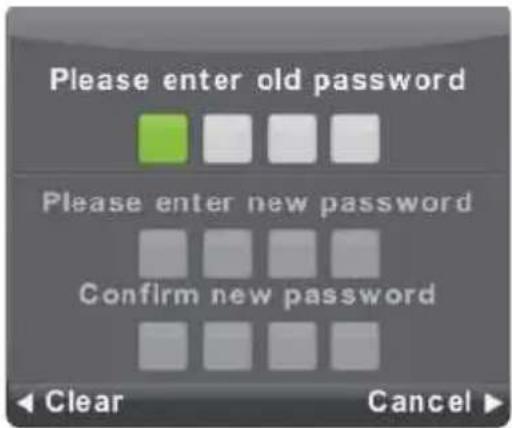
text_image
Please enter old password Please enter new password Confirm new password Clear CancelPress ▼ / ▲ button to then press OK button password
Channel Lock
Press ▼ / ▲ button to select Channel Lock then press OK button to enter sub-menu to select. Press Green button to lock or unlock the channel.
Parental Guidance
Press ▼ / ▲ button to select Parental Guidance, then press OK button to enter sub-menu to select the number of age which is suitable for your children.
text_image
Parental Guidance Off 3 4 5 6 7 OK Select MENU Back
text_image
Channel Lock 1 BBC ONE 2 BBC TWO 3 BBC CHOICE 4 BBC NEWS 24 5 BBC TEXT 1 BBC PARLMNT LOCK OK Select 1/1 MENU BackKey Lock
Press ▼ / ▲ button to select Key Lock, then press ◀ / ▶ button to select Off or On. When Key Lock's status is on, you can't use the Key panel button.
Hotel Mode
text_image
Hotel Mode On Source Lock Default Source Off Default Prog 1 Default Volume Off Max Volume 100 Import Database Export Database Clear Lock- Press ▼ / ▲ button on the remote control to select Hotel Mode in the Lock menu.
- Press OK button on the remote control to enter the sub-menu.
- After finishing your adjustment, Press MENU button to save and return back to the previous menu.
Hotel Mode
Press ▼ / ▲ button to select Hotel Mode, then press ◀ / ▶ button to select On or Off.
Source Lock
Press ▼ / ▲ button to select Source Lock, then press OK button to enter sub-menu to select.
Default Source
Press ▼ / ▲ button to select Default Source, then press OK button to enter sub-menu to select.
Default Prog
Press ▼ / ▲ button to select Default Prog, then press ◀ / ▶ button to adjust.
It is available when the default source is DTV or ATV.
Max Volume
Press ▼ / ▲ button to select Max Volume, then press ◀ / ▶ button to adjust.
Clear Lock
Press ▼ / ▲ button to select Clear Lock, then press OK button to clear the setting you have done before.
Setup Menu
Press MENU button to display the main menu
Press ◀ / ▶ button to select SETUP in the main menu
text_image
Language TT Language Audio Languages Subtitle Language Hearing Impaired PVR File System Aspect Ratio Blue Screen First Time Installation Reset Software Update (USB) Environment HDMI CEC English East Hrvatski Hrvatski Off 4:3 On Home Mode Move OK Select Exit- Press ▼ / ▲ button to select the option that you want to adjust in the SETUP menu.
- Press OK button to adjust.
- After finishing your adjustment, Press OK button to save and return to the previous menu.
Language
Select an OSD menu language can be displayed Default English is selected as menu language.
Press ▼ / ▲ / ◀ / ▶ button to select Menu Language.
text_image
Language English Albania Magyar Espanol Hrvatski Polski OK Select MENU Back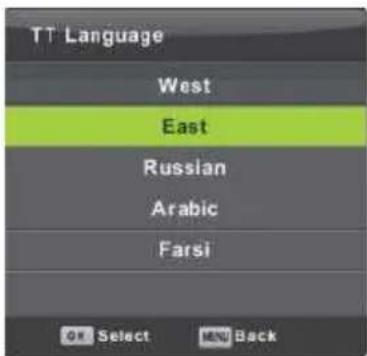
text_image
TT Language West East Russian Arabic Farsi OK Select MAN BackTT Language
Press ▼ / ▲ button to select TT Language, then press OK button to enter sub-menu. Press ▼ / A / ◀ / ▶ button to select TT language.
Audio Languages
Press ▼ / ▲ button to select Audio Languages, then press OK button to enter sub-menu. Press ◀ / ▶ button to select the Primary /Secondary of Audio Languages.
Press ▼ / ▲ / ◀ / ▶ button to select the Audio Languages.

text_image
Audio Languages Primary Hrvatski Norsk Romáseste Magyar Polski Slovenščina Nederlands Russian Srpski or Select BackSubtitle Language
Press ▼ / A button to select Subtitle Language, then press OK button to enter sub-menu. Press ◀ / ▶ button to select the Primary /Secondary of Subtitle Language.
Press ▼ / A/ ◀ / ▶ button to select the Subtitle Language.
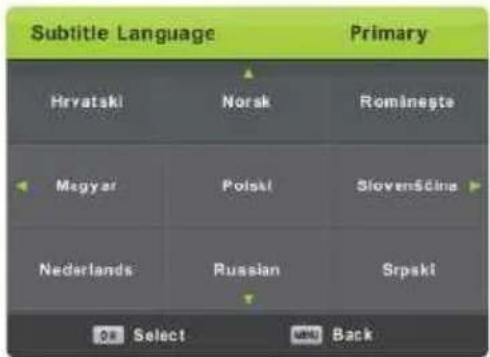
text_image
Subtitle Language Primary Hrvatski Norsk Rominepte Megyar Polski Sloven$čina Nederlands Russian Srpski OK Select Help BackHearing Impaired
Press ▼ / A button to select Hearing Impaired, then press OK button to select On or Off.
PVR File System
Press ▼ / A button to select PVR File System, then press OK button to enter sub-menu.
Press ▼ / A button to select Check PVR File System,
then press OK button to enter. Then it will check the USB speed.
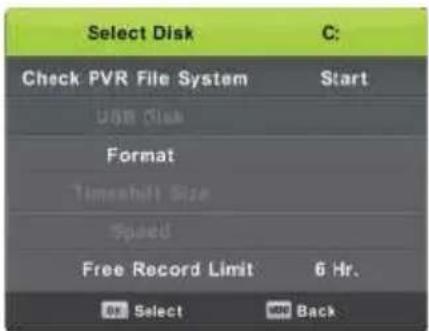
text_image
Select Disk C: Check PVR File System Start USB Disk Format Timeshall Size Speed Free Record Limit 6 Hr. OK Select 100 BackAspect Ratio
Press ▼ / ▲ button to select Aspect Ratio, then press OK button to enter sub-menu.
Press ▼ / ▲ button to select aspect ratio. (Available options are: Auto, 4:3,16:9, Zooml, Zoom2).
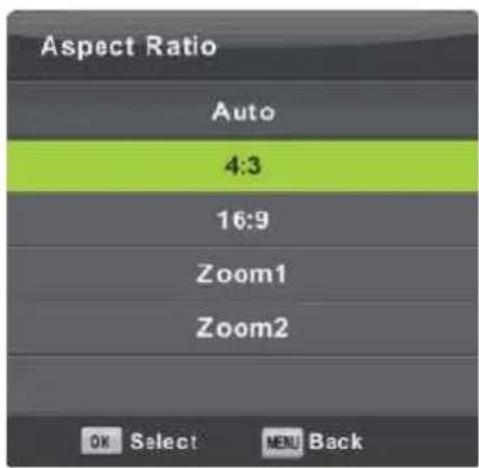
text_image
Aspect Ratio Auto 4:3 16:9 Zoom1 Zoom2 OK Select MENU BackBlue Screen
Press ▼ / ▲ button to select Blue Screen, then press OK button to select On or Off.
First Time Installation
Press ▼ / ▲ button to select First time installation, then press OK button to enter.
Reset
Press ▼ / ▲ button to select Reset, then press OK button to enter sub-menu.
Software Update(USB)
Press ▼ / ▲ button to select Software Update (USB), plug your USB device in the USB slot, then press OK button to update the right software.
HDMI CEC
Press ▼ / ▲ button to select HDMI CEC, then press OK button to enter the sub-menu.
text_image
HDMI CEC CEC Control On Audio Receiver Off Device Auto Power Off Off TV Auto Power On Off Device List Device Menu MENU BackCEC Control Press ◀ / ▶ button to turn the CEC Control on or off.
Audio Receiver Press ◀ / ▶ button to turn the
Audio Receiver on or off.
Device Auto Power Off Press ◀ / ▶ button to turn the Device Auto Power Off on or off. Device List Press OK button to open the list of device.
Screen Menu (Only PC Mode)
Press MENU button to display the main menu.
Press ◀ / ▶ button to select SCREEN in the main menu.
text_image
Auto Adjust H-Offset 50 V-Offset 50 Size 50 Phase 14 Position Reset SCREEN- Press ▼ / ▲ button to select the option that you want to adjust in the SCREEN menu.
- Press OK button to adjust.
- After finishing your adjustment, Press OK button to save and return to the previous menu.
Auto Adjust
Press OK button to start adjusting H-Offset/V-Offset/Size/Phase automatically.
H-Offset.
Adjust the horizontal position of the picture.
Press ▼ / ▲ button to select H-Offset, then press OK button to enter sub-menu.
V-Offset
Adjust the vertical position of the picture.
Press ▼ / ▲ button to select V-Offset, then press OK button to enter sub-menu.
Size
Adjust the display size.
Press ▼ / ▲ button to select Size, then press OK button to enter sub-menu.
Phase
Adjust the horizontal interfering lines.
Press ▼ / ▲ button to select Phase, then press OK button to enter sub-menu.
Position Reset
Press ▼ / ▲ button to select Position Reset, then press OK button to enter
Notes:
- Noise Reduction in PICTURE option is invalid.
- AD Switch in SOUND option is invalid.
- TIME menu and description are the same as that for DTV or ATV mode.
- Channel Lock and Parental Guidance in LOCK option is invalid.
- Audio Languages, Subtitle Language, Hearing Impaired and PVR File System in SETUP option is invalid.
- PC mode has no CHANNEL menu.
Meida
Note: Before operating Media menu, Plug in USB device, then press INPUT button to set the Input Source to Media.
Press ▼ / ▲ button to select Media in the Source menu, then press OK button to enter.
text_image
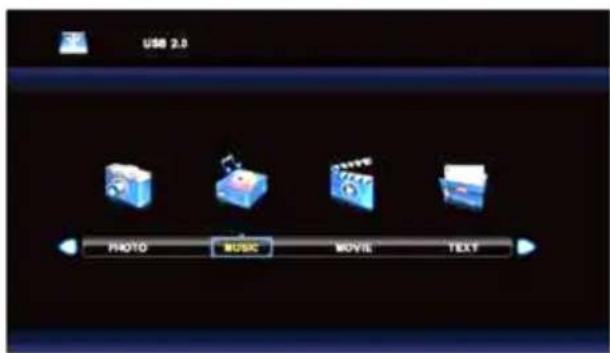
USB 2.0 PHOTO MUSIC MOVIE TEXTPress ◀ / ▶ button to select the option you want to adjust in the main Media menu, then press OK button to enter.
Photo Menu
text_image
30 30 30 30 30 30 30 30 30 30 30 30 30 30 30 30 30 30 30 30 30 30 30 30 30 30 30 30 30 30 30 30 30 30 588x776x248_set.jpg 999 Play Pause Prev Next Stop RepeatALL Music Playlist Info.Press ◀ / ▶ button to select PHOTO in the main menu, then press OK button to enter. Press Exit button to return to the previous menu and exit menu to quit.
Press ◀ / ▶ button to select the file you want to watch in the file selecting menu, then press OK button to display picture.
text_image
PHOTO C:\picture 1 / 1 Return Resolution: 500 X 375 Size: 102 KBytes Date: 2007 / 11 / 22 Time: 15 : 52 : 54 1_500x375x24b_szt.jpg.jpg Delete tm ExitWhen highlighting the option you select, the file information will appear on the right and picture will be previewed in the center.
Music Menu
Press ◀ / ▶ button to select MUSIC in the main menu, then press OK button to enter. Press Exit button to return to the previous menu and exit menu to quit.
text_image
USB 2.0 PHOTO MUSIC MOVIE TEXT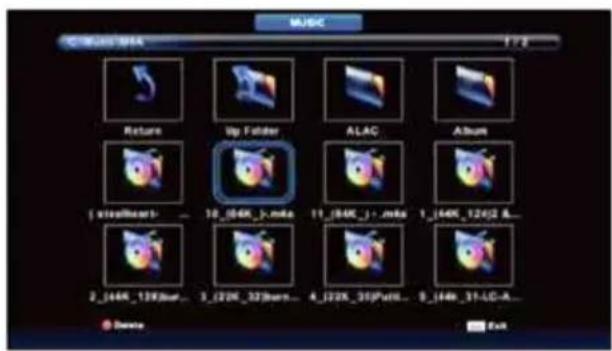
text_image
MUSIC C:\Music\MA4 1 / 2 Return Up Folder ALAC Album 1 [sleefheart]... 10_104K_j.maka 11_104K_j-.maka 1_144K_124/2 A... 2_144K_139/2mata... 3_122K_323mara... 4_122K_35/Putk... 5_144K_31-LG-A... Delete ExitPress ◀ / ▶ button to select return option to the previous menu.
Press ◀ / ▶ button to select drive disk you want to listen, then press OK button to enter.
text_image
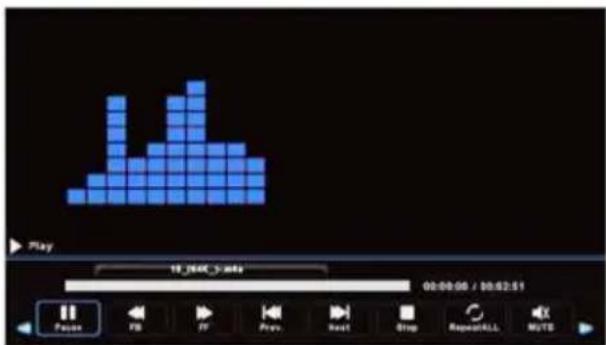
Play 10:00C 3:00 02:08:06 / 08:02:51 Position FD FF Play Next Stop RepeatKILL MODEMovie Menu
Press ◀ / ▶ button to select MOVIE in the main menu, then press OK button to enter. Press Exit button to return to the previous menu and exit menu to quit.
text_image
USB 2.0 PHOTO MUSIC MOVIE TEXTPress ◀ / ▶ button to select drive disk you want to watch, then press OK button to enter. Press OK button to play the selected movie.
Press OK button to select menu in the bottom you want to run, then press OK button to operate. Press Exit button to back to the previous menu and exit button to quit the entire menu.
text_image
24_TAVC_1440x805_2422K.Vor_55_44K_2ch/LT_ 00:00:01 / 00:03:26 Paus FB FF Prev. Next Stop CharSet RepeatALLText Menu
Press ◀ / ▶ button to select TEXT in the main menu, then press OK button to enter. Press Exit button to return to the previous menu and exit menu to quit.
text_image
1. Hola! ! 2. Buenos días!! 3. Buenas tardes!! 4. Buenas noches!! 5. Gracias! 6. Muchas gracias! 7. De nada 8. Adiós!! 9. Hasta luego!! 10. Hasta mañanall! 11. Hasta prontoll (=see you soon) 12. Qué tal?? Spanish 100.txt Previous P... Next Page Prev. Next Stop CharSet Music PlaylistPress ◀ / ▶ button to select drive disk you want to watch, then press OK button to enter.
Press ◀ / ▶ button to select return option to back to the previous menu.
Troubleshooting
If the TV does not operate as usual or appears to be faulty please read carefully this section. Many operational issues can be resolved by users.
It is also advisable to unplug the TV from the AC socket on the wall for 60 seconds or more, then reconnect and start again. This simple procedure helps in restoring stable conditions for electric circuits and firmware of the unit.
Please contact Manufacturer Customer Care if the problem is unresolved or you have other concerns.
| SYMPTOMS POSSIBLE SOLUTIONS | |
| No sound or picture. | ·Check if the power cord is plugged into a powered AC outlet.·A power switch on the right side bottom edge of the front panel must be turned on. Press the [POWER] button in the remote control to activate the unit from Standby.·Check to see if LED light is either red or blue. If illuminated, power to TV is OK. |
| I have connected an external source to my TV and I get no picture and/or sound. | ·Check for the correct output connection on the external source and for the correct input connection on the TV.·Make sure you have made the correct selection for the input mode for the incoming signal. |
| When I turn On my television, there is a few second delay before the picture appears. Is this normal? | ·Yes, this is normal. That is the TV searching for previous setting information and initializing the TV. |
| Picture is normal, but no sound. | ·Check the volume settings.·Check if Mute mode is set "on". |
| Sound but no picture or black and white picture. | ·If black and white picture first unplug TV from AC outlet and re-plug after 60 seconds.·Check that the Colour is set to 50 or higher.·Try different TV channels. |
| Sound and picture distorted or appear wavy. | ·An electrical appliance may be affecting TV set. Turn off any appliances, if interference goes away, move appliance farther away from TV.·Insert the power plug of the TV set into another power outlet. |
| Sound and picture is blurry or cuts out momentarily. | ·If using an external antenna, check the direction, position and connection of the antenna.·Adjust the direction of your antenna or reset or fine tune the channel. |
| Horizontal/vertical stripe on picture or picture is shaking. | ·Check if there is interfering source nearby, such as appliance or electric tool. |
| The plastic cabinet makes a "clicking" type of sound. | ·"Click" sound can be caused when the temperature of the television changes. This change causes the television cabinet to expand or contract, which makes the sound. This is normal and the TV is OK.. |
| Remote control does not work. | ·Confirm that TV still has power and is operational.·Change the batteries in the remote control.·Check if the batteries are correctly installed. |
Manufactured under license from Dolby Laboratories. Dolby and the double-D symbol are trademarks of Dolby Laboratories

The "CI Plus" Logo is a trademark of CI Plus LLP.

Information on Disposal for Users of Waste Electrical & Electronic Equipment (private households)

This symbol on the product(s) and / or accompanying documents means that used electrical and electronic products should not be mixed with general household waste. For proper treatment, recovery and recycling, please take this product(s) to designated collection points where it will be accepted free of charge. Alternatively, in some countries you may be able to return your products to your local retailer upon purchase of an equivalent new product.
Disposing of this product correctly will help save valuable resources and prevent any potential negative effects on human health and the environment, which could otherwise arise from inappropriate waste handling. Please contact your local authority for further details of your nearest designated collection point. Penalties may be applicable for incorrect disposal of this waste, in accordance with your national legislation.
Disposal of waste batteries

Check local regulations for disposal of waste batteries or call your local customer service in order to get instructions on the disposal of old and used batteries. The batteries in this product should not be disposed of with household waste. Be sure to dispose of old batteries in special places for disposal of used batteries that are found in all retail shops where you can buy batteries.
EU Declaration of Conformity
Hereby, M SAN Grupa d.d. declares that the radio equipment type TV set is in compliance with Directive 2014/53/EU.
The full text of the EU declaration of conformity is available at the following internet address: www.msan.hr/dokumentacijaartikala
POŠTOVANI!
Zahvaljujemo na kupnji Vivax uređaja i nadamo se da ćete biti zadovoljni odabirom. Ako u jamstvenom roku bude potreban popravak proizvoda, molimo savjetujte se sa ovlaštenim prodavačem koji Vam je proizvod prodao ili nas kontaktirajte na dolje navedene brojeve i adrese. MOLIMO VAS DA PRIJE UPORABE PROIZVODA PAŽLJIVO PROČITATE UPUTE PRILOŽENE UZ PROIZVODI
JAMSTVENI LIST
VIVAX
HR
MODEL UREĐAJA
SERIJSKI BROJ
DATUM PRODAJE
BROJ RAČUNA PRODAVATELJA
POTPIS I PEČAT PRODAVATELJA
-
Ovim jamstvom M SAN Grupa kao davatelj jamstva u Republici Hrvatskoj jamči besplatan popravak istog u skladu s važećim propisima i u skladu s uvjetima opisanim u ovom jamstvenom listu. Ovim jamstvom jamčimo da će predmet ovog jamstva raditi bez pogreške uzrokovane eventualnom lošom izradom ili lošim materijalom izrade. Svi, eventualno nastali, kvarovi biti će besplatno otklonjeni u ovlaštenom servisu u jamstvenom roku.
-
UVJETI JAMSTVA Jamstveni rok počinje od dana kupnje proizvoda i traje 12 mjeseci, osim za Vivax Imago televizore (CRT, LCD, PDP) za koje jamstvo traje 24 mjeseca.
-
U slučaju kvara na proizvodu koji je predmet ovog jamstva, obvezujemo se da ćemo isti popraviti u najkraćem mogućem roku, a najkasnije u roku od 45 dana. Ako se proizvod ne može popraviti ili se ne popravi u roku od 45 dana, biti će zamijenjen novim. Jamstvo će biti produženo za vrijeme trajanja popravka.
-
Jamstvo se priznaje samo uz račun o kupnji, te uz ovaj jamstveni list koji mora biti ispravno popunjen odnosno mora sadržavati datum prodaje, pečat i potpis prodavatelja.
5. JAMSTVO NE OBUHVAĆA
POTPIS I PEČAT PRODAVATELJA
-
Ovom garancijom garantira proizvođač proizvoda, preko KIM TEC d.o.o., kao uvoznika i davatelja garancije u Republici Bosni i Hercegovini besplatan popravak istog u skladu s važećim propisima i u skladu s uvjetima opisanim u ovom garantnom listu. Ovom garancijom garantiramo da će predmet ove garancije raditi bez greške uzrokovane eventualnom lošom izradom i lošim materijalom izrade. Svi eventualno nastali kvarovi biti će besplatno otklonjeni u ovlaštenom servisu u garantnom roku.
-
UVJETI GARANCIJE Garantni rok počinje teći od dana kupnje proizvoda i traje 12 mjeseci, osim za Vivax Imago televizore (CRT, LCD, PDP) za koje jamstvo traje 24 mjeseca.
-
U slučaju kvara na proizvodu koji je predmet ove garancije, obavezujemo se da ćemo isti popraviti u najkraćem mogućem roku, a najkasnije u roku od 45 dana. Ako se proizvod ne može popraviti ili se ne popravi u roku od 45 dana, biti će zamijenjen novim. Ako popravak proizvoda traje duže od 10 dana, garancija će se produžiti za vrijeme trajanja popravka.
-
Garancija se priznaje samo uz račun o kupnji, te uz ovaj garantni list koji mora biti ispravno popunjen odnosno mora sadržavati datum prodaje, pečat i potpis prodavatelja.
-
Davalac garancije osigurava servis i rezervne dijelove 7 godina od datuma kupnje.
12. GARANCIJA NE OBUHVAĆA
POTPIS I PEÇAT PRODAVCA
- Ovom izjavom o saobraznosti proizvođač proizvoda, preko KIM TEC CG d.o.o., kao uvoznika i davaoca prava u Crnoj Gori besplatan popravak istog u skladu s vazećim propisima i u skladu s uslovima opisanim u ovoj izjavi o saobraznosti.
- Ovom izjavom o saobraznosti istićemo da će predmet ovog prava raditi bez greške uzrokovane eventualnom lošom izradom i lošim materijalom izrade. Svi eventualno nastali kvarovi biće besplatno otklonjeni u ovlašćenom servisu u predvidjenom roku za reklamaciju.
• USLOVI REKLAMACIJE: Rok za reklamaciju počinje teći od dana kupovine proizvoda i traje 24 mjeseca. - U slučaju kvara na proizvodu koji je predmet reklamacije, obavezujemo se da ćemo isti popraviti u najkraćem mogućem roku, a najkasnije u roku od 15 dana. Ako se proizvod ne može popraviti ili se ne popravi u roku od 15 dana, biće zamijenjen novim.
- Pravo na reklamaciju se priznaje uz fiskalni račun o kupovini, i uz ovu izjavu o saobraznosti koja mora biti ispravno popunjena, odnosno morasadržati datum prodaje, pečati potpis prodavca.
- Davalac izjave o saobraznosti osigurava servis i rezervne djelove 7 godina od datuma kupovine.
PRAVO NA REKLAMACIJU NE OBUHVATA
text_image
KIM-TEC M.P.OBAVEZE POTROŠAČA
- Da se pridržava priloženog uputstva za upotrebu i pravilnika o upotrebi proizvoda
- Da eksploataciju opreme vrši u skladu sa priloženim uputstvom za upotrebu, navedenim u pripadajućoj tehničkoj dokumentaciji.
- Da obezbedi odgovarajući čslovedu kome će uređaj biti smešten:
• Temperatura vazduha 10-40 °C
• Relativna vlažnost vazduha od 10 do 90%
• Zaštita od direktnog sunčevog zračenja
• Zaštita od prašine i kondenzacije - Zaštita od raznih vrsta elektromagnetnih zračenja
- Da obezbedi stabilan izvor mrežnog napajanja (varijacije napona max. 10%, varijacije učestanosti max. 30%).
- Da obezbedi uzemljenu elektroinstalaciju, da bi se izbegle razlike potencijala, naročito ako se radi o dislociranoj opremi, koja je povezana (LAN mreže, Unix/Xenix terminali i si.).
- Da po mogućstvu sačuva i dostavi priloženu tehničku dokumentaciju u toku trajanja reklamacionog roka.
- Da instalaciju / servis poveri isključivo ovlašćenim licima kao i da pazi da ne ošeti kontrolnu nalepnicu.
IZJAVA UVOZNIKA/DISTRIBUTERA
- Proizvodi imaju propisane, odnosno deklarisane karakteristike kvaliteta.
- Proizvod će ispravno funkcionisati ako se korisnik pridržava uputstava iz priložene tehničke dokumentacije
- Trgovac je dužan je da vodi računa o ispravnom popunjavanju i overi Osnovnih podataka o proizvodu iz ovog lista
- Proizvođač definišu kao potrošni materijal proizvode / delove proizvoda kao što su toneri, kertridži, glave ink jet štampača, valjci za povlačenje, mehanizam za transport papira, baterije i sve ostalo slično navedenom, a shodno izjavi proizvođača.
Za utvrđivanje i otklanjanje nesaobraznosti u najkraćem mogućem roku, preporučujemo Vam najbliži servis sa priložene liste:
CENTRALNI SERVIS: KimTec servis d.o.o., Viline Vode bb, Slobodna Zona Beograd L12/3, Beograd, Tel. 011/20-70-684, Fax. 011/20-70-689 servis@kimtec.rs, www.kimtecservis.rs
| ME STO | NAZIV ADRESA TELEFON | ||
| Čačak | Quartz | Kneza Miloša 102 | 032/34-84-14 |
| Jagodina | RTV servis Aleksandar | Stevana Prvovenčanog BB TC YASSA | 035/245-570 |
| Kikinda | Karanović | Zmaj Jovina 2 | 0230/439-132 |
| Kladovo Omega elektronik | Trg Kralja Petra bb | 019/801-380 | |
| Kragujevac | Fokus | Ljubiše Bogdanovića 14 | 034/314-400 |
| Kraljevo | ETC servis | Dimitrija Tucovića 10,lok.13 | 036-234-517 |
| Kruševac | Electron | Stojana Miloševića 6 | 037/421-792 |
| Leskovac | TNT | Južnomoravskih brigada 156 B3 L8 | 016/223-789 |
| Leskovac | Vera szd | Stanoja Glavaša 9 | 016/237-855 |
| Loznica | C electronic | Karadjordjeva 26 | 015/893-560 |
| Mladenovac | On-line sztr | Milutina Milankovića 14/1 | 011/ 823-4813 |
| Niš | MD servis centar | Save Kovačevića 11 A | 018/4524-072 |
| Novi Pazar | Elmaz ETT | Generala Živkovića 66 | 020/390-100 |
| Novi Pazar | Elektrotehna | 1.maj 154 | 020/337-250 |
| Novi Sad | Spektar | Branimira Čosića 23 | 021/477-80-44 |
| Obrenovac | SZER Pionir | Miloša Obrenovića 23 | 011/8721-386 |
| Obrenovac | Market servis Zlatko | Vuka Karadžića 105 | 011/87-24-214 |
| Pančevo | Bundalo | Đerdapska 16 | 013/371-530 |
| Pirot | DS elektronika | 7.juli br.6 | 010/313-690 |
| Požarevac | SR AVS | Kosančićeva 23 - 2 012/556-188, 012/556-189 | |
| Prokuplje | Solon | Ratka Pavlovića 195 | 027/325-466 |
| Sombor | Megatronic | Gruje Dedića 24 | 025/440-440 |
| Sremska Mitrovica | C electronic | Parobrodska 5 | 022/615-972 |
| Subotica | AVC | Luke Sučića 9 | 024/555-598 |
| Subotica | WM servis | Ruzmarina 2 ; PJ Frankopanska 36 | 024/523-765 |
| Šabac | Central service doo | Prote Smiljanića 52 | 015/319-530 |
| Šabac | Digipro doo | Jele Spiridonović Savić 22 | 015/300-450, 015/300-451 |
| Šid | SPIN | Cara Dušana 65 | 022/715-282 |
| Ub | Omega elektronik | Milana Munjasa 48 | 014/411-936, 014/410-884 |
| Užice | Radio elektro | Nikole Pašića 39 | 031/512-796 |
| Valjevo | TV servis Spasojević | Hajduk Veljkova 4 | 014/220-343 |
| Vranje | 5 com | Trg Bratstva jedinstva 10 | 017/404-994 |
| Vršac | Spektar | Nikite Tolstoja 49 | 013/838-961 |
| Zaječar | Electron | Ljube Nešića 88 | 019/424-946 |
| Zrenjanin | Servis Pakoci | Milana Stanivukovića 92 | 023/563-920 |
Ovlašćeni servis :
KIM-TEC SERVIS d.o.o Beograd, Viline vode bb, Slobodna zona Beograd L12/3, telefon 011/207-06-84, servis@kimtec.rs
| SERVISNI KUPON BR.1 | ||
| Naziv: | Ser. br. | Datum prijema: |
| Opis kvara: | Datum predaje: | |
| Opis radova ugrađeni delovi: | Servisirao: | |
| SERVISNI KUPON BR.2 | ||
| Naziv: | Ser. br. | Datum prijema: |
| Opis kvara: | Datum predaje: | |
| Opis radova ugrađeni delovi: | Servisirao: | |
| SERVISNI KUPON BR.3 | ||
| Naziv: | Ser. br. | Datum prijema: |
| Opis kvara: | Datum predaje: | |
| Opis radova ugrađeni delovi: | Servisirao: | |
Za klima uredaje:
Redovni godišnji servis vašeg klima uređaja, omogučava uređaju siguran i kvalitetniji rad.
Ukoliko obavite po jedan godišnji servis u naredne dve godine, automatski stičete pravo na servisiranje reklamacije bez naknade troška još dodatnih 12 meseci. Godišnji servis korisnik finansira iz sopstvenih sredstava.
SERVISNI PREGLED
Servis / Montažer
Datum:
Važi do: M.P.
SERVISNI PREGLED
Servis / Montažer
Datum: ____
Važido: ____
M.P.
ПОЧИТУВАНИ!
bar
| Category | Value | |---|---| | Top Bar | 100 | | Bottom Bar | 0 | | Bottom Bar | 0 | | Bottom Bar | 0 | | Bottom Bar | 0 |
text_image
Diagram showing a sequence of red rectangular blocks arranged in two rows, with one block highlighted in black.Kosova Electronic Service Center
Kosova Electronic Service Center
-VIVAX Air Conditions; White Goods and Small Home Appliances
| A | PRODUCT FICHE | INFORMACIJSKI LIST | |
| B | Brand | Robna marka | VIVAX |
| C | Type | Tip uređaja | LED TV |
| D | Model | Model | LED TV-32LE91T2W |
| E | Energy Efficiency class | Razred energetske učinkovitosti | A+ |
| F | Visible Screen Size | Dijagonala vidljivog zaslona | 32" / 80cm |
| G | On mode average power consumption (W) | Potrošnja električne energije u stanju uključenosti (W) | 31 |
| H | Annual energy consumption (kWh/Annum) * | Godišnja potrošnja energije (kWh/god) * | 45 |
| I | Standby Power consumption (W) | Potrošnja energije u stanju mirovanja (W) | <0.5 |
| J | Off mode power consumption (W) | Potrošnja energije u stanju isključenosti (W) | 0 |
| K | Display Resolution | Rezolucija zaslona | 1366 x 768 pix |
| * | Based on the power consumption of the television operating 4 hours per day for 365 days. The actual energy consumption will depend on how the television is used. | Potrošnja energije kWh godišnje, na osnovi potrošnje električne energije televizora koji je u funkciji 4h dnevno 365 dana. Stvarna potrošnja energije ovisit će o načinu na koji se televizor koristi. |