Spectro LED Baton 20 - Uncategorized Genaray - Free user manual and instructions
Find the device manual for free Spectro LED Baton 20 Genaray in PDF.

User questions about Spectro LED Baton 20 Genaray
0 question about this device. Answer the ones you know or ask your own.
Ask a new question about this device
Download the instructions for your Uncategorized in PDF format for free! Find your manual Spectro LED Baton 20 - Genaray and take your electronic device back in hand. On this page are published all the documents necessary for the use of your device. Spectro LED Baton 20 by Genaray.
USER MANUAL Spectro LED Baton 20 Genaray
natural_image
Product photo of a studio lighting fixture with a long white beam mounted on a stand against a blurred golden background (no text or symbols visible)
genaray®
SpectroLED INTRODUCTION
THANK YOU FOR CHOOSING GENARAY
The Genaray Baton is a bicolor wand-style LED light that provides even illumination along its entire length. The Baton's simplicity and portability is surpassed only by its versatility. It packs up in its own carry bag and is light enough to take anywhere. Use it as a key light, an accent light, or for background ambience. As a handheld fixture, it can create dramatic indoor or outdoor effects for photo and video shoots. The fixture's integrated diffuser prevents the multiple shadows that are common in LED lighting, and it throws a soft, wide, wraparound beam that's perfect for portraits and group photos.
Preset color temperature and brightness buttons allow for instantaneous changes to the settings. The Baton runs on AC or battery power with the optional battery grip (sold separately). When you add the battery grip to the 20- and 34-inch models, the Baton becomes a handheld light.
PRECAUTIONS


- Please read and follow these instructions, and keep his manual in a safe place.
- Keep this unit away from water and any flammable gases or liquids.
- Make sure the unit is powered off when plugging it into a power source.
- Use only the correct, recommended voltage.
-
Do not attempt to disassemble of repair the equipment. Doing so will void the warranty, and Genaray will not be responsible for any damage.
-
Handle the unit with care.
- Do not stare directly at the lights when they are powered on.
- Clean the unit with only a soft, dry cloth.
- Keep this unit away from children.
- Use only parts provided by the manufacturer.
• Make sure the item is intact and that there are no missing parts. - All images are for illustrative purposes only.

text_image
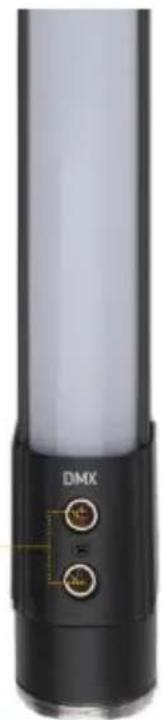
BATON OVERVIEWFront
natural_image
Close-up of a black cylindrical device with two labeled connectors (DMX) and a small yellow arrow pointing to it, no readable text or symbols beyond the label.Threaded ring for battery handle
Back

text_image
LCD screen Power button Mode button Up/Down buttons Brightness preset buttons Color temperature preset buttons
text_image
Magnet mount sockets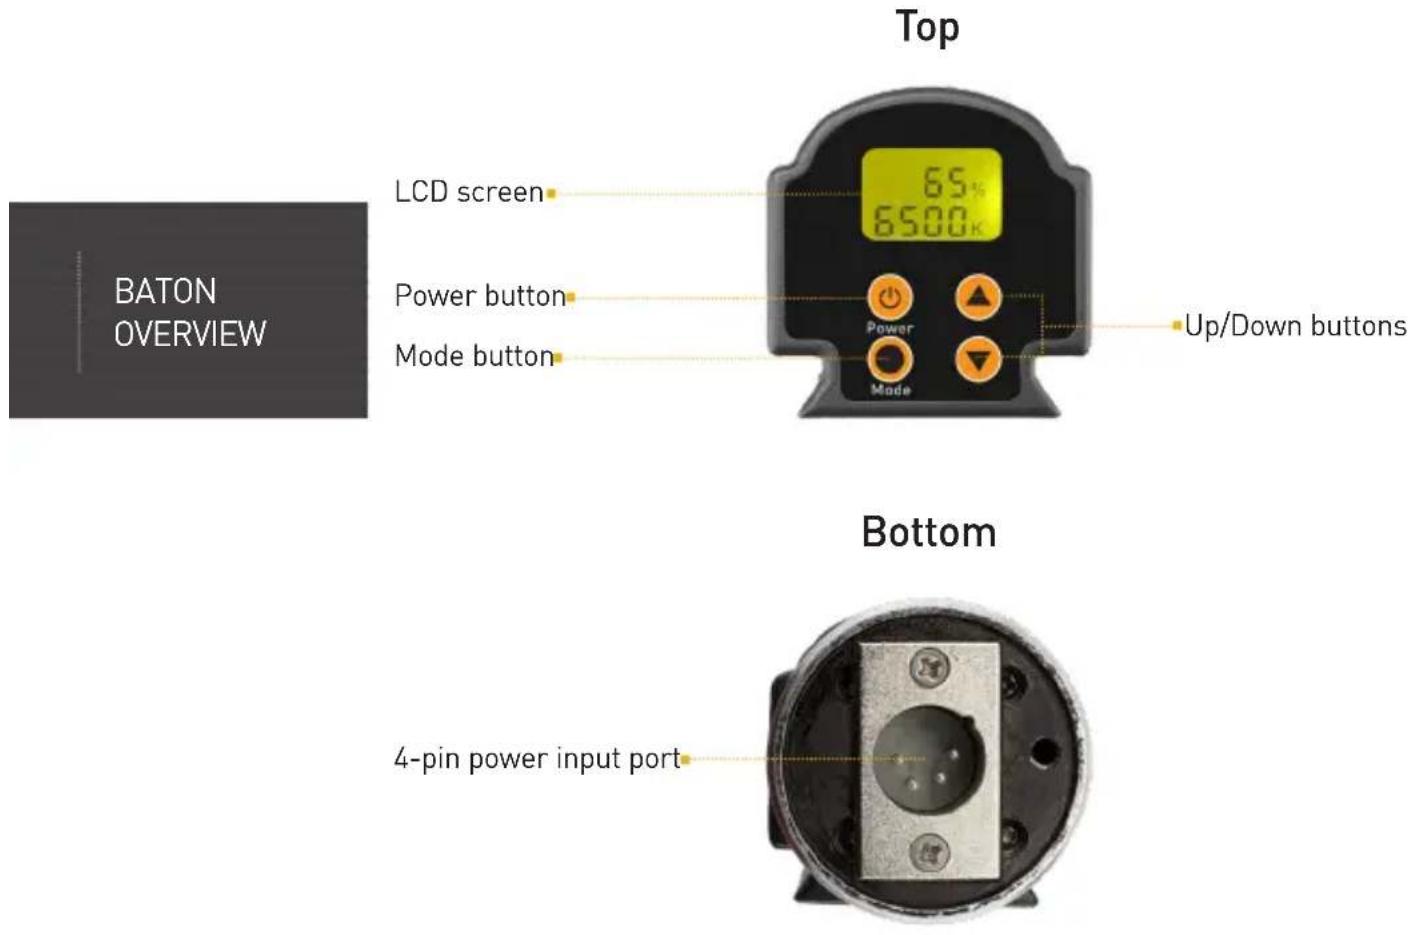
text_image
BATON OVERVIEW Top LCD screen 6500K 6500K Power button Up/Down buttons Mode button Bottom 4-pin power input portArca-Swiss style ballhead mount
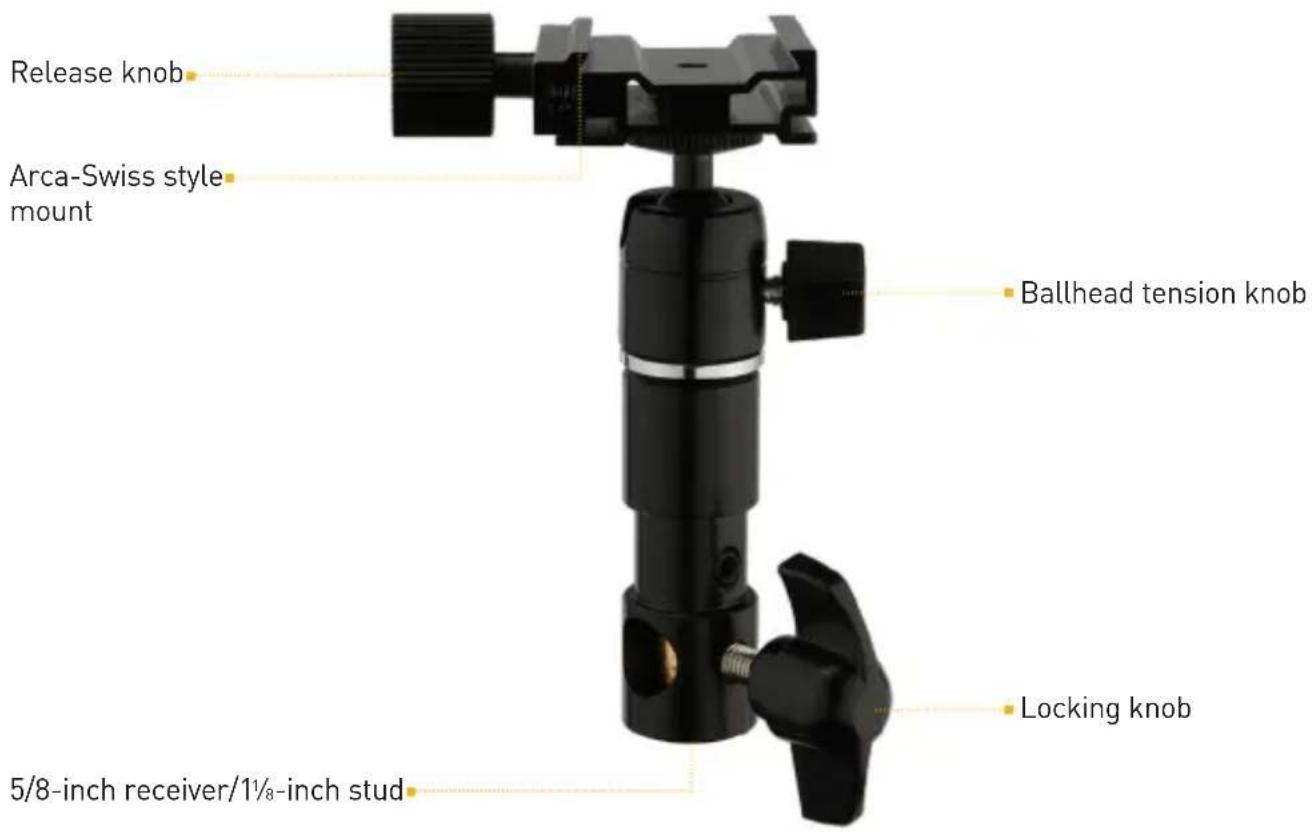
text_image
Release knob Arca-Swiss style mount Ballhead tension knob Locking knob 5/8-inch receiver/1½-inch stud- Baton light fixture
- AC adapter
- Power cable
- DMX Cable
- Magnet mounts
- Arca-Swiss style ballhead mount
- Carrying case
- User manual
MOUNTING THE BATONCONTENTS INCLUDE
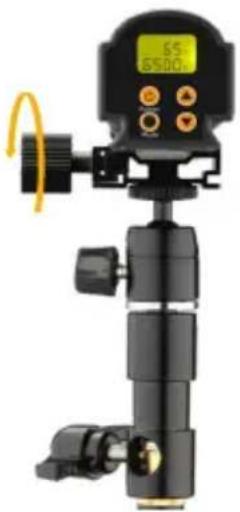
ATTACHING THE ARCA-SWISS STYLE MOUNT
- Loosen the release knob, and fit the back edges of the Baton into the grooves of the mount.
- Tighten the release knob until secure.
natural_image
Black handheld camera mount with digital display and orange control buttons (no visible text or symbols)MOUNTING THE BATON TO A LIGHT STAND
The included ballhead can be mounted onto any light stand with a 5/8-inch stud.
The 5/8-inch receiver has a pass-through, so the ballhead can be mounted horizontally or vertically.
- Mount the Baton on a light stand with a 5/8-inch stud, and turn the locking knob until secure.
- Adjust the orientation of the Baton by loosening the ballhead tension knob.
To mount the Baton on a stand with a junior receiver or combo head:
- Remove the locking knob so the base of the ballhead becomes a 118 -inch stud.
- Insert it into a junior receiver.
MOUNTING TO A TRIPOD
The battery handle has a 1/4-20 threaded socket for convenient tripod mounting.
- Screw the battery handle onto the tripod's 1/4-20 mounting post until it's secure.
- Attach the Baton to the handle by following the instructions below in Using the Baton with Battery Power.
USING THE MAGNET MOUNTS
Screw the included magnets into the sockets on the back of the Baton, and attach the fixture to any ferrous metal surface.
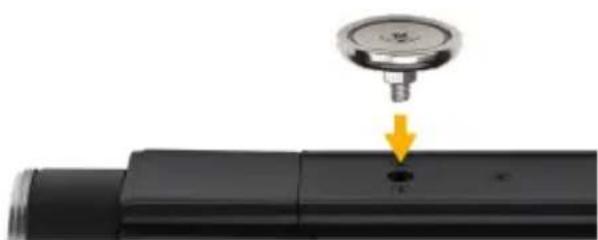
natural_image
Close-up of a pressure gauge attached to a black cylindrical device with a yellow arrow pointing to a small hole (no text or symbols visible)POWERING THE BATON
USING THE BATON WITH AC POWER
Important ⚠️ ⚡️
The Baton is a multivoltage fixture capable of running on 100 to 240 V, 50/60 Hz. The included cable has a 120 V, 50 Hz plug. To use this fixture with other voltages, you must use a plug adapter (sold separately).
Connect the AC power adapter to the Baton with the 4-pin XLR cable, and use the power cable to connect the adapter to an outlet.
Important!
The 4-pin connector should easily attach. Don't use force to plug the XLR connector into the Baton's power input plug.
USING THE BATON WITH BATTERY POWER
The Baton-20 and Baton-34 models have the option of running on the Genaray BATON-BAT, a dedicated rechargeable battery handle that attaches to the base of the Baton (sold separately).
- Align the XLR connector with the pins on the bottom of the Baton.
- Press the battery pack onto the Baton, and turn the locking ring clockwise to tighten until secure.
To check the remaining power in the battery pack, press and hold the power indicator.
4 lights Fully charged
3 lights 75%
2 lights 50%
1 light 25% or less. Recharge the battery.
OPERATING THE BATON
TURNING ON THE BATON
Warning!
When set to full brightness, the Baton is a powerful light. Do not look directly into the light while it's being switched on.
Press the ON/OFF button to turn on the Baton.
The Baton starts up in brightness adjustment mode.
Use the Up/Down buttons to adjust the brightness in 1% increments.
Brightness Preset Buttons
Press to set brightness to 25%, 50%, 75%, and 100%. Use the Up/Down buttons to fine-tune the brightness.
ADJUSTING THE COLOR TEMPERATURE
- Press the Mode button to enter color temperature mode.
- When the color temperature blinks, use the Up/Down buttons to fine-tune the color temperature in 100 K increments.
When no adjustment is made after 5 seconds, the color temperature is set, and the Up/Down buttons return to brightness adjustment mode.
Color Temperature Preset Buttons
Press to select 2800, 3200 (tungsten balance), 4300, 5600 (daylight balance), or 6500 K color temperature.
Press the Mode button to use the Up/Down buttons to fine-tune the color temperature in 100 K increments.
USING DMX
The Baton supports DMX-512, so the light's settings can be remotely controlled from a DMX console.
To set up DMX operation on the Baton, follow these steps:
- Use the included 5-pin cable to attach a DMX controller to either one of the mini DMX ports. The other port will automatically become the output port.
- Use the other mini DMX port to connect multiple lights.
Note: If the Baton is the only light connected to the DMX controller, no DMX termination is necessary.
- Refer to the DMX controller's user manual to set its DMX address.
SETTING THE DMX ADDRESS
The DMX address is a 3-digit number from 001 to 512.
- Double-press the Mode button. The three-digit DMX address will blink.
- Press the Up/Down buttons to select a DMX address in increments of 1.
- Press the Mode button to set the address and return to brightness adjustment mode.
Important!
Make sure the DMX address on the Baton matches the DMX console's address.
DMX CONTROL
| DMX Address on LCD screen | Corresponding Channels on DMX Console |
| 1 1-1 Brightness | 1-2 Color temperature |
| 2 1-2 Brightness | 1-3 Color temperature |
| — | — |
| 16 1-16 Brightness | 2-1 Color temperature |
| 17 2-1 Brightness | 2-2 Color Temperature |
| — | — |
| 511 32-15 Brightness | 32-16 Color temperature |
| 512 — |
PRODUCT SPECIFICATIONS
LIGHT FIXTURE
Output Power: 20: 28 W
34:58W
53: 88 W
Beam Angle: 110^
Color Temperature: 2800 ±150 K to 6500 ±300 K
Color Accuracy Standard: CRI: 95 to 98
TLCI:≥95
Dimming: 100% to 10%
Display: LCD
Housing Material: Metal
Photometrics @ 3ft.
20: 628lx @3200K, 625lx @4400K, 627lx @5600K
34: 1148lx @3200K, 1125lx @4400K, 1145lx @5600K
53: 1467lx @3200K, 1495lx @4400K, 1554lx @5600K
Number of LEDs: 20: 192
34:320
53:512
Expected Lamp Life: 50,000 hr.
Dimensions (H × W × D): 20: 2 × 2 × 22 in.
(5×5×56.6cm)
34: 2 × 2 × 36 in.
(5×5×91.6cm)
53: 2 × 2 × 55 in.
(5×5×139.6cm)
Weight: 20: 1.74 lb. (0.79 kg)
34: 2.4 lb. (1.1 kg)
53: 3.4 lb. (1.54 kg)
CONNECTORS
Power Input Connector: 4-pin male XLR
DMX Connector: 5-pin mini male XLR
MOUNTING
Fixture Mount: 5/8 in. receiver
1½ in. stud
Arca-Swiss style mount
POWER
AC Input Power: 100 to 240 V AC, 50/60 Hz
DC Input Power: 27 V DC
Power Source: AC Adapter, 4-Pin XLR
Max Power Consumption: 20: 28 W
34:58 W
53:88 W
ONE-YEAR LIMITED WARRANTY
This Genaray product is warranted to the original purchaser to be free from defects in materials and workmanship under normal consumer use for a period of one (1) year from the original purchase date or thirty (30) days after replacement, whichever occurs later. Genaray's responsibility with respect to this limited warranty shall be limited solely to repair or replacement, at Genaray's discretion, of any product that fails during normal use of this product in its intended manner and in its intended environment. Inoperability of the product or part(s) shall be determined by Genaray. If the product has been discontinued, Genaray reserves the right to replace it with a model of equivalent quality and function.
This warranty does not cover damage or defect caused by misuse, neglect, accident, alteration, abuse, improper installation or maintenance. EXCEPT AS PROVIDED HEREIN, GENARAY MAKES NEITHER ANY EXPRESS WARRANTIES NOR ANY IMPLIED WARRANTIES, INCLUDING BUT NOT LIMITED TO ANY IMPLIED WARRANTY OF MERCHANTABILITY OR FITNESS FOR A PARTICULAR PURPOSE. This warranty provides you with specific legal rights, and you may also have additional rights that vary from state to state.
To obtain warranty coverage, contact the Genaray Customer Service Department to obtain a return merchandise authorization ("RMA") number, and return the defective product to Genaray along with the RMA number and proof of purchase. Shipment of the defective product is at the purchaser's own risk and expense.
For more information, or to arrange service, visit www.genaray.com or contact us at info@genaray.com.
© 2019 Genaray. All Rights Reserved.
6 genaray