TM6002 - Blender VOX - Free user manual and instructions
Find the device manual for free TM6002 VOX in PDF.

User questions about TM6002 VOX
0 question about this device. Answer the ones you know or ask your own.
Ask a new question about this device
Download the instructions for your Blender in PDF format for free! Find your manual TM6002 - VOX and take your electronic device back in hand. On this page are published all the documents necessary for the use of your device. TM6002 by VOX.
USER MANUAL TM6002 VOX
natural_image
Abstract black and white geometric pattern with diagonal stripes (no text or symbols)VOX
ELECTRONICS
TM-6002
GBR
SRB
ESP
PRT
GRC
SVN
HRV
BIH
MNE
MKD
ALB
OPERATING INSTRUCTIONS STAND BLENDERUPUTSTVO ZA UPOTREBU BLENDER
When using this electrical appliance, basic safety precautions should always be followed, including the following:
- Read all instructions.
- Before using check that the voltage indicated on the product corresponds with the voltage of your electrical outlet.
-
Do not let cord hang on hot surface or over edge of table or counter.
-
Do not operate any appliance with a damaged cord or plug or after the appliance malfunction or has been damaged in any manner. Return the appliance to the nearest authorized service facility for examination, repair or adjustment.
-
If the supply cord is damaged, it must be replaced by the manufacturer or its service agent or a similarly qualified person in order to avoid a hazard.
-
Close supervision is necessary when any appliance is used by or near children.
-
Avoid contacting the moving parts.
-
Keep hands and utensils out of container while blending to reduce the risk of severe injury to persons or damage to the blender. A scraper may be used but must be used only when the blender is not running.
-
The use of attachments not recommended or sold by manufacturer may cause on fire, electric shock or injury.
-
Unplug from outlet when not in use, before putting on or taking off parts, and before cleaning. To disconnect, turn any control to “off”, then remove plug from wall outlet by grasping the plug, not the cord.
-
To reduce the risk of injury, never place blade assembly on motor unit without the jar properly attached.
-
This appliance is not intended for use by persons (including children) with reduced physical, sensory or mental capabilities, or lack of experience and knowledge, unless they have been given supervision or instruction concerning use of the appliances by a person responsible for their safety.
-
Children should be supervised to ensure that they do not play with the appliance.
-
Do not leave the machine on unattended.
-
When removing the blender from the motor unit, wait until the blades have completely stopped.
-
Always operate blender with cover in place.
-
Always use the appliance on a secure, dry level surface.
-
Never place this appliance on or near a hot gas or an electric burner or where it could touch a heated appliance.
-
Do not use outdoors.
-
Do not use appliance for other than its intended use.
WARNING: Potential injury from misuse. Care shall be taken when handling the sharp cutting blades, emptying the bowl and during cleaning.
CAUTION: Ensure that the blender is switched off before removing it from the stand. Switch off the appliance and disconnect from supply before changing accessories or approaching parts that move in use.
HOUSEHOLD USE ONLY
KNOW YOUR BLEANDER
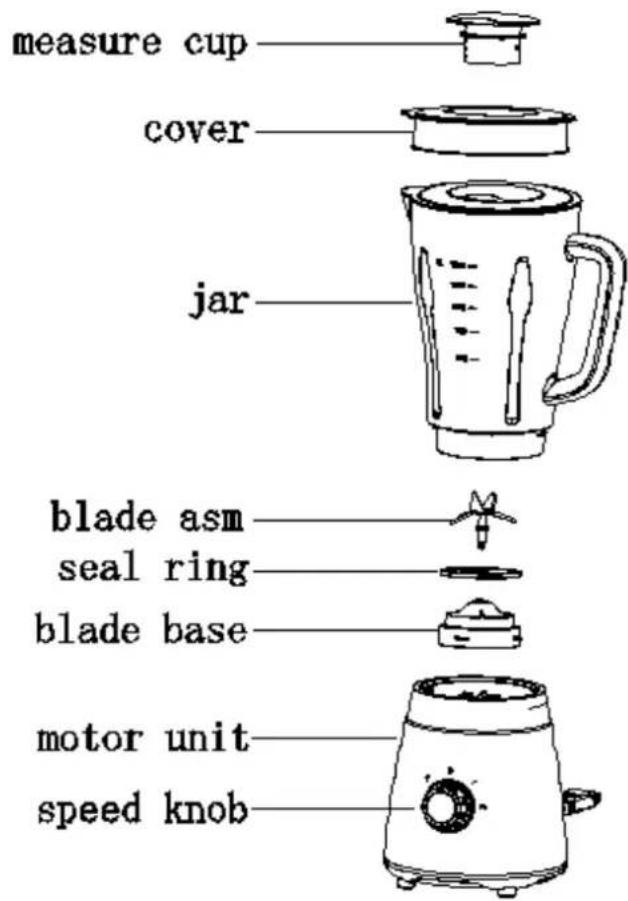
text_image
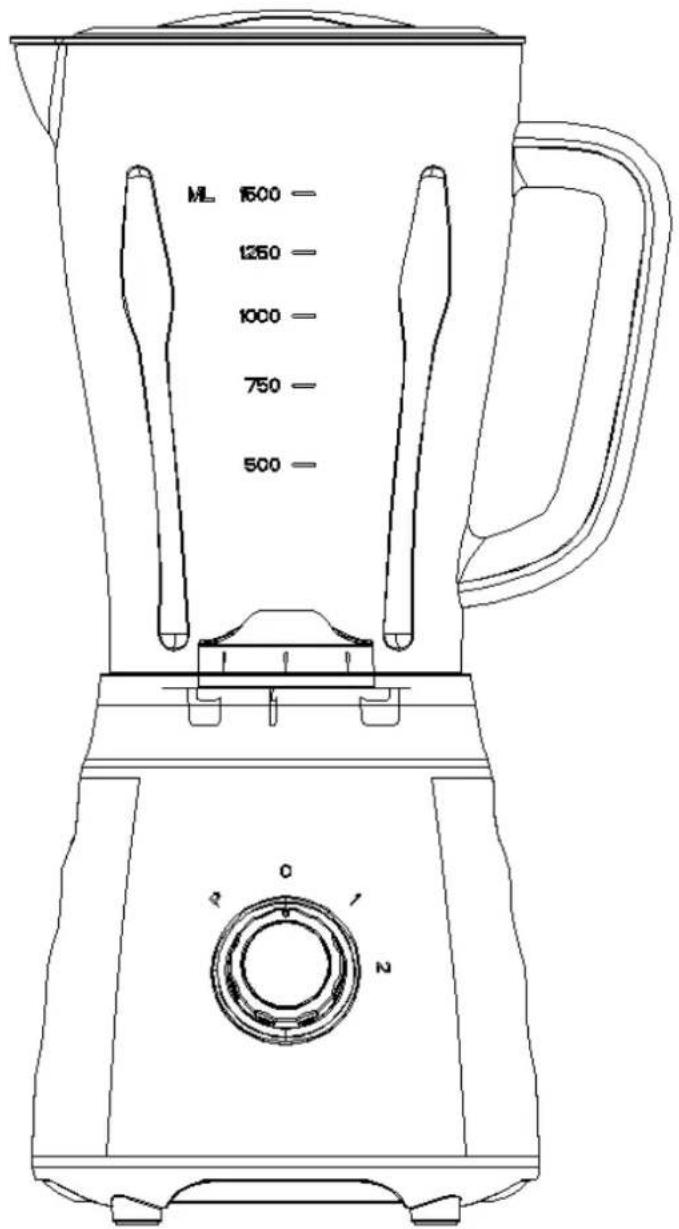
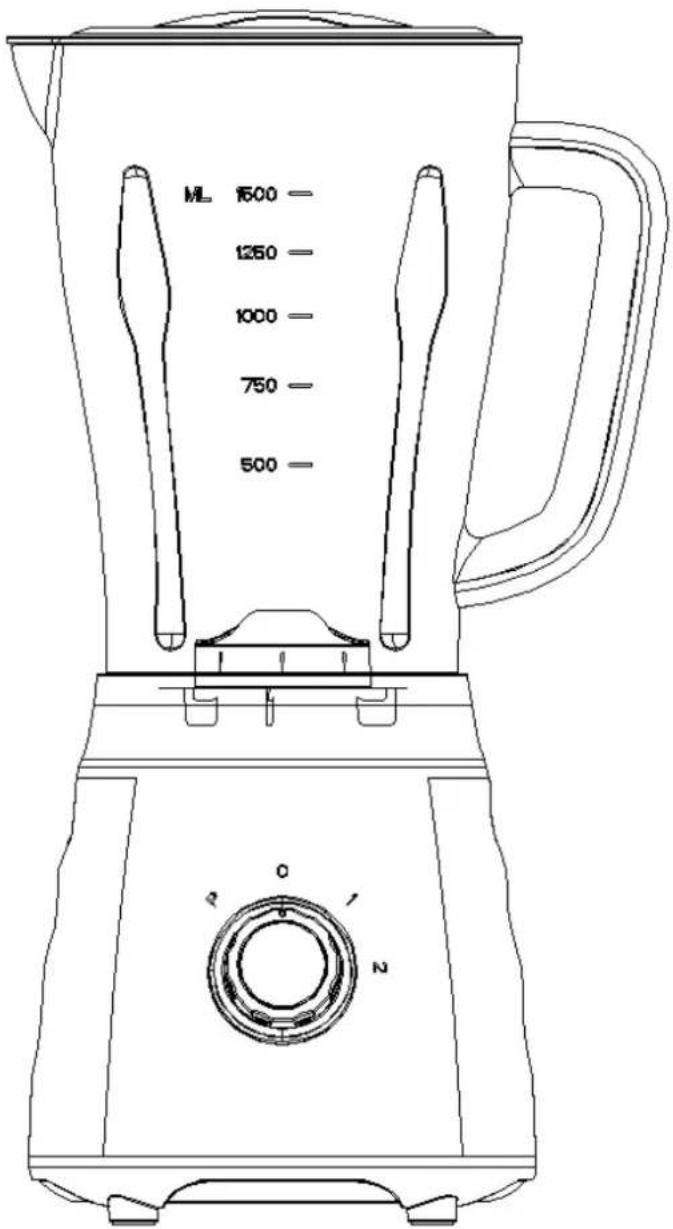
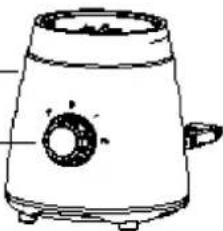
measure cup cover jar blade asm seal ring blade base motor unit speed knobFig.1
SPEED KNOB
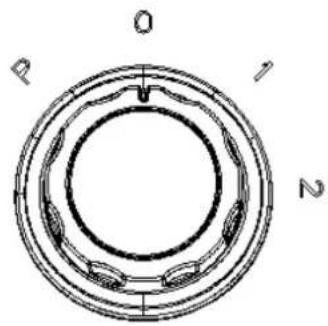
text_image
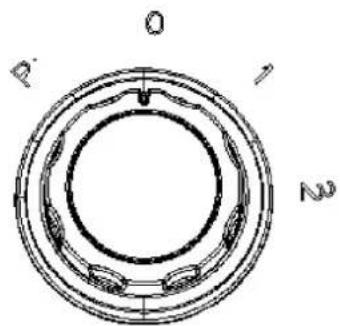
P O 1 NFig.2
HOW TO USE
Before initial use
- Before first use, unpack the appliance and place all parts on a horizontal surface.
-
The jar assembly (including the measure cup, lid, seal ring 1, jar, seal ring 2, blade assembly and jar base) has already been assembled into the motor unit. Disassemble to wash all detachable parts except the motor unit. Refer to the latter chapter CARE AND CLEANING.
-
Once all pieces have been cleaned and dry thoroughly, reassemble.
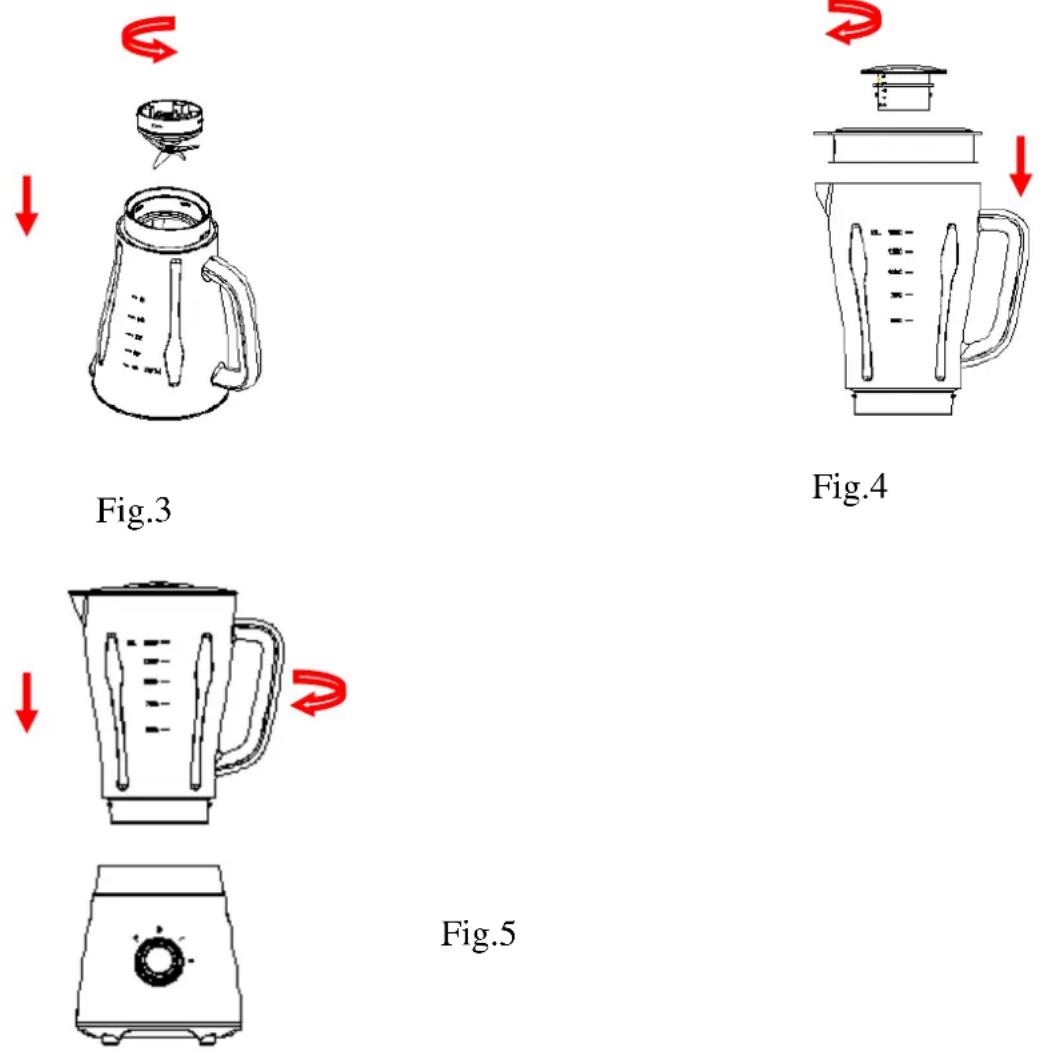
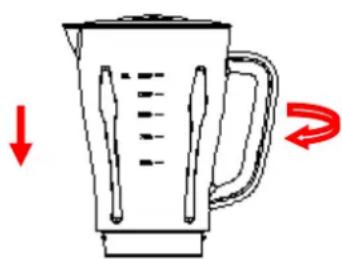
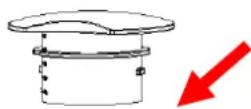
1) Invert the jar onto a level surface, holding the jar handle, put the the seal ring 2 and blade assembly onto the jar base bottom and secure the blade assembly by turning it anti-clockwise until tight (See Fig.3)
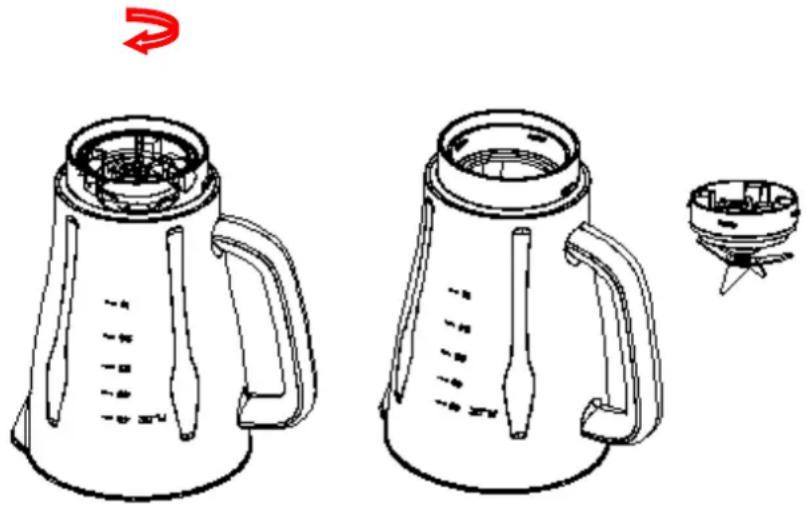
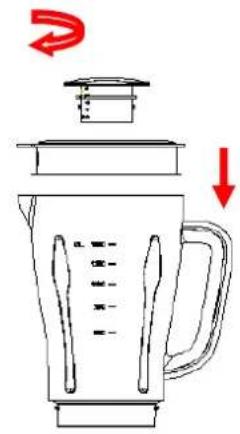
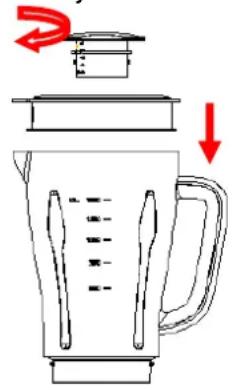
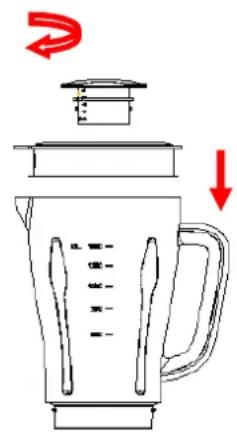
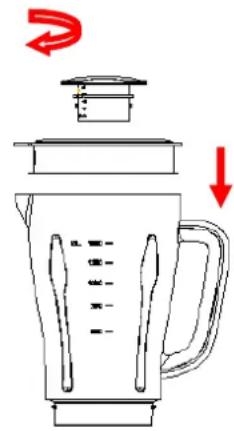
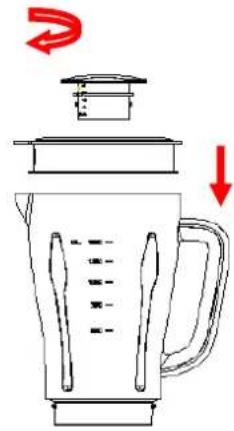
2) Reposition the jar assembly with its opening upwards. Wrap the seal ring 1 around the lid bottom and put the lid onto the jar assembly. Place the measure cup exactly into the lid by fitting the small projection on the both sides of the cup into the slots of the lid and turning the cup clockwise until tight. (See Fig.4)
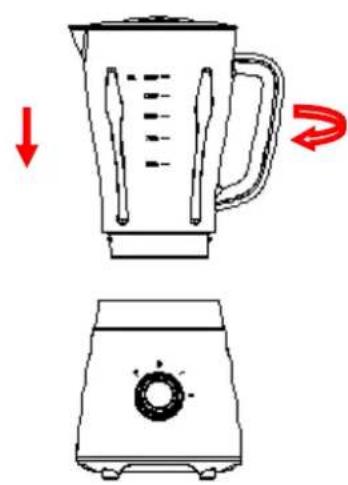
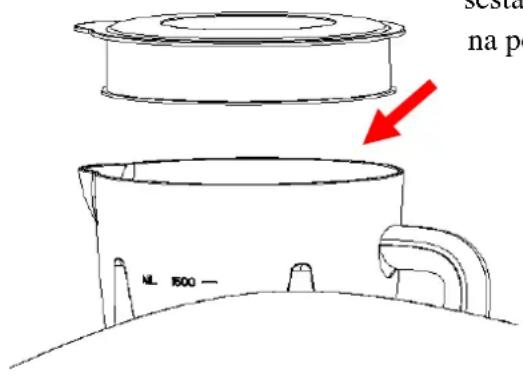
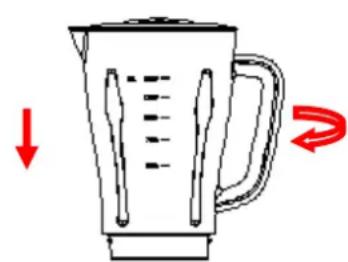
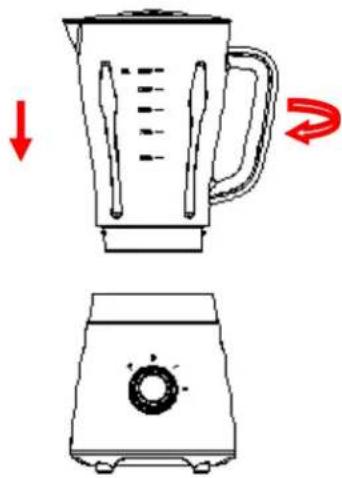
3) Finally, place the assembled jar onto the motor unit by aligning the strip on the assembled jar bottom. (See Fig.5)
CAUSION: Jar and jar base is now secure. Do not try to twist the jar and jar base onto motor unit
How to use
- Peeled or cored the fruit or vegetables and then cut it into small dices.
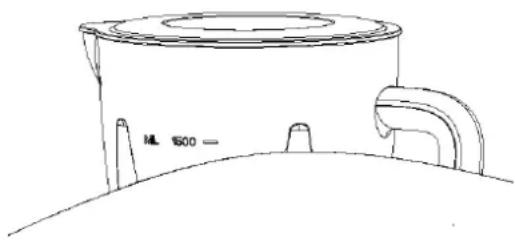
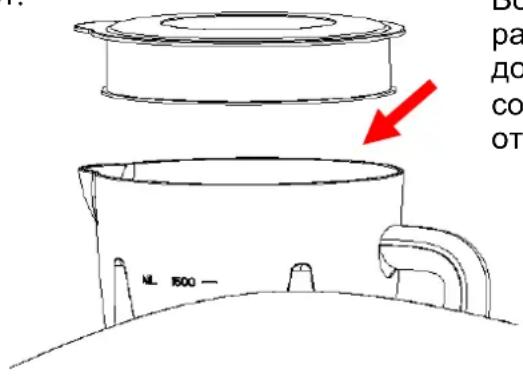
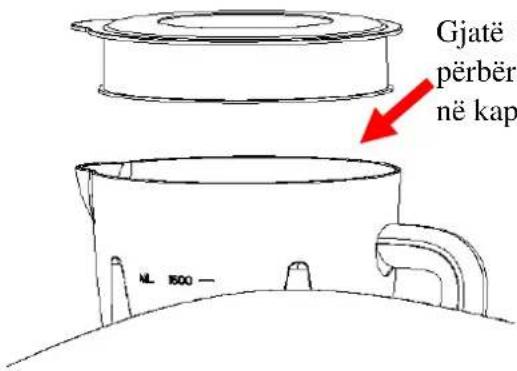
- Place the food to be blended into the jar (See Fig.6). Usually, certain amount of purified water has to be added to facilitate the smooth running of appliance. The proportion of the food and water is 2:3. The amount of mixture should not exceed the max level as indicated on the jar.
RECIPE
| FOOD TYPE SPEC WEIGHT SPEED | ||
| Carrot (apple, pear etc.) | Cut into 15mm*15mm*15mmm | Carrot: 600gWater: 900g |
Note: never use boiling liquids or run the appliance empty.
- Put the lid on the jar. Be sure the measuring cup is in place.
- Plug the power cord into a standard wall outlet.
- Turn the speed knob to the appropriate speed setting for your task.
- For quick or delicate blending tasks, turn the speed knob to P position and hold for a few seconds and then release, the knob will reset to O position automatically. Operate several times until the consistence you want is obtained
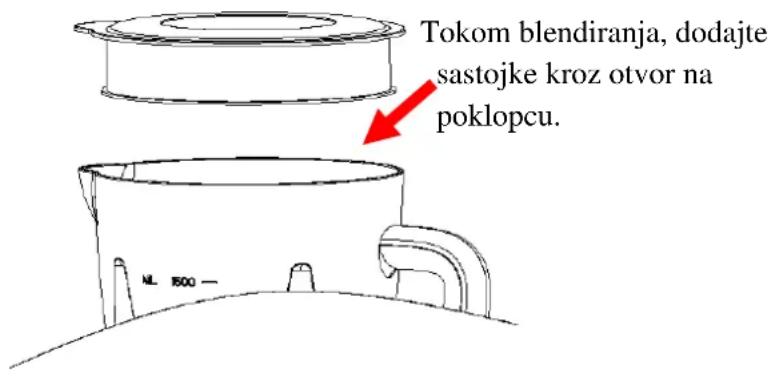
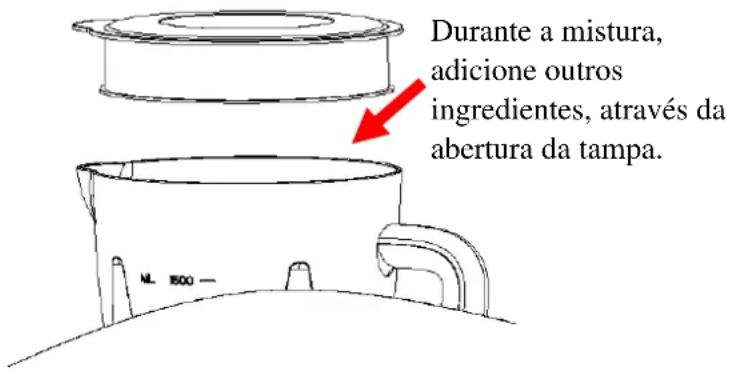
- If you want to add ingredients while the blender is working, remove the measuring cup and place through the lid opening. (See Fig.7)
- When crushing ice or hard food, keep one hand firmly on the lid.
- When the consistence you desire is obtained, turn the knob to O position.
Note: 1) For each use, the consecutive operation time should not exceed 3 minutes. at least 10 minutes rest time must be maintained between two continuous cycles, let the unit cool to room temperature before performing next operation cycle.
2) If you want to stop the machine during operation, turn the knob to O position anytime.

Before blending, add food to be blended into the jar.

natural_image
Technical line drawing of a cylindrical tank with a curved handle and two protruding ports (no text or symbols)Fig.6
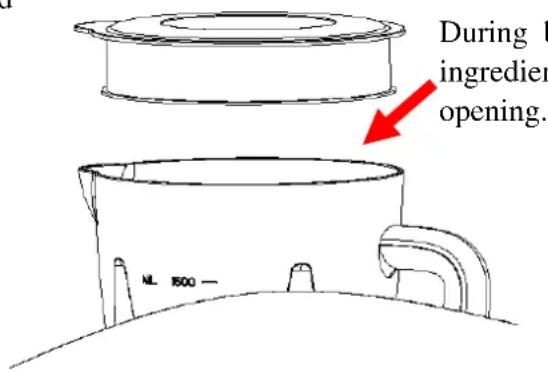
text_image
During the ingredient opening. NL 500 —Fig.7
Important operating tips
- For best circulation of food that are to be blended with some liquid, pour the liquid into the jar first, then add solids.
- Some of the tasks that cannot be performed efficiently with a blender are: beating egg whites, whipping cream, mashing potatoes, grinding meat, mixing dough, extracting juice from fruit and vegetable
- The following items should never be placed in the unit as they may cause damage: bones, large pieces of solid, frozen food, or tough foods such as turnips.
- To crush ice, add up to 6 ice cubes. If more ice is needed, remove the cup and add cubes one by one through the lid opening.
CARE AND CLEANING
This product contains no user serviceable parts. Refer service to qualified service personnel.
- Before cleaning, unplug the blender.
- Always wash immediately after use for easier cleaning. Don't let food dry on the jar assembly as this will make cleaning difficult.
- Pour a little warm soapy water into the jar and turn the knob to P position for a few seconds. And then empty the jar.
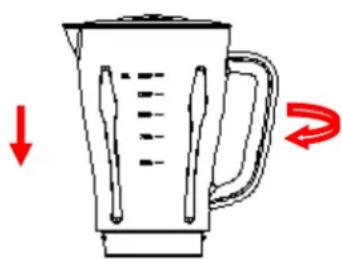
- Dismantle all detachable parts. Lift the jar assembly off the motor unit, To detach the blade assembly by turning it clockwise from the jar base bottom, and remove the seal ring 2 and blade assembly (see fig.8). In addition, detach the jar cover seal ring 1 from the jar cover.
natural_image
Line drawings of two types of kitchen mugs with a small stand, no text or symbols presentFig.8
- Rinse the measure cup, lid, seal ring 1, jar, seal ring 2 and blade assembly by hands or in a dishwasher and then dry. They are dishwasher safe components, but the temperature setting shall not exceed 70^ C.
- Brush the blade clean using warm soapy water, then rinse thoroughly under the tap. Don't touch the sharp blades, handle carefully. Don't immerse the blade assembly in water. Leave to dry upside down away from children.
- Wipe the motor unit with a damp cloth and dry thoroughly. Remove the stubborn spots by rubbing with non-abrasive cleaner. If liquids spill into the motor unit; first unplug the unit, then wipe with a damp cloth and dry thoroughly.
CAUSION
1) Do not immerse the motor unit in liquid to prevent the risk of electric shock.
2) Do not use rough scouring pads or cleansers on parts or finish.
3) Do not place any parts of this unit into dishwasher for cleaning. This unit is not available for dishwasher.
12 Month Warranty
Thank you for your purchase from VOX.
UPUTSTVO ZA UPOTREBU
BLENDER
Model: TM-6002
text_image
ML 1500 - 1250 - 1000 - 750 - 500 -VAŽNA BEZBEDNOSNA UPUTSTVA
text_image
Diagram showing a kettle with a lid and a downward arrow indicating rotation or change, likely illustrating a mechanical or electrical concept.Slika 3

text_image
Diagram of a blender with red directional arrows indicating rotation and compression processSlika 4
natural_image
Line drawing of a blender with red directional arrows indicating speed (no text or symbols)
Slika 5
Kako da koristite blender
- Oljuštite voće ili povrće i izvadite koštice, zatim ga isecite na male kocke.
- Stavite hranu u posudu blendera (Vidi Sliku 6). Obično je potrebno dodati određenu količinu čiste vode da bi se olakšao rad blendera. Odnos hrane i vode je 2:3. Količina smese za obradu ne sme preći maksimalni nivo označen na posudi.
RECEPT
| Vrsta hrane Uputstvo | Težina Brzina | ||
| Šargarepa (jabuka, kruška itd) | Isecite na 15mm*15mm*15mmm | Šargarepa: 600gVoda: 900g | Velika brzina |
natural_image
Technical line drawing of a mechanical component with no visible text or symbolsSlika 6
text_image
Tokom blendiranja, dodajte sastojke kroz otvor na poklopcu.Slika 7
Važni saveti
natural_image
Line drawing of two types of kitchen thermos with a small stand, no text or symbols presentSlika 8
- Operite čašu sa merama, poklopac, posudu, zaptivni prsten, postolje sa sečivima za mlevenje, postolje sa sečivima za seckanje ručno ili u sudomašini. To su delovi bezbedni za pranje u sudomašini, ali temperatura pranja ne sme prelaziti70°C.
- Očistite sečivo koristeći toplu, sapunjavu vodu i temeljno isperite pod tekućom vodom. Ne dodirujte oštro sečivo i rukujte njime pažljivo. Ne potapajte sečivo u vodu. Okrenite ga nakon pranja naopačke i ostavite ga dase osuši, držeći ga podalje od dece.
- Obrišite motornu jedinicu vlažnom krpom i osušite temeljno. Uklonite tvrdokorne flekenekom neabrazivnom tečnošću. Ako se desi da se prospe tečnost na motornu jedinicu, prvo iskopčajte uređaj iz struje, a zatim prebrišite temeljno suvom krpom i ostavite da se osuši.
PAŽNJA
1- Ne potapajte motornu jedinicu u tečnost kako biste sprečili rizik od strujnog udara.
2- Ne koristite grube četke za čišćenje i jaka sredstva za čišćenje.
3- Ne stavljajte postolje sa motorom u sudomašinu radi čišćenja. Ovaj deo nije prikladan za pranje u sudomašini.
12 Meseci garancije
text_image
Diagram showing a kettle with a lid and a rotating arrow indicating rotation or change, with a red downward arrow below.Fig.3
text_image
Diagram of a blender with red directional arrows indicating rotation and drop, showing internal structure and handle.Fig.4
natural_image
Illustration of a blender and its side view showing the blade and lid (no text or symbols)Fig.5
Cómo utilizar
natural_image
Technical line drawing of a kettle with internal blades and a separate view showing internal structure (no text or symbols)MANUAL DE INSTRUÇÕES
LIQUIDIFICADOR
Model:TM-6002
text_image
ML 1500 - 1250 - 1000 - 750 - 500 -POR FAVOR MANTENHA ESTAS INSTRUÇÕES PARA NECESSIDADES
FUTURAS
PRECAUÇÕES IMPORTANTES
natural_image
Line drawing of a blender with handle and spout (no text or symbols)


natural_image
Line drawing of a toaster oven with no text or symbolsFig. 1
BOTÃO DE VELOCIDADE

text_image
P O 1 2Fig. 2
COMO UTILIZAR
text_image
Diagram showing a kettle with a lid and a flame, illustrating the process of cooling or boiling.Fig.3
text_image
Diagram of a blender with red directional arrows indicating rotation and drop, showing liquid level changes.Fig.4

natural_image
Diagram showing a blender with a handle and a separate blender with a knob, both without any text or symbols.Fig.5
Como usar
text_image
ML 1500 =Fig.6
natural_image
Line drawing of a kettle with side handles and a small inset showing the interior pan (no text or symbols)Fig.8
text_image
Diagram showing a kettle with a lid and a rotating arrow indicating rotation or direction, with a red arrow pointing downward.Euk. 3

text_image
Diagram of a blender with red directional arrows indicating rotation and compression processEik. 4

natural_image
Illustration of a blender and a toaster with directional arrows indicating motion (no text or symbols)Euk 5
text_image
MIL 500 =Euk. 6
text_image
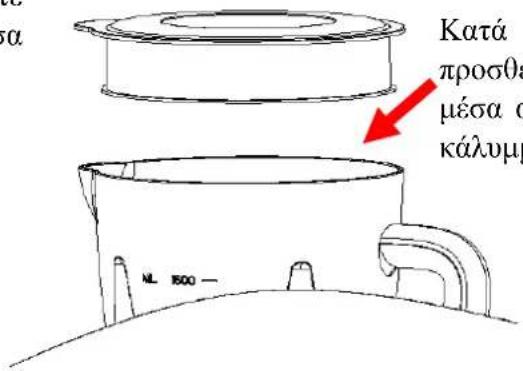
Kata proosθε μέσα o káluμμ NL 1500 —Eik. 7
natural_image
Line drawings of two types of kitchen thermos with a small dish on the right (no text or symbols)Euk. 8
text_image
Diagram showing a kettle with a lid and a rotating arrow indicating rotation direction, with a red downward arrow below.Slika 3
text_image
Diagram of a blender with red directional arrows indicating rotation and compression processSlika 4
natural_image
Line drawing of a blender with red directional arrows indicating speed (no text or symbols)
Slika 5
natural_image
Technical line drawing of a cylindrical tank with a curved handle and two protruding ports (no text or symbols)Slika 6
text_image
sesta na po NL 800 —natural_image
Line drawing of two types of kitchen thermos with a small stand, no text or symbols presentSlika 8
text_image
Exploded diagram of a blender with labeled parts in Chinese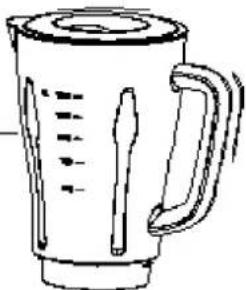
natural_image
Line drawing of a blender with handle and side blades (no text or symbols)


natural_image
Line drawing of a toaster oven with handle and lid (no text or symbols)Slika 1
Regulator brzine
text_image
P Q A0Slika 2
UPORABA BLENDERA
Prije prve uporabe
text_image
Diagram showing a kettle with a lid and a rotating arrow indicating rotation direction, with a red downward arrow below.Slika 3

text_image
Diagram of a blender with red directional arrows indicating rotation and compression processSlika 4

natural_image
Line drawing of a blender with a red arrow indicating rotation (no text or symbols)
Slika 5
Kako da koristite blender
- Oljuštite voće ili povrće i izvadite koštice, zatim ga isijecite na male kocke.
- Stavite hranu u posudu blendera (Vidi Sliku 6). Obično je potrebno dodati određenu količinu čiste vode da bi se olakšao rad blendera. Odnos hrane i vode je 2:3. Količina smjese za obradu ne smije preći maksimalnu razinu označen na posudi.
RECEPT
| Vrsta hrane Uputa | Težina Brzina | ||
| Mrkva (jabuka, kruška itd) | Isijecite na 15mm*15mm*15mmm | Mrkva: 600gVoda: 900g | Velika brzina |
Napomena: nikada ne koristite ključalu tekućinu niti puštajte uređaj u rad ukoliko je posuda prazna.
- Stavite poklopac na posudu. Provjerite da li je čaša s mjerama postavljena u otvor poklopca.
- Uključite utikač u standardnu zidnu utičnicu.
- Okrenite gumb za reguliranje brzine na željenu razinu.
- Za brza ili gruba mljevenja, okrenite regulator brzine na poziciju P i držite nekoliko sekundi, a zatim pustite. Regulator brzine će se automatski vratiti u poziciju O, zatim pustite. Ukoliko je to nephodno ponovite ovaj proces više puta dok ne dobijete željeni rezultat.
- Ukoliko želite da dodate neke sastojke dok blender radi, skinite čašu sa mjerama sa vrha poklopca i kroz otvor dodajte sastojke. (Vidi Sliku 7)
- Kada lomite led ili tvrdu hranu, čvrsto držite poklopac.
- Kada je hrana obrađena u skladu sa Vašim potrebama, stavite regulator u položaj O.
Napomena: 1) Kod svake uporabe, kontiniurani rad ne smije preći 3 minuta. Najmanje 10 minuta uređaju treba da se ohladi između dva uzastopna ciklusa rada, sačekajte da se uređaj ohladi do razine sobne temperature prije nego što nastavite s radom.
2) Ukoliko želite da zaustavite rad mašine tjekom korišćenja, stavite regulator upoziciju O u bilo kom trenutku.
Prije blendiranja, dodajte hranu u posudu.
natural_image
Technical line drawing of a cylindrical tank with a curved handle and two protruding ports (no text or symbols)Slika 6

text_image
Tokom blendiranja, dodajte sastojke kroz otvor na poklopcu.Slika 7
Važni savjeti
natural_image
Line drawings of two types of kitchen mugs with a side view showing a small dish (no text or symbols)Slika 8
text_image
Exploded diagram of a blender with labeled parts in Chinese
natural_image
Line drawing of a blender with handle and side blades (no text or symbols)


natural_image
Line drawing of a toaster oven with no text or symbolsSlika 1
Regulator brzine

text_image
P Q A0Slika 2
UPOTREBA BLENDERA
Prije prve upotrebe
text_image
Diagram showing a kettle with a lid and a rotating arrow indicating rotation direction, with a red downward arrow below.Slika 3

text_image
Diagram of a blender with red directional arrows indicating rotation and compression processSlika 4
natural_image
Illustration of a blender with a red arrow indicating rotation (no text or symbols)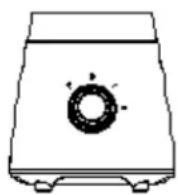
Slika 5
Kako da koristite blender
- Oljuštite voće ili povrće i izvadite koštice, zatim ga isijecite na male kocke.
- Stavite hranu u posudu blendera (Vidi Sliku 6). Obično je potrebno dodati određenu količinu čiste vode da bi se olakšao rad blendera. Odnos hrane i vode je 2:3. Količina smjese za obradu ne smije preći maksimalni nivo označen na posudi.
RECEPT
| Vrsta hrane Uputstvo | Težina Brzina | ||
| Šargarepa (jabuka, kruška itd) | Isijecite na 15mm*15mm*15mmm | Šargarepa: 600gVoda: 900g | Velika brzina |
natural_image
Technical line drawing of a cylindrical tank with a curved handle and two protruding ports (no text or symbols)Slika 6

text_image
Tokom blendiranja, dodajte sastojke kroz otvor na poklopcu.Slika 7
Važni savjeti
natural_image
Line drawings of two types of kitchen mugs with a side view showing a small dish (no text or symbols)Slika 8
- Operite čašu sa mjerama, poklopac, posudu, zaptivni prsten, postolje sa sječivima za mljevenje, postolje sa sječivima za sjeckanje ručno ili u sudomašini. To su dijelovi bezbjedni za pranje u sudomašini, ali temperatura pranja ne smije prelaziti70°C.
- Očistite sječivo koristeći toplu, sapunjavu vodu i temeljno isperite pod tekućom vodom. Ne dodirujte oštro sječivo i rukujte njime pažljivo. Ne potapajte sječivo u vodu. Okrenite ga nakon pranja naopačke i ostavite ga da se osuši, držeći ga podalje od djece.
- Obrišite motornu jedinicu vlažnom krpom i osušite temeljno. Uklonite tvrdokorne fleke nekom neabrazivnom tečnošću. Ako se desi da se prospe tečnost na motornu jedinicu, prvo iskopčajte uređaj iz struje, a zatim prebrišite temeljno suvom krpom i ostavite da se osuši.
PAŽNJA
text_image
Diagram showing a kettle with a lid and a side panel, illustrating a process with red arrows indicating rotation or change.Слика 3
text_image
Diagram of a blender with red directional arrows indicating rotation and drop, showing liquid level measurement.Слика 4

natural_image
Line drawing of a blender with arrow indicating rotation (no text or symbols)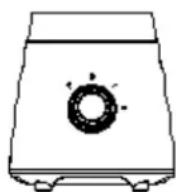
Слика 5
natural_image
Technical line drawing of a cylindrical tank with a curved handle and side port (no text or symbols)Слика 6
natural_image
Line drawings of two types of kitchen thermos with a small dish on the right (no text or symbols)Слика 8
text_image
Diagram showing a kettle with a lid and a rotating knob, illustrating the process of rotation or cooling.Fig.3
natural_image
Line drawing of a blender with red arrows indicating rotation and drop (no text or symbols)Fig.4
natural_image
Illustration of a blender and its corresponding kitchen blender with a red arrow indicating rotation (no text or symbols)Fig.5
natural_image
Technical line drawing of a cylindrical mechanical component with a curved base and protruding pipe (no text or symbols)Fig.6
natural_image
Line drawings of two types of kitchen thermos (no text or symbols present)Fig.8