EV-Y1201-AMWQ - Security Camera Enforcer - Free user manual and instructions
Find the device manual for free EV-Y1201-AMWQ Enforcer in PDF.

User questions about EV-Y1201-AMWQ Enforcer
0 question about this device. Answer the ones you know or ask your own.
Ask a new question about this device
Download the instructions for your Security Camera in PDF format for free! Find your manual EV-Y1201-AMWQ - Enforcer and take your electronic device back in hand. On this page are published all the documents necessary for the use of your device. EV-Y1201-AMWQ by Enforcer.
USER MANUAL EV-Y1201-AMWQ Enforcer
4-in-1 HD TVI, CVI, AHD, Analog
Bullet Cameras
Manual

natural_image
Exterior view of a white ENFORER security camera (no text or symbols on body)EV-Y1201-AMWQ shown
| Model # | Lens | Resolution | Voltage | Style | Color |
| EV-Y1201-A2WQ | 2.8mm | 1080p | 12VDC | Bullet | White |
| EV-Y1201-AMWQ | 2.8~12mm | 1080p | 12VDC | Bullet | White |
Features:
- Select between multiple formats: TVI, CVI, AHD, and Analog
- 1080p Resolution
- ICR Module
- Joystick OSD Control
• 3D-NR (3D Digital Noise Reduction)
• DWDR (Digital Wide Dynamic Range)
• Rugged, weatherproof (IP66) construction
- Cables concealed in bracket to prevent tampering
Specifications:
| Model | EV-Y1201-A2WQ | EV-Y1201-AMWQ | |
| Type | Fixed Bullet Camera | Varifocal Bullet Camera | |
| Formats | TVI (Default) / CVI / AHD / Analog | ||
| CMOS | ^1/2.9 " 2MP Sony CMOS | ||
| Resolution (HD) | 1920x1080 | ||
| TV Lines (Analog) | 1200TVL | ||
| 3D-NR | Yes | ||
| 2D-NR | Yes | ||
| DWDR | Yes | ||
| OSD (On-Screen Display) | Yes | ||
| Cable OSD control | Yes | ||
| Video output | 1.0Vp-p Complex video output | ||
| Megapixels | 2MP | ||
| Lens | 2.8mm ICR | 2.8~12mm ICR | |
| Viewing angle | 90° | 30°~90° | |
| # of IR LEDs | 30 | 3 (IR III) | |
| IR Range | Up to 50ft (15m) | Up to 100ft (30m) | |
| FPS | 30FPS | ||
| F Stop | F1.4-F1.6 | ||
| Minimum illumination (IR On) | 0Lux | ||
| Gamma correction | 0-1 | ||
| S/N Ratio | 50dB | ||
| DSS (Digital Show Shutter) | Yes | ||
| Shutter control | Yes | ||
| Gain control | Yes | ||
| White balance | Auto, Day & Night | ||
| Operating voltage | 12VDC | ||
| Current draw | (IR On) | 160mA | 400mA |
| (IR Off) | 90mA | 90mA | |
| IP Rating | IP66 | ||
| Operating temperature | -4°~131° F (-20°~55° C) | ||
| Dimensions | 6^9/_16"x2^9/_16" (166x65 mm) | 10^7/_16"x3^1/_4" (265x83 mm) | |
| Weight | 14.1-oz (400g) | 1-lb 10.8-oz (760g) | |
Parts List:
| 1x | Bullet camera | 3x/4x* | Screws | 3x/4x* | Screw anchors |
| 1x | DC plug with terminal block | 1x | Hex wrench | 1x | Flathead screwdriver* |
| 1x | Mounting template | 1x | Manual | * EV-Y1201-AMWQ Only |
Dimensions:
EV-Y1201-A2WQ:

text_image
69/16" (166mm) 29/16" (65mm) 215/16" (75mm)EV-Y1201-AMWQ:
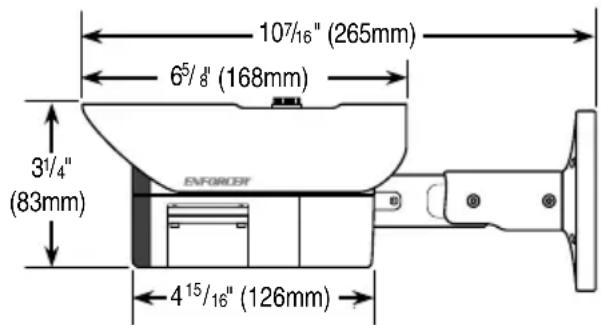
text_image
107/16" (265mm) 65/8" (168mm) 31/4" (83mm) ENFORCER 415/16" (126mm)Overview:
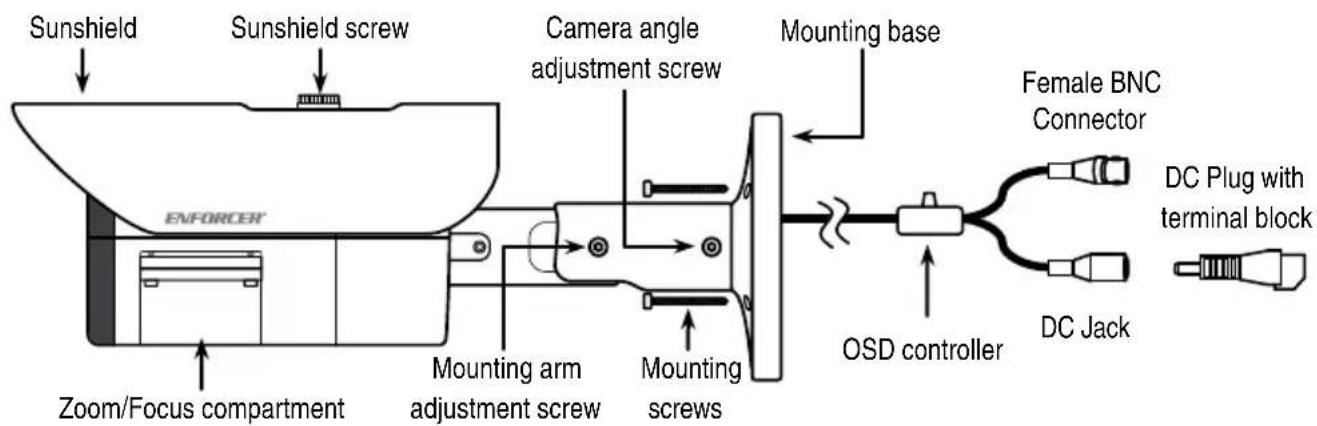
text_image
Sunshield Sunshield screw Camera angle adjustment screw Mounting base Female BNC Connector ENFORCER Zoom/Focus compartment Mounting arm adjustment screw Mounting screws OSD controller DC Plug with terminal block DC JackEV-Y1201-AMWQ shown above.
Important: Do not cut any wires as the warranty will be voided.
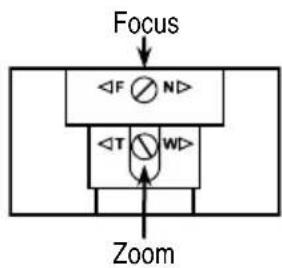
Zoom & Focus Adjustment\*:
To adjust the Zoom and Focus, open the Zoom/Focus compartment using the provided hex wrench.
Once within the compartment, use the provided flathead screwdriver to loosen the Zoom and Focus screws to allow for adjustment.
Focus
To focus in on close objects, push the focus screw right towards "N". To focus out on far objects, push the screw right towards "F".
Zoom
To zoom in, push the zoom screw left towards "T". To zoom out, push the screw right towards "W".
flowchart
graph TD
    A["Focus"] --> B["<F N>"]
    B --> C["<T WD>"]
    C --> D["Zoom"]
*EV-Y1201-AMWQ only
OSD Controller Settings:
To set format via the OSD controller, press the controller in the direction of the desired setting, hold for 5 seconds, and release when the camera restarts.
See chart below.
| Direction | Format Setting |
| Up | CVI |
| Down | TVI |
| Left | CVBS |
| Right | AHD |

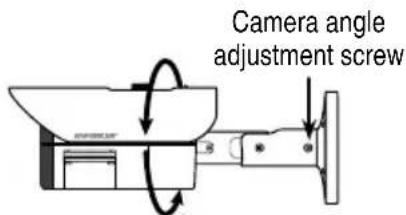
Camera Angle and Positioning:
To adjust the camera angle and positioning, loosen the camera angle adjustment screw and mounting arm adjustment screw. Rotate the camera and position the mounting arm in the desired position and retighten the screws.
Camera angle:
text_image
Camera angle adjustment screwCamera arm position:
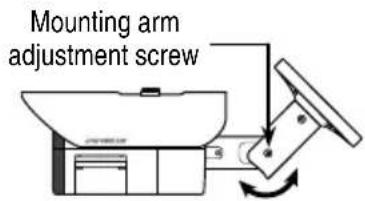
text_image
Mounting arm adjustment screwBefore Starting:
- Use the camera within the given temperature and voltage limits.
-
Do not point the camera at the sun.
-
Do not subject the camera to strong vibrations.
- Do not mount the camera in areas exposed to radiation, strong magnetic fields, or strong electrical signals.
Installation:
- Run a 12VDC power supply wire and a video cable with a male BNC connector to the wall or ceiling where the camera is to be mounted.
- Temporarily connect the camera to the 12VDC power supply.
- Temporarily connect the camera's female BNC connector to the video cable's male BNC connector.
-
While watching the monitor, hold the camera against the wall or ceiling by hand where it is to be mounted, then turn the camera until it is certain that this mounting location is correct.
-
Adjust the zoom and focus to desired settings. See "Zoom and Focus Adjustment*". (EV-Y1201-AMWQ only).
- Use the OSD controller's joystick to adjust the camera settings. See "OSD Controller Settings". (For more information, see separate OSD manual).
- Use a pencil and the included mounting template sticker to mark the mounting location. Disconnect the 12VDC power supply and video cable.
- Mount the camera mounting base to the wall using the included mounting screws. (Continued next page)
Installation (continued):
- Reconnect the 12VDC power supply and video cable.
- Turn the monitor on and confirm the camera is sending the proper video signal.
- Adjust the camera to the desired angle and position. See "Camera Angle and Positioning" for more information.
- Do a final test of the video camera and monitor.
Troubleshooting:
| The screen is blank. | Check that the camera is powered up.Check that the power supply's polarity is correct.Check that the monitor is powered up.Check that the video cable connecting the camera to the monitor is connected properly. |
| The screen image is dim. | Clean the lens using a soft, clean cloth.Check that the light source is adequate. |
| The screen image has poor contrast. | Adjust the monitor's contrast knob.Change the position of the camera. |
| The screen image flickers. | Change the position of the camera, check cables and format setting |
| The screen image is distorted. | Change the position of the camera, check cables and format setting |
| The camera case is hot. | Check that the correct power supply is in use. |
WARNING: Stop using the camera if you see a malfunction such as smoke or unusual heat, as it could cause fire or electric shock. Do not open the case of this device, as there are no user-serviceable components inside.
Do not cut any wires as the warranty will be voided.
IMPORTANT: Users and installers of this product are responsible for ensuring this product complies with all national, state, and local laws and statutes related to monitoring and recording audio and video signals. SECO-LARM will not be held responsible for the use of this product in violation of any current laws or statutes.
FCC COMPLIANCE STATEMENT
THIS DEVICE COMPLIES WITH PART 15 OF THE FCC RULES. OPERATION IS SUBJECT TO THE FOLLOWING TWO CONDITIONS: (1) THIS DEVICE MAY NOT CAUSE HARMFUL INTERFERENCE AND (2) THIS DEVICE MUST ACCEPT ANY INTERFERENCE RECEIVED, INCLUDING INTERFERENCE THAT MAY CAUSE UNDESIRED OPERATION.
Notice: The changes or modifications not expressly approved by the party responsible for compliance could void the user's authority to operate the equipment.
IMPORTANT NOTE: To comply with the FCC RF exposure compliance requirements, no change to the antenna or the device is permitted. Any change to the antenna or the device could result in the device exceeding the RF exposure requirements and void user's authority to operate the device.
WARRANTY: This SECO-LARM product is warranted against defects in material and workmanship while used in normal service for three (3) years from the date of sale to the original customer. SECO-LARM's obligation is limited to the repair or replacement of any defective part if the unit is returned, transportation prepaid, to SECO-LARM. This Warranty is void if damage is caused by or attributed to acts of God, physical or electrical misuse or abuse, neglect, repair or alteration, improper or abnormal usage, or faulty installation, or if for any other reason SECO-LARM determines that such equipment is not operating properly as a result of causes other than defects in material and workmanship. The sole obligation of SECO-LARM and the purchaser's exclusive remedy, shall be limited to the replacement or repair only, at SECO-LARM's option. In no event shall SECO-LARM be liable for any special, collateral, incidental, or consequential personal or proper damage of any kind to the purchaser or anyone else.
NOTICE: The SECO-LARM policy is one of continual development and improvement. For that reason, SECO-LARM reserves the right to change specifications without notice. SECO-LARM is also not responsible for misprints.
Copyright © 2017 SECO-LARM U.S.A., Inc. All rights reserved. This material may not be reproduced or copied, in whole or in part, without the written permission of SECO-LARM.
SECO-LARM® U.S.A., Inc.
16842 Millikan Avenue, Irvine, CA 92606
Phone: (949) 261-2999 | (800) 662-0800
Website: www.seco-larm.com
Email: sales@seco-larm.com

PICSN4
MI_EV-Y1201-AxWQ_17011.docx