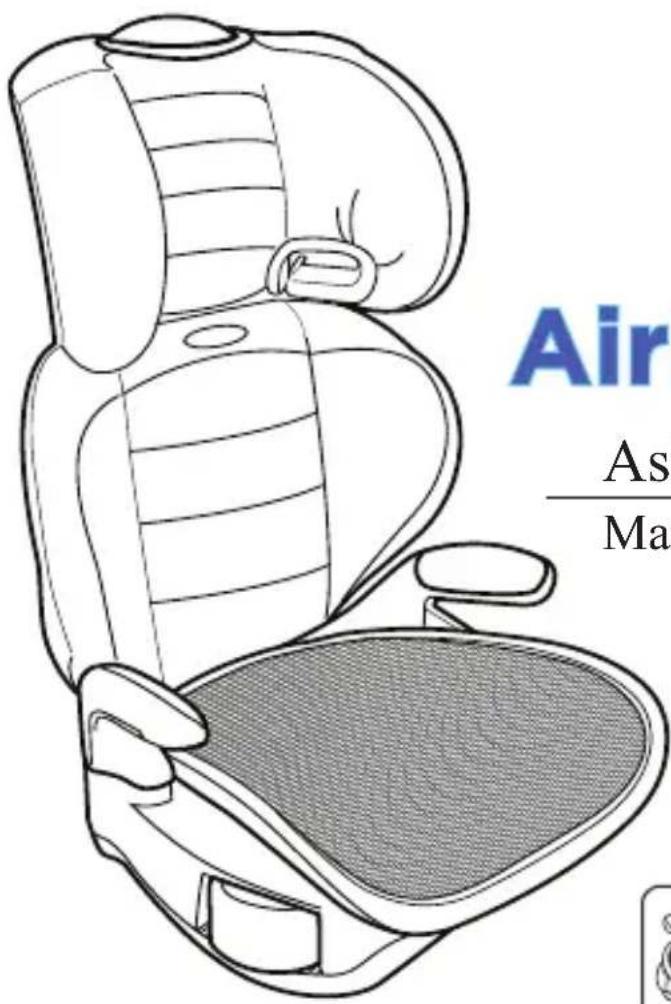
Booster Air - Car seat GRACO - Free user manual and instructions
Find the device manual for free Booster Air GRACO in PDF.

| Product Type | Booster Car Seat |
| Brand | Graco |
| Model | Booster Air |
| Weight Range | 40-100 lbs (18-45 kg) |
| Height Range | 43-57 inches (109-145 cm) |
| Dimensions (Assembled) | Approx. 17 x 15 x 26 inches |
| Weight of Seat | Approx. 8 lbs (3.6 kg) |
| Seat Type | High-back booster with adjustable headrest |
| Harness Type | Transition from 5-point harness to belt-positioning booster |
| Installation Method | Vehicle seat belt or LATCH system |
| Cup Holders | 2 (removable, dishwasher safe) |
| Fabric Care | Removable and machine washable seat pad |
| Air Ventilation System | Built-in air vents for comfort |
| Safety Standards | Exceeds federal safety standards |
| Expiration | 10 years from date of manufacture |
| Accessories Included | User manual, LATCH connectors |
| Replacement Parts | Available via Graco customer service |
Frequently Asked Questions - Booster Air GRACO
User questions about Booster Air GRACO
0 question about this device. Answer the ones you know or ask your own.
Ask a new question about this device
Download the instructions for your Car seat in PDF format for free! Find your manual Booster Air - GRACO and take your electronic device back in hand. On this page are published all the documents necessary for the use of your device. Booster Air by GRACO.
USER MANUAL Booster Air GRACO
natural_image
Line drawing of a car seat with top and front views (no text or symbols)READ THIS MANUAL
Do not install or use this car seat until you read and understand the instructions in this manual.
FAILURE TO PROPERLY USE THIS CAR SEAT INCREASES THE RISK OF SERIOUS INJURY OR DEATH IN A SUDDEN STOP OR CRASH.
Table of Contents
Registration Information....3....
Recall Information....3....
If You Need Help/Replacement parts 4.
Parts List 5
Warnings to Parents and Other Users 6-8
Assembling the Back Support 9-13
Weight and Height Limits 14-15
Vehicle Seat Location Requirements 16
Vehicle Seat Belt Requirements..17....
SAFE Vehicle Belt Systems 17
UNSAFE Vehicle Belt Systems....18
Using your Graco Booster Seat 19-21
Booster Seat Positions 22
Securing your Child in Vehicle 23-26
Adjusting the Head Support 27
Removing the Back Support to Use as Backless
Booster (on certain models)....28
Securing Child in Vehicle with
Shoulder Belt Positioning Clip 29-32
Additional Information....33
Airplane Use 33
Cupholders 33
Instruction Sheet Storage 34
Care and Maintenance 34-35
To Clean Seat Mesh....36
Registration Information
Model Number:
Manufactured on:
Purchase Date:
Register Your Booster Seat
Please fill in the above information. The model number and manufactured on (date) can be found on a label underneath your booster seat. Fill out the prepaid registration postcard attached to the seat cover and mail it today. Child restraints could be recalled for safety reasons. You must register this restraint to be reached in a recall.
Send your name, address, model number and manufacturing date to:
Graco Children's Products Inc.
150 Oaklands Blvd.
Exton, PA, 19341
or call 1-800-345-4109
or register online at: www.gracobaby.com
Recall Information
- Call the U.S. Government’s Vehicle Safety Hotline at 1-888-327-4236 (TTY: 1-800-424-9153)
• or go to http://www.NHTSA.gov
• Graco: 1-800-345-4109 or www.gracobaby.com
If You Need Help
Please contact our Customer Service Department with any questions you may have concerning parts, use, maintenance or warranty information. When you contact us, please have your product's model number and manufactured on (date) ready so that we may help you efficiently. This number can be found on a sticker on the underside of your booster seat.
1-800-345-4109
or www.gracobaby.com
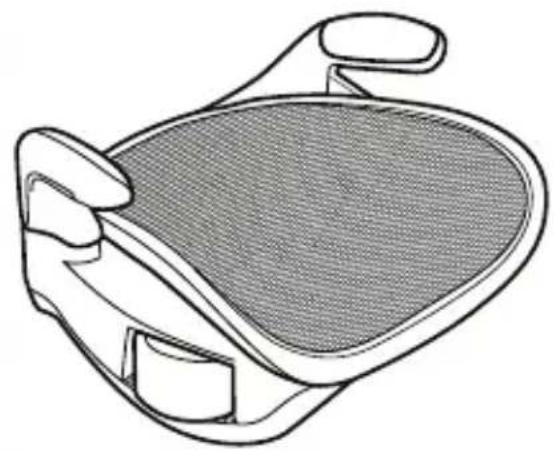
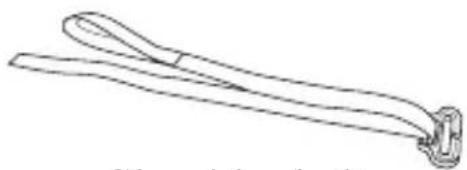
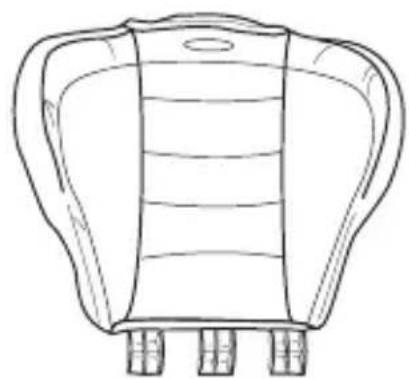
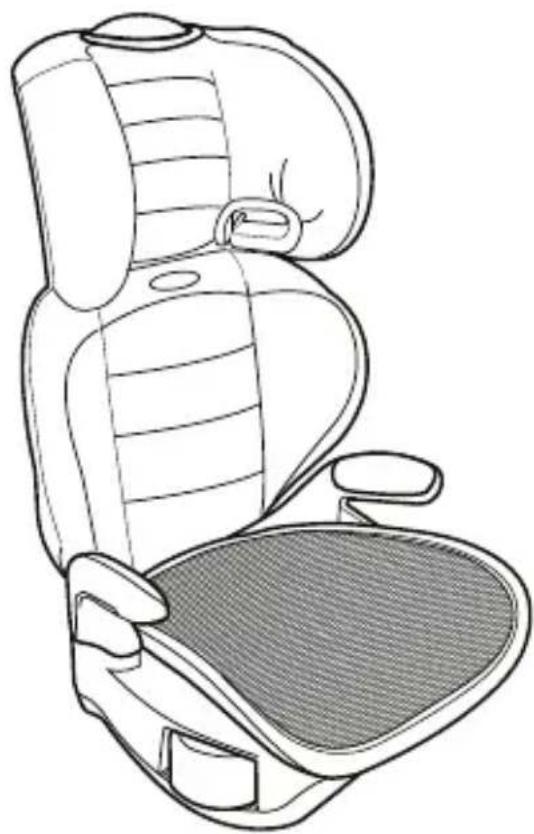
Parts List
Adult assembly required.
natural_image
Line drawing of a car seat with mesh insulation and side pockets (no text or symbols)Base
natural_image
Line drawing of a pair of tongs or clips with a central handle (no text or symbols)Shoulder belt positioning clip
On Certain Models

natural_image
Line drawing of a person's torso with hands holding the chest (no text or symbols)Head Support
natural_image
Line drawing of a stylized elephant-shaped object with no text or symbolsLower Back Support
WARNING
- NO BOOSTER SEAT CAN GUARANTEE PROTECTION FROM INJURY. HOWEVER, PROPER USE OF THIS BOOSTER SEAT REDUCES THE RISK OF SERIOUS INJURY OR DEATH TO YOUR CHILD.
- DO NOT INSTALL OR USE THIS BOOSTER SEAT UNTIL YOU READ AND UNDERSTAND THE INSTRUCTIONS IN THIS MANUAL AND IN YOUR VEHICLE OWNER'S MANUAL. DO NOT let others install or use the booster seat unless they understand how to use it.
- FAILURE TO PROPERLY USE THIS BOOSTER SEAT INCREASES THE RISK OF SERIOUS INJURY OR DEATH IN A SHARP TURN, SUDDEN STOP OR CRASH. YOUR CHILD CAN BE INJURED IN A VEHICLE EVEN IF YOU ARE NOT IN A CRASH. Sudden braking and sharp turns can injure your child if the booster seat is not properly installed or if your child is not properly secured in the booster seat.
• NEVER PLACE THIS BOOSTER SEAT IN A VEHICLE SEATING LOCATION THAT
HAS AN AIR BAG. If an air bag inflates, it can hit the child and booster seat with great force and cause serious injury or death to your child. Refer to your vehicle owner's manual for information about air bags and booster seat installation.
text_image
Prohibition sign with a crossed-out toilet and hand icon, indicating no smoking or disinfection- According to accident statistics, CHILDREN ARE SAFER WHEN PROPERLY RESTRAINED IN REAR VEHICLE SEATING POSITIONS, RATHER THAN FRONT SEATING POSITIONS.
For a vehicle with a front passenger air bag, refer to your vehicle owner's manual as well as these instructions for booster seat installation.
- NEVER LEAVE A BOOSTER SEAT UNSECURED IN YOUR VEHICLE. An unsecured booster seat can be thrown around and may injure occupants in a sharp turn, sudden stop or crash.
Remove it or make sure that it is securely belted in the vehicle.
- REPLACE THE BOOSTER SEAT AFTER AN ACCIDENT OF ANY KIND. An accident can cause damage to the booster seat that you cannot see.
• DO NOT MODIFY YOUR BOOSTER SEAT or use any accessories or parts supplied by other manufacturers.
- NEVER USE BOOSTER SEAT IF IT HAS DAMAGED OR MISSING PARTS. DO NOT use a cut, frayed or damaged vehicle seat belt.
- THE BOOSTER SEAT CAN BECOME VERY HOT IF LEFT IN THE SUN. Contact with these parts can burn your child’s skin. Always touch the surface of any metal or plastic parts before putting your child in the booster seat.
- THIS CHILD RESTRAINT CONFORMS to all applicable Federal Motor Vehicle Safety Standards and is certified for use in motor vehicles. This restraint is NOT certified for use in aircraft because there is no shoulder belt available.
- NEVER GIVE THIS BOOSTER SEAT to someone else without also giving them this manual.
- NEVER USE A SECOND-HAND BOOSTER SEAT or a booster seat whose history you do not know.
- NEVER USE THIS BOOSTER SEAT without the armrests attached to the base.
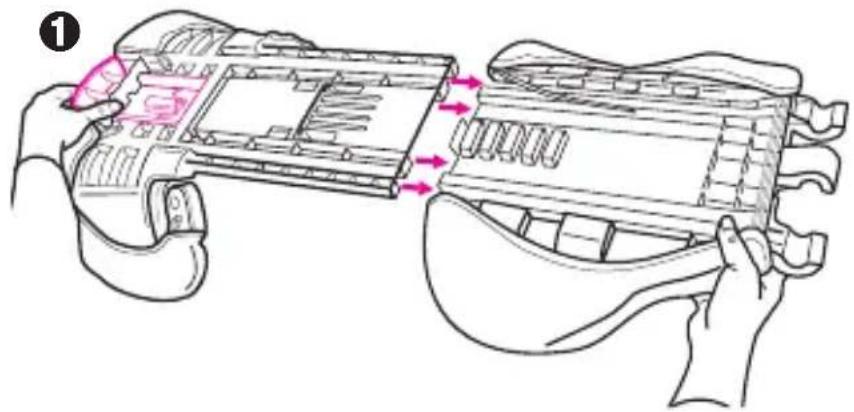
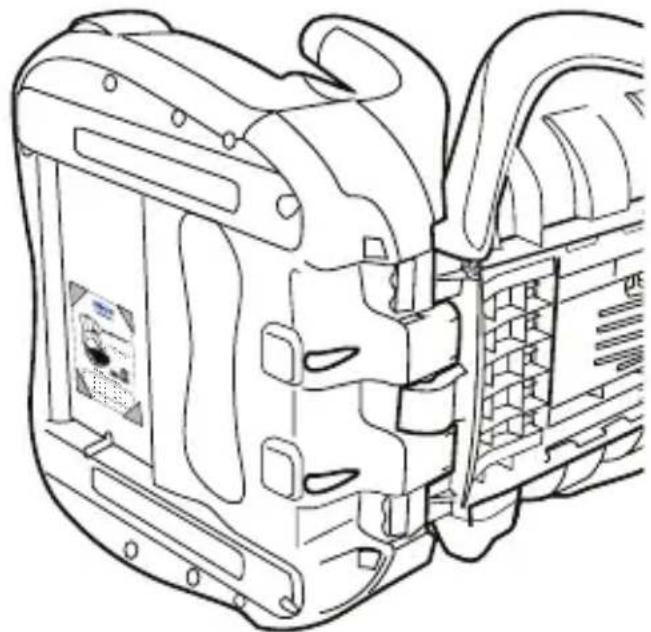
Assembling the Back Support (on certain models)
Step 1.
Flip over head support and lower back support as shown ①.
natural_image
Illustration of a hand holding a device with arrows indicating process flow (no text or symbols)Step 2.
Squeeze red adjustment handle and slide two pieces together until they snap into place ②.
CHECK to make sure two pieces are securely snapped together by pulling on them.
2

text_image
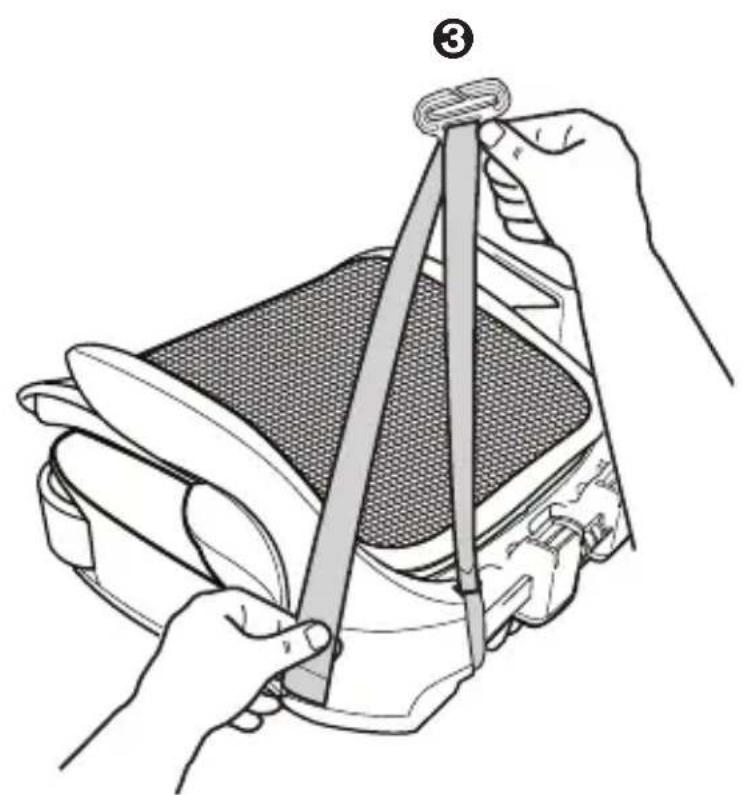
CLICK!Step 3
Attach elastic strap to the hook on the fabric, on the other side of seat pad ③.

text_image
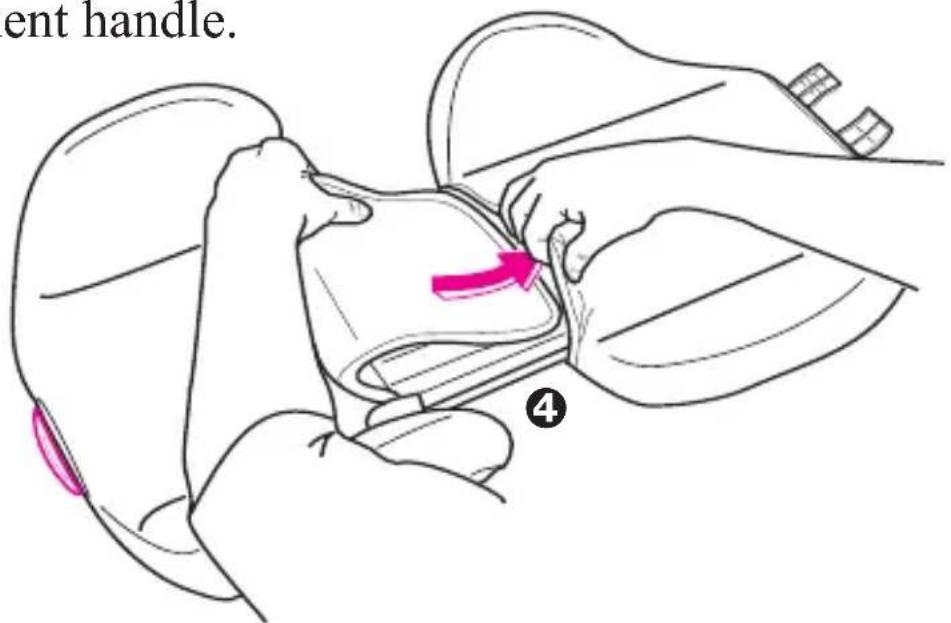
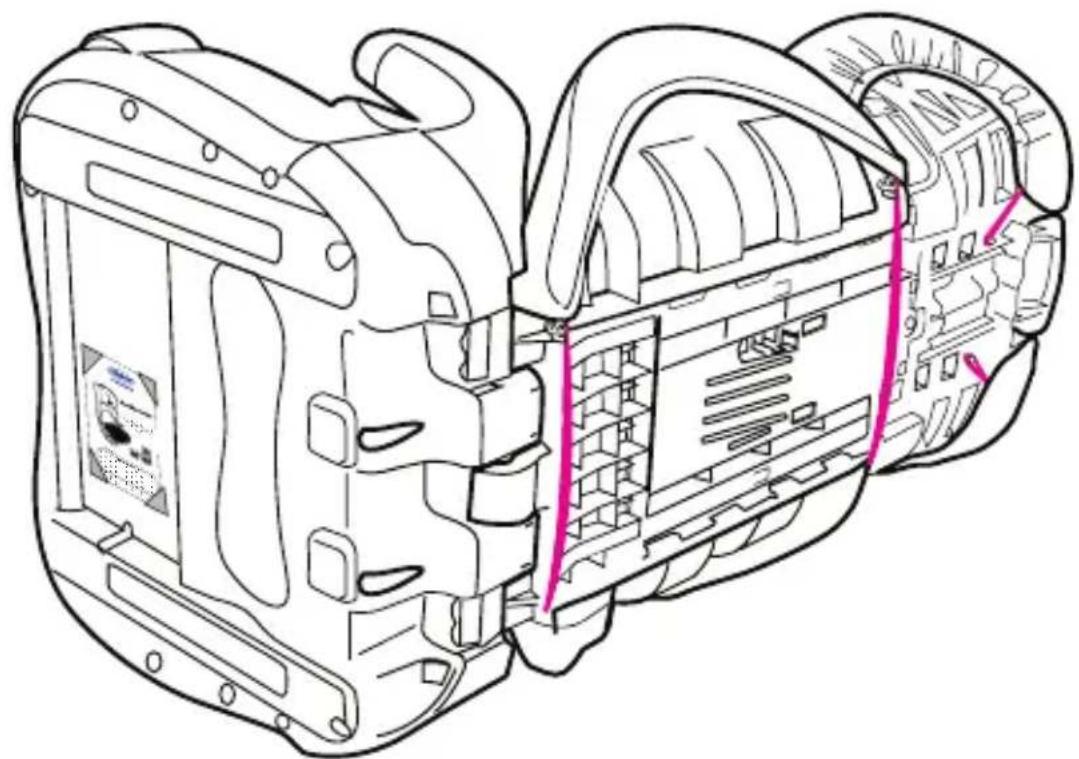
Technical diagram showing a hand operating a mechanical device with three circular insets highlighting different components and a numbered callout.Step 4.
Flip seat over and insert the fabric from the head support underneath the fabric on the lower back support as shown ④.
To make insertion of fabric easier, slide the upper and lower back pieces apart by squeezing the red adjustment handle.
text_image
ent handle. ④Step 5.
Attach back support to base. “U”-shaped hooks on bottom of back support will interlock with bars on base ⑤. Make sure that no part of the seat covering interferes when attaching back support to the base.
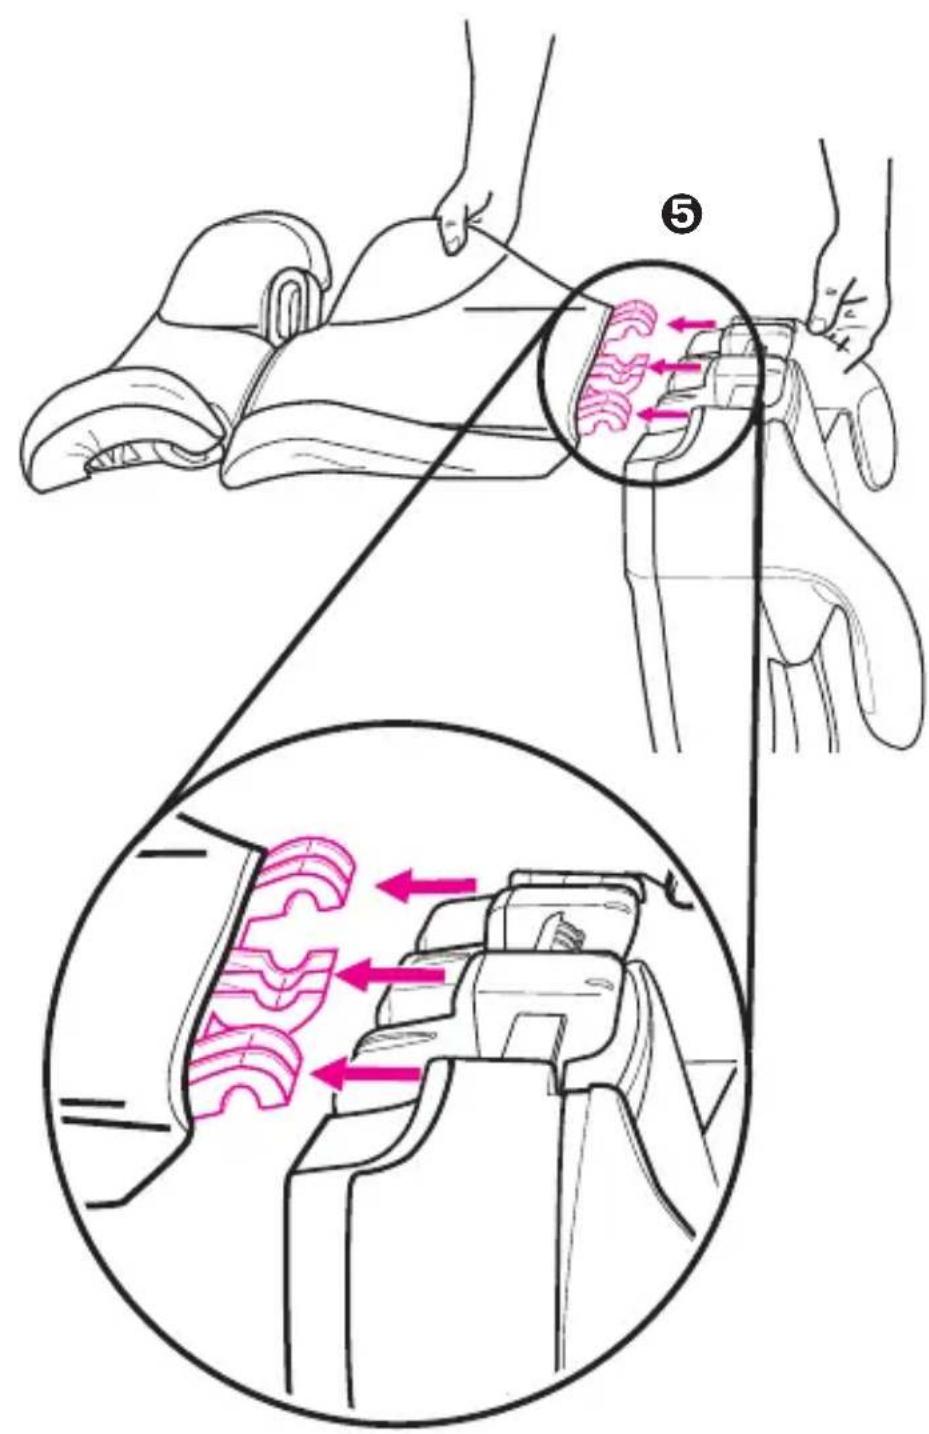
text_image
Medical illustration showing foot massage technique with magnified view of muscle compression and force direction arrowsStep 6
Once backrest is securely attached to the base, push backrest up as shown ⑥.

natural_image
Illustration of a car seat assembly with arrows indicating direction (no text or symbols)Step 7
Your Graco booster seat is now ready to use. See page 19-26, “Using your Graco Booster Seat” and “Securing Your Child in Vehicle”.
natural_image
Line drawing of a car seat with adjustable seat, no text or symbols presentWeight and Height Limits
WARNING
FAILURE TO USE booster seat in a manner appropriate for your child's size may increase the risk of serious injury or death.
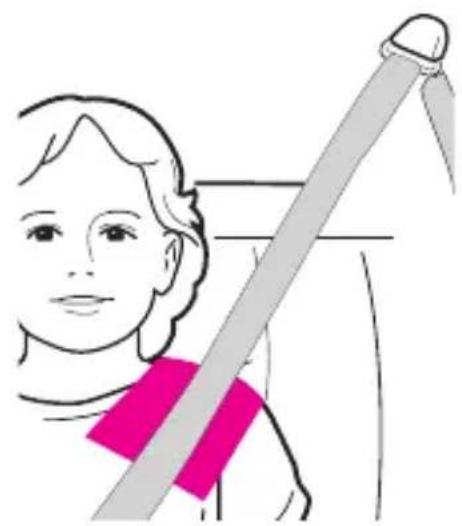
To use this Graco booster seat, your child MUST meet ALL of the following requirements:
With back support (approximately 3 to 10 years old):
- weigh between 30 and 100 lbs.
(mass between 13.6 and 45 kg), and
• are between 38 and 57 inches (96 and 145 cm) in height, and
- the shoulder belt MUST lay across child's shoulders in red zone as shown in ① and the lap portion is positioned low on the childs hips, and
- the child's ears are below top of booster seat. If tops of ears are above top of seat, your child is too large for the booster seat

text_image
Illustration showing a child wearing a seatbelt with a bandage, labeled with number 1 and pointing to the device.Without back support (approximately 4 to 10 years old) :
- weigh between 40 and 100 lbs. (mass between 18 and 45 ~kg ), and
• are between 40 and 57 inches (101 and 145 cm) in height, and
- the shoulder belt MUST lay across child’s shoulders in red zone as shown in ② and the lap portion is positioned low on the child’s hips, and
- when sitting on the booster seat, your child’s ears are below the top of the vehicle seat cushion / head rest.
natural_image
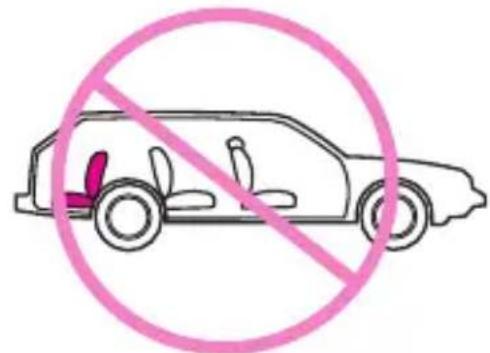
Illustration of a person seated in a chair holding a long, segmented object (no text or symbols)Vehicle Seat Location Requirements
WARNING
IMPROPER PLACEMENT OF THE BOOSTER SEAT INCREASES THE RISK OF SERIOUS INJURY OR DEATH. Some seating positions in your vehicle may NOT be safe for this booster seat. Some vehicles do not have any seating positions that can be used safely with the booster seat. If you are not sure where to place the booster seat in your vehicle, consult your vehicle owner's manual or call Graco Children's Products Inc., at 1-800-345-4109.
- Children are safer when properly restrained in rear vehicle seating positions. Whenever possible secure the Graco booster seat in the center position of the seat directly behind the front seats. However, if this position is equipped with a lap belt only it cannot be used.

natural_image
Side view diagram of a car showing the dashboard and seat area with an arrow indicating left side (no text or symbols)• The vehicle seat MUST face forward.
text_image
Prohibition sign showing a car with a red seat and a pink circle, indicating no prohibition or restriction.
natural_image
Simple line drawing of a car with two seats and a diagonal no-smoking symbol (no text or labels)WARNING
MANY SEAT BELT SYSTEMS ARE NOT SAFE TO USE WITH THE BOOSTER SEAT.
Pay careful attention to these systems; some of the seat belts that are NOT safe to use look very much like seat belts that are safe to use. If you are unsure, consult your vehicle owner's manual or call Graco Children's Products Inc., at 1-800-345-4109.
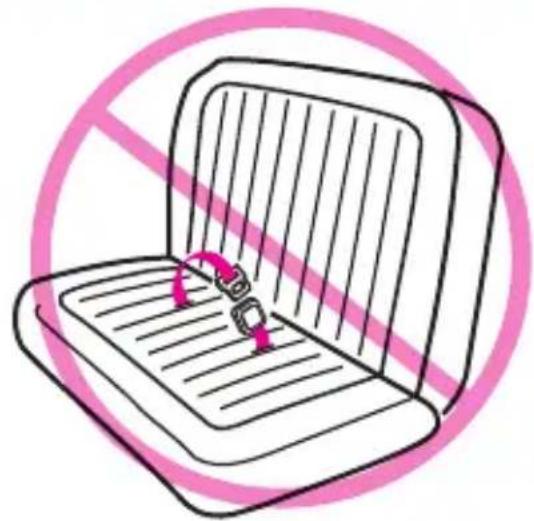
SAFE VEHICLE SEAT BELT SYSTEM
ONLY A LAP/SHOULDER BELT SYSTEM CAN BE USED WITH THIS BOOSTER SEAT.

natural_image
Line drawing of a pink car seatbelt inside a vehicle (no text or symbols)UNSAFE Vehicle Seat Belt Systems
DO NOT USE ANY OF THE FOLLOWING VEHICLE BELT SYSTEMS.
• NEVER use a lap-only belt.
natural_image
Illustration of a laptop with a pink prohibition symbol overlay (no text or symbols on the diagram itself)• NEVER use a Passive Restraint - Lap or Shoulder Belt Mounted on Door

natural_image
Illustration of a car seat with a pink diagonal line indicating no change, enclosed in a circle (no text or symbols)• NEVER use a Passive Restraint - Lap Belt with Motorized Shoulder Belt
NEVER use vehicle belts that are attached to the door in any way or that move along a track to automatically surround the passenger when the door is closed.

natural_image
Illustration of a car seat with a pink diagonal cord and seatbelt, no text or symbols presentUsing Your Graco Booster Seat
WARNING
FAILURE TO PROPERLY SECURE YOUR CHILD AND THE BOOSTER SEAT IN YOUR VEHICLE INCREASES THE RISK OF SERIOUS INJURY OR DEATH IN THE EVENT OF A SHARP TURN, SUDDEN STOP OR CRASH.
Use only the vehicle's lap and shoulder belt system when restraining the child in this booster seat ①.
NEVER use a vehicle lap-only belt across front of child ②.
DO NOT place vehicle shoulder belt behind child's back ③.

text_image
Illustration showing three steps of car seatbelt usage: seated, no seatbelt allowed, and sitting with no seatbelt allowed.Vehicle belts MUST lay flat against child and MUST not be twisted.
DO NOT use shoulder belt loose or positioned under child's arm ④.
DO NOT position vehicle belt over top of the armrests ⑤. It must pass underneath the armrests.
Make sure vehicle belt is NOT twisted.
Lap portion of lap/shoulder belt MUST be low and snug on hips, just touching thighs.
DO NOT allow child to slide down in booster seat ⑥.
If child will not keep vehicle restraint properly positioned, DO NOT use this booster seat. Use a different child restraint system.

text_image
④
text_image
⑤
text_image
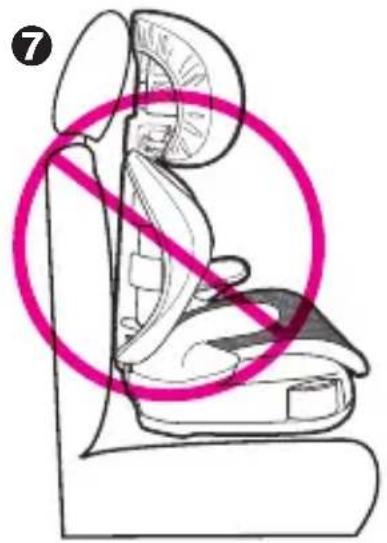
⑥Vehicle seat headrest must not interfere with booster seat head support ⑦. The front of booster seat MUST NOT hang over front of vehicle seat ⑧.
natural_image
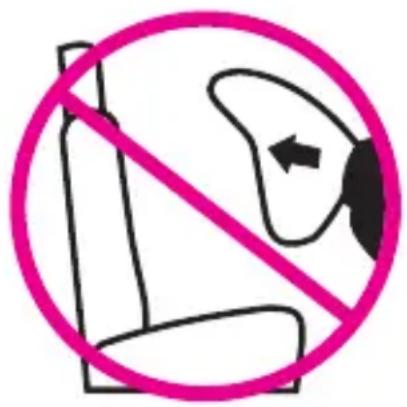
Line drawing of a person sitting in a car seat with a pink prohibition symbol (no text or labels)
natural_image
Line drawing of a car seat with a pink prohibition symbol (no text or labels)The back of the booster seat MUST fit flat against the vehicle seat back as shown ⑨.
natural_image
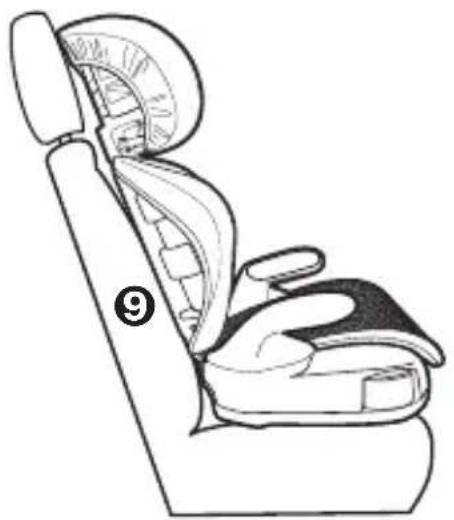
Line drawing of a car seat with a numbered label (9) indicating the number 9, showing no text or symbols on the chair itself.Booster Seat Positions
Your booster has two positions as shown.

text_image
① Upright ② ReclinedThe back of the booster seat MUST fit flat against the vehicle seat back as shown in ③ in either the first or second position.
natural_image
Line drawing of a car seat with neck and seatbelt (no text or symbols)DO NOT USE booster seat beyond reclined position ②.

natural_image
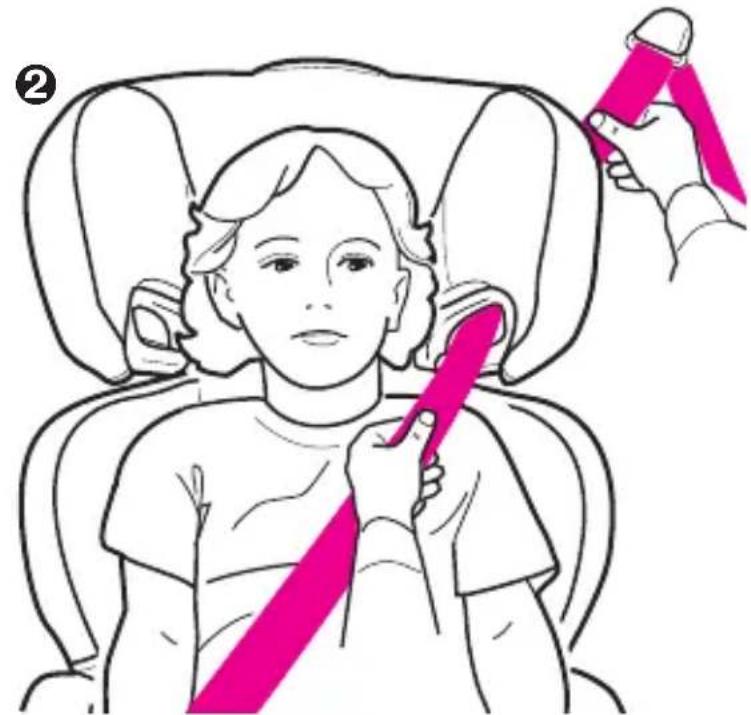
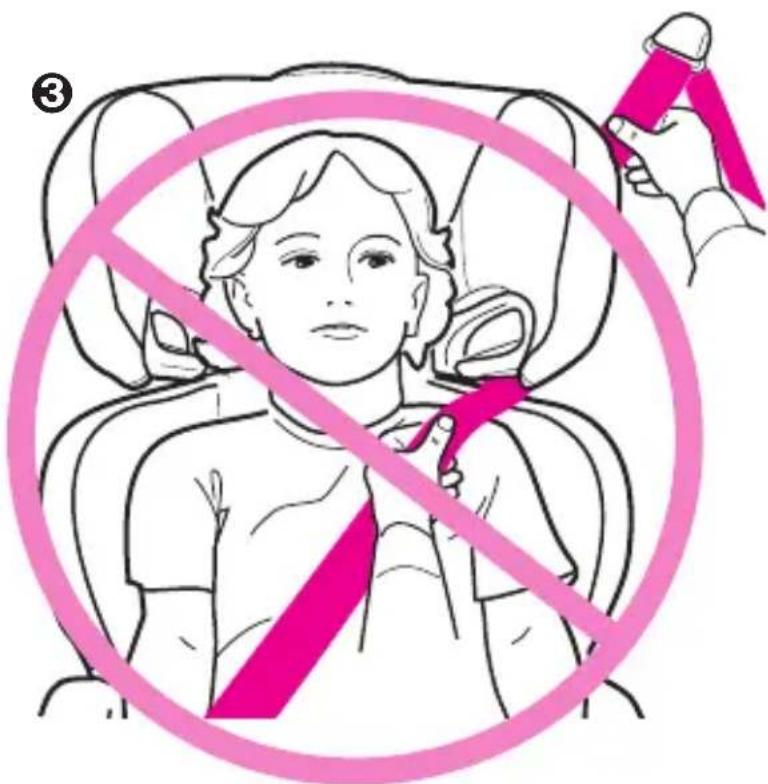
Illustration of a hand using a car seatbelt with a pink prohibition symbol (no text or symbols present)Securing Your Child in Vehicle
-
Place booster seat firmly against the back of a forward-facing vehicle seat equipped with a lap/shoulder belt only ①.
-
Have your child sit in booster seat with their back flat against back of booster seat.

text_image
Illustration of a child wearing a car seatbelt with a pink belt, labeled with number 1 and pointing to the seatbelt.- Position shoulder belt through the shoulder belt guide shown in ②, NOT as shown in ③. Fasten buckle and pull up on the shoulder belt to tighten.
natural_image
Illustration of a person seated in a car seat with a pink bandage tool applied to the neck (no text or symbols)CORRECT

text_image
Safety warning symbol showing a person sitting in a seat with a pink prohibition sign, indicating no protection or absence of using the device.INCORRECT
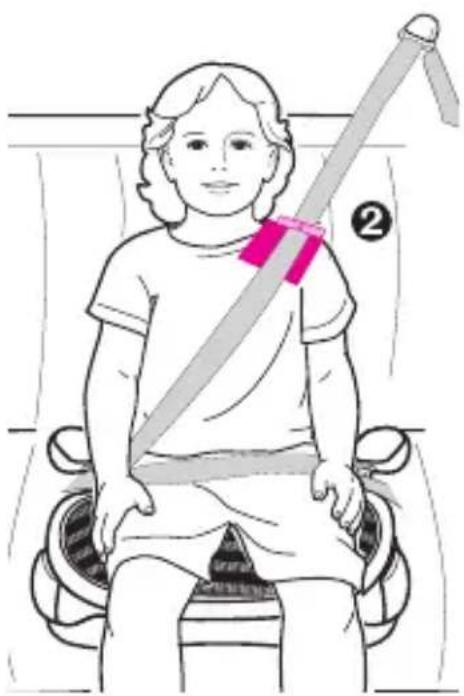
- To ensure the correct head support height is obtained, the bottom of the headrest MUST be even with the top of child's shoulders as shown in ④ and the shoulder belt must be positioned in the red zone as shown in ⑤.
The lap belt portion MUST pass under the armrests and be positioned low on the hips.

text_image
Diagram illustrating a person's seatbelt usage, labeled with number 4 and pink banding technique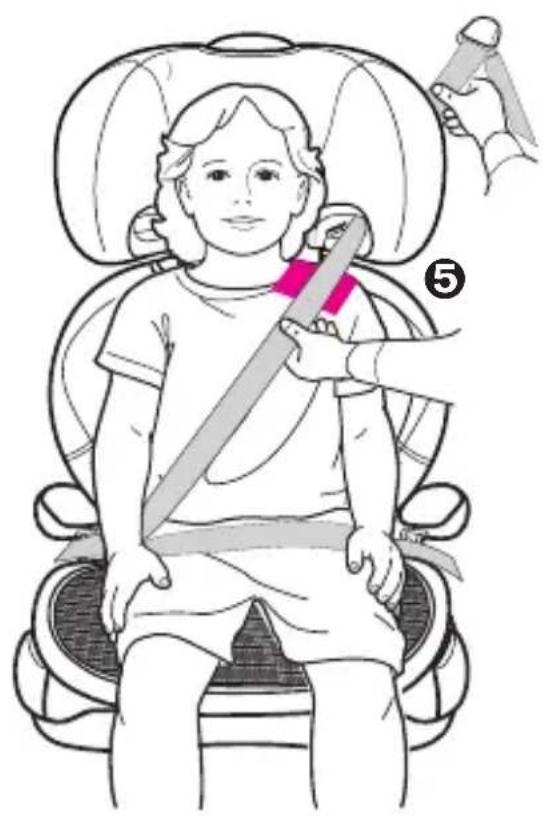
text_image
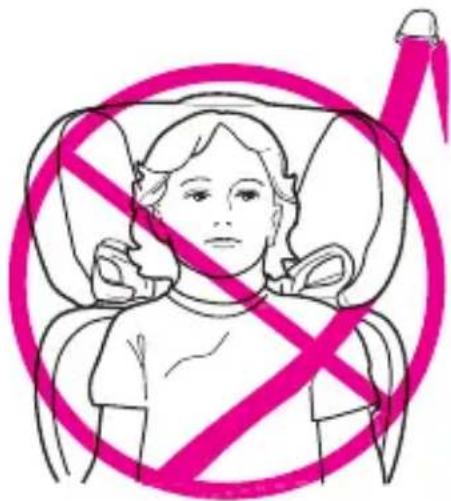
Illustration of a child wearing a car seat with a bandage, labeled with number 5 and hand holding a tool.- If the belt lays across child's neck, head or face ⑥, readjust head support height.
Follow instructions on page 27, “Adjusting the Head Support”.
6

text_image
Illustration showing a person with a crossed-out pink prohibition symbol, likely indicating no medical or health restrictions.INCORRECT

text_image
Prohibition sign with crossed-out human face and pink circular background, featuring a lightning bolt symbolINCORRECT
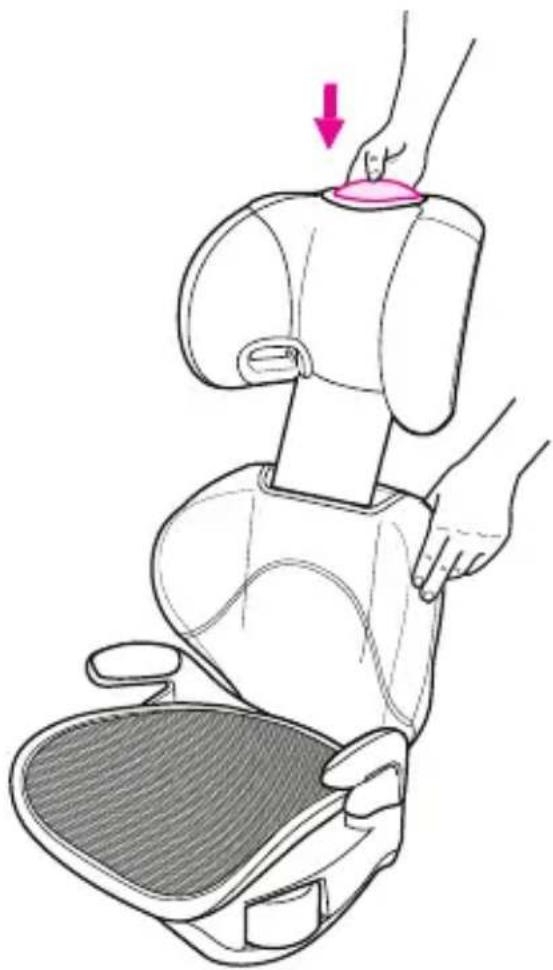
Adjusting the Head Support
BEFORE adjusting the head support height, have your child lean forward slightly.
Squeeze the red adjustment handle on top of seat and pull back support up until it snaps into one of the 6 height positions.
To lower, squeeze red adjustment handle and push down.
CHECK to make sure it is securely snapped into one of the 6 height positions by pulling up on head support.

natural_image
Diagram of a hand pressing down on a mechanical component with an upward arrow indicating motion (no text or symbols present)Back of seat
natural_image
Illustration of a person using a car seatbelt device to lift a pink lid, with no text or symbols present.Removing the Back Support (on certain models) to Use as Backless Booster
To use booster seat without back support:
Remove back support as shown.

natural_image
Illustration of a banana peel with leaves and a sliced fruit, showing a curved arrow indicating rotation (no text or symbols)“U” shaped hooks on bottom of back support are interlocked with bars on base. Lift back support off base.

text_image
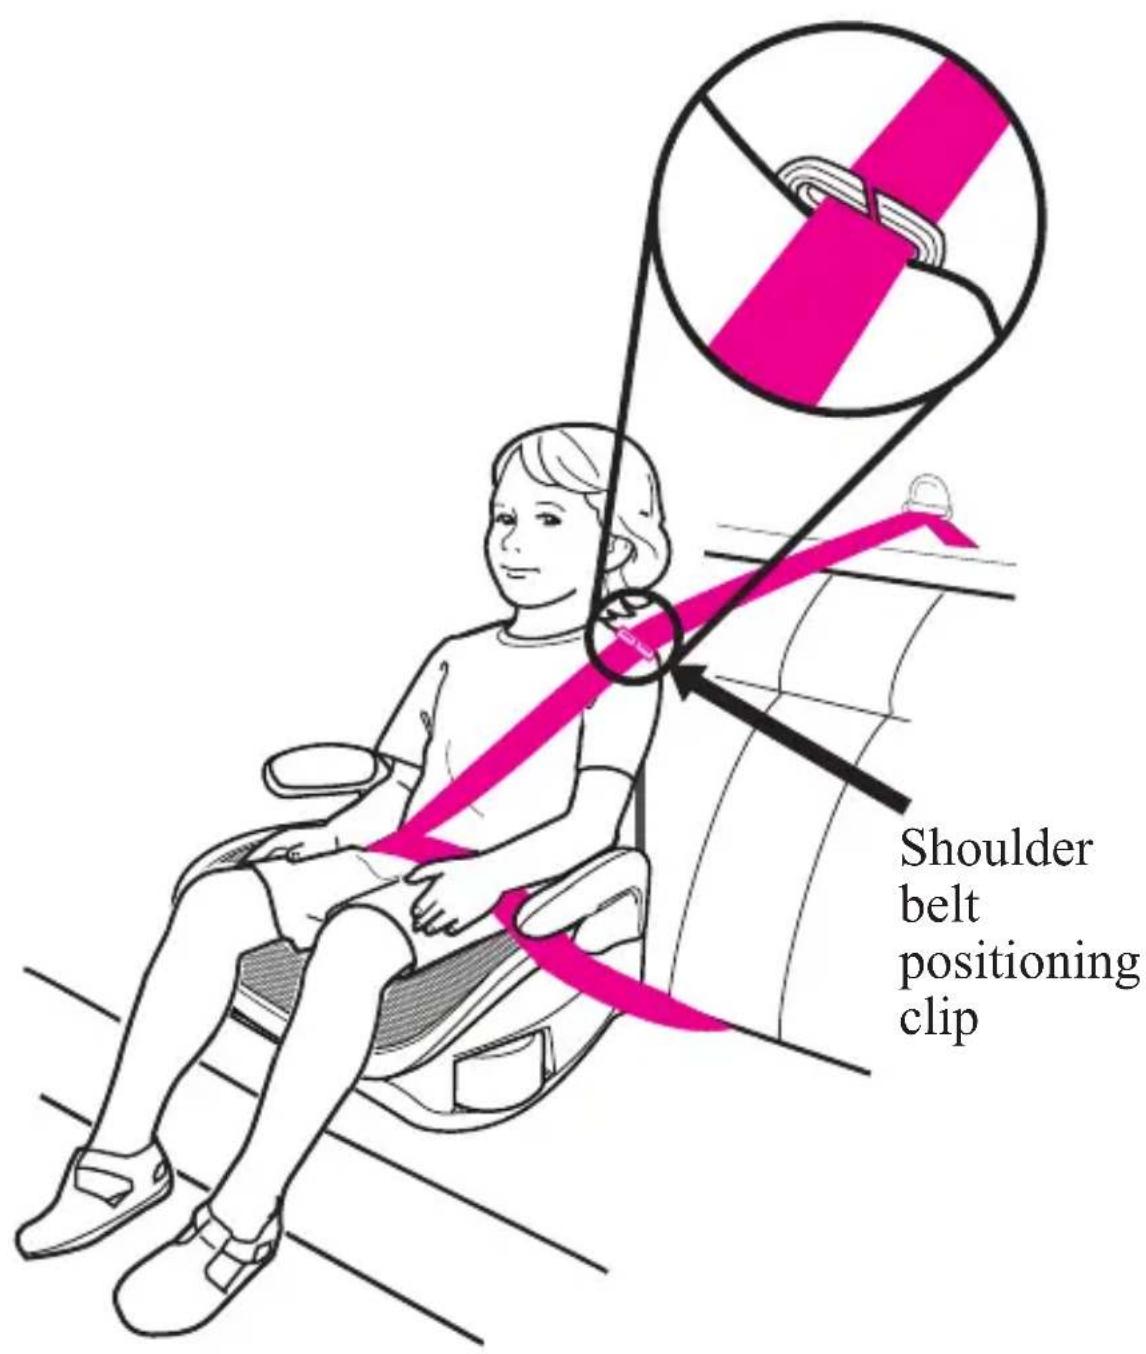
Soft ackSecuring Child in Vehicle with Shoulder Belt Positioning Clip
The shoulder belt MUST lay across child's shoulders in red zone as shown.
If shoulder belt lays outside this zone, the shoulder belt positioning clip MUST be used.
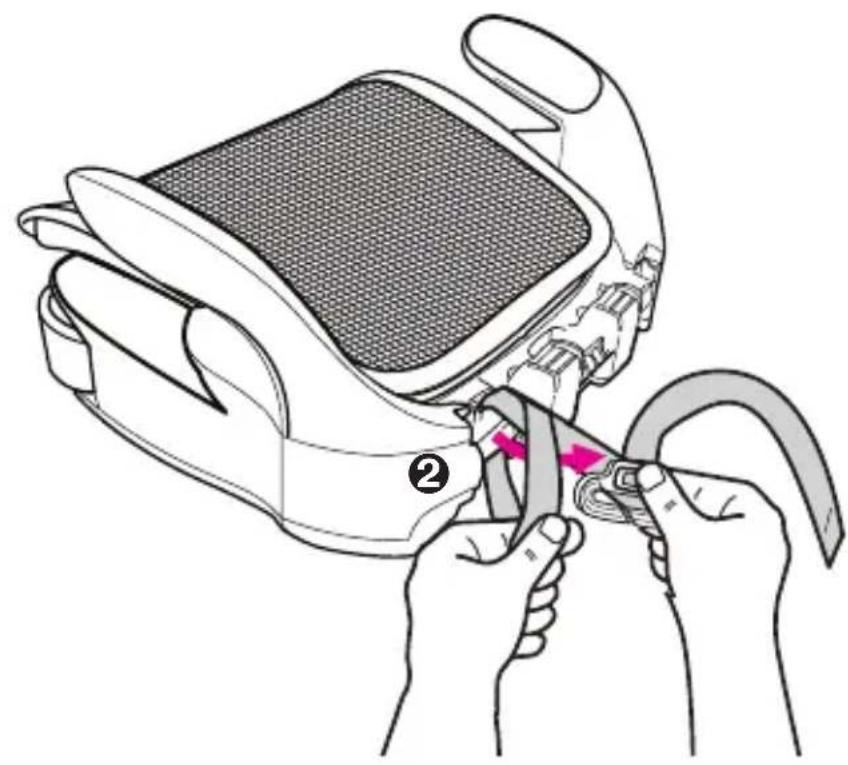
To attach clip to booster seat:
- Insert the loop end of strap around vertical bar on rear of seat as shown in ①. The shoulder belt positioning clip MUST be attached onto the vertical bar of the base closest to where the vehicle shoulder belt lays across the child.
natural_image
Illustration of a person holding a long pole, wearing a pink bandage (no text or symbols)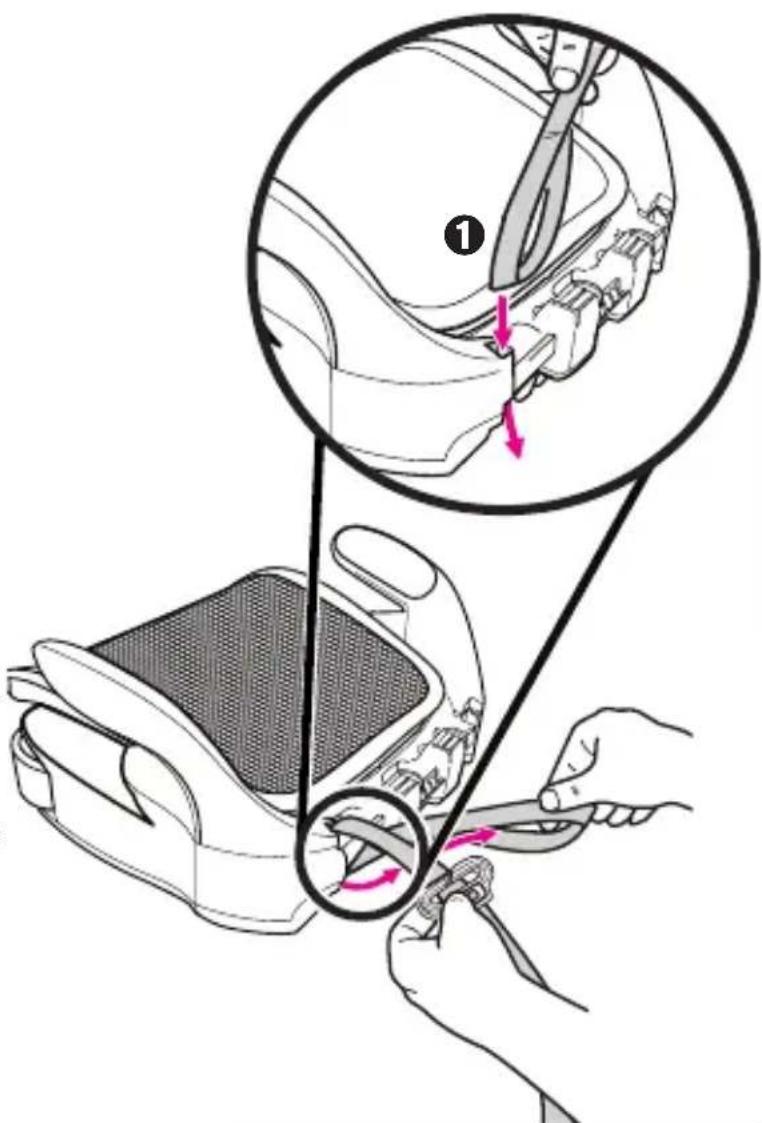
text_image
Diagram illustrating a mechanical assembly with labeled parts and directional arrows indicating motion or force.- Pass the clip and strap through the loop end as shown in ② and pull strap up ③.
NOTE: Free end of strap should face front of seat.
natural_image
Illustration of hands connecting a device to a cable, showing mechanical components and a numbered label (no text or symbols present)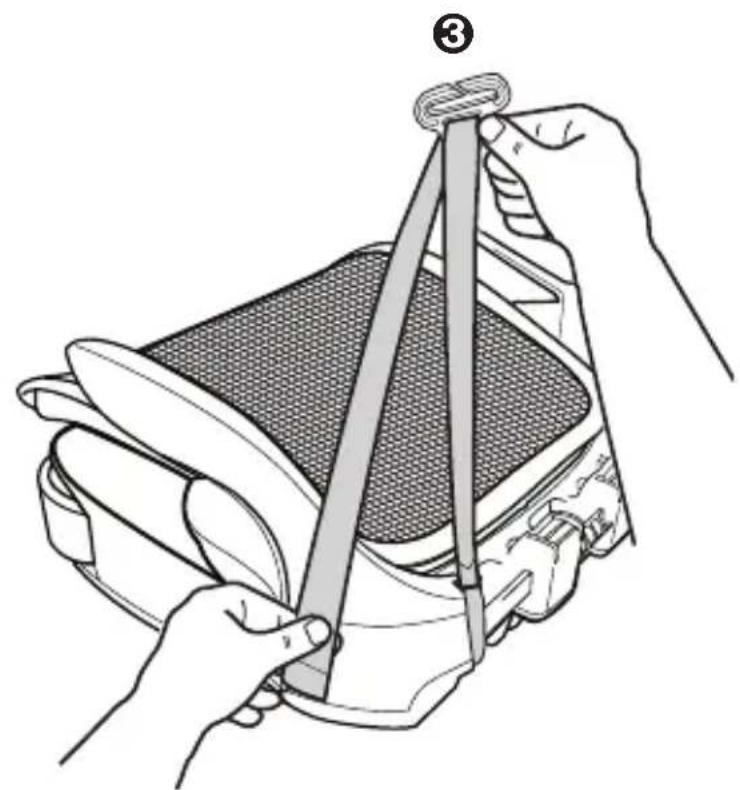
natural_image
Illustration of hands holding a rope tied to a mesh material inside a container (no text or symbols)- Slide the vehicle shoulder belt onto the clip as shown and pull strap down to tighten clip against child's shoulder.
The lap belt portion MUST pass under the armrests and be positioned low on the hips. The belt MUST NOT be twisted.
text_image
Shoulder belt positioning clipRear view of child sitting in seat
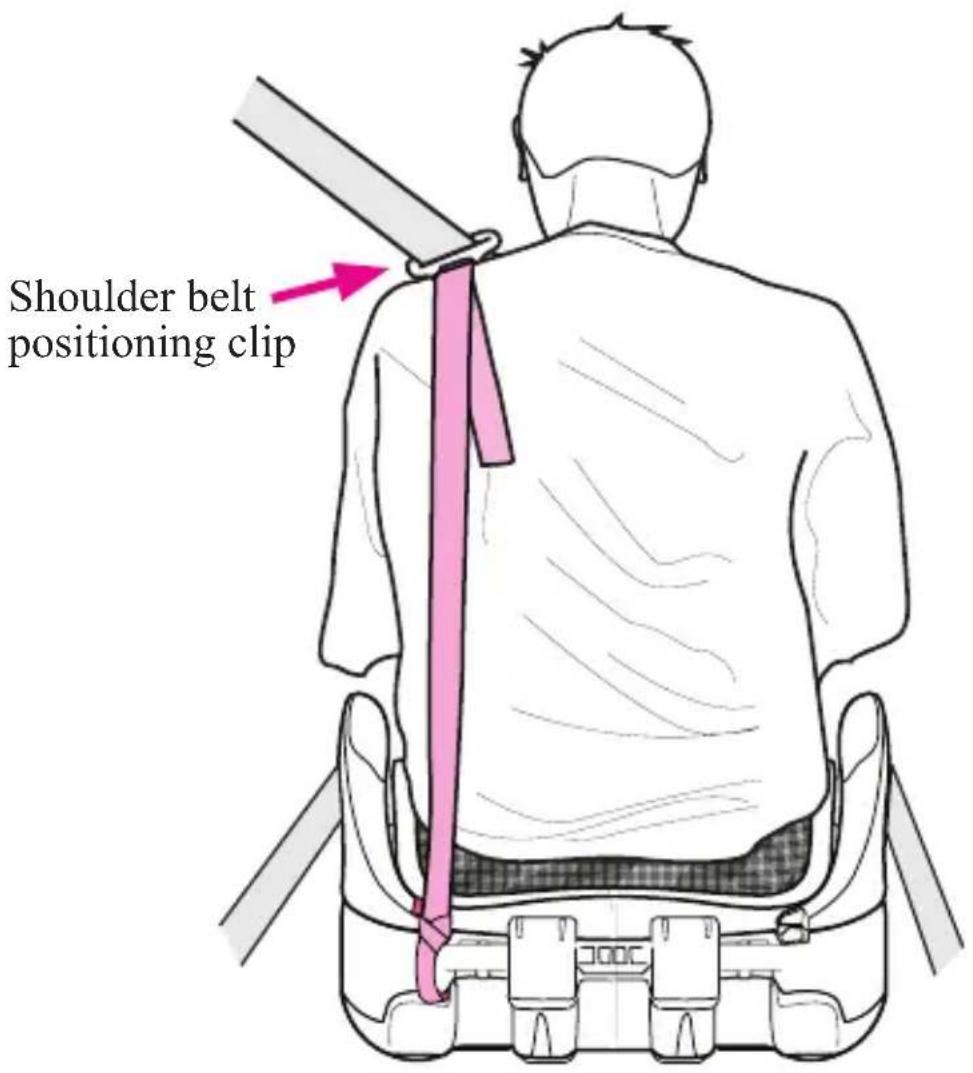
text_image
Shoulder belt positioning clip- For warnings on vehicle belt positions, see pages 19-21, “Using your Graco Booster Seat”.
Additional Information
Airplane Use
This restraint is NOT certified for use in an aircraft because aircraft seats do not have a shoulder belt.
Cupholders
Cupholders are included on both sides of the seat.

natural_image
Illustration of a seated anatomical device with hands holding and two arrows indicating movement or force direction (no text or symbols)Instruction Sheet Storage
Your instruction manual can be stored on the bottom of the seat as shown.
natural_image
Technical line drawing of a vehicle chassis showing front and side views (no text or symbols)Care and Maintenance
• CONTINUOUS USE OF BOOSTER SEAT MAY CAUSE DAMAGE TO VEHICLE SEAT. Use a booster seat mat, towel or thin blanket to protect upholstery.
• METAL AND PLASTIC PARTS: clean with mild soap and cool water. No bleach or detergents.
- DO NOT USE booster seat if seat mesh is ripped or torn.
To Remove Seat Cover
- Remove elastic loops from seat as shown.
natural_image
Technical line drawing of a mechanical device showing internal components and mounting points (no text or symbols)- Machine wash cover in cold water on delicate cycle and drip-dry. DO NOT USE BLEACH.
- To put the seat cover back on, reverse preceding instructions.
To Clean Seat Mesh
Normal cleaning:
For normal cleaning, vacuum fabric as needed. Vacuuming picks up dust and reduces the need for professional cleaning. Do not brush fabric or use vacuum attachment with a rotary brush. Brushing may permanently damage the nap or change the character of the fabric.
Use a water-based cleaner (specifically made for cleaning fabric) or a solution of mild (alkaline) warm soapy water (not overly soapy) applied with a damp clean cloth or sponge. Work the cleaner into a lather or foam. Never use hot water, it will set the stain. Avoid scrubbing.
text_image
Air As MaAirBooster™
Asiento para niños
natural_image
Top-down line drawing of a car seat with no text or symbolsLEA ESTE MANUAL.
Graco Children's Products Inc.
150 Oaklands Blvd.
natural_image
Line drawing of a car seat with mesh insulation and side pockets (no text or symbols)Base

natural_image
Line drawing of a pair of tongs or clips with a central handle (no text or symbols)natural_image
Line drawing of a person's torso with hands holding the chest (no text or symbols)Apoyacabezas

natural_image
Line drawing of a stylized elephant-shaped object with no text or symbolsRespaldo
ADVERTENCIA
text_image
Prohibition sign with a toilet and toilet, featuring a crossed-out arrow symbolnatural_image
Illustration of a hand holding a device with arrows indicating process flow (no text or symbols)Paso 2.
text_image
Technical diagram showing a hand operating a device with three circular insets highlighting different components, including a pink tool and pink plug.Paso 4.
text_image
Medical illustration showing hand massage technique with labeled procedure and magnified view of muscle movementPaso 6
natural_image
Illustration of a car seat assembly with arrows indicating direction (no text or symbols)Paso 7
natural_image
Line drawing of a car seat with adjustable seat, no text or symbols presentADVERTENCIA
natural_image
Illustration of a child seated in a car seat with a bandage, no text or symbols presentnatural_image
Illustration of a person seated in a chair with a bandage and belt, no text or symbols presenttext_image
Prohibition sign showing a car with a seat and no accompanying text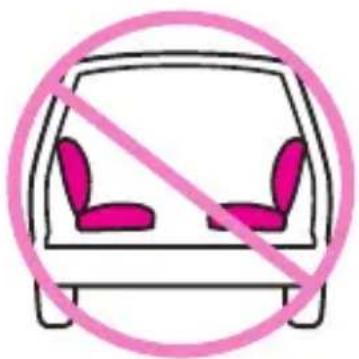
natural_image
Prohibition sign showing a car with two seats and a diagonal line (no text or symbols)natural_image
Line drawing of a pink car seatbelt with a belt buckle, shown in perspective view (no text or symbols)natural_image
Illustration of a laptop with a pink prohibition symbol overlay (no text or symbols on the diagram itself)
natural_image
Illustration of a car seat with a pink diagonal line indicating no change, enclosed in a circle (no text or symbols)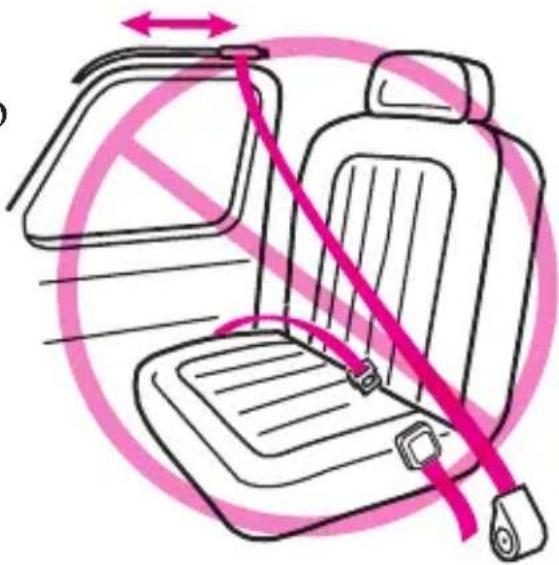
natural_image
Illustration of a car seat with a pink diagonal cord and seatbelt, no text or symbols presenttext_image
Illustration showing three steps of car seatbelt usage: seated, no seatbelt allowed, and sitting with a child.natural_image
Line drawing of a person sitting in a car seat with a pink prohibition symbol (no text or labels)
natural_image
Line drawing of a car seat with a pink prohibition symbol (no text or labels)natural_image
Line drawing of a car seat with a numbered label (9) indicating the number 9, showing no text or symbols on the chair itself.natural_image
Line drawing of a car seat with neck and seatbelt (no text or symbols)
natural_image
Illustration of a hand using a car seatbelt with a pink prohibition symbol (no text or symbols present)text_image
Illustration of a child wearing a car seatbelt with a pink belt, labeled with number 1 and pointing to the seat.natural_image
Illustration of a person seated in a chair holding a pink tool, with no visible text or symbolsCORRECTA
text_image
Safety warning symbol showing a person seated in a seat with a pink diagonal line crossing it, indicating no liability or prohibition.INCORRECTA
text_image
Diagram illustrating a person's seatbelt usage, labeled with number 4 and pink banding technique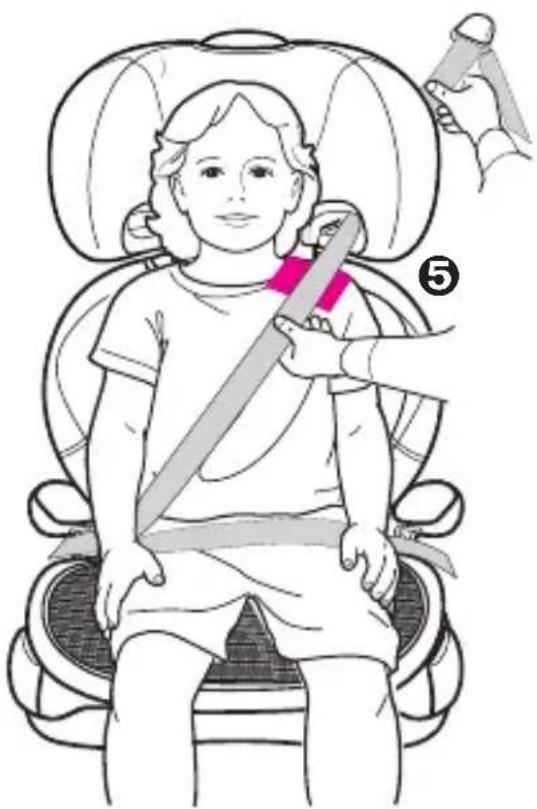
text_image
Medical illustration showing a child seated in a car seat with a bandage and a hand holding a tool, labeled with number 5.text_image
Illustration showing a person with a crossed-out pink prohibition symbol, likely indicating no smoking or anti-smoking.INCORRECTA
text_image
Safety warning symbol with crossed-out hand and shield, indicating no protection or absence of a childINCORRECTA
natural_image
Diagram of a hand pressing down on a mechanical component with an upward arrow indicating motion (no text or symbols present)natural_image
Illustration of a person using a car seatbelt device to lift a pink lid, with no text or symbols present.natural_image
Illustration of a banana peel with leaves and a curved arrow indicating rotation (no text or symbols)text_image
Medical illustration showing abdominal massage technique with magnified view of muscle compression and force arrowsnatural_image
Illustration of a person holding a long, elongated object (no text or symbols present)natural_image
Illustration of hands operating a medical device with a cable being inserted (no text or symbols present)