
DD35 - Electronic drum YAMAHA - Free user manual and instructions
Find the device manual for free DD35 YAMAHA in PDF.

| Product Type | Digital Electronic Drum |
| Brand | YAMAHA |
| Model | DD35 |
| Power Supply | 6 AA (R6P/LR6) alkaline batteries recommended or PA-3B AC adapter (12V DC) |
| Polyphony | 16 simultaneous notes |
| Drum Kits | 100 preset kits (00-99) + 1 custom kit |
| Drum Voices | 148 high-quality drum sounds |
| Accompaniment Songs | 100 songs (including lessons and play-along) |
| Hand Percussion Mode | Yes, with automatic pad sensitivity adjustment |
| Learning Game | Built-in Drum Game function |
| Pads | 4 touch pads with LED backlighting |
| Controls | PAD, KIT, SONG, TEMPO/TAP, DRUM GAME, LIGHT ON/OFF, HAND PERC, START/STOP, DEMO, volume up/down buttons |
| Display | 3-digit LED display |
| Connectors | Headphone/audio output (PHONES/OUTPUT) stereo mini jack, DC IN 12V adapter input |
| Included Accessories | 2 drumsticks, owner's manual |
| Dimensions (approx.) | 40 x 30 x 10 cm |
| Weight (approx.) | 2 kg (without batteries) |
| Usage Precautions | Do not expose to moisture, shocks, or extreme temperatures. Use only the recommended adapter. Do not open the device. |
| Cleaning | Soft, dry cloth. Do not use solvents. |
| Battery Maintenance | Remove batteries if not used for extended periods. Do not mix new and old batteries or different types. |
Frequently Asked Questions - DD35 YAMAHA
User questions about DD35 YAMAHA
0 question about this device. Answer the ones you know or ask your own.
Ask a new question about this device
Download the instructions for your Electronic drum in PDF format for free! Find your manual DD35 - YAMAHA and take your electronic device back in hand. On this page are published all the documents necessary for the use of your device. DD35 by YAMAHA.
USER MANUAL DD35 YAMAHA
This product utilizes batteries or an external power supply (adapter). DO NOT connect this product to any power supply or adapter other than one described in the manual, on the name plate, or specifically recommended by Yamaha.
This product should be used only with the components supplied or; a cart, rack, or stand that is recommended by Yamaha. If a cart, etc., is used, please observe all safety markings and instructions that accompany the accessory product.
SPECIFICATIONS SUBJECT TO CHANGE:
The information contained in this manual is believed to be correct at the time of printing. However, Yamaha reserves the right to change or modify any of the specifications without notice or obligation to update existing units.
This product, either alone or in combination with an amplifier and headphones or speaker/s, may be capable of producing sound levels that could cause permanent hearing loss. DO NOT operate for long periods of time at a high volume level or at a level that is uncomfortable. If you experience any hearing loss or ringing in the ears, you should consult an audiologist.
IMPORTANT: The louder the sound, the shorter the time period before damage occurs.
NOTICE:
Service charges incurred due to a lack of knowledge relating to how a function or effect works (when the unit is operating as designed) are not covered by the manufacturer's warranty, and are therefore the owners responsibility. Please study this manual carefully and consult your dealer before requesting service.
ENVIRONMENTAL ISSUES:
Yamaha strives to produce products that are both user safe and environmentally friendly. We sincerely believe that our products and the production methods used to produce them, meet these goals. In keeping with both the letter and the spirit of the law, we want you to be aware of the following:
Battery Notice:
This product MAY contain a small non-rechargeable battery which (if applicable) is soldered in place. The average life span of this type of bat
terry is approximately five years. When replacement becomes necessary, contact a qualified service representative to perform the replacement.
This product may also use "household" type batteries. Some of these may be rechargeable. Make sure that the battery being charged is a rechargeable type and that the charger is intended for the battery being charged.
When installing batteries, do not mix batteries with new, or with batteries of a different type. Batteries MUST be installed correctly. Mismatches or incorrect installation may result in overheating and battery case rupture.
Warning:
Do not attempt to disassemble, or incinerate any battery. Keep all batteries away from children. Dispose of used batteries promptly and as regulated by the laws in your area. Note: Check with any retailer of household type batteries in your area for battery disposal information.
Disposal Notice:
Should this product become damaged beyond repair, or for some reason its useful life is considered to be at an end, please observe all local, state, and federal regulations that relate to the disposal of products that contain lead, batteries, plastics, etc. If your dealer is unable to assist you, please contact Yamaha directly.
NAME PLATE LOCATION:
The name plate is located on the bottom of the product. The model number, serial number, power requirements, etc., are located on this plate. You should record the model number, serial number, and the date of purchase in the spaces provided below and retain this manual as a permanent record of your purchase.
Model
Serial No.
Purchase Date
92-BP (bottom)
PLEASE KEEP THIS MANUAL
FCC INFORMATION (U.S.A.)
1. IMPORTANT NOTICE: DO NOT MODIFY THIS UNIT!
This product, when installed as indicated in the instructions contained in this manual, meets FCC requirements. Modifications not expressly approved by Yamaha may void your authority, granted by the FCC, to use the product.
2. IMPORTANT: When connecting this product to accessories and/or another product use only high quality shielded cables. Cable/s supplied with this product MUST be used. Follow all installation instructions. Failure to follow instructions could void your FCC authorization to use this product in the USA.
3. NOTE: This product has been tested and found to comply with the requirements listed in FCC Regulations, Part 15 for Class "B" digital devices. Compliance with these requirements provides a reasonable level of assurance that your use of this product in a residential environment will not result in harmful interference with other electronic devices. This equipment generates/uses radio frequencies and, if not installed and used according to the instructions found in the users manual, may cause interference harmful to the operation of other electronic devices. Compliance with FCC regulations does not guar
antee that interference will not occur in all installations. If this product is found to be the source of interference, which can be determined by turning the unit "OFF" and "ON", please try to eliminate the problem by using one of the following measures:
Relocate either this product or the device that is being affected by the interference.
Utilize power outlets that are on different branch (circuit breaker or fuse) circuits or install AC line filter/s.
In the case of radio or TV interference, relocate/reorient the antenna. If the antenna lead-in is 300 ohm ribbon lead, change the lead-in to co-axial type cable.
If these corrective measures do not produce satisfactory results, please contact the local retailer authorized to distribute this type of product. If you can not locate the appropriate retailer, please contact Yamaha Corporation of America, Electronic Service Division, 6600 Orangethorpe Ave, Buena Park, CA90620
The above statements apply ONLY to those products distributed by Yamaha Corporation of America or its subsidiaries.
- This applies only to products distributed by YAMAHA CORPORATION OF AMERICA.
(class B)
OBSERVERA!
- Please keep these precautions in a safe place for future reference.

WARNING
Always follow the basic precautions listed below to avoid the possibility of serious injury or even death from electrical shock, short-circuiting, damages, fire or other hazards. These precautions include, but are not limited to, the following:
- Do not open the instrument or attempt to disassemble the internal parts or modify them in any way. The instrument contains no user-serviceable parts. If it should appear to be malfunctioning, discontinue use immediately and have it inspected by qualified Yamaha service personnel.
- Do not expose the instrument to rain, use it near water or in damp or wet conditions, or place containers on it containing liquids which might spill into any openings.
- If the AC adaptor cord or plug becomes frayed or damaged, or if there is a sudden loss of sound during use of the instrument, or if any unusual smells or smoke should appear to be caused by it, immediately turn off
the power switch, disconnect the adaptor plug from the outlet, and have the instrument inspected by qualified Yamaha service personnel.
- Use the specified adaptor (PA-3B or an equivalent recommended by Yamaha) only. Using the wrong adaptor can result in damage to the instrument or overheating.
- Before cleaning the instrument, always remove the electric plug from the outlet. Never insert or remove an electric plug with wet hands.
- Check the electric plug periodically and remove any dirt or dust which may have accumulated on it.

CAUTION
Always follow the basic precautions listed below to avoid the possibility of physical injury to you or others, or damage to the instrument or other property. These precautions include, but are not limited to, the following:
- Do not place the AC adaptor cord near heat sources such as heaters or radiators, and do not excessively bend or otherwise damage the cord, place heavy objects on it, or place it in a position where anyone could walk on, trip over, or roll anything over it.
- When removing the electric plug from the instrument or an outlet, always hold the plug itself and not the cord.
- Do not connect the instrument to an electrical outlet using a multiple-connector. Doing so can result in lower sound quality, or possibly cause overheating in the outlet.
- Unplug the AC power adaptor when not using the instrument, or during electrical storms.
- Always make sure all batteries are inserted in conformity with the +/- polarity markings. Failure to do so might result in overheating, fire, or battery fluid leakage.
- Always replace all batteries at the same time. Do not use new batteries together with old ones. Also, do not mix battery types, such as alkaline batteries with manganese batteries, or batteries from different makers, or different types of batteries from the same maker, since this can cause overheating, fire, or battery fluid leakage.
- Do not dispose of batteries in fire.
- Do not attempt to recharge batteries that are not intended to be charged.
- When the batteries run out, or if the instrument is not to be used for a long time, remove the batteries from the instrument to prevent possible leakage of the battery fluid.
- Keep batteries away from children.
- If the batteries do leak, avoid contact with the leaked fluid. If the battery fluid should come in contact with your eyes, mouth, or skin, wash immediately with water and consult a doctor. Battery fluid is corrosive and may possibly cause loss of sight or chemical burns.
- Before connecting the instrument to other electronic components, turn off the power for all components. Before turning the power on or off for all components, set all volume levels to minimum. Also, be sure to set the volumes of all components at their minimum levels and gradually raise
the volume controls while playing the instrument to set the desired listening level.
- Do not expose the instrument to excessive dust or vibrations, or extreme cold or heat (such as in direct sunlight, near a heater, or in a car during the day) to prevent the possibility of panel disfiguration or damage to the internal components.
- Do not use the instrument near other electrical products such as televisions, radios, or speakers, since this might cause interference which can affect proper operation of the other products.
- Do not place the instrument in an unstable position where it might accidentally fall over.
- Before moving the instrument, remove all connected adaptor and other cables.
- When cleaning the instrument, use a soft, dry cloth. Do not use paint thinners, solvents, cleaning fluids, or chemical-impregnated wiping cloths. Also, do not place vinyl, plastic or rubber objects on the instrument, since this might discolor the panel or keyboard.
- Do not rest your weight on, or place heavy objects on the instrument, and do not use excessive force on the buttons, switches or connectors.
- Do not operate the instrument for a long period of time at a high or uncomfortable volume level, since this can cause permanent hearing loss. If you experience any hearing loss or ringing in the ears, consult a physi-cian.
Yamaha cannot be held responsible for damage caused by improper use or modifications to the instrument, or data that is lost or destroyed.
Always turn the power off when the instrument is not in use.
Make sure to discard used batteries according to local regulations.
- The illustrations and LED displays as shown in this owner's manual are for instructional purposes only, and may be different from the ones on your instrument.
Congratulations!
Thank you for purchasing the Yamaha DD-35. The DD-35 has been developed to respond and play like a drum set — but with greater ease, flexibility and sophisticated functions. Before you use the instrument, we recommend that you carefully read through this manual.
Contents
Setting Up 5
Power Requirements. 5
Front Panel 6
Playing the Demo Song 8
Play the Pads 9
Pad Names. 9
Hand Percussion ON/OFF 10
Assigning a Drum Kit to the Pads. 10
Assigning a Voice to Individual Pads ("L'U" Custom Kit) 11
Playing a Song 12
Selecting a Song 12
Tap Start. 13
Adjusting the Tempo 13
Pad Light ON/OFF. 14
Playing the Game 15
Selecting and Playing a Game Song 15
Appendix 16
Troubleshooting 16
Drum Voice List. 17
Song List 19
Drum Kit List. 20
Specifications 22
Supplied Accessoories
- Drum Stick (x2)
- Owner's Manual
This section contains information about setting up your DD-35 for playing. Make sure to read this section carefully before using the instrument.
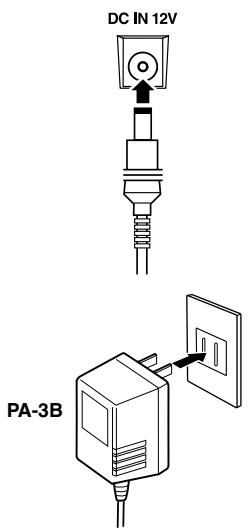
Power Requirements
Although the DD-35 will run either from an optional AC adaptor or batteries, Yamaha recommends use of an AC adaptor whenever possible. An AC adaptor is more environmentally friendly than batteries and does not deplete resources.
Using an AC Power Adaptor
① Make sure that the [STANDBY/ON] switch of the DD-35 is set to STANDBY.
② Connect the AC adaptor (PA-3B or other adaptor specifically recommended by Yamaha) to the power supply jack.
③ Plug the AC adaptor into an AC outlet.
WARNING
- Use ONLY a Yamaha PA-3B AC Power Adaptor (or other adaptor specifically recommended by Yamaha) to power your instrument from the AC mains. The use of other adaptors may result in irreparable damage to both the adaptor and the DD-35.
- Unplug the AC Power Adaptor when not using the DD-35, or during electrical storms.
Using Batteries
For battery operation the DD-35 requires six 1.5V "AA" size, R6P (LR6) or equivalent batteries. (Alkaline batteries are recommended.) When the batteries need to be replaced, the volume may be reduced, the sound may be distorted, and other problems may occur. When this happens, turn the power off and replace the batteries, as described below.
① Open the battery compartment cover located on the instrument's bottom panel.
② Insert the six new batteries, being careful to follow the polarity markings on the inside of the compartment.
③ Replace the compartment cover, making sure that it locks firmly in place.
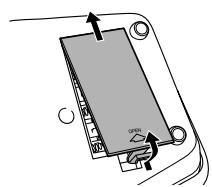
CAUTION
- When the batteries run down, replace them with a complete set of six new batteries. NEVER mix old and new batteries.
- Do not use different kinds of batteries (e.g. alkaline and manganese) at the same time.
- If the instrument is not to be in use for a long time, remove the batteries from it, in order to prevent possible fluid leakage from the battery.
- Plugging or unplugging the AC power adaptor while the batteries are installed will reset the DD-35 to the defaults.
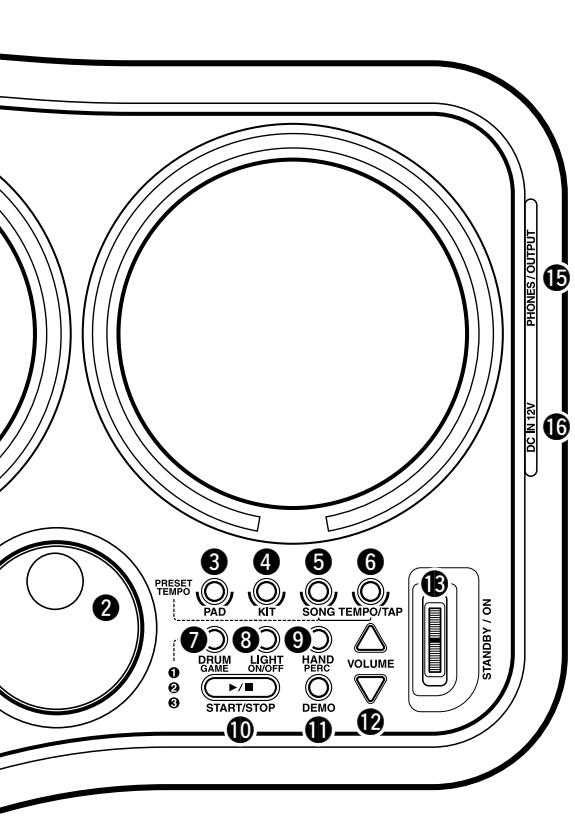
Front Panel
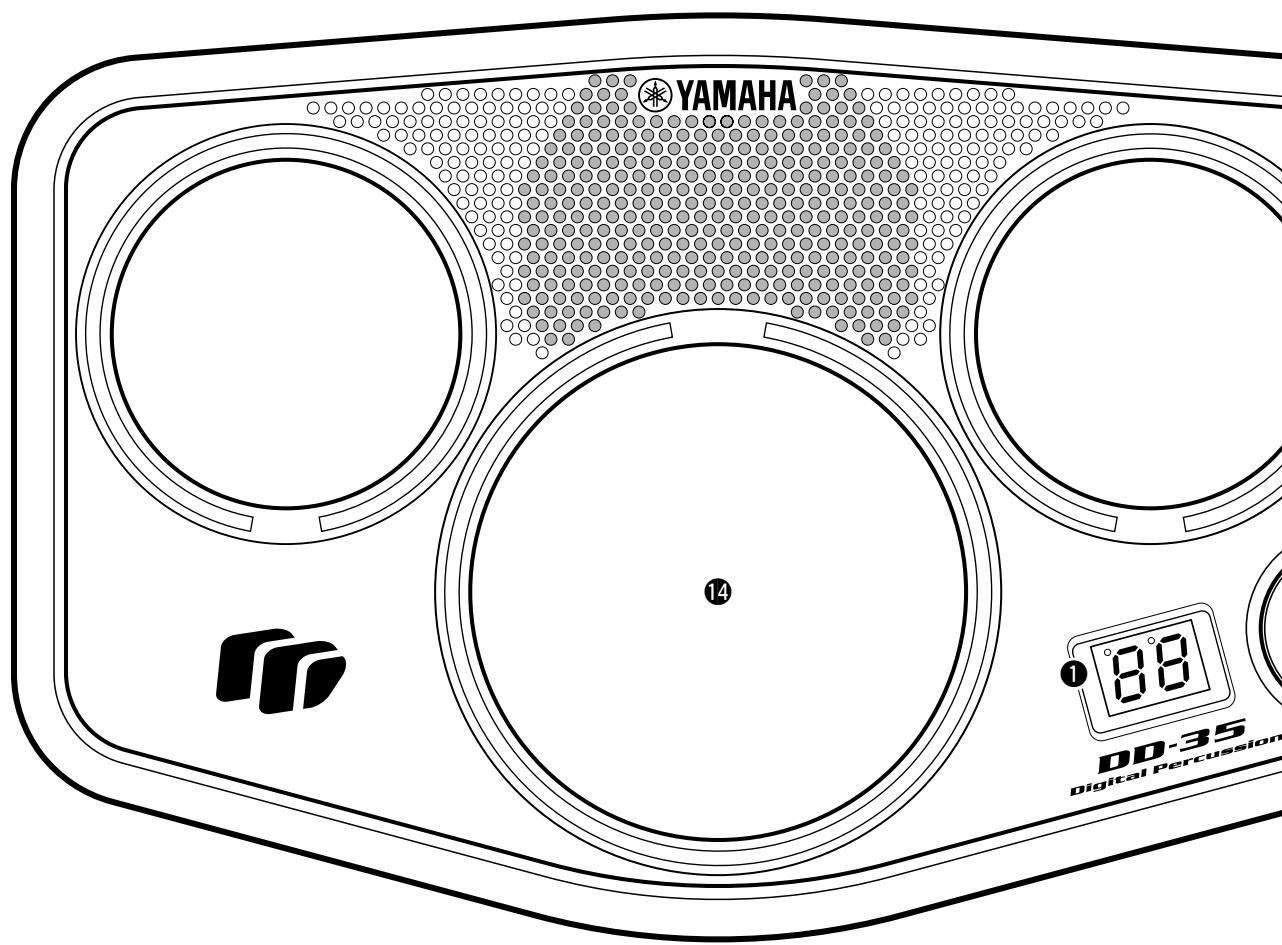
Front Panel
1 DISPLAY 10
DIAL 8
3 PAD button 11
KIT button 10
SONG button. 12, 14, 15
⑥ TEMPO/TAP button. 13, 14
DRUM GAME button 15
LIGHT ON/OFF button 14
9 HAND PERC button 10
10 START/STOP button 8, 12, 13, 15
DEMO button 8
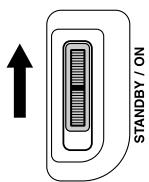
12 VOLUME [▲], [▼] buttons 8
STANDBY/ON Switch 8
14 Drum Pads (x4) 9
Side Panel (Right)
15 PHONES/OUTPUT Jack. 7
DC IN 12V (AC Adaptor) Jack
Side Panel (Right)


Using a pair of headphones
A standard pair of stereo headphones can be plugged in here for private practice or late-night playing. The internal speaker system is automatically shut off when a pair of head phones is plugged into the PHONES/OUTPUT jack.
Do not listen with the headphones at high volume for long periods of time. Doing so may cause hearing loss.


CAUTION
- Connect the DD-35 to external equipment only after turning off power for all devices. To prevent damage to the speakers, set the volume of the external devices at the minimum setting before connecting them. Failure to observe these cautions may result in electric shock or equipment damage.

CAUTION
- Use the sticks with caution. Do not use them for anything other than playing the instrument. Also, to avoid damage or injury, refrain from waving them recklessly or throwing them.
The DD-35 features a demonstration song, specially created to show you the dynamic possibilities of the instrument.
1 Turn on the power.
Turn the [STANDBY/ON] switch ON.
CAUTION
- Even when the switch is in the "STANDBY" position, electricity is still flowing to the instrument at the minimum level. When you are not using the DD-35 for a long time, make sure you unplug the AC power adaptor from the wall AC outlet, and/or remove the batteries from the instrument.
2 Start the Demo Song.
Press the [DEMO] button and the demo song starts playing.
MASTER VOLUME
The overall volume level of the DD-35 is controlled by two VOL-UME [], [] buttons (9 volume levels L1 - L9).
Press the VOLUME [▲] button to increase the overall volume by one level. Press the VOLUME [▼] button to decrease the overall volume by one level. Holding down either of the buttons increases or decreases the volume level rapidly.
The DIAL can also be used to adjust the volume.
| L1 | ←LS→ | LS |
| Small | ←Volume Level→ | Large |
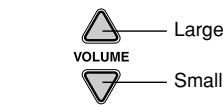

3 Stop the Demo Song.
To stop playback, press the [DEMO] button again or press the [START/STOP] button.
Strike the pad with the supplied drum sticks or your hand to play the drum voices.
When playing the pads with your hand, turn the Hand Percussion feature on by pressing the [HAND PERC] button ("on" is indicated).
The volume of the pads' sounds responds to your playing; when you play soft the volume is soft, and when you play strongly the volume is loud.
The actual loudness of the sound may vary according to which part of the pad is struck.
Pad Names

Ex. shown, Drum Kit 09

- If you hit a pad too strongly, the adjacent pad(s) may inadvertently sound as well.
Hand Percussion ON/OFF
You can play the pads of the DD-35 either with the supplied sticks or with your hands.
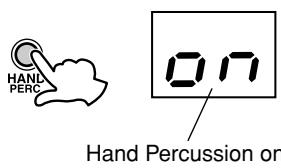
1 Press the [HAND PERC] button.
When you press the [HAND PERC] button, "on" appears in the display, and the pad sensitivity is automatically adjusted for optimum playing by hand.
![YAMAHA DD35 - Press the [HAND PERC] button. - 1](/content/2025/01/114545/images/a81f21572e4f3b6fe861c5696e3bc10766419643930f0bd4c8e9ec4792fa4baa.jpg)
- When Hand Percussion is on, a special set of sounds ideal for playing by hand are automatically assigned to the pads (see the "Drum Voice List" page 17).
- While “on” or “Off” is indicated in the display, the dial can also be used to turn Hand Percussion on or off.
CAUTION
- When Hand Percussion is on, do not strike the pads with drumsticks or anything other than your hands.
Assigning a Drum Kit to the Pads
The DD-35 allows you to choose from 100 different Drum Kits (00 - 99 : see the “Drum Kit List” page 20) quickly and easily. 100 of the kits have preset voice combinations that will be set to the pads when the kit is selected.
Select some different kits and try playing them.
The DD-35 also has one Custom Drum Kit allowing you to assign the desired voices to the four pads (see "Assigning a Voice to Individual Pads" page 11).


1 Press the [KIT] button.
Pressing the [KIT] button, the currently selected Drum Kit number appears in the display.
![YAMAHA DD35 - Press the [KIT] button. - 1](/content/2025/01/114545/images/068d9fc9d4528252e5d0df965258cdd6bbfe3321fe250b48c3c220531decde66.jpg)
![YAMAHA DD35 - Press the [KIT] button. - 2](/content/2025/01/114545/images/ce3fb4e60515a2d8df9bfae64d7ad9ab06736555e78a4896f7f091797cbac7c0.jpg)
Select a Drum Kit Number.
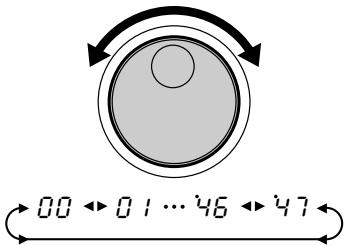
Turn the DIAL to select a Drum Kit number. Drum Kit numbers will increase as the DIAL is turned to the right (clockwise), and decrease as the DIAL is turned to the left (counter-clockwise).

- Drum Kit number 09 is normally selected when the power is turned on.
- The "C U" Drum Kit is the Custom Kit. Changes made to any one of the preset drum kits will be saved here (see "Assigning a Voice to Individual Pads" page 11).
- When a song is selected, a suitable kit is automatically assigned for optimum playing with the selected song.
- For some drum kits (90 - 99), the sound changes each time you strike the pad.
Assigning a Voice to Individual Pads ("L" Custom Kit)
The DD-35 contains a total of 148 high quality drum sounds (see the "Drum Voice List" page 17) and you can assign these freely to each of the four drum pads. Try assigning some different voices and create your own "L U" Custom Drum Kit.

- Any changes made to one of the preset drum kits will automatically be saved in the "C U" Custom Drum Kit.
- Any data assigned to the custom kit will be replaced by factory default values ("09") when the power is turned off.
- Both the Custom and "03" drum kit contents are the same until modified (see the "Drum Kit List" page 20).

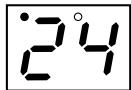
1 Press and hold the [PAD] button.
Press and hold the [PAD] button, and the latest assigned voice number is shown in the display.
| Voice number | Display | Comment |
| 24 | 24 | — |
| 124 | 24 | Values of 100 and over are indicated by a sin-gle dot. |
![YAMAHA DD35 - Press and hold the [PAD] button. - 1](/content/2025/01/114545/images/d0ead41a18247b9955bfff8e86e2319d86a5d9e7169d7a1603b7e3af8da56e2e.jpg)
![YAMAHA DD35 - Press and hold the [PAD] button. - 2](/content/2025/01/114545/images/ce6b5157d63bfa4e5f9b56d73c52fe935df0a3454a2307a470a082a47fde7b3e.jpg)
2 Enable a pad for voice selection by simultaneously holding the [PAD] button and striking the appropriate pad.
The currently assigned voice number for the pad is shown in the display.
![YAMAHA DD35 - Enable a pad for voice selection by simultaneously holding the [PAD] button and striking the appropriate pad. - 1](/content/2025/01/114545/images/6d4876be31888b727f990a14530190e3a503b25e02e3622e6ebb269cb298b0bb.jpg)
3 Select a Voice Number.
You can select the voice by repeatedly striking the pad, (while listening to the voice) or by turning the DIAL.
- Striking the pad to select a voice.
While holding down the [PAD] button, strike the desired pad repeatedly, to increment through the voice numbers one-by-one.
Using the DIAL to select a voice.
Simultaneously hold down the [PAD] button and turn the DIAL clockwise to continuously step up through the voice numbers, and turn the DIAL counter-clockwise to step down through the voice numbers.
Repeat the previous steps 2 and 3 for any or all of the DD-35's pads.

4 Play the Pads.
After you've assigned a voice to the desired pad, and you release the [PAD] button, the DD-35 automatically saves your edits to the custom kit. You can now play the sounds you have assigned to the pads.
The DD-35 features 100 different songs that can be used to provide accompaniment (see the "Song List" page 19). Select one of the songs and have a listen.
The DD-35 also has special lesson songs (5 - 59 and 65 - 94), which feature the model playing of a teacher. By trying to match the teacher's performance, you can master the various rhythm patterns. You can also use the Game function with these songs. (See "Playing the Game" on page 15.)
Song numbers 60 - 64 are for playing a single, entire song. Song numbers 95 - 99 are specifically for use with the Game function.

- The DD-35 has a total simultaneous polyphony of 16 notes.
Selecting a Song
1 Press the [SONG] button.
![YAMAHA DD35 - Press the [SONG] button. - 1](/content/2025/01/114545/images/b1aaf8ed1fbf681930bae1999cd1a1eb39495144baed181d32e5cf8706e85709.jpg)
![YAMAHA DD35 - Press the [SONG] button. - 2](/content/2025/01/114545/images/02cee17721dd8ed68d1d4d2658186172162bbc765ae98a4d4dae8a16395dd9b0.jpg)
Press the [SONG] button, the currently selected song number will appear in the display.
![YAMAHA DD35 - Press the [SONG] button. - 3](/content/2025/01/114545/images/e4acc5f406d21e3b058f4639fa9656f6fa33d55261df4b4fde17fe24af48bef8.jpg)
![YAMAHA DD35 - Press the [SONG] button. - 4](/content/2025/01/114545/images/d1f117f653600cd9ac2ed6458b5617ba58ac1e1d244bc581671af4e725b43163.jpg)
Select a song number.
Song numbers will increase in value as the DIAL is turned to the right (clockwise) and decrease as the DIAL is turned to the left (counterclockwise). (See the "Song List" page 19.)
NOTI
- Song number "OO" is automatically selected whenever the power is turned on.
- Selecting a song will also automatically select the best suited Drum Kit for that song.
- The relative difficulty or playing level of each song is indicated in the "Song List" on page 19.

3 Press the [START/STOP] button.
Press the [START/STOP] button, the song will start playback. To stop playback of the song, press the [START/STOP] button once again.
![YAMAHA DD35 - Press the [START/STOP] button. - 1](/content/2025/01/114545/images/efba5af4524d7dc94e8ce0ff8f3738d72539796d6422c83148847b7cb1bea6ad.jpg)
- You can also use the TAP START function to start songs (see page 13).