Elite Bagless Vacuum DEU003 - Vacuum Cleaner Easy Home - Free user manual and instructions
Find the device manual for free Elite Bagless Vacuum DEU003 Easy Home in PDF.

| Product Type | Bagless Canister Vacuum Cleaner |
| Model | Elite Bagless Vacuum DEU003 |
| Brand | Easy Home |
| Color | Black and Red |
| Dimensions (L x W x H) | 15.4 x 10.6 x 12.2 inches |
| Weight | 11.5 lbs |
| Power Supply | 120V, 60Hz, 12A |
| Suction Power | 200 Air Watts (approx.) |
| Dust Capacity | 1.5 liters |
| Filtration System | Cyclonic + HEPA washable filter |
| Attachments | Crevice tool, dusting brush, upholstery tool, extension wand |
| Cord Length | 20 feet |
| Noise Level | 78 dB |
| Reach | Up to 30 feet |
| Bagless | Yes, easy-empty dust cup |
| Maintenance | Washable filters, periodic filter replacement |
| Safety Features | Thermal overload protection |
| Spare Parts Available | Yes, filters available separately |
| Repairability | User-serviceable filters and brush blockages |
| Certifications | ETL listed |
| Warranty | 2-year limited warranty |
| Manufacturer | Easy Home |
| Country of Origin | China |
Frequently Asked Questions - Elite Bagless Vacuum DEU003 Easy Home
User questions about Elite Bagless Vacuum DEU003 Easy Home
0 question about this device. Answer the ones you know or ask your own.
Ask a new question about this device
Download the instructions for your Vacuum Cleaner in PDF format for free! Find your manual Elite Bagless Vacuum DEU003 - Easy Home and take your electronic device back in hand. On this page are published all the documents necessary for the use of your device. Elite Bagless Vacuum DEU003 by Easy Home.
USER MANUAL Elite Bagless Vacuum DEU003 Easy Home
natural_image
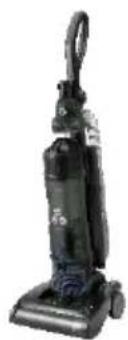
Black vacuum cleaner with blue mesh body and attached hose (no visible text or symbols)English.....3
Español.....15
Contents
Parts list 3
Contents ....3
Assembly 4
Safety instrucons.... 5
User instrucons....8
Troubleshoong....11
Cleaning and maintenance 12
Other useful informaon 13
Technical specicaons 13
Storing 13
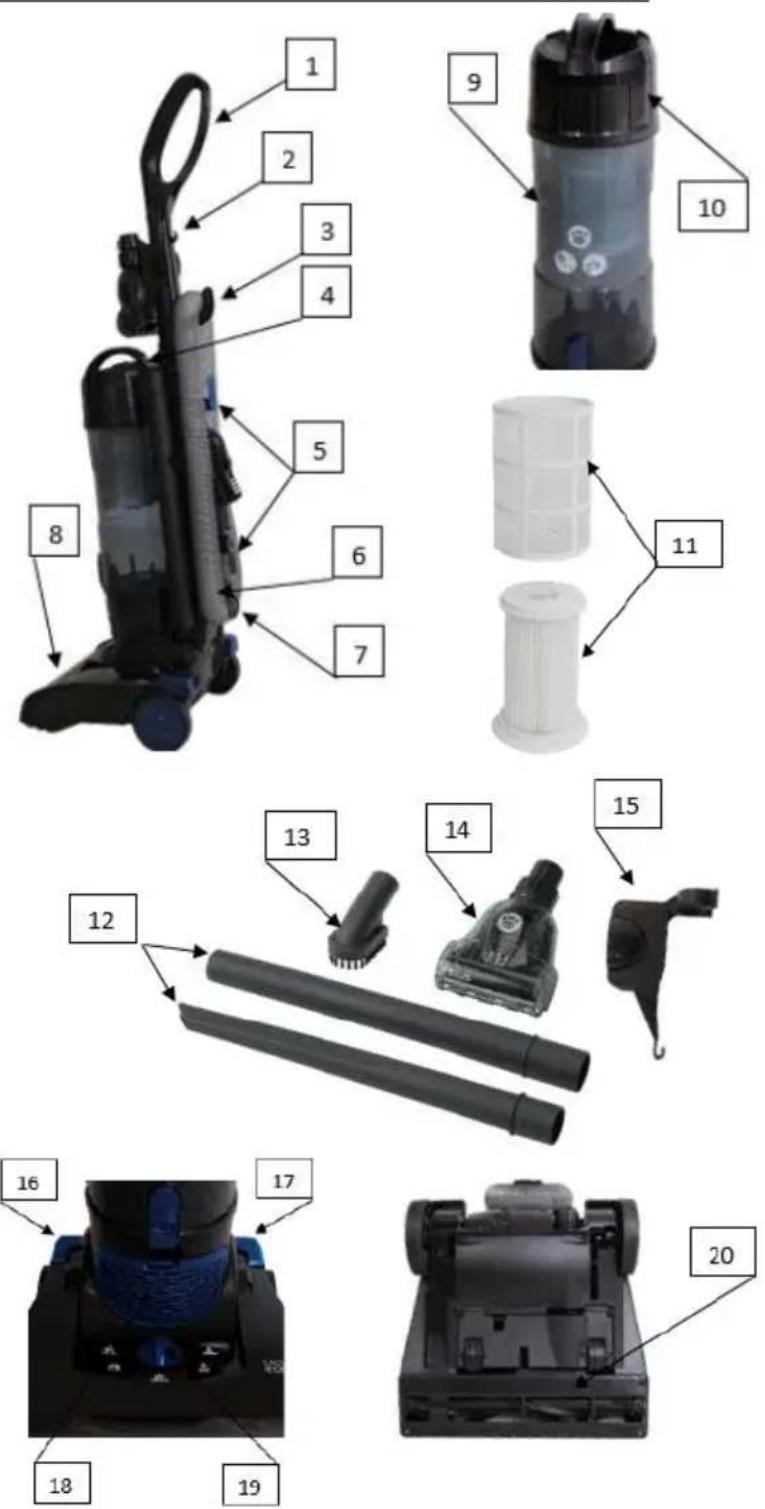
Main parts
- Handle with screw
- Cord clip
- Hose storage hook
- Dust container release buon
- Cord storage hook (2)
- Removable hose
- Hose receptacle
- Vacuum head
- Dust container
- Dust container lid
- HEPA Iter with mesh cover
- Crevice/Extension tool
- Dust brush
- Pet brush
- Pet brush holder
- ON/OFF pedal
- Release pedal
- Exhaust Iter with cover
- Carpet/Floor selector knob
- Brush and belt cover
Contents of packaging
- Handle
- Vacuum body
- Dust container with lid
• HEPA Iter with mesh cover - Crevice tool
- Extension Tool
- Pet brush
- Removable hose
- Vacuum head
- Instrucon manual
Assembly
- Unpack the Elite Bagless Vacuum from the box.
- Remove any unwanted packaging materials such as cardboard, plascs or styrofoam.
- For packaging purposes, the handle is packed uninstalled to the vacuum. Each handle to the vacuum by placing the handle on top of the vacuum body and secure with large screw provided.

natural_image
Pure mechanical component diagram without any text, numbers, or symbols- Put the pet brush in the holder and then each the holder to the vacuum handle.

natural_image
Five black plastic spray bottles with different designs and accessories, shown from front and side views (no text or symbols visible)DO NOT USE ANY ABRASIVE MATERIAL TO CLEAN THE SURFACE
DO NOT IMMERSE THE ELITE BAGLESS VACUUM INTO WATER AT ANY TIME
IMPORTANT SAFETY INSTRUCTIONS
When using electrical appliances, basic safety precautions should always be followed.
PLEASE READ AND SAVE ALL INSTRUCTIONS BEFORE USING THE ELITE BAGLESS VACUUM. KEEP AWAY FROM WATER!
- To protect against electrical shock, do not immerse power cord or plug in water or any other liquid. This is an electrical appliance. To avoid the risk of electrical shock or serious personal injury, always operate with dry hands.
- Close supervision is necessary when any appliance is being used by or near children. This vacuum is not intended for use by persons (including children) with reduced physical, sensory or mental capabilities, or lack of experience and knowledge, unless they have been given supervision or instrucon concerning the use of the vacuum by a person responsible for their safety.
- Do not use the vacuum outdoors. It is for household use only.
- Do not allow the vacuum to be used as a toy. Close aenon is necessary when vacuum is used by or near children.
- Do not use the vacuum with damaged cord or outlet plug. Do not use the vacuum if it has been dropped, damaged, le outdoors, or dropped in water. Return the vacuum to the service center for examinaon, repair or refund or contact customer service.
- Do not aempt to change accessories while the vacuum is running.
- Do not handle the plug or the vacuum with wet hands.
- Use the vacuum only as described in this manual. The use of accessory aachments not recommended by the manufacturer may cause damage to the vacuum or personal injuries.
- Do not put any object into openings of the vacuum. Do not use with any opening blocked. Keep free of dust, lint, hair and anything that may reduce air ow.
- Keep hair, loose clothing, ngers, and all parts of body away from openings and moving parts.
- Do not pick up anything that is burning or smoking, such as cigarettes, matches, or hot ashes with the vacuum.
-
Do not use abrasive materials to clean the vacuum. Do not immerse the vacuum in water.
-
Do not pick up liquids with the vacuum or use on wet floors.
- Do not use the vacuum on concrete, tar, or similar rough surfaces.
- Do not pick up pieces of string or fabrics with the vacuum.
- Do not vacuum frayed carpets or tassels on carpets.
- Do not use the vacuum to pick up ammable or combustible liquids such as gasoline or use in areas where they may be present.
- Do not use the vacuum without the dust container in place.
- Store the vacuum indoors. Store aer use to prevent accidents.
- Do not abuse the power cord. Never carry the vacuum by the power cord or pull the power cord to disconnect the outlet plug from an outlet; instead grasp the outlet plug and pull to disconnect.
- Unplug from the outlet when not in use and before cleaning.
- Do not let cord hang over edge of counter or touch hot surfaces.
- Do not place on or near a hot gas or electric burner, or in a heated oven.
- To disconnect, always turn OFF rst, then unplug from wall outlet.
- Do not run vacuum over the supply cord as this could damage the supply cord and its insulaon.
WARNING! Before using your vacuum, make sure that the dust container is in the locked posion and that all Iters are in place. NEVER operate this vacuum without any of the Iters.
WARNING! A thermal cutout switches o the cleaner to prevent overheang if it is used when full or there is a blockage or dirty Iters. If this should happen, switch to OFF, unplug and troubleshoot. It will take about 45 minutes for the cut out to automacally reset.
SAVE ALL INSTRUCTIONS!
Safety instrucons
WARNING: Read and understand all instrucons. Failure to follow all instrucons listed below may result in electric shock, re or serious personal injury. The warnings, cauons, and instrucons discussed in this instrucon manual cannot cover all possible condions and situaons that may occur. It must be understood by the operator that common sense and cauon are a factor which cannot be built into this product, but must be supplied by the operator.
CAUTION: A short power supply cord is provided to reduce the risk of personal injury resulting from becoming entangled in or tripping over a longer cord. Extension cords are available from local hardware stores and may be used if care is exercised in their use. If an extension cord is required, special care and cauon is necessary. Also, the cord must be: (1) marked with an electrical rang of 125V, and at least 13 A., 1625 W., and (2) the cord must be arranged so that it will not drape over the countertop or tabletop where it can be pulled on by children or tripped over accidentally.
Polarized plug
NOTE: This vacuum has a polarized plug (one blade is wider than the other).
- As a safety feature to reduce the risk of electrical shock, this plug is intended to t in a polarized outlet only one way.
- If the plug does not t fully in the outlet, reverse the plug.
- If the plug sll does not t, contact a qualified electrician. Do not aempt to defeat this safety feature.
Electric power
If the electric circuit is overloaded with other appliances, your appliances may not operate properly. The appliances should be operated on a separate electrical circuit from other operang appliances.

Safety warning
Although your vacuum is easy to operate, for your safety, the warnings below must be followed:
- Do not place the vacuum near a heat source.
- Do not unplug by pulling on the power supply cord.
- The vacuum must be unplugged:
A. Before any cleaning or maintenance.
B. If it appears to be faulty.
THIS PRODUCT IS INTENDED FOR HOUSEHOLD USE ONLY. SAVE THESE INSTRUCTIONS!
User instrucons
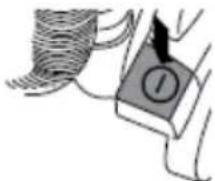
How to turn ON/OFF the upright vacuum
-
Before using the vacuum, plug into a power outlet.
-
The removable hose MUST be placed securely in the hose receptacle.
-
Press the ON/OFF pedal on the right near the base connected to the vacuum head to turn the vacuum ON.
-
Press the ON/OFF pedal again to turn the vacuum OFF.
-
Unplug the vacuum aer each use.
natural_image
Simple line drawing of a person holding a device with a circular button labeled 'I' (no text or symbols beyond the label)How to use the oor care control selector
- The control selector raises and lowers the height of the nozzle.
- Make sure the vacuum is in the upright (parked) posion and move the selector to the required seng for the type of oor covering.
Sengs:
1 Hard oors - Best performance and energy eciency, short to medium pile carpets, hard wooden oors, wooden oor boards with crevices, ceramic les
2 Low pile – Low pile carpets, delicate oor coverings such as vinyl or linoleum, parquet ooring
3 and #4 Medium/High pile – For longer pile carpets, the moon resistance may increase Use these intermediate sengs to reduce the force required to push the vacuum
5 Tool mode – Luxury carpet and tool mode

natural_image
Line drawing of a vacuum cleaner with hand operating it, showing internal components and a magnified inset of the device (no text or symbols present)IMPORTANT: Using this vacuum for loop pile carpets with pile greater than 1 inch (30 mm) is not recommended. Consult the carpet manufacturer's recommended cleaning instrucons before vacuuming.
NOTE: When cleaning delicate hard oors such as vinyl or linoleum, the control switch must be moved to posion 2. Failure to do so may cause damage to the oor.
Vacuum cleaner release
-
Press the pedal on the le near the base connected to the vacuum head and pull downwards on the handle to release the vacuum.
-
Push upwards on the handle to lock into upright (parking) posion.

text_image
PUBA AS3How to use the accessories
- The crevice tool is used for cleaning radiators, corners, edges, drawers.
- The dust brush is used for cleaning curtains, shelves, bookshelves, lamps and other delicate objects.
- The pet brush is used for pet hair & allergen remover. NEVER touch the rotang brush.
- The extension pole is used for extended reach and to add extra strength to your hose.
IMPORTANT: When using cleaning tools, the vacuum must be kept in the upright posion, particularly when cleaning stairs. The height should also be set to tool mode.
NOTE: All accessories can be used being aached to hose alone or with the extension pole aached to the hose. When vacuuming stairs, always work with the vacuum posioned up against the boom step.
How to empty the dust container
CAUTION: Always be sure that the vacuum is switched to OFF and unplugged before aempng to empty the dust container.
- Press the dust container release button to detach the dust container from the vacuum body. Then press the dust container dirt release buon at the boom of the dust container and empty into the trash receptacle.

natural_image
Illustration of two different hand-painted views of a vacuum cleaner's internal structure, showing mechanical components and tool path (no text or symbols)-
Once emped, gently tap or shake the container to release any excess dust from the liters.
-
Close the dust container dirt release door.
-
Place boom of the dust container into the vacuum body. Press rmly unl you hear an audible click.
How to clear a blockage
Low sucon or poor pick up may be due to a clog in the vacuum. If you noce a change in the sound of the motor or a reducon in performance, check for clogs.
CAUTION: Always be sure that the vacuum is switched to OFF and unplugged before aempng to remove a clog.
- Empty dust container.
- Check dust container for buildup.
- Check both the HEPA and exhaust Iters.
-
Remove hose and check for clogs at either end or inside.
-
Check for clog in vacuum head. Turn the vacuum over and rotate the brushes to identify any obstrucons including hair.
-
To clear a blockage in the pet hair and allergen remover, twist the collar and li the cover.

natural_image
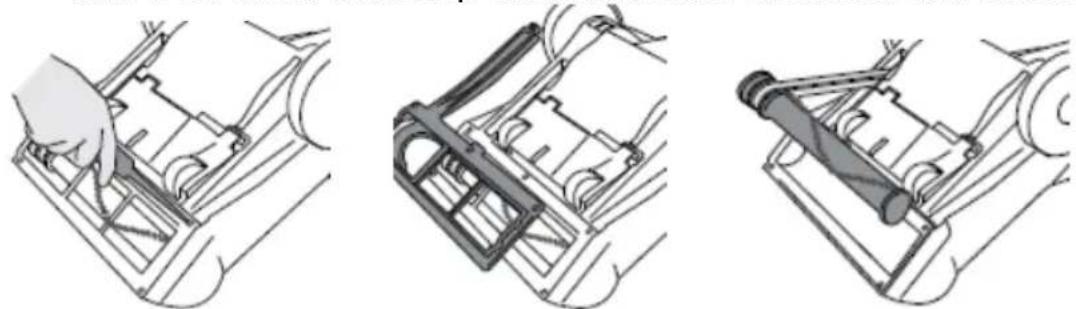
Technical line drawing of a mechanical device with gears and a bearing (no text or symbols)How to change the belt or brush
If the vacuum is not picking up eciently, the belt or brushes or both may need to be cleaned or replaced. But rst, make sure to troubleshoot by emptying the dust container, cleaning the Iters and checking for blockages.
CAUTION: Always be sure that the vacuum is switched to OFF and unplugged before aempng any maintenance.
- Turn the vacuum over and remove the 6 screws aaching the guard to the base. Remove the brush guard, brush and belt and check for wear on the belt and/or debris on the brush. Loop the belt around the motor and brush channel.
natural_image
Three technical line drawings showing mechanical assembly steps (no text or symbols)- Hold the brush and stretch the belt unl the brush can be sloed back into the vacuum head housing. Rotate the brush to ensure free movement of the belt. Replace the brush guard and ghten screws unl secure.

natural_image
Three-step line drawings of a vehicle's internal components, showing hand positioning and assembly (no text or symbols)Troubleshoong
- Has the cleaner overheated?
- Allow vacuum to cool and rest for 45 minutes
- Are the Iters blocked?
• See cleaning instrucons on how to properly clean all Iters
- Is there a working electricity supply to the vacuum?
- Check with another electrical appliance or try another electrical supply
- Is the hose or vacuum head blocked?
• See "how to clear a blockage"
- Is the oor selector height set correctly?
• See "oor care control selector"
- Is the brush rotang?
- Check that the brush is rotang
WARNING! A thermal cutout switches o the cleaner to prevent overheang if it is used when full or there is a blockage or dirty Iters. If this should happen, switch to OFF, unplug and troubleshoot. It will take about 45 minutes for the cut out to automacally reset.
SAVE ALL INSTRUCTIONS!
Cleaning and maintenance
CAUTION:
Always be sure that the vacuum is turned OFF and UNPLUGGED before cleaning or aempng to store the item. NEVER IMMERSE THE MOTOR in water or any other liquid. NEVER operate the vacuum without the dust container and liter in place.
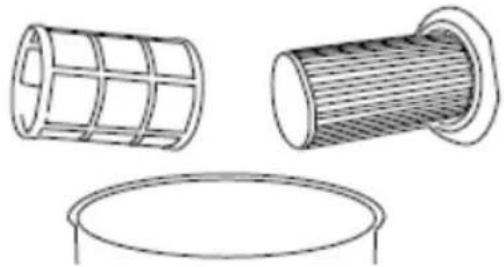
How to clean the Iters
- Turn the dust container lid to open by lining up the arrow with "Iter access". Remove the HEPA Iter assembly from the dust container lid by rotang the Iter. It is recommended that the Iters are washed aer every 5 dust container empes. Remove the mesh frame from around the mesh Iter, then gently tap both Iters to release any excess dust.

natural_image
Illustration of hands holding a device with an arrow pointing to it (no text or symbols present)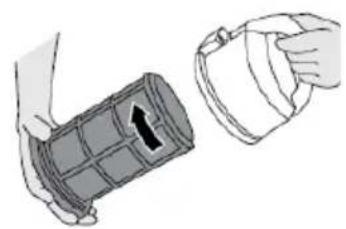
natural_image
Illustration of two hands holding a cylindrical object with a handle, no text or symbols present- Wash both the HEPA Iter and mesh frame under warm water unl the water runs clean and clear. Remove excess water by shaking both Iters. Leave to dry for 24 hours. Reassemble Iter and ret back into dust container lid, only when completely dry.
natural_image
Technical line drawings of three different mechanical components: a grid-patterned cylindrical component, a mesh-lined cylindrical component, and a circular base (no text or symbols)-
Exhaust Filter – The exhaust Iter is located at the bottom of the vacuum. Press the latch and pull the exhaust Iter grill away from the vacuum.
-
Pull the boom of the Iter outward so the top of the Iter unhooks from the Iter recess. The exhaust Iter can be lightly rinsed with warm tap water. Please make sure that the exhaust Iter is completely dry before the next use.
How to clean the dust container
- Remove the dust container lid and HEPA lter from the dust container.
- The dust container can be rinsed with warm soapy water and dried with a so cloth. Please make sure that the dust container is completely dry before next use.
Other useful informaon
Technical specicaons
Model Number DEU004
Rang Voltage 120V – 60Hz
Rated Waage 1400W
Storing
- Store the vacuum in a dry locaon.
- Do not place any heavy items on top of vacuum during storage as this may result in possible damage of the vacuum.
- Cauon: Any electronic or electrical appliance should not be stored in or exposed to areas of high heat or humidity. Do not store your vacuum close to stoves, radiators, furnaces or in a bathroom or bathing area.
Service center
If you have any quesons regarding the operaon of this vacuum please contact our service center at:
Tel: 1-888-367-7373
Business Hours: Mon-Fri 10:00am – 5:00pm EST
Email: help@myproduct.care

Environmental protecon
If the appliance should no longer work at all, please make sure that it is disposed of in an environmentally friendly way.
Contenido
text_image
Exploded view diagram of a vacuum cleaner with numbered parts for identification and assembly reference.Ensamblaje
natural_image
Pure mechanical component diagram without any text, numbers, or symbolsnatural_image
Product images of various black plastic spray bottles and connectors, no visible text or symbolsNO USE MATERIALES ABRASIVOS PARA LIMPIAR LA SUPERFICIE
natural_image
Illustration of a hand holding a small object with a numbered label (no text or symbols present)natural_image
Line drawing of a vacuum cleaner with hand operating it, showing internal components and a magnified inset of the device (no text or symbols present)natural_image
Illustration of two different mechanical or industrial components: a hand holding a vacuum cleaner and a cylindrical device with a handle, both without any text or symbols.natural_image
Technical line drawing of a mechanical device with gears and a separate cylindrical component (no text or symbols)Cambio de correa o cepillo
natural_image
Three technical line drawings showing mechanical assembly steps: hand tool, bracket, and cylindrical component (no text or symbols)natural_image
Three-step line drawings of a car's internal components, showing hand positioning and assembly (no text or symbols)natural_image
Illustration of a hand holding a medical device with an arrow indicating direction (no text or symbols present)
natural_image
Illustration of hands holding a cylindrical object with an arrow indicating direction (no text or symbols)natural_image
Technical line drawings of three cylindrical components: a grid-like structure, a ribbed cylindrical component with mesh texture, and a circular base (no text or symbols)*We recommend you keep the receipt with this warranty card
Locaon of purchase
Descripon of malfuncon:
natural_image
Black vacuum cleaner with attached armrest (no visible text or symbols)Return your completed warranty card to:
Wachsmuth & Krogmann, Inc.
1015 Hawthorn Drive
Itasca, IL
60143
USA
help@myproduct.care
AFTER SALES SUPPORT
55292

888 367 7373
help@myproduct.care
MODEL:
DEU003 02/2018
Hotline:
888-367-7373
Operang hours:
Monday – Friday
10:00am - 5:00pm EST
3
YEAR WARRANTY AÑOS DE GARANTÍA
ALDI INC. FULL WARRANTY CONDITIONS
Dear Customer,
The ALDI warranty is a full warranty oering you the following benets:
Warranty period:
3 years from date of purchase.
6 months for movable parts and consumables under normal and proper conditions of use (e.g. rechargeable baeries).
Costs: Free repair/exchange or refund.
No transport costs.
ADVICE:
Please contact our service hotline by phone, e-mail or fax before sending in the device. This allows us to provide support in the event of possible operator errors.
In order to make a claim under the warranty, please send us:
- The faulty item with all component parts, the original receipt and the warranty card properly completed.
The warranty does not cover damage caused by:
- Accident or unanticipated events (e.g. lightning, water, re).
- Improper use or transport.
- Failure to follow the safety and maintenance instrucons.
• Other improper treatment or modicaon of the product.
Aer the expiraon of the warranty period, you may wish to have your product repaired at your own expense. You will be need of the repair costs in advance.
This warranty gives you specific legal rights, and you may also have other rights which vary from state to state, but this warranty is not intended to exceed statutory minimum requirements beyond what is included above.
This warranty does not limit the statutory obligaon of the seller arising from any implied warranes. The period of warranty can only be extended in accordance with applicable law.
Neither the service company nor ALDI will assume any liability for data or sengs stored on any returned product.
TARJETA DE GARANTÍA
natural_image
Black vacuum cleaner with attached armrest (no visible text or symbols)10:00a.m. - 5:00p.m.