A600E - Smartphone LENOVO - Free user manual and instructions
Find the device manual for free A600E LENOVO in PDF.

| Product Type | Smartphone |
| Brand | Lenovo |
| Model | A600E |
| Dimensions | Approximately 140 x 70 x 9 mm |
| Weight | Approximately 150 g |
| Display | 4.5-inch TFT, 480 x 854 pixels |
| Processor | Quad-core 1.3 GHz |
| Operating System | Android 5.1 Lollipop |
| RAM | 1 GB |
| Storage | 8 GB, expandable via microSD |
| Battery | Li-Ion 2000 mAh, removable |
| Camera (Rear) | 5 MP with LED flash |
| Camera (Front) | 2 MP |
| Connectivity | Wi-Fi 802.11 b/g/n, Bluetooth 4.0, GPS, 3G |
| SIM | Dual SIM (Mini-SIM, dual standby) |
| Sensors | Accelerometer, proximity |
| Power Supply | 5V/1A charger via micro-USB |
| Main Functions | Calling, texting, internet browsing, multimedia playback, camera, GPS navigation |
| Maintenance & Cleaning | Wipe with a soft dry cloth; avoid liquids and abrasive cleaners |
| Safety | Do not expose to extreme temperatures; use approved chargers only |
| Spare Parts & Repairability | Battery and back cover replaceable; screen and other parts may be repaired by authorized service centers |
| General Information | Lenovo A600E is a budget-friendly smartphone released in 2015, suitable for basic tasks. |
Frequently Asked Questions - A600E LENOVO
User questions about A600E LENOVO
0 question about this device. Answer the ones you know or ask your own.
Ask a new question about this device
Download the instructions for your Smartphone in PDF format for free! Find your manual A600E - LENOVO and take your electronic device back in hand. On this page are published all the documents necessary for the use of your device. A600E by LENOVO.
USER MANUAL A600E LENOVO
Read this manual carefully
before operating the phone
Contents
Technical parameters....1
Initial setup procedure....2
Charging the phone....2
Inserting the SIM card 2
Inserting the memory card....2
Key layout 3
Key tips ....3
Powering on/off....5
Powering on....5
Powering off....5
Gravity sensor and multi-touch....6
Using the multi-touch function....7
Opening an application....7
Scrolling....7
Zooming in or out....8
Home screen....9
Quick start....9
Working with Menus....9
Opening and closing the Launcher....11
Applications.... 11
Widgets....12
Shortcuts.... 12
Arranging your Home screen 12
Changing the background of your Home screen.... 13
Google Play....14
Accessing Google Play....14
Adding a Google account in your phone....14
Downloading an application from Google play.... 14
Application menu....15
Opening the Application menu 15
Browsing the Application menu....15
Creating an application shortcut to the Home screen 15
Removing an application shortcut from the Home screen 15
Phone status bar and notifications 16
Checking notifications and current activities 16
Toolkit 17
Status icons....17
Making and answering calls 19
Making a call 19
Answering a call 19
Rejecting a call 20
Ending a call 20
Adjusting the volume 20
Turning the speaker on or off....20
Adding one call 20
Options available during a call 20
Text entry 22
On-screen keyboard 22
Android keyboard input method 22
Entering text....22
Entering other characters 22
Editing text....22
Selecting text....23
Cutting/Copying/Pasting text 23
Communication 24
Messaging 24
Contacts....25
Call log....28
Email 28
Multimedia....31
Camera....31
Music 32
FM Radio 35
Gallery 36
Sound recorder....37
Browser 38
Opening the web browser 38
Managing bookmarks 38
Browser options 38
Changing browser settings.... 39
Tools 40
Calendar 40
Clock....40
Calculator 41
ES File Explorer 41
Connecting to networks and devices 42
Determining the network you are using 42
Editing or creating new access points 42
WLAN networks....42
Bluetooth 43
Connecting hands-free kit.... 44
Tethering & portable hotspot 44
Connecting to a computer via USB 45
PC sync software 45
Settings 46
WLAN 46
Bluetooth....46
More....46
Airplane mode 46
Dual SIM settings 47
Call settings....47
Audio profiles 47
Display 47
Storage....47
Battery 48
Apps 48
Accounts & sync 48
Location services 48
Security 48
Language & input....49
Backup & reset 49
Data & time....49
Schedule power on & off 49
Accessibility 49
Developer options 49
About phone....49
Precautions and tips for the A600e....50
Recycling and environmental information 51
General recycling statement 51
Important WEEE information....51
Recycling information for India 52
Battery recycling marks 52
Restriction of Hazardous Substances Directive (RoHS) 53
Technical parameters
Product: CDMA2000 digital mobile phone
Model: Lenovo A600e
System: Android 4.0.4
Size: Approximately 124.5 mm × 64 mm × 11.9 mm
Weight: Approximately163.8 g (including battery)
Standby time: Maximum 663 hours *
Battery capacity: 2500 mAh
*may vary depending on local signal strength
SAR Information
0.664W/Kg@1g(HEAD) 0.943W/kg@1g(BODY)
Body-worn operation
This phone was tested for typical body-worn operations. To comply with RF exposure requirements, a minimum separation distance of 1.0 cm must be maintained between the user's body and the phone, including the antenna.
Third-party belt-clips, holsters, and similar accessories used by this phone should not contain any metallic components. Body-worn accessories that do not meet these requirements may not comply with RF exposure requirements and should be avoided.
Use only the supplied or an approved antenna. Unauthorized antennas, modifications, or attachments could impair call quality, damage the phone, or result in violation of regulations. Do not use the phone with a damaged antenna. If a damaged antenna comes into contact with the skin, a minor burn may result.
Please contact your local dealer for replacement antenna.
Initial setup procedure
Charging the phone
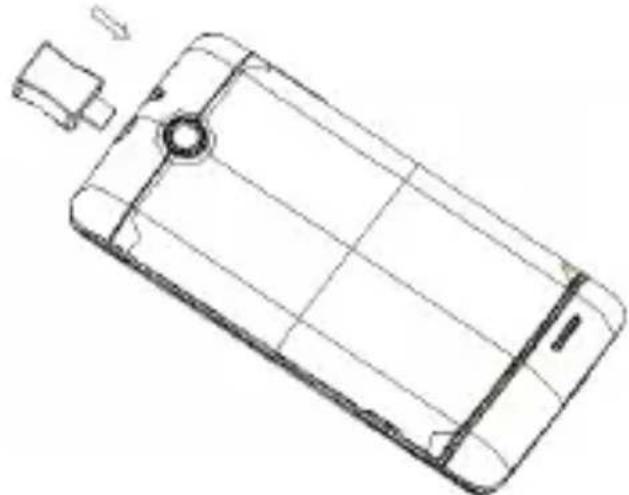
natural_image
Line drawing of a smartphone showing front panel, screen, and cable (no text or symbols)Inserting the SIM card
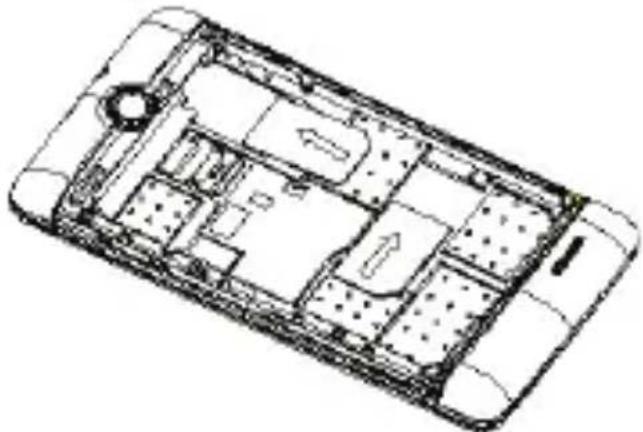
natural_image
Line drawing of a smartphone interior showing internal compartments and ventilation slots (no text or symbols)Inserting the memory card
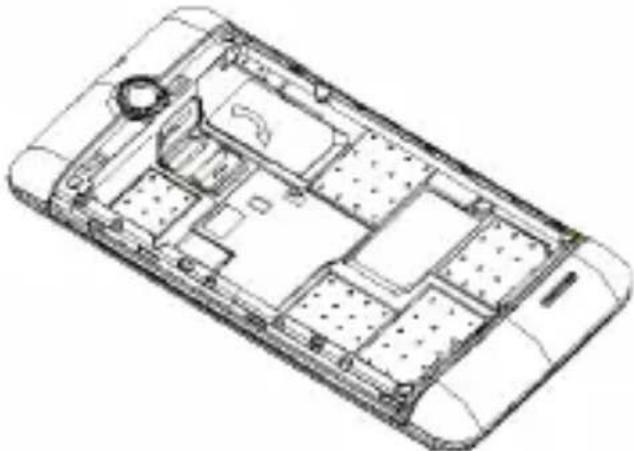
natural_image
Technical line drawing of a smartphone interior showing internal compartments and casing (no text or symbols)Key layout
Key tips
Volume key

Power key

natural_image
Pure black vertical line on white background, no text or symbols present
text_image
Benedev
natural_image
Pure black vertical line on white background, no text or symbols present
natural_image
Black rectangular electronic device with 'RELIANCE' branding and a circular lens on top (no other text or symbols visible)Menu key
Power key
- When the phone is off, press and hold the Power key to turn on the phone.
- When the phone is on, press and hold the Power key to enter phone options. (Power off, Airplane mode, etc.)
- To save your battery charge, prevent accidental touches or when you want to wipe smudges off your touch screen, put the touch screen to sleep by pressing the Power key.
- To wake up the touch screen, just press the Power key again, then drag the Lock icon to the right on the screen to unlock, according to the dialog on the screen.
Menu key
- Opens a menu with items related to the current screen/application.
Home key
- Touch the Home key to return to the Home screen. If you are viewing the left or right of the Extended Home screen, touching the Home key to open the central Home screen.
- Touch and hold the Home key to view the applications you have used recently.
Back key
● Touch the Back key to return to the previous screen you were viewing.
Volume key
- Press the Volume key to change the volume. When playing music or video files, press the Volume key to adjust media volume.
Powering on/off
Powering on
Press the Power key until the phone vibrates.
Note: You may need to enter the Personal Identification Number (PIN) or draw the unlock pattern if you have set a PIN or unlock pattern.
Powering off
Press and hold the Power key to display the phone options menu, then select Power off.
Gravity sensor and multi-touch
This feature automatically rotates the screen according to the orientation of the phone. You can lock the A600e screen in the current direction by turning the rotation lock downward. To lock or unlock the screen direction, select Launcher >
Settings > Display > Auto-rotate screen.
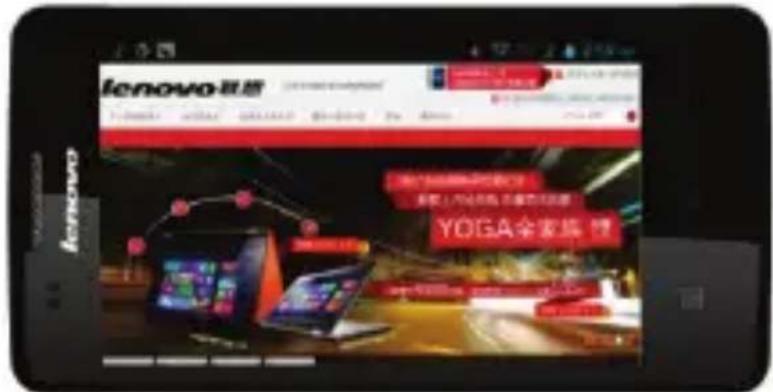
You can use the A600e in the landscape or portrait mode.
After launching an application, you can rotate the screen to your preferred direction.
text_image
lenovo联想 YOGA全家福 12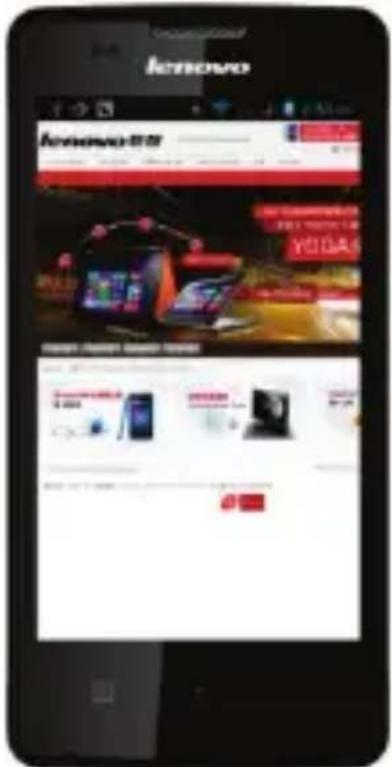
text_image
iKONNOVO iKONNOVO 800 VODA6 I KONNOVO 800 VODA6 VODA6 VODA6Using the multi-touch function
The multi-touch function enables you to perform various operations on the screen.
Opening an application
To open an application, touch the icon of the application on the screen. Touch the Home key to return to the Home screen.
text_image
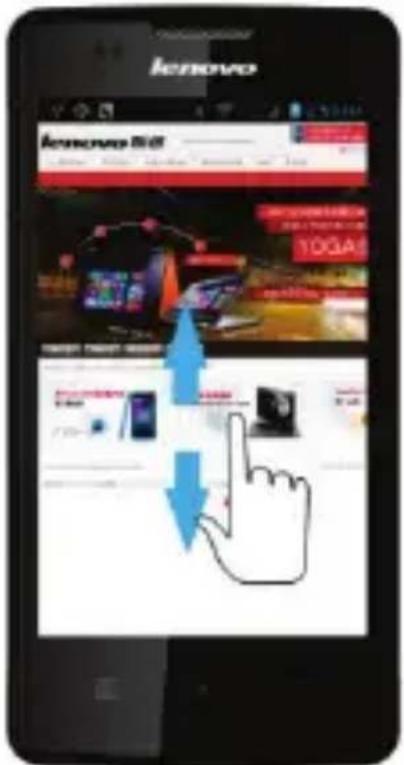
lenovo lenovo 世界 YOGAS TOMATO SMART ROOTS 100% 200% 300% 400% 500% 600% 700% 800% 900% 1000% 1100% 1200% 1300% 1400% 1500% 1600% 1700% 1800% 1900% 2000% 2100% 2200% 2300% 2400% 2500% 2600% 2700% 2800% 2900% 3000% 3100% 3200% 3300% 3400% 3500% 3600% 3700% 3800% 3900% 4000% 4100% 4200% 4300% 4400% 4500% 4600% 4700% 4800% 4900% 5000% 5100% 5200% 5300% 5400% 5500% 5600% 5700% 5800% 5900% 6000% 6100% 6200% 6300% 6400% 6500% 6600% 6700% 6800% 6900% 7000% 7100% 7200% 7300% 7400% 7500% 7600% 7700% 7800% 7900% 8000% 8100% 8200% 8300% 8400% 8500% 8600% 8700% 8800% 8900% 9000% 9100% 9200% 9300% 9400% 9500% 9600% 9700% 9800% 9900%Scrolling
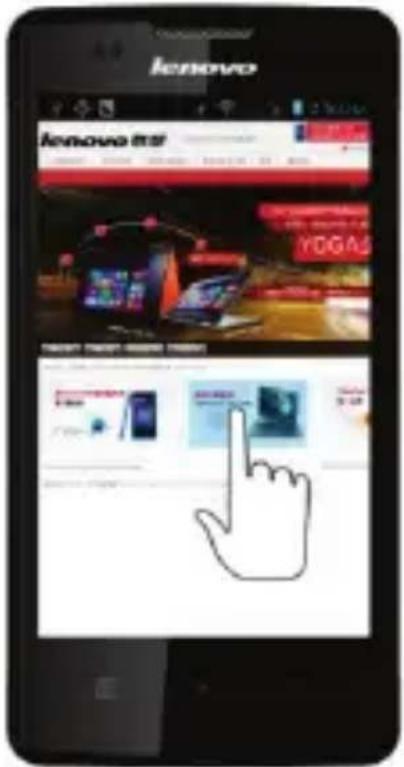
Scroll the screen by dragging up or down on the content.
text_image
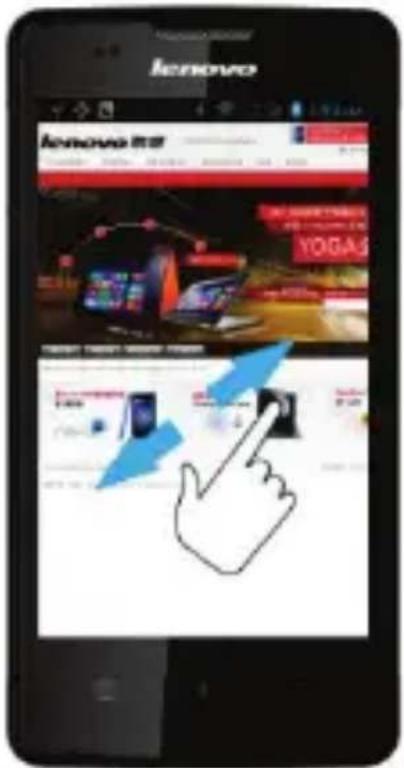
lenovo lenovo BID 10GAS NEW TEXT 3200000000000000000000000000000000000000000000000000000000000000000000000000000000000 12.12.24.25.26.27.28.29.30.31.32.33.34.35.36.37.38.39.40.41.42.43.44.45.46.47.48.49.50.51.52.53.54.55.56.57.58.59.60.61.62.63.64.65.66.67.68.69.70.71.72.73.74.75.76.77.78.79.80.81.82.83.84.85.86.87.88.89.90.91.92.93.94.95.96.97.98.99.100.Zooming in or out
You can zoom in or out of a map or web page. To do so, just touch the screen with two fingers and move them apart or together.
text_image
iEnovo iEnovo 联讯 YOGASHome screen
Quick start
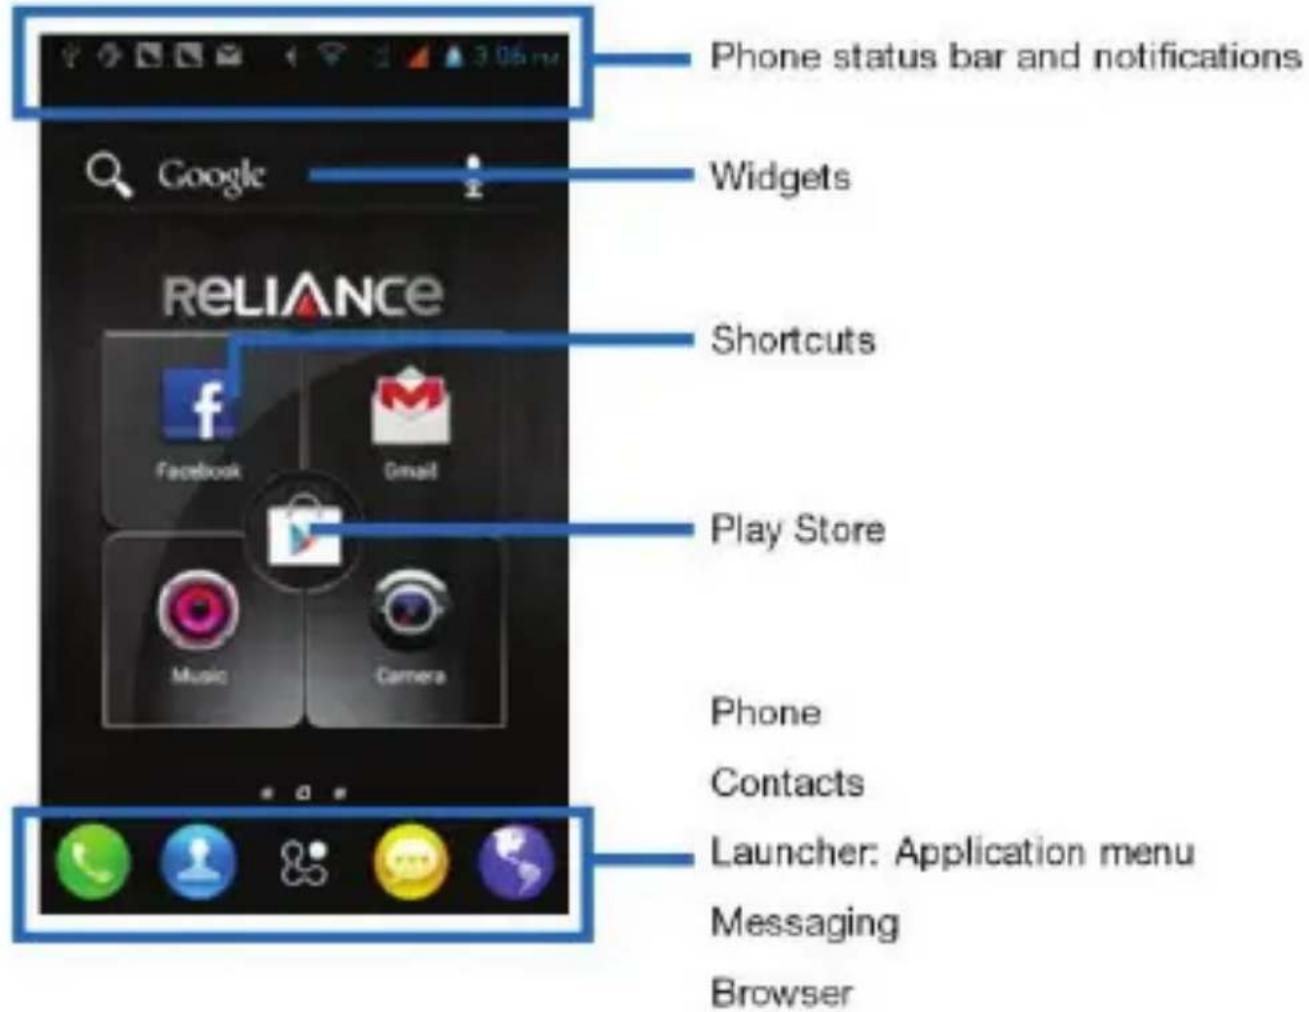
The Home screen gives you all your latest information in one place. It is the equivalent of the desktop screen on a computer and is displayed when you turn on the phone. It is your gateway to the main features in your phone. You can customize your Home screen with shortcuts, widgets, folders, and wallpapers.
text_image
Phone status bar and notifications Widgets Shortcuts Play Store Phone Contacts Launcher: Application menu Messaging BrowserSlide the Home screen left or right to view more content in other panels on the Home screen. You can add shortcuts, widgets, folders, etc., to the Home screen.
Note: Your Home screen might look different from the illustration above.
Working with Menus
The phone provides you with options menus and context menus.
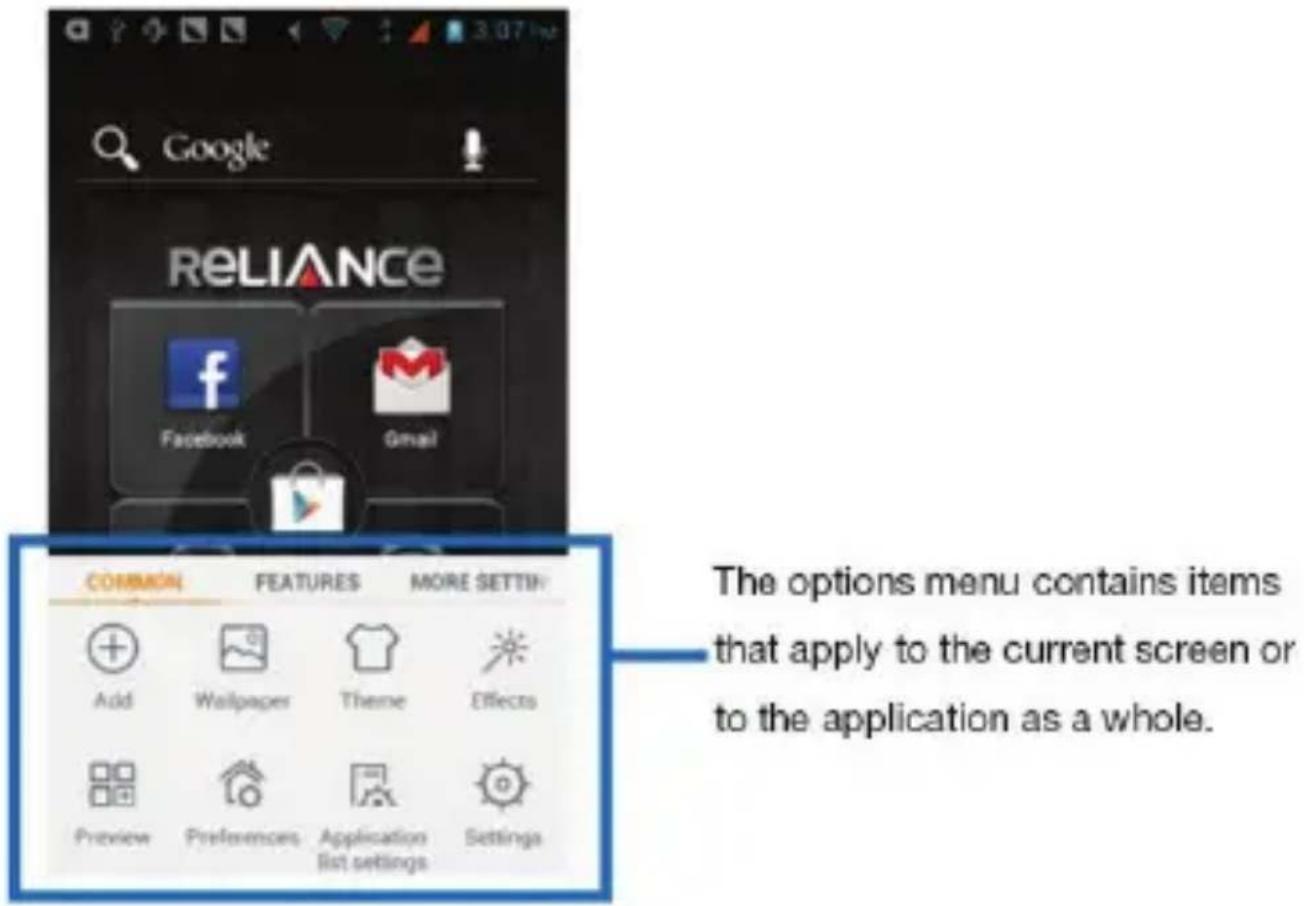
Options menus
- Options menus contain tools that apply to the activities of the current screen or application; not to any specific item on the screen. You can open the options menu by touching the Menu key.
- Not all screens have options menus. If you touch the Menu key on a screen that has no options menu, no menu will appear.
text_image
Google RELIANCE Facebook Gmail COMMON FEATURES MORE SETTING Add Wallpaper Theme Effects Preview Preferences Application Settings The options menu contains items that apply to the current screen or to the application as a whole.Context menus
- Context menus contain tools that apply to a specific item on the screen. You can open a context menu by touching and holding an item on the screen. Not all items have context menus. If you touch and hold an item that has no context menu, no menu will appear.
● Example of a Contacts screen and context menu.
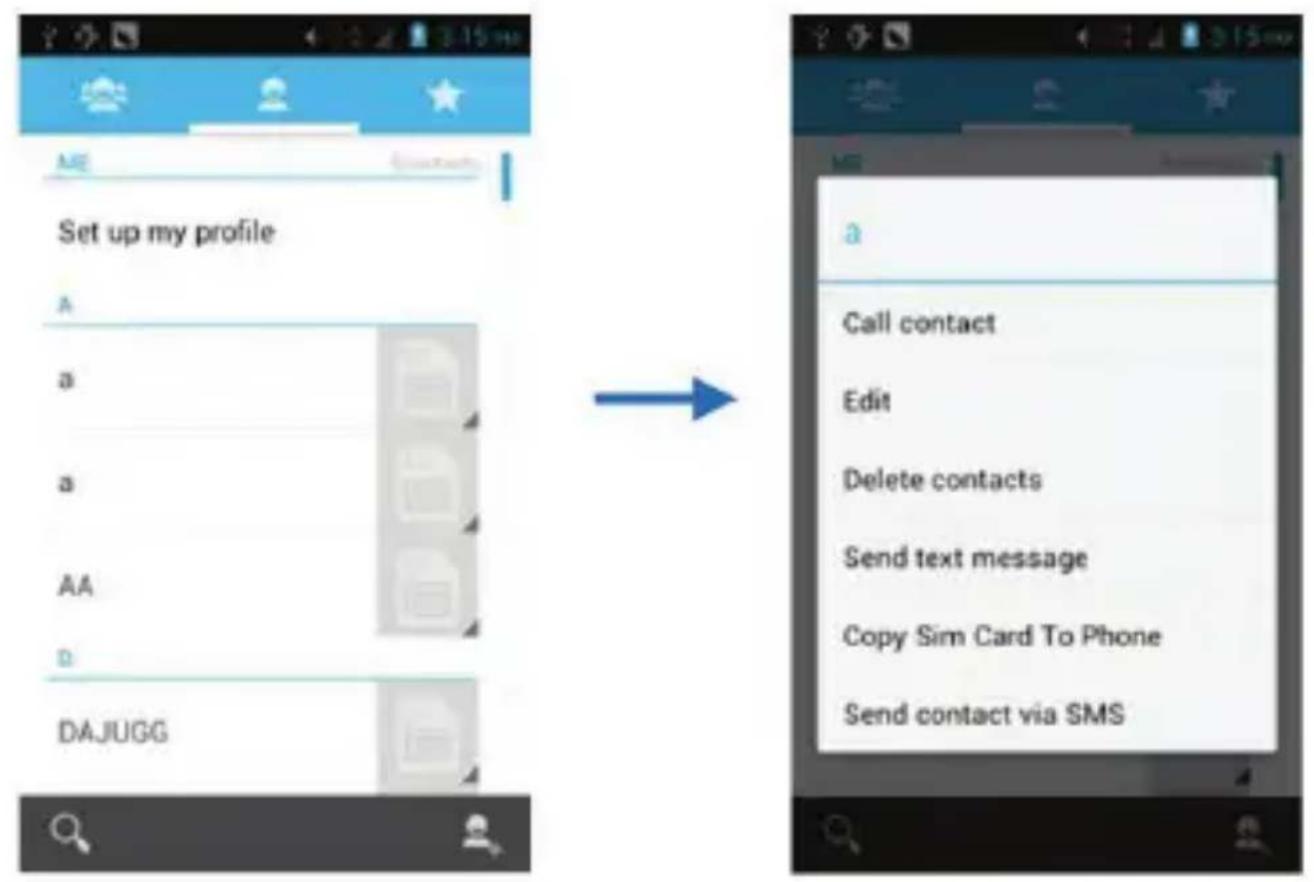
text_image
Set up my profile A a a AA D DAJUGG Call contact Edit Delete contacts Send text message Copy Sim Card To Phone Send contact via SMSOpening and closing the Launcher
Touch the Launcher, you can slide the screen left or right to view more applications.
After opening the Launcher, touch an icon to enter the desired application. Touch the Back key to return to the previous screen. Touch the Home key to return to the Home screen.
Applications
Adding an application to the Home screen
Touch and hold the Home screen, then touch Applications. You can select applications to add to the Home screen, such as Calculator, Clock, etc.
Removing an application from the Home screen
Touch and hold the application icon on the Home screen until it vibrates, then drag it to the Remove tab.
Widgets
A widget is small application on the Home screen that displays as an icon, such as a music symbol, an analog clock, etc., which you can use directly from your Home screen. For example, the Music widget allows you to start playing audio files directly from Home screen, and the Analog clock widget shows the current time.
You can download additional widgets from the library of Android widgets.
Adding a widget to Home screen
Touch and hold the Home screen, then touch Widgets, you will see widget options menu.
Touch the icon to select the widget, then back to the Home screen. You can use the widget easily on Home screen.
Removing a widget on Home screen
Touch and hold the widget icon on Home screen until it vibrates, then drag it to the Remove tab.
Shortcuts
Adding a shortcut to Home screen
Touch and hold the Home screen, then touch Shortcuts, you can select shortcuts to add to Home screen, such as Bookmark, Contact, Direct message and so on.
Removing a shortcut on Home screen
Touch and hold the shortcut icon on Home screen until it vibrates, then drag it to the Remove tab.
Arranging your Home screen
Touch and hold an item on Home screen until it vibrates, then drag it where you want.
Adding a folder to the Home screen
Touch and hold the Home screen, touch Folders, enter the name of the folder, select the applications you want to add to the folder, then confirm. The new folder will be created and added to Home screen.
Organizing your applications with folders
To make a new folder on your Home screen, stack one application on top of another.
Naming folder on the Home screen
Touch the applications stack on the Home screen. Then touch the Unnamed Folder to show the name folder field and enter the folder name.
Moving shortcuts on the Home screen to a folder
Touch and hold the item on Home screen until it vibrates, then stack the application on top of others.
Moving shortcuts in a folder to the Home screen
Touch and hold the item in a folder until it vibrates, then drag the item out of the folder.
Changing the background of your Home screen
Adapt the Home screen to your own style using wallpapers from Gallery, Live wallpapers, or Static wallpapers.
Touch and hold the Home screen to select Wallpaper, and select a wallpaper from Gallery, Live wallpapers, or Static wallpapers. Then set it as the wallpaper.
Tip: You can use the camera to take a photo, then set it as the wallpaper.
Google Play
Google Play, formerly known as the Android Market, is a digital application distribution platform, which provides a world of applications and games, and allows users to browse and download music, magazines, books, games, and applications.
Accessing Google Play
From the central Home screen, touch the Play Store.
Alternatively, touch Launcher > Play Store.
Note: You need a Google account to use the Play Store.
Adding a Google account in your phone
- Touch Launcher > Settings > Accounts & sync > ADD ACCOUNT > Google.
- Create a new Google account, or sign in if you already have one, according to the Add account wizard. Your phone is now ready to use with Gmail, Play store, etc.
Downloading an application from Google play
You can download a variety of applications, which are available either for free or at a cost. You need to have a working internet connection to download from Google play, which may incur data traffic charges.
- Find an application you are interested in by browsing through the categories, or by using the search function.
- Touch the item to view its description, and follow the instructions to complete the installation or purchase.
Application menu
The Application menu, which you open from your Home screen, contains the applications that come installed with your phone.
The Application menu extends beyond the screen width. Slide the screen left and right to view all content.
Opening the Application menu
Touch the Launcher.
Browsing the Application menu
Open the Application menu, then slide the screen right or left.
Creating an application shortcut to the Home screen
Touch and hold an application on the Application menu until it vibrates, then drag it to the Home tab, and place it where you want on the Home screen.
Removing an application shortcut from the Home screen
Touch and hold the shortcut until it vibrates, then drag it to the Remove tab.
Phone status bar and notifications
The status bar at the top of the screen contains icons that alert you about new messages, missed calls, signal strength, battery status, and other information.
Checking notifications and current activities
Drag down the status bar to open the Notification panel and get more information.
For example, you can see missed calls, and which applications are running, such as the Music.
Opening the Notification panel
Drag the status bar downwards.
Closing the Notification panel
Drag the bottom of the Notification panel upwards.
Opening a running application from the Notification panel
Touch the icon for the running application.
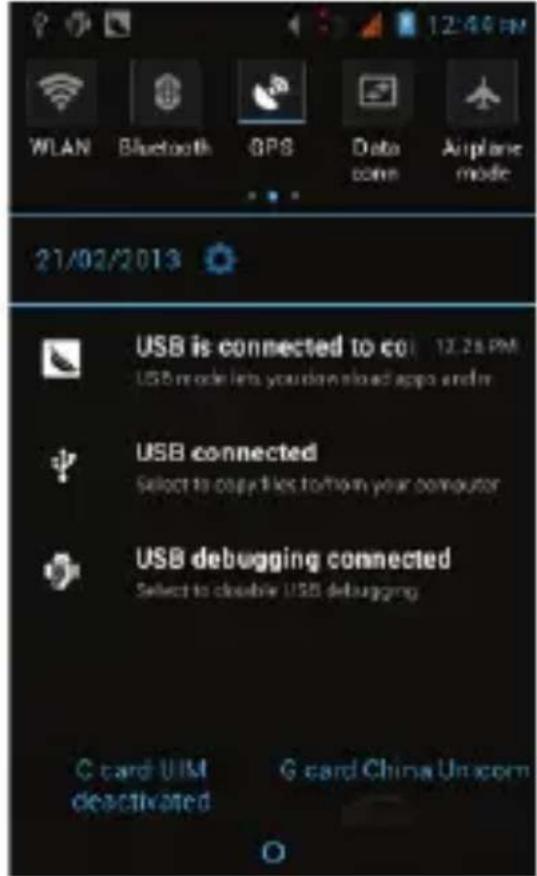
text_image
WLAN Bluetooth GPS Data conn Airplane mode 21/02/2013 USB is connected to co: 12.28 PM USB mode lets you download apps and/or USB connected Select to copy files to form your computer USB debugging connected Select to double USB debugging G card UIM deactivated G card China UnicomToolkit
In the Toolkit you can quickly start common applications such as Bluetooth,
WLAN, etc.
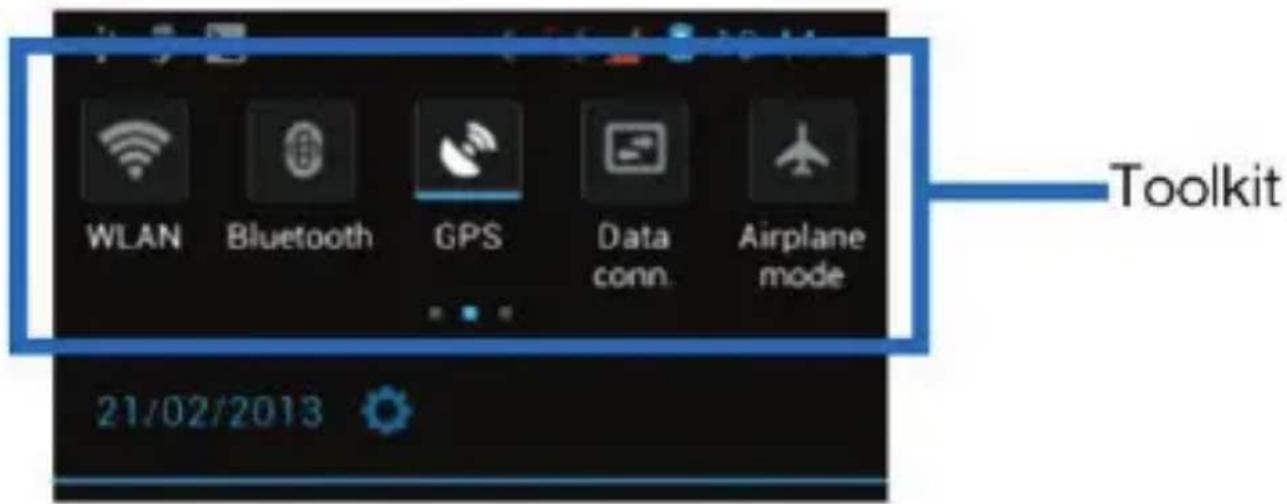
text_image
WLAN Bluetooth GPS Data conn. Airplane mode 21/02/2013 ToolkitStatus icons
The following status icons may appear on your screen:
| Icon Statement | |
| No cards | |
| Failed search for Card1 Network | |
| Failed search for Card2 Network | |
| Card1 "CDMA1x only" Network | |
| Card1 Network signal level | |
| Card2 Network signal level | |
| Unread SMS messages | |
| Missed calls | |
| Bluetooth is activated | |
| USB is connected | |
| Alarm is activated | |
| Battery is being charged | |
| Ring | |
| Silent | |
| WLAN is connected | |
| Roaming | |
| USB debugging | |
| Airplane mode | |
| Full battery | |
| Low battery | |
| Vibrate on | |
| GPS searching | |
| GPS is connected | |
| Card1 EVDO Data connection | |
| Card1 1x Data connection | |
| Card2 EDGE Data connection | |
| Card2 GPRS Data connection |
Making and answering calls
Making a call
Directly making a call
Touch the Phone to display the dialing keypad. Touch the numeric buttons of the telephone number, then touch the Dial button to make the call.
Making a call from Contacts
Touch Launcher > Contacts to display the list of contacts, touch the desired contact, then touch the Dial button that is located next to the number to make the call.
Making a call from Call log
Touch Launcher > Call log to select the log, then touch the Dial button that is located next to the number to make the call.
Making an international call
Touch the Phone to display the dialing keypad. Touch and hold the "0" key until "+" appears on the screen, then input the country code or region code, city code and phone number.
Dialing from Messaging
- Touch Launcher > Messaging to open the message interface.
- Touch one conversation.
- Touch the Dial button that is located at the top of the conversation screen.
Answering a call
Your phone will ring or vibrate (depending on the current mode and settings) upon an incoming call.
To answer an incoming call, drag 📋 towards the right side according to the dialog on the screen.
If the earphone is inserted into the phone, press the key on the earphone to
answer the call.
Rejecting a call
If you want to reject an incoming call, slide 📋 towards the left side according to the dialog on the screen.
Ending a call
Touch the End button to disconnect the call.
Adjusting the volume
You can raise or lower the volume by pressing the Volume key.
Turning the speaker on or off
Touch the Speaker button to turn on the speaker, and touch it again to turn off speaker.
Adding one call
In a call, touch the Add call button to add one call. This function requires the support of the network operator.
Options available during a call
The following call options can be activated only during a call. When a call is in progress, you can put it on hold, initiate a phone conference, mute your microphone, et c.
| Call options | |
| Key pad: Display the key pad. | Touch |
| Speaker: Turn on/off the speaker. Touch | |
| Mute: Deactivate the microphone so that the other party cannot hear you. | Touch |
| Hold: Place a call on hold. Touch | |
| Add call: Open the dial pad to dial a second call. | Touch |
| End: End a call. Touch |  |
Press the Volume key to adjust the call volume.
Text entry
On-screen keyboard
Touch the keys of the on-screen QWERTY keyboard to enter text. You can open this keyboard by touching the text field.
Android keyboard input method
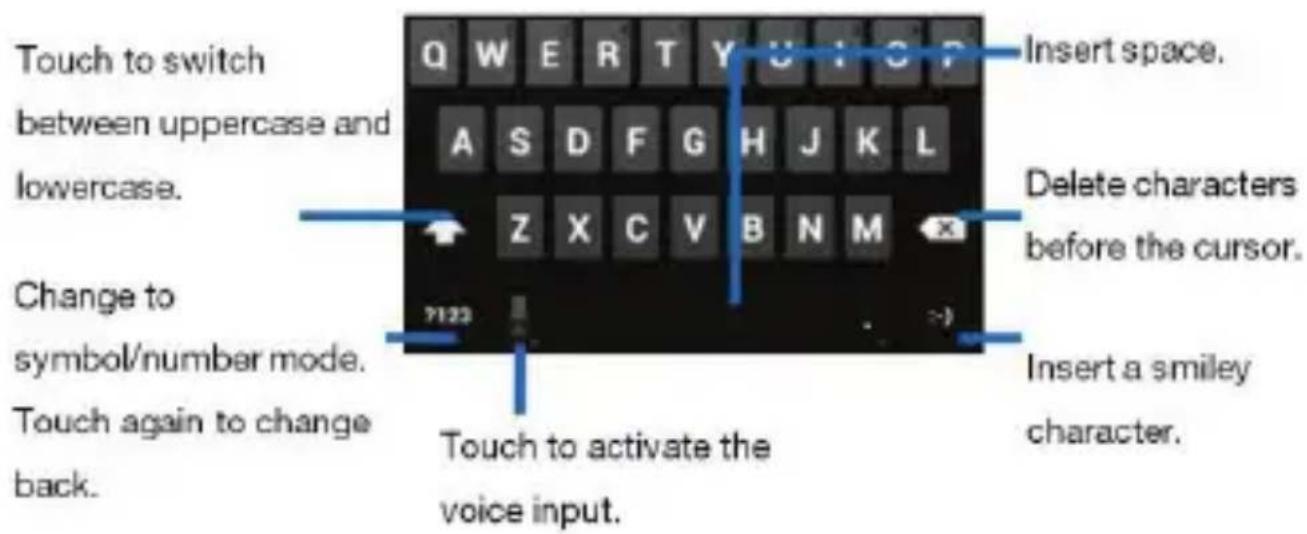
text_image
Touch to switch between uppercase and lowercase. Change to symbol/number mode. Touch again to change back. Q W E R T Y U H C F A S D F G H J K L Z X C V B N M 7123 Insert space. Delete characters before the cursor. Insert a smiley character. Touch to activate the voice input.Entering text
● Touch the keys on the keyboard to type.
- Use the Delete key to erase characters to the left of the cursor.
- When you have finished typing, touch the Back key to close the keyboard.
Entering other characters
- Touch the Symbols key 2123 to switch to the numbers and symbols keyboard.
- Touch the 📄 on the symbols keyboard to view additional symbols.
Editing text
You can edit the text you enter in text fields to cut, copy, and paste text, within or across applications. Some applications do not support editing of some or all of the text they display. Other applications may offer their own way to select the text you want to work with.
Selecting text
You can select text for cutting or copying. The selected text is highlighted in blue.
- Touch and hold the portion that contains the text. Some options open with icons.
- Move the cursor to select the text.
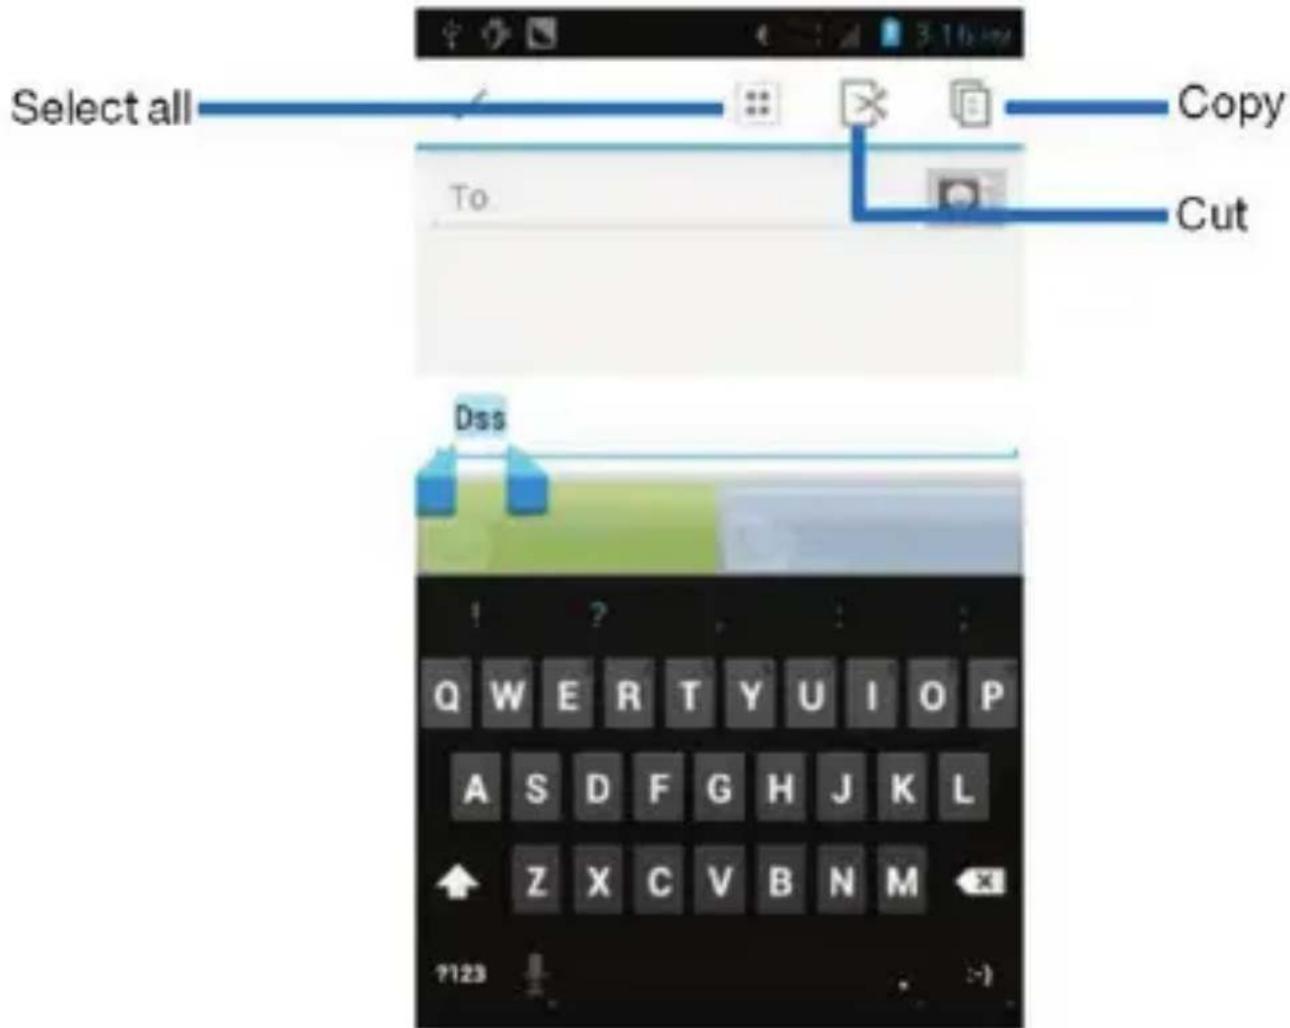
text_image
Select all To. Copy Cut Dss Q W E R T Y U I O P A S D F G H J K L Z X C V B N M 7123Cutting/Copying/Pasting text
- Touch the Cut or Copy.
- Touch and hold the text field where you want to paste the text.
- Touch PASTE. The text is inserted at the cursor.
You can paste the text that you copied from one application into other text fields in any application.
Communication
Messaging
Touch Launcher > Messaging.
You can compose, send and receive text messages from your phone, and also compose, send and receive multimedia messages, which contain media files such as pictures, videos and audios.
When you view your messages, they appear as conversations, which means that all messages to and from a particular person are grouped together.
Composing a new message
- Touch Launcher > Messaging.
- Touch.
- To add a recipient, touch 📄, then find and mark the contact name. To send to more than one recipient, mark the contact name(s) for the other recipient(s). You can also enter the recipient's phone number manually.
- Touch Type message to enter your message text.
- If you want to insert a media file, touch 🔥, and select an attachment.
- Choose SIM card, to send the message.
When editing a message, touch the Menu key, some additional options will be available to you; for example, Add subject, Insert smiley, etc. You can touch the options to do their associated actions.
Deleting message threads
- Touch Launcher > Messaging.
- Touch and hold the message thread.
- Select the conversations you want to delete.
- Touch ☐, then touch Delete in the menu that pops up.
You can also touch the Menu key and touch Delete all threads to delete all message threads from the window.
Forwarding a message
- Touch Launcher > Messaging.
- Touch the conversation containing the message you want to forward.
- Touch and hold the message you want to forward.
- Touch Forward in the menu that opens.
- To add a recipient, touch 📄, then find and mark the contact name. To add more than one recipient, mark the contact name(s) for the other recipient(s). You can also enter the recipient's phone number manually.
- Choose SIM card to send the message.
Locking a message
You can lock a message.
- Touch Launcher > Messaging.
- Touch the conversation containing the message you want to lock.
- Touch and hold the message you want to lock.
- Touch Lock in the menu that opens. A Lock icon appears. Unlock a message by touching and holding the message then touch Unlock.
Messaging settings
- Touch Launcher > Messaging.
- Touch the Menu key, then select Settings in the menu that opens.
- You can change the messages settings, such as delete old messages when limits are reached, request a delivery report for each message you send, etc.
Contacts
Touch Launcher > Contacts.
The Contacts application offers you to store and manage all your contacts.
Contacts screen overview
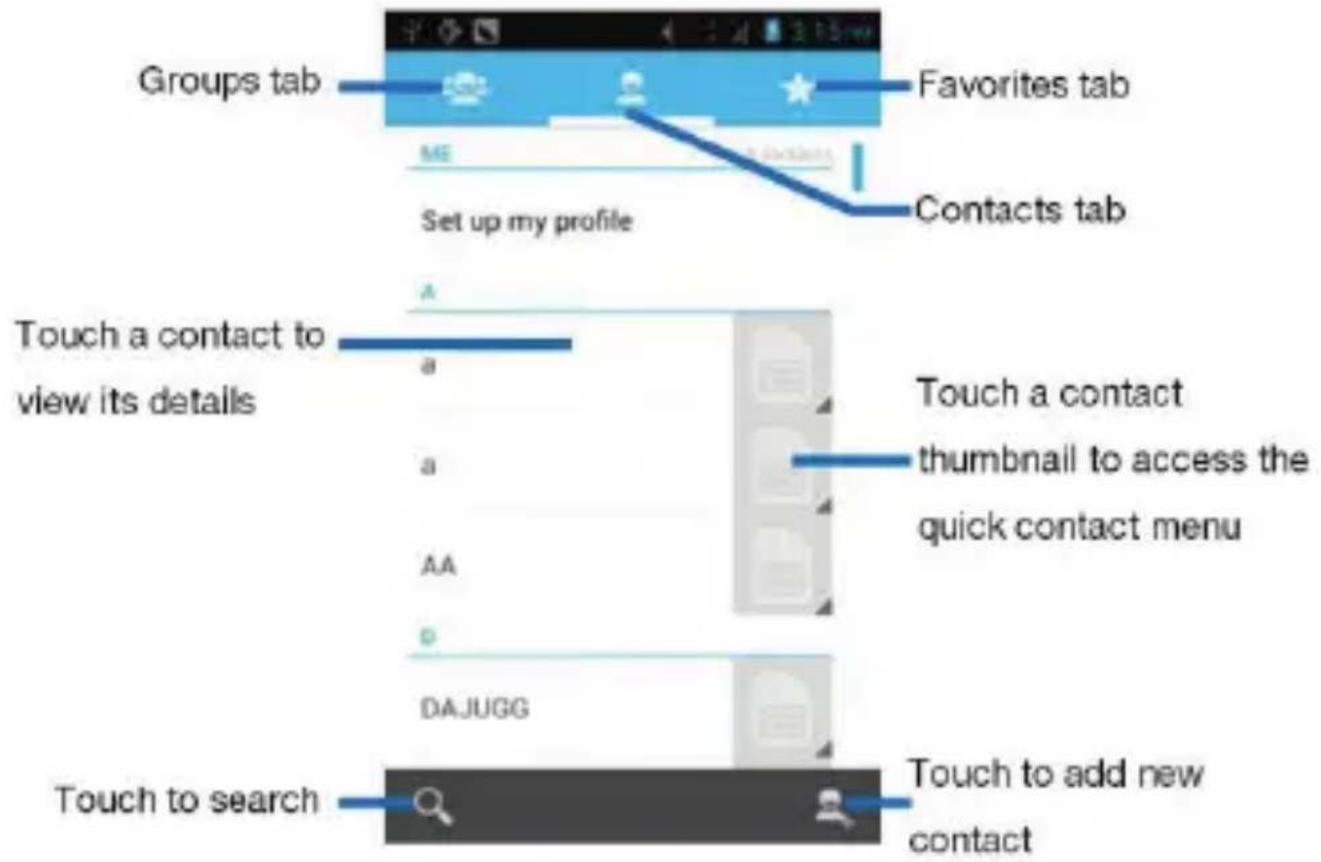
text_image
Groups tab Favorites tab ME Set up my profile Contacts tab Touch a contact to view its details a a AA D DAJUGG Touch to search Touch to add new contactAdding a contact
- Touch Launcher > Contacts.
- Touch.
- Select account to which you want to add this new contact.
- Enter the information for the contact.
- Touch DONE.
Searching for a contact
- Touch Launcher > Contacts.
- Touch.
- Input the first character of the name you are searching for. All records having a contact name beginning with that character will be displayed.
Additional options
From the contacts list screen, touch the Menu key. Some additional options will
be available to you; for example, Import/export, Share contact, etc.
- Contacts to display: To select which contacts to display in the contacts list.
- Import/export: Import/export contacts from one account to other one.
- Delete contacts: You can mark more than one contact, then delete these marked contacts.
- Share contact: You can share contacts via Bluetooth, Email, etc.
- Accounts: You can synchronize your phone contacts with a synchronization account.
● Settings: Change the settings related to the displayed options.
● Memory status: Check the amount of memory used for contacts.
Contact groups
You can assign contacts to groups to get quicker access to them from the
Contacts application. It allows you to create a new group; such as VIPs, schoolmates, friends, family, co-workers, etc.
Creating a new group
- Touch Launcher > Contacts.
- Touch the Groups tab.
- Touch.
- Input the information for the group, then touch DONE.
Assigning a contact to a group
- Touch Launcher > Contacts.
- Touch the Groups tab.
- Touch a group to which you want to assign contacts.
-
Touch 📄 to choose contacts to add. You can also edit the group, touch Type person's name to input the contact's name, then the corresponding contact entry will pop up. Select the desired contact entry.
-
Touch DONE.
Only the contacts stored in phone memory can be assigned to groups.
Favorites
You can set contacts as favorites to access to them from the Contacts application. Only the contacts stored in phone memory can be set as favorites.
Setting a contact as a favorite
- Touch Launcher > Contacts.
- From contacts list, touch the contact which you want to set as a favorite.
- Touch to set the contact as a favorite.
To cancel a favorite, touch.
Call log
Touch Launcher > Call log.
Touch the required tab, such as All, Received, Dialed, and Missed calls, on the upside screen of the Call log interface. You can also switch UIM/SIM card to view different logs.
Select a log, then touch and hold the log. You can remove the item from the Call log, and send text message to the phone number.
Touch Launcher > Email.
The Email application in your phone allows you to compose, send and receive emails through your regular email account.
You need create account first, then create email to send. You can configure email for most accounts in just a few steps.
Setting up an email account in your phone
- Touch Launcher > Email.
- Enter your email address and password, then touch Next.
-
If the settings for the email account cannot be downloaded automatically, complete the setup manually. If necessary, contact your email service provider for detailed settings.
-
When you are prompted, enter a name for your email account, so that it is easily identifiable. The same name shows in the emails you send from this account.
- Touch Next.
Creating and sending an email
- Touch Launcher > Email.
- Touch.
- Enter recipients' addresses, and subject.
- Compose email. Touch the Menu key, you can attach a file.
- If you want to add Cc/Bcc, touch the Menu key, then touch Add Cc/Bcc.
- Touch ▶ to send the email.
Receiving emails
- Touch Launcher > Email.
- Touch 📋 to refresh, you can download new emails.
Reading your emails
- Touch Launcher > Email.
- In the email inbox, scroll up or down, and touch the email you want to read.
Replying to an email
- Touch Launcher > Email.
- In the email inbox, scroll up or down, and touch the email to which you want to reply.
- Touch ←, or touch → to select Reply all.
- Enter your reply, touch ▷ to send the email.
Forwarding an email
- Touch Launcher > Email.
-
In the email inbox, scroll up or down, and touch the email you want to forward.
-
Touch to select Forward.
- Enter recipients' addresses.
- Touch ≥ to send the email.
Viewing all folders
- Touch Launcher > Email.
- Touch at the top of the screen, then select Show all folders. You can also touch at the bottom of the email inbox.
Multimedia
Camera
Touch Launcher > Camera.
Take a photo or record a video with the camera in your phone. You can hold the camera horizontally or vertically. Share a photo or a video with your friends, or upload your photos and videos to a web service.
Camera control overview
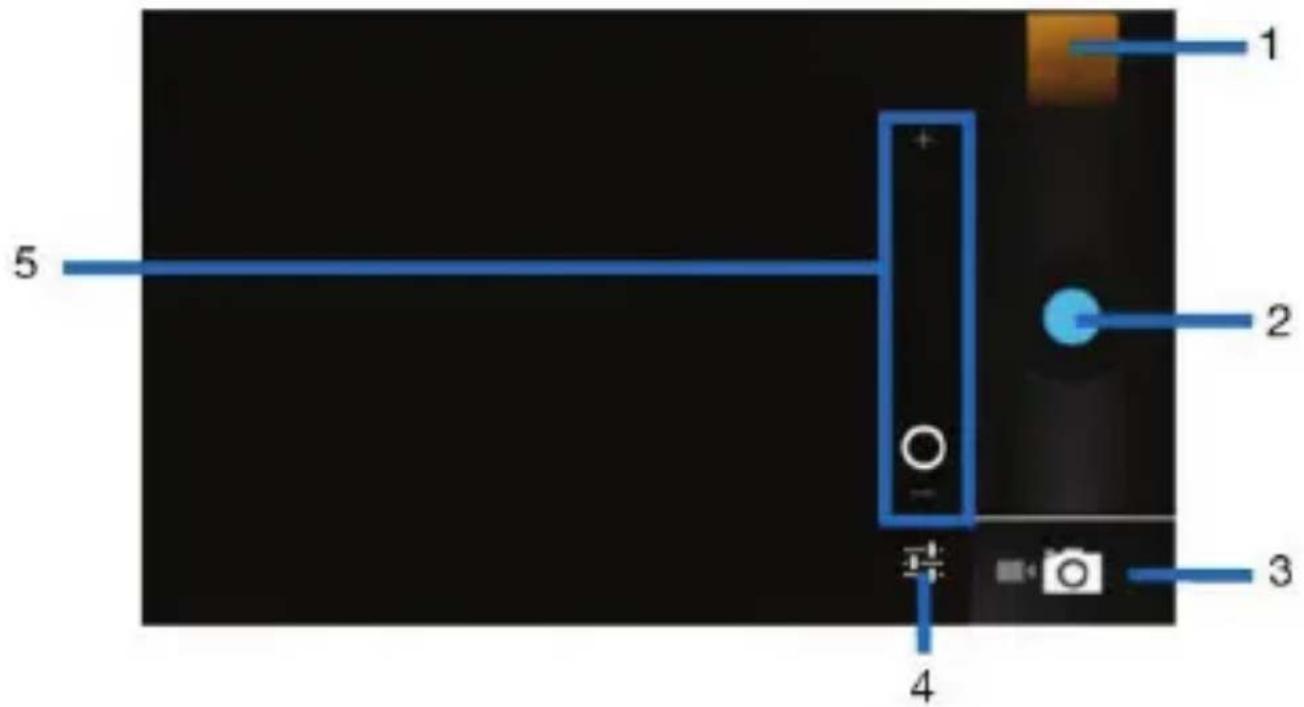
text_image
1 2 3 4 5| Camera controls | |
| 1 Preview your pictures or videos you captured | |
| 2 Take photos or record videos | |
| 3 Switch between camera mode, camcorder mode | |
| 4 Settings | |
| 5 Zoom in or out |
Taking a photo
- Adjust your picture size, picture quality, color effect, and other settings if you wish.
- Frame your subject on the screen. You can zoom in or out by touching the Zoom icon.
- Touch the Shutter icon on the screen.
The picture you just took is displayed for a moment, then is displayed as a thumbnail.
Shooting a video
- Switch to the camcorder mode
- Adjust the video duration, color effect, and other settings if you wish.
- Point the lens to the scene you want to shoot
- Touch the Start icon.
- Touch the Stop icon to stop shooting.
Music
Touch Launcher > Music.
The phone comes with a Music player that plays songs, listen to audio book and podcasts you have stored. It gives you a host of setting options to make your listening experience interesting.
You can easily transfer your favorite music from your PC to the SD card and experience a whole world of interesting and melodious music.
When you copy music to your SD card, the Music player searches the card for music files and builds a catalog of your music, based on information about each file.
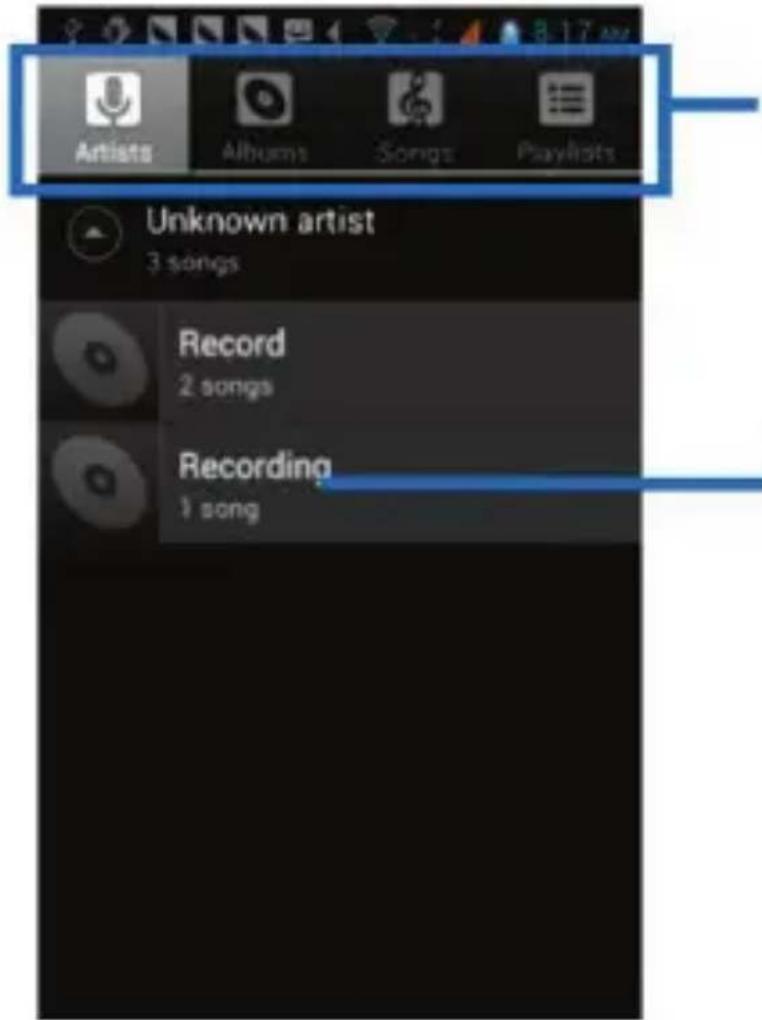
text_image
Artists Albums Songs Playlists Unknown artist 3 songs Record 2 songs Recording 1 songCategories
Touch to select Artists, Albums, Songs or Playlists.
Touch to open the album, songs or playlist.
Music library
The Music library offers the following multiple categories that you can select.
| Categories | |
| Artists: Songs classified by singers | |
| Albums: Songs classified by albums | |
| Songs : Display all songs | |
| Playlists: Display playlists | |
If you touch and hold an artist, a song, or an album, some options will be available to you; for example, Play, Add to playlist, Delete, etc.
Music player
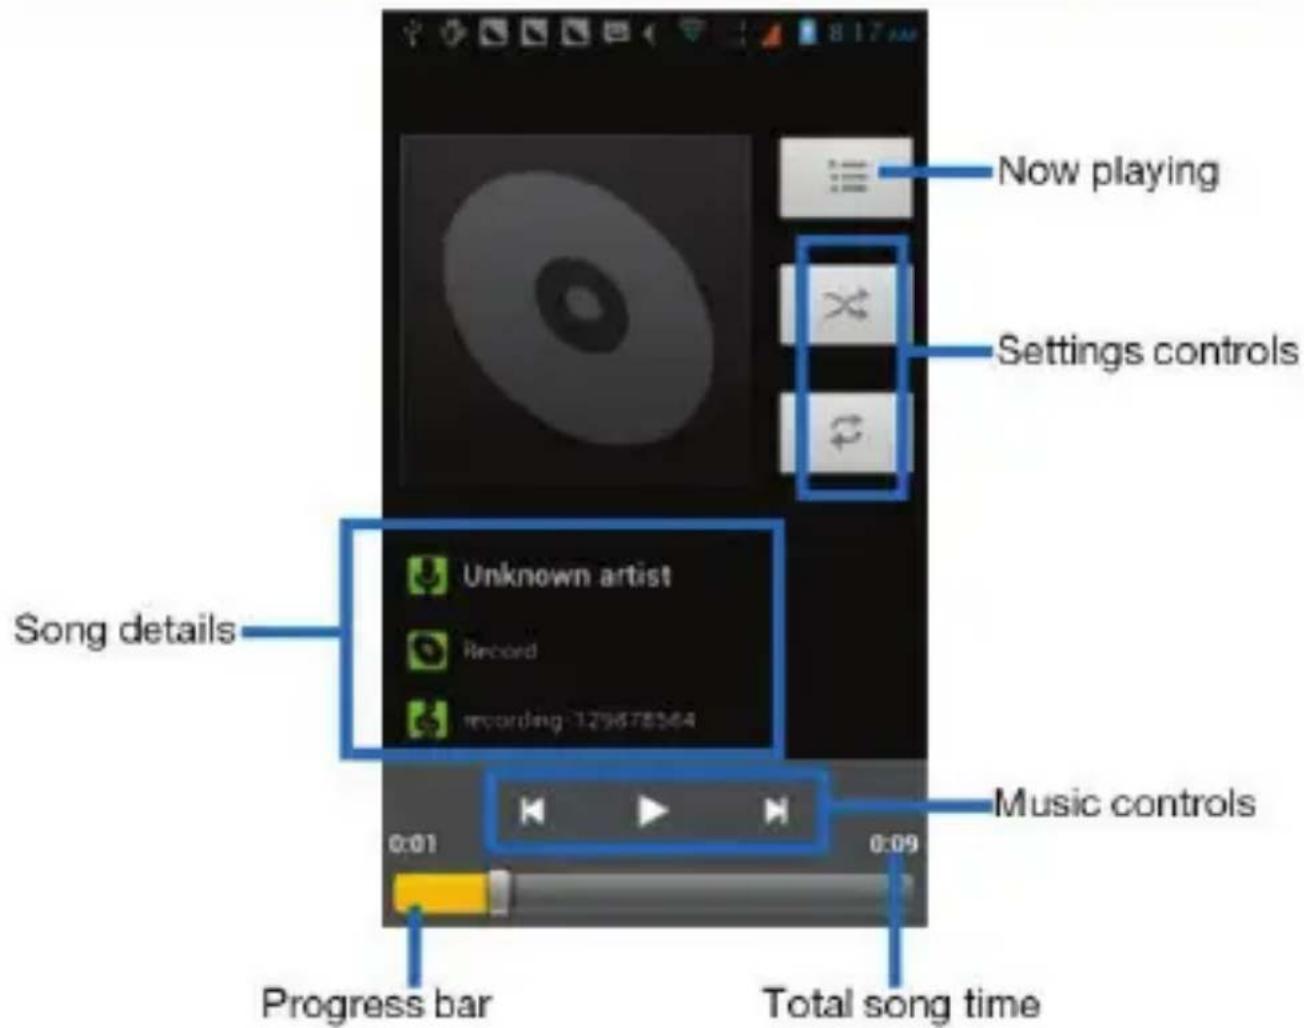
text_image
Now playing Settings controls Song details Unknown artist Record recording 129678564 0:01 0:09 Music controls Progress bar Total song timeYou can return to the Music library screen from the Music player screen in the
Music applications by touching Menu key, then touching Library.
| Music player controls | |
| Play/Pause Touch / | ▶ ▶ |
| Previous/Next Touch / | ◀ ▶ |
| Rewind/Forward Touch and hold / | ◀ ▶ |
| Volume adjust | Touch Volume key |
| Now playing Touch | ≡ |
| Shuffle Touch | ✕ |
| Repeat: Touch to repeat all songs;touch again to repeat current song. | Touch ↻ |
Touch the Menu key, some additional options such as Library, Party shuffle and Add to playlist will be available to you.
FM Radio
Touch Launcher > FM Radio.
The phone comes with an in-built FM Radio. You can listen to FM Radio stations, and add them to channel list. You have to plug in an earphone, as the antenna of the FM Radio. You can listen to the radio either through an earphone, or through the speaker in the phone.
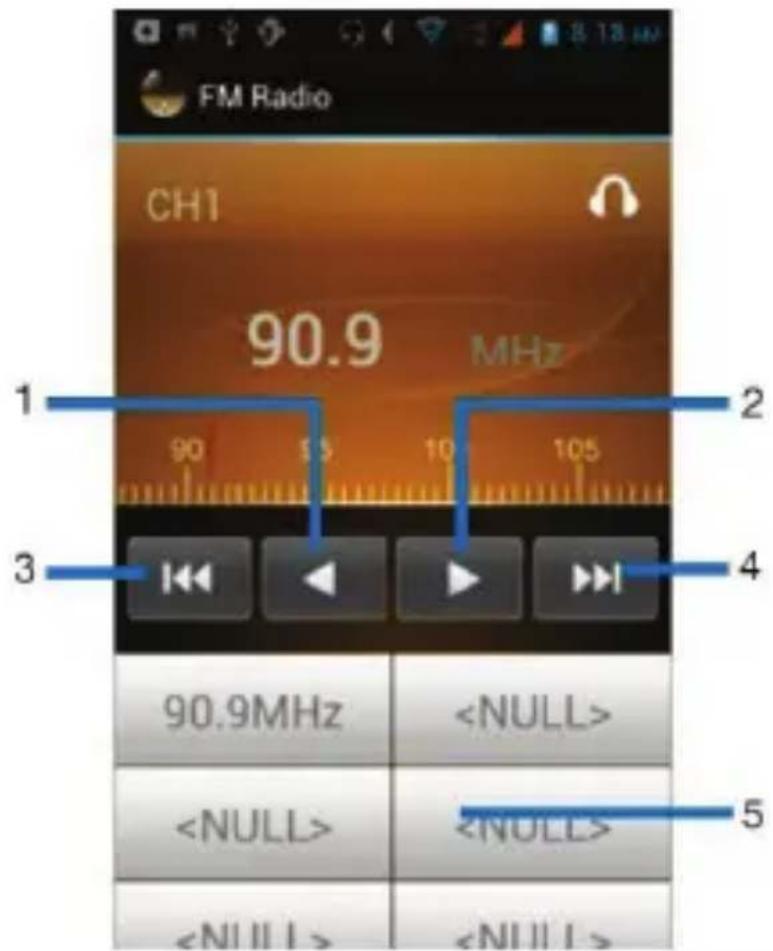
text_image
FM Radio CH1 90.9 MHz 1 2 3 4 90.9MHz| FM Radio controls | |
| 1 To | fine-tune the FM frequency |
| 2 To | fine-tune the FM frequency |
| 3 To | search for the previous effective frequency |
| 4 To | search for the next effective frequency |
| 5 | Touch an unused button to save the current frequency to the frequency list, then you can touch it to play. Touch and hold the button, some additional options are available to you. |
Touch the Menu key, some additional options will be available to you: Edit local frequency, Delete frequency list, Search, Enable speaker, and Exit.
Gallery
Touch Launcher > Gallery.
The Gallery offers you to view photos and play videos which are downloaded as well as those taken by the phone camera.
From Gallery, you can also share your photos and videos with your friends, via Bluetooth, Email, or Messaging, etc.
Touch an album to open it and view its contents.
Touch a picture or a video in an album to view it.
| Gallery controls | |
| Slide show | |
| Share albums or files via various ways | |
| Delete | |
When viewing a picture, touch the Menu key, some additional options will be available to you, such as Delete, Slideshow, Edit, Rotate left, Rotate right,
Crop, Details, and Set picture as.
Sharing an Album
- Touch Launcher > Gallery.
- Touch the Menu key, touch Select album in the menu that opens.
- Select the albums you want to share.
- Touch.
- In the menu that opens, touch the application to use to share the selected
albums. You can share via Bluetooth, Email, Messaging, etc.
Sound recorder
Touch Launcher > Sound recorder.
Record sound and play sound file.
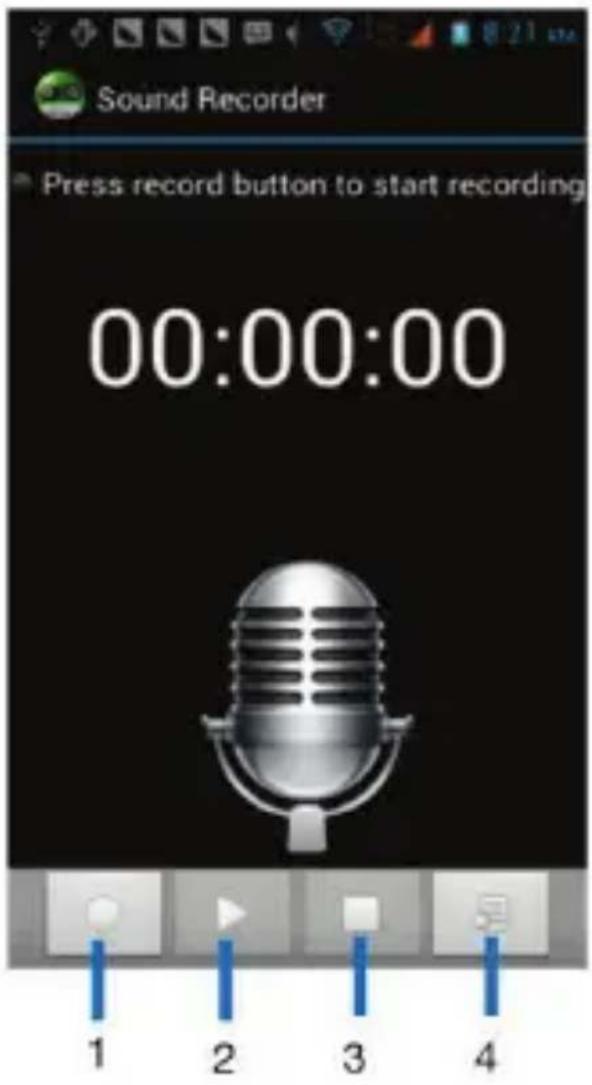
text_image
Sound Recorder Press record button to start recording 00:00:00 1 2 3 4| Sound recorder controls | |
| 1 To | start recording |
| 2 Review and play recorded file after recording | |
| 3 To | stop recording |
| 4 Recording file list | |
Browser
Use your web browser to view and navigate web pages, add pages as bookmarks, and save pages for offline reading. You can open several windows at the same time and switch among them easily.
Opening the web browser
Touch Launcher > Browser.
Searching and address bar
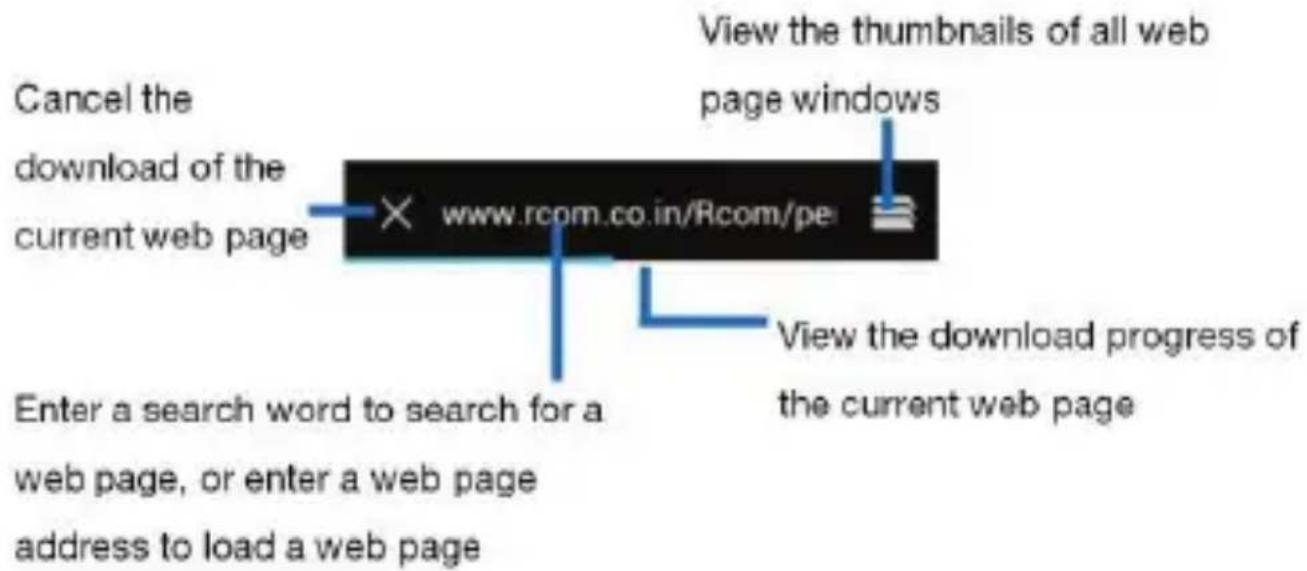
text_image
Cancel the download of the current web page × www.rcom.co.in/Rcom/pe View the thumbnails of all web page windows Enter a search word to search for a web page, or enter a web page address to load a web page View the download progress of the current web pageManaging bookmarks
Bookmarks let you access your favorite and frequently visited web pages quickly. You can add bookmarks directly from your phone browser.
Bookmarking a web page
- When you are viewing the web page, touch the Menu key.
- Touch Save to bookmarks.
- If desired, you can edit the bookmark.
- When you're done, touch OK.
Browser options
When you are viewing the web page, touch the Menu key, some options are available to you, such as Save to bookmarks which allows you to add a URL to
your bookmark list, Save for offline reading which allows you to store the current page in memory so that it can be read later even if you lose your internet connection.
Changing browser settings
You can change the browser settings and customize your browser view, such as set homepage, clear locally cached content and data bases, override a website's request to control zoom behavior.
Tools
Calendar
Touch Launcher > Calendar.
Your phone has a calendar for managing your time schedule. You can use the calendar to keep track of important events. After entering the calendar function menu, you can select year, month and date.
Setting the calendar view
- Touch Launcher > Calendar.
- Touch. February 2013
- Select Day, Week, or Month in the menu that opens.
Adding a calendar event
- Touch Launcher > Calendar.
- Touch.
- Enter the name, location, time, and description for the event.
- Select a reminder for the event.
- Touch DONE.
Clock
Touch Launcher > Clock.
The Clock allows you to view time and date. You can also add an alarm, set the alarm and turn it on. Then, the alarm can ring at a specific time you set.
Adding an alarm
- Touch Launcher > Clock.
- Touch Set alarm.
- Touch Add alarm.
- You need set time, repeat, ringtone, vibrate, etc. Then, turn it on.
- Touch OK. The alarm will ring at the time you have set.
Calculator
Touch Launcher > Calculator.
Keep your calculations on your finger tips with the calculator. Using this application allows you to make calculations. The calculator provides the basic arithmetic functions; addition, subtraction, multiplication, and division. You can also use an advanced panel.
How to use the calculator
- Touch Launcher > Calculator.
- Enter the first number using the numeric keys.
- Enter the operation for your calculation by touching the Plus, Minus, Multiplication, or Division key.
- Enter the next number.
- To view the result, touch the “=” (equals) key.
Touch the Menu key, you can open advanced panel to do calculation.
ES File Explorer
Touch Launcher > ES File Explorer.
ES File Explorer is a featured local/LAN/FTP/NET manager.
Access the ES File Explorer, from Local manager, touch Favorites to choose /external_sd/ (external SD card) or choose Home (internal storage), touch the Menu key, choose More > Help center > Help, to view its details.
Connecting to networks and devices
Your phone can connect to a variety of networks and devices, including WLAN,
Bluetooth. You can also transfer files to/from your PC through the data cable.
Determining the network you are using
- Touch Launcher > Settings.
- Touch More... > Mobile networks > Network settings > Access point names. The name of the wireless service provider you are currently registered with is selected in the list.
Editing or creating new access points
If you and your wireless service provider determine that you need to change the settings of your current access point name (APN) or to create a new one, you must obtain the APN and detailed settings from your provider.
- Touch Launcher > Settings.
- Touch More... > Mobile networks > Network settings > Access point names.
- Touch an existing APN to edit it, or touch the Menu key, then touch New APN. Enter the APN settings that you obtained from your wireless service provider.
- Touch the Menu key, then Save.
- If you created a new APN, touch it in the APNs screen to start using it.
WLAN networks
WLAN is a wireless networking technology that can provide internet access at distance of up to 100 meters. To use WLAN on your phone, you access a wireless access point, or “hotspot”. Some hotspots are open and you can simply connect to them. Others are hidden or implement other security features, so you must configure your phone so it can connect to them.
Tip: Turn off WLAN when you are not using it, to extend the life of your battery.
Connecting to WLAN network
- Touch Launcher > Settings >WLAN.
- Check WLAN to turn it on. The phone scans for available WLAN networks and displays the names of those it finds. Secured networks are indicated with a Lock icon.
- Touch a network to connect to it
If the network is secured, you are prompted to enter a password or other credentials (Ask your network administrator for details)
Receiving notifications
By default, when WLAN is on, you receive notifications in the status bar when your phone detects an open WLAN network.
- Turn on WLAN, if it's not already on.
- In the WLAN list screen, touch the Menu key to open Advanced options, check Network notification. You can uncheck this option to stop receiving notifications.
Bluetooth
Bluetooth is a short-range wireless communications technology that devices can use to exchange information over a distance of about 10 meters.
Turning Bluetooth on/off
- Touch Launcher > Settings > Bluetooth.
- Check or uncheck Bluetooth to turn it on or off.
Pairing with Bluetooth devices
You must pair your phone with a device before you can connect to it. Once you pair your phone with a device, they stay paired unless you unpair them.
- Touch Launcher > Settings > Bluetooth.
-
If Bluetooth is not turned on, check Bluetooth to turn it on. Your phone scans for and displays the IDs of all available Bluetooth devices in range.
-
If the device you want to pair with is not in the list, touch SEARCH FOR DEVICES.
- Touch the ID of the desired device in the list to pair it.
Connecting hands-free kit
You are provided with a hands-free earpiece set with your phone, which can be used to listen to your MP3 songs and listen and speak while on a call. To connect the hands-free earpiece, simply connect the connector into the connecting socket.
Tethering & portable hotspot
You can share your phone's mobile data connection via USB, as a portable WLAN hotspot, or Bluetooth.
Turning on/off portable WLAN hotspot
- Touch Launcher > Settings > More....
- Touch Tethering & portable hotspot, Check or uncheck Portable WLAN hotspot to turn it on or off.
Note: As Portable WLAN hotspot is enabled, WLAN function shall automatically close.
Portable WLAN hotspot settings
- Touch Launcher > Settings > More....
- Touch Tethering & portable hotspot, Check Portable WLAN hotspot to turn on hotspot.
- Touch Configure WLAN hotspot to set the hotspot name and password.
- After the password for hotspot is set, this password needs to be entered when other WLAN devices connect to the phone through WLAN.
USB tethering
You can share your phone's mobile data connection with a single computer using a USB cable.
- Connect your phone to a computer by using the USB cable that came with your phone.
- Touch Launcher > Settings > More....
- Touch Tethering & portable hotspot, check the USB tethering.
Connecting to a computer via USB
You can connect your phone to a computer with a USB cable to transfer music, pictures, and other files between your phone's SD card and the computer.
You cannot share your phone's data connection and SD card via USB cable at the same time. If you are using USB tethering, you must turn that off first.
The connection to USB interfaces has to be limited to USB 2.0 version or higher.
The connection to so called power USB is prohibited.
PC sync software
Suggestions: connect phone to computer, copy the [HandsetDriver] folder on the CD-ROM to your computer first, then backup it.
How to enable/disable CD-ROM mode
- Open handset menu [Settings > Developer options].
- Touch CD-ROM mode to enable/disable CD-ROM mode.
How to install Lenovo tool
Connect your handset to the computer, click LenovoTool_.*.*._os.exe to install Lenovo tool.
How to install handset USB driver
- Click [HandsetDriver\DriverInstall.exe] to install handset USB driver.
- Disable the CD-ROM mode (Open handset menu [Settings > Developer options], uncheck CD-ROM mode).
- Handset USB driver will install automatically.
How to uninstall handset USB driver
Click [HandsetDriver\DriverUninstall.exe] to uninstall handset USB driver.
Settings
Get to know the settings in your phone so that you can personalize them to your own requirements. Go to Settings to configure how your phone looks, sounds, communication, privacy, and operations in a variety of ways.
WLAN
Turn WLAN on or off, scan available WLAN networks, or add the WLAN network. The detailed information is available in the section named Connecting to networks and devices.
Bluetooth
Turn Bluetooth on or off, search for available Bluetooth devices, and make your phone visible or invisible to other Bluetooth devices. The detailed information is available in the section named Connecting to networks and devices.
More...
Turn Airplane mode on or off, and configure settings for VPN and Mobile networks, and enable your phone to share its mobile data connection as a portable WLAN hotspot, or through USB tethering.
Airplane mode
In areas where the use of mobile phones is restricted, you can activate the Airplane mode to disable phone function but still use other functions of your phone such as calendar, music and games. You will not be able to make/answer calls, send/receive messages or browse the internet in Airplane mode.
- On the Home screen, touch the Menu key, then touch Settings > More...
- Check the box for Airplane mode. The phone will turn off all wireless connections when Airplane mode is enabled.
Tip: You can press and hold the Power key, then select Airplane mode.
Dual SIM settings
Set preferences on how you use SIM/UIM inserted in your phone.
Call settings
Let you configure phone call settings, such as voicemail service, and other special features offered by your carrier.
Voicemail service
When you are unable to answer a call, you can let the caller leave a message for you to listen to later.
This service requires network support so make sure you apply for it before use. In the dialing keypad, touch and hold the "1" key to dial the voicemail number.
You can edit the voicemail number under Settings > Call settings > Call settings > Voicemail settings menu.
Audio profiles
Configure how your phone rings, vibrates, or alerts you in other ways when you receive communications, etc.
Display
● Brightness: Adjust the brightness of the screen.
- Wallpaper: Adapt the Home screen to your own style using wallpapers from Gallery, Live Wallpapers, or Static Wallpapers.
● Auto-rotate screen: Switch orientation automatically when rotating phone.
- Sleep: Adjust the delay before the screen automatically turns off.
Storage
Let you check out available space on your phone's system storage, phone internal storage and your SD card.
Copying files between a PC and your SD card, you should set the SD card as
USB mass storage.
- Connect your phone to your PC with the USB cable.
- Drag the Notification bar downwards.
- Choose USB connected, to turn on USB storage.
During this time, you can't access the SD card from your phone.
Safely removing the SD card
Drag down the Notification panel and choose Turn off USB storage.
Erasing the SD card
- Touch Launcher > Settings.
- Touch Storage > Erase SD card.
Battery
Check battery status and battery level.
Apps
Manage downloaded, SD card and running applications.
Accounts & sync
Allows you to add and manage supported accounts. Enables your phone to synchronize data with the synchronization accounts that you add.
Location services
Enable or disable Location service, GPS satellites, etc. You can let applications use data from sources such as WLAN and mobile networks to determine your approximate location, let applications use GPS to pinpoint your location, use server to assist GPS, and let Google use your location to improve search results and other services.
Security
Protect your phone by setting up different locks and passwords.
Language & input
Let you select the language for the text on your phone and for configuring the onscreen keyboard.
Backup & reset
Manage your personal data.
Data & time
You can set the format of date and time.
Schedule power on & off
Set powering on/off of the phone automatically.
Accessibility
Enable your installed accessibility services and adjust related settings.
Developer options
Set options for application development. For example, you can set the phone to enter debug mode when USB connections are active.
About phone
View information about your phone, such as Status, Legal information, etc.
Precautions and tips for the A600e
Never drop, strike, scratch, twist, knock, vibrate or push the A600e or place any heavy objects on it.
Gently touch the A600e.
Keep the A600e away from any magnetic substances, mobile phones in conversation, electrical appliances or speakers.
Avoid exposing the A600e to extreme temperatures (lower than -10^ or higher than 50^ ).
Do not place the A600e in a damp environment.
Do not use corrosive detergents or solvents to clean your A600e. Just wipe the
A600e screen with a damp, soft, lint-free cloth to clear fingerprints off it.
Recycling and environmental information
General recycling statement
Lenovo encourages owners of information technology (IT) equipment to
responsibly recycle their equipment when it is no longer needed. Lenovo offers a variety of programs and services to assist equipment owners in recycling their IT
products. For information on recycling Lenovo products, go to:
http://www.lenovo.com/recycling.
Important WEEE information

natural_image
Simple line drawing of a trash bin with crossed lines indicating no waste or plastic discharge (no text or symbols)
The WEEE marking on Lenovo products applies to countries with WEEE and e-waste regulations (for example, European Directive 2002/96/EC, India E-Waste Management & Handling Rules, 2011). Appliances are labeled in accordance with local regulations concerning waste electrical and electronic equipment (WEEE).
These regulations determine the framework for the return and recycling of used appliances as applicable within each geography. This label is applied to various products to indicate that the product is not to be thrown away, but rather put in the established collective systems for reclaiming these end of life products.
Users of electrical and electronic equipment (EEE) with the WEEE marking must not dispose of end of life EEE as unsorted municipal waste, but use the collection framework available to them for the return, recycle, and recovery of WEEE and to minimize any potential effects of EEE on the environment and human health due to the presence of hazardous substances. For additional WEEE information go to: http://www.lenovo.com/recycling.
Recycling information for India
Recycling and disposal information for India is available at:
http://www.lenovo.com/social_responsibility/us/en/sustainability/ptb_india.html.
Battery recycling marks

natural_image
Symbol of a trash bin crossed with two crossed lines, representing waste sorting or restriction (no text present)Restriction of Hazardous Substances Directive (RoHS)
India RoHS
RoHS compliant as per E-Waste (Management & Handling) Rules, 2011.
Version number: V1.0 70112729