Tablet Charging Cabinets - Armoires de charge pour tablettes Anthro - Free user manual and instructions
Find the device manual for free Tablet Charging Cabinets Anthro in PDF.

| Product Type | Tablet Charging Cabinet |
| Brand | Anthro |
| Dimensions (H x W x D) | 36" x 20" x 16" (91.4 x 50.8 x 40.6 cm) |
| Weight | 45 lbs (20.4 kg) |
| Material | Heavy-duty steel with powder coat finish |
| Color | Black |
| Number of Tablets Charged | 16 tablets simultaneously |
| Charging Ports | 16 USB-A ports |
| Input Voltage | 100-240V AC, 50/60Hz |
| Output per Port | 5V, 2.4A (12W max per port) |
| Total Power Output | 192W |
| Lock Type | Key lock with 2 keys included |
| Ventilation | Active cooling fans with rear exhaust |
| Cable Management | Internal routing channels and ties |
| Assembly Required | No, ready to use out of box |
| Included Accessories | Power cord, 2 keys, shelf dividers, cable ties |
| Warranty | 1 year limited warranty |
| Certifications | UL, FCC, CE |
| Operating Temperature | 32°F to 104°F (0°C to 40°C) |
| Mounting Style | Freestanding, floor-standing |
| Maintenance | Wipe exterior with dry cloth; clean fans with compressed air |
Frequently Asked Questions - Tablet Charging Cabinets Anthro
User questions about Tablet Charging Cabinets Anthro
0 question about this device. Answer the ones you know or ask your own.
Ask a new question about this device
Download the instructions for your Armoires de charge pour tablettes in PDF format for free! Find your manual Tablet Charging Cabinets - Anthro and take your electronic device back in hand. On this page are published all the documents necessary for the use of your device. Tablet Charging Cabinets by Anthro.
USER MANUAL Tablet Charging Cabinets Anthro
Components at a Glance
The open views of the front and side of the cabinet below are for the TAB20 cabinet. The interior of the TAB16 will look slightly different.

text_image
front of Cabinet (closed) Locking front door to User area. Locking door latch w/padlock bracket. Barbara
natural_image
Interior view of a laboratory or storage cabinet with numbered compartments (4, 5, 6) and open door (no visible text or symbols on the cabinet itself)Front of Cabinet (open)
- Lock mechanism
- Bay dividers with Cable Channels
- Laptop cubby for host computer

natural_image
Interior view of a server room with numbered compartments (7, 8, 9) showing internal wiring and equipment (no text or symbols visible)Side of Cabinet (open)
- Power cord
- Pegboard divider with cable clips
- Locking side door to IT area
Hello! Thank you for choosing Anthro.
Anthro's Tablet Charging Cabinets are designed to automatically charge and store tablet, smart phone, and hand-held devices safely and efficiently. The TAB20 cabinet supports 20 devices. The TAB16 cabinet supports 16 devices. Please review this manual before installing your equipment to learn how to use the cabinet safely.
The cabinet is listed to UL Information Technology Equipment 60950-1 safety standard.
AC input: 120VAC 60 Hz. Max amps: 12A.
Table of Contents
Getting Started 2
Safety Notices 2
Loading Devices 3
Troubleshooting Guide ..... 4
Warranty 4
Getting Started
Important Safeguards - We want you to be safe!
These cabinets are electrical devices. Use care with them and follow these important safeguards:
- Electrical devices are not toys. Children are often unaware of the hazards associated with electrical devices, so this unit must always be used by adults or with adult supervision.
• Do not use this unit outdoors. - Liquids should not be stored in, set on or placed inside this unit.
- Never unplug this product from the outlet when your hands are wet.
- Set the power switch to the down OFF position before you unplug the unit from the wall, plug the unit into the wall, or plug in devices.
- Be careful with the power cord. Do not jam the power cord against sharp edges. Do not use the unit if the cord appears to be damaged or if the ground prong is missing. When the unit is not plugged in, wrap the power cord and store in the IT area.
• Do not use an extension cord with this unit. - Inadequate repair can create significant hazards to users and is not covered by the warranty. Repairs should always be performed by a qualified electrician.
Electrical Testing
- Before using your new charging cabinet, have a qualified electrician verify the current draw does not exceed the rating of the unit when all the devices are installed.
- Test the contact integrity of the wall outlet using a receptacle tension tester such as a Woodhead 1760 or a Safeplug 1700.
- Test the branch circuit for ground integrity and branch circuit protection.
- Do not plug in the unit if the switch, receptacles, or power cord have been damaged or if the ground prong is missing from the plug. If repairs are ever needed, they should be performed by a qualified electrician.
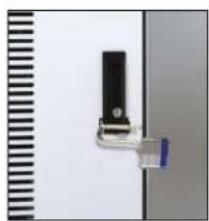
Doors and Locks
The front doors on each cabinet feature a two-point keyed locking system to protect your devices. To open a door, lift the bottom of the handle and rotate it to the inside of the unit. Your unit shipped with 2 keys. Contact Anthro, 800.325.3841, for replacements.
For added security, each front door features a padlock bracket to hold your own padlock. When installed, your padlock restricts access to the handle so the unit can't be opened.
natural_image
Close-up of a mechanical component with a black rectangular block and blue clip, mounted on a vertical surface (no visible text or symbols)Please return the enclosed Registration Card to receive our product updates, new catalogs, sale flyers, and the chance to win \$300 worth of Anthro furniture.

text_image
WAIT! Please you have to get your right for the person's care. You are you doing your own care. You can't have you to get your right for your care. You can't have you to get your right for your care. You can't have you to get your right for your care. You can't have you to get your right for your care. You can't have you to get your right for your care. You can't have you to get your right for your care. You can't have you to get your right for your care. You can't have you to get your right for your care.Loading Devices, Cable Management
Visit anthro.com/tablet to see tips and tricks for wiring up Anthro Tablet Charging Solutions in our Wire Showdown video!
In the front User area of the cabinet
- Starting at the outside of each shelf, route one charging cord along the top of each divider. Make sure that the cord end that goes into the devices is at the front of the bay and that
the power end goes to the back panel and into the IT area.
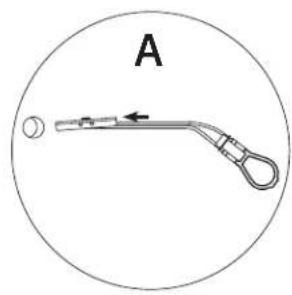
- Leave enough slack in front (approximately 4.5"; use the height of the divider as a measuring stick) so users can plug in the device without straining the cord. [Image A]
- Weave the cord around the short hook at the front of the divider, then back and forth through the three long channels along the top of the divider, including the center channel that's lower than the others, and finally through the short hook at the back of the divider. [Image B and C]
• Feed the rest of the cord into the IT area. [Image D]

natural_image
Close-up of a white electronic component with multiple vertical pins and a curved wire, labeled 3 to 6 (no text or symbols on the component itself)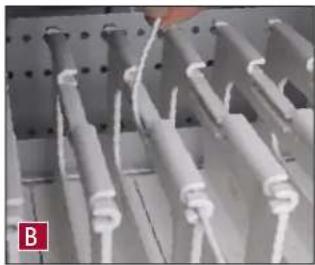
natural_image
Close-up of white cylindrical wires or connectors in a metal rack (no visible text or symbols)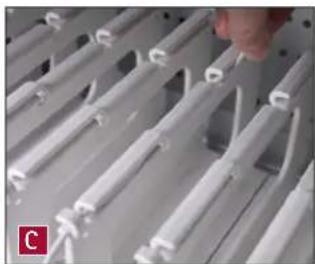
natural_image
Close-up of white plastic electrical connectors arranged in rows, with a hand adjusting the wires (no visible text or symbols)
natural_image
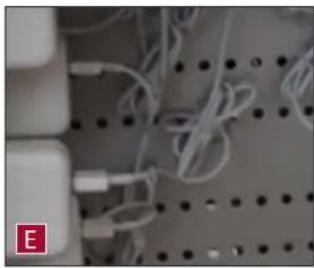
Close-up of a hand installing or adjusting white plastic components on a metal rack (no visible text or symbols)In the side IT area of the cabinet
- Plug in each power adapter, then poke cable clips into the holes in the pegboard divider – one cable clip per adapter should do. Coil each cord and secure it into the cable clip before plugging it into the adapter. [Image E]
- A great technique for coiling cables is to wind them around two fingers before securing them in the cable clips. [Image F] Be sure to leave enough slack in your cord so it can plug into the adapter.
• Plug the cord into the adapter. [Image G]
- For devices with large power adapters, first bundle the cord and adapter together to save space, then plug in the adapter. Finally, use cable clips to secure the bundle to the pegboard divider.
- Turn the power switch to the OFF position before plugging the cabinet into the wall. [Image H]
natural_image
Close-up of white cables and connectors on a perforated metal plate (no text or symbols visible)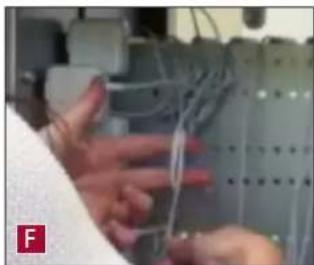
natural_image
Close-up of hands operating a mechanical device with wires and components (no visible text or symbols)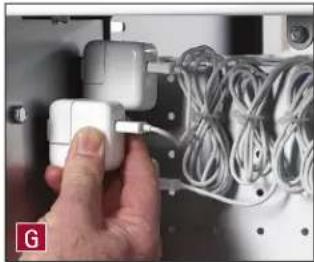
natural_image
Hand inserting a white cable into a rack of cables (no text or symbols visible)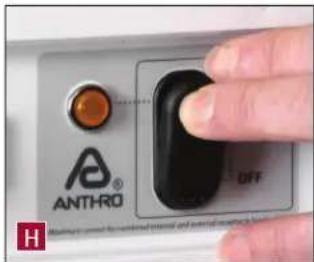
text_image
ANTHRO OFFSTEP 1
Select the Mounting Location and Method
- When choosing the right place to install your cabinet, be sure to check the location of your power source. The power cord that comes with your cabinet is 10 ft long.
- Your cabinet can be wall-mounted to wood wall studs or drywall, or bolt it to a countertop. If you're installing to wood wall studs, go to Step 2. If you're installing into drywall, go to Step 3. If you're bolting to a countertop, go to Step 4. The cabinet also comes with cushioned feet; use them if you're placing your cabinet on a flat surface. See Step 5 for installation instructions.
STEP 2
Wall-mount to Wood Wall Studs
This is a two-person step.
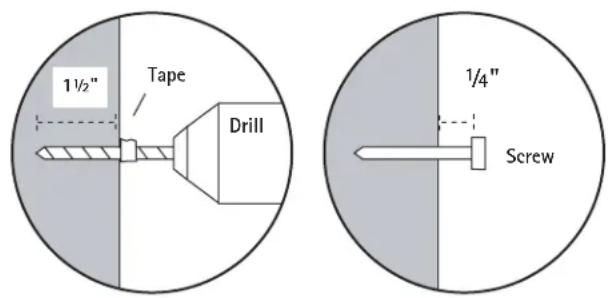
■ Determine the installation point for your cabinet. Using a stud finder, locate the studs. While one person holds the cabinet frame up to the wall at the desired height, the other marks the height of the top of the cabinet. Measure down 1-1/2" along the studs to determine the position of the screws and mark where the screws will go. Use a level to make sure the marks are level.
■ Using a 1/8" drill bit, drill one hole in a stud about 1-1/2" deep. How do you make sure that hole is 1-1/2" deep? Measure that length on your drill bit and mark it with a piece of masking tape. Stop drilling when you reach the masking tape. Repeat for the second screw.
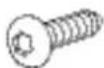
- Using a Phillips driver (or a power driver with a Phillips bit), attach the first 1-5/8" long screw at that mounting point, but don't tighten all the way to the wall. Stop tightening when the screw head is about 1/4" away from wall.
■ Lift the cabinet onto the wall. Mark the screw position of the lower screws. Remove the cabinet, drill the lower holes, and install the lower screws. Lift the cabinet into place and tighten all four screws.

1-5/8" Screw
325-5086-00
Wall Stud Profile
text_image
1½" Tape Drill 1/4" Screw
Go to Step 6.
STEP 3
Wall-mount to Drywall
■ Determine the installation point for your cabinet. While one person holds the cabinet frame up to the wall at the desired height, the other marks the height of the top of the cabinet. Measure down 1-1/2" to determine the position of the screws and mark where the screws will go. Use a level to make sure the marks are level.
- Drill 1/2" diameter hole at the mounting point.
■ Insert a TOGGLER into one hole, metal end first.
■ Pull the plastic ring end so the metal channel rests flush behind the wall. With your other hand, slide the plastic cap along the straps until the flange of the cap is flush with the wall.
■ Place your thumb between the plastic straps. Push side to side, snapping off the straps at the wall.
- Insert a 1-5/8" long screw into the TOGGLER, but don't tighten all the way. Leave the bolt head about 1/4" from the plastic cap.
■ Repeat for the second TOGGLER.
■ Lift the cabinet onto the wall. Mark the screw position of the lower screws. Remove the cabinet and install the lower TOGGLERs. Lift the cabinet into place and tighten all four screws.
Go to Step 6.
natural_image
Simple line drawing of a medical or laboratory device with a circular end and a curved handle, labeled 'A' (no text or symbols on the diagram itself)
natural_image
Simple line drawing of a mechanical lever or support structure with a circular label 'B' and an arrow indicating left motion (no text or symbols beyond label)
natural_image
Simple line drawing of a hanging tool or bracket with a vertical bar and label 'C' (no text or symbols on the object itself)
text_image
D
STEP 4
Bolt-through Installation to Countertop
■ Pre-drill a 1/4" dia hole in your countertop or shelf.
■ Using a box knife, slice through the membrane covering the pre-drilled holes on the bottom of the cabinet.
■ Slide the 3.5" bolt through the washer, through the bottom of the cabinet, through the countertop, and capture with the 325-5259-00 nut.
3.5" Bolt
325-5657-00

5/8" Washer 325-5379-00

Nylock Nuts
325-5259-00
Go to Step 6.
STEP 5
Install Feet
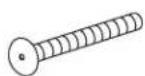
- Stick a 3/4" wood screw through each rubber bumper (581-5063-00).
- Locate the four pre-drilled holes on the bottom of the cabinet, one in each corner. Using the Anthro driver, attach each foot to the cabinet.
3/4" (#10-9) Wood Screw 325-5575-00
STEP 6
Install the Bay Labels and Route Cables
- Your cabinet comes with labels for numbering the bays in your cabinet. Line up each label with the front face of the bay shelf, peel of the backer, and affix the label.
- Starting at the far left-hand side of each shelf, route one cord through the channel at the top of the divider. The right-hand divider on each shelf will not have a cord. Make sure the cord end that goes into the device is at the front of the cart and the power end goes through the back panel and into the IT area. Leave enough slack in front so users have enough cord to easily plug into the device without straining the cord. To quickly measure an adequate length, use the height of the divider as a measuring stick.
- In the IT area, poke cable clips into the holes in the pegboard divider and route cords. Plug in each power adapter, then connect each cord to an adapter. Turn the power switch to the OFF position before plugging the cart or cabinet into the wall.
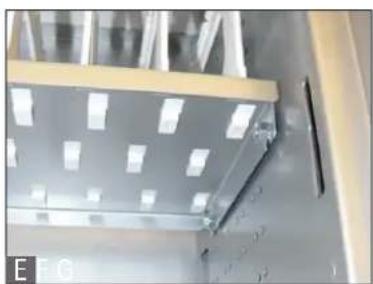
HOW TO REMOVE THE UPPER CABINET SHELF
To store taller devices in a Tablet Charging Cabinet, remove the upper shelf following these steps:
- Open the front door of the cabinet all the way.
• Using a 7/16" socket, loosen but do not remove the four Keps Nuts located under the upper shelf. [Image E] - Carefully lift the shelf straight up until the shelf clears the nuts, then tilt the shelf and pull it out. [Images F and G]
• Using the 7/16" socket, tighten the nuts.
natural_image
Interior view of a metallic industrial or laboratory facility with a metal panel and structural supports (no visible text or symbols)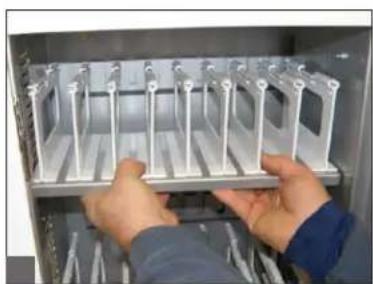
natural_image
Person installing or adjusting a metal rack inside an open industrial enclosure (no visible text or symbols)
natural_image
Person holding a metallic rack inside an open refrigerator (no visible text or symbols)CONGRATULATIONS! YOUR CABINET ASSEMBLY IS COMPLETE!
Troubleshooting Guide
Does it sync?
Yes, Anthro's cabinets sync. Use either your facility's wireless network or, for a wired connection, use Anthro's USB Sync Kit (sold separately). Learn more at anthro.com/tablet.
How do I know if my devices will draw more than the allowed current?
Have a qualified electrician verify the unit's current draw. Perform this test with devices installed and batteries discharged.
The devices are all plugged in, but they won't charge. What do I do?
First, check the cabinet: With the switch in the down OFF position, inspect the main power cord and plug to make sure that they're undamaged. Plug the cord into a working power outlet. Next, check the devices: Verify that each device is connected to its power adapter and that each brick is plugged into the power column. Move the switch to the up ON position to direct power to the devices. Still need some help? Call Anthro at 800-325-3841 for assistance.
Someone tried to break into the unit and damaged a door. Can it be replaced?
Yes, you can order a replacement. Call Anthro at 800-325-3841. We'll ask you for the model number of your unit and whether it's for the front or side of the unit.
My power cord/plug is damaged. Is it covered under warranty?
No, it is not covered under warranty. If the plug is damaged, have a qualified electrician replace it. If you need a replacement cord, contact Anthro at 800-325-3841.
When I plug in the unit it trips the circuit breaker. What is wrong?
The cabinets are designed to run on a 15 amp circuit. If you have other equipment or appliances plugged into the same circuit you may be overloading it. Have a qualified electrician check that adequate power is available in the circuit.
My unit was damaged during shipment. What should I do?
Anthro has a program established with our freight carriers to address ship damage. Please contact Anthro at 800.325.3841 and we'll work with you.
How do I find the unit's serial number?
The serial number label is located inside the IT area near the base.
Can I remove a bay divider?
Yes! Locate the tab at the base of the front of the divider. Place a piece of masking tape on the shelf in front of the tab to protect the shelf's finish, then carefully and gently pry up the tab using a narrow flat-head screwdriver.
Anthro Corporation Limited Warranty
What Does This Warranty Cover?
This warranty covers any defects in material or workmanship in Anthro Charging Cabinets.
Who is Covered By This Warranty?
This warranty extends to the original consumer of the product only.
How Long Does This Warranty Last?
The warranty lasts for two years from date of purchase for the electrical components (excluding the data cables, power cord and plug) and lifetime for the enclosure.
What Will Anthro Do?
Anthro will send replacement parts only. Labor is not included.
What Is Not Covered By This Warranty?
This warranty does not cover the power cord. This warranty does not cover product that has been damaged by accident, unreasonable use, neglect, inadequate repair, tampering or other causes not arising from defects in material or workmanship FOR AS LONG AS THE WARRANTY PERIODS LISTED ABOVE. Labor costs are not included. This includes but is not limited to the implied warranties or merchantability and fitness. Some states do not allow limitations on how long an implied warranty lasts, so this limitation may not apply to you.
ANTHRO'S RESPONSIBILITY IS LIMITED TO THE ACTIONS LISTED UNDER "What Will Anthro Do?" AS LISTED ABOVE AND NOTHING ELSE.
This warranty does not cover, and Anthro will not be responsible for, any damages you may have due to loss of use of the product, or any other costs or expenses incurred by you or anyone else who uses the product, whether due to defects, breach of contract, negligence, strict liability or otherwise. ANTHRO IS NOT LIABLE FOR ANY INDIRECT, SPECIAL, INCIDENTAL, OR CONSEQUENTIAL DAMAGES RELATED TO THE PRODUCT OR THIS WARRANTY. Some states do not allow the exclusion or limitations or consequential or incidental damages, so these limitations or exclusions may not apply to you.
How Do I Get Service?
Call Anthro at 1-800-325-3841.
How Does State Law Apply To This Warranty?
This warranty gives you specific legal rights and you may also have other rights that vary from state to state. This warranty is governed by the laws of Oregon, excluding its conflict of laws principles, unless your state requires that its law be used.

ANTHRO
Technology Furniture®
- Fast and Friendly!
Anthro Corporation® | 10450 SW Manhasset Dr. | Tualatin, OR 97062
Toll-free: 800.325.3841 | Fax: 800.325.0045 | email: sales@anthro.com | anthro.com
Outside the U.S. | Tel: 503.691.2556 | Fax: 503.691.2409

natural_image
Woman smiling while holding a white industrial control cabinet (no visible text or symbols)Thank you for choosing Anthro!
Please return the enclosed Registration Card to receive our product updates, new catalogs, and sale flyers.

300-5592-00

text_image
ANTHRO®800.325.3841
November 2013