
WS909 - Scent diffuser OREGON SCIENTIFIC - Free user manual and instructions
Find the device manual for free WS909 OREGON SCIENTIFIC in PDF.


| Product Type | Fragrance Diffuser |
| Brand | Oregon Scientific |
| Model | WS909 |
| Dimensions (L x W x H) | 12 x 12 x 20 cm |
| Weight | 0.5 kg |
| Power | 3 AA batteries (not included) |
| Main Functions | Programmed diffusion, intensity adjustment, auto shut-off |
| Tank Capacity | 50 ml |
| Coverage Area | Up to 30 m² |
| Material | ABS Plastic |
| Color | White / Silver |
| Maintenance and Cleaning | Clean the tank with a soft cloth and warm water. Do not immerse. |
| Safety | Auto shut-off if tipped over |
| Spare Parts and Repairability | Tank, cap, atomizer available on the manufacturer's website |
| Warranty | 2 years |
| General Information | Ultrasonic diffuser, quiet operation |
Frequently Asked Questions - WS909 OREGON SCIENTIFIC
User questions about WS909 OREGON SCIENTIFIC
0 question about this device. Answer the ones you know or ask your own.
Ask a new question about this device
Download the instructions for your Scent diffuser in PDF format for free! Find your manual WS909 - OREGON SCIENTIFIC and take your electronic device back in hand. On this page are published all the documents necessary for the use of your device. WS909 by OREGON SCIENTIFIC.
USER MANUAL WS909 OREGON SCIENTIFIC
Lighting Settings.... 3
Sleep Timer Settings.... 3
Tune Settings and External Audio Devices.... 3
Volume Settings...... 4
Cleaning the water Tank.... 4
Maintenance.... 4
Specifications.... 4
About Oregon Scientific.... 4
EU-Declaration of Comformity.... 4
INTRODUCTION
Thank you for your purchase of i.relax Zen Aroma Diffuser. Please read these instructions carefully and keep the manual near for future reference. By breaking up a mixture of water and essential oils into millions of micro-particles, this aroma diffuser is designed to help you relax at home. Oregon Scientific designed this product to provide you with three of the well known holistic relaxation methods: Aromatherapy, Colour Therapy and Sound therapy.
PRECAUTIONS
- Do not turn the unit upside down without removing the Glass Cover, Plastic Cover and / or the liquid content from the water tank as described in the user manual when attempting to plug or unplug any cable.
- Handle the unit and the Glass Cover with extra care.
- Do not fill more than the maximum mark indicated at the interior of the water tank.
- Do not subject the unit to excessive force, shock, dust, temperature or humidity.
- Store and use the aroma diffuser at room temperature only, and do not use when the room temperature is very low (< 0°C).
- Do not cover the ventilation holes with any items such as newspapers, curtains etc.
- Remove dust regularly with a dry cloth. Accumulated dust poses a potential of fire hazard.
- Do not expose your aroma diffuser to extreme heat or light (e.g. direct sunlight).
- Do not immerse the unit in water. If you spill any liquid on it, dry it immediately with a soft, lint-free cloth.
- Do not clean the unit with abrasive or corrosive materials.
• Only use fresh batteries. - When disposing this product, ensure it is collected separately for special waste treatment.
- Placement of this product on certain types of timber may result in damage to its finish for which Oregon Scientific will not be responsible. Consult the furniture manufacturer's care instructions for information.
- Images shown in this manual may differ from the actual display.
- Do not tamper with the unit's internal components. This invalidates the warranty.
- The contents of this manual may not be reproduced without the permission of the manufacturer.
-
Do not dispose old batteries as unsorted municipal waste. Collection of such waste separately for.
-
If the supply cord is damaged, it must be replaced by a special cord or assembly available from the manufacturer or its service agent.
- This appliance is not intended for use by persons (including children) with reduced physical, sensory or mental capabilities, or lack of experience and knowledge, unless they have been given supervision or instruction concerning use of the appliance by a person responsible for their safety.
• Children should be supervised to ensure that they do not play with the appliance - The instructions shall include the substance of the following:
The appliance is only to be used with the recommended vaporizing medium. The use of other substances may give rise to a toxic or fire risk.
For the alliances that are directly plugged into socket-outlets, if the temperature rise of accessible surfaces during the test of Clause 11 exceeds the value specified for handles knobs, grips and similar parts that are held for short periods only in normal use, the instructions shall include the substance of the following: - The unit has hot surfaces to evaporate the active ingredients and these surfaces should not be touched during use.
NOTE The technical specifications for this product and the contents of the user manual are subject to change without notice.
NOTE Features and accessories will not be available in all countries. For more information, please contact your local retailer.
OVERVIEW
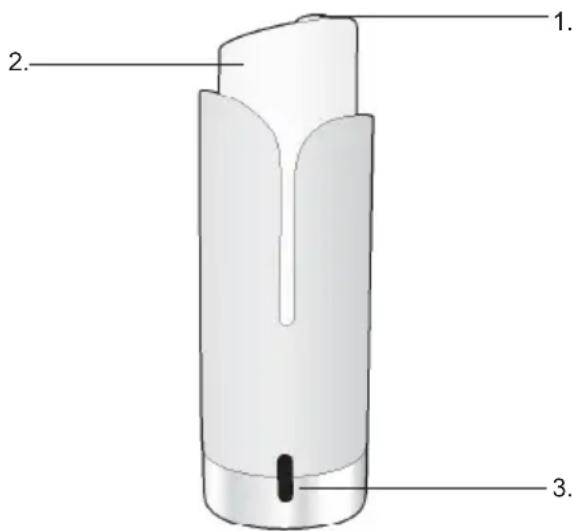
- Diffuser outlet
- Glass Cover
- LED Indicator Light: Orange / Red light

natural_image
3D diagram of a cylindrical device with a central slot and two labeled points (4 and 5), no text or symbols present.-
DC: Socket for connecting to AC / DC power adaptor.
-
Audio Line in Jack
REMOTE CONTROL
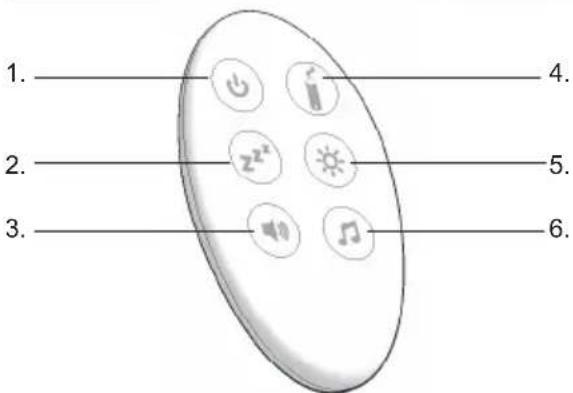
- POWER button: Turn on / off the unit.
- SLEEP TIMER button: Set diffuser timer (120mins / 60 mins / OFF)
- VOLUME button: Set speaker volume (low / medium / high)
- DIFFUSE button: Turn on / off the diffuse function
- LIGHT button: Press to choose light setting: Red / Orange / Yellow / Green / Blue / Purple / Loop / OFF
- TUNE button: Press to toggle one of the 5 background tunes
FEATURES
- Unltrasonic Diffusing Technology
- Soothing Sounds and Music line-in
- Colour light effect
- Material: Natural wood
- Ultrasonic technology with special mist dispersion effect
- Light effect in 6 colors (Red, Orange, Yellow, Blue, Green, Purple)
- Choice of 2 natural sounds and 3 musical pieces
- Audio music line-in
- Remote control
- Sleep timer function
- Low water level indicator
- Power: AC / DC adaptor (included)
GETTING STARTED
Connecting to power mains
- Remove the battery protector before first use.
- Remove the Glass Cover and the Plastic Cover from the unit.

flowchart
graph TD
    A["Input"] --> B["Processing"]
    B --> C["Output"]
Glass CoverPlastic Cove
- Plug the power adaptor to the DC Jack.
- Place the unit on a stable and even surface.
- Pour maximum 75ml of room temperature tap water into the water tank.
- Add few drops of essential oil into the water tank as illustrated.
- Put the Plastic Cover and Glass cover back to the unit.

- Connect the power adaptor the mains power supply.
- Press the POWER ⏻ button on the remote control to turn on the unit.
NOTE
• Do not use distilled water.
• Do not use water over 40 °C.
• Use water soluble essential oil only.
- Switch off and unplug the unit from the mains before moving or cleaning the unit.
- Do not overfill the water tank. The timber body of the unit will crack if absorbed too much moisture. Always keep the timber body dry.
- Do not turn the unit upside down when the water tank is filled and /or the Glass Cover and / or the Plastic Cover have not been removed from the unit.
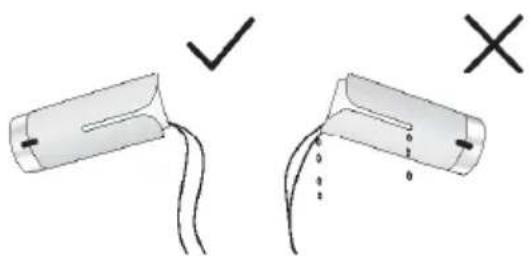
To pour away the remnant from the water tank
- Press the POWER ⏻ button at the remote control to turn off the unit and unplug from the mains.
- Remove the Glass Cover and Plastic cover from the unit.
- Pour the remnant away as illustrated.
natural_image
Two mechanical components with checkmark and cross symbols indicating alignment or failure (no text or labels)- Put the covers back to the unit when finished.
IMPORTANT
- Do not pour the remnants from the diffuser outlet.
- Do not pour the remnants from any other side of the water tank to avoid the remnants drips to the timber body.
- If the remnants spilt accidentally to the timber body, the power cable or the power plug, immediately wipe with a soft lint-free cloth to remove all the moisture.
USING THE AROMA DIFFUSER
DIFFUSION
- Press the DIFFUSE button to turn on aroma diffusion function.
- Press again to turn off the diffusion function
- When there is no or not enough water, the red indicator light will flash unit the water tank is filled. You should turn off the unit by press the POWER ⏻ button, refill the water tank and then turn on the unit and diffusion function again.
NOTE
Do not direct the aroma mist towards furniture or electrical appliances.
LIGHTING SETTINGS
- Press the LIGHT ✪ button to turn on the lighting.
- Press the LIGHT ✪ button repeatedly to select desired lighting mode or to turn lighting off.
- The order of setting choices is red, orange, yellow, green, blue, purple, loop and off.
SLEEP TIMER SETTINGS
- Press the SLEEP TIMER button repeatedly to toggle timer setting or to turn off the timer.
- The order of setting choices is 120 mins, 60 mins and off.
- When 120 mins timer is selected two orange indicator light will turn on and the countdown starts instantly. When there is 60 mins left one of the orange indicator light will switch off automatically.
- When 60 mins timer is selected one orange indicator light will turn on and the countdown starts instantly.
NOTE
The unit will switch off when the timer ends. Press the POWER ⏻ button again to turn on the unit and select functions.
TUNE SETTINGS AND EXTERNAL AUDIO DEVICES
- Press the TUNE 🎨 button repeatedly to choose background tunes or to turn off the tune function.
• There are 5 tunes of choices.
Using external audio devices
The Zen Aroma Diffuser is compatible with any audio device with a 3.5mm audio output jack. To connect a external audio device to the unit:
- Turn off the unit by pressing the POWER button ⏻ at the control panel.
- Remove the Glass Cover and Plastic Cover and pour away the liquid in the water as described in GETTING STARTED.
- Connect the external audio device with the bullet-shaped plug of 3.5mm audio cable and connect the unit with the L-shaped plug of the same cable.
- Place the unit and the audio device on a stable and even surface.
- Pour maximum 75ml of room temperature tap water into the water tank.
- Add few drops of essential oil into the water tank.
- Put the Plastic Cover and Glass cover back to the unit as described in GETTING STARTED.
- Connect the power adaptor the mains power supply.
- Press the POWER ⏻ button on the remote control to turn on the unit.
- Turn on the external audio device, the speaker of the unit will start broadcasting the content immediately.
NOTE
- The background tune function of the unit will not be able to operate when the 3.5mm audio plug is connected to the unit, even when there is no audio device connected.
- Do not turn the unit upside down without removing the Glass Cover, Plastic Cover and / or the liquid content from the water tank as described above when attempting to plug or unplug any cable.
- Do not connect the line in jack of the unit with the bullet-shaped plug of the 3.5mm audio cable. The unit will not be able to stand upright properly.
VOLUME SETTINGS
- Press the VOLUME 📁 button repeatedly to adjust the speaker volume.
- The order of setting choices is low, medium and high.
CLEANING THE WATER TANK
The water tank should be cleaned regularly by using the cleaning clip.
- Remove the Glass Cover and Plastic Cover from the unit. Pour away any remnant from the water tank as described in GETTING STARTED.
- Pick a small piece of soft lint-free cloth by the cleaning clip.
- Reach and clean the diffuser plate at the base of the water tank with the cleaning clip and the cloth. Clean also the interior of the water tank.
- Put the covers back to the unit.
MAINTENANCE
- The suitable water temperature for the water tank is 15 - 40 °C.
• Clean water tank and cover weekly. - Refresh the water in the water tank each time you use the unit.
- Make sure the unit has been cleaned, drained and dried completely, including the body, the water tank, the cables and plugs, with a soft and dry cloth when you are not going to use the unit for a long time.
- Do not immerse the whole unit or any cables and plugs in water or any other liquid. Clean the base unit and the body with a dry cloth.
• Do not use cleaning or scouring agents.
SPECIFICATIONS
| TYPE | DESCRIPTION |
| MAIN UNIT | |
| L x W x H | 80mm(L)x80mm(W)x 228mm(H)(3.15in x 3.17in x 8.98in) |
| Weight | 700g (1.54lbs) |
| Power | Power adaptor: INPUT 100 – 240V ~ 50/60Hz |
ABOUT OREGON SCIENTIFIC
Visit our website (www.oregonscientific.com) to learn more about Oregon Scientific products. If you're in the US and would like to contact our Customer Care department directly, please visit: www2.oregonscientific.com/service/support OR
Call 1-800-853-8883.
For international inquiries, please visit:
www2.oregonscientific.com/about/international
EU-DECLARATION OF CONFORMITY
Hereby, Oregon Scientific, declares that this WS909 i.relax Zen Aroma Diffuser is in compliance with EMC directive 2004 / 108 / CE. A copy of the signed and dated Declaration of Conformity is available on request via our Oregon Scientific Customer Service.

natural_image
3D diagram of a cylindrical device with a central slot and two labeled points (no text or symbols on the object itself)natural_image
Two diagrams showing a mechanical or electrical component with a checkmark and an X mark, no text or symbols present.- Press the VOLUME 📁 button repeatedly to adjust the speaker volume.
- The order of setting choices is low, medium and high.
PULIZIA DEL SERBATOIO
natural_image
3D diagram of a cylindrical device with a central slot and labeled parts 4 and 5 (no text or symbols on the device itself)natural_image
Two diagrams showing a cylindrical object with a checkmark and an X symbol, connected by wires (no text or labels present)EUROPE - DÉCLARATION DE CONFORMITÉ
natural_image
3D diagram of a cylindrical device with a central slot and labeled parts 4 and 5 (no text or symbols on the device itself)natural_image
Two diagrams showing a cylindrical object with a checkmark and an X mark, connected by wires (no text or symbols present)i.relax Difusor de aroma zen
Modelo: WS909
MANUAL DE USUARIO
CONTENIDOS
Introducción.... 1
Precauciones.... 1
Resumen.... 1
natural_image
3D diagram of a cylindrical device with internal components and labeled parts (no text or symbols on the object itself)natural_image
Two diagrams showing a cylindrical object with a checkmark and an inverted view of its internal structure, marked with X and Y axes (no text or symbols present)i.relax Difusor de Aroma Zen
Modelo: WS909
MANUAL DO UTILIZADOR
ÍNDICE
Introdução.... 1
Precauções.... 1
Visão Geral.... 1
Controlo Remoto.... 2
natural_image
3D rendering of a cylindrical electronic device with a black indicator light and mounting base (no text or symbols)-
- CC: tomada para ligar o adaptador de corrente CA / CC.
- Tomada de entrada de sinal áudio
CONTROLO REMOTO
-
-
- 6.

natural_image
Two diagrams showing a cylindrical object with a checkmark and an X mark, connected by wires (no text or symbols present)natural_image
3D diagram of a cylindrical device with a central slot and two labeled points (4 and 5) at the bottom, no text or symbols on the object itself.natural_image
Two identical diagrams showing a cylindrical object with a curved line and a submerged object, marked with check and cross symbols (no text or labels)| TYPE | BESCHRIJVING |
| HET APPARAAT | |
| L x B x H | 80mm(L)x80mm(B)x 228mm (H)(3.15in x 3.15in x 8.98in) |
| Gewicht | 700g (1.54 lbs) |
| Stroom: | Voeding adapter: INVOER100 – 240V ~ 50/60Hz |
OVER OREGON SCIENTIFIC
natural_image
3D diagram of a cylindrical device with a central slot and two labeled points (4 and 5) at the base, no text or symbols on the object itself.natural_image
Two hand-drawn diagrams showing a cable or wire connection, with checkmark and cross symbols indicating correct and incorrect states (no text or labels present)natural_image
Two mechanical components with cross symbols indicating failure or incorrect states (no text or labels present)- 完成後將蓋子蓋回機體。
重要事项
natural_image
Two diagrams showing a cylindrical object with a checkmark and an X mark, connected by wires (no text or symbols present)4. 完成後將蓋子蓋回机体。
重要事项
- INTRODUCTION
- PRECAUTIONS
- OVERVIEW
- REMOTE CONTROL
- FEATURES
- GETTING STARTED
- Connecting to power mains
- NOTE
- To pour away the remnant from the water tank
- IMPORTANT
- USING THE AROMA DIFFUSER
- DIFFUSION
- LIGHTING SETTINGS
- SLEEP TIMER SETTINGS
- TUNE SETTINGS AND EXTERNAL AUDIO DEVICES
- Using external audio devices
- VOLUME SETTINGS
- CLEANING THE WATER TANK
- MAINTENANCE
- ABOUT OREGON SCIENTIFIC
- EU-DECLARATION OF CONFORMITY
- PULIZIA DEL SERBATOIO
- EUROPE - DÉCLARATION DE CONFORMITÉ
- i.relax Difusor de aroma zen
- Modelo: WS909
- MANUAL DE USUARIO
- CONTENIDOS
- MANUAL DO UTILIZADOR
- ÍNDICE
- CONTROLO REMOTO
- OVER OREGON SCIENTIFIC
- 重要事项
- 完成後將蓋子蓋回机体。
Brand : OREGON SCIENTIFIC
Model : WS909
Category : Scent diffuser