CPCGY121DWCI - Cooker CORBERO - Free user manual and instructions
Find the device manual for free CPCGY121DWCI CORBERO in PDF.

User questions about CPCGY121DWCI CORBERO
0 question about this device. Answer the ones you know or ask your own.
Ask a new question about this device
Download the instructions for your Cooker in PDF format for free! Find your manual CPCGY121DWCI - CORBERO and take your electronic device back in hand. On this page are published all the documents necessary for the use of your device. CPCGY121DWCI by CORBERO.
USER MANUAL CPCGY121DWCI CORBERO
text_image
B C D A E F GFig 4

natural_image
Technical line drawing of a device casing with internal components labeled E (no text or symbols beyond labels)Fig 5
text_image
Ventilation slot > 30mm 15 MINtext_image
Screw Fixing bracket Worktop atext_image
Technical diagram showing pipe fitting with labeled parts A, B, and Cnatural_image
Two simple line drawings of a cooking pot with handles and cross-bracing (no text or symbols)Fig 9
SELECCIONE EL QUEMADOR DERECHO
INSTALLATION AND USER INSTRUCTIONS
CPCGY101DN
CPCGY111DNCI
CPCGY121DWCI
CPCGY202DN
CPCGY212DNCI
CPCGY222DWCI
Note: Do not use the hob until you have read the instruction manual
INTRODUCTION
Thank you for purchasing a new Gas Hob

text_image
Triple ring burner 3.3kWCPCGY101DN
CPCGY111DNCI
CPCGY121DWCI

text_image
Rapid burner 3.0kW Semi-rapid burner 1.75kWCPCGY202DN
CPCGY212DNCI
CPCGY222DWCI
Even if you have used a gas hob before, it is important that you read these instructions thoroughly before starting to cook, paying particular attention to the installation and safety instructions. If you have any problems with installing, operating, or cooking with your hob, please check through these instructions thoroughly to make sure that you have not missed anything.
WARNING! For your own safety, make sure that these instructions on Installation, use and maintenance are followed.
We advise you to keep these instructions in a safe place for future reference. If you sell or transfer ownership of this product, please pass on these instructions to the new owner.
YOUR HOB
Applicable For gas
| Model | Triple burner | Rapid burner | Semi-rapid burner | Material | Power Supply | Size(mm) | Built-in(mm) |
| CPCGY101DN | 3300W | / | / | Black Glass | AC 220~240V/50Hz | 520×320×110 | 480×280 |
| CPCGY111DNCI | 3300W | / | / | Black Glass | AC 220~240V/50Hz | 520×320×110 | 480×280 |
| CPCGY121DWCI | 3300W | / | / | White Glass | AC 220~240V/50Hz | 520×320×110 | 480×280 |
| CPCGY202DN | / | 3000W | 1750W | Black Glass | AC 220~240V/50Hz | 520×320×110 | 480×280 |
| CPCGY212DNCI | / | 3000W | 1750W | Black Glass | AC 220~240V/50Hz | 520×320×110 | 480×280 |
| CPCGY222DWCI | / | 3000W | 1750W | White Glass | AC 220~240V/50Hz | 520×320×110 | 480×280 |
CLEANING
VITREOUS ENAMEL
Hotplate, burner caps, pan supports.
Cloth wrung out in hot soapy water. Stubborn stains. Can be removed with a cream paste approved by the Vitreous Enamel Development Council, liquid cleaner or by rubbing with fine steel wool soap pads.
NOTE: The pan supports can also be cleaned in the dishwasher.
ALUMINIUM
Hotplate burner bodies.
Similar to paint cleaning above. Use a nylon brush to remove any cleaning materials, water or dirt from the hotplate burner bodies. After cleaning, wipe dry and refit to the hob ensuring they are correctly seated. Check parts are reassembled correctly by lighting the burners and allowing to dry out.
PLASTIC
Control knobs.
Wipe with a cloth wrung out in hot soapy water.
STAINLESS STEEL
Cloth wrung out in hot soapy water.
SAFETY INSTRUCTIONS
Ensure that these notes and that the whole of this instruction book is thoroughly read and understood before installation or operation of the hob.
The instructions are provided in the interest of your safety.
GAS SAFETY (INSTALLATION & USE) REGULATIONS
- It is the law that all gas appliances are installed by competent persons in accordance with current edition of the above regulations. It is in your interest and that of safety to ensure compliance with the law.
- Repairs or servicing of this product must only be carried out by an authorized agent service and the agent using only approved parts.
- No attempt must be made to modify this appliance.
- Cooking appliances become very hot in use, therefore ensure children and pets are kept away. The use of oven gloves is recommended when during use,
- Do not allow children to operate or play with any part of the appliance.
- Do not use unstable pans and position handle away from the edge of the hob. The use of a suitable hob.
- In the interests of safety and hygiene, ensure the hob is kept clean as a buildup of grease could cause
- This appliance is designed for domestic cooking only; commercial catering may invalidate the warranty.
- Do not cover the hob or place combustible materials on or near the surface even when the hob is not in use.
- Do not fill deep fat frying pans more than one third full of oil. Do not leave unattended.
- Before cleaning the hob, switch off at the mains.
- When finished cooking, switch all controls off and allow to cool.
- If you sell or transfer ownership of this product, please pass on these instructions to the new owner.
- This appliance is not intended for use by persons (including children) with reduced physical, sensory or mental capabilities, or lack of experience and knowledge, unless they have been given supervision or instruction concerning use of the appliance by a person responsible for their safety.
- Children should be supervised to ensure that they do not play with the appliance.
- If the supply cord is damaged, it must be replaced by the manufacturer or its service agent or a similarly qualified person in order to avoid a hazard.
- Do not immerse appliance or power cord into water or any other liquids.
- Please pull the pin out when you do cleaning and maintenance. When the appliance is installed, you can pull out the pin.
INSTALLATION INSTRUCTIONS
TECHNICAL INFORMATION
The Installation, the adjustments, conversions and maintenance listed in this part must only be carried out by qualified persons.
The safety and automatic adjustment devices of the appliance may only be modified by an authorized service agent. The Installation of this gas hob must comply with the standards in force.
This appliance is not connected to a flue for discharge of the combustion products; therefore, it must be connected in compliance with the above-mentioned installation rules. Particular attention must be paid to the instructions given below for ventilation and aeration.
WARNING!
The appliance must not be connected to a combustion products evacuation device. It shall be installed and connected in accordance with current installation regulations. Particular attention shall be given to the relevant instructions regarding ventilation.
LOCATION
The cooker may be located in a kitchen, kitchen/dinner or a bed-sitting room, but not in a room containing a bath or shower. The hob must not be installed in a bed-sitting room of less than 20m ^3 . LPG models shall not be installed in a room or internal space below ground level, e.g. in a basement.
PROVISION FOR VENTILATION
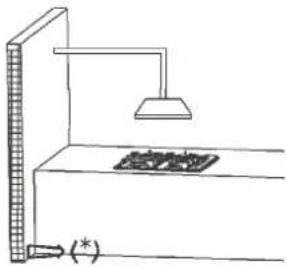
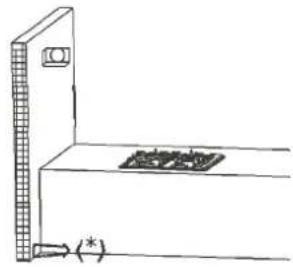
When a gas appliance is being used, it produces heat and humidity in the room where it is installed. For this reason, the room must be well ventilated, keeping the natural ventilation openings free (fig. 1) and switching on the mechanical aeration system (suction hood or electric fan, Figs. 2 and 3).
If the cooker is used for a long time additional aeration may be necessary, for instance, opening a window, or a more effective aeration by increasing the power of the mechanical system if there is one.
NOTE:
(*) Air inlet minimum section:100cm ^4

natural_image
Simple line drawing of a cabinet or shelf with a wall-mounted top and a base, no text or symbols present.Fig 1
natural_image
Simple line drawing of a kitchen sink with a lamp and a stove (no text or symbols)Fig 2
natural_image
Simple line drawing of a kitchen appliance with a wall-mounted stove and a side panel (no text or symbols)Fig 3
UNPACKING THE APPLIANCE
Remove all packaging before use and check to make sure that the appliance is in perfect condition.
If you have any doubts do not use the appliance and call your supplier.
Some parts on the appliance are protected by a plastic film. This protective film must be removed before the appliance is used. We recommend carefully slitting the plastic film along the edges with a sharp knife or pin.
The packaging materials should carefully discard and not left within easy reach of children as they are a potential safety hazard.
INSTALLING AND FIXING THE HOB
Your hob can be fitted to any worktop with a thickness of 40 to 50 mm,
accordance with No overhanging surface or cooker hood should be closer to the hotplate than 750 mm.
Fix in position in fig, 4. If fitting a 600-mm bridging unit above the 700-mm hob unit, the sides of adjacent cabinets may be lower than 760 mm down to 334 mm provided they are resistant to heat and steam.
The hob has a special seal which prevents liquid from entering the cabinet Follow these instructions in order to correctly apply this seal:
Detach the seals from their backing, that the transparent protection still adheres to the seal itself.
Turn over the hob and correctly position seal E^ (fig. 5) under the edge of the hob itself, so that the outer part of the seal itself perfectly matches the outer edge of the hob. The ends of the strips must fit together without overlapping. Evenly and securely fix the seal to the hob, pressing it firmly in place.
text_image
B C D A E G FFig 4

natural_image
Technical diagram of a rectangular electronic component with labeled pins (E), no readable text or symbols present.Fig 5
INSTALLATION OPTIONS
OPTION:
When fitting a gas hob above a drawer or standard housing unit, suitable precautions must be taken to prevent contact with the casing of the hob, which becomes very hot during operation. The recommended method for overcoming this problem is to fix a wooden panel within the cabinet at a distance of 15mm below the underside of the hob (see fig 1). This panel must have adequate ventilation to the rear.

text_image
Ventilation slot > 30mm 15 MENThe panel underneath the hob must be easily removable to allow for any servicing requirements.
INSERTING AND FIXING THE HOB
Before inserting the hob into the work surface, place the adhesive seal (a) around the underside edge of the hob. It is important to fix this gasket evenly, without gaps or overlapping to prevent liquids from seeping underneath the hob.
- Remove the pan stands and the burner caps then turn the hob upside down, taking care not to damage the ignition plugs and the thermocouples.
- Place the gasket around the bottom edge of the hob as shown in the illustration overleaf (left).
- Place the hob in the installation opening and push it down so that the hob is resting firmly on the cabinet.
- Secure the hob in position using the fixing brackets supplied.

text_image
Screw Fixing bracket Worktop aSecure the hob to the underside of the worktop using the fixings provided.
Screw one end of the bracket into the pre-drilled holes in the underside of the hob.
The other end of the bracket should be located underneath the worktop to secure the hob in position.
GAS CONNECTION
The appliance's gas inlet fitting is a 1/2" male threaded conic gas type in accordance with the ISO 7-1 standards. Make the connection using rigid pipe.
When making the gas connection, it is important to place the gasket (A) in between the inlet pipe (C) and the elbow (B), to ensure a gas tight seal.

text_image
Technical diagram showing pipe fitting with labeled parts A, B, and CGAS CONVERSION INSTRUCTIONS:
The manufacturers servicing instructions detail how authorized personnel may convert the gas hob from Natural gas to Universal LPG or from Universal LPG to Natural gas. Contact the manufacturer or agent as required.
Gas supply replacement and installation guidelines:

text_image
LPG > NG The gas rail seal G1/2° Female coupler NG > LPG The gas rail seal Ø11.5 Female couplerThis appliance must be installed and connected in accordance with installation Regulations in force in the country in which the appliance is to be used.
This appliance is supplied to run on LPG and natural gas. Conversion for use on LPG and Natural gas must be undertaken by a qualified person.
Once installed, check there are no leaks using a soapy solution (never a flame).
It is the law that all gas appliances are installed by competent persons in accordance with the current edition of the Gas Safety Installation and Use Regulations.
It is in your interest and that of safety to ensure compliance with the law.
GAS ADJUSTMENT
4 Change the injector of the burners.

text_image
InjectorRemove the pan support, Burner lid and Flame spreader.
Unscrew the injector using a 7mm box spanner and replace it with the stipulated injector for new gas supply. Carefully reassemble the all components.
After injectors are replaced, it is advisable to strongly tighten
Adjustment of minimum level of the flame
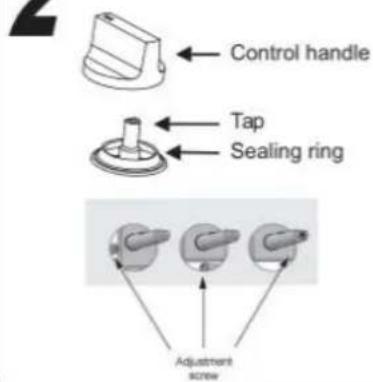
text_image
Control handle Tap Sealing ring Adjustment screw① Turn the taps down to minimum
② Remove the knob from the tap and place a small bladed screwdriver in the centre of the tap shaft.
③ The correct adjustment is obtained when the flame has a length of about 3 - 4 mm.
- For butane/propane gas, the adjusting screw must be tightly screwed in.
- Refit the control knob.
- Make sure that the flame does not go out by quickly turning from maximum flow to minimum flow. If it does then remove the control knob and make further adjustments to the gas flow, testing it again once the adjustment has been made.
④ Repeat this process for each one of the gas taps.

■ Do not dismantle the tap shaft: in the event of a malfunction, change the whole tap.
■ Before placing the burners back on the top place, make sure that the injector is not blocked.
■ A full operational test and a test for possible leakages must be carried out after gas conversion. (such as soap water or gas detector)
■ After completing conversion, a qualified technician or installer has to mark "V" on the right gas category to match with the setting in rating plate. Remove the previous setting "V" mark.
Injector replacement table:
| Burner | Type of gas | Pressure | Nozzle diameter | Nominal Charge | |
| mbar | 1/100mm | kW | g/h | ||
| Semi-rapid | Natural G20 | 20 | 97 | 1.75 | 127.35 |
| Butane G30 | 28~30 | 65 | 1.75 | 127.35 | |
| Rapid | Natural G20 | 20 | 130 | 3.0 | 218.31 |
| Butane G30 | 28~30 | 86 | 3.0 | 218.31 | |
| Triple-ring | Natural G20 | 20 | 135 | 3.3 | 240.15 |
| Butane G30 | 28~30 | 92 | 3.3 | 240.15 | |
USER INSTRUCTIONS
Stone, glass and ceramic pans are not suitable to use on a ceramic hob because they do not conduct heat well
- To light the hotplate push in the appropriate control knob and turn anti-clockwise to the large flame symbol (fig. 8).
-
Keep the knob depressed until the burner lights.
-
Turn the tap to the required setting.
- In the event of the burner flames being accidentally extinguished, turn off the burner control and don't attempt to reignite the burner for at least 1 min.
NOTE: Matches can be used to light the burners in the event of a power failure. Keep the control knob pressed in for 15 seconds ensuring the burner stays lit when released. If the burner fails to stay lit wait for 1 minute before relighting.
TROUBLE SHOOTING
Servicing of the hotplates must only be done by an authorized service representative (see back of this booklet) and the hotplate must not be modified. Power must be disconnected before any servicing or maintenance is conducted.
| Problem Probable | cause Solution | |
| Not ignited | No Spark Check the electricity supply | |
| The burner lid is badly assembled Assemble the lid correctly | ||
| The gas supply is closed Open the gas supply completely | ||
| Badly ignited | The gas supply is not completely open. | Open the gas supply completely |
| The burner lid is badly assembled Assemble the lid correctly | ||
| The ignition plug is contaminated With alien substance | Wipe alien substance with a dry cloth | |
| The burners are wet Dry the burners lids carefully | ||
| The holes in the flame spreader are clogged | Clean the flame spreader | |
| Noise made when combusted and ignited | The burner lid is badly assembled | Assemble the lid correctly |
| Flame goes out when in use. | The flame supervision device is contaminated with alien substance | Clean the supervision device |
| Product being cooked has boiled over and extinguished the flame | Turn off burner knob. Wait one minute and reignite zone | |
| A strong draught may have blown the flame out | Turn off zone and check cooking area for draught such as open windows. Wait one minute and reignite zone | |
| Yellow Flame | The holes in the flame spreader are clogged | Clean the flame spreader |
| Different gas is used Check the gas used | ||
| Unstable Flame | The burner lid is badly assembled | Assemble the lid correctly |
| Gas Smell | Gas leakage | Stop using the product and close the middle valve.Open the window to ventilate.Contact our service centre by using a phone outside. |
CORRECT DISPOSAL OF THIS PRODUCT:
This marking indicates that this product should not be disposed with other household wastes throughout the EU. To prevent possible harm to the environment or human health from uncontrolled the sustainable reuse of material resources. waste disposal, recycle it responsibly to promote
To return your used device, please use the return and collection systems or contact the retailer where the product was purchased. They can take this product for environmental safe recycling.

About ERP
A) Measurement and calculation methods
- The gas hob was CE approval according to the Gas Appliance Directives 2009/142/EC.
• The energy efficiency of this gas hob was tested and measured according to EN30-2-1-1998+A1-2003+A2-2005.
- The semi-rapid burner and rapid burner were tested separately; the auxiliary burner is not required for test because its nominal heat input is less than 1,16kW.
• The energy efficiency of the gas burners and the hob were calculated according to COMMISSION REGULATION (EU) No. 66/2014.
B) Rational use of the energy and the appliance
- The gas hob is designed for domestic use only, please do not use for commercial.
• The gas hob is designed for use with gas (LPG and Natural gas), the combustion products contain carbon monoxide and carbon
dioxide, the exhaust of combustion products is affecting our environment when reach a certain amount of CO and CO2.
• To ensure the rational use of energy, please install the gas hob according to the specifications in clause 5, and please make sure you
are using the correct diameter of pan for each burn
• To ensure the safety use, please read this instruction manual before use; please follow the installation, operation and maintenance
guideline.
• To ensure the optimal life expectancy of the gas hob, please follow the operation and maintenance guideline strictly; please do not modify the appliance.
- Please contact your local after-sale service for repairing and exchanging of the components (such as gas valve, control knob) if necessary.
- The materials of the gas hob are metal, please dispose the gas hob recycling when the gas hob comes to the end-of-life.
- The packaging materials of this appliances is recyclable, please make good use of waste materials.
CERTIFICADO DE GARANTÍA
The presentation of the purchase invoice accompanied by this guarantee certificate is essential.
Covered Risks.
This appliance is guaranteed against any malfunction, provided that it is intended for domestic use, proceeding to its repair within the warranty period and only by the authorized SAT network.
Our Corberó appliances have the manufacturer's legal warranty that covers any breakdown or defect for 36 months, from the invoice date of January 1, 2022. If necessary, we take care of any possible incident whenever it is due to a defective component or manufacturing fault. Warranty Exceptions
Warranty Exceptions
• That the date of the certificate does not coincide with the date of sale of the original invoice.
• Faults produced by blow, by fall or any other cause of force majeure.
• If the device has been manipulated by unauthorized personnel.
- Faults produced or derived as a consequence of improper use, installation defects, or modifications to the device that alter its operation.
- Start-up, maintenance, cleaning, components subject to wear, lamps, aesthetic parts, oxidation, plastics, rubbers, housings and crystals.
- Microwave ovens (with the exception of built-in ones) and tabletop ovens in the event of any incident of operation, they must be taken to the nearest technical service by the customer. They are not collected or repaired at home.
Electric thermos guarantee. 3-year warranty including travel and labor costs that correspond to the repair of the product, having to have maintenance once every 12 months. Especially if you have installed a gas appliance, keep in mind as the owner of the installation, the obligation to carry out a complete review of the equipment, (according to Royal Decree 238 / 2013, of April 5. RITE. IT3, M. Lo thermos electrical and boilers that include hot water storage tanks, for the benefit of the Guarantee to apply, it is mandatory that the magnesium anode is operational and that it performs the protection function adequately. For this, it is recommended that the anode be checked biannually by the Official Service and is renewed when necessary Periodicity that must be annual in those areas with critical waters (CaCO3 content greater than 200mg / L , that is, from 20^ of hardness) Deposits without the correct state of the protection anode are not covered by the warranty Regardless of the type of tank or product, all heating or DHW overpressure valves must be channeled to avoid damage and n the house due to water discharges. The product warranty does not cover damages caused by not channeling the water spilled by this valve.
"THESE EXCEPTIONS VOID THE WARRANTY, THE REPAIR BEING CHARGED TO THE CUSTOMER"
Period covered in devices according to the law of guarantees in the sale of consumer goods Current law is "RD 7/2021"