HuddleShare - Wireless presenter HuddleCamHD - Free user manual and instructions
Find the device manual for free HuddleShare HuddleCamHD in PDF.


| Product Type | Wireless presentation system (BYOD) |
| Model | HuddleShare (HC-HUDDLESHARE) |
| Dimensions (W x D x H) | 5.5 x 3.74 x 0.63 in (140 x 95 x 16 mm) |
| Weight | 0.4 lb (200 g) |
| Power Supply | 5V DC, 10W max, via included adapter with interchangeable plugs (US, EU, UK, AU) |
| Wireless Standards | WiFi 802.11 a/g/n/ac, dual-band 2.4 & 5 GHz |
| Video Output | 1x HDMI 1.4, up to 1920x1080@60Hz or 1920x1200@60Hz |
| Video Input | 1x Wireless, 1x HDMI (up to 4K@60Hz) |
| Audio Output | HDMI (embedded) + 3.5mm line-level stereo |
| Simultaneous Connections | Up to 14 devices; 1 active presentation at a time |
| Supported Devices | Windows, Mac, iOS, Android via WirelessMedia app or Apple AirPlay |
| ShareKey Dongle | Pre-paired USB 3.0 Type-A & C dongle for plug-and-play on PC/Mac |
| Mounting | Table or wall mount with VESA-compatible bracket (hardware not included) |
| Antennas | 2x external, rotatable dipoles |
| USB Ports | 2x USB 2.0 (front and rear), for mouse/touchscreen or USB drive |
| LAN Port | 1x RJ-45 Ethernet for corporate network connectivity |
| Security | AES WPA2-PSK encryption; configurable password and moderator control |
| Maintenance & Cleaning | Wipe with dry soft cloth; keep vents clear; do not use liquids |
| Spare Parts & Repairability | Antennas and power adapter are replaceable; internal parts not user-serviceable |
| Operating Temperature | 32 to 104 °F (0 to 40 °C) |
| Storage Temperature | -4 to 140 °F (-20 to 60 °C) |
| Included Accessories | 2 antennas, power adapter with 4 plug types, ShareKey dongle, quick start guide |
Frequently Asked Questions - HuddleShare HuddleCamHD
User questions about HuddleShare HuddleCamHD
0 question about this device. Answer the ones you know or ask your own.
Ask a new question about this device
Download the instructions for your Wireless presenter in PDF format for free! Find your manual HuddleShare - HuddleCamHD and take your electronic device back in hand. On this page are published all the documents necessary for the use of your device. HuddleShare by HuddleCamHD.
USER MANUAL HuddleShare HuddleCamHD
HuddleShare User Manual

natural_image
Black wireless router device with two external antennas and power button (no visible text or symbols)BYOD Wireless Presentation Device
Feature List:
HuddleShare:
- Supports screenshot of PC or Mac through WirelessMedia app, or through Apple screen mirror service
- Supports smart device presentation through WirelessMedia app, or through Apple screen mirror service
• Supports remote viewing the active signal on display by installed app on smart devices
• Support remote mouse to control the active source devices from other smart devices
• Supports VESA mount
• Supports Apple & iOS device compatibility through WirelessMedia app & Apple screen mirroring service
• Supports WiFi Hotspot for connecting and sharing
• Supports 3.5mm line level audio output
- Supports smart device presentation through WirelessMedia app, or through Apple screen mirror service
- HDMI auto-switch
• Pre-Paired ShareKey USB 3.0 type A & C dongle for Mac & PC
Table of Contents
-
Overview 6
-
Specifications....8
-
Panel Layout....9
3.1 Hardware Interface 9
3.1.1 HuddleShare Front Panel....9
3.1.2 HuddleShare Rear Panel 11
3.2 Software Interface....13
3.2.1 Home Page....13
- Installation....15
4.1 Installation Methods for the HuddleShare....15
4.2 HuddleShare Power Connection....17
4.3 HuddleShare Video Connection....17
4.4 HuddleShare Audio Connection....17
4.5 HuddleShare LAN Connection....19
4.6 About USB Device Connection....20
4.7 Wiring Diagram....21
- Quick Start....21
5.1 "ShareKey" to Mac or PC/Laptop 21
5.2 "WirelessMedia" via external USB drive to Mac or PC/Laptop....21
5.2.1 Connect via WiFi Hotspot: 22
5.2.2 Connect via LAN Connection: 23
5.3 Mirroring....23
5.3.1 Mirroring PC/Laptop....23
5.3.2 Mirroring Mobiles 24
- "Setting" Configuration....25
6.1 Ethernet: 26
6.1.1 IP Address....26
6.1.2 Ethernet MAC address....26
6.1.3 Proxy & IP Settings 26
6.1.4 PPPoE settings....27
6.2 Wireless Network....27
6.2.1 Wireless Network Configuration Wizard....28
6.2.2 Show Device Name and Password When Mirroring....28
Rev 1.1 8/19
6.2.3 Auto Change WiFi Hotspot Password....28
6.2.4 WiFi Analyzer....28
6.3 Moderator Control 33
6.4 General Settings....33
6.4.1 Auto Create Launcher....34
6.4.2 Auto Standby 34
6.4.3 Apple Screen Mirror Quality....34
6.4.4 HDMI Output Resolution....34
6.4.5 HDMI Input Auto Switch....34
6.4.6 Home Screen Background Image....34
6.4.7 Volume....34
6.5 Security Setting....35
6.5.1 Security Level....35
6.5.2 LAN Discovery & Connection....35
6.5.3 Remote View Lock....35
6.5.4 Show PC's User Name When Mirroring....36
6.5.5 Clear History After Meeting....36
6.5.6 Change Admin Password....36
6.6 Language 36
6.7 System Update 36
6.8 Date & Time....37
6.9 About Device 37
6.9.1 Model Number 37
6.9.2 Software Version....38
- Updating HuddleShare ....38
7.1 Upgrading HuddleShare 38
- Operation Guide....39
8.1 Transmitting PC Desktop....39
8.1.1 Transmitting Windows PC/Laptop 39
8.1.2 Transmitting MAC OS PC/Laptop and iOS Mobile Device 39
8.1.3 How to Enable Apple Screen Mirroring 40
8.2 “WirelessMedia” App for iOS....41
8.3 Transmit Android Mobile Device 44
8.4 HDMI Input Select 47
Rev 1.1 8/19
- WiFi Recommended Settings 47
9.1 Checking WiFi Config on HuddleShare 47
9.2 Checking the WiFi RSSI on PC/Mobile 47 - Troubleshooting....48
1. Overview
HuddleShare Overview
The HuddleShare makes connecting or participating in a meeting simple and effective, by just clicking a visual button. It also allows other users to join and be more active in the meeting. This results in making the meeting more efficient and productive.
HuddleShare Connection Components
The HuddleShare includes the base unit for sharing, and numerous ways to connect. By using the WirelessMedia for Android" APK, "WirelessMedia for IOS", or using a USB drive (We will go over this in later steps).

flowchart
graph TD
    A["Wireless Media"] -->|1| B["RF"]
    B -->|2 & 3| C["Wi-Fi Network"]
    C -->|4| D["Output"]
Fig 1.1
| ID | Name | Description |
| 1 | HuddleShare | Host Unit |
| 2 | WirelessMedia for Android | For smart android devices to share the screen, transmit photos/music/video/files, exchange files, remote view and review mouse. |
| 3 | WirelessMedia for IOS | For smart IOS devices to share the screen, transmit photos/music/video/files, exchange files, remote view and review mouse. |
| 4 | WiFi Hotspot | Wirelessly connect to the HuddleShare by connecting to the HuddleShare's WiFi Hotspot. |
Accessories List
| ID | Name | Description |
| 1 | Antenna | 2 pcs of antenna are included in the box. To avoid damage, they are not pre-mounted. The antenna can rotate for a better wireless connection. |
| 2 | Power adapter | International plug inter-changeable power adapter, of which the plugs includes US, Europe, UK, Australia standard. |
Fig 1.2 below goes over the basic connection of the HuddleShare

flowchart
graph TD
    A["Computer"] -->|HuddleShare| B["Smart Phone"]
    A -->|HuddleShare| C["Smart Tablet"]
    B --> D["Wireless Media iOS APP"]
    C --> E["Wireless Media Android APP"]
    D --> F["Windows PC"]
    D --> G["MacBook"]
    D --> H["Windows"]
    D --> I["iOS"]
    E --> J["Android"]
    style A fill:#f9f,stroke:#333
    style B fill:#ccf,stroke:#333
    style C fill:#cfc,stroke:#333
    style D fill:#fcc,stroke:#333
    style E fill:#cff,stroke:#333
    style F fill:#ffc,stroke:#333
    style G fill:#cfc,stroke:#333
    style H fill:#fcc,stroke:#333
    style I fill:#ffc,stroke:#333
Fig 1.2
2. Specifications
| Specifications of HuddleShare | ||
| Supported Formats | Video Input Formats | 1x Wireless, 1x HDMI |
| Format Compliance | WIFI 802.11 a/g/n/ac | |
| Video Output Formats | 1x HDMI | |
| Video Output Resolution | 1920x1080@60Hz, 1920x1200@60Hz | |
| Format Compliance | HDMI 1.4 | |
| Audio Input Formats | 1x DVI Audio in | |
| Audio Output Formats | HDMI: embedded digital audioDe-embedded analog stereo audio: 20 kΩ impedance | |
| Input Connector | Wireless Input | WIFI 802.11n/ac |
| Output Connector | HDMI Output | 1x HDMI 19-pin female connector |
| Analog Audio Output | 1x 3.5mm PC audio female connectors | |
| Features | Simultaneous Windows | 1 |
| Simultaneous Connections | ≤14 | |
| Wireless Data Rate | Up to 300Mbps | |
| Video Playback Frame Rate | 20 - 30 FPS | |
| Wireless transmission protocol | IEEE 802.11 a/g/n/ac | |
| Frequency band | 2.4 GHZ and 5 GHz | |
| Video Capacity | 1080P @ >60Hz Apple Screen Mirror for IOS devices1080P @ >60Hz "WirelessMedia" app | |
| Remote Viewing | Mirroring remote view on mobile by app installed | |
| Mobile Capability | Free IOS app, Free Android app | |
| Encryption | AES WPA PSK, WPA2 PSK | |
| Remote Mouse | Remote control presenter's PC | |
| Control | On-Screen Setting | Configuration Visual Button, by HID mouse, or remote control on APP |
| Mechanical | Dimensions W x D x H | 5.5" x 3.74" x 0.63" (140mm x 95mm x 16mm) |
| Weight | 0.4 lbs (200g) | |
| Construction | 1~2mm plastic with matte black finish | |
| Environmental | Operating Temperature | +32° to +104° F (0° to +40°C) |
| Storage Temperature | -4° to +140° F (-20° to +60°C) | |
| Humidity (Storage / Operating) | 20% to 90% (non-condensing) | |
| Power | DC Power | 5V |
| Power Consumption | 10W (max.) | |
| Power Accessories | 1x DC adapter with four plug-in, US, Europe, UK,Australia | |
3. Panel Layout
The installation chapter gives an overview of the interface of the HuddleShare.
3.1 Hardware Interface
3.1.1 HuddleShare Front Panel

| ID | Name | Descriptions |
| 1 | Front USB Connector | USB port, for HuddleShare launcher, mouse control, USB touch screen, etc. |
| 2 | Power button and back-lit LED indicator | Upon pressing this button, the HuddleShare will power on and the LED indicators will light up. When pressed again, the LED indicators will turn off which indicates the HuddleShare is powered off. |
USB Port Capabilities
- The USB port is used to update the software of the HuddleShare.
- The USB port is used for connecting a mouse to select local HDMI Input, control the setting configuration, open the Help Page and control PC source device.
- The USB port can be used for connecting a USB-based touch screen to select local HDMI Input, control the Setting configuration, open the Help page and control PC source device.
POWER button
To power the unit on/off, press the power button located on the front of the HuddleShare. The LED indicator will light up when powered on and turn off when powered off.
Mounting points.
The mounting points are located at the bottom of the base unit.
3.1.2 HuddleShare Rear Panel
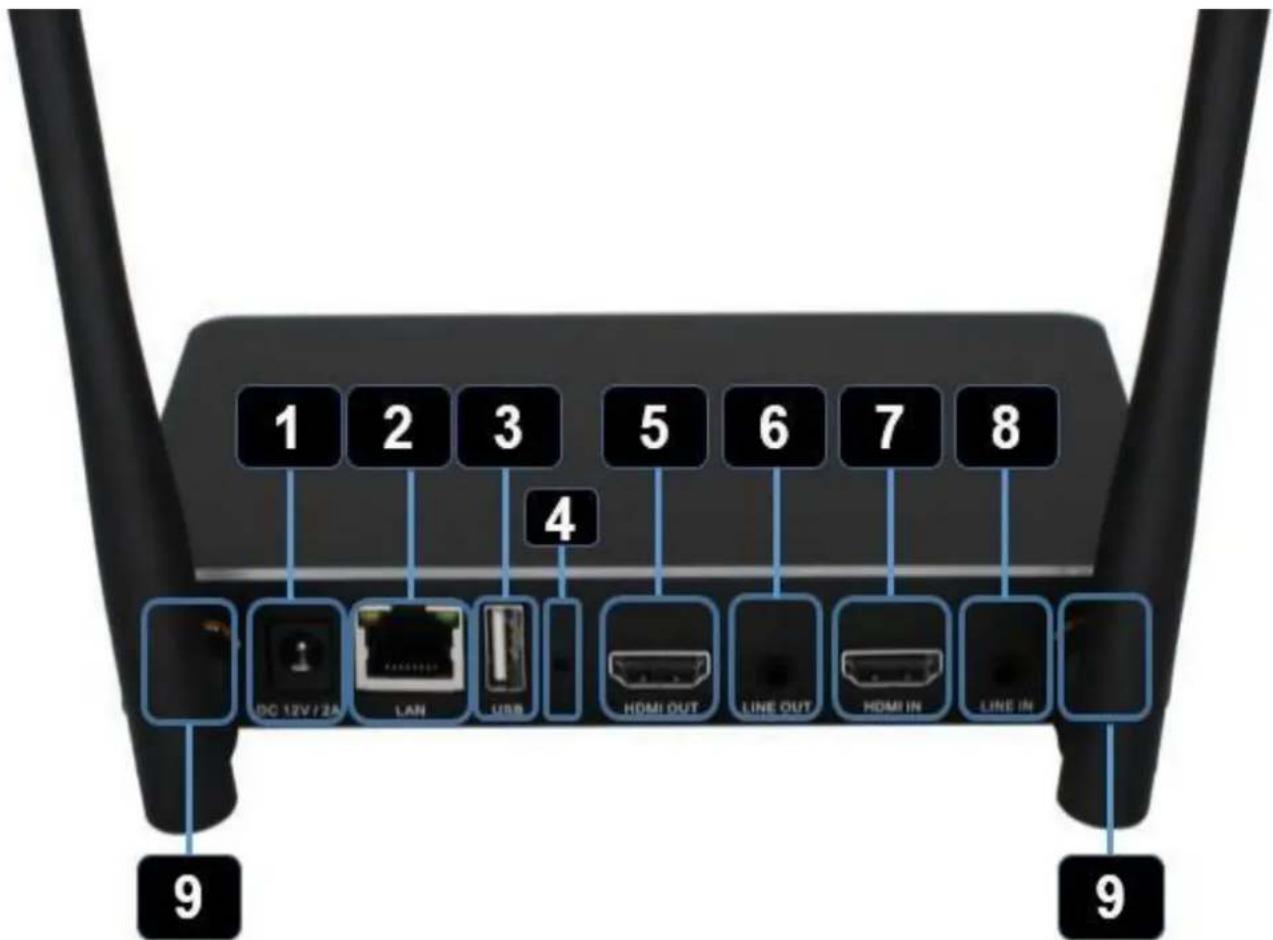
| ID | Name | Description |
| 1 | DC Power Socket | Connect the included power adapter to this socket, and connect the plug to an available electrical outlet |
| 2 | LAN Ethernet Port | Connect an Ethernet cable between this jack and a LAN to connect HuddleShare to LAN |
| 3 | Rear USB Connector | USB port, for mouse control, USB touch screen etc. |
| 4 | Reset | Reset button to restore to the factory default setting |
| 5 | HDMI Output | Connect an HDMI cable from this port to an HD display. |
| 6 | Line Level Audio Output | 2 channel analog audio output, Connect a 3.5mm mini-jack PC connector from this jack to the Line In jack of an audio system. |
| 7 | HDMI Input | Connect a local HDMI input, up to 4K_60Hz, HDCP2.2 source device |
| 8 | Line Audio Input | 2 channel analog audio output, Connect a 3.5mm mini-jack PC connector from this jack to the Line In jack of an external audio source devices |
| 9 | Antenna Connection Points | Screw on the included two antennas to these two ports |
Restore default configuration via Reset button
- Turn on the HuddleShare
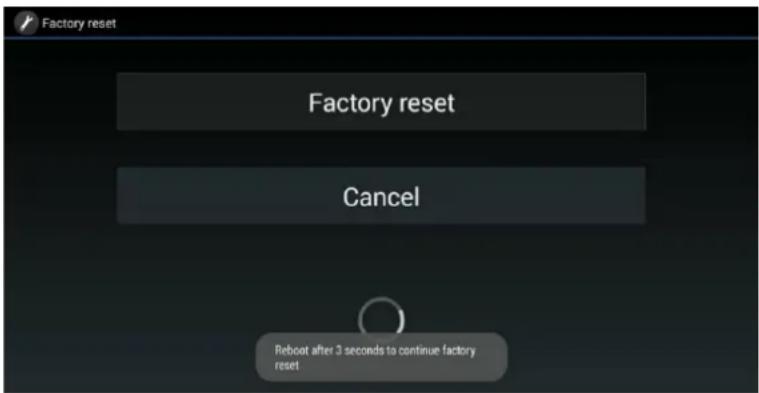
- When the Home Page is shown, press the reset button on the rear panel of HuddleShare. Press this button for at least 2 seconds, or until the factory reset page is shown as below.
- Or use a mouse to connect to HuddleShare and click Factory Reset. The Base unit will reboot after 3 seconds to the default configuration. Cancel to return without resetting.

Default Configuration
- Ethernet
○ Proxy: None
- IP Setting: DHCP
- Wireless Network:
- Portable Wi-Fi hotspot: ON
- SSID: HuddleShare
- Security: WPA2 PSK
- Frequency: 2.4GHz
○ Channel: 6
- WirelessMedia Setting:
○ Apple Screen Mirror quality: High
- Output resolution: 1920x1080@60Hz
o Background image: Supports customized backgrounds
○ Volume: 50
• Security Setting
- Connection: LAN Connection
o Presenter Lock: Disabled
- Language
○ English
- Date & Time
○ Automatic date & time: using network provided time

Attention: LAN connection is set to "disabled" after restoring to default. If you plan to utilize the LAN section, you should to turn it on. To turn on, please refer to Page [Security setting]
3.2 Software Interface
3.2.1 Home Page
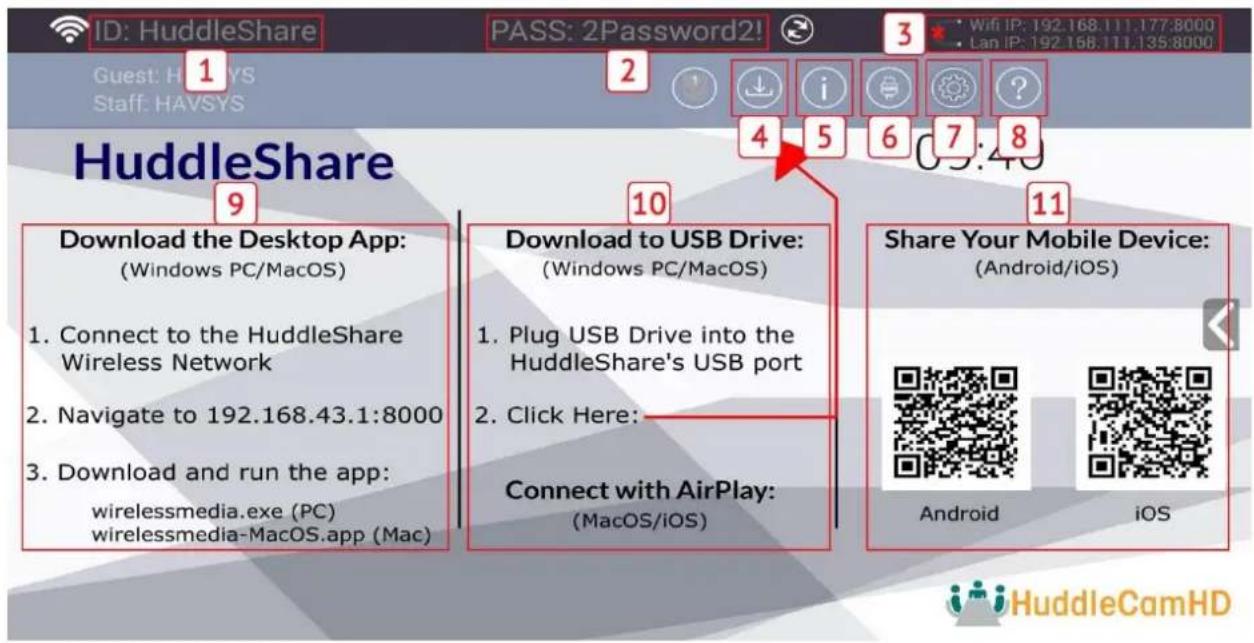
| ID | Name | Description |
| 1 | SSID (Service Set Identifier Name) | Connect to the Wi-Fi network “HuddleShare” to connect and share content with the HuddleShare |
| 2 | PASS (Password) | Enter the password when connecting to the Wi-Fi SSID of HuddleShare |
| 3 | WiFi IP / LAN IP | Corporate LAN IP Address and LAN IP address of HuddleShare |
| 4 | Download | Download launcher (PC Software) to USB drive |
| 5 | Information | Make SSID/PASS/IP visible or invisible |
| 6 | HDMI Input | Click to switch to local HDMI input |
| 7 | Setting | Using a mouse or touch screen, click to open “Settings” menu |
| 8 | Help | Opens helpful documents for quick installation, operation, and after sales support |
| 9 | PC Software Connectivity | Steps for connecting PC/Laptop to HuddleShare |
| 10 | USB Drive Connectivity | Steps for connecting PC/Laptop to HuddleShare through USB drive |
| 11 | Mobile Device QR Code | Scannable QR code for downloading the WirelessMedia app from store |
SSID and PASS (password)
Connect to the Hotspot of HuddleShare by using this SSID and PASS.

Attention: if it shows N/A, please click the Setting page, find Wireless Network and check on the
Portable Wi-Fi hotspot. Please refer to [Wireless Network].
Changeable PASS (password)
- By default, the PASS (password) randomly changes every 5 minutes. PASS (password) settings can be adjusted in the Settings page. For more information, please refer to [Wireless Network].
- PASS Options: Never Change, 5m, 30m, 1h, 2h, 4h, & 24h.
- After PASS change, smart mobile devices must enter the correct SSID & PASS to connect to HuddleShare hotspot for complete functionality.
- When the HuddleShare is disconnected from PC Launcher Software for 15 seconds, it will open up a dialog box for user to confirm whether to clear the meeting history, including all data/files being temporarily memorized in the HuddleShare.
WiFi address & LAN IP address:
WiFi IP address shows the hotspot's IP.
LAN IP address shows the corporate LAN (Local Area Network)

Attention: When it shows “N/A”, it means, the HuddleShare is not connected to the LAN (Local Area work) by CAT cable or it failed to get an available IP address from the network.
Download
Click this button to download the launcher (PC software) to a USB drive connected to the USB port of the HuddleShare.
Information
Click this button to toggle the ID/PASS/IP address visibility displayed on the screen.
HDMI Input
Click this button to toggle the local HDMI input on the HuddleShare. A mouse or touch screen must first be connected directly to the HuddleShare.
Setting
Gives a way to control all the configuration of the HuddleShare over a LAN (local Area Network). Users must use a mouse or touch screen to traverse the settings.
The Settings sub-menu includes:
- Ethernet
- Wireless Network
- Moderator Control
- General Settings
- Security Settings
- Language
- System Update
- Date & Time
- About Device
Help
- User Manual
- FAQ
- Readme
PC/Laptop Quick-Start steps
- Connect PC/Laptop to HuddleShare via WiFi.
- Enter WiFi IP or connect USB drive to HuddleShare to download Wireless Media Software
- Start the WirelessMedia software on PC/Laptop.
- Select your HuddleShare and present your screen.
Smart mobile devices Quick-Start steps
- Download APK/APP named WirelessMedia
- Connect wireless network [Wireless Network Name] and enter password
- Open the application and click "Mirror" to show your mobile screen
4. Installation
The installation chapter gives an overview of the different ways to install and connect HuddleShare Base Unit. Overview
• Installation methods for the HuddleShare
- Table mounting
○ Wall mounting
- Recommendations about antenna placement and orientation
• HuddleShare Power Connection
• HuddleShare Video Connection
• HuddleShare Audio Connection
• HuddleShare LAN Connection
- About USB Device Connection
- Wiring Diagram
4.1 Installation Methods for the HuddleShare
The HuddleShare can be installed in different ways in a meeting room. The articulated antennas are removable. They can rotate for better wireless connection.
- Table Mount
- Wall Mount
Attention: For optimal performance, install the Base unit close to the display and avoid obstacles between the Base unit and the Buttons.
Necessary Tools
- A drill (type of drill depends on the type of wall)
- Flat screwdriver
- Additional screwdriver that matches the mounting screws (mounting screws not included in the package)
Necessary Parts
• 2) Mounting screws (M3 0.55 pitch)
- 2) plugs
• 2) Mounting Brackets
How to Table/Wall Mount
- Drill two holes in the table/wall as indicated. Horizontal Distance: 177mm (6.9in) ± 0.15
- On the bottom of the HuddleShare, place the bracket on the 4 holes and turn in 4 delivered flat screws. Fasten accordingly.
- Insert a plug in each hole (if needed, depends on the wall type), and drive in 2 screws. Please leave at least a dimension 0.15mm space to place the bracket between the screw header and wall. Ensure the screw used is not bigger than the hole on the mounting adapter
a. Note: Mounting screws and plugs are not included with the HuddleShare. The type of screws required depends on the type of wall (stone, wood, plasterboard, etc.) you are mounting the HuddleShare to. - Place the HuddleShare on the wall, so that the holes on the bracket matches the 2 unfixed screws on the wall. Hook the bracket on the screw and slide the Base Unit downwards until it's fixed in the 2 screw on the wall.
- Affix the bracket with the 2 unused screws.
Antenna Placement
- The antennas should be oriented vertically, perpendicular to the ceiling and parallel to the walls. - The antennas should be installed far enough away from metallic surfaces, radio equipment, concrete walls, WiFi access point, cordless telephone, or any other surfaces/equipment that block radio waves.
o Metallic Surfaces: At least 1.6ft/50cm
○ Radio Equipment: 3.3ft/1m
○ Concrete Walls: 6in/15cm
- For best results, have a direct line of sight between the antennas and connected device. Any obstruction can cause performance degradation.
- Due to the radio pattern of the dipole antennas, it's recommended to mount the HuddleShare away from any position that may be utilized for content sharing. It's advised to mount the HuddleShare towards the side of the room
4.2 HuddleShare Power Connection
The Base unit can be powered by the external universal power adapter.
How to connect the external power adapter
- Connect the power supply to the base unit
- Connect the corresponding power adapter (US, UK, EU, or AU shown below, respectively) for your region
- Plug power supply into wall outlet

natural_image
Four black plastic electronic components with metallic pins, shown from different angles (front, side, top, and front-right views) against a white background.4.3 HuddleShare Video Connection
- Screw on the two antennas to the HuddleShare.
- Connect the HuddleShare HDMI Output to a HD display via an HDMI cable.
- Connect the power adapter to the HuddleShare DC power socket and connect the other side to an available electrical outlet.
Once fully booted up, the system will show the home page, as shown in Fig 4.1

flowchart
graph LR
    A["HuddleShare"] -->|HDMI Power| B["HuddleShare"]
    B --> C["Download the Desktop App: (Windows PC/MacOS)"]
    C --> D["1. Connect to the HuddleShare Wireless Network"]
    C --> E["2. Navigate to 192.168.43.1:B000"]
    C --> F["3. Download and run the app: wirelessmedia.exe (PC) wirelessmedicine-MacOS.app (Mac)"]
    D --> G["Download to USB Drive: (Windows PC/MacOS)"]
    G --> H["1. Plug USB Drive into the HuddleShare's USB port"]
    G --> I["2. Click Here:"]
    I --> J["Connect with AirPlay: (MacOS/IOS)"]
    J --> K["Share Your Mobile Device: (Android/IOS)"]
    K --> L["Android"]
    K --> M["iOS"]
Fig 4.1
4.4 HuddleShare Audio Connection
HuddleShare launcher software can capture the audio output of the PC/Laptop, re-direct and send to the HuddleShare together with the video signal. The audio will be output from the 3.5mm connector and HDMI output simultaneously.
It's up to the user to decide whether to send the audio signal together with the video signal.
Audio via HDMI Output
By default, the audio signal is sent together with the video signal to the display, as shown below in figure 4.2. If your display does not support simultaneous video & audio, please see the section labeled "How to connect separate audio"

Fig 4.2
How to connect separate audio
For a visual diagram on how to connect separate audio, please see Fig 4.3 below.
- Connect a 3.5mm audio cable into the audio of the base unit
- Connect the other side to the meeting room's sound system

flowchart
graph TD
    A["HuddleShare"] -->|Audio| B["USB"]
    A -->|Audio| C["Power"]
    A -->|Audio| D["USB"]
    A -->|Audio| E["Power"]
    A -->|Audio| F["USB"]
    A -->|Audio| G["Power"]
    A -->|Audio| H["USB"]
    A -->|Audio| I["Power"]
    A -->|Audio| J["USB"]
    A -->|Audio| K["Power"]
    A -->|Audio| L["USB"]
    A -->|Audio| M["Power"]
    A -->|Audio| N["USB"]
    A -->|Audio| O["Power"]
    A -->|Audio| P["USB"]
    A -->|Audio| Q["Power"]
    A -->|Audio| R["USB"]
    A -->|Audio| S["Power"]
    A -->|Audio| T["USB"]
    A -->|Audio| U["Power"]
    A -->|Audio| V["USB"]
    A -->|Audio| W["Power"]
    A -->|Audio| X["USB"]
    A -->|Audio| Y["Power"]
    A -->|Audio| Z["USB"]
    A -->|Audio| AA["Power"]
    A -->|Audio| AB["USB"]
    A -->|Audio| AC["Power"]
    A -->|Audio| AD["USB"]
    A -->|Audio| AE["Power"]
    A -->|Audio| AF["USB"]
    A -->|Audio| AG["Power"]
    A -->|Audio| AH["USB"]
    A -->|Audio| AI["Power"]
    A -->|Audio| AJ["USB"]
    A -->|Audio| AK["Power"]
    A -->|Audio| AL["USB"]
    A -->|Audio| AM["Power"]
    A -->|Audio| AN["USB"]
    A -->|Audio| AO["Power"]
    A -->|Audio| AP["USB"]
    A -->|Audio| AQ["Power"]
    A -->|Audio| AR["USB"]
    A -->|Audio| AS["Power"]
    A -->|Audio| AT["USB"]
    A -->|Audio| AU["Power"]
    A -->|Audio| AV["USB"]
    A -->|Audio| AW["Power"]
    A -->|Audio| AX["USB"]
    A -->|Audio| AY["Power"]
    A -->|Audio| AZ["USB"]
    A -->|Audio| BA["Power"]
    A -->|Audio| BB["USB"]
    A -->|Audio| BC["Power"]
    A -->|Audio| BD["USB"]
    A -->|Audio| BE["Power"]
    A -->|Audio| BF["USB"]
    A -->|Audio| BG["Power"]
    A -->|Audio| BH["USB"]
    A -->|Audio| BI["Power"]
    A -->|Audio| BJ["USB"]
    A -->|Audio| BK["Power"]
    A -->|Audio| BL["USB"]
    A -->|Audio| BM["Power"]
    A -->|Audio| BN["USB"]
    A -->|Audio| BO["Power"]
    A -->|Audio| BP["USB"]
    A -->|Audio| BQ["Power"]
    A -->|Audio| BR["USB"]
    A -->|Audio| BS["Power"]
Fig 4.3
Sound is not sent out
The HuddleShare launcher will capture and send the audio from PC/Laptop.
- Please ensure the button is solid blue and the PC/Laptop is displaying on the screen
- Check Settings configuration to adjust the Volume Set in WirelessMedia Settings tab
PC/Laptop Sound
Upon mirroring, the HuddleShare will mute the internal speaker of PC/Laptop and route the audio to the base unit. This is on purpose and to avoid audio feedback.
When sharing is stopped, the internal speaker of PC/Laptop will resume normal operation.

Attention: If you want to keep the internal speaker of PC/Laptop enabled while routing the audio to the
HuddleShare, please click the audio mute icon in the status bar to turn on the internal speaker.
4.5 HuddleShare LAN Connection
The HuddleShare can be connected to a local network or directly to a PC/Laptop. For normal operation, a LAN connection is not necessary. When needed, it's suggested to connect the HuddleShare to the internet.
Typical LAN connections uses:
• For LAN integration of the HuddleShare
• For maintenance purposes
How to connect LAN
For a visual diagram on how to connect LAN, please see Fig 4.4 below.
- Connect a network cable with RJ-45 connector into the LAN port of Base unit
- Connect other side to LAN

flowchart
graph TD
    A["HuddleShare"] -->|HDMI| B["HuddleShare"]
    A -->|Ethernet Power| C["Server"]
    A -->|HDMI| D["User Interface"]
    A -->|HDMI| E["User Interface"]
    A -->|HDMI| F["User Interface"]
    A -->|HDMI| G["User Interface"]
    A -->|HDMI| H["User Interface"]
    A -->|HDMI| I["User Interface"]
    A -->|HDMI| J["User Interface"]
    A -->|HDMI| K["User Interface"]
    A -->|HDMI| L["User Interface"]
    A -->|HDMI| M["User Interface"]
    A -->|HDMI| N["User Interface"]
    A -->|HDMI| O["User Interface"]
    A -->|HDMI| P["User Interface"]
    A -->|HDMI| Q["User Interface"]
    A -->|HDMI| R["User Interface"]
    A -->|HDMI| S["User Interface"]
    A -->|HDMI| T["User Interface"]
    A -->|HDMI| U["User Interface"]
    A -->|HDMI| V["User Interface"]
    A -->|HDMI| W["User Interface"]
    A -->|HDMI| X["User Interface"]
    A -->|HDMI| Y["User Interface"]
    A -->|HDMI| Z["User Interface"]
    A -->|HDMI| AA["User Interface"]
    A -->|HDMI| AB["User Interface"]
    A -->|HDMI| AC["User Interface"]
    A -->|HDMI| AD["User Interface"]
    A -->|HDMI| AE["User Interface"]
    A -->|HDMI| AF["User Interface"]
    A -->|HDMI| AG["User Interface"]
    A -->|HDMI| AH["User Interface"]
    A -->|HDMI| AI["User Interface"]
    A -->|HDMI| AJ["User Interface"]
    A -->|HDMI| AK["User Interface"]
    A -->|HDMI| AL["User Interface"]
    A -->|HDMI| AM["User Interface"]
    A -->|HDMI| AN["User Interface"]
    A -->|HDMI| AO["User Interface"]
    A -->|HDMI| AP["User Interface"]
    A -->|HDMI| AQ["User Interface"]
    A -->|HDMI| AR["User Interface"]
    A -->|HDMI| AS["User Interface"]
    A -->|HDMI| AT["User Interface"]
    A -->|HDMI| AU["User Interface"]
    A -->|HDMI| AV["User Interface"]
    A -->|HDMI| AW["User Interface"]
    A -->|HDMI| AX["User Interface"]
    A -->|HDMI| AY["User Interface"]
    A -->|HDMI| AZ["User Interface"]
    A -->|HDMI| BA["User Interface"]
    A -->|HDMI| BB["User Interface"]
    A -->|HDMI| BC["User Interface"]
    A -->|HDMI| BD["User Interface"]
    A -->|HDMI| BE["User Interface"]
    A -->|HDMI| BF["User Interface"]
    A -->|HDMI| BG["User Interface"]
    A -->|HDMI| BH["User Interface"]
    A -->|HDMI| BI["User Interface"]
    A -->|HDMI| BJ["User Interface"]
    A -->|HDMI| BK["User Interface"]
    A -->|HDMI| BL["User Interface"]
    A -->|HDMI| BM["User Interface"]
    A -->|HDMI| BN["User Interface"]
    A -->|HDMI| BO["User Interface"]
    A -->|HDMI| BP["User Interface"]
    A -->|HDMI| BQ["User Interface"]
    A -->|HDMI| BR["User Interface"]
    A -->|HDMI| BS["User Interface"]
    A -->|HDMI| BT["User Interface"]
    A -->|HDMI| BU["User Interface"]
    A -->|HDMI| BV["User Interface"]
    A -->|HDMI| BW["User Interface"]
    A -->|HDMI| BX["User Interface"]
    A -->|HDMI| BY["User Interface"]
    A -->|HDMI| BZ["User Interface"]
    A -->|HDMI| CA["User Interface"]
    A -->|HDMI| CB["User Interface"]
    A -->|HDMI| CC["User Interface"]
    A -->|HDMI| CD["User Interface"]
    A -->|HDMI| CE["User Interface"]
    A -->|HDMI| CF["User Interface"]
    A -->|HDMI| CG["User Interface"]
    A -->|HDMI| CH["User Interface"]
    A -->|HDMI| CI["User Interface"]
    A -->|HDMI| CJ["User Interface"]
    A -->|HDMI| CK["User Interface"]
Fig 4.4
LAN Indicator
- When LAN is connected, an OSD "Ethernet Connected" is shown on the bottom right of the home page as shown in Fig 4.4
- When LAN is disconnected, an OSD "Ethernet Disconnected" is shown on the bottom right of the home page as shown in Fig 4.4
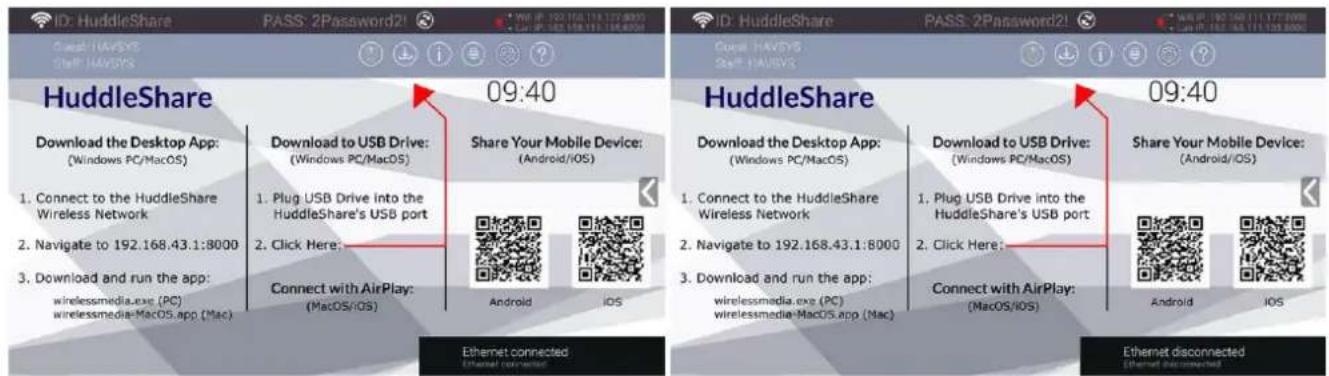
Fig 4.4
4.6 About USB Device Connection
WirelessMedia can be controlled by USB-based mouse/touch screen.
- To configure the Settings, Help, and HDMI Input
- To control the sharing PC/Laptop
- To activate system upgrade
- For white board or annotation
- To update ShareKey
How to connect mouse or touch screen
Connect the USB cable from the mouse or touch screen monitor to one of the free USB ports on the HuddleShare. For a visual diagram, please see Fig 4.5 below.
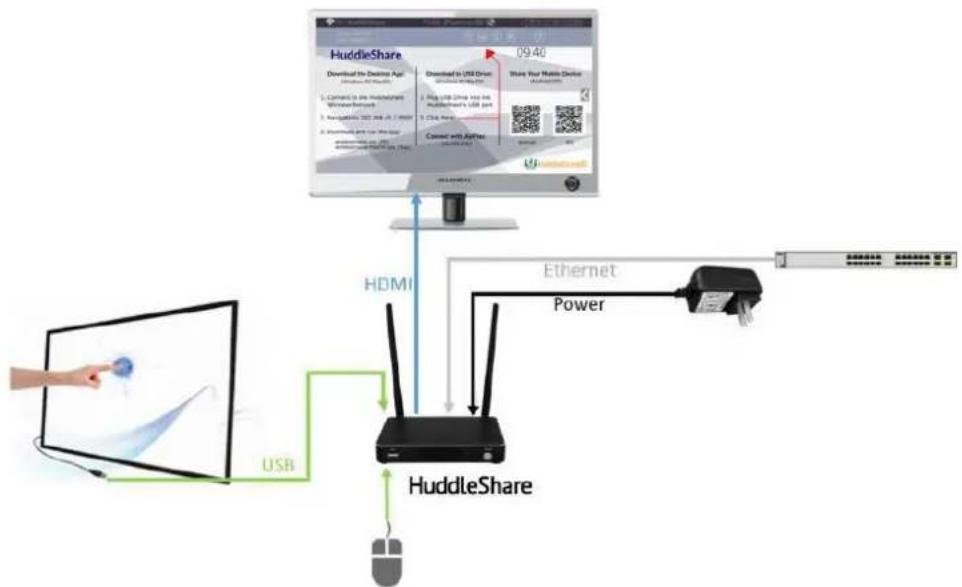
flowchart
graph TD
    A["User"] -->|USB| B["HuddleShare"]
    B -->|HDMI| C["Monitor"]
    C -->|Ethernet Power| D["Server"]
    D -->|Data Transfer| E["Downloading to HuddleShare Web/Internet"]
    E --> F["Downloading to USB Drive Web/Internet"]
    F --> G["Share Your Huddle Device Release"]
    G --> H["09:40"]
Fig 4.5
How to use USB control
For mouse control:
- Single Click to select
• Right Click to back till the Home Page.
For touch screen control:
- Touch to select
- Press to open the contextual menus, as double-click to single click the right button of a USB mouse.
4.7 Wiring Diagram

flowchart
graph TD
    A["HuddleShare"] -->|09:40| B["Download the Desktop Apps (Windows PC) (WPC)"]
    A --> C["Downloaded to USB Drive (Windows PC) (WPC)"]
    A --> D["Share Your Mobile Device (Web.com)"]
    A --> E["Audio"]
    A --> F["Power"]
    A --> G["USB"]
    A --> H["HDMI"]
    A --> I["USB"]
    A --> J["HuddleShare"]
    J --> K["Power"]
    J --> L["Internet"]
    style A fill:#f9f,stroke:#333
    style B fill:#ccf,stroke:#333
    style C fill:#cfc,stroke:#333
    style D fill:#fcc,stroke:#333
    style E fill:#cff,stroke:#333
    style F fill:#ffc,stroke:#333
    style G fill:#cfc,stroke:#333
    style H fill:#fcc,stroke:#333
    style I fill:#ffc,stroke:#333
    style J fill:#cfc,stroke:#333
    style K fill:#fcc,stroke:#333
    style L fill:#ffc,stroke:#333
    style_M["User"] --> N["Computer"]
    N --> O["Smartphone with monitor"]
    O --> P["USB"]
    P --> Q["Audio"]
    Q --> R["HDMI"]
    R --> S["Power"]
    S --> T["Ethernet"]
    T --> U["Audio"]
    U --> V["USB"]
Fig 4.6
5. Quick Start
5.1 "ShareKey" to Mac or PC/Laptop
- Connect the included pre-paired ShareKey to your Mac or PC using the USB-A or USB-C connector
- By default, the "WirelessMedia" software will immediately open and begin presenting to the HuddleShare.
Note: if you need to update the ShareKey, simply connect it to the HuddleShare and it will automatically update.
5.2 "WirelessMedia" via external USB drive to Mac or PC/Laptop
- Connect a USB drive to an available USB port on the HuddleShare.
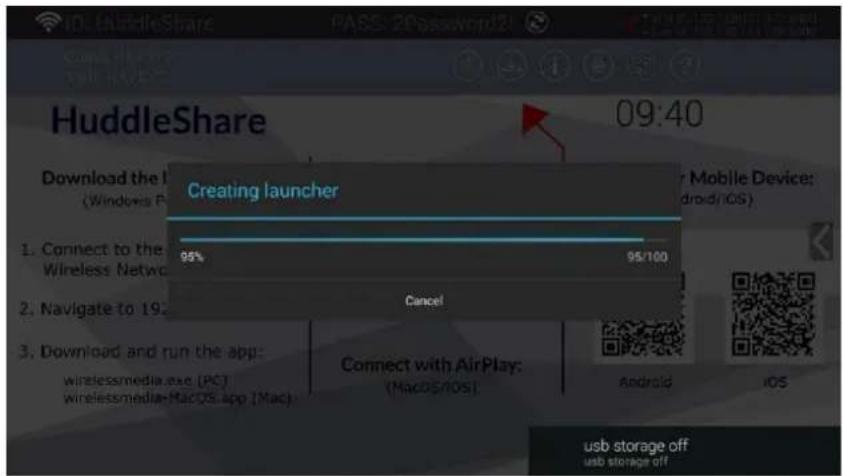
- Click "Download" on the top of main interface, as shown below.

- Once clicked, the download will begin. You will see a progress bar as shown below. Once the download is complete, you will receive the message "Succeed to create launcher, they are in directory / UDISK / Launcher"
-
Simply disconnect the USB drive from the USB port. You will find the WirelessMedia PC client software on the USB drive.
-
Launch the WirelessMedia PC client software to connect to the HuddleShare and begin sharing.
5.2.1 Connect via WiFi Hotspot:
- Check the SSID & Password are shown on the Home Page, as shown below.
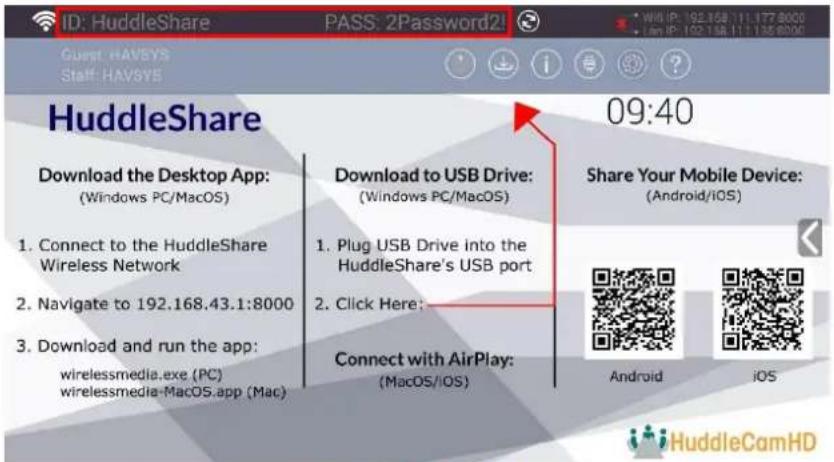
- If it shows SSID: N/A, please refer to [Wireless Network] section below
5.2.2 Connect via LAN Connection:
- Be sure the HuddleShare is connected to the Network. When connected, a local IP address will be displayed in the top right corner.

Attention: When it shows "N/A", it means the HuddleShare is not connected to the LAN (Local Area Network) by CAT cable, or it failed to contact a DHCP server to obtain an IP address.
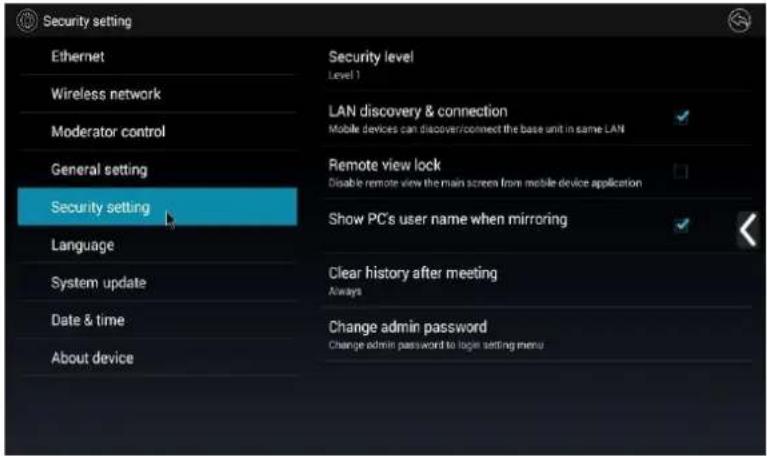
- Please refer to the Security Settings page, check on the LAN discovery & connection below.
5.3 Mirroring
5.3.1 Mirroring Mac or PC/Laptop
To mirror the video of your Mac or PC/Laptop, you can utilize the included [ShareKey], or using the steps below.
- Using a USB drive, download the WirelessMedia Software from the HuddleShare's USB port and connect to a Mac or PC/Laptop
- Run WirelessMedia client software
- While searching for the HuddleShare, the software will display a search bar.
- When utilizing a WiFi connection, it will open a device list. Choose the proper HuddleShare after searching.
- When utilizing a LAN connection, it will open the following device list. Choose the proper HuddleShare after searching.
- Connect to the proper HuddleShare by entering the PASS (password) showing on the Home Screen.
5.3.2 Mirroring Mobiles
- Connect to the HuddleShare via WiFi Hotspot or through corporate LAN.
- Open the "WirelessMedia" application on your mobile device. You will see the Home Page of "WirelessMedia". To open the Device List, please click the button "☑" on Android; and click the button "☐" on iOS as shown below:
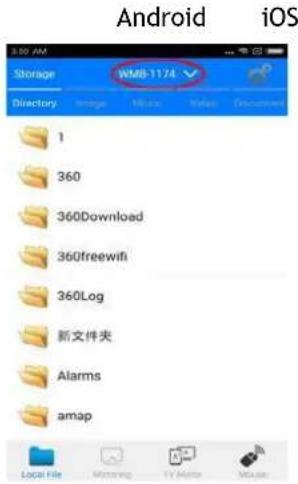

- Click the found device to connect to the HuddleShare.


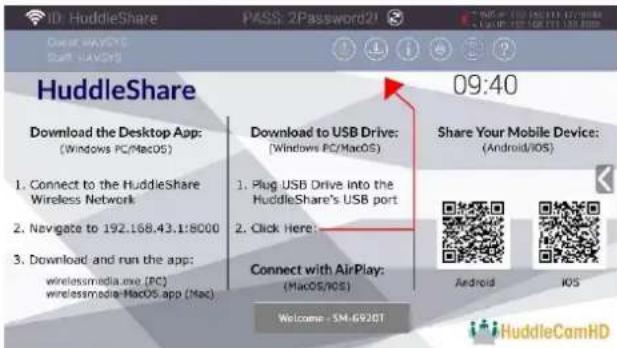
- After completing the pairing, it will display "Welcome ***" on the Home Page. For example, if we connect a Samsung Galaxy Smart Phone, it will display "Welcome Samsung Galaxy", as shown below.
-
At this point, the pairing between HuddleShare and mobile device is complete and ready
-
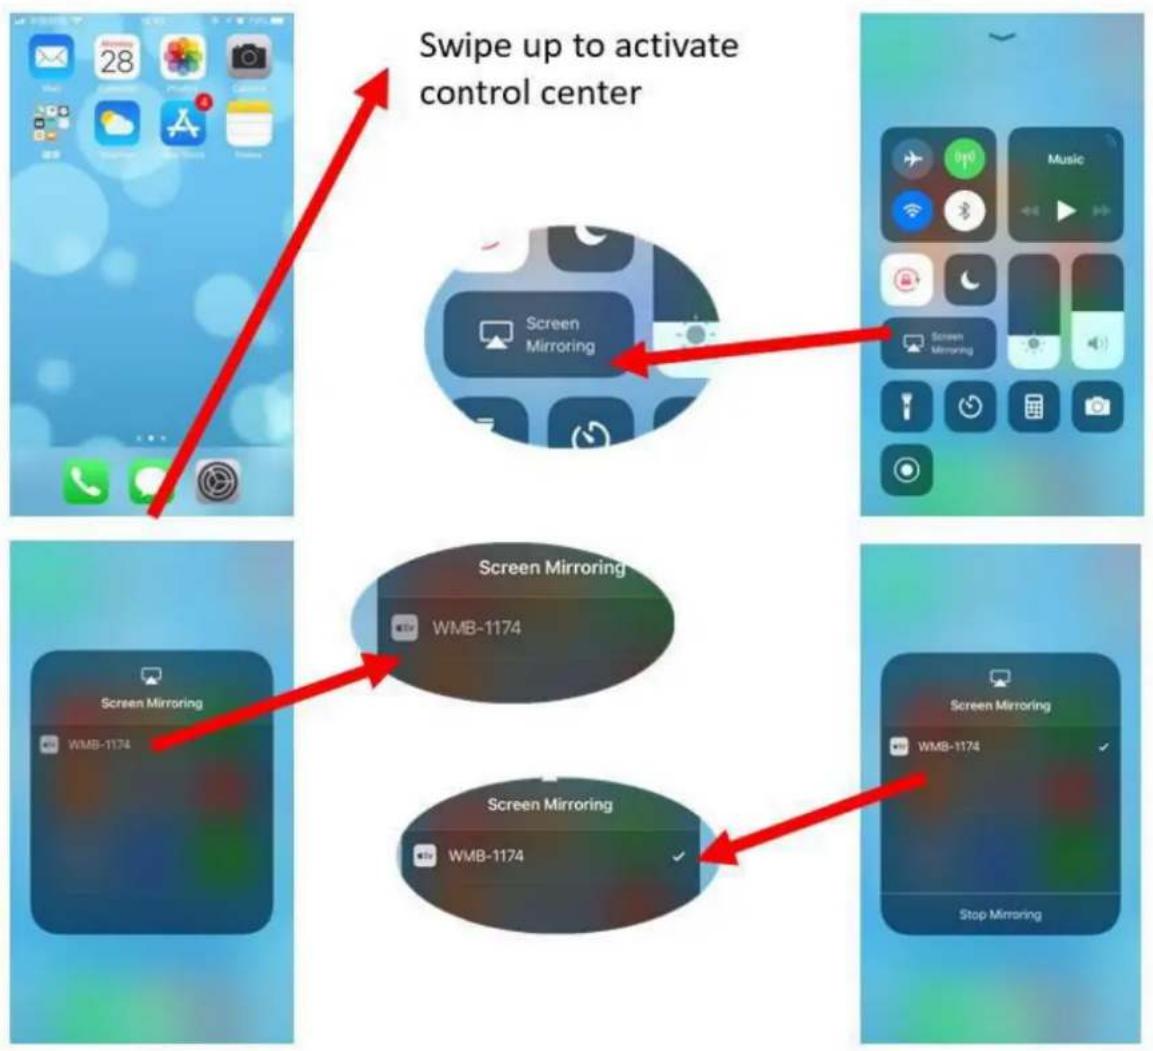
For iOS devices, please swipe up from bottom of display to open control center and enable Apple Screen Mirror. From there, select the HuddleShare from within the app to start mirroring to the main screen.
- For Android 5.0+ devices, please click the Device List to select the target HuddleShare and click the Mirror icon on the main interface of the WirelessMedia APK for Android.
- For Android devices lower than 5.0, please click the Local Files icon to select the sharing picture, music, or video.
6. "Setting" Configuration
Connect a mouse or touch screen to either of the (2) USB 2.0 ports on the HuddleShare and click the Settings button in the top right corner to open the Settings menu.
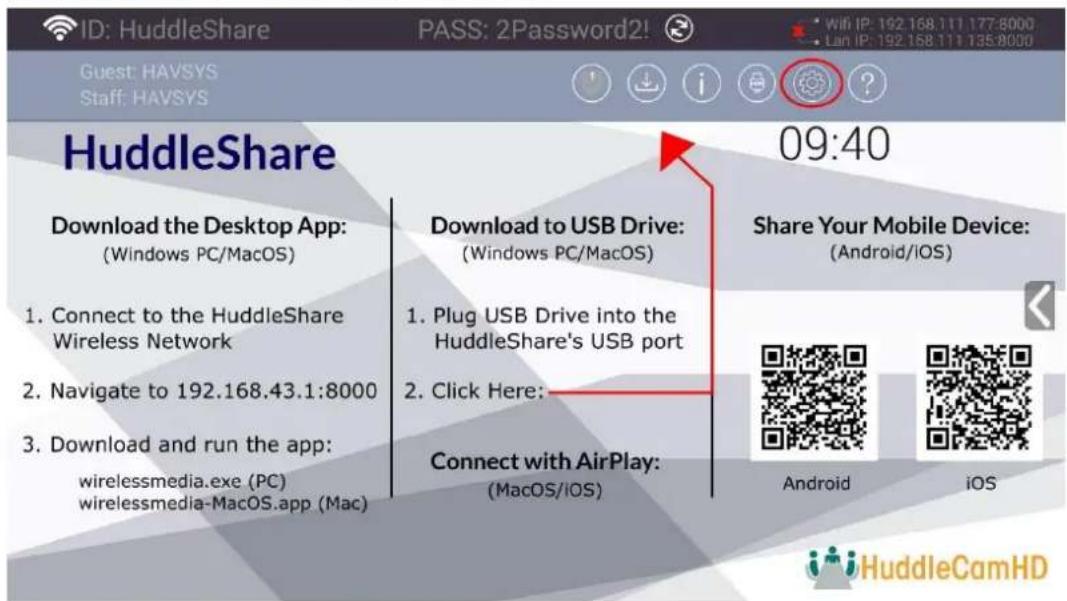
From the Settings interface, you can adjust: Ethernet, Wireless Network, Moderator Control, General Settings, Security Settings, Language, System Update, Date & Time, and About Device.

6.1 Ethernet:
Includes IP address, Ethernet MAC address, Proxy & IP settings, and PPPoE Settings.
6.1.1 IP Address
The local IP address of the HuddleShare.
6.1.2 Ethernet MAC address
The unique MAC address of HuddleShare
6.1.3 Proxy & IP Settings
Click here to adjust the Proxy & IP Settings

- Proxy: Click in the dropdown menu to select "None" or "Manual"
-
IP Settings: Click in the dropdown menu to select "Static" or "DHCP". When set to DHCP, the HuddleShare will auto assign an available IP Address. When set to Static IP Addressing, it will open an advanced settings page with the options shown below:
-
IP Address: Click in this text field to assign a Static IP Address corresponding to your network.
Gateway: Click in this text field to assign a Default Gateway to the IP Address of your router.
- Must be on the local subnet. Cannot be set to "0.0.0.0". When not utilizing a router, use any IP Address on the subnet.
○ Network Prefix Length: Click in this text field to adjust the Network Prefix Length. Default is 24
- DNS1: Click in this text field to adjust the DNS1 corresponding to your local network.
- DNS2: Click in this text field to adjust the DNS2 corresponding to your local network.
After adjusting the settings to your liking, click "Set" to save and return. Or click "Cancel" to exit without saving.
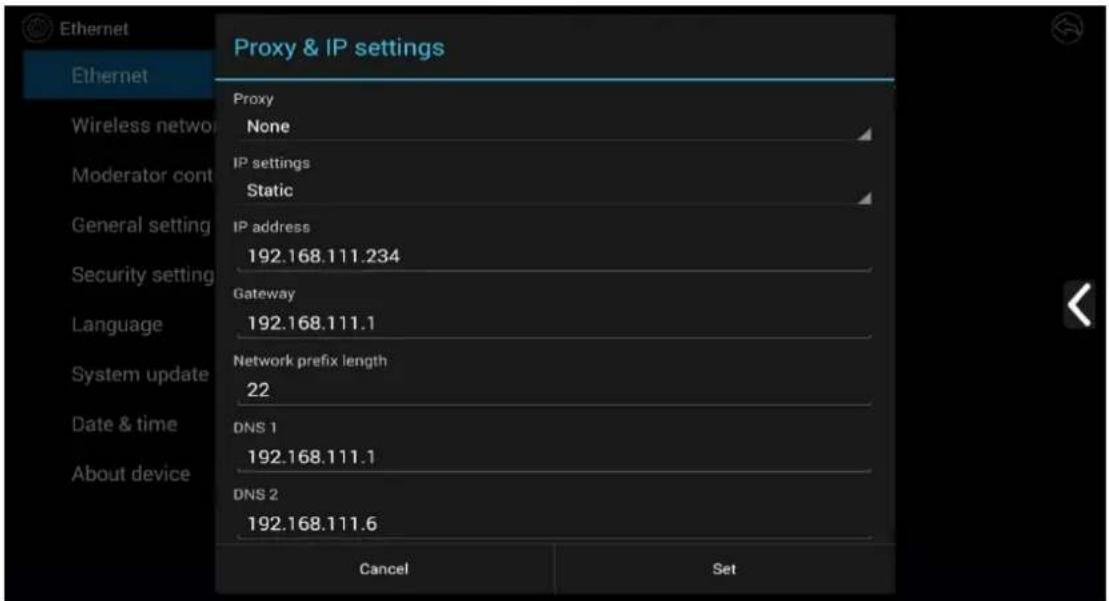
Change IP Address: Click in the IP Address text field and use a USB connected keyboard or use the on screen keyboard paired with a mouse to adjust the IP Address.
6.1.4 PPPoE settings
Click here to adjust the Point to Point Protocol over Ethernet Settings
PPPoE settings:
- User name: Click in the text field to fill out the appropriate user name.
- Password: Click in the text field to fill out the appropriate password.
- Check the input field "Show Password" to show the text in the password field.
- Check the input field "Save Account and Password" to allow for saving and exiting of the field.

6.2 Wireless Network
Includes Wireless Network Configuration Wizard, Show Device Name and Password When Mirroring, Auto-Change Password, and Wi-Fi Analyzer.

6.2.1 Wireless Network Configuration Wizard
Click to use the Configuration Wizard to easily set up your HuddleShare on your LAN.
6.2.2 Show Device Name and Password When Mirroring
When enabled, will display SSID and PASS on screen when mirroring so additional participants can join and mirror. When disabled, other participants can not see the SSID and PASS on the main screen and may not be able to connect.
6.2.3 Auto Change WiFi Hotspot Password
Configure to automatically change WiFi password to a random number every period. Options include:
- Never: Never change the WiFi password.
- 5 Minutes: Change the WiFi password every 5 minutes.
• 30 Minutes: Change the WiFi password every 30 minutes.
• 1 Hour: Change the WiFi password every 1 hour.
• 2 Hours: Change the WiFi password every 2 hours.
• 4 Hours: Change the WiFi password every 4 hours.
• 24 Hours: Change the WiFi password every 24 hours.
6.2.4 WiFi Analyzer
WiFi Analyzer is an embedded application tool that provides advice for the deployment and WiFi configuration. The IEEE802.11 a/g/n/ac standard makes use of a part of the 2.4GHz ISM band of the 5GHz U-NII bands.
The 2.4GHz ISM band (industrial, scientific and medical) goes from 2.400 GHz to 2.500GHz and can be used freely by any radio device for industrial, scientific and medical application. This band is also used by several common telecommunications protocols or standards for the likes of WiDi, Bluetooth, ZigBee, RFIS devices, etc. A more comprehensive list of systems authorized on this band can be found at:
http://www.efis.dk/sitecontent.jsp?sitecontent=ecatable for the European Union and at: http://transition.fcc.gov/oet/spectrum/table/fcctable.pdf for the United States.
The 802.11 standard divides the 2.4GHz ISM band into (13) thirteen 22MHz wide channels, spaces 5MHz from
each other (cf. as table 1 below). These channels thus strongly overlap with each other. The availability of these channels varies from country to country.
Table 1 below depicts the channels enabled for the different regional versions

flowchart
graph TD
    A["1"] --> B["2"]
    B --> C["3"]
    C --> D["4"]
    D --> E["5"]
    F["6"] --> G["7"]
    H["11"] --> I["8"]
    I --> J["9"]
    J --> K["10"]
    style A fill:#f9f,stroke:#333
    style K fill:#f9f,stroke:#333
Table 1 Wi-Fi channels in the 2.4GHz band
| Channel Number | Frequency Range (MHz) | Regional Version | |||
| NA | EU | JP | CN | ||
| 1 | 2401 - 2423 | X | X | X | X |
| 2 | 2406 - 2428 | X | X | X | X |
| 3 | 2411 - 2433 | X | X | X | X |
| 4 | 2416 - 2438 | X | X | X | X |
| 5 | 2421 - 2443 | X | X | X | X |
| 6 | 2426 - 2448 | X | X | X | X |
| 7 | 2431 - 2453 | X | X | X | X |
| 8 | 2436 - 2458 | X | X | X | X |
| 9 | 2441 - 2463 | X | X | X | X |
| 10 | 2446 - 2468 | X | X | X | X |
| 11 | 2451 - 2473 | X | X | X | X |
| 12 | 2456 - 2478 | ||||
| 13 | 2461 - 2483 | ||||
Table 2: Wifi channels in the 2.4 GHz frequency band
The 5GHz U-NII band covers discontinued parts of the RF spectrum between 5.15GHz and 5.825GHz and allows the use of unlicensed wireless systems. The U-NII band is divided into 4 different sub-bands subjected to specific restriction (cf. Table 3).
| Band | Frequency Range (MHz) | Number of WiFi Channels | Restriction |
| U-NII 1 | 5150 - 5250 | 4 | Until recently, limited to indoor use only |
| U-NII 2 | 5250 - 5350 | 4 | Requires use of radar detection |
| U-NII 2 Extended | 5470 - 5725 | 11 | Requires use of radar detection |
| U-NII 3 | 5725 - 5825 | 4 |
Table 3: U-NII organization
Contrary to the channels defined on the 2.4 GHz band, the channels defined on the 5 GHz band do not overlap with each other.
As stated in Table 3, the U-NII 2 and U-NII2 extended sub-bands are also used by several radar systems and can only be used by Wi-Fi access points using the Dynamic Frequency Selection (DFS) and Transmit Power Control (TPC) algorithms. These 2 algorithms have been defined by the IEEE802.11h standard and specify a set of procedures to detect and avoid interference with radar systems operating in the U-NII 2 and U-NII 2 extended sub-bands.
The WirelessMedia access points currently do no support DFS and TPC as specified in the IEEE 802.11h standard. Table 4 goes over the list of supported 5GHz channels in different regions.
The 5GHz band is used much less on WiFi devices than the 2.4GHz alternative. In addition, many of the older WiFi devices only support the 2.4GHz channel, which makes 5GHz less popular. Moreover, 5GHz channels do not overlap with each other. As a result, the use of 5GHz channels is most often the best choice when installing for the lowest chance of WiFi interference.
| Channel Number | Frequency Range (MHz) | Regional Variant | |||
| NA | EU | JP | CN | ||
| 36 | 5150 - 5170 | X | X | X | |
| 40 | 5170 - 5190 | X | X | X | |
| 44 | 5190 - 5210 | X | X | X | |
| 48 | 5210 - 5230 | X | X | X | |
| 149 | 5735 - 5755 | X | X | ||
| 153 | 5755 - 5775 | X | X | ||
| 157 | 5775 - 5795 | X | X | ||
| 161 | 5795 - 5815 | X | X | ||
| 165 | 5815 - 5835 | X | X | ||
Table 4: Regional Variants
Wi-Fi Channel Selection
Wireless communication signals travel through the air. When two devices are transmitting on the same frequency, the communication will become distorted. When that distortion becomes too severe, the transmitted packets may no longer be understood by the receiver. As a result, these packets will be re-transmitted. This causes a decrease in the data rate achieved which inevitably causes more latency between the transmitting and receiving devices.
To limit the interference between WiFi devices, the 802.11 standard makes use of the CSMA/CA and Clear-Channel Assessment (CCA) algorithms. Before sending a packet, the device checks whether or not another transmission is currently going on. When free, the device will use the channel to send packets. Otherwise, the device will back off and retry after a short period of time. Even while making use of the CSMA/CA and CCA algorithms, too many WiFi devices on the same channel will negatively impact the maximum achievable data rate. In addition, these algorithms are inefficient against interferences coming from non WiFi devices or from WiFi devices operating on overlapping channels. Therefore, it is strongly recommended to select a WiFi channel with little to no congestion.
Site Survey
Ideally, the selection of the WiFi Channel should be made after conducting a wireless site survey. This site survey maps out the different sources of interference and the active RF systems.
Based on the site survey results, the least occupied channel can be found and selected for each meeting room.
WiFi Analyzer includes two modes:
- Simple Mode: Find and scan a WiFi channel to analyze its channel and find the recommended channel.
- Expert Mode: Gives real time map of current WiFi hotspot devices, channel, and RSSI for easy selection of a non-congested WiFi channel.

Generic Configuration Rules
When no site survey is made, the following rules of thumb should allow for a successful configuration:
- The HuddleShare access point in a meeting room should not re-use a WiFi Channel that overlaps with one of the channels used in the corporate WLAN infrastructure. Ideally, at least two channels in the corporate WLAN should be reserved for the HuddleShare. If numerous HuddleShare systems are located close to one another, more channels may be required.
When installing HuddleShare base units, we recommend checking with your IT department to find which channels are not used by the corporate WLAN infrastructure in the desired location.
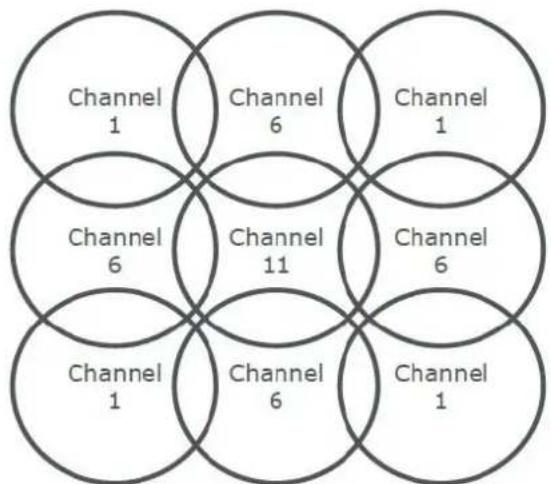
- In an ideal setup, overlapping channels should not be used for two HuddleShare units within range of each other. As the 2.4GHz bands overlap with each other, best practice is to use channels 1, 6, & 11 on a single floor. On floors above and below, the channel pattern will be shifted to avoid overlap between floors (e.g. by placing channel 6 at the center of the illustrated pattern below).
- If there are not enough channels available, two or more HuddleShares can be placed on the same channel. This will impact the quality of the connection when several clients are sharing simultaneously.
When three HuddleShares are placed on top of one another, this can result in performance issues as illustrated in Table 5 & 6. Table 5 shows a scenario in which all clients are streaming video content, and Table 6 shows a standard office situation where clients share typical office documents or presentations.
- As stated above, the 5GHz channels do not overlap with each other, and are used less by devices without WiFi compared to the 2.4GHz channels. In addition, 5GHz signals are more rapidly degraded than 2.4GHz signals. Therefore, the use of a 5GHz channel is recommended. This will limit the impact of wireless devices on your WLAN.
| Clients Sharing Video | 1 | 2 | 3 |
| 1 | Ok | Ok | Ok |
| 2 | Ok | Ok | Moderate risk of reduced quality |
| 3 | Ok | Moderate risk of reduced quality | Strong risk of reduced quality |
| 4 | Ok | Strong risk of reduced quality | Strong risk of reduced quality |
Table 5: Connection quality matrix of multiple HuddleShares using the same channel simultaneously for video streaming
| Number of clients sharing typical office documents | 1 | 2 | 3 |
| 1 | Ok | Ok | Ok |
| 2 | Ok | Ok | Ok |
| 3 | Ok | Ok | Ok |
| 4 | Ok | Ok | Moderate risk of reduced quality |
Table 6: Connection quality matrix when multiple HuddleShares use the same channel simultaneously for daily office work (Power point, excel, etc.)
Important Remarks about the HuddleShare Installation
Please be sure the HuddleShare is installed correctly to ensure the performance and communication between the HuddleShare & device(s) aren't affected. When installing, please follow the rules below:
- Keep direct line of sight between HuddleShare and devices. Any obstruction will cause the signal to follow a longer path, which degrades performance.
- Due to the radio pattern of the dipole antennas, the antennas should not be placed above the HuddleShare users. When ceiling mounting, it's advised to position the antennas to the side, parallel to the ceiling.
- Do not use the HuddleShare without the shipped antennas. Removing the antenna will cause severe degradation of the signal quality and may result in connection issues between the HuddleShare and clients.
- Install the HuddleShare in an open environment and avoid installing in a metallic shell. A metallic shell (or shelf) can act as a Faraday cage and block the RF signal.
○ If installing in a metallic shell or shelf is unavoidable, different external antennas may be required. - Once the HuddleShare is installed, it is best to control the signal strength at the potential device location. For best performance, signal strength of -70dBm is needed.
Wi-Fi Troubleshooting
Check the RSSi from the connected devices.
When utilizing a channel free of any interference, a signal that is too weak coming from the WirelessMedia client (mobile device or software) can result in an unstable link. In such situations, we recommend:
- Measuring the RSSI from the HuddleShare at different device locations. This can be accomplished by means of a free WiFi survey tool such as the “WiFi Analyzer” Android application, or another base unit’s embedded WiFi Analyzer. As previously stated, the RSSI should be at least -70dBm.
- Check the signal state reported on the HuddleShares web interface on the tab "Maintenance" > "Buttons"
If the measured RSSI is too low, check the section marked [Important Remarks about the HuddleShare Installation].
Attention: After using the WiFi Analyzer, the Portable WiFi Hotspot will turn off automatically. Be sure to enable WiFi Hotspot afterwards for best performance.
6.3 Moderator Control
Once enabled, connected devices will display on right side of the HuddleShare interface as shown below.

Using a mouse or touch screen, you can select one of the connected devices by clicking it. You can have up to 14 devices in the preview window simultaneously. Use the page up/down buttons to see more options.
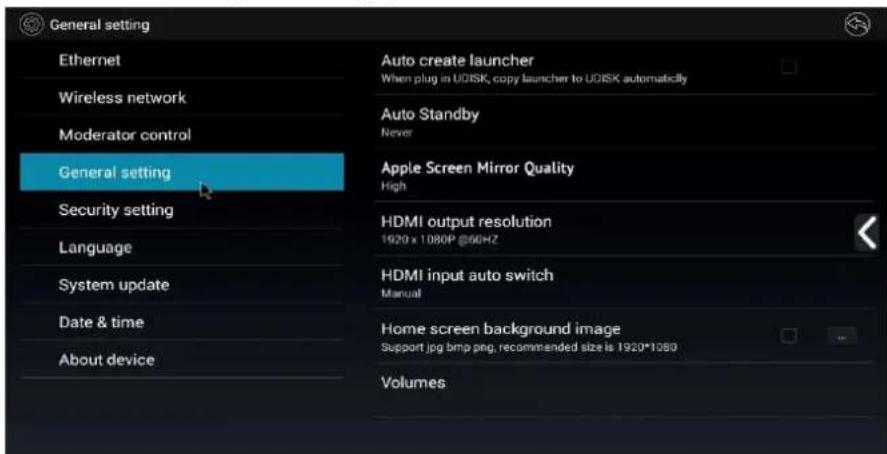
6.4 General Settings
Includes: Auto Create Launcher, Auto Standby, Apple Screen Mirror Quality, HDMI Output Resolution, HDMI Input Auto Switch, Home Screen Background Image, and Volumes.
6.4.1 Auto Create Launcher
When enabled, the PC Client Software will automatically download to USB Drive upon connection to HuddleShare.
6.4.2 Auto Standby
Configure to change when the HuddleShare automatically goes into Standby mode. Options include:
• Never: Never automatically go into Standby mode.
• 1 Minute: Go into Standby mode after 1 minute
• 5 Minutes: Go into Standby mode after 5 minutes
• 10 Minutes: Go into Standby mode after 10 minutes
• 15 Minutes: Go into Standby mode after 15 minutes
• 30 Minutes: Go into Standby mode after 30 minutes
6.4.3 Apple Screen Mirror Quality
Configure the image quality from iOS devices using Apple Screen Mirror Service. Options include:
• High: 1920x1080
• Medium: 1280x720
- Low: 1136x640

Attention: Higher screen quality will use a higher data rate. Under certain data rate, lower resolution perform better.
6.4.4 HDMI Output Resolution
Configure the output resolution of the HuddleShare's HDMI port. Options include:
• 1920x1080p @ 60Hz
- 1920x1200p @ 60Hz
6.4.5 HDMI Input Auto Switch
Configure the method of HDMI switching. Options include:
- Manual: Switch HDMI Input manually via clicking the icon on the home page.
- Last-Connect Switch: Switch the last connection between the wireless and wired.
- Switch to active HDMI Input when HDMI screen is shown longer than 5 sec.
6.4.6 Home Screen Background Image
Change the HuddleShare's background image of home screen with .jpg, .bmp, or .png (recommended size: 1920x1080)
Image must be stored in a USB drive connected to one of the HuddleShare's USB port to upload.
6.4.7 Volume
Allows for adjustment of the HuddleShare's Volume. Options include: 0 \~ 100
6.5 Security Setting
Includes Security Level, LAN Discovery & Connection, Remote View Lock, Clear History After Meeting, and Change Admin Password.

6.5.1 Security Level
Allow for adjustment of the Security Level when connecting to the HuddleShare.

6.5.2 LAN Discovery & Connection
Allow PC/Laptop/Mobile Device/Tablet to discover the HuddleShare and connect to it.
6.5.3 Remote View Lock
Enable/Disable Remote View for connected WirelessMedia devices. Default is Enabled.
6.5.4 Show PC's User Name When Mirroring
Enable/Disable connected PC's User Name to show when connected and mirroring.
6.5.5 Clear History After Meeting
Configure how frequently the HuddleShare deletes history when meetings have finished. Options include:
- Decide by User
- Never
- Always
6.5.6 Change Admin Password
Click to change the administrator password. Default password is "admin"
6.6 Language
Includes Language settings. Click to find the appropriate language.
6.7 System Update
Includes Local Update and Full Update.
- Local Update: Includes application software.
• Full Update: Includes application software & firmware. - Factory Reset: Click to set HuddleShare back to factory default settings.

6.8 Date & Time
Includes Automatic Date & Time, Set Date, Set Time, Select Time Zone, Use 24-Hour format, and Choose Date Format

• Automatic Date & Time: Check to use the network provided time for system.
- Set Date: Click in the input field to fill out appropriate date.
- Set Time: Click in the input field to fill out appropriate time.
- Select Time Zone: Click in the input field to fill out the appropriate time zone.
• Use 24-Hour format: Check to use 24-Hour format
- Choose Date format: Click to select the date format
6.9 About Device
Includes Model Number and Software Version.

6.9.1 Model Number
HC-HUDDLESHARE
6.9.2 Software Version
Includes Version Number# 3.0.2D.A1036
7. Updating HuddleShare
The HuddleShare includes two methods of updating. "Local Update" & "Full Update".
- "Local Update" will update the OS.
- “Full Update” will update the OS and booter loader.
7.1 Upgrading HuddleShare
The HuddleShare can be updated through a USB drive following the steps below.
- Copy the updating file "update.bin" to the root, or base level directory of the USB drive.

- Connect the USB drive to either port of the HuddleShare.
a. Note: The USB port can only support up to 500ma. Please use a standard low power USB drive to upgrade
- Connect an HDMI display to the HDMI Output port.
- Connect the power adapter to the HuddleShare and power on.
- Click the "Settings" button in the top right corner.
- Within Settings, click the "System Update" tab.
- Click the button "Full Update"
- After clicking the "Update" button, "Reboot to continue update?" will be displayed. Click OK to continue
a. Note: The unit can't be powered off until the upgrading process is finished, or the firmware will be corrupted.
-
The HuddleShare will auto reboot after completing the upgrade.
-
After reboot, the Home Page will be displayed. Once shown, use a pin to push the "Reset" button on the rear panel to restore to factory default.
- On the next page, click "Factory Reset". You'll be greeted by the message "Reboot after 3 seconds to continue factory reset", as shown below.
- After reboot, the home page will appear again.
- As of now, your firmware upgrade is complete! Check the About Device section of the Settings menu to confirm your Software Version has updated.
8. Operation Guide
8.1 Transmitting PC Desktop
Operating system requirement: Windows XP/Vista/7/8/8.1/10 32 & 64 bit
8.1.1 Transmitting Windows PC/Laptop
- Execute the WirelessMedia PC client software
-
Once you see the message "Ready to share" at the bottom right, you can click to begin mirroring on the HuddleShare.
a. If the WirelessMedia software is unable to detect the HuddleShare, the software will display "Unconnected" and the device list will remain empty. See [Wireless Network]. -
Click again to stop mirroring to HuddleShare.
-
Settings icon of UI includes:
a. Extended Desktop: Check box to transmit the extended desktop of PC/Laptop. Default setting mirrors Main Desktop of PC/Laptop
b. Preserve Aspect Ratio: Check box to keep the original aspect ratio on the main screen.
c. HDMI Input: Click to display the connected HDMI source through the HuddleShare.
d. Remote View Lock: Disables view from mobile devices.
e. Super Low Latency of Mouse: Control the HuddleShare through PC/Laptop mouse
- A WirelessMedia status icon is added to the status bar at the bottom right corner. Right click to open up the WirelessMedia settings. Options Include:
a. About WirelessMedia: Click to check the software version of the HuddleShare.
b. Exit
8.1.2 Transmitting MAC OS PC/Laptop and iOS Mobile Device
Apple Screen Mirroring: The HuddleShare supports Apple Screen Mirroring. Enable Apple Screen Mirror Service on your Apple device to mirror your desktop on the HuddleShare's main screen. Swipe up from bottom of desktop to activate the Control Center. Click the Screen Mirroring icon and select the HuddleShare to connect.
8.1.3 How to Enable Apple Screen Mirroring
flowchart
graph TD
    A["Swipe up to activate control center"] --> B["Screen Mirroring"]
    B --> C["Screen Mirroring WMB-1174"]
    C --> D["Screen Mirroring WMB-1174"]
    D --> E["Stop Mirroring"]
8.2 "WirelessMedia" App for iOS
Operating system requirement: iOS 7.0+
- Open the "WirelessMedia" application.

- The main interface is shown below. The features include:

- Local Files: Mirror local files including Photos, Videos, & Music
- File Sharing/Exchange: Sets up a temporary connection between PC/Laptop for file transferring
- Screen Image/Remote View: View what's currently being mirrored to the HuddleShare main display
- Wireless Mouse/Remote Mouse: Control the HuddleShare or shared device like a mouse
- Menu Icon: Shows the menu icons (photo, video, music, file sharing, etc.)
• Device List: Shows available HuddleShare & connect -
File & Operation Zone: Select the file to transmit and control (if available)
-
Local Files: Select file from local storage to mirror to HuddleShare

- File Sharing/Exchange: Share or exchange files with a PC/Laptop using the HuddleShare hotspot or WLAN a. Check the IP address by opening File Sharing/Exchange.
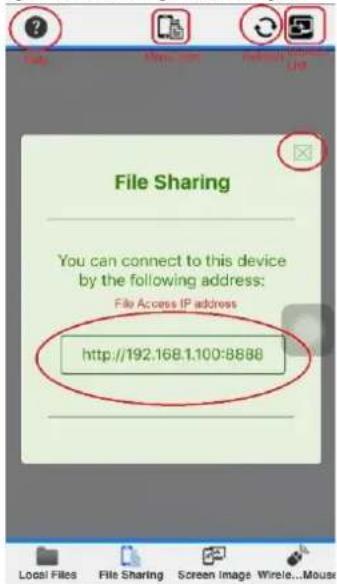
b. Have a PC type in the IP address into a web browser, as shown below.

c. Upon closing the File Sharing dialog box, you will enter the HuddleShare File List as shown below
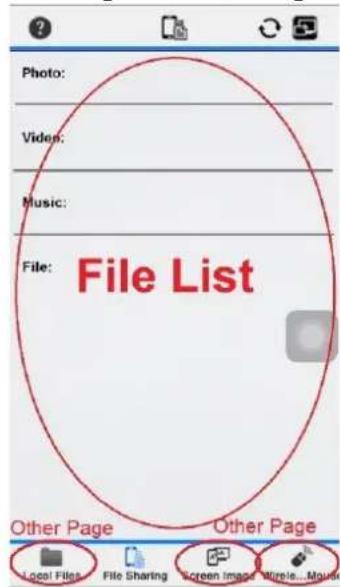
• Help: Re-open IP address page
- File List: Select photos, videos, music, or other files to transmit
- Other Page: Tap any of the other pages to exit File Sharing/Exchange and go to the corresponding function
- Screen Image/Remote View: View what's currently being mirrored to the HuddleShare main display a. When nothing is being shared, you will see:

- Red Cross Icon: Return to the HuddleShare Main Interface
• Operation Zone: Zone to view shared screen and control as a mouse
- Hidden Menu: Click to open the hidden function features. Includes Back & Keyboard as shown in the lower image.
- Back: Sends a "Return" command to the HuddleShare to go back to the previous directory menu.
• Keyboard: Opens the keyboard
- Wireless Mouse: Click in the Operation Zone to use the Wireless Mouse and control the HuddleShare.

a. Mouse Pointer: Represents the mouse position on the HuddleShare.
b. Re-Position: Resets the mouse to the center of the screen.
c. Back: Sends a "Return" command to the HuddleShare to go back to the previous directory menu.
d. Red Cross Icon: Return to the HuddleShare Main Interface.
8.3 Transmit Android Mobile Device
- Open the "WirelessMedia" application.

- The WirelessMedia Main Interface can be seen below. The features include:
Android 4.x Android 5.x

- Local Files: Mirror local files including Photos, Videos, & Music
- File Upload/Exchange: Sets up a temporary connection between PC/Laptop for file transferring
- TV Mirror: View what's currently being mirrored to the HuddleShare main display
- Mouse: Control the HuddleShare or shared device like a mouse
- Menu Icon: Shows the menu icons (photo, video, music, file sharing, etc.)
• Device List: Shows available HuddleShare & connect -
File & Operation Zone: Select the file to transmit and control (if available)
-
Local Files: Select file from local storage to mirror to HuddleShare. File types include: Image, Music, Video, & more.


Attention: Android Mirroring requires Android OS 5.0+
- File Upload/Exchange: Share or exchange files with a PC/Laptop on the HuddleShare hotspot or WLAN a. Check the IP address by opening File Sharing/Exchange.

• Help: Re-open IP address page
- File List: Select photos, videos, music, or other files to transmit
- Other Page: Tap any of the other pages to exit File Sharing/Exchange and go to the corresponding function


b. Have a PC type in the IP address into a web browser, as shown below.
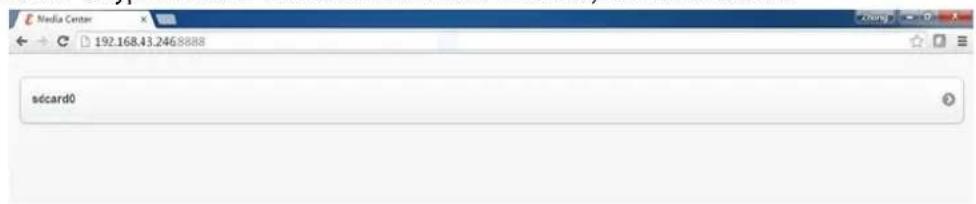
c. Open the root directory "sdcard0" as shown below.

d. Using the "Upload" button, select the files you wish to upload.
- Remote View: View what's currently being mirrored to the HuddleShare main display a. When nothing is being shared, you will see:

- Red Cross Icon: Return to the HuddleShare Main Interface
• Operation Zone: Zone to view shared screen and control as a mouse - Hidden Menu: Click to open the hidden function features. Includes Back & Keyboard as shown in the lower image.
- Back: Sends a "Return" command to the HuddleShare to go back to the previous directory menu.
-
Keyboard: Opens the keyboard
-
Wireless Mouse: Click in the Operation Zone to use the Wireless Mouse and control the HuddleShare.

a. Mouse Pointer: Represents the mouse position on the HuddleShare.
b. Re-Position: Resets the mouse to the center of the screen.
c. Back: Sends a "Return" command to the HuddleShare to go back to the previous directory menu.
d. Red Cross Icon: Return to the HuddleShare Main Interface.
8.4 HDMI Input Select
When on the Home Page, you can use a USB connected mouse or the Wireless Mouse feature to choose the HDMI Input. When an HDMI input is selected and connected, it will be displayed on the main display. When not connected, a connection diagram will be displayed on the main display, as shown below by default.


When utilizing the HDMI input, you can click the Home Icon in the top right corner to go back to the Home Page.
9. WiFi Recommended Settings
9.1 Checking WiFi Config on HuddleShare
You can utilize a WiFi analysis software to check the WiFi environment in order to select an unused WiFi frequency between 2.4GHz & 5GHz. The WiFi channels are as follows:
• 2.4GHz: 1, 2, 3, 4, 5, 6, 7, 8, 9, 10, & 11
• 5GHz: 36, 40, 44, 47, 149, 153, 157, 161, & 165
9.2 Checking the WiFi RSSI on PC/Mobile
You can utilize a WiFi analysis software to measure the WiFi RSSI (Received Signal Strength Indicator). It's recommended to have the RSSI above -70dB to ensure proper signal transmission.
10. Troubleshooting
To troubleshoot, please read through the table below to resolve any issues you may run in to. If the issue persists, reach out to our support team at help@HuddleCamHD.com or call 610-518-2200 Ext 1004
| Problem | Cause | Solution |
| “SSID: N/A and Password: N/A” is displayed on Home Page and mobile device can’t find HuddleShare’s WiFi. | Hotspot is not turned on. | Using a mouse, click the Settings button on the Home Page. Go to Wireless Network & enable Portable Hotspot. |
| “WirelessMedia” can’t connect to HuddleShare | WiFi Hotspot password changed | Double check that the password is correct. |
| Can’t discover the HuddleShare through application | ·Ensure the HuddleShare is connected to the same LAN as device·Portable Hotspot is disabled. Go to Wireless Network settings | |
| Can’t connect to the correct HuddleShare | Check the Device List and ensure you are connecting to the correct HuddleShare | |
| Image quality on the main display is not clear | The quality of cable between HuddleShare & main display is poor | ·Replace cable·Ensure cable is connected properly |
| Main display is set to incorrect resolution | Ensure the HuddleShare’s resolution is set to the native resolution of the main display | |
| HuddleShare connection is poor & unstable. | Wireless Congestion | Using a WiFi Scanner, find and select a free wireless frequency & channel in the Settings |
| Low Signal Strength | ·Change the orientation of the antennas·Remove any obstruction from line of sight | |
| WirelessMedia app is not running when USB Drive is inserted into PC/Laptop | Bad USB connection to PC/Laptop | ·Disconnect & reconnect USB·Use another USB port·Reboot PC/Laptop |
| USB port power is limited | Change USB port policy to run at high power | |
| Low Video Performance | PC/Laptop performance | ·Lower PC/Laptop resolution·Disable the hardware acceleration for video |
| Wireless Connectivity | Use WiFi analysis software to scan for uncongested channels | |
| No video on main display | Content uses HDCP | WirelessMedia input doesn’t support HDCP video |
| Connect source directly to HuddleShare HDMI input | ||
| Windows 7: “Windows has detected your computer's performance is slow...” | WirelessMedia uses GPU resources. Windows 7 may suggest using a different theme for increased performance | This error message can be ignored. Choose “Keep the current color scheme.” |
| Content is removed from main display and button LEDs are blinking | Connection to HuddleShare is lost | · WirelessMedia will attempt to automatically restore the connection. Upon failure, the button will blink red· Disconnect/reconnect button from PC/Laptop |
| Nothing is shown on main display | Display is powered off | Power on the display |
| The display cable isn't connected correctly | Connect the HDMI cable from HuddleShare to main display | |
| Display doesn't recognize HuddleShare or it's unable to display HuddleShare resolution | Change the resolution of HuddleShare through Settings Configuration | |
| The Base Unit is in Standby mode | Briefly press the Standby button on the HuddleShare to power On/Off | |
| Bad WiFi Connection | Wireless channel is congested | Use WiFi analysis software to scan for uncongested channels |
| Connection between HuddleShare & Button is obstructed | · Move HuddleShare to another location· Reorient HuddleShare antennas· Remove obstructions from line of sight | |
| No LAN connection to HuddleShare | Wrong IP address | · IP address isn't within LAN range· DHCP isn't enabled |
| No WiFi connection with HuddleShare | SSID isn't correct | Enter the correct SSID |
| No WiFi connection between HuddleShare & mobile device | Wrong WiFi frequency | Ensure mobile device is on the correct frequency (2.4GHz or 5GHz) |
| Wrong password | Enter the correct SSID/Password combination | |
| No audio when transmitting local file | Unsupported audio format. List includes: Dolby MS11, DDCO DTSLBR, DTSE, DTSNeoUltra, SRS-THEATERSOUND, DTS_StudioSound3D, & DTS_HD | Reformat audio to DD, DD+, HEAAC, DTS DMP, WMA, DRA, or COOK |
| Can't enter File Sharing/Exchange in WirelessMedia iOS application | WirelessMedia app is running in background. Due to Apply policy, any background app can't run | Put WirelessMedia back in front stage |
| Can't update HuddleShare | Flash drive format is NTFS | Re-format flash drive to FAT format |
| Can't connect through Apple Screen Mirror Service | Operating System requirements: OS X: 10.6/10.7/10.8/10.9/10.10 iOS: 8.0 & up | Update to later Operating System |
| Can’t connect through Android device | Operating System requirements: Android 2.3 & up | Update to later Operating System |
| Can’t connect through PC/Laptop | Operating System Requirements: Windows XP/Vista/7/8/8.1/10 32 & 64 bit | Update to later Operating System |

- HuddleShare User Manual
- BYOD Wireless Presentation Device
- Feature List:
- HuddleShare:
- Table of Contents
- Overview
- HuddleShare Overview
- HuddleShare Connection Components
- Accessories List
- Specifications
- Panel Layout
- Hardware Interface
- HuddleShare Front Panel
- USB Port Capabilities
- POWER button
- Mounting points.
- HuddleShare Rear Panel
- Restore default configuration via Reset button
- Default Configuration
- Software Interface
- Home Page
- SSID and PASS (password)
- Changeable PASS (password)
- WiFi address & LAN IP address:
- Download
- Information
- HDMI Input
- Setting
- The Settings sub-menu includes:
- Help
- PC/Laptop Quick-Start steps
- Smart mobile devices Quick-Start steps
- Installation
- Installation Methods for the HuddleShare
- Necessary Tools
- Necessary Parts
- How to Table/Wall Mount
- Antenna Placement
- HuddleShare Power Connection
- How to connect the external power adapter
- HuddleShare Video Connection
- HuddleShare Audio Connection
- Audio via HDMI Output
- How to connect separate audio
- Sound is not sent out
- PC/Laptop Sound
- HuddleShare LAN Connection
- How to connect LAN
- LAN Indicator
- About USB Device Connection
- How to connect mouse or touch screen
- How to use USB control
- Wiring Diagram
- Quick Start
- "ShareKey" to Mac or PC/Laptop
- "WirelessMedia" via external USB drive to Mac or PC/Laptop
- Connect via WiFi Hotspot:
- Connect via LAN Connection:
- Mirroring
- Mirroring Mac or PC/Laptop
- Mirroring Mobiles
- "Setting" Configuration
- Ethernet:
- IP Address
- Ethernet MAC address
- Proxy & IP Settings
- PPPoE settings
- PPPoE settings:
- Wireless Network
- Wireless Network Configuration Wizard
- Show Device Name and Password When Mirroring
- Auto Change WiFi Hotspot Password
- WiFi Analyzer
- Wi-Fi Channel Selection
- Site Survey
- Generic Configuration Rules
- Important Remarks about the HuddleShare Installation
- Wi-Fi Troubleshooting
- Moderator Control
- General Settings
- Auto Create Launcher
- Auto Standby
- Apple Screen Mirror Quality
- HDMI Output Resolution
- HDMI Input Auto Switch
- Home Screen Background Image
- Volume
- Security Setting
- Security Level
- LAN Discovery & Connection
- Remote View Lock
- Show PC's User Name When Mirroring
- Clear History After Meeting
- Change Admin Password
- Language
- System Update
- Date & Time
- About Device
- Model Number
- Software Version
- Updating HuddleShare
- Upgrading HuddleShare
- Operation Guide
- Transmitting PC Desktop
- Transmitting Windows PC/Laptop
- Transmitting MAC OS PC/Laptop and iOS Mobile Device
- How to Enable Apple Screen Mirroring
- "WirelessMedia" App for iOS
- Transmit Android Mobile Device
- HDMI Input Select
- WiFi Recommended Settings
- Checking WiFi Config on HuddleShare
- Checking the WiFi RSSI on PC/Mobile
- Troubleshooting
Brand : HuddleCamHD
Model : HuddleShare
Category : Wireless presenter