USER MANUAL ASPIRE V3-771G-53218G1.5TMAII ACER
Date of purchase: ____
Place of purchase: ____
Safety instructions
Read these instructions carefully. Keep this document for future reference. Follow all warnings and instructions marked on the product.
Turning the product off before cleaning
Unplug this product from the wall outlet before cleaning. Do not use liquid cleaners or aerosol cleaners. Use a damp cloth for cleaning.
Warnings
Accessing the power cord
Be sure that the power outlet you plug the power cord into is easily accessible and located as close to the equipment operator as possible. When you need to disconnect power to the equipment, be sure to unplug the power cord from the electrical outlet.
Disconnecting the power source
Observe the following guidelines when connecting and disconnecting power to the power supply unit:
Install the power supply unit before connecting the power cord to the AC power outlet.
Unplug the power cord before removing the power supply unit from the computer.
If the system has multiple sources of power, disconnect power from the system by unplugging all power cords from the power supplies.
Using electrical power
- This product should be operated from the type of power indicated on the marking label. If you are not sure of the type of power available, consult your dealer or local power company.
- Do not allow anything to rest on the power cord. Do not locate this product where people will walk on the cord.
- If an extension cord is used with this product, make sure that the total ampere rating of the equipment plugged into the extension cord does not exceed the extension cord ampere rating. Also, make sure that the total rating of all products plugged into the wall outlet does not exceed the fuse rating.
iv
- Do not overload a power outlet, strip or receptacle by plugging in too many devices. The overall system load must not exceed 80% of the branch circuit rating. If power strips are used, the load should not exceed 80% of the power strip's input rating.
- This product's AC adapter is equipped with a three-wire grounded plug. The plug only fits in a grounded power outlet. Make sure the power outlet is properly grounded before inserting the AC adapter plug. Do not insert the plug into a non-grounded power outlet. Contact your electrician for details.

Warning! The grounding pin is a safety feature. Using a power outlet that is not properly grounded may result in electric shock and/or injury.

Note: The grounding pin also provides good protection from unexpected noise produced by other nearby electrical devices that may interfere with the performance of this product.
- The system can be powered using a wide range of voltages; 100 to 120 or 220 to 240 V AC. The power cord included with the system meets the requirements for use in the country/region where the system was purchased. Power cords for use in other countries/regions must meet the requirements for that country/region. For more information on power cord requirements, contact an authorized reseller or service provider.
Bundled dummy cards

Note: Information in this section may not apply to your computer.
Your computer shipped with plastic dummies installed in the card slots. Dummies protect unused slots from dust, metal objects or other particles.
Save the dummies for use when no cards are in the slots.
General
• Do not use this product near water.
- Do not place this product on an unstable cart, stand or table. If the product falls, it could be seriously damaged.
- Slots and openings are provided for ventilation to ensure reliable operation of the product and to protect it from overheating. These openings must not be blocked or covered. The openings should never be blocked by placing the product on a bed, sofa, rug or other similar surface. This product should never be placed near or over a radiator or heat register, or in a built-in installation unless proper ventilation is provided.
• Never push objects of any kind into this product through cabinet slots as they
may touch dangerous voltage points or short-out parts that could result in a fire or electric shock. Never spill liquid of any kind onto or into the product.
- To avoid damage of internal components and to prevent battery leakage, do not place the product on a vibrating surface.
- Never use it under sporting, exercising, or any vibrating environment which will probably cause unexpected short current or damage rotor devices, HDD, Optical drive, and even exposure risk from lithium battery pack.
- The bottom surface, areas around ventilation openings and AC adapter may get hot. To avoid injury, ensure they do not come in contact with your skin or body.
- Your device and its enhancements may contain small parts. Keep them out of the reach of small children.
- The surface temperature of the base will rise during normal operation, particularly when plugged in to AC power. Allowing sustained contact with exposed skin can cause discomfort or burns.
Product servicing
Do not attempt to service this product yourself, as opening or removing covers may expose you to dangerous voltage points or other risks. Refer all servicing to qualified service personnel.
Unplug this product from the wall outlet and refer servicing to qualified service personnel when:
• The power cord or plug is damaged, cut or frayed.
• Liquid was spilled into the product.
• The product was exposed to rain or water.
• The product has been dropped or the case has been damaged.
- The product exhibits a distinct change in performance, indicating a need for service.
- The product does not operate normally after following the operating instructions.

Note: Adjust only those controls that are covered by the operating instructions, since improper adjustment of other controls may result in damage and will often require extensive work by a qualified technician to restore the product to normal condition.
Guidelines for safe battery usage
This notebook uses a Lithium-ion battery. Do not use it in a humid, wet or corrosive environment. Do not put, store or leave your product in or near a heat source, in a high temperature location, in strong direct sunlight, in a microwave oven or in a pressurized container, and do not expose it to temperatures over 60^ C ( 140^ F). Failure to follow these guidelines may cause the battery to leak acid, become hot, explode or ignite and cause injury and/or damage. Do not pierce, open or
disassemble the battery. If the battery leaks and you come into contact with the leaked fluids, rinse thoroughly with water and seek medical attention immediately. For safety reasons, and to prolong the lifetime of the battery, charging will not occur at temperatures below 0^ C ( 32^ F) or above 40^ C ( 104^ F).
The full performance of a new battery is achieved only after two or three complete charge and discharge cycles. The battery can be charged and discharged hundreds of times, but it will eventually wear out. When the operation time becomes noticeably shorter than normal, buy a new battery.
Use only the approved batteries, and recharge your battery only with the approved chargers designated for this device.
Use the battery only for its intended purpose. Never use any charger or battery that is damaged. Do not short-circuit the battery. Accidental short-circuiting can occur when a metallic object such as a coin, clip or pen causes direct connection of the positive (+) and negative (-) terminals of the battery. (These look like metal strips on the battery.) This might happen, for example, when you carry a spare battery in your pocket or purse. Short-circuiting the terminals may damage the battery or the connecting object.
The capacity and lifetime of the battery will be reduced if the battery is left in hot or cold places, such as in a closed car in summer or winter. Always try to keep the battery between 15^ C and 25^ C ( 59^ F and 77^ F). A device with a hot or cold battery may not work temporarily, even when the battery is fully charged. Battery performance is especially limited in temperatures well below freezing.
Do not dispose of batteries in a fire as they may explode. Batteries may also explode if damaged. Dispose of batteries according to local regulations. Please recycle when possible. Do not dispose as household waste.
Wireless devices may be susceptible to interference from the battery, which could affect performance.

Note: Please refer to www.acer.com for battery shipping documents.
Replacing the battery pack
The notebook uses lithium batteries. Replace the battery with the same type as that which came bundled with your product. Use of another battery may present a risk of fire or explosion.

Warning! Batteries may explode if not handled properly. Do not disassemble or dispose of them in fire. Keep them away from children. Follow local regulations when disposing of used batteries.
Caution for Optical Drive Device

Note: Information in this section may not apply to your computer.
CAUTION: This appliance contains a laser system and is classified as a "CLASS 1 LASER PRODUCT." In case of any trouble with this device, please contact your nearest AUTHORIZED service station. To prevent direct exposure to the laser beam, do not try to open the enclosure.
CLASS 1 LASER PRODUCT
CAUTION: INVISIBLE LASER RADIATION WHEN OPEN. AVOID EXPOSURE TO BEAM.
APPAREIL A LASER DE CLASSE 1 PRODUIT
LASERATTENTION: RADIATION DU FAISCEAU LASER INVISIBLE EN CAS D'OUVERTURE. EVITTER TOUTE EXPOSITION AUX RAYONS.
LUOKAN 1 LASERLAITE LASER KLASSE 1
Telephone line safety
- Disconnect all telephone lines from the equipment when not in use and/or before servicing.
- To avoid the remote risk of electric shock from lightning, do not connect the telephone line to this equipment during lightning or thunderstorms.

Warning! For safety reasons, do not use non-compliant parts when adding or changing components. Consult your reseller for purchase options.
Radio frequency interference

Warning! For safety reasons, turn off all wireless or radio transmitting devices when using your laptop under the following conditions. These devices may include, but are not limited to: wireless LAN (WLAN), Bluetooth and/or 3G.
viii
Remember to follow any special regulations in force in any area, and always switch off your device when its use is prohibited or when it may cause interference or danger. Use the device only in its normal operating positions. This device meets RF exposure guidelines when used normally. To successfully transmit data files or messages, this device requires a good quality connection to the network. In some cases, transmission of data files or messages may be delayed until such a connection is available. Ensure that the above separation distance instructions are followed until the transmission is completed. Parts of the device are magnetic. Metallic materials may be attracted to the device, and persons with hearing aids should not hold the device to the ear with the hearing aid. Do not place credit cards or other magnetic storage media near the device, because information stored on them may be erased.
Medical devices
Operation of any radio transmitting equipment, including wireless phones, may interfere with the functionality of inadequately protected medical devices. Consult a physician or the manufacturer of the medical device to determine if they are adequately shielded from external RF energy or if you have any questions. Switch off your device in health care facilities when any regulations posted in these areas instruct you to do so. Hospitals or health care facilities may be using equipment that could be sensitive to external RF transmissions.
Pacemakers. Pacemaker manufacturers recommend that a minimum separation of 15.3 centimeters (6 inches) be maintained between wireless devices and a pacemaker to avoid potential interference with the pacemaker. These recommendations are consistent with the independent research by and recommendations of Wireless Technology Research. Persons with pacemakers should do the following:
• Always keep the device more than 15.3 centimeters (6 inches) from the pacemaker
- Not carry the device near your pacemaker when the device is switched on. If you suspect interference, switch off your device, and move it.
Hearing aids. Some digital wireless devices may interfere with some hearing aids. If interference occurs, consult your service provider.
Vehicles
RF signals may affect improperly installed or inadequately shielded electronic systems in motor vehicles such as electronic fuel injection systems, electronic anti-skid (anti-lock) braking systems, electronic speed control systems, and air bag systems. For more information, check with the manufacturer, or its representative, of your vehicle or any equipment that has been added. Only qualified personnel should service the device, or install the device in a vehicle. Faulty installation or service may be dangerous and may invalidate any warranty that may apply to the device. Check regularly that all wireless equipment in your vehicle is mounted and operating properly. Do not store or carry flammable liquids, gases, or explosive materials in the same compartment as the device, its parts, or enhancements. For vehicles equipped with an air bag, remember that air bags inflate with great force. Do not place objects,
including installed or portable wireless equipment in the area over the air bag or in the air bag deployment area. If in-vehicle wireless equipment is improperly installed, and the air bag inflates, serious injury could result. Using your device while flying in aircraft is prohibited. Switch off your device before boarding an aircraft. The use of wireless teledevices in an aircraft may be dangerous to the operation of the aircraft, disrupt the wireless telephone network, and may be illegal.
Potentially explosive environments
Switch off your device when in any area with a potentially explosive atmosphere and obey all signs and instructions. Potentially explosive atmospheres include areas where you would normally be advised to turn off your vehicle engine. Sparks in such areas could cause an explosion or fire resulting in bodily injury or even death. Switch off the device at refueling points such as near gas pumps at service stations.
Observe restrictions on the use of radio equipment in fuel depots, storage, and distribution areas; chemical plants; or where blasting operations are in progress. Areas with a potentially explosive atmosphere are often, but not always, clearly marked. They include below deck on boats, chemical transfer or storage facilities, vehicles using liquefied petroleum gas (such as propane or butane), and areas where the air contains chemicals or particles such as grain, dust or metal powders. Do not switch the notebook on when wireless phone use is prohibited or when it may cause interference or danger.
Emergency calls
Warning: You cannot make emergency calls through this device. To make an emergency call you shall dial out through your mobile phone or other telephone call system.
Disposal instructions
Do not throw this electronic device into the trash when discarding. To minimize pollution and ensure utmost protection of the global environment, please recycle. For more information on the Waste from Electrical and Electronics Equipment (WEEE) regulations, visit
www.acer-group.com/public/Sustainability

ENERGY STAR

ENERGY STAR
Acer's ENERGY STAR qualified products save your money by reducing energy cost and protecting the environment without sacrificing features or performance. Acer is proud to offer our customers products with the ENERGY STAR mark.
What is ENERGY STAR?
Products that are ENERGY STAR qualified use less energy and prevent greenhouse gas emissions by meeting strict energy efficiency guidelines set
by the U.S. Environmental Protection Agency. Acer is committed to offering products and services worldwide that help customers save money, conserve energy and improve the quality of our environment. The more energy we can save through higher energy efficiency, the more we reduce greenhouse gases and the risks of climate change. More information refers to
www.energystar.gov or www.energystar.gov/powermanagement.

Note: Information in this section may not apply to your computer.
Acer ENERGY STAR qualified products:
• Produce less heat and reduce cooling loads, and warmer climates.
- Automatically go into "display sleep" and "computer sleep" mode after 10 and 30 minutes of inactivity respectively.
- Wake the computer from sleep mode by pushing keyboard or moving mouse.
• Computers will save more than 80% energy at "sleep" mode.
ENERGY STAR and the ENERGY STAR mark are registered U.S. marks
Computer users may complain of eyestrain and headaches after prolonged use. Users are also at risk of physical injury after long hours of working in front of a computer. Long work periods, bad posture, poor work habits, stress, inadequate working conditions, personal health and other factors greatly increase the risk of physical injury.
Incorrect computer usage may lead to carpal tunnel syndrome, tendonitis, tenosynovitis or other musculoskeletal disorders. The following symptoms may appear in the hands, wrists, arms, shoulders, neck or back:
• Numbness, or a burning or tingling sensation.
• Aching, soreness or tenderness.
• Pain, swelling or throbbing.
• Stiffness or tightness.
• Coldness or weakness.
If you have these symptoms, or any other recurring or persistent discomfort and/or pain related to computer use, consult a physician immediately and inform your company's health and safety department.
The following section provides tips for more comfortable computer use.
Finding your comfort zone
Find your comfort zone by adjusting the viewing angle of the monitor, using a footrest, or raising your sitting height to achieve maximum comfort. Observe the following tips:
• Refrain from staying too long in one fixed posture.
- Avoid slouching forward and/or leaning backward.
- Stand up and walk around regularly to remove the strain on your leg muscles.
• Take short rests to relax your neck and shoulders.
- Avoid tensing your muscles or shrugging your shoulders.
• Install the external display, keyboard and mouse properly and within comfortable reach.
- If you view your monitor more than your documents, place the display at the center of your desk to minimize neck strain.
Taking care of your vision
Long viewing hours, wearing incorrect glasses or contact lenses, glare, excessive room lighting, poorly focused screens, very small typefaces and low-contrast displays could stress your eyes. The following sections provide suggestions on how to reduce eyestrain.
Eyes
• Rest your eyes frequently.
- Give your eyes regular breaks by looking away from the monitor and focusing on a distant point.
- Blink frequently to keep your eyes from drying out.
Display
- Keep your display clean.
- Keep your head at a higher level than the top edge of the display so your eyes point downward when looking at the middle of the display.
- Adjust the display brightness and/or contrast to a comfortable level for enhanced text readability and graphics clarity.
-
Eliminate glare and reflections by:
-
placing your display in such a way that the side faces the window or any light source,
• minimizing room light by using drapes, shades or blinds,
• using a task light,
• changing the display's viewing angle,
• using a glare-reduction filter,
• using a display visor, such as a piece of cardboard extended from the display's top front edge.
- Avoid adjusting your display to an awkward viewing angle.
- Avoid looking at bright light sources for extended periods of time.
Developing good work habits
The following work habits make computer use more relaxing and productive:
• Take short breaks regularly and often.
xii
• Perform some stretching exercises.
- Breathe fresh air as often as possible.
• Exercise regularly and maintain a healthy body.

Warning! We do not recommend using the computer on a couch or bed. If this is unavoidable, work for only short periods, take breaks regularly, and do some stretching exercises.

Note: For more information, please refer to "Regulations and safety notices" on page 59.
First things first
We would like to thank you for making an Acer notebook your choice for meeting your mobile computing needs.
Your guides
To help you use your Acer notebook, we have designed a set of guides:
First off, the setup poster helps you get started with setting up your computer.
This Aspire User's Manual contains useful information applying to all models in the Aspire product series. It covers basic topics such as using the keyboard and audio, etc. Please understand that due to its nature, the User's Manual will occasionally refer to functions or features which are only contained in certain models of the series, but not necessarily in the model you purchased. Such instances are marked in the text with language such as "only for certain models."
The Quick Guide introduces you to the basic features and functions of your new computer. For more on how your computer can help you to be more productive, please refer to the Aspire User's Manual. This guide contains detailed information on such subjects as system utilities, data recovery, expansion options and troubleshooting. In addition it contains warranty information and the general regulations and safety notices for your notebook. It is available in Portable Document Format (PDF) and comes preloaded on your notebook. Follow these steps to access it:
1 From Start, simply start typing "User" to open the Search charm.
2 Click Acer User's Manual to open the User's Manual on your machine.
Basic care and tips for using your computer
Turning your computer on and off
To turn on the computer, simply press and release the power button. Please refer to the setup poster for the location of the power button.
To turn the power off, do any of the following:
- Use the Windows shutdown command: Press the Windows key + , click Settings > Power then click Shut Down.
If you need to power down the computer for a short while, but don't want to completely shut it down, you can put it into Hibernate by:
- Pressing the power button.
You can also put the computer in sleep mode by pressing the sleep hotkey + .

Note: If you cannot power off the computer normally, press and hold the power button for more than four seconds to shut down the computer. If you turn off the computer and want to turn it on again, wait at least two seconds before powering up.
Taking care of your computer
Your computer will serve you well if you take care of it.
- Do not expose the computer to direct sunlight. Do not place it near sources of heat, such as a radiator.
- Do not expose the computer to temperatures below 0^ (32°F) or above 50^ (122°F).
• Do not subject the computer to magnetic fields.
- Do not expose the computer to rain or moisture.
- Do not spill water or any liquid on the computer.
- Do not subject the computer to heavy shock or vibration.
• Do not expose the computer to dust or dirt.
• Never place objects on top of the computer.
• Do not slam the computer display when you close it.
• Never place the computer on uneven surfaces.
Taking care of your AC adapter
Here are some ways to take care of your AC adapter:
- Do not connect the adapter to any other device.
- Do not step on the power cord or place heavy objects on top of it. Carefully route the power cord and any cables away from foot traffic.
- When unplugging the power cord, do not pull on the cord itself but pull on the plug.
- The total ampere ratings of the equipment plugged in should not exceed the ampere rating of the cord if you are using an extension cord. Also, the total current rating of all equipment plugged into a single wall outlet should not exceed the fuse rating.
Taking care of your battery pack
Here are some ways to take care of your battery pack:
- Use only batteries of the same kind as replacements. Turn the power off before removing or replacing batteries.
- Do not tamper with batteries. Keep them away from children.
- Dispose of used batteries according to local regulations. Recycle if possible.
Cleaning and servicing
When cleaning the computer, follow these steps:
1 Turn off the computer and remove the battery pack.
2 Disconnect the AC adapter.
3 Use a soft, moist cloth. Do not use liquid or aerosol cleaners.
If either of the following occurs:
• The computer has been dropped or the body has been damaged;
• The computer does not operate normally
Please refer to "Frequently asked questions" on page 52.
Information for your safety and comfort iii
Safety instructions iii
Warnings
iii
Caution for Optical Drive Device vi
Radio frequency interference vii
Medical devices viii
Vehicles viii
Potentially explosive environments ix
Emergency calls ix
Disposal instructions ix
ENERGY STAR ix
Tips and information for comfortable use x
First things first xiii
Your guides xiii
Basic care and tips for using your computer xiii
Turning your computer on and off xiii
Taking care of your computer xiv
Taking care of your AC adapter xiv
Taking care of your battery pack xv
Cleaning and servicing XV
Touchpad 1
Touchpad basics (for models with separate buttons) 1
Touchpad basics (for models with integrated buttons) 2
Touchpad gestures 3
Using the keyboard 4
Lock keys and embedded numeric keypad\ 4
Hotkeys 5
Recovery 7
Creating a recovery backup 7
Creating a drivers and applications backup 9
Recovering your system 11
Reinstalling drivers and applications 11
Returning to an earlier system snapshot 13
Returning your system to its factory condition 14
Recovering from Windows 14
Recovering from a recovery backup 16
Acer Backup Manager 19
Acer clear.fi 21
Navigating media and photos 21
Shared files 21
Which devices are compatible? 22
Playing to another device 22
Power management 23
Saving power 23
Disable Fast startup 23
Battery pack 25
Battery pack characteristics 25
Charging the battery 26
Optimizing battery life 26
Checking the battery level 27
Battery-low warning 27
Installing and removing the battery pack 27
Taking your notebook PC with you 29
Disconnecting from the desktop 29
Moving around 29
Preparing the computer 29
What to bring to meetings 30
Taking the computer home 30
Preparing the computer 30
What to take with you 30
Special considerations 30
Setting up a home office 31
Traveling with the computer 31
Preparing the computer 31
What to take with you 31
Special considerations 31
Traveling internationally with the computer 31
Preparing the computer 32
What to bring with you 32
Special considerations 32
Securing your computer 33
Using a computer security lock 33
Using passwords 33
Entering passwords 34
Setting passwords 34
Expanding through options 35
Connectivity options 35
Fax/data modem 35
Built-in network feature 36
Consumer Infrared (CIR) 36
Universal Serial Bus (USB) 37
IEEE 1394 port 38
High-Definition Multimedia Interface 38
ExpressCard 39
Installing memory 40
Enjoying TV with Windows Media Center 42
Choose your input type 42
Watching TV using the optional DVB-T (digital TV) antenna
(for selected models) 42
To connect the digital antenna 43
Watching TV with an external antenna or cable socket 43
BIOS utility 44
Boot sequence 44
Password 44
Using software 45
Playing DVD movies 45
Using a Bluetooth connection 46
Enabling and disabling Bluetooth 46
Adding a Bluetooth device 47
Troubleshooting 50
Troubleshooting tips 50
Error messages 50
Frequently asked questions 52
Requesting service 53
International Travelers Warranty (ITW) 53
Before you call 53
Tips and hints for using Windows 8 55
Three concepts you might want to keep in mind 55
How do I access the charms? 55
How do I get to Start? 55
How do I jump between apps? 55
How do I turn off my computer? 55
Why is there a new interface? 55
How do I unlock my computer? 56
How do I personalize my computer? 56
I want to use Windows in the way that I'm used to - give me my
desktop back! 57
Where are my apps? 57
What is a Microsoft ID (account)? 57
How do I add a favorite to Internet Explorer? 58
How do I check for Windows updates? 58
Where can I get more information? 58
Regulations and safety notices 59
FCC statement 59
Modem notices 60
LCD pixel statement 62
Radio device regulatory notice 62
General 62
Wireless operation channels for different domains 63
France: Restricted wireless frequency bands 63
List of National Codes 64
The FCC RF safety requirement 64
Canada — Low-power license-exempt radio
communication devices (RSS-210) 65
Exposure of humans to RF fields (RSS-102) 65
LCD panel ergonomic specifications 67
Touchpad
The built-in touchpad is a pointing device that senses movement on its surface. This means the cursor responds as you move your finger across the surface of the touchpad.

Note: Please keep the touchpad and your fingers dry and clean.
The following items show you how to use the touchpad with two buttons.
- Move your finger across the touchpad to move the cursor.
- Press the left and right buttons located beneath the touchpad to perform selection and execution functions. These two buttons are similar to the left and right buttons on a mouse. Tapping on the touchpad is the same as clicking the left button.
| Function | Left button | Right button | Main touchpad |
| Execute | Quickly click twice. | | Tap twice (at the same speed as double-clicking a mouse button). |
| Select | Click once. | | Tap once. |
| Drag | Click and hold, then use finger on the touchpad to drag the cursor. | | Tap twice (at the same speed as double-clicking a mouse button); rest your finger on the touchpad on the second tap and drag the cursor. |
| Access context menu | | Click once. | |

Note: Illustrations for reference only. The exact configuration of your PC depends on the model purchased.

Note: When using the touchpad, keep it — and your fingers — dry and clean. The touchpad is sensitive to finger movement; hence, the lighter the touch, the better the response. Tapping harder will not increase the touchpad's responsiveness.

Note: By default, vertical and horizontal scrolling is enabled on your touchpad. It can be disabled under Mouse settings in Windows Control Panel.

Note: The touchpad is sensitive to finger movement; the lighter the touch, the better the response. Tapping harder will not increase the touchpad's responsiveness.
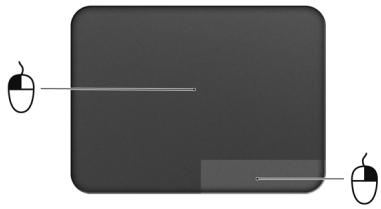
The cursor is controlled by some basic gestures:
- Single-finger slide: Slide a finger across the touchpad to move the cursor.

- Single-finger press or tap: Press the touchpad down, or lightly tap the touchpad with your finger, to perform a 'click', which will select or start an item. Quickly repeat the tap to perform a double tap or 'double click'.
- Single-finger press or tap in the bottom-right corner: Press the bottom right corner of the touchpad 🔒 to perform a 'right click'. In the Start screen, this will toggle the app commands, in most apps this will open a context menu related to the selected item.
natural_image
Simple diagram of a rectangular block with two computer mouse icons on both sides (no text or symbols)
- Drag: Press and hold the bottom left corner of the touchpad, or tap twice anywhere on the touchtap, then slide a finger across the touchpad to select all items in an area.
Touchpad gestures
Windows 8 and many applications support touchpad gestures that use one or more fingers.

Note: Support for touchpad gestures depends on the active application.
- Swipe in from right edge: Toggle the charms.
- Swipe in from top edge: Toggle the app commands.
- Swipe in from left edge: Switch to the previous app.
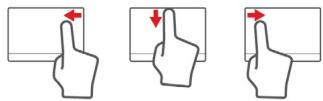
- Two-finger slide: Swiftly scroll through web pages, documents and playlists by placing two fingers on the touchpad and moving both in any direction.
- Two-finger pinch: Zoom in and out of photos, maps and documents with a simple finger-and-thumb gesture.

Using the keyboard
The keyboard has full-sized keys and an embedded numeric keypad*, separate cursor, lock, Windows, function and special keys.
Lock keys and embedded numeric keypad\

Note: Information in this section may not apply to your computer.
The keyboard has three lock keys which you can toggle on and off.
| Lock key | Description |
| Caps Lock | When Caps Lock is on, all alphabetic characters typed are in uppercase. |
| Num Lock+* | When Num Lock is on, the embedded keypad is in numeric mode. The keys function as a calculator (complete with the arithmetic operators +, -, *, and /). Use this mode when you need to do a lot of numeric data entry. A better solution would be to connect an external keypad. |
| Scroll Lock+ | When Scroll Lock is on, the screen moves one line up or down when you press the up or down arrow keys respectively. Scroll Lock does not work with some applications. |
The embedded numeric keypad functions like a desktop numeric keypad. It is indicated by small characters located on the upper right corner of the keycaps. To simplify the keyboard legend, cursor-control key symbols are not printed on the keys.
| Desired access | Num Lock on | Num Lock off |
| Number keys on embedded keypad | Type numbers in a normal manner. | |
| Cursor-control keys on embedded keypad | Holdwhile using cursor-control keys. | Holdwhile using cursor-control keys. |
| Main keyboard keys | Holdwhile typing letters on embedded keypad. | Type the letters in a normal manner. |
Hotkeys
The computer employs hotkeys or key combinations to access most of the computer's controls like screen brightness and volume output.
To activate hotkeys, press and hold the key before pressing the other key in the hotkey combination.
| Hotkey | Icon | Function | Description |
|  | Communication key | Enables / disables the computer's communication devices. (Communication devices may vary by configuration.) |
|  | Sleep | Puts the computer in Sleep mode. |
|  | Display toggle | Switches display output between the display screen, external monitor (if connected) and both. |
|  | Display off | Turns the display screen backlight off to save power. Press any key to return. |
|  | Touchpad toggle | Turns the built-in touchpad on and off. |
|  | Speaker toggle | Turns the speakers on and off. |
| | NumLk | Turns the embedded numeric keypad on or off (only for certain models). |
|  | Brightness up | Increases the screen brightness. |
|  | Brightness down | Decreases the screen brightness. |
|  | Volume up | Increases the sound volume. |
|  | Volume down | Decreases the sound volume. |
|  | Play/Pause | Play or pause a selected media file. |
| | Stop | Stop playing the selected media file. |
| | Previous | Return to the previous media file. |
| | Next | Jump to the next media file. |
Recovery
If you are having trouble with your computer, and the frequently asked questions (see page 52) do not help, you can 'recover' your computer - i.e. return it to an earlier state.
This section describes the recovery tools available on your computer. Acer provides Acer Recovery Management, which allows you to create a recovery backup, a drivers and applications backup, and to start recovery options, either using Windows tools, or the recovery backup.

Note: Acer Recovery Management is only available with a pre-installed Windows operating system.

Important: We recommend that you create a Recovery Backup and Drivers and Applications Backup and as soon as possible. In certain situations a full recovery will require a USB recovery backup.
Creating a recovery backup
To reinstall from a USB storage drive, you must first create a recovery backup. The recovery backup includes the entire original contents of your computer's hard drive, including Windows and all factory-loaded software and drivers. Using this backup will restore your computer to the same state as when you purchased it, while giving you an option to retain all settings and personal data.

Note: Make sure you have a USB drive with a capacity of at least 16 GB.
- From Start, type 'Recovery' and then click Acer Recovery Management in the list of apps.
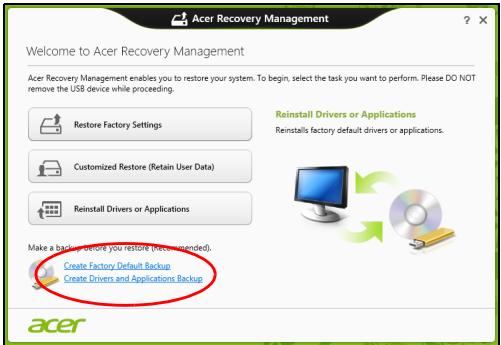
- Click Create Factory Default Backup. The Recovery Drive window opens.
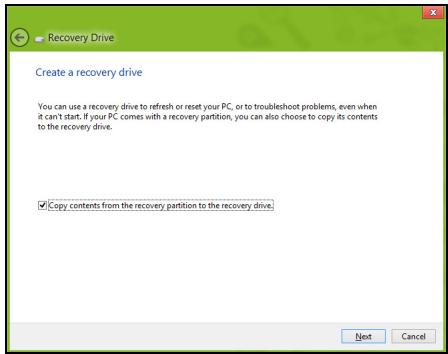
Make sure Copy contents from the recovery partition to the recovery drive is selected. This provides the most complete and safest recovery backup.
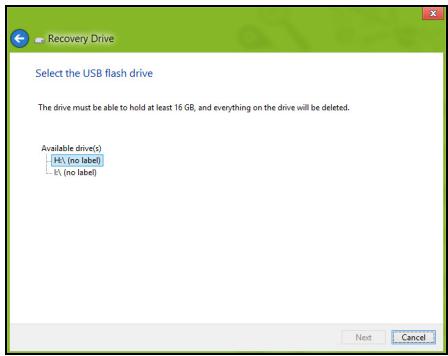
- Plug in the USB drive then click Next.
- Make sure your USB drive has enough capacity before continuing. The recovery backup requires at least 16 GB of storage
- You will be shown the backup progress on the screen.
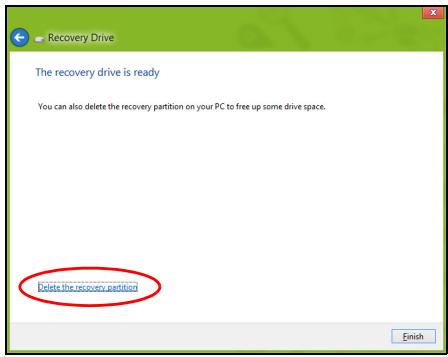
- Follow the process until it completes.
- After creating the recovery backup, you can choose to delete the recovery information on your computer. If you delete this information, you can only use the USB recovery backup to restore your computer, if you lose or erase the USB drive, you cannot restore your computer.
- Unplug the USB drive and label it clearly.

Important: Write a unique, descriptive label on the backup, such as 'Windows Recovery Backup'. Make sure you keep the backup in a safe place that you will remember.
Creating a drivers and applications backup
To create a Drivers and Applications Backup, that contains the factory-loaded software and drivers needed by your computer, you may use either a USB storage drive or, if your computer features a DVD recorder, one or more blank recordable DVDs.
- From Start, type 'Recovery' and then click Acer Recovery Management in the list of apps.

2. Click Create Drivers and Applications Backup.
Plug in the USB drive or insert a blank DVD into the optical drive, then click Next.
- If you are using a USB drive, make sure your USB drive has enough capacity before continuing.
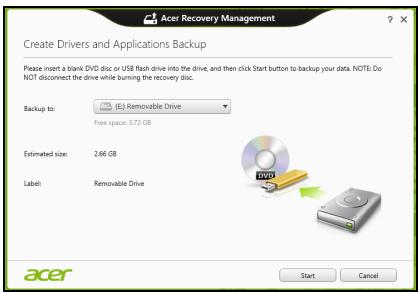
- If using DVDs, it will also show the number of blank, recordable discs you will need to complete the recovery discs. Make sure that you have the required number of identical, blank discs.
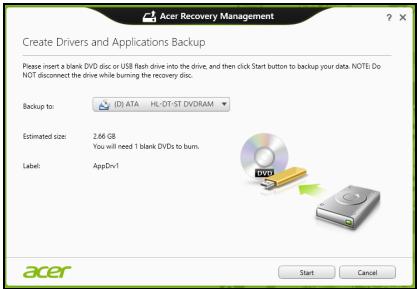
- Click Start to copy files. You will be shown the backup progress on the screen.
- Follow the process until it completes:
- If you are using optical discs, the drive ejects each disc as it completes burning it. Remove the disc from the drive and mark it with a permanent marker.
If multiple discs are required, insert a new disc when prompted, then click OK. Continue until the process is complete.
- If you are using a USB drive, unplug the drive and label it clearly.

Important: Write a unique, descriptive label on each backup, such as 'Drivers and Applications Backup'. Make sure you keep the backup in a safe place that you will remember.
Recovering your system
To recover your system:
If only one or two items of software or hardware have stopped working correctly, the problem may be solved by reinstalling the software or the device drivers.
To reinstall software and drivers that were pre-installed at the factory, see "Reinstalling drivers and applications" on page 11.
For instructions on reinstalling software and drivers that were not pre-installed, see that product's documentation or support Web site.
2. Revert to a previous system condition.
If reinstalling software or drivers does not help, then the problem may be solved by returning your system to a previous state when everything was working correctly.
For instructions, see "Returning to an earlier system snapshot" on page 13.
3. Reset your operating system.
If nothing else has solved the problem and you want to reset your system, but keep your user information, see "Returning your system to its factory condition" on page 14.
4. Reset your system to its factory condition.
If nothing else has solved the problem and you want to reset your system to factory condition, see "Returning your system to its factory condition" on page 14.
Reinstalling drivers and applications
As a troubleshooting step, you may need to reinstall the applications and device drivers that came pre-installed on your computer from the factory. You can reinstall using either your hard drive or the backup you have created.
- Other applications - If you need to reinstall software that did not come pre-installed on your computer, you need to follow that software's installation instructions.
- New device drivers - If you need to reinstall device drivers that did not come pre-installed on your computer, follow the instructions provided with the device.
If you are reinstalling using Windows and the recovery information stored on your computer:
- From Start, type 'Recovery' and then click Acer Recovery Management in the list of apps.
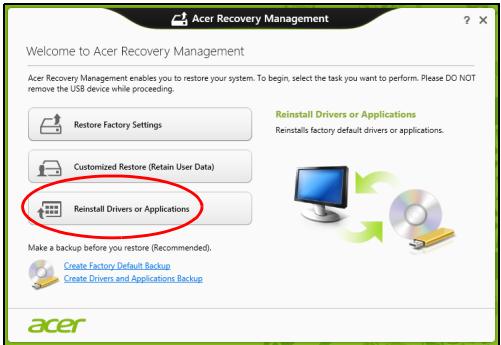
- Click Reinstall Drivers or Applications.
- You should see the Contents section of the Acer Resource Center.
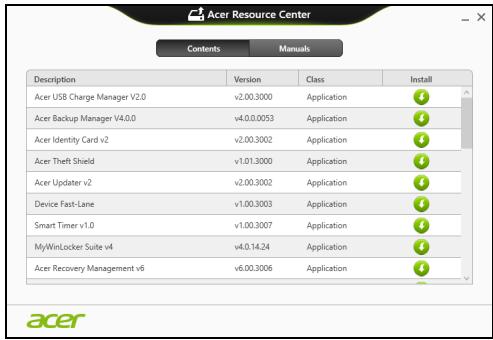
- Click the install icon for the item you want to install, then follow the onscreen instructions to complete the installation. Repeat this step for each item you want to reinstall.

If you are reinstalling from a Drivers and Applications Backup on a DVD or USB drive:
- Insert the Drivers and Applications Backup into the disc drive or connect it to a free USB port.
• If you inserted a DVD wait for Acer Resource Center to start.
- If Acer Resource Center does not start automatically, press the Windows key + , then double-click on the optical drive icon.
- If you are using a USB drive, press the Windows key + , then double-click on the drive that contains the backup. Double-click on ResourceCenter.
- You should see the Contents section of the Acer Resource Center.

- Click the install icon for the item you want to install, then follow the onscreen prompts to complete the installation. Repeat this step for each item you want to reinstall.

Returning to an earlier system snapshot
Microsoft System Restore periodically takes a 'snapshot' of your system settings and saves them as restore points. In most cases of hard-to-resolve software problems, you can return to one of these restore points to get your system running again.
Windows automatically creates an additional restore point each day, and also each time you install software or device drivers.

Note: For more information about using Microsoft System Restore, from Start, type 'Help' and then click Help and Support in the list of apps. Type 'Windows system restore' in the Search Help box, then press Enter.
Returning to a restore point
- From Start, type 'Control Panel' and then click Control Panel in the list of apps.
- Click System and Security > Action Center, then click Recovery at the bottom of the window.
- Click Open System Restore, then Next.
- Click the latest restore point (at a time when your system worked correctly), click Next, then Finish.
- A confirmation window appears; click Yes. Your system is restored using the restore point you specified. This process may take several minutes, and may restart your computer.
Returning your system to its factory condition
If your computer experiences problems that are not recoverable by other methods, you may need to reinstall everything to return your system to its factory condition.
You can recover from either your hard drive or the recovery backup you have created.
- If you can still run Windows and have not deleted the recovery partition, see "Recovering from Windows" on page 14.
- If you cannot run Windows, your original hard drive has been completely reformatted or you have installed a replacement hard drive, see "Recovering from a recovery backup" on page 16.
Recovering from Windows
Start Acer Recovery Management:
- From Start, type 'Recovery' and then click Acer Recovery Management in the list of apps.
Two options are available, Restore Factory Settings (Reset my PC) or Customized Restore (Refresh my PC).

Restore Factory Settings deletes everything on your hard drive, then reinstalls Windows and all software and drivers that were pre-installed on your system. If you can access important files on your hard drive, back them up now. See "Restore Factory Settings with Acer Recovery Management" on page 15.
Customized Restore will attempt to retain your files (user data) but will reinstall all software and drivers. Software installed since you purchased your PC will be removed (except software installed from the Windows Store). See "Customized Restore with Acer Recovery Management" on page 16.
Restore Factory Settings with Acer Recovery Management
1. Click Restore Factory Settings.
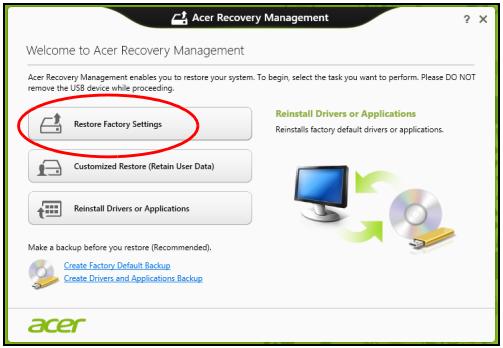

Caution: 'Restore Factory Settings' will erase all files on your hard drive.
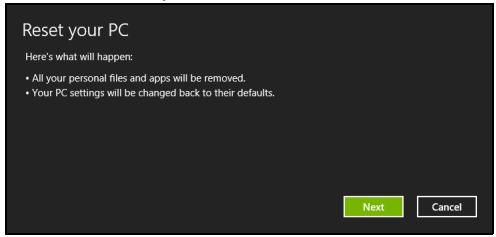
2. The Reset your PC window opens.
Images for reference only.
3. Click Next, then choose how to erase your files:
a. Just remove my files quickly erases all files before restoring your computer and takes about 30 minutes.
b. Fully clean the drive completely cleans the drive after each file is erased, so no files can be viewed after the recovery. Cleaning the drive takes much longer, up to 5 hours, but is much more secure as old files are completely removed.
4. Click Reset.
- The recovery process begins by restarting your computer, then continues by copying files to your hard drive.
- After the recovery has finished, you can start using your computer by repeating the first-start process.
Customized Restore with Acer Recovery Management
1. Click Customized Restore (Retain User Data).
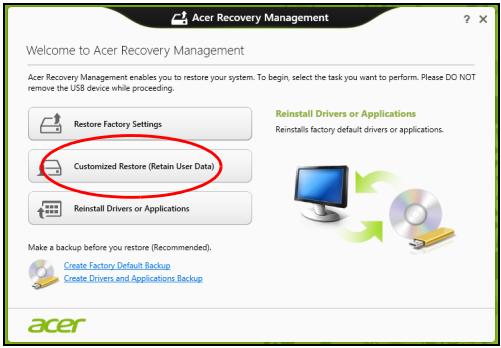
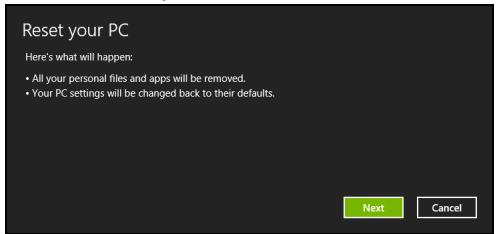
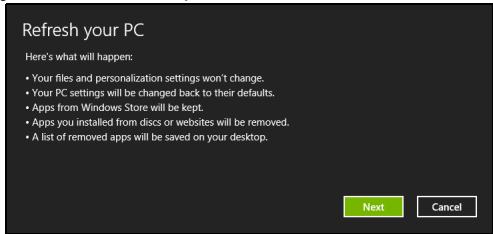
2. The Refresh your PC window opens.

3. Click Next, then Refresh.
- The recovery process begins by restarting your computer, then continues by copying files to your hard drive. This process takes about 30 minutes.
Recovering from a recovery backup
To recover from a recovery backup on a USB drive:
- Find your recovery backup.
- Plug in the USB drive and turn on your computer.
- If it is not already enabled, you must enable the F12 Boot Menu:
a. Press when starting your computer.
b. Use the left or right arrow keys to select the Main menu.
c. Press the down key until F12 Boot Menu is selected, press to change this setting to Enabled.
d. Use the left or right arrow keys to select the Exit menu.
e. Depending on the type of BIOS your computer uses, select Save Changes and Exit or Exit Saving Changes and press Enter. Select OK or Yes to confirm.
f. Your computer will restart.
- During startup, press to open the boot menu. The boot menu allows you to select which device to start from, select the USB drive.
a. Use your arrow keys to select USB Device, then press Enter.
b. Windows starts from the recovery backup instead of the normal startup process.
-
Select your keyboard type.
-
Select Troubleshoot and then choose the type of recovery to use:
a. Click Advanced then System Restore to start Microsoft System Restore: Microsoft System Restore periodically takes a 'snapshot' of your system settings and saves them as restore points. In most cases of hard-to-resolve software problems, you can return to one of these restore points to get your system running again.
b. Click Reset your PC to start the reset process:
Reset your PC deletes everything on your hard drive, then reinstalls Windows and all software and drivers that were pre-installed on your system. If you can access important files on your hard drive, back them up now. See "Reset your PC from the recovery backup" on page 17.
c. Click Refresh your PC to start the refresh process:
Refresh your PC will attempt to retain your files (user data) but will reinstall all software and drivers. Software installed since you purchased your PC will be removed (except software installed from the Windows Store). See "Refresh your PC from the recovery backup" on page 18.
Reset your PC from the recovery backup

Caution: Reset your PC will erase all files on your hard drive.
- The Reset your PC window opens.
Images for reference only.
- Click Next.
- Select the operating system to recover (normally only one option is available).
- Choose to keep any changes to the hard drive:
a. If you have deleted the recovery partition or otherwise changed the partitions on the hard drive and want to keep these changes, select No.
b. To completely restore your computer to Factory Settings, select Yes.
- Choose how to erase your files:
a. Just remove my files quickly erases all files before restoring your computer and takes about 30 minutes.
b. Fully clean the drive completely cleans the drive after each file is erased, so no files can be viewed after the recovery. Cleaning the drive takes much longer, up to 5 hours, but is much more secure as old files are completely removed.
- Click Reset.
- After the recovery has finished, you can start using your computer by repeating the first-start process.
Refresh your PC from the recovery backup
- The Refresh your PC window opens.
- Click Next.
- Select the operating system to recover (normally only one option is available).
- Click Refresh.
- The recovery process begins by restarting your computer, then continues by copying files to your hard drive. This process takes about 30 minutes.
Acer Backup Manager

Note: This feature is only available on certain models.
Acer Backup Manager is a utility that enables you to do a variety of backup functions each accomplished in only three simple steps. You can even set these functions to automatically recur as often as your like.

To start Acer Backup Manager in Windows 8, simply start typing "Backup Manager". Alternatively, in Desktop mode, select Acer Backup Manager. This opens the Welcome screen; from this screen you can select the type of backup you'd like to create.
• Back Up My Files: Select files to back up.
- Image My Drive: Create a backup file for the entire drive. You can burn this file to a DVD, save them to another drive on your computer*, or save them to removable media (i.e. a flash drive) to restore your computer at a later time.
- Migrate My Files: Allows you to copy files to a USB device so that you can migrate files from your old computer to your new one or any other computer with Acer Backup Manager.
- Clear out / Restore Files: Remove seldom used files to free up disk space or restore files from your backup.
Select the backup type you'd like to make and select the files or drive you want to back up, then follow the onscreen instructions:
1 Select the content you want to back up. The less content you select, the quicker the process will be, but it will increase your risks of losing data.
2 Select where you want the backup copies to be stored. Your options include removable media, a drive on your computer*, CD/DVD media, a remote PC, or the cloud using Microsoft SkyDrive.
3 Select how often you want Acer Backup Manager to create backups.
Once you have finished these three steps, backups will be created according to the schedule.

*NOTE: You will need to select an external drive or your D: drive; Acer Backup Manager cannot store a backup on the source drive.
If you wish to change your settings at any time, go to the Acer Backup Manager profiles screen. To get there from the Acer Backup Manager welcome screen, click Launch My Backup Profiles.
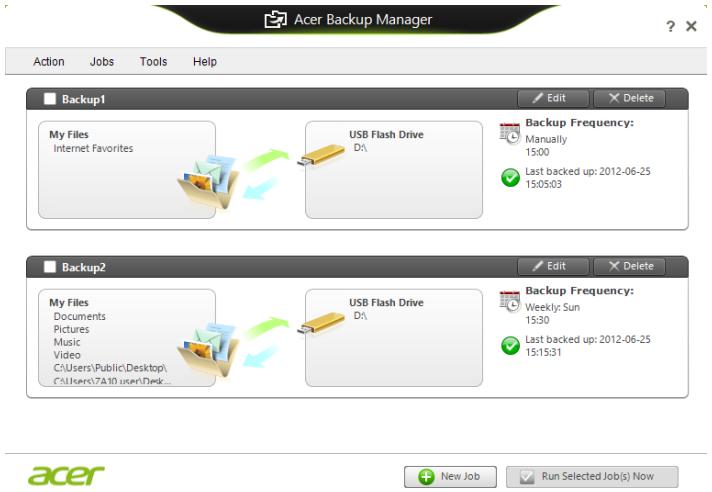
From here you can edit or delete existing backup profiles.
Acer clear.fi

Note: Only for certain models.
With Acer clear.fi, you can enjoy videos, photos and music. Stream media from, or to, other devices with Acer clear.fi installed.

Note: All devices must be connected to the same network.
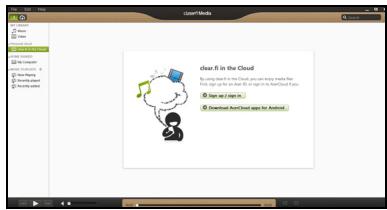
To watch videos or listen to music open clear.fi Media, to browse photos open clear.fi Photo.


Important: When you first open a clear.fi application, Windows Firewall will ask for permission to allow clear.fi to access the network. Select Allow Access in each window.
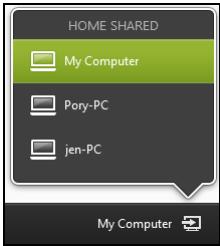
The list in the left panel shows your computer ('My Library'), then other devices if any are connected to your network ('Home Shared').
To view files on your computer, select one of the categories under 'My Library', then browse the files and folder on the right.
Shared files
Devices connected to your network are shown in the Home Shared section. Select a device, then the select the category to explore.
After a short delay, shared files and folders are shown on the right. Browse to the file you want to play, then double-click to start playback.
Use the media controls in the bar across the bottom of the screen to control playback. For example, when music is selected, you can play, pause or stop playback, and adjust the volume.

natural_image
User interface toolbar with playback, pause, and sound control icons (no text or symbols)

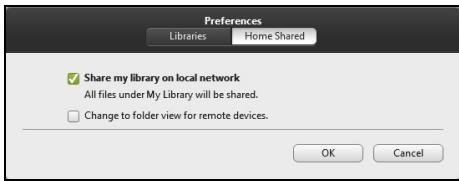
Note: You must activate sharing on the device that stores the files. Open clear.fi on the device that stores the files, select Edit then make sure Share my library on local network is active.
Which devices are compatible?
Certified Acer devices with clear.fi or DLNA software can be used with the clear.fi software. These include DLNA-compliant PCs, smartphones, and NAS (Network Attached Storage) devices.
Playing to another device
If you want to play the media on another device, you need to do the following:
- In the bottom right corner, select Play to.
- Select the remote device that will be used to play the file.

Note: Only devices optimised for playback are available in this list, certain PCs and storage devices will not appear. To add a Windows PC to this list, open Windows Media Player, select Stream and Allow remote control of my Player...
- Select a file in the main window, then use the media controls in the bar across the bottom of the screen to control the remote device.
For more help, go to http://www.acer.com/clearfi/download/.
Power management
This computer has a built-in power management unit that monitors system activity. System activity refers to any activity involving one or more of the following devices: keyboard, mouse, hard disk, peripherals connected to the computer, and video memory. If no activity is detected for a period of time, the computer stops some or all of these devices in order to conserve energy.
Saving power
Disable Fast startup
Your computer uses Fast startup to start quickly, but also uses a small amount of power to check for signals to start. These checks will slowly drain your computer's battery.
If you prefer to reduce your computer's power requirements and environmental impact, turn off Fast startup:

Note: If Fast startup is off, your computer will take longer to start from Sleep. If your computer features Acer Instant On or Acer Instant Connect, these will also be turned off.
Your computer will also not start if it receives an instruction to start over a network or from a connected HDMI device (Wake on LAN or Wake on HDMI).
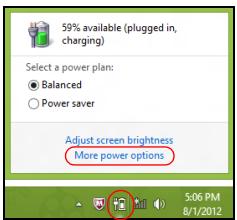
- Open the Desktop.
- Click Power Options in the Notification area.
-
Select More Power Options.
-
Select Choose what the power buttons do.
- To access Shutdown Settings, select Change settings that are currently unavailable.

- Scroll down and disable Turn on fast startup.
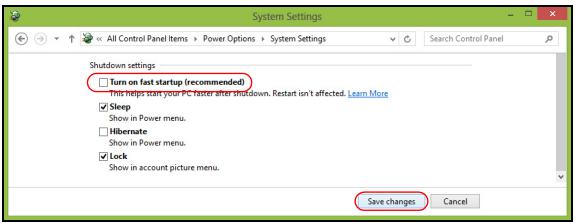
- Select Save changes.
Battery pack
The computer uses a battery pack that gives you long use between charges.
Battery pack characteristics
The battery pack has the following characteristics:
• Employs current battery technology standards.
• Delivers a battery-low warning.
The battery is recharged whenever you connect the computer to the AC adapter. Your computer supports charge-in-use, enabling you to recharge the battery while you continue to operate the computer. However, recharging with the computer turned off results in a significantly faster charge time.
The battery will come in handy when you travel or during a power failure. It is advisable to have an extra fully charged battery pack available as backup. Contact your dealer for details on ordering a spare battery pack.

Note: Some models have an embedded battery. If the battery needs to be replaced, please contact an authorized service center.
Conditioning a new battery pack
Before you use a battery pack for the first time, there is a conditioning process that you should follow:
1 Insert the new battery without turning the computer on.
2 Connect the AC adapter and fully charge the battery.
3 Disconnect the AC adapter.
4 Turn on the computer and operate using battery power.
5 Fully deplete the battery until the battery-low warning appears.
6 Reconnect the AC adapter and fully charge the battery again.
Follow these steps again until the battery has been charged and discharged three times.
Use this conditioning process for all new batteries, or if a battery hasn't been used for a long time. If the computer is to be stored for more than two weeks, you are advised to remove the battery pack from the unit.

Warning: Do not expose battery packs to temperatures below 0^ C ( 32^ F) or above 45^ C ( 113^ F). Extreme temperatures may adversely affect the battery pack.
By following the battery conditioning process you condition your battery to accept the maximum possible charge. Failure to follow this procedure will prevent you from obtaining the maximum battery charge, and will also shorten the effective lifespan of the battery.
In addition, the useful lifespan of the battery is adversely affected by the following usage patterns:
- Using the computer on constant AC power with the battery inserted. If you want to use constant AC power, you are advised to remove the battery pack after it is fully charged.
• Not discharging and recharging the battery to its extremes, as described above.
- Frequent use; the more you use the battery, the faster it will reach the end of its effective life. A standard computer battery has a life span of about 300 charges.
Charging the battery
To charge the battery, first make sure that it is correctly installed in the battery bay. Plug the AC adapter into the computer, and connect to a mains power outlet. You can continue to operate your computer on AC power while your battery is charging. However, charging the battery with the computer turned off results in a significantly faster charge time.

Note: You are advised to charge the battery before retiring for the day. Charging the battery overnight before traveling enables you to start the next day with a fully charged battery.
Optimizing battery life
Optimizing battery life helps you get the most out of battery operation, prolonging the charge/recharge cycle and improving recharging efficiency. You are advised to follow the suggestions set out below:
• Purchase an extra battery pack.
• Use AC power whenever possible, reserving battery for on-the-go use.
- Eject a PC Card if it is not being used, as it will continue to draw power (for selected models).
- Store the battery pack in a cool, dry place. The recommended temperature is 10^ C ( 50^ F) to 30^ C ( 86^ F). Higher temperatures cause the battery to self-discharge faster.
• Excessive recharging decreases the battery life.
• Look after your AC adapter and battery.
Checking the battery level
The Windows power meter indicates the current battery level. Rest the cursor over the battery/power icon on the taskbar to see the battery's present charge level.
Battery-low warning
When using battery power pay attention to the Windows power meter.

Warning: Connect the AC adapter as soon as possible after the battery-low warning appears. Data will be lost if the battery to become fully depleted and the computer shuts down.
When the battery-low warning appears, the recommended course of action depends on your situation:
| Situation | Recommended Action |
| The AC adapter and a power outlet are available. | 1. Plug the AC adapter into the computer, and then connect to the mains power supply.2. Save all necessary files.3. Resume work.Turn off the computer if you want to recharge the battery rapidly. |
| An extra fully charged battery pack is available. | 1. Save all necessary files.2. Close all applications.3. Turn off the computer.4. Replace the battery pack.5. Turn on the computer and resume work. |
| The AC adapter or a power outlet is unavailable. You have no spare battery pack. | 1. Save all necessary files.2. Close all applications.3. Turn off the computer. |
Installing and removing the battery pack

Note: Some models have an embedded battery. If the battery needs to be replaced, please contact an authorized service center.

Important! Before removing the battery from the unit, connect the AC adapter if you want to continue using your computer. Otherwise, turn off the computer first.
To install a battery pack:
1 Align the battery with the open battery bay; make sure that the end with the contacts will enter first, and that the top surface of the battery is facing up.
2 Slide the battery into the battery bay and gently push until the battery locks in place.
To remove a battery pack:
1 Slide the battery release latch to release the battery.
2 Pull the battery from the battery bay.
Taking your notebook PC with you
This section gives you tips and hints to consider when moving around or traveling with your computer.
Disconnecting from the desktop
Follow these steps to disconnect your computer from external accessories:
1 Save any open files.
2 Remove any media, floppy disks or compact disks from the drive(s).
3 Shut down the computer.
4 Close the display cover.
5 Disconnect the cord from the AC adapter.
6 Disconnect the keyboard, pointing device, printer, external monitor and other external devices.
7 Disconnect the Kensington lock if you are using one to secure the computer.
Moving around
When you are just moving within short distances, for example, from your office desk to a meeting room.
Preparing the computer
Before moving the computer, close and latch the display cover to place it in Sleep mode. You can now safely take the computer anywhere you go within the building. To bring the computer out of Sleep mode, open the display; then press and release the power button.
If you are taking the computer to a client's office or a different building, you may choose to shut down the computer:
press the Windows key + and click Start > Shut Down.
Or:
You can put the computer in Sleep mode by pressing + . Then close and latch the display.
When you are ready to use the computer again, unlatch and open the display; then press and release the power button.

Note: If the Sleep indicator is off, the computer has entered Hibernation mode and is turned off. If the power indicator is off but the Sleep indicator is on, the computer has entered Sleep mode. In both cases, press and release the power button to turn the computer back
on. Note that the computer may enter Hibernation mode after being in Sleep mode for a period of time.
What to bring to meetings
If your meeting is relatively short, you probably do not need to bring anything with you other than your computer. If your meeting will be longer, or if your battery is not fully charged, you may want to bring the AC adapter with you to plug in your computer in the meeting room.
If the meeting room does not have an electrical outlet, reduce the drain on the battery by putting the computer in Sleep mode. Press + or close the display cover whenever you are not actively using the computer. To resume, open the display (if closed), then press and release the power button.
Taking the computer home
When you are moving from your office to your home or vice versa.
Preparing the computer
After disconnecting the computer from your desktop, follow these steps to prepare the computer for the trip home:
- Check that you have removed all media and compact discs from the drive(s). Failure to remove the media can damage the drive head.
- Pack the computer in a protective case that can prevent the computer from sliding around and cushion it if it should fall.

Caution: Avoid packing items next to the top cover of the computer. Pressure against the top cover can damage the screen.
What to take with you
Unless you have some items at home, take the following items with you:
• AC adapter and power cord.
• The printed setup poster.
Special considerations
Follow these guidelines to protect your computer while traveling to and from work:
- Minimize the effects of temperature changes by keeping the computer with you.
- If you need to stop for an extended period of time and cannot carry the computer with you, leave the computer in the trunk of the car to avoid exposing the computer to excessive heat.
- Changes in temperature and humidity can cause condensation. Allow the computer to return to room temperature, and inspect the screen for condensation before turning on the computer. If the temperature change is greater than 10^ C ( 18^ F), allow the computer to come to room temperature slowly. If possible, leave the computer for 30 minutes in an environment with a temperature between outside and room temperature.
Setting up a home office
If you frequently work on your computer at home, you may want to purchase a second AC adapter for use at home. With a second AC adapter, you can avoid carrying the extra weight to and from home.
If you use your computer at home for significant periods of time, you might also want to add an external keyboard, monitor or mouse.
Traveling with the computer
When you are moving within a larger distance, for instance, from your office building to a client's office building or traveling locally.
Preparing the computer
Prepare the computer as if you were taking it home. Make sure that the battery in the computer is charged. Airport security may require you to turn on your computer when carrying it into the gate area.
What to take with you
Take the following items with you:
- AC adapter
- Spare, fully-charged battery pack(s)
• Additional printer driver files if you plan to use another printer
Special considerations
In addition to the guidelines for taking the computer home, follow these guidelines to protect your computer while traveling:
• Always take the computer as carry-on luggage.
- If possible, have the computer inspected by hand. Airport security X-ray machines are safe, but do not put the computer through a metal detector.
- Avoid exposing floppy disks to hand-held metal detectors.
Traveling internationally with the computer
When you are moving from country to country.
Preparing the computer
Prepare the computer as you would normally prepare it for traveling.
What to bring with you
Bring the following items with you:
- AC adapter
- Power cords that are appropriate for the country to which you are traveling
- Spare, fully-charged battery packs
• Additional printer driver files if you plan to use another printer
• Proof of purchase, in case you need to show it to customs officials
• International Travelers Warranty passport
Special considerations
Follow the same special considerations as when traveling with the computer. In addition, these tips are useful when traveling internationally:
- When traveling in another country, check that the local AC voltage and the AC adapter power cord specifications are compatible. If not, purchase a power cord that is compatible with the local AC voltage. Do not use converter kits sold for appliances to power the computer.
- If you are using the modem, check if the modem and connector are compatible with the telecommunications system of the country you are traveling in.
Securing your computer
Your computer is a valuable investment that you need to take care of. Learn how to protect and take care of your computer.
Security features include hardware and software locks — a security notch and passwords.
Using a computer security lock
The notebook comes with a Kensington-compatible security slot for a security lock.
Wrap a computer security lock cable around an immovable object such as a table or handle of a locked drawer. Insert the lock into the notch and turn the key to secure the lock. Some keyless models are also available.
Using passwords
Passwords protect your computer from unauthorized access. Setting these passwords creates several different levels of protection for your computer and data:
- Supervisor Password prevents unauthorized entry into the BIOS utility. Once set, you must enter this password to gain access to the BIOS utility. See "BIOS utility" on page 44.
- User Password secures your computer against unauthorized use. Combine the use of this password with password checkpoints on boot-up and resume from Hibernation for maximum security.
- Password on Boot secures your computer against unauthorized use. Combine the use of this password with password checkpoints on boot-up and resume from Hibernation for maximum security.

Important! Do not forget your Supervisor Password! If you forget your password, please get in touch with your dealer or an authorized service center.
Entering passwords
When a password is set, a password prompt appears in the center of the display screen.
- When the Supervisor Password is set, a prompt appears when you press to enter the BIOS utility at boot-up.
- Type the Supervisor Password and press to access the BIOS utility. If you enter the password incorrectly, a warning message appears. Try again and press .
- When the User Password is set and the password on boot parameter is enabled, a prompt appears at boot-up.
- Type the User Password and press to use the computer. If you enter the password incorrectly, a warning message appears. Try again and press .

Important! You have three chances to enter a password. If you fail to enter the password correctly after three tries, the system halts. Press and hold the power button for four seconds to shut down the computer. Then turn on the computer again, and try again.
Setting passwords
You can set passwords using the BIOS utility.
Expanding through options
Your notebook PC offers you a complete mobile computing experience.
Connectivity options
Ports allow you to connect peripheral devices to your computer as you would with a desktop PC. For instructions on how to connect different external devices to the computer, read the following section.
Fax/data modem

Note: Information in this section may not apply to your computer.
Your computer has a built-in V.92 56 Kbps fax/data modem.

Warning! This modem port is not compatible with digital phone lines. Plugging this modem into a digital phone line will damage the modem.
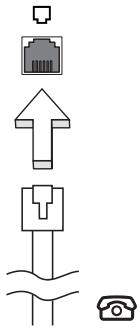
To use the fax/data modem port, connect a phone cable from the modem port to a telephone jack.

Warning! Please make sure that the cable you use is appropriate for the country in which you are working.
Built-in network feature
The built-in network feature allows you to connect your computer to an Ethernet-based network.
To use the network feature, connect an Ethernet cable from the Ethernet (RJ-45) port on the chassis of the computer to a network jack or hub on your network.

Consumer Infrared (CIR)

Note: Information in this section may not apply to your computer.
The computer's Consumer Infrared (CIR) port is used to receive signals from your remote control, or other devices with CIR capability.
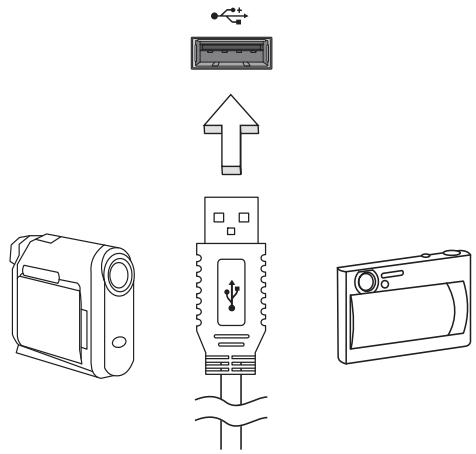
Universal Serial Bus (USB)
The USB 2.0 port is a high-speed serial bus which allows you to connect USB peripherals without taking up precious system resources.
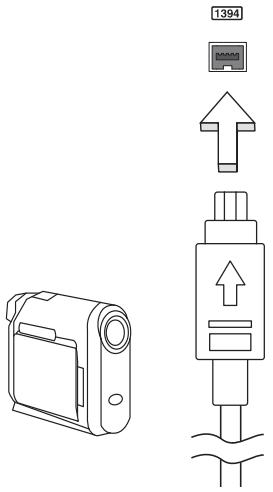
IEEE 1394 port

Note: Information in this section may not apply to your computer.
The computer's IEEE 1394 port allows you to connect to an IEEE 1394-compatible device like a video camera or digital camera. See your video or digital camera's documentation for details.

Note: Information in this section may not apply to your computer.
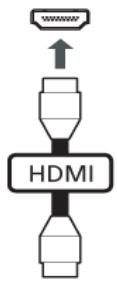
HDMI (High-Definition Multimedia Interface) is an industry-supported, uncompressed, all-digital audio/video interface. HDMI provides an interface between any compatible digital audio/video source, such as a set-top box, DVD player, and A/V receiver and a compatible digital audio and/or video monitor, such as a digital television (DTV), over a single cable.
Use the HDMI port on your computer to connect with high-end audio and video equipment. Single cable implementation allows tidy setup and fast connection.
flowchart
graph TD
    A["Input Signal"] --> B["Device"]
    B --> C["HDMI"]
    C --> D["Output"]
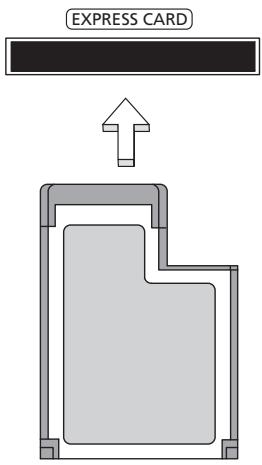
ExpressCard

Note: Information in this section may not apply to your computer.
The ExpressCard is the newest version of the PC Card. It is a smaller and faster interface that further enhances the usability and expandability of your computer. ExpressCards support a vast number of expansion options, including flash memory card adapters, TV-tuners, Bluetooth connectivity and IEEE 1394b adapters. ExpressCards support USB 2.0 and PCI Express applications.

Important! There are two types, ExpressCard/54 and ExpressCard/34 (54 mm and 34 mm), each with different functions. Not all ExpressCard slots will support both types. Please refer to your card's manual for details on how to install and use the card, and its functions.
Inserting an ExpressCard
Insert the card into the slot and push gently until it clicks into position.
Ejecting an ExpressCard
Before ejecting an ExpressCard:
1 Exit the application using the card.
2 Left-click the remove hardware icon on the taskbar and stop the card operation.
3 Push the card gently into the slot and release to pop out the card. Then pull the card free from the slot.
Installing memory

Note: Information in this section may not apply to your computer.
Follow these steps to install memory:
1 Turn off the computer, unplug the AC adapter (if connected) and remove the battery pack. Then turn the computer over to access its base.
2 Remove the screws from the memory cover; then lift and remove the memory cover.
3 (a) Insert the memory module diagonally into the slot, then (b) gently press it down until it clicks into place.
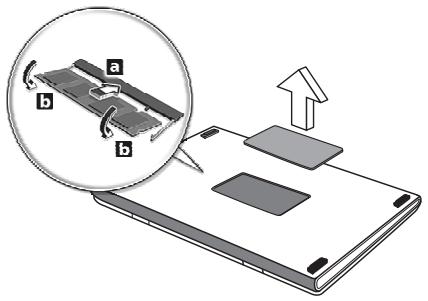
4 Replace the memory cover and secure it with the screw.
5 Reinstall the battery pack, and reconnect the AC adapter.
6 Turn on the computer.
The computer automatically detects and reconfigures the total memory size. Please consult a qualified technician or contact your local Acer dealer.

Note: This feature is only available on certain models.
Computers that include Windows Media Center Edition or InstantOn Arcade may be used to watch TV and to access video content (via an audio/video connection to an external device, such as a video camera).
The audio/video connection may be either a DVB-T digital antenna (for selected models) or a PAL/SECAM or NTSC connector. Please refer to the appropriate section:
Watching TV using the optional DVB-T (digital TV) antenna (for selected models)
DVB-T digital TV is an international standard that is used to transmit terrestrial television services in digital format. It is gradually replacing analog broadcasts in many countries. The DVB-T digital antenna can be used with Windows Media Center to watch local DVB-T digital TV broadcasts on your notebook PC.
To connect the digital antenna
1 Plug the antenna cable into the RF jack of your computer.
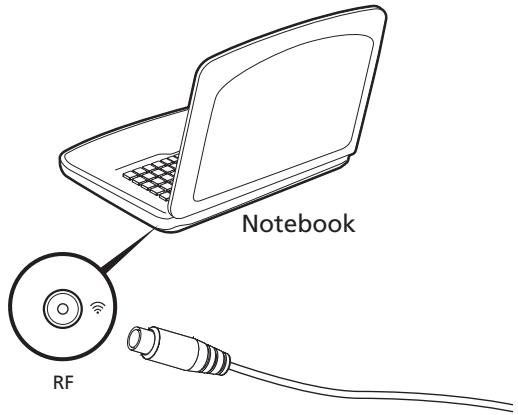

Note: Do not twist or loop the antenna cable. Extend the antenna cable up to 20 cm to improve signal quality.
Watching TV with an external antenna or cable socket
You may use conventional TV cables (connected to an external antenna or cable socket) to watch TV on your computer.
Connecting antenna cables
To connect your cables:
1 Plug the antenna connector into the RF jack of your computer.
2 Connect the other end to your TV cable, using the cable converter if necessary.

flowchart
graph TD
    A["RF"] --> B["Notebook"]
    B --> C["Converter"]
    B --> D["Home antenna"]
    C --> E["PAL/SECAM"]
    D --> F["NTSC"]

Important! Please ensure you use the correct cable system for your region before attempting to connect the antenna cable.
BIOS utility
The BIOS utility is a hardware configuration program built into your computer's BIOS.
Your computer is already properly configured and optimized, and you do not need to run this utility. However, if you encounter configuration problems, you may need to run it.
To activate the BIOS utility, press during the POST while the notebook PC logo is being displayed.
Boot sequence
To set the boot sequence in the BIOS utility, activate the BIOS utility, then select Boot from the categories listed at the top of the screen.
Password
To set a password on boot, activate the BIOS utility, then select Security from the categories listed at the top of the screen. Find Password on boot: and use the and keys to enable this feature.
Using software
Playing DVD movies

Note: This feature is only available on certain models.
When the DVD drive module is installed in the optical drive bay, you can play DVD movies on your computer.
1 Eject the DVD.

Important! When you launch the DVD player for the first time, the program asks you to enter the region code. DVD discs are divided into 6 regions. Once your DVD drive is set to a region code, it will play DVD disks of that region only. You can set the region code a maximum of five times (including the first time), after which the last region code set will remain permanent. Recovering your hard disk does not reset the number of times the region code has been set. Refer to the table below for DVD movie region code information.
2 The DVD movie will automatically play after a few seconds.
| Region code | Country or region |
| 1 | USA, Canada |
| 2 | Europe, Middle East, South Africa, Japan |
| 3 | Southeast Asia, Taiwan, South Korea |
| 4 | Latin America, Australia, New Zealand |
| 5 | Former USSR, parts of Africa, India |
| 6 | People's Republic of China |

Note: To change the region code, insert a DVD movie of a different region into the DVD drive. Please refer to the online help for more information.
Using a Bluetooth connection
Bluetooth is a technology enabling you to transfer data wirelessly over short distances between many different types of devices. Bluetooth-enabled devices include computers, cell phones, tablets, wireless headsets, and keyboards.
To use Bluetooth, you must ensure the following:
- Bluetooth is enabled on both devices.
- Your devices are "paired" (or connected).
Enabling and disabling Bluetooth
The Bluetooth adapter must be enabled on both devices. For your computer, this may be an external switch, a software setting, or a separate Bluetooth dongle plugged into the computer's USB port (if no internal Bluetooth adapter is available).

Note: Please check your devices owner's manual to determine how to turn on its Bluetooth adapter.
Then, from the notification area, click the Bluetooth icon, and select Open Settings.
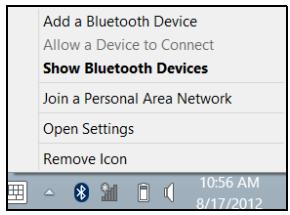
Select the Allow Bluetooth devices to find this computer check box, click Apply, and then click OK.
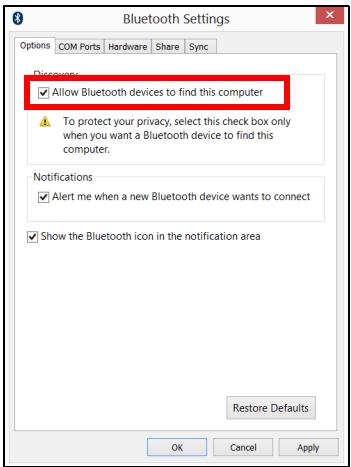
The Bluetooth adapter in your computer is now enabled and ready for you to add Bluetooth devices.
To disable your computer's Bluetooth adapter, do the following:
- Press the Windows key + and then type Wireless.
- In the results, click on Wireless.
- Click the toggle under Bluetooth to enable/disable it.
Adding a Bluetooth device
Every new device must first be "paired" with your computer's Bluetooth adapter. This means it must first be authenticated for security purposes. You only need to pair once. After that, simply turning on the Bluetooth adapter of both devices will connect them.
From the notification area, click the Bluetooth icon, and select Add a Bluetooth Device.
Click on the device you want to add.

A code displays on your computer, which should match the code displayed on your device. Select Yes. Then, accept the pairing from your device.
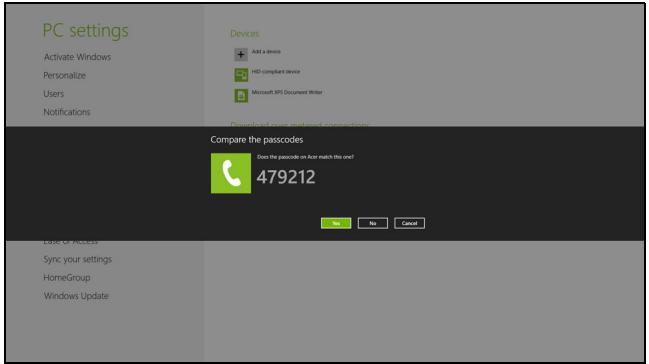

Note: Some devices using older versions of the Bluetooth technology require both devices to enter a PIN. In the case of one of the devices not having any inputs (as in a headset), the passcode is hardcoded into the device (usually "0000" or "1234"). Consult your device's user manual for more information.
Your device will show up in the list of devices if it was successfully paired. Open the Control Panel and under Hardware and Sound click on View devices and
printers. Right click on your device and select Advanced Operations > Connect to operation window.
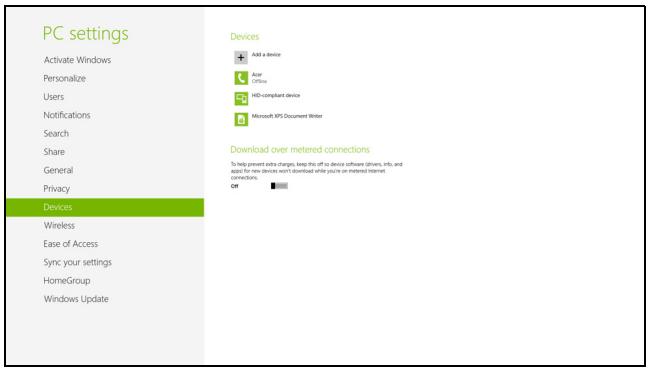
The operation window enables you to play music and audio from your device through your computer, send files to your device and change Bluetooth settings.
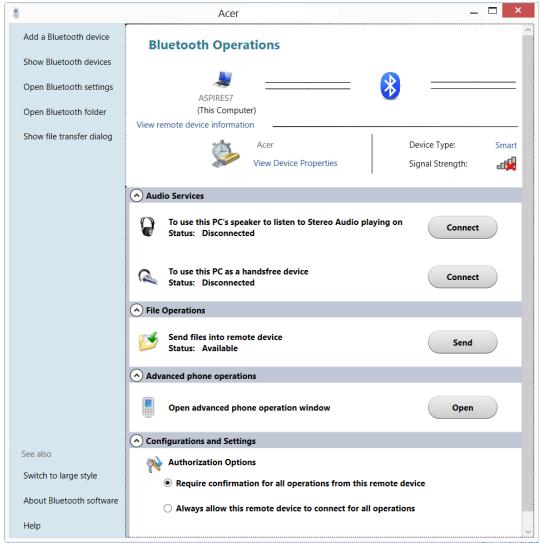
Troubleshooting
This chapter shows you how to deal with common system problems.
Read it before calling a technician if a problem occurs. Solutions to more serious problems require opening up the computer. Do not attempt to open the computer yourself; contact your dealer or authorized service center For assistance.
Troubleshooting tips
This notebook PC incorporates an advanced design that delivers onscreen error message reports to help you solve problems.
If the system reports an error message or an error symptom occurs, see "Error messages" below. If the problem cannot be resolved, contact your dealer. See "Requesting service" on page 53.
Error messages
If you receive an error message, note the message and take the corrective action. The following table lists the error messages in alphabetical order together with the recommended course of action.
| Error messages | Corrective action |
| CMOS battery bad | Contact your dealer or an authorized service center. |
| CMOS checksum error | Contact your dealer or an authorized service center. |
| Disk boot failure | Insert a system (bootable) disk, then pressto reboot. |
| Equipment configuration error | Press(during POST) to enter the BIOS utility, then pressExitin the BIOS utility to reboot. |
| Hard disk 0 error | Contact your dealer or an authorized service center. |
| Hard disk 0 extended type error | Contact your dealer or an authorized service center. |
| I/O parity error | Contact your dealer or an authorized service center. |
| Keyboard error or no keyboard connected | Contact your dealer or an authorized service center. |
| Keyboard interface error | Contact your dealer or an authorized service center. |
| Memory size mismatch | Press <F2> (during POST) to enter the BIOS utility, then press Exit in the BIOS utility to reboot. |
If you still encounter problems after going through the corrective measures, please contact your dealer or an authorized service center for assistance.
Frequently asked questions
The following is a list of possible situations that may arise during the use of your computer. Easy solutions are provided for each one.
I turned on the power, but the computer does not start or boot up.
Look at the power indicator:
• If it is not lit, no power is being supplied to the computer. Check the following:
- If you are using on the battery, it may be low and unable to power the computer. Connect the AC adapter to recharge the battery pack.
• Make sure that the AC adapter is properly plugged into the computer and to the power outlet.
• If it is lit, check the following:
- Is a non-bootable (non-system) disk in the external USB floppy drive? Remove or replace it with a system disk and press + + to restart the system.
Nothing appears on the screen.
The computer's power management system automatically blanks the screen to save power. Press any key to turn the display back on.
If pressing a key does not turn the display back on, three things might be the cause:
- The brightness level might be too low. Press + <▷> (increase) to adjust the brightness level.
- The display device might be set to an external monitor. Press the display toggle hotkey + to toggle the display back to the computer.
- If the Sleep indicator is lit, the computer is in Sleep mode. Press and release the power button to resume.
No audio is heard from the computer.
Check the following:
- The volume may be muted. In Windows, look at the volume control (speaker) icon on the taskbar. If it is crossed-out, click the icon and deselect the Mute all option.
- The volume level may be too low. In Windows, look at the volume control icon on the taskbar. You can also use the volume control buttons to adjust the volume.
- If headphones, earphones or external speakers are connected to the line-out port on the computer, the internal speakers automatically turn off.
I want to eject the optical drive tray without turning on the power.
There is a mechanical eject hole on the optical drive. Simply insert the tip of a pen or paperclip into the hole and push to eject the tray.
The keyboard does not respond.
Try attaching an external keyboard to a USB port on the computer. If it works, contact your dealer or an authorized service center as the internal keyboard cable may be loose.
The printer does not work.
Check the following:
- Make sure that the printer is connected to a power outlet and that it is turned on.
- Make sure that the printer cable is connected securely to a USB port and the corresponding port on the printer.
Requesting service
International Travelers Warranty (ITW)
Your computer is backed by an International Travelers Warranty (ITW) that gives you security and peace of mind when traveling. Our worldwide network of service centers are there to give you a helping hand.
An ITW passport comes with your computer. This passport contains all you need to know about the ITW program. A list of available, authorized service centers is in this handy booklet. Read this passport thoroughly.
Always have your ITW passport on hand, especially when you travel, to receive the benefits from our support centers. Place your proof-of-purchase in the flap located inside the front cover of the ITW passport.
If the country you are traveling in does not have an Acer-authorized ITW service site, you can still get in contact with our offices worldwide. Please visit
www.acer.com.
Before you call
Please have the following information available when you call Acer for online service, and please be at your computer when you call. With your support, we can reduce the amount of time a call takes and help solve your problems efficiently. If there are error messages or beeps reported by your computer, write them down as they appear on the screen (or the number and sequence in the case of beeps).
You are required to provide the following information:
Name: ____
Address:
Telephone number: ____
Machine and model type: ____
Serial number: ____
Date of purchase: ____
Tips and hints for using Windows 8
We know this is a new operating system that will take some getting used to, so we've created a few pointers to help you get started.
Three concepts you might want to keep in mind
1. Start
The Start button is no longer available; you can launch apps from the Start screen.
2. Tiles
Live tiles are similar to thumbnails of the apps.
3. Charms
Charms allow you to perform useful functions, such as sharing content, turning off your PC or changing settings.
How do I access the charms?
Move the cursor to the upper or lower right-hand corner of the screen to access the charms, or press the Windows key + .
How do I get to Start?
Press the Windows key on the keyboard; press the Windows key + and click Start; or move the cursor to the lower left-hand corner of the screen and click Start.
How do I jump between apps?
Move the cursor to the left-hand edge of the screen to view thumbnails of apps that are currently running.
You may also press the Windows key + to open and scroll through the current apps.
How do I turn off my computer?
Press the Windows key + , click Settings > Power and select the action you'd like to take. Alternatively, from Desktop, click Acer Power Button and select the action you'd like to take.
Why is there a new interface?
The new interface for Windows 8 is designed to work well with touch input. Windows Store apps will automatically use the whole screen and don't require closing in the traditional way. Windows Store apps will be displayed on Start using live-tiles.
What are 'live tiles?'
Live tiles are similar to thumbnails of the apps that will be updated with new content whenever you're connected to the Internet. So, for example, you can view weather or stock updates without needing to open the app.
How do I unlock my computer?
Press the any key and click on a user account icon to unlock the computer. If your account has a password set, you will need to enter the password to continue.
How do I personalize my computer?
You can personalize Start with a different background image or by arranging the tiles to suit your personal needs.
To change the background, press the Windows key + and click Settings > Change PC settings > Personalize. Click Start screen at the top of the page and select a color and image.
How do I move tiles?
Click and hold a tile to select it, then drag it to the place on Start that you want it to appear. Other tiles will be moved to accommodate the tile in its new location.
Can I make tiles bigger or smaller?
Right-click on a tile, then select Smaller or Larger from the menu that appears at the bottom of the screen.
How do I personalize the Lock screen?
You can personalize the lock screen with a different image or to show you quick status and notifications to suit your personal needs.
To change the background, press the Windows key + and click Settings > Change PC settings > Personalize. Click Lock screen at the top of the page and select the image and apps you would like to see on the lock screen.
So, how do I close an app?
Move the cursor to the top of the screen and click and drag the window downwards to close the app.
You can close apps from the thumbnails on the left-hand edge of the screen by right-clicking on a thumbnail and selecting Close.
Can I change the screen resolution?
From Start, start typing 'Control Panel' to open Search and display the results; click Control Panel > Adjust screen resolution.
I want to use Windows in the way that I'm used to - give me my desktop back!
From Start click the Desktop tile to see a traditional desktop. You can pin apps you frequently use to the taskbar to easily open them.
If you click an app that is not a Windows Store app, Windows will automatically open the app using Desktop.
Where are my apps?
From Start, simply start typing the name of the app you would like to open, and Search will automatically open and list results.
To view the complete list of apps, press the space bar or the Menu key and click All apps.
How do I make an app appear on Start?
If you're in All apps and you want to make an app appear on Start, you can select the app and right-click on it. Select Pin to Start from the menu that appears at the bottom of the screen.
How do I remove a tile from Start?
Right-click the tile and click Unpin from Start from the menu that appears at the bottom of the screen.
How do I make an app appear on my taskbar in Desktop?
If you're in All apps and you want to make an app appear on the taskbar in Desktop, you can select the app and right-click on it. Select Pin to taskbar from the menu that appears at the bottom of the screen.
How do I install apps?
You can download Windows Store apps from Store. You will need to have a Microsoft ID to purchase and download apps from Store.
I can't find apps like Notepad and Paint! Where are they?
From Start you can simply start typing the name of the app you're looking for to open Search and list the results. Alternatively, open All apps and scroll to 'Windows Accessories' to see the list of legacy programs.
What is a Microsoft ID (account)?
A Microsoft account is an email address and password that you use to sign in to Windows. You can use any email address, but it is best if you choose the one you already use to communicate with friends and sign in to your favorite websites. When you sign in to your PC with a Microsoft account, you'll connect your PC to the people, files, and devices you care about.
Do I need one?
You do not need a Microsoft ID to use Windows 8, but it makes life easier because you can sync data across different machines you sign in to using a Microsoft ID.
How do I get one?
If you've already installed Windows 8 and didn't sign in with a Microsoft account or you don't have a Microsoft account and want to get one, press the Windows key + and click Settings > Change PC settings > Users > Switch to a Microsoft account, and follow the onscreen instructions.
How do I add a favorite to Internet Explorer?
Internet Explorer 10 doesn't have traditional favorites, instead you can pin shortcuts to Start. Once you have the page open, right-click anywhere on the page to open the menu at the bottom of the screen. Click Pin to Start.
How do I check for Windows updates?
Press the Windows key + and click Settings > Change PC settings > Windows Updates. Click Check for updates now.
For more information please visit:
• Windows 8 tutorials: www.acer.com/windows8-tutorial
• Support FAQs: www.acer.com/support
Regulations and safety notices
FCC statement
This device has been tested and found to comply with the limits for a Class B digital device pursuant to Part 15 of the FCC rules. These limits are designed to provide reasonable protection against harmful interference in a residential installation. This device generates, uses, and can radiate radio frequency energy and, if not installed and used in accordance with the instructions, may cause harmful interference to radio communications.
However, there is no guarantee that interference will not occur in a particular installation. If this device does cause harmful interference to radio or television reception, which can be determined by turning the device off and on, the user is encouraged to try to correct the interference by one or more of the following measures:
• Reorient or relocate the receiving antenna.
- Increase the separation between the device and receiver.
- Connect the device into an outlet on a circuit different from that to which the receiver is connected.
- Consult the dealer or an experienced radio/television technician for help.
Notice: Shielded cables
All connections to other computing devices must be made using shielded cables to maintain compliance with FCC regulations.
Notice: Peripheral devices
Only peripherals (input/output devices, terminals, printers, etc.) certified to comply with the Class B limits may be attached to this equipment. Operation with non-certified peripherals is likely to result in interference to radio and TV reception.
Caution
Changes or modifications not expressly approved by the manufacturer could void the user's authority, which is granted by the Federal Communications Commission, to operate this computer.
Notice: Canadian users
This Class B digital apparatus complies with Canadian ICES-003.
Compliant with Russian regulatory certification

ME61
Modem notices

Note: Information in this section may not apply to your computer.
Notice for USA
This equipment complies with Part 68 of the FCC rules. Located on the modem is a label that contains, among other information, the FCC Registration Number and Ringer Equivalence Number (REN) for this equipment. Upon request, you must provide this information to your telephone company.
If your telephone equipment causes harm to the telephone network, the telephone company may discontinue your service temporarily. If possible, they will notify you in advance. But, if advance notice is not practical, you will be notified as soon as possible. You will also be informed of your right to file a complaint with the FCC.
Your telephone company may make changes in its facilities, equipment, operations, or procedures that could affect the proper functioning of your equipment. If they do, you will be notified in advance to give you an opportunity to maintain uninterrupted telephone service.
If this equipment should fail to operate properly, disconnect the equipment from the phone line to determine if it is causing the problem. If the problem is with the equipment, discontinue use and contact your dealer or vendor.

Caution: To reduce the risk of fire, use only No. 26 AWG or larger UL Listed or CSA Certified Telecommunication Line Cord.
TBR 21
This equipment has been approved [Council Decision 98/482/EC - "TBR 21"] for single terminal connection to the Public Switched Telephone Network (PSTN). However, due to differences between the individual PSTNs provided in different
countries, the approval does not, of itself, give an unconditional assurance of successful operation on every PSTN termination point. In the event of problems, you should contact your equipment supplier in the first instance. For more information about applicable countries, please refer to "Regulations and safety notices" on page 59.
Notice for Australia
For safety reasons, only connect headsets with a telecommunications compliance label. This includes customer equipment previously labeled permitted or certified.
Notice for New Zealand
1 The grant of a Telepermit for any item of terminal equipment indicates only that Telecom has accepted that the item complies with minimum conditions for connection to its network. It indicates no endorsement of the product by Telecom, nor does it provide any sort of warranty. Above all, it provides no assurance that any item will work correctly in all respects with another item of Telepermitted equipment of a different make or model, nor does it imply that any product is compatible with all of Telecom's network services.
2 This equipment is not capable, under all operating conditions, of correct operation at the higher speeds for which it is designed. Telecom will accept no responsibility should difficulties arise in such circumstances.
3 Some parameters required for compliance with Telecom's Telepermit requirements are dependent on the equipment (PC) associated with this device. The associated equipment shall be set to operate within the following limits for compliance with Telecom's Specifications:
a There shall be no more than 10 call attempts to the same number within any 30-minute period for any single manual call initiation, and
b The equipment shall go on-hook for a period of not less than 30 seconds between the end of one attempt and the beginning of the next call attempt.
4 Some parameters required for compliance with Telecom's Telepermit requirements are dependent on the equipment (PC) associated with this device. In order to operate within the limits for compliance with Telecom's specifications, the associated equipment shall be set to ensure that automatic calls to different numbers are spaced such that there is not less than 5 seconds between the end of one call attempt and the beginning of another.
5 This equipment shall not be set up to make automatic calls to Telecom's 111 Emergency Service.
6 This device is equipped with pulse dialing while the Telecom standard is DTMF tone dialing. There is no guarantee that Telecom lines will always continue to support pulse dialing.
7 Use of pulse dialing, when this equipment is connected to the same line as other equipment, may give rise to bell tinkle or noise and may also cause a
false answer condition. Should such problems occur, the user should NOT contact the telecom Fault Service.
8 This equipment may not provide for the effective hand-over of a call to another device connected to the same line.
9 Under power failure conditions this appliance may not operate. Please ensure that a separate telephone, not dependent on local power, is available for emergency use.
LCD pixel statement
The LCD unit is produced with high-precision manufacturing techniques.
Nevertheless, some pixels may occasionally misfire or appear as black or red dots.
This has no effect on the recorded image and does not constitute a malfunction.
Radio device regulatory notice

Note: Below regulatory information is for models with wireless LAN and / or Bluetooth only.
General
To prevent radio interference to the licensed service, this device is intended to be operated indoors.
This product complies with the radio frequency and safety standards of any country or region in which it has been approved for wireless use. Depending on configurations, this product may or may not contain wireless radio devices (such as wireless LAN and/or Bluetooth modules). Below information is for products with such devices.
Hereby, Acer, declares that this computer is in compliance with the essential requirements and other relevant provisions of Directive 1999/5/EC.
Wireless operation channels for different domains
| N. America | 2.412-2.462 GHz | Ch01 through Ch11 |
| Japan | 2.412-2.484 GHz | Ch01 through Ch14 |
| Europe ETSI | 2.412-2.472 GHz | Ch01 through Ch13 |
France: Restricted wireless frequency bands
Some areas of France have a restricted frequency band. The worst case maximum authorized power indoors is:
• 10 mW for the entire 2.4 GHz band (2400 MHz - 2483.5 MHz)
• 100 mW for frequencies between 2446.5 MHz and 2483.5 MHz

Note: Channels 10 through 13 inclusive operate in the band 2446.6 MHz to 2483.5 MHz.
There are few possibilities for outdoor use: On private property or on the private property of public persons, use is subject to a preliminary authorization procedure by the Ministry of Defense, with maximum authorized power of 100 mW in the 2446.5 - 2483.5 MHz band. Use outdoors on public property is not permitted.
In the departments listed below, for the entire 2.4 GHz band:
• Maximum authorized power indoors is 100 mW
• Maximum authorized power outdoors is 10 mW
Departments in which the use of the 2400 - 2483.5 MHz band is permitted with an EIRP of less than 100 mW indoors and less than 10 mW outdoors:
| 01 Ain Orientales | 25 Doubs | 59 Nord | 75 Paris |
| 02 Aisne | 26 Drome | 60 Oise | 82 Tarn et Garonne |
| 03 Allier | 32 Gers | 61 Orne | 84 Vaucluse |
| 05 Hautes Alpes | 36 Indre | 63 Puy Du Dome | 88 Vosges |
| 08 Ardennes | 37 Indre et Loire | 64 Pyrenees Atlantique | 89 Yonne |
| 09 Ariege | 41 Loir et Cher | 66 Pyrenees | 90 Territoire de Belfort |
| 11 Aude | 45 Loret | 67 Bas Rhin | 94 Val de Marne |
| 12 Aveyron | 50 Manche | 68 Haut Rhin | |
| 16 Charente | 55 Meuse | 70 Haute Saone | |
| 24 Dordogne | 58 Nievre | 71 Saone et Loire | |
This requirement is likely to change over time, allowing you to use your wireless LAN card in more areas within France.
Please check with ART for the latest information (www.art-telecom.fr).

Note: Your WLAN Card transmits less than 100 mW, but more than 10 mW.
List of National Codes
This equipment may be operated in the following countries:
| Country | ISO 31662 letter code | Country | ISO 31662 letter code |
| Austria | AT | Malta | MT |
| Belgium | BE | Netherlands | NT |
| Cyprus | CY | Poland | PL |
| Czech Republic | CZ | Portugal | PT |
| Denmark | DK | Slovakia | SK |
| Estonia | EE | Slovenia | SL |
| Finland | FI | Spain | ES |
| France | FR | Sweden | SE |
| Germany | DE | United Kingdom | GB |
| Greece | GR | Iceland | IS |
| Hungary | HU | Liechtenstein | LI |
| Ireland | IE | Norway | NO |
| Italy | IT | Switzerland | CH |
| Latvia | LV | Bulgaria | BG |
| Lithuania | LT | Romania | RO |
| Luxembourg | LU | Turkey | TR |
The FCC RF safety requirement
The radiated output power of the wireless LAN Mini PCI Card and Bluetooth card is far below the FCC radio frequency exposure limits. Nevertheless, the notebook PC series shall be used in such a manner that the potential for human contact during normal operation is minimized as follows:
1 Users are requested to follow the RF safety instructions on wireless option devices that are included in the user's manual of each RF option device.

Caution: To comply with FCC RF exposure compliance requirements, a separation distance of at least 20 cm (8 inches) must be maintained
between the antenna for the integrated wireless LAN Mini PCI Card built in to the screen section and all persons.
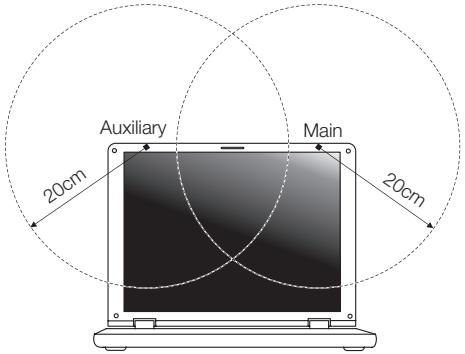

Note: The wireless Mini PCI adapter implements a transmission diversity function. The function does not emit radio frequencies simultaneously from both antennas. One of the antennas is selected automatically or manually (by users) to ensure good quality radiocommunication.
2 This device is restricted to indoor use due to its operation in the 5.15 to 5.25 GHz frequency range. FCC requires this product to be used indoors for the frequency range 5.15 to 5.25 GHz to reduce the potential for harmful interference to co-channel Mobile Satellite systems.
3 High power radar is allocated as the primary user of the 5.25 to 5.35 GHz and 5.65 to 5.85 GHz bands. These radar stations can cause interference with and/or damage this device.
4 An improper installation or unauthorized use may cause harmful interference to radio communications. Also any tampering of the internal antenna will void the FCC certification and your warranty.
The notebook PC series employs low gain integral antennas that do not emit RF field in excess of Health Canada limits for the general population; consult Safety Code 6, obtainable from Health Canada's website at www.hc-sc.gc.ca/rpb.
This device complies with RSS210 of Industry Canada.
This Class B digital apparatus complies with Canadian ICES-003, Issue 4, and RSS-210, No 4 (Dec 2000) and No 5 (Nov 2001).
"To prevent radio interference to the licensed service, this device is intended to be operated indoors and away from windows to provide maximum shielding. Equipment (or its transmit antenna) that is installed outdoors is subject to licensing."
Caution: When using IEEE 802.11a wireless LAN, this product is restricted to indoor use due to its operation in the 5.15- to 5.25-GHz frequency range. Industry Canada requires this product to be used indoors for the frequency range of 5.15 GHz to 5.25 GHz to reduce the potential for harmful interference to co-channel mobile satellite systems. High power radar is allocated as the primary user of the 5.25- to 5.35-GHz and 5.65 to 5.85-GHz bands. These radar stations can cause interference with and/or damage to this device.
The maximum allowed antenna gain for use with this device is 6dBi in order to comply with the E.I.R.P limit for the 5.25- to 5.35 and 5.725 to 5.85 GHz frequency range in point-to-point operation.
LCD panel ergonomic specifications
| Design viewing distance | 500 mm |
| Design inclination angle | 0.0° |
| Design azimuth angle | 90.0° |
| Viewing direction range class | Class IV |
| Screen tilt angle | 85.0° |
| Design screen illuminance | Illuminance level: [250 + (250)] lx where = 85^ Color: Source D65 |
| Reflection class of LCD panel(positive and negative polarity) | Ordinary LCD: Class IProtective LCD: Class III |
| Image polarity | Both |
| Reference white:Pre-setting of luminance and color temperature @ 6500K (tested under BM7) | Ynu'nv'n |
| Pixel fault class | Class II |
Notebook Aspire
www.acer-group.com/public/Sustainability

ENERGY STAR

Acer Backup Manager 20
Acer clear.fi 22
CD panel ergonomic specifications 66
Touchpad
natural_image
Simple diagram of a computer monitor with two mouse handles, no text or symbols present
Customized Restore (Retain User Data)

Welcome to Acer Backup Manager
Select one action below to start managing your data.
Back Up My Files
Pick and choose which files to back up or let the program find it all for you.
Image My Drive
Make a complete image backup of your drive.
Migrate My Files
Transfer your files from another computer to this computer.
Clear out / Restore Files
Remove seldom used files to free up space or restore files from your backup.

Launch My Backup Profiles
Back Up My Files
The file backup helps you create a complete backup of your documentation. Choose the file or folder for the backup and then select the destination for the backup. Once you have selected the destination, the final step is to schedule the backup. Click on the Backup My Files button to create a backup.
flowchart
graph LR
    A["File / Folder"] --> B["USB"]
    B --> C["Storage / USB"]
    C --> D["Calendar / Clock"]
    D --> E["Clock Icon"]
acer
☐ Directly enter "My Backup Profiles" next time
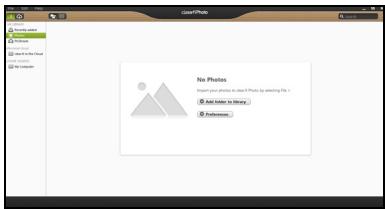

natural_image
User interface toolbar with playback, pause, and audio control icons (no text or symbols)


Dépannage
This Class B digital apparatus complies with Canadian ICES-003.

This device complies with RSS210 of Industry Canada.
This Class B digital apparatus complies with Canadian ICES-003, Issue 4, and RSS-210, No 4 (Dec 2000) and No 5 (Nov 2001).
"To prevent radio interference to the licensed service, this device is intended to be operated indoors and away from windows to provide maximum shielding. Equipment (or its transmit antenna) that is installed outdoors is subject to licensing."
Caution: When using IEEE 802.11a wireless LAN, this product is restricted to indoor use due to its operation in the 5.15- to 5.25-GHz frequency range. Industry Canada requires this product to be used indoors for the frequency range of 5.15 GHz to 5.25 GHz to reduce the potential for harmful interference to co-channel mobile satellite systems. High power radar is allocated as the primary user of the 5.25- to 5.35-GHz and 5.65 to 5.85-GHz bands. These radar stations can cause interference with and/or damage to this device.
CD panel ergonomic specifications
| Design viewing distance | 500 mm |
| Design inclination angle | 0.0^ |
| Design azimuth angle | 90.0^ |
| Viewing direction range class | Class IV |
| Screen tilt angle | 85.0^ |
| Design screen illuminance | Illuminance level: [250 + (250)] lx where = 85^ Color: Source D65 |
| Reflection class of LCD panel(positive and negative polarity) | Ordinary LCD: Class IProtective LCD: Class III |
| Image polarity | Both |
| Reference white:Pre-setting of luminance and color temperature @ 6500K (tested under BM7) | Ynu'nv'n |
| Pixel fault class | Class II |
Aspire-Notebook
Benutzerhandbuch
Modellnummer: ____
Seriennummer: ____
Kaufdatum: ____
Kaufort: ____
CLASS 1 LASER PRODUCT
ACHTUNG: INVISIBLE LASER RADIATION WHEN OPEN. AVOID EXPOSURE TO BEAM.
APPAREIL A LASER DE CLASSE 1 PRODUIT
LASERATTENTION: RADIATION DU FAISCEAU LASER INVISIBLE EN CAS D'OUVERTURE. EVITTER TOUTE EXPOSITION AUX RAYONS.
LUOKAN 1 LASERLAITE LASER KLASSE 1
Acer Backup Manager 20
Acer clear.fi 22
HDMI (High-Definition Multimedia Interface)
(International Travelers Warranty; ITW) 57
Vor einem Anruf 57
LCD panel ergonomic specifications 67
Touchpad
natural_image
Simple diagram of two computer mouse icons connected by a line, no text or symbols present


Here's what will happen:
- Your files and personalization settings won't change.
- Your PC settings will be changed back to their defaults.
- Apps from Windows Store will be kept.
- Apps you installed from discs or websites will be removed.
• A list of removed apps will be saved on your desktop.
Next
Cancel
Welcome to Acer Backup Manager
Select one action below to start managing your data.
Back Up My Files
Pick and choose which files to back up or let the program find it all for you.
Image My Drive
Make a complete image backup of your drive.
Migrate My Files
Transfer your files from another computer to this computer.
Clear out / Restore Files
Remove seldom used files to free up space or restore files from your backup.

Launch My Backup Profiles
Back Up My Files
The file backup helps you create a complete backup of your documentation. Choose the file or folder for the backup and then select the destination for the backup. Once you have selected the destination, the final step is to schedule the backup. Click on the Backup My Files button to create a backup.

flowchart
graph LR
    A["File / Folder"] --> B["USB"]
    B --> C["Storage / USB"]
    C --> D["Calendar / Clock"]
    D --> E["Clock Icon"]
acer
☐ Directly enter "My Backup Profiles" next time


natural_image
User interface control panel with playback, pause, and sound waves (no text or symbols)


Problemlösung

LCD panel ergonomic specifications
| Design viewing distance | 500 mm |
| Design inclination angle | 0.0^ |
| Design azimuth angle | 90.0^ |
| Viewing direction range class | Class IV |
| Screen tilt angle | 85.0^ |
| Design screen illuminance | Illuminance level: [250 + (250)] lx where = 85^ Color: Source D65 |
| Reflection class of LCD panel(positive and negative polarity) | Ordinary LCD: Class IProtective LCD: Class III |
| Image polarity | Both |
| Reference white:Pre-setting of luminance and color temperature @ 6500K (tested under BM7) | Ynu'nv'n |
| Pixel fault class | Class II |
Notebook Aspire
Manuale dell'utente
www.acer-group.com/public/Sustainability

ENERGY STAR

ENERGY STAR
Acer Backup Manager 20
Acer clear.fi 22
High-Definition Multimedia Interface
ITW (International Traveler's Warranty) 54
How do I access the charms? 56
Come arrivo a Start? 56
LCD panel ergonomic specifications 64
Touchpad
natural_image
Simple diagram of two computer mouse icons pointing to a dark rectangular block (no text or symbols)
Customized Restore (Retain User Data)

Here's what will happen:
- Your files and personalization settings won't change.
- Your PC settings will be changed back to their defaults.
- Apps from Windows Store will be kept.
- Apps you installed from discs or websites will be removed.
• A list of removed apps will be saved on your desktop.
Next
Cancel


natural_image
User interface toolbar with playback, pause, and sound control icons (no text or symbols)


ITW (International Traveler's Warranty)
How do I access the charms?
Come arrivo a Start?

The use of these equipments is regulated by:
- D.L.gs 1.8.2003, n. 259, article 104 (activity subject to general authorization) for outdoor use and article 105 (free use) for indoor use, in both cases for private use.
- D.M. 28.5.03, for supply to public of RLAN access to networks and telecom services.
LCD panel ergonomic specifications
| Design viewing distance | 500 mm |
| Design inclination angle | 0.0^ |
| Design azimuth angle | 90.0^ |
| Viewing direction range class | Class IV |
| Screen tilt angle | 85.0^ |
| Design screen illuminance | Illuminance level: [250 + (250)] lx where = 85^ Color: Source D65 |
| Reflection class of LCD panel(positive and negative polarity) | Ordinary LCD: Class IProtective LCD: Class III |
| Image polarity | Both |
| Reference white:Pre-setting of luminance and color temperature @ 6500K (tested under BM7) | Ynu'nv'n |
| Pixel fault class | Class II |
Portátil Aspire
Manual de usuario
CLASS 1 LASER PRODUCT
PRECAUCIÓN: INVISIBLE LASER RADIATION WHEN OPEN. AVOID EXPOSURE TO BEAM.
APPAREIL A LASER DE CLASSE 1 PRODUIT
LASERATTENTION: RADIATION DU FAISCEAU LASER INVISIBLE EN CAS D'OUVERTURE.EVITTER TOUTE EXPOSITION AUX RAYONS.
LUOKAN 1 LASERLAITE LASER KLASSE 1
Acer Backup Manager 19
Acer clear.fi 21
(International Travelers Warranty; ITW) 52
Antes de llamar 53
LCD panel ergonomic specifications 62
Panel táctil
natural_image
Simple diagram of a computer monitor with two mouse icons pointing to its screen (no text or symbols)
Customized Restore (Retain User Data)


natural_image
User interface toolbar with playback, pause, and sound control icons (no text or symbols)


The operation of this product in the radio channel 2 (2417 MHz) is not authorized in the following cities: Agadir, Assa-Zag, Cabo Negro, Chaouen, Goulmima, Oujda, Tan Tan, Taourirt, Taroudant and Taza.
LCD panel ergonomic specifications
| Design viewing distance | 500 mm |
| Design inclination angle | 0.0^ |
| Design azimuth angle | 90.0^ |
| Viewing direction range class | Class IV |
| Screen tilt angle | 85.0^ |
| Design screen illuminance | Illuminance level: [250 + (250)] lx where = 85^ Color: Source D65 |
| Reflection class of LCD panel(positive and negative polarity) | Ordinary LCD: Class IProtective LCD: Class III |
| Image polarity | Both |
| Reference white:Pre-setting of luminance and color temperature @ 6500K (tested under BM7) | Ynu'nv'n |
| Pixel fault class | Class II |
Portátil Aspire
Manual do Utilizador
CLASS 1 LASER PRODUCT
CAUTION: INVISIBLE LASER RADIATION WHEN OPEN. AVOID EXPOSURE TO BEAM.
APPAREIL A LASER DE CLASSE 1 PRODUIT
LASERATTENTION: RADIATION DU FAISCEAU LASER INVISIBLE EN CAS D'OUVERTURE.EVITTER TOUTE EXPOSITION AUX RAYONS.
LUOKAN 1 LASERLAITE LASER KLASSE 1
www.acer-group.com/public/Sustainability
ENERGY STAR

Acer Backup Manager 19
Acer clear.fi 21
Consumer Infrared (CIR)
(apenas para determinados modelos) 37
Universal Serial Bus (USB) 38
Porta IEEE 1394
(apenas para determinados modelos) 38
High-Definition Multimedia Interface
(apenas para determinados modelos) 39
(International Travelers Warranty; ITW) 53
Antes de telefonar 54
LCD panel ergonomic specifications 63
natural_image
Simple diagram of a computer monitor with two mouse icons pointing to its screen (no text or symbols)
Customized Restore (Retain User Data)


natural_image
User interface toolbar with playback, pause, and sound control icons (no text or symbols)


Consumer Infrared (CIR) (apenas para determinados modelos)

O adaptador de Bluetooth no seu computador está agora ativado e pronto para adicionar dispositivos Bluetooth.


LCD panel ergonomic specifications
| Design viewing distance | 500 mm |
| Design inclination angle | 0.0^ |
| Design azimuth angle | 90.0^ |
| Viewing direction range class | Class IV |
| Screen tilt angle | 85.0^ |
| Design screen illuminance | Illuminance level: [250 + (250)] lx where = 85^ Color: Source D65 |
| Reflection class of LCD panel(positive and negative polarity) | Ordinary LCD: Class IProtective LCD: Class III |
| Image polarity | Both |
| Reference white:Pre-setting of luminance and color temperature @ 6500K (tested under BM7) | Ynu'nv'n |
| Pixel fault class | Class II |
Aspire Notebook
LASERPRODUCT KLASSE 1
VOORZICHTIG: ONZICHTBARE LASERSTRALING INDIEN GEOPEND.
VOORKOM BLOOTSTELLING AAN STRAAL.
APPAREIL A LASER DE CLASSE 1 PRODUIT
LASERATTENTION: RADIATION DU FAISCEAU LASER INVISIBLE EN CAS
D'OUVERTURE. EVITTER TOUTE EXPOSITION AUX RAYONS.
LUOKAN 1 LASERLAITE LASER KLASSE 1
Acer Backup Manager 20
Acer clear.fi 22
High-Definition Multimedia Interface
ITW (International Travelers Warranty) 54
Voordat u belt 55
LCD panel ergonomic specifications
63
Touchpad
natural_image
Simple diagram of a computer monitor with two mouse icons pointing to its screen (no text or symbols)
Start Acer Recovery Management
Customized Restore (Retain User Data)

Om Acer Backup Manager te starten in Windows 8, voert u simpelweg "Backup Manager" in. U kunt ook in de Desktop-modus Acer Backup Manager kiezen.


natural_image
User interface control bar with playback, pause, and sound waves (no text or symbols)


Problemen oplossen
ITW (International Travelers Warranty)

LCD panel ergonomic specifications
| Design viewing distance | 500 mm |
| Design inclination angle | 0.0^ |
| Design azimuth angle | 90.0^ |
| Viewing direction range class | Class IV |
| Screen tilt angle | 85.0^ |
| Design screen illuminance | Illuminance level: [250 + (250)] lx where = 85^ Color: Source D65 |
| Reflection class of LCD panel(positive and negative polarity) | Ordinary LCD: Class IProtective LCD: Class III |
| Image polarity | Both |
| Reference white:Pre-setting of luminance and color temperature @ 6500K (tested under BM7) | Ynu'nv'n |
| Pixel fault class | Class II |
Aspire Notebook
Brukerhåndbok
© 2012 Med enerett.
KLASSE 1 LASERPRODUKT
FORSIKTIG: USYNLIG LASERSTRÅLING I ÅPEN TILSTAND. UNNGÅ STRÅLEN.
APPAREIL A LASER DE CLASSE 1 PRODUIT
LASERATTENTION: RADIATION DU FAISCEAU LASER INVISIBLE EN CAS D'OUVERTURE. EVITTER TOUTE EXPOSITION AUX RAYONS.
LUOKAN 1 LASERLAITE LASER KLASSE 1
Acer Backup Manager 18
Acer clear.fi 20
Deaktiver hurtigoppstart 23
Batteri 25
CIR-port (Consumer Infrared) (bare for visse modeller) 36
Universal Serial Bus (USB) 37
IEEE 1394-port (bare for visse modeller) 37
International Travelers Warranty (ITW) 51
Før du ringer 51
LCD panel ergonomic specifications 60
Berøringsplate (Touchpad)
Den innebygde berøringsplaten er en pekeenhet som føler bevegelser på overflaten. Dette betyr at markøren reagerer når du beveger fingeren på overflaten av berøringsplaten.

natural_image
Simple diagram of a computer monitor with two mouse handles, no text or symbols present
- Plugg ut USB-stasjonen og merk den tydelig.

Start Acer Recovery Management:
Customized Restore (Retain User Data)

Bildene er kun for referanseformål.
Bildene er kun for referanseformål.
Her kan du redigere eller slette eksisterende sikkerhetskopiprofiler.
Acer clear.fi


natural_image
User interface toolbar with playback, pause, and sound control icons (no text or symbols)

Deaktiver hurtigoppstart
- Velg Lagre endringer.
Batteri

CIR-port (Consumer Infrared) (bare for visse modeller)
IEEE 1394-port (bare for visse modeller)
Datamaskinens IEEE 1394-port lar deg koble til en IEEE 1394-enhet, f.eks. et video-eller digitalkamera. Se dokumentasjonen til video- eller digitalkameraet hvis du vil ha detaljer.
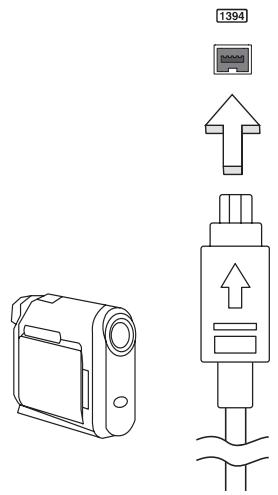


International Travelers Warranty (ITW)

LCD panel ergonomic specifications
| Design viewing distance | 500 mm |
| Design inclination angle | 0.0° |
| Design azimuth angle | 90.0° |
| Viewing direction range class | Class IV |
| Screen tilt angle | 85.0° |
| Design screen illuminance | Illuminance level:[250 + (250cosα)] lx where α = 85°Color: Source D65 |
| Reflection class of LCD panel(positive and negative polarity) | Ordinary LCD: Class IProtective LCD: Class III |
| Image polarity | Both |
| Reference white:Pre-setting of luminance and color temperature @ 6500K (tested under BM7) | Ynu'nv'n |
| Pixel fault class | Class II |
Aspire Notebook
Brugervejledning
Modelnummer: ____
Serienummer: ____
Købsdato: ____
Købt hos: ____
CLASS 1 LASER PRODUCT
CAUTION: INVISIBLE LASER RADIATION WHEN OPEN. AVOID EXPOSURE TO BEAM.
APPAREIL A LASER DE CLASSE 1 PRODUIT
LASERATTENTION: RADIATION DU FAISCEAU LASER INVISIBLE EN CAS D'OUVERTURE. EVITTER TOUTE EXPOSITION AUX RAYONS.
LUOKAN 1 LASERLAITE LASER KLASSE 1
Acer Backup Manager 18
Acer clear.fi 20
High-Definition Multimedia Interface
International Travelers Warranty (ITW) 51
Inden du ringer 51
LCD panel ergonomic specifications 60
Pegefelt
natural_image
Simple diagram of a computer monitor with two mouse handles, no text or symbols present
- Klik på Opret drivere og programsikkerhedskopiering.
Start Acer Recovery Management:
- Fra Start indtaster du 'Recovery', hvorefter du klikker på Acer Recovery Management i listen over apps.


natural_image
User interface toolbar with playback, pause, and sound control icons (no text or symbols)

- Vælg Gem ændringer.
Batteripakke

flowchart
graph TD
    A["USB Port"] --> B["USB Port"]
    B --> C["HDMI"]
    C --> D["USB Port"]


International Travelers Warranty (ITW)

LCD panel ergonomic specifications
| Design viewing distance | 500 mm |
| Design inclination angle | 0.0° |
| Design azimuth angle | 90.0° |
| Viewing direction range class | Class IV |
| Screen tilt angle | 85.0° |
| Design screen illuminance | Illuminance level:[250 + (250cosα)] lx where α = 85°Color: Source D65 |
| Reflection class of LCD panel(positive and negative polarity) | Ordinary LCD: Class IProtective LCD: Class III |
| Image polarity | Both |
| Reference white:Pre-setting of luminance and color temperature @ 6500K (tested under BM7) | Ynu'nv'n |
| Pixel fault class | Class II |
Aspire bärbar dator
Användarhandboken
KLASS 1 LASERPRODUKT
VARNING: OSYNLIG LASERSTRÅLNING NÄR DENNA DEL ÄR ÖPPEN. UNDVIK ATT UTSÄTTA DIG FÖR STRÅLEN.
APPAREIL A LASER DE CLASSE 1 PRODUIT
LASERATTENTION: RADIATION DU FAISCEAU LASER INVISIBLE EN CAS D'OUVERTURE. EVITTER TOUTE EXPOSITION AUX RAYONS.
LUOKAN 1 LASERLAITE LASER KLASSE 1
www.acer-group.com/public/Sustainability
ENERGY STAR

ENERGY STAR
Acer Backup Manager 18
Acer clear.fi 20
(International Travelers Warranty; ITW) 51
Innan du ringer 52
LCD panel ergonomic specifications 61
Pekplatta
natural_image
Simple diagram with two computer mouse icons pointing to a dark rectangular shape (no text or symbols)
- Klicka Ominstallera drivrutiner eller program.
Starta Acer Recovery Management:
Customized Restore (Retain User Data)


natural_image
User interface toolbar with playback, pause, and sound control icons (no text or symbols)


Consumer infrared (CIR) (endast för vissa modeller)
IEEE 1394-port (endast för vissa modeller)


Felsöka datorn

LCD panel ergonomic specifications
| Design viewing distance | 500 mm |
| Design inclination angle | 0.0^ |
| Design azimuth angle | 90.0^ |
| Viewing direction range class | Class IV |
| Screen tilt angle | 85.0^ |
| Design screen illuminance | Illuminance level: [250 + (250)] lx where = 85^ Color: Source D65 |
| Reflection class of LCD panel(positive and negative polarity) | Ordinary LCD: Class IProtective LCD: Class III |
| Image polarity | Both |
| Reference white:Pre-setting of luminance and color temperature @ 6500K (tested under BM7) | Ynu'nv'n |
| Pixel fault class | Class II |
Aspire kannettavat
Käyttöohjekirja
Acer Backup Manager 20
Acer clear.fi 22
High-Definition Multimedia Interface
LCD panel ergonomic specifications 64
Kosketusalusta
natural_image
Simple diagram of two computer mouse icons connected by a line, no text or symbols present


natural_image
User interface toolbar with playback, pause, and sound control icons (no text or symbols)


LCD panel ergonomic specifications
| Design viewing distance | 500 mm |
| Design inclination angle | 0.0^ |
| Design azimuth angle | 90.0^ |
| Viewing direction range class | Class IV |
| Screen tilt angle | 85.0^ |
| Design screen illuminance | Illuminance level: [250 + (250)] lx where = 85^ Color: Source D65 |
| Reflection class of LCD panel(positive and negative polarity) | Ordinary LCD: Class IProtective LCD: Class III |
| Image polarity | Both |
| Reference white:Pre-setting of luminance and color temperature @ 6500K (tested under BM7) | Ynu'nv'n |
| Pixel fault class | Class II |
Ноутбук Aspire
CLASS 1 LASER PRODUCT
CAUTION: INVISIBLE LASER RADIATION WHEN OPEN. AVOID EXPOSURE TO BEAM.
APPAREIL A LASER DE CLASSE 1 PRODUIT
LASERATTENTION: RADIATION DU FAISCEAU LASER INVISIBLE EN CAS D'OUVERTURE. EVITTER TOUTE EXPOSITION AUX RAYONS.
LUOKAN 1 LASERLAITE LASER KLASSE 1
Acer Backup Manager 21
Acer clear.fi 23
High-Definition Multimedia Interface
LCD panel ergonomic specifications 66
Сенсорная панель
natural_image
Simple diagram of a computer monitor with two mouse icons pointing to its screen (no text or symbols)


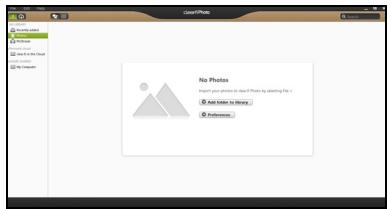

natural_image
User interface toolbar with playback, pause, and sound control icons (no text or symbols)


LCD panel ergonomic specifications
| Design viewing distance | 500 mm |
| Design inclination angle | 0.0° |
| Design azimuth angle | 90.0° |
| Viewing direction range class | Class IV |
| Screen tilt angle | 85.0° |
| Design screen illuminance | Illuminance level:[250 + (250cosa)] lx where a = 85°Color: Source D65 |
| Reflection class of LCD panel(positive and negative polarity) | Ordinary LCD: Class IProtective LCD: Class III |
| Image polarity | Both |
| Reference white:Pre-setting of luminance and color temperature @ 6500K(tested under BM7) | Ynu'nv'n |
| Pixel fault class | Class II |
Notebook Aspire
Acer Backup Manager 19
Acer clear.fi 21
High-Definition Multimedia Interface
(International Travelers Warranty; ITW) 54
LCD panel ergonomic specifications 64
Touchpad
natural_image
Simple diagram of a computer monitor with two mouse icons pointing to it (no text or symbols)
Customized Restore (Retain User Data)


natural_image
User interface toolbar with playback, pause, and audio control icons (no text or symbols)


LCD panel ergonomic specifications
| Design viewing distance | 500 mm |
| Design inclination angle | 0.0^ |
| Design azimuth angle | 90.0^ |
| Viewing direction range class | Class IV |
| Screen tilt angle | 85.0^ |
| Design screen illuminance | Illuminance level: [250 + (250)] lx where = 85^ Color: Source D65 |
| Reflection class of LCD panel(positive and negative polarity) | Ordinary LCD: Class IProtective LCD: Class III |
| Image polarity | Both |
| Reference white:Pre-setting of luminance and color temperature @ 6500K (tested under BM7) | Ynu'nv'n |
| Pixel fault class | Class II |
Aspire notebook
CLASS 1 LASER PRODUCT
CAUTION: INVISIBLE LASER RADIATION WHEN OPEN. AVOID EXPOSURE TO BEAM.
APPAREIL A LASER DE CLASSE 1 PRODUIT
LASERATTENTION: RADIATION DU FAISCEAU LASER INVISIBLE EN CAS D'OUVERTURE. EVITTER TOUTE EXPOSITION AUX RAYONS.
LUOKAN 1 LASERLAITE LASER KLASSE 1
Acer Backup Manager 19
Acer clear.fi 21
LCD panel ergonomic specifications 64
Érintőpad
natural_image
Simple diagram of two computer mouse icons connected by a line, no text or symbols present
Start Acer Recovery Management:
Customized Restore (Retain User Data)

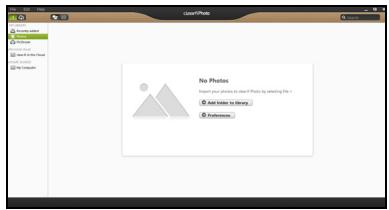

natural_image
User interface control panel with playback, pause, and sound playback controls (no text or symbols)


Hibaelhárítás

LCD panel ergonomic specifications
| Design viewing distance | 500 mm |
| Design inclination angle | 0.0^ |
| Design azimuth angle | 90.0^ |
| Viewing direction range class | Class IV |
| Screen tilt angle | 85.0^ |
| Design screen illuminance | Illuminance level: [250 + (250)] lx where = 85^ Color: Source D65 |
| Reflection class of LCD panel(positive and negative polarity) | Ordinary LCD: Class IProtective LCD: Class III |
| Image polarity | Both |
| Reference white:Pre-setting of luminance and color temperature @ 6500K (tested under BM7) | Ynu'nv'n |
| Pixel fault class | Class II |
Notebook Aspire
www.acer-group.com/public/Sustainability

ENERGY STAR

ENERGY STAR
Acer Backup Manager 19
Acer clear.fi 21
Rozhraní CIR (Consumer infrared)
High-Definition Multimedia Interface
(International Travelers Warranty; ITW) 51
Než zavoláte 51
LCD panel ergonomic specifications 60
Zařízení touchpad
natural_image
Simple diagram of a computer monitor with two mouse handles, no text or symbols present
Customized Restore (Retain User Data)


natural_image
User interface toolbar with playback, pause, and sound control icons (no text or symbols)


Odstraňování potíží

LCD panel ergonomic specifications
| Design viewing distance | 500 mm |
| Design inclination angle | 0.0^ |
| Design azimuth angle | 90.0^ |
| Viewing direction range class | Class IV |
| Screen tilt angle | 85.0^ |
| Design screen illuminance | Illuminance level: [250 + (250)] lx where a = 85^ Color: Source D65 |
| Reflection class of LCD panel(positive and negative polarity) | Ordinary LCD: Class IProtective LCD: Class III |
| Image polarity | Both |
| Reference white:Pre-setting of luminance and color temperature @ 6500K (tested under BM7) | Ynu'nv'n |
| Pixel fault class | Class II |
www.acer-group.com/public/Sustainability

ENERGY STAR

Acer Backup Manager 19
Acer clear.fi 21
Prehl'adávanie médií a fotografií 21
Zdiel'ané súbory 21
High-Definition Multimedia Interface
(len pre určité modely) 38
ExpressCard (len pre určité modely) 38
LCD panel ergonomic specifications 61
Dotyková plocha
natural_image
Simple diagram of two computer mouse icons connected by a line, no text or symbols present
- Odpojte USB jednotku a zretel'ne ju označte.

Spustite Acer Recovery Management:
Customized Restore (Retain User Data)


natural_image
User interface toolbar with playback controls and a sound slider (no text or symbols)

- Vyberte možnost' Uložit' zmeny.
Batéria

Port IEEE 1394 (len pre určité modely)
4 Vrát'te spät' kryt pamäte a zaistite ho skrutkou.
5 Dajte batériu na svoje miesto a znova pripojte AC adaptér.
6 Zapnite počítač.

Začiarknite políčko Povolit' zariadeniam Bluetooth vyhl'adat' tento počítač, kliknite na Použit' a potom kliknite na OK.


Riešenie problémov

LCD panel ergonomic specifications
| Design viewing distance | 500 mm |
| Design inclination angle | 0.0^ |
| Design azimuth angle | 90.0^ |
| Viewing direction range class | Class IV |
| Screen tilt angle | 85.0^ |
| Design screen illuminance | Illuminance level: [250 + (250)] lx where = 85^ Color: Source D65 |
| Reflection class of LCD panel(positive and negative polarity) | Ordinary LCD: Class IProtective LCD: Class III |
| Image polarity | Both |
| Reference white:Pre-setting of luminance and color temperature @ 6500K (tested under BM7) | Ynu'nv'n |
| Pixel fault class | Class II |
Prenosnik Aspire
Acer Backup Manager 19
Acer clear.fi 21
Krmarjenje po medijskih datotekah in fotografijah 21
Datoteke v souporabi 21
International Travelers Warranty (ITW)
(Mednarodna potovalna garancija) 52
Preden pokličete 53
Napotki in namigi za uporabo Windows 8 54
LCD panel ergonomic specifications 63
Sledilna plošča
natural_image
Simple diagram of two computer mouse icons pointing to a dark rectangular object (no text or symbols)
- Odklopite pogon USB in ga razločno označite.

Zaženite Acer Recovery Management:
Customized Restore (Retain User Data)

Slike so le informativne.
- Kliknite Naprej in izberite, kako želite izbrisati datoteke:
3. Kliknite Naprej in nato Osveži.
- Postopek obnovitve se bo pričel s ponovnim zagonom računalnika in nadaljeval s kopiranjem datotek na trdi disk. Ta postopek traja približno 30 minut.
Slike so le informativne.
- Kliknite Naprej.
- Izberite operacijski sistem, ki ga želite obnoviti (običajno je na voljo le ena možnost).
- Izberite, ali želite ohraniti spremembe particij na trdem disku:
a. izberite Ne, će ste particijo za obnovitev izbrisali ali kako drugače spreminjali particije na trdem disku in želite te spremembe ohraniti.
b. Izberite Da, će želite računalnik povsem povrniti na tovarniško privzete nastavitve.
- Kliknite Naprej.
- Izberite operacijski sistem, ki ga želite obnoviti (običajno je na voljo le ena možnost).
- Kliknite Osveži.
- Postopek obnovitve se bo pričel s ponovnim zagonom računalnika in nadaljeval s kopiranjem datotek na trdi disk. Ta postopek traja približno 30 minut.
Acer Backup Manager


natural_image
User interface toolbar with playback controls and a sound slider (no text or symbols)

- Izberite možnost Shrani spremembe.
Baterija

Opozorilo! Prepričajte se, da je kabel, ki ga uporabljate primeren za državo v kateri delate.
CIR (consumer infrared) (le na določenih modelih)
4 Namestite pokrov in ga pritrdite z vijaki.
5 Namestite baterijo in priključite AC adapter.
6 Vključite računalnik.

Izberite potrditveno polje Dovoli, da naprave Bluetooth najdejo ta računalnik, kliknite Uporabi in nato V redu.

Kliknite na napravo, ki jo želite dodati.
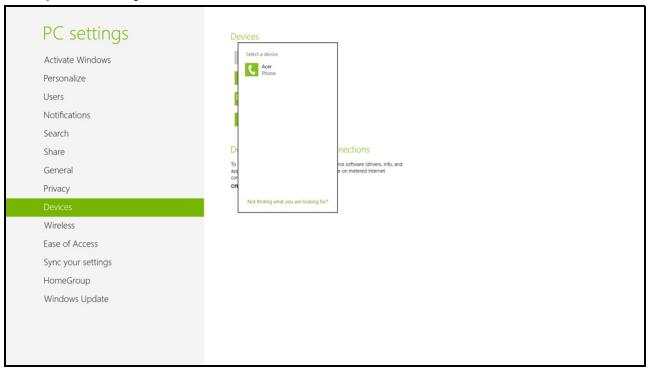
Na računalniku bo prikazana koda, ki se mora ujemati s kodo, prikazano na napravi. Izberite Da. Nato na napravi sprejmite vzpostavitev povezave.


Okno za operacije vam omogoča predvajanje glasbe in zvoka z naprave preko računalnika, pošiljanje datotek na nanjo in spreminjanje nastavitev Bluetooth.
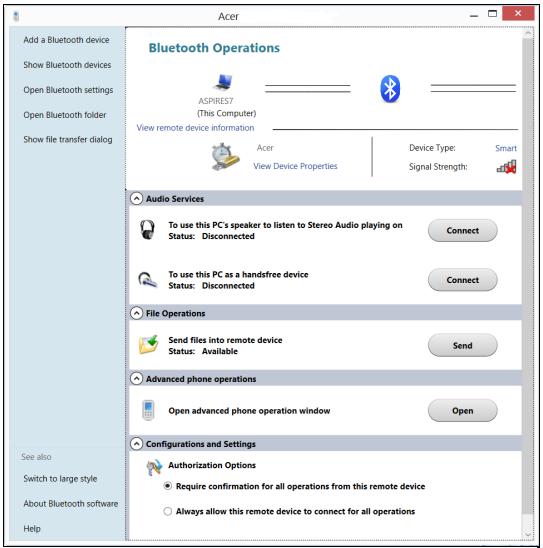
Odpravljanje napak

LCD panel ergonomic specifications
| Design viewing distance | 500 mm |
| Design inclination angle | 0.0^ |
| Design azimuth angle | 90.0^ |
| Viewing direction range class | Class IV |
| Screen tilt angle | 85.0^ |
| Design screen illuminance | Illuminance level: [250 + (250)] lx where = 85^ Color: Source D65 |
| Reflection class of LCD panel(positive and negative polarity) | Ordinary LCD: Class IProtective LCD: Class III |
| Image polarity | Both |
| Reference white:Pre-setting of luminance and color temperature @ 6500K (tested under BM7) | Ynu'nv'n |
| Pixel fault class | Class II |
www.acer-group.com/public/Sustainability

ENERGY STAR

ENERGY STAR
Acer proizvosi s etiketom ENERGY STAR štede Vaš novac smanjenjem troškova struje i zaštićivanjem okoliša bez gubitka svojstava ili performansi. Acer se ponosi time što svojim kupcima može ponuditi proizvode s etiketom ENERGY STAR.
Što je ENERGY STAR?
Acer Backup Manager 19
Acer clear.fi 21
Navigacija medijima i fotografijama 21
Dijeljene dattoeke 21
LCD panel ergonomic specifications 63
Dodirna ploča
natural_image
Simple diagram of a computer monitor with two mouse icons pointing to its screen (no text or symbols)
- Povlačenje od desnog ruba: Uključuje ili isključuje prikaz ikona gumbića.
- Povlačenje s vrha: Uključuje ili isključuje naredbe aplikacije.
- Povlačenje od lijevog ruba: Povrat na prethodnu aplikaciju.
- Klizanje sa dva prsta: Brzo pregledavajte i listajte web stranice, dokumente i popise za reprodukciju tako što ćete postaviti dva prsta na dodirnu ploču i pomicati ih oba u bilo kojem smjeru.
- Približavanje ili udaljavanje dva prsta: Uvećajte i smanjite fotografije, karte i dokumente jednostavnim pokretom palca i još jednog prsta.

Uporaba tipkovnice
Tipkovnica ima tipke pune veličine i ugrađenu numeričku tipkovnicu*, odvojene kursorske tipke, tipke za zaključavanje, Windows, funkcijske i posebne tipke.
- Izvadite USB pogon i nedvosmisleno ga označite.

Važno: Označite jedinstvenom, opisnom oznakom poput „Sigurnosna kopija za oporavak Windowsa“. Sigurnosnu kopiju držite na sigurnom mjestu koje ćete lako upamtiti.
- Kliknite na Stvori sigurnosnu kopiju upravljačkih programa i aplikacija.
Umetnite USB pogon ili prazni DVD disk u optički pogon i zatim kliknite na Dalje.
- Ako koristite DVD diskove, prikazat će se potreban broj praznih diskova koji će vam biti potrebni da biste snimili sve potrebno za oporavak. Prije nastavka postupka provjerite imate li dovoljan broj istovrsnih praznih diskova.

- Kliknite na Početak da biste kopirali datoteke. Na zaslonu će biti pokazan napredak postupka stvaranja sigurnosne kopije.
- Slijedite postupak do završetka:
- Ako koristite optičke diskove, pogon izbacuje svaki disk nakon završetka snimanja na isti. Uklonite disk iz pogona i označite ga vodootpornim flomasterom za diskove.
Ako je potrebno više diskova, nakon upita za novi disk umetnite ga i kliknite na U redu. Nastavite snimati diskove do dovršetka postupka.
- Ako koristite USB pogon, izvadite ga i nedvosmisleno ga označite.

Važno: Označite jedinstvenom, opisnom oznakom poput „Sigurnosna kopija upravljačkih programa i aplikacija“. Sigurnosnu kopiju držite na sigurnom mjestu koje ćete lako upamtiti.
Oporavak sustava
Za oporavak sustava:
- Izvršite manje popravke.
- Kliknite na Ponovno instaliraj upravljačke programe ili aplikacije.
- Trebali biste vidjeti poglavlje Sadržaj u Acer centar resursa.
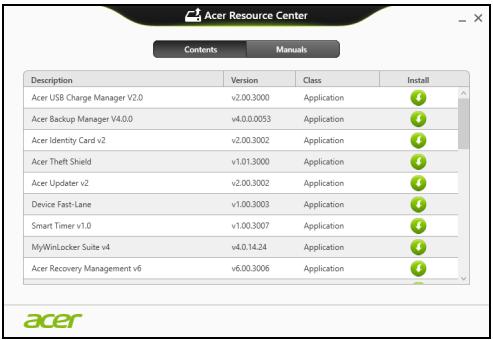
- Kliknite na ikonu instaliraj za stavku koju želite instalirati i zatim slijedite upute na zaslonu za završetak instalacije. Ponovite ovaj korak za svaku stavku koju želite ponovno instalirati.

Pokrenite Acer Recovery Management:
- U izborniku Početak, unesite "Oporavak" i kliknite na Acer Recovery Management u popisu aplikacija.
Customized Restore (Retain User Data)

- Kliknite na Dalje, a zatim na Osvježi.
- Postupak oporavka počinje ponovnim pokretanjem računala, a nastavlja se kopiranjem datoteka na tvrdi disk. Postupak traje oko 30 minuta.
- Kliknite na Dalje.
- Odaberite operativni sustav za oporavak (obično je dostupna samo jedna mogućnost).
- Kliknite na Osvježi.
- Postupak oporavka počinje ponovnim pokretanjem računala, a nastavlja se kopiranjem datoteka na tvrdi disk. Postupak traje oko 30 minuta.
Acer Backup Manager

Napomena: Mogucnost je dostupna samo na odredenim modelima.
Acer Backup Manager je uslužni program koji vam omogucuje izvođenje razlicitih funkcija sigurnosnog kopiranja i to svako u tri jednostavna koraka. Moguce je odrediti i automatsko izvođenje tih funkcija koliko god to cesto želite.
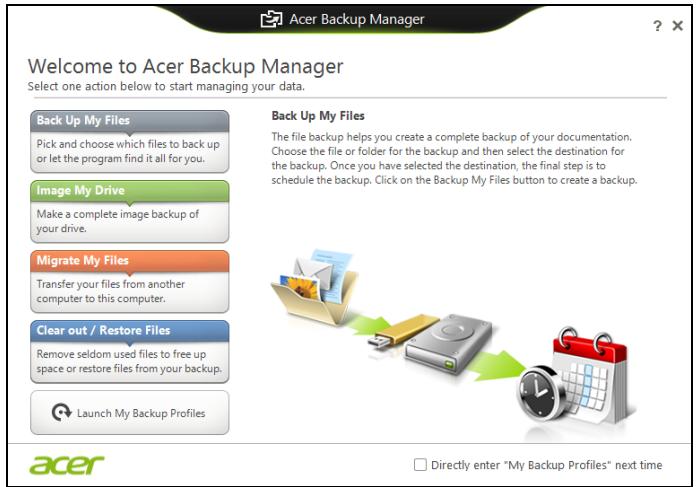
Tu možete promijeniti ili izbrisati postojece profile sigurnosnog kopiranja.
Acer clear.fi

Napomena: Samo za određene modele.


natural_image
User interface toolbar with playback, pause, and sound control icons (no text or symbols)

Napomena: Potrebno je aktivirati dijeljenje na uređaju na kojem su datoteke spremljene. Otvorite clear.fi na uređaju na kojem su datoteke spremljene, odaberite Uredi i provjerite je li aktivna opcija Dijeli moju biblioteku na lokalnoj mreži.
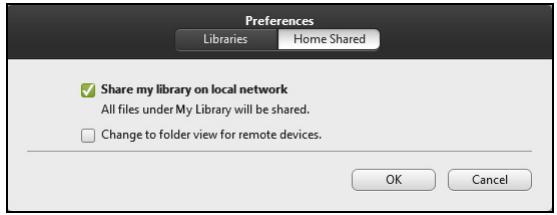
-
Odaberite Odaberite što rade gumbi za uključivanje.
-
Za pristup postavkama isključivanja, odaberite Promijeni postavke koje su trenutno nedostupne.
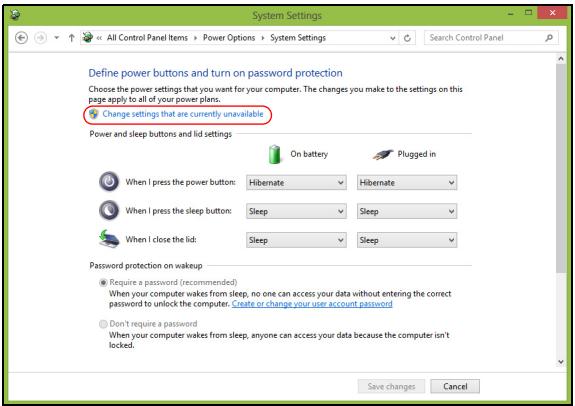
- Odaberite Spremi promjene.
Baterijski komplet
Računalo koristi baterijski komplet koji vam pruža dugo korištenje između punjenja.
Karakteristike baterijskog kompleta
Pritisnite tipku Windows + kliknite na Start > shut down.
lli:
Možete računalo ostaviti u stanju mirovanja (Sleep) pritiskom + . Tada zatvorite i zabravite ekran.
Kad ste spremni ponovno koristiti računalo, otključajte i otvorite ekran; tada pritisnite i pustite tipku za uključivanje.

Napomena: Ako je Sleep indikator (indikator stanja mirovanja) isključen, tada je računalo prešlo u stanje hibernacije i tada je isključeno. Ako je indikator napajanja isključen, ali je Sleep indikator uključen, računalo je prešlo u stanje Sleep (mirovanje). U oba slučaja, pritisnite i otpustite tipku za uključivanje za ponovno uključivanje računala. Obratite pozornost na činjenicu kako računalo može prijeći u stanje Hibernacije nakon što je neko vrijeme bilo u stanju Sleep (mirovanje).

Upozorenje! Molimo, osigurajte da je kabel koji koristite odgovarajući za državu u kojoj radite.
Korisnički infracrveni priključak (CIR) (samo za određene modele)
Korisnički infracrveni priključak računala (CIR) koristi se za prijem signala s vašeg daljinskog upravljača ili drugih uređaja koji koriste CIR (infracrvenu vezu).
Univerzalna serijska sabirnica (USB)
USB 2.0 priključak je serijska sabirnica velike brzine koja omogućuje povezivanja USB perifernih uređaja bez zauzimanja dragocjenih resursa sustava.

IEEE 1394 priključnica (samo za određene modele)
4 Vratite poklopac memorije i osigurajte ga vijcima.
5 Ponovno ugradite baterijski komplet i ponovno spojite AC adapter.
6 Uključite računalo.
Računalo automatski otkriva i ponovno konfigurira ukupnu veličinu memorije. Molimo, obratite se kvalificiranom tehničaru ili vašem zastupniku robne marke Acer.

Napomena: Mogućnost je dostupna samo na određenim modelima.
Računala koja sadrže Windows Media Center Edition ili InstantOn Arcade mogu se koristiti za gledanje televizije te za pristup video sadržajima (putem audio/video veze s vanjskim uređajem poput video kamere).
Odaberite tip ulaza
Audio/video veza može biti ili DVB-T digitalna antena (za odabrane modele) ili PAL/SECAM ili NTSC konektor. Molimo pročitajte odgovarajući odlomak:
Gledanje televizije pomoću DVB-T (digitalne TV) antene (za odabrane modele)
DVB-T je međunarodni standard koji se koristi za prijenos zemaljskih televizijskih usluga u digitalnom formatu. U mnogim zemljama postepeno već istiskuje analogna emitiranja. DVB-T digitalna antena može se koristiti uz Windows Media Center za gledanje lokalnih DVB-T digitalnih televizijskih programa na Vašem prijenosnom računalu.
Spajanje digitalne antene
1 Umetnite antenski kabel u RF utičnicu Vašeg računala.
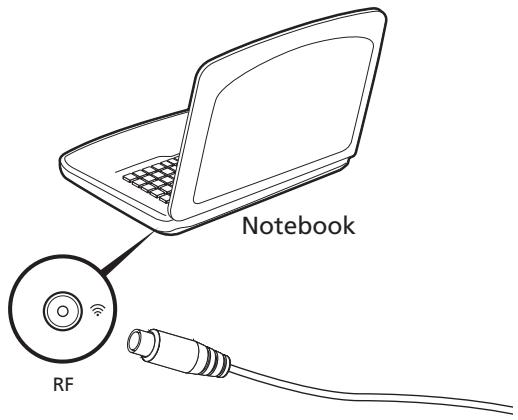

Napomena: Ne savijate i ne stavljajte u omču antenski kabel. Produljite kabel do 20cm za poboljšanje kvalitete signala.
Gledanje televizije uz pomoć vanjske antene ili utičnice za kabel
Kako bi gledali televiziju na Vašem računalu možete koristiti uobičajene televizijske kablove (povezane s vanjskom antenom ili utičnicom za kabel).
Spajanje antenskih kablova
Kako bi spojili kablove morate:
1 Umetnuti antenski konektor u RF utičnicu Vašeg računala.
2 Na drugi kraj spojite televizijski kabel, koristeći kablovski pretvornik ako je to potrebno.
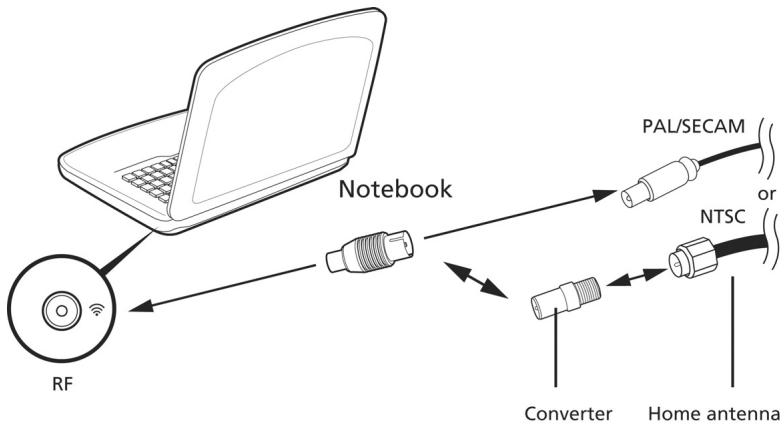
flowchart
graph TD
    A["RF"] --> B["Notebook"]
    B --> C["Converter"]
    B --> D["Home antenna"]
    C --> E["PAL/SECAM or NTSC"]

Odaberite potvrdni okvir Dozvoli Bluetooth uređajima pronalazak ovog računala, kliknite na Primijeni, a zatim na U redu.

Kliknite na uređaj koji želite dodati.


Napomena: Neki uređaji koji koriste starije inačice Bluetooth tehnologije zahtijevaju unos PIN-a na oba uređaja. U slučaju da jedan od uređaja nema nikakvih mogućnosti za unos (primjerice slušalice), lozinka je upisana na kućište uređaja (obično "0000" ili "1234"). Pogledajte korisnički priručnik uređaja.
International Travelers jamstvo (ITW)
Vaše računalo je pod International Travelers jamstvom (ITW) koje vam daje sigurnost i spokoj kada putujete. Naša mreža servisnih centara diljem svijeta je tu da vam pruži pomoć.

Napomena: Bežični Mini PCI adapter primjenjuje funkciju višestrukog odašiljanja. Ova funkcija ne emitira radiofrekvencije istovremeno iz obje antene. Jedna od antena je automatski ili ručno (od strane korisnika) odabrana kako bi se osigurala dobra kvaliteta radiokomunikacije.
2 Ovaj uređaj je ograničen na upotrebu u zatvorenom prostoru zbog njegovog rada u frekvencijskom rasponu od 5,15 do 5,25 GHz. FCC zathijeva da ovaj proizvod bude korišten u zatvorenom prostoru zbog frekvencijskog opsega od 5,15 do 5,25 GHz da bi se smanjile potencijalne štetne interferencije za mobilne satelitske sustave koji rade na istom kanalu.
3 Radarima visoke snage dodijeljena je osnovna uporaba frekvencijskih pojasa od 5.25 do 5.35 GHz i od 5.65 do 5.85 GHz. Ove radarske stanice mogu izazvati interferenciju i/ili oštetiti ovaj uređaj.
LCD panel ergonomic specifications
| Design viewing distance | 500 mm |
| Design inclination angle | 0.0° |
| Design azimuth angle | 90.0° |
| Viewing direction range class | Class IV |
| Screen tilt angle | 85.0° |
| Design screen illuminance | Illuminance level:[250 + (250cosα)] lx where α = 85°Color: Source D65 |
| Reflection class of LCD panel(positive and negative polarity) | Ordinary LCD: Class IProtective LCD: Class III |
| Image polarity | Both |
| Reference white:Pre-setting of luminance and color temperature @ 6500K(tested under BM7) | Ynu'nv'n |
| Pixel fault class | Class II |
Computer portabil Aspire
Manual de utilizare
www.acer-group.com/public/Sustainability

ENERGY STAR

ENERGY STAR
Acer Backup Manager 19
Acer clear.fi 21
LCD panel ergonomic specifications 64
Zona de atingere
natural_image
Simple diagram of a computer monitor with two mouse handles, no text or symbols present
Lansați Acer Recovery Management:
Customized Restore (Retain User Data)


natural_image
User interface toolbar with playback, pause, and sound control icons (no text or symbols)

Ce dispositive sunt compatibile?


Depanare

LCD panel ergonomic specifications
| Design viewing distance | 500 mm |
| Design inclination angle | 0.0^ |
| Design azimuth angle | 90.0^ |
| Viewing direction range class | Class IV |
| Screen tilt angle | 85.0^ |
| Design screen illuminance | Illuminance level: [250 + (250)] lx where a = 85^ Color: Source D65 |
| Reflection class of LCD panel(positive and negative polarity) | Ordinary LCD: Class IProtective LCD: Class III |
| Image polarity | Both |
| Reference white:Pre-setting of luminance and color temperature @ 6500K (tested under BM7) | Ynu'nv'n |
| Pixel fault class | Class II |
Aspire ноутбук
Acer Backup Manager 19
Acer clear.fi 21
LCD panel ergonomic specifications 64
Тъчпад
natural_image
Simple diagram with two computer mouse icons pointing to a rectangular block (no text or symbols)
Customized Restore (Retain User Data)


natural_image
User interface control panel with playback, pause, and audio playback controls (no text or symbols)


LCD panel ergonomic specifications
| Design viewing distance | 500 mm |
| Design inclination angle | 0.0^ |
| Design azimuth angle | 90.0^ |
| Viewing direction range class | Class IV |
| Screen tilt angle | 85.0^ |
| Design screen illuminance | Illuminance level: [250 + (250)] lx where = 85^ Color: Source D65 |
| Reflection class of LCD panel(positive and negative polarity) | Ordinary LCD: Class IProtective LCD: Class III |
| Image polarity | Both |
| Reference white:Pre-setting of luminance and color temperature @ 6500K (tested under BM7) | Ynu'nv'n |
| Pixel fault class | Class II |
Aspire sülearvuti
Kasutusjuhend
www.acer-group.com/public/Sustainability

ENERGY STAR

ENERGY STAR
Acer Backup Manager 18
Acer clear.fi 20
High-Definition Multimedia Interface
natural_image
Simple diagram with two computer mouse icons pointing to a rectangular block (no text or symbols)
- Klöpsake käsul Loo tehasesätetega varukoopia. Avaneb aken Taastedraiv.
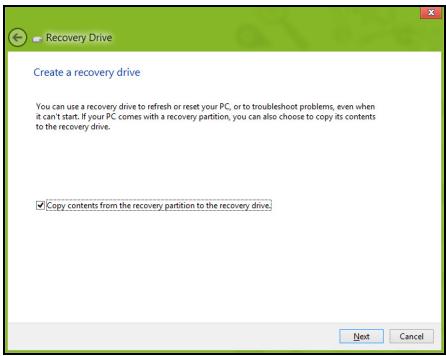
2. Klöpsake käsul Loo draiverite ja rakenduste varukoopia.

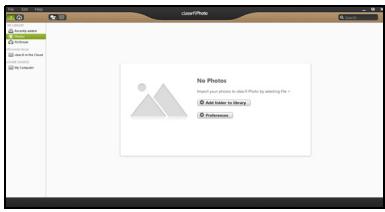

natural_image
User interface toolbar with playback, pause, and sound control icons (no text or symbols)


Consumer Infrared (CIR, laiatarbe infrapuna) (ainult teatud mudelitel)

Klöpsake seadmel, mida soovite lisada.


LCD panel ergonomic specifications
| Design viewing distance | 500 mm |
| Design inclination angle | 0.0^ |
| Design azimuth angle | 90.0^ |
| Viewing direction range class | Class IV |
| Screen tilt angle | 85.0^ |
| Design screen illuminance | Illuminance level: [250 + (250)] lx where a = 85^ Color: Source D65 |
| Reflection class of LCD panel(positive and negative polarity) | Ordinary LCD: Class IProtective LCD: Class III |
| Image polarity | Both |
| Reference white:Pre-setting of luminance and color temperature @ 6500K (tested under BM7) | Ynu'nv'n |
| Pixel fault class | Class II |
Aspire piezīmjdators
1. KLASES LÃZERA PRODUKTS
BRĪDINĀJUMS ATVEROT RODAS NEREDZAMA LĀZERA RADIĀCIJA. IZVAIRIETIES NO PAKŁAUŠANAS IEDARBĪBAI.
APPAREIL A LASER DE CLASSE 1 PRODUIT
LASERATTENTION: RADIATION DU FAISCEAU LASER INVISIBLE EN CAS D'OUVERTURE. EVITTER TOUTE EXPOSITION AUX RAYONS.
LUOKAN 1 LASERLAITE LASER KLASSE 1
Acer Backup Manager 19
Acer clear.fi 21
LCD panel ergonomic specifications 62
Skārienpanelis
natural_image
Simple diagram of two computer mouse icons connected by a line, no text or symbols present
Sākt Acer Recovery Management:
Customized Restore (Retain User Data)


natural_image
User interface toolbar with playback, pause, and sound control icons (no text or symbols)


IEEE 1394 ports (tikai noteiktiem modeliem)

Darbbu logs auj jums atskaot mziku un audio no jsu ierces caur datoru, nostt failus uz jsu ierci un maint Bluetooth iestatjumus.
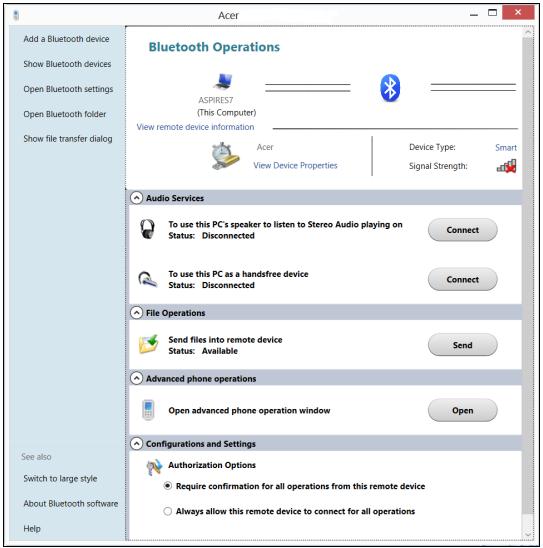
Problēmu novēršana

LCD panel ergonomic specifications
| Design viewing distance | 500 mm |
| Design inclination angle | 0.0^ |
| Design azimuth angle | 90.0^ |
| Viewing direction range class | Class IV |
| Screen tilt angle | 85.0^ |
| Design screen illuminance | Illuminance level: [250 + (250)] lx where = 85^ Color: Source D65 |
| Reflection class of LCD panel(positive and negative polarity) | Ordinary LCD: Class IProtective LCD: Class III |
| Image polarity | Both |
| Reference white:Pre-setting of luminance and color temperature @ 6500K (tested under BM7) | Ynu'nv'n |
| Pixel fault class | Class II |
www.acer-group.com/public/Sustainability
ENERGY STAR

ENERGY STAR
High-Definition Multimedia Interface
(„High-Definition“ multimedia sąsaja)
International Travelers Warranty (ITW) garantija 54
Prieš skambinant 54
LCD panel ergonomic specifications 64
natural_image
Simple diagram of a computer monitor with two mouse handles, no text or symbols present
- Spustelékite Perdiegti tvarkykles arba programas.
Paleiskite Acer Recovery Management:
Customized Restore (Retain User Data)

2. Atidaromas langasKompiuterio atnaujinimas.
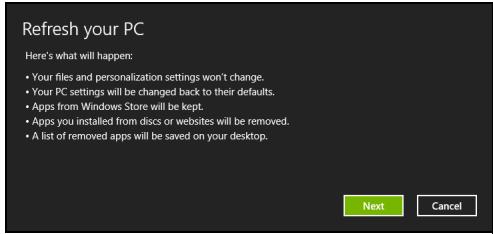
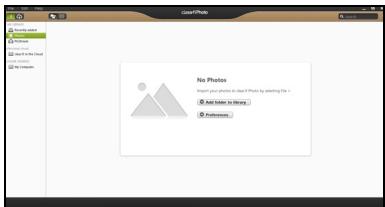

natural_image
User interface toolbar with playback, pause, and sound control icons (no text or symbols)


Consumer Infrared (CIR) (tik tam tikruose modeliuose)


Gedimų diagnostika
International Travelers Warranty (ITW) garantija

LCD panel ergonomic specifications
| Design viewing distance | 500 mm |
| Design inclination angle | 0.0^ |
| Design azimuth angle | 90.0^ |
| Viewing direction range class | Class IV |
| Screen tilt angle | 85.0^ |
| Design screen illuminance | Illuminance level: [250 + (250)] lx where = 85^ Color: Source D65 |
| Reflection class of LCD panel(positive and negative polarity) | Ordinary LCD: Class IProtective LCD: Class III |
| Image polarity | Both |
| Reference white:Pre-setting of luminance and color temperature @ 6500K(tested under BM7) | Ynu'nv'n |
| Pixel fault class | Class II |
Acer Backup Manager 21
Acer clear.fi 23
(International Travelers Warranty; ITW) 55
LCD panel ergonomic specifications 66
Επιφάνεια Αφής
natural_image
Simple diagram of a computer monitor with two mouse handles, no text or symbols present


natural_image
User interface toolbar with playback, pause, and sound control icons (no text or symbols)


LCD panel ergonomic specifications
| Design viewing distance | 500 mm |
| Design inclination angle | 0.0^ |
| Design azimuth angle | 90.0^ |
| Viewing direction range class | Class IV |
| Screen tilt angle | 85.0^ |
| Design screen illuminance | Illuminance level:[250 + (250cosa)] lx where a = 85^ Color: Source D65 |
| Reflection class of LCD panel(positive and negative polarity) | Ordinary LCD: Class IProtective LCD: Class III |
| Image polarity | Both |
| Reference white:Pre-setting of luminance and color temperature @ 6500K (tested under BM7) | Ynu'nv'n |
| Pixel fault class | Class II |
Aspire Notebook
Kullanım Kılavuzu
www.acer-group.com/public/Sustainability

ENERGY STAR

Acer Backup Manager 19
Acer clear.fi 21
Exposure of humans to RF fields (RSS-102) 60
LCD panel ergonomic specifications 60
Dokunmatik yüzey
natural_image
Simple diagram of a computer monitor with two mouse icons pointing to it (no text or symbols)
Customized Restore (Retain User Data)


natural_image
User interface toolbar with playback, pause, and sound control icons (no text or symbols)


Sorun giderme

The notebook PC series employs low gain integral antennas that do not emit RF field in excess of Health Canada limits for the general population; consult Safety Code 6, obtainable from Health Canada's website at www.hc-sc.gc.ca/rpb.
LCD panel ergonomic specifications
| Design viewing distance | 500 mm |
| Design inclination angle | 0.0° |
| Design azimuth angle | 90.0° |
| Viewing direction range class | Class IV |
| Screen tilt angle | 85.0° |
| Design screen illuminance | Illuminance level:[250 + (250cosα)] lx where α = 85°Color: Source D65 |
| Reflection class of LCD panel(positive and negative polarity) | Ordinary LCD: Class IProtective LCD: Class III |
| Image polarity | Both |
| Reference white:Pre-setting of luminance and color temperature @ 6500K (tested under BM7) | Ynu'nv'n |
| Pixel fault class | Class II |
Aspire 노트북
사용 설명서
안전 및 편의 정보
안전 지침
ITW (International Travelers Warranty) 50
전화하기 전에 50
LCD panel ergonomic specifications 60
터치패드
natural_image
Simple diagram of two computer mouse icons pointing to a rectangular block (no text or symbols)

참조용 이미지.
- PC 새로 고침 창이 열립니다.
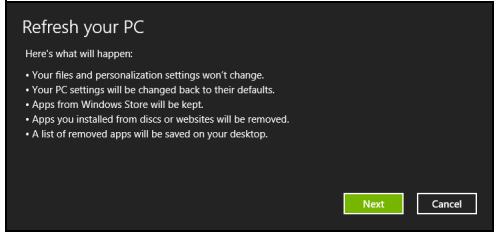
참조용 이미지.
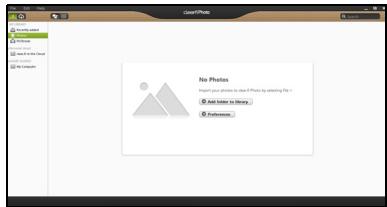

natural_image
User interface toolbar with playback, pause, and sound control icons (no text or symbols)

어떤 장치가 호환됩니다까?
- 변경 내용 저장을 선택합니다.
배터리 팩


추가할 장치를 클릭합니다.
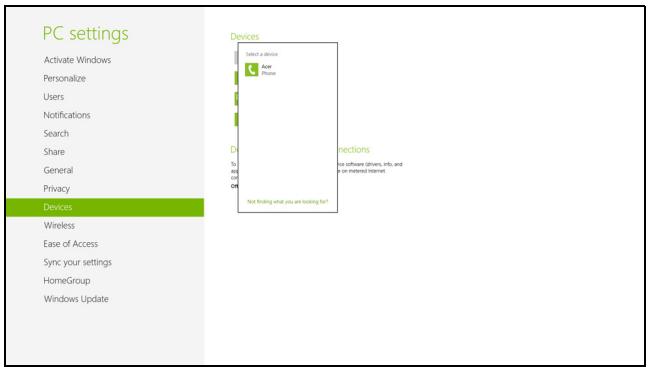

문제 해결
ITW (International Travelers Warranty)

LCD panel ergonomic specifications
| Design viewing distance | 500 mm |
| Design inclination angle | 0.0^ |
| Design azimuth angle | 90.0^ |
| Viewing direction range class | Class IV |
| Screen tilt angle | 85.0^ |
| Design screen illuminance | Illuminance level: [250 + (250)] lx where = 85^ Color: Source D65 |
| Reflection class of LCD panel(positive and negative polarity) | Ordinary LCD: Class IProtective LCD: Class III |
| Image polarity | Both |
| Reference white:Pre-setting of luminance and color temperature @ 6500K (tested under BM7) | Ynu'nv'n |
| Pixel fault class | Class II |
Aspire 筆記型電腦
使用手册
產品型號:
產品序號:____
購買日期:
購買地點:
安全與舒適性的相關資訊
重要安全指示
CLASS 1 LASER PRODUCT
CAUTION: INVISIBLE LASER RADIATION WHEN OPEN. AVOID EXPOSURE TO BEAM.
APPAREIL A LASER DE CLASSE 1 PRODUIT
LASERATTENTION: RADIATION DU FAISCEAU LASER INVISIBLE EN CAS D'OUVERTURE.EVITTER TOUTE EXPOSITION AUX RAYONS.
LUOKAN 1 LASERLAITE LASER KLASSE 1
www.acer-group.com/public/Sustainability

ENERGY STAR (能源之星)

ENERGY STAR
LCD panel ergonomic specifications 56
觸控板
natural_image
Simple diagram of two computer mouse icons pointing to a dark rectangular shape (no text or symbols)
- 拔出 USB 磁碟機並將其清楚標示。

- 按一下建立驅動程式和應用程式備份。
- 按一下重新安裝驅動程式或應用程式。

影像僅供參考。
2. 重新整理電腦視窗會開啓。
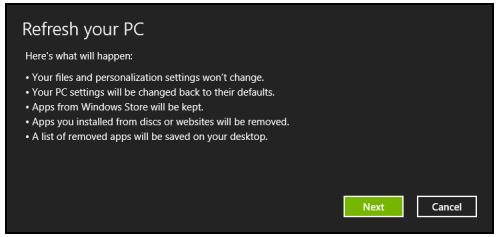
影像僅供參考。
Welcome to Acer Backup Manager
Select one action below to start managing your data.
Back Up My Files
Pick and choose which files to back up or let the program find it all for you.
Image My Drive
Make a complete image backup of your drive.
Migrate My Files
Transfer your files from another computer to this computer.
Clear out / Restore Files
Remove seldom used files to free up space or restore files from your backup.

Launch My Backup Profiles
Back Up My Files
The file backup helps you create a complete backup of your documentation. Choose the file or folder for the backup and then select the destination for the backup. Once you have selected the destination, the final step is to schedule the backup. Click on the Backup My Files button to create a backup.

flowchart
graph LR
    A["File / Folder"] --> B["USB"]
    B --> C["Storage / DVD"]
    C --> D["Calendar / Calendar"]
    D --> E["Clock"]
□ Directly enter "My Backup Profiles" next time
acer
您可在此處編輯或刪除現有的備份設定檔。
Acer clear.fi

注意:只適用特定型號。
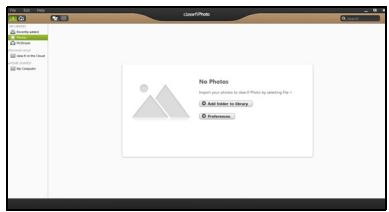

natural_image
User interface control bar with playback, pause, and sound waves (no text or symbols)

有哪些相容的装置?
- 向下捲動並停用啟動快速開機。

- 選取儲存變更。
電池組

CIR 紅外線埠 (僅適用於特定機型)

在想要新增的裝置上按一下。


故障排除

LCD panel ergonomic specifications
| Design viewing distance | 500 mm |
| Design inclination angle | 0.0^ |
| Design azimuth angle | 90.0^ |
| Viewing direction range class | Class IV |
| Screen tilt angle | 85.0^ |
| Design screen illuminance | Illuminance level: [250 + (250)] lx where = 85^ Color: Source D65 |
| Reflection class of LCD panel(positive and negative polarity) | Ordinary LCD: Class IProtective LCD: Class III |
| Image polarity | Both |
| Reference white:Pre-setting of luminance and color temperature @ 6500K (tested under BM7) | Ynu'nv'n |
| Pixel fault class | Class II |
Aspire 笔记本电脑
用户手册
© 2012 保留所有权利
Aspire 笔记本电脑用户手册
本次修订:2013年1月
产品型号:____
产品序号:____
购买日期:____
购买地点:____
有关安全和舒适性的信息
重要安全须知
CLASS 1 LASER PRODUCT
CAUTION: INVISIBLE LASER RADIATION WHEN OPEN. AVOID EXPOSURE TO BEAM.
APPAREIL A LASER DE CLASSE 1 PRODUIT
LASERATTENTION: RADIATION DU FAISCEAU LASER INVISIBLE EN CAS D'OUVERTURE. EVITTER TOUTE EXPOSITION AUX RAYONS.
LUOKAN 1 LASERLAITE LASER KLASSE 1
LCD panel ergonomic specifications 53
触摸板
natural_image
Simple diagram of a computer monitor with two mouse icons pointing to its screen (no text or symbols)
- 从右侧向内滑动:切换超级按钮。
- 从顶部向内滑动:切换应用程序命令。
- 拔出 U 盘并明确标示。

- 单击创建驱动程序和应用程序备份。
- 单击重新安装驱动程序或应用程序。
启动 Acer Recovery Management:

图片仅供参考。
2. 刷新计算机窗口将打开。
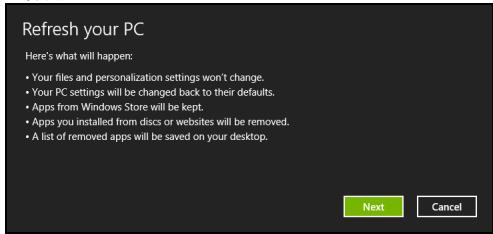
图片仅供参考。


natural_image
User interface control bar with playback, pause, and sound waves (no text or symbols)

哪些设备可兼容?
- 向下滚动并禁用打开快速启动。
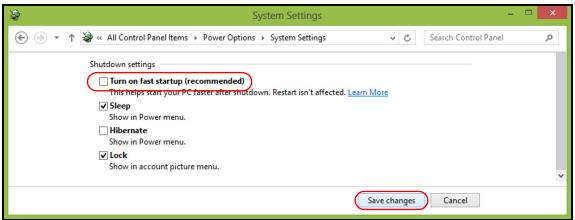
- 选择保存更改。
电池组

Consumer Infrared (CIR) (仅限部分型号)

单击要添加的设备。


疑难解答

LCD panel ergonomic specifications
| Design viewing distance | 500 mm |
| Design inclination angle | 0.0^ |
| Design azimuth angle | 90.0^ |
| Viewing direction range class | Class IV |
| Screen tilt angle | 85.0^ |
| Design screen illuminance | Illuminance level: [250 + (250)] lx where = 85^ Color: Source D65 |
| Reflection class of LCD panel(positive and negative polarity) | Ordinary LCD: Class IProtective LCD: Class III |
| Image polarity | Both |
| Reference white:Pre-setting of luminance and color temperature @ 6500K (tested under BM7) | Ynu'nv'n |
| Pixel fault class | Class II |
Notebook Aspire
Manual Pengguna
© 2012 Hak Cipta Dilindungi Undang-Undang.
Acer Backup Manager 18
Acer clear.fi 20
Consumer Infrared (CIR)
ITW (International Travelers Warranty) 51
Exposure of humans to RF fields (RSS-102) 62
LCD panel ergonomic specifications 62
Panel sentuh
natural_image
Simple diagram of a computer monitor with two mouse handles, no text or symbols present
Mulai Acer Recovery Management:
- Dari Mulai, ketik 'Pemulihan' lalu klik Acer Recovery Management di dalam daftar aplikasi.
Tersedia dua pilihan, Pulihkan Setelan Pabrik (Reset PC saya) atau Pemulihan Disesuaikan (Segarkan PC saya).
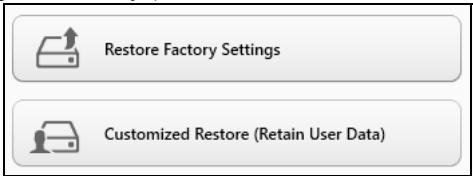


natural_image
User interface toolbar with playback, pause, and sound control icons (no text or symbols)


Consumer Infrared (CIR) (hanya untuk model-model tertentu)
Port IEEE 1394 (hanya untuk model-model tertentu)

Pilih kotak periksa Izinkan perangkat Bluetooth untuk menemukan komputer ini, klik Terapkan, lalu klik OK.


Mengatasi masalah
ITW (International Travelers Warranty)

The notebook PC series employs low gain integral antennas that do not emit RF field in excess of Health Canada limits for the general population; consult Safety Code 6, obtainable from Health Canada's website at www.hc-sc.gc.ca/rpb.
LCD panel ergonomic specifications
| Design viewing distance | 500 mm |
| Design inclination angle | 0.0° |
| Design azimuth angle | 90.0° |
| Viewing direction range class | Class IV |
| Screen tilt angle | 85.0° |
| Design screen illuminance | Illuminance level:[250 + (250cosα)] lx where α = 85°Color: Source D65 |
| Reflection class of LCD panel(positive and negative polarity) | Ordinary LCD: Class IProtective LCD: Class III |
| Image polarity | Both |
| Reference white:Pre-setting of luminance and color temperature @ 6500K (tested under BM7) | Ynu'nv'n |
| Pixel fault class | Class II |
CLASS 1 LASER PRODUCT
CAUTION: INVISIBLE LASER RADIATION WHEN OPEN. AVOID EXPOSURE TO BEAM.
APPAREIL A LASER DE CLASSE 1 PRODUIT
LASERATTENTION: RADIATION DU FAISCEAU LASER INVISIBLE EN CAS D'OUVERTURE. EVITTER TOUTE EXPOSITION AUX RAYONS.
LUOKAN 1 LASERLAITE LASER KLASSE 1
Acer Backup Manager 18
Acer clear.fi 20
LCD panel ergonomic specifications 64
ทัชแพ็ด
natural_image
Simple diagram of a computer mouse connected to a blank rectangular block (no text or symbols)
2. คลิก Create Drivers and Applications Backup
- หากคุณใช้แผ่น DVD
Customized Restore (Retain User Data)

Here's what will happen:
- Your files and personalization settings won't change.
- Your PC settings will be changed back to their defaults.
- Apps from Windows Store will be kept.
- Apps you installed from discs or websites will be removed.
• A list of removed apps will be saved on your desktop.
Next
Cancel
Welcome to Acer Backup Manager
Select one action below to start managing your data.
Back Up My Files
Pick and choose which files to back up or let the program find it all for you.
Image My Drive
Make a complete image backup of your drive.
Migrate My Files
Transfer your files from another computer to this computer.
Clear out / Restore Files
Remove seldom used files to free up space or restore files from your backup.

Launch My Backup Profiles
Back Up My Files
The file backup helps you create a complete backup of your documentation. Choose the file or folder for the backup and then select the destination for the backup. Once you have selected the destination, the final step is to schedule the backup. Click on the Backup My Files button to create a backup.
flowchart
graph LR
    A["File / Folder"] --> B["USB"]
    B --> C["Storage / USB"]
    C --> D["Calendar / Clock Icon"]
acer
☐ Directly enter "My Backup Profiles" next time

natural_image
User interface toolbar with playback, pause, and sound control icons (no text or symbols)


การแก้ไขปัญหา
forecasts can be obtained from the results of the results.

LCD panel ergonomic specifications
| Design viewing distance | 500 mm |
| Design inclination angle | 0.0^ |
| Design azimuth angle | 90.0^ |
| Viewing direction range class | Class IV |
| Screen tilt angle | 85.0^ |
| Design screen illuminance | Illuminance level: [250 + (250)] lx where = 85^ Color: Source D65 |
| Reflection class of LCD panel(positive and negative polarity) | Ordinary LCD: Class IProtective LCD: Class III |
| Image polarity | Both |
| Reference white:Pre-setting of luminance and color temperature @ 6500K (tested under BM7) | Ynu'nv'n |
| Pixel fault class | Class II |