
ISIO 3 - Gardening tool BOSCH - Free user manual and instructions
Find the device manual for free ISIO 3 BOSCH in PDF.

| Brand | BOSCH |
| Model | ISIO 3 |
| Product type | 2-in-1 cordless garden tool (grass shear and hedge shear) |
| Power source | Integrated 3.6 V, 1.3 Ah lithium-ion battery |
| Charging time | 3.5 hours |
| Battery life | Up to 50 min (grass shear), 35 min with wheel cart |
| Charger | Mains charger 100-240 V, 400 mA, weight 0.2 kg (EU) |
| Cutting width (grass) | 80 mm |
| Cutting length (hedges) | 115 mm |
| Cutting capacity (hedges) | Stems up to 8 mm thick |
| Weight | 0.5 kg (grass shear) to 1.2 kg (with wheel cart) |
| Main functions | Hedge cutting, grass cutting (edging), vertical mode (edging) |
| Safety | Safety lock, automatic shut-off in case of overload, blade stops within seconds |
| Anti-jamming technology | Microelectronics with automatic reverse rotation (up to 3 s) |
| Battery type | Li-Ion, with deep discharge protection (ECP) |
| Maintenance | Cleaning with soft brush, lubrication with Bosch spray, simple blade change (SDS) |
| Spare parts | Grass blade (2609002039), hedge blade (2609002040), wheel cart (2609002041) |
| Included accessories | Replacement blade (depending on version), charger, wheel cart (depending on version) |
| Warranty | Bosch after-sales service |
| Manufacturer | Robert Bosch GmbH, Power Tools Division, Germany |
Frequently Asked Questions - ISIO 3 BOSCH
User questions about ISIO 3 BOSCH
0 question about this device. Answer the ones you know or ask your own.
Ask a new question about this device
Download the instructions for your Gardening tool in PDF format for free! Find your manual ISIO 3 - BOSCH and take your electronic device back in hand. On this page are published all the documents necessary for the use of your device. ISIO 3 by BOSCH.
USER MANUAL ISIO 3 BOSCH
Power Tools Division
70745 Leinfelden-Echterdingen
Germany
www.bosch-garden.com
F 016 L70 632 (2010.07) O / 17 XXX

3 "165140"706322
Isio

BOSCH
en Original instructions

English. Page 6


Safety Notes
Explanation of symbols

Read all safety warnings and all instructions. Failure to follow the warnings and instructions may result in electric shock, fire and/or serious injury.

Wear eye protection and stout shoes at all times while operating the machine.

Pay attention that bystanders are not injured through foreign objects thrown from the machine.
Keep bystanders a safe distance away from the machine.

Do not use the machine in the rain or leave it outdoors when it is raining.
Warning! The cutting means continues to move after the motor is switched off.

Only use the battery charger indoors.
General Power Tool SafetyWarnings
WARNING
Read all safety warnings and all instructions. Failure to follow
the warnings and instructions may result in electric shock, fire and/or serious injury.
Save all warnings and instructions for future reference.
The term "power tool" in the warnings refers to your mains-operated (corded) power tool or battery-operated (cordless) power tool.
1) Work area safety
a) Keep work area clean and well lit. Cluttered or dark areas invite accidents.
b) Do not operate power tools in explosive atmospheres, such as in the presence of flammable liquids, gases or dust. Power tools create sparks which may ignite the dust or fumes.
c) Keep children and bystanders away while operating a power tool. Distractions can cause you to lose control.
2) Electrical safety
a) Power tool plugs must match the outlet. Never modify the plug in any way. Do not use any adapter plugs with earthed (grounded) power tools. Unmodified plugs and matching outlets will reduce risk of electric shock.
b) Avoid body contact with earthed or grounded surfaces, such as pipes, radiators, ranges and refrigerators. There is an increased risk of electric shock if your body is earthed or grounded.
c) Do not expose power tools to rain or wet conditions. Water entering a power tool will increase the risk of electric shock.
d) Do not abuse the cord. Never use the cord for carrying, pulling or unplugging the power tool. Keep cord away from heat, oil, sharp edges and moving parts. Damaged or entangled cords increase the risk of electric shock.
e) When operating a power tool outdoors, use an extension cord suitable for outdoor use. Use of a cord suitable for outdoor use reduces the risk of electric shock.
f) If operating a power tool in a damp location is unavoidable, use a residual current device (RCD) protected supply. Use of an RCD reduces the risk of electric shock.
3) Personal safety
a) Stay alert, watch what you are doing and use common sense when operating a power tool. Do not use a power tool while you are tired or under the influence of drugs, alcohol or medication. A moment of inattention while operating power tools may result in serious personal injury.
b) Use personal protective equipment. Always wear eye protection. Protective equipment such as dust mask, non-skid safety shoes, hard hat, or hearing protection used for appropriate conditions will reduce personal injuries.
c) Prevent unintentional starting. Ensure the switch is in the off-position before connecting to power source and/or battery pack, picking up or carrying the tool. Carrying power tools with your finger on the switch or energising power tools that have the switch on invites accidents.
d) Remove any adjusting key or wrench before turning the power tool on. A wrench or a key left attached to a rotating part of the power tool may result in personal injury.
e) Do not overreach. Keep proper footing and balance at all times. This enables better control of the power tool in unexpected situations.
f) Dress properly. Do not wear loose clothing or jewellery. Keep your hair, clothing and gloves away from moving parts. Loose clothes, jewellery or long hair can be caught in moving parts.
g) If devices are provided for the connection of dust extraction and collection facilities, ensure these are connected and properly used. Use of dust collection can reduce dust-related hazards.
4) Power tool use and care
a) Do not force the power tool. Use the correct power tool for your application. The correct power tool will do the job better and safer at the rate for which it was designed.
b) Do not use the power tool if the switch does not turn it on and off. Any power tool that cannot be controlled with the switch is dangerous and must be repaired.
c) Disconnect the plug from the power source and/or the battery pack from the power tool before making any adjustments, changing accessories, or storing power tools. Such preventive safety measures reduce the risk of starting the power tool accidentally.
d) Store idle power tools out of the reach of children and do not allow persons unfamiliar with the power tool or these instructions to operate the power tool.
Power tools are dangerous in the hands of untrained users.
e) Maintain power tools. Check for misalignment or binding of moving parts, breakage of parts and any other condition that may affect the power tool's operation. If damaged, have the power tool repaired before use. Many accidents are caused by poorly maintained power tools.
f) Keep cutting tools sharp and clean. Properly maintained cutting tools with sharp cutting edges are less likely to bind and are easier to control.
g) Use the power tool, accessories and tool bits etc. in accordance with these instructions, taking into account the working conditions and the work to be performed. Use of the power tool for operations different from those intended could result in a hazardous situation.
5) Battery tool use and care
a) Recharge only with the charger specified by the manufacturer. A charger that is suitable for one type of battery pack may create a risk of fire when used with another battery pack.
b) Use power tools only with specifically designated battery packs. Use of any other battery packs may create a risk of injury and fire.
c) When battery pack is not in use, keep it away from other metal objects, like paper clips, coins, keys, nails, screws or other small metal objects, that can make a connection from one terminal to another. Shorting the battery terminals together may cause burns or a fire.
d) Under abusive conditions, liquid may be ejected from the battery; avoid contact. If contact accidentally occurs, flush with water. If liquid contacts eyes, additionally seek medical help. Liquid ejected from the battery may cause irritation or burns.
6) Service
a) Have your power tool serviced by a qualified repair person using only identical replacement parts. This will ensure that the safety of the power tool is maintained.
Hedge trimmer safety warnings
- Keep all parts of the body away from the cutter blade. Do not remove cut material nor hold material to be cut when blades are moving. Make sure the switch is off when clearing jammed material. A moment of inattention while operating the hedge trimmer may result in serious personal injury.
- Carry the hedge trimmer by the handle with the cutter blade stopped. When transporting or storing the hedge trimmer always fit the cutting device cover. Proper handling of the hedge trimmer will reduce possible personal injury from the cutter blades.
Hold power tool by insulated gripping surfaces only, because the cutter blade may contact hidden wiring. Cutting blades contacting a "live" wire may make exposed metal parts of the power tool "live" and could give the operator an electric shock. - Keep cable away from cutting area. During operation the cable may be hidden in shrubs and can be accidentally cut by the blade.
SafetyWarnings for Shrub/Grass Shears
- This tool is not intended for use by persons (including children) with reduced physical, sensory or mental capabilities, or lack of experience and knowledge, unless they have been given supervision or instruction concerning use of the appliance by a person responsible for their safety. Children should be supervised to ensure that they do not play with the appliance.
- Never allow children or people unfamiliar with these instructions to use the machine. Local regulations may restrict the age of the operator. When not in use store the machine out of reach of children.
The operator or user is responsible for accidents or hazards occurring to other people or their property. - Never operate the machine while people, especially children or pets, are nearby.
- Keep supply flexible cord away from cutting means.
- Wear eye protection and stout shoes at all times while operating the machine.
Avoid trimming in bad weather conditions especially when there is a risk of lightening. - Use the machine only in daylight or good artificial light.
- Check if guards and protective devices are undamaged and properly mounted. Before using, carry out possibly necessary maintenance and repairs.
- Switch on the motor only when the hands and feet are away from the cutting means.
Always disconnect the machine from the power supply (i.e. remove the plug from the mains or remove the disabling device):
whenever you leave the machine,
- before clearing a blockage,
- before checking, cleaning or working on the machine,
- after striking a foreign object. Inspect the machine for damage and make repairs as necessary,
- if the machine starts to vibrate abnormally (check immediately).
Take care against injury to feet and hands from the cutting means.
Before any work on the machine (e. g. maintenance, changing the tool, etc.) as well as during its transport and storage, lock the On/Off switch in the off position. There is danger of injury when the On/Off switch is unintentionally actuated.

Protect the power tool against heat, e. g., against continuous intense sunlight, fire, water, and moisture. Danger of explosion.
Do not open the battery. Danger of short-circuiting.
- Do not short-circuit the battery. There is danger of explosion.
In case of damage and improper use of the battery, vapours may be emitted. Provide for fresh air and seek medical help in case of complaints. The vapours can irritate the respiratory system.
- When the battery is defective, liquid can escape and come into contact with adjacent components. Check any parts concerned. Clean such parts or replace them, if required.
SafetyWarnings forbattery chargers

Keep the battery charger away from rain or moisture. Penetration of water in the battery charger increases the risk of an electric shock.
- Only charge Bosch lithium ion batteries or batteries installed in Bosch products with the voltages listed in the technical data. Otherwise there is danger of fire and explosion.
- Recharge only with the charger specified by the manufacturer. A charger that is suitable for one type of battery pack may create a risk of fire when used with another battery pack.
- Do not charge other batteries. The battery charger is suitable only for charging Bosch lithium ion batteries within the listed voltage range. Otherwise there is danger of fire and explosion.
-
Do not charge non-rechargeable batteries. There is a danger of explosion.
-
Keep the battery charger clean. Contamination can lead to danger of an electric shock.
- Before each use, check the battery charger. If damage is detected, battery charger should be changed to new one. Never open the battery charger yourself. Have repairs performed only by a qualified technician and only using original spare parts. Damaged battery chargers, cables and plugs increase the risk of an electric shock.
- Do not operate the battery charger on easily inflammable surfaces (e. g., paper, textiles, etc.) or surroundings. The heating of the battery charger during the charging process can pose a fire hazard.
Children should be supervised to ensure that they do not play with the battery charger.
Children or persons with mental or physical limitations may only use the charger under supervision or after having been instructed. A thorough introduction reduces operating errors and injuries.
Functional Description

Read all safety warnings and all instructions. Failure to follow the warnings and instructions may result in electric shock, fire and/or serious injury.
Intended Use
The garden product is intended for light trimming of shrubs and lawn edges in domestic use.
Delivery Scope
Carefully remove the garden product from its packaging and check if the following parts are complete:
- Shrub shear or grass shear
- Blade guard (fitted)
- Battery Charger
-
Pole cart (only with "grass shear & pole cart" set)
-
Grass shear blade (only with "shrub/grass shear" set)
- Operating instructions
When parts are missing or damaged, please contact your dealer.
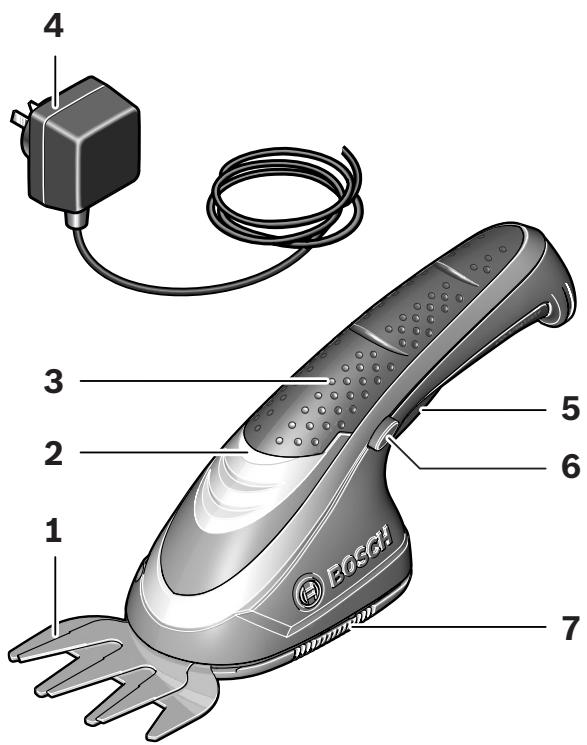
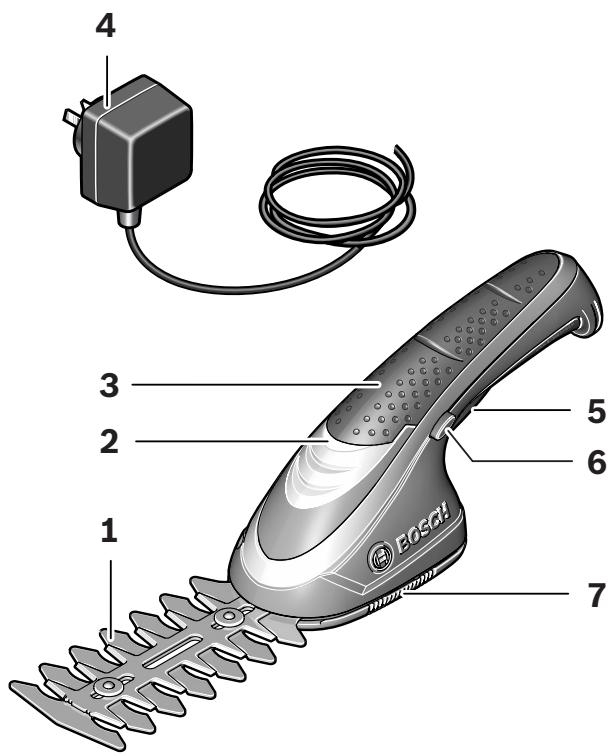
Product Features
The numbering of the garden product features refers to the illustration of the garden product on the graphics page.
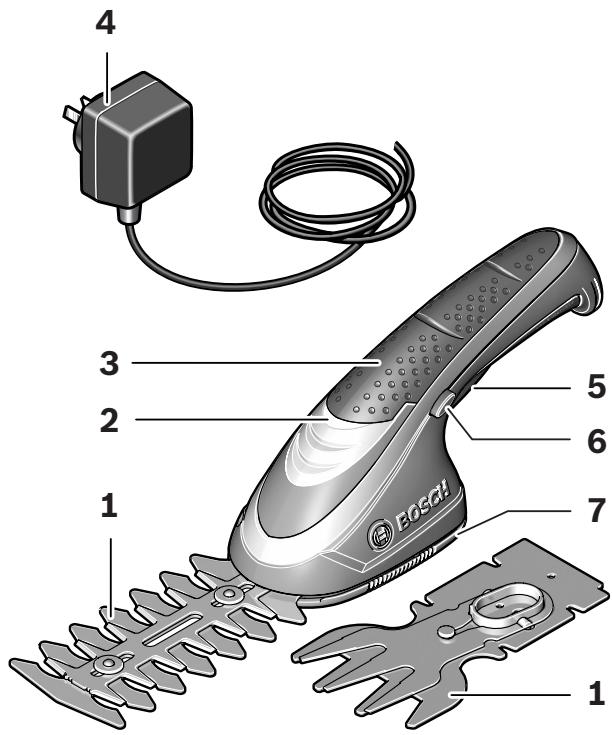
1 Blade
2 Battery charge-control indicator
3 Handle
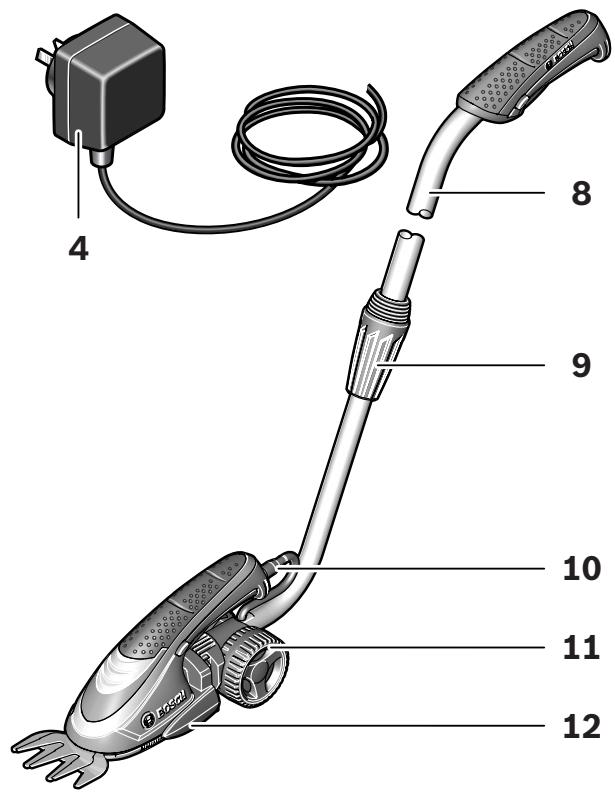
4 Battery charger
5 On/Off switch
6 Lock-off button for On/Off switch
7 SDS drive cover
8 Telescopic pipe
9 Adjusting collar
10 Handle connector
11 Wheels
12 Wheel cart
13 Socket for charge plug
14 Plug connector for charger
15 SDS drive cover release button
Accessories shown or described are not part of the standard delivery scope of the product. A complete overview of accessories can be found in our accessories program.
Technical Data
| Isio | Grass Shear | Shrub Shear | Grass Shear with Pole Cart | Shrub/Grass Shear Set | |
| Article number | 3 600 H33 002 | 3 600 H33 003 | 3 600 H33 002 | 3 600 H33 002 | |
| Grass shear blade | ● | - | ● | ● | |
| Blade width | mm | 80 | - | 80 | 80 |
| Shrub shear blade | - | ● | - | ● | |
| Blade length | mm | - | 115 | - | 115 |
| Pole cart | - | - | ● | - | |
| Weight according to EPTA-Procedure 01/2003 | kg | 0.5 | 0.6 | 1.2 | 0.6 |
| Battery | Li-lon | Li-lon | Li-lon | Li-lon | |
| Rated voltage | V= | 3.6 | 3.6 | 3.6 | 3.6 |
| Capacity | Ah | 1.3 | 1.3 | 1.3 | 1.3 |
| Charging period (battery discharged) | h | 3.5 | 3.5 | 3.5 | 3.5 |
| Number of battery cells | 1 | 1 | 1 | 1 | |
| Run time per battery charge (upto) | min | 50 | 50 | 35 | 50 |
Please observe the article number on the type plate of your garden product. The trade names of the individual garden products may vary.
| Isio | Grass Shear | Shrub Shear | Grass Shear with Pole Cart | Shrub/Grass Shear Set | |
| Battery Charger | |||||
| Article number | EU | 2 609 003 262 | 2 609 003 262 | 2 609 003 262 | 2 609 003 262 |
| EU | 2 609 003 263 | 2 609 003 263 | 2 609 003 263 | 2 609 003 263 | |
| UK | 2 609 003 264 | 2 609 003 264 | 2 609 003 264 | 2 609 003 264 | |
| UK | 2 609 003 265 | 2 609 003 265 | 2 609 003 265 | 2 609 003 265 | |
| Input voltage | V~ | 230 (EU) | 230 (EU) | 230 (EU) | 230 (EU) |
| V~ | 220-230 (EU) | 220-230 (EU) | 220-230 (EU) | 220-230 (EU) | |
| V~ | 230 (UK) | 230 (UK) | 230 (UK) | 230 (UK) | |
| V~ | 230 (UK) | 230 (UK) | 230 (UK) | 230 (UK) | |
| Charging current | mA | 400 | 400 | 400 | 400 |
| Allowable charging temperature range | °C | 0-45 | 0-45 | 0-45 | 0-45 |
| Weight according to EPTA-Procedure 01/2003 | kg | 0.2 (EU) | 0.2 (EU) | 0.2 (EU) | 0.2 (EU) |
| kg | 0.071 (EU) | 0.071 (EU) | 0.071 (EU) | 0.071 (EU) | |
| kg | 0.25 (UK) | 0.25 (UK) | 0.25 (UK) | 0.25 (UK) | |
| kg | 0.078 (UK) | 0.078 (UK) | 0.078 (UK) | 0.078 (UK) |
Please observe the article number on the type plate of your garden product. The trade names of the individual garden products may vary.
Noise/Vibration Information
Grass Shear
Measured sound values determined according to EN 60745.
Typically the A-weighted sound pressure level of the product is less than 70 dB(A).
Vibration total values (triax vector sum) determined according to EN 60335:
Vibration emission value a_h = 2.5 m/s^2 , Uncertainty K = 1.5 m/s^2 .
Shrub Shear
Measured sound values determined according to 2000/14/EC.
Typically the A-weighted noise levels of the product are: Sound pressure level 69 dB(A); sound power level 77 dB(A). Uncertainty K = 1.3 dB.
Vibration total values (triax vector sum) determined according to EN 60745:
Vibration emission value a_h = 2.5 m/s^2 , Uncertainty K = 1.5 m/s^2 .
The vibration emission level given in this information sheet has been measured in accordance with a standardised test given in EN 60745 and may be used to compare one tool with another. It may be used for a preliminary assessment of exposure.
The declared vibration emission level represents the main applications of the tool. However if the tool is used for different applications, with different accessories or poorly maintained, the vibration emission may differ. This may significantly increase the exposure level over the total working period.
An estimation of the level of exposure to vibration should also take into account the times when the tool is switched off or when it is running but not actually doing the job. This may significantly reduce the exposure level over the total working period.
Identify additional safety measures to protect the operator from the effects of vibration such as: maintain the tool and the accessories, keep the hands warm, organisation of work patterns.
Declaration of Conformity C
Grass Shear
We declare under our sole responsibility that the product described under "Technical data" is in conformity with the following standards or standardization documents: EN 60335 (battery powered product) and EN 60335 (battery charger) according to the provisions of the directives 2006/95/EC, 2004/108/EC, 2006/42/EC.
Shrub Shear
We declare under our sole responsibility that the product described under "Technical Data" is in conformity with the following standards or standardization documents: EN 60745 (battery powered product) and EN 60335 (battery charger) according to the provisions of the directives 2006/95/EC, 2004/108/EC, 2006/42/EC, 2000/14/EC.
2000/14/EC: Guaranteed sound power level 79 dB(A). Conformity assessment procedure according to Annex V.
Equipment category: 25
Technical file at:
Bosch Lawn and Garden Ltd., PT-LG/EAE, Stowmarket, Suffolk IP14 1EY, England
C 07
Dr. Egbert Schneider Senior Vice President Engineering
Dr. Eckerhard Ströttgen
Head of Product
Certification
paa. i.v. nuo7gcu
Robert Bosch GmbH, Power Tools Division
D-70745 Leinfelden-Echterdingen
22.07.2010
Assembly
For Your Safety
Warning! Switch off before adjusting or cleaning. The blades continue to move for a few seconds after the garden product is switched off.
Caution! Do not touch the moving blades.
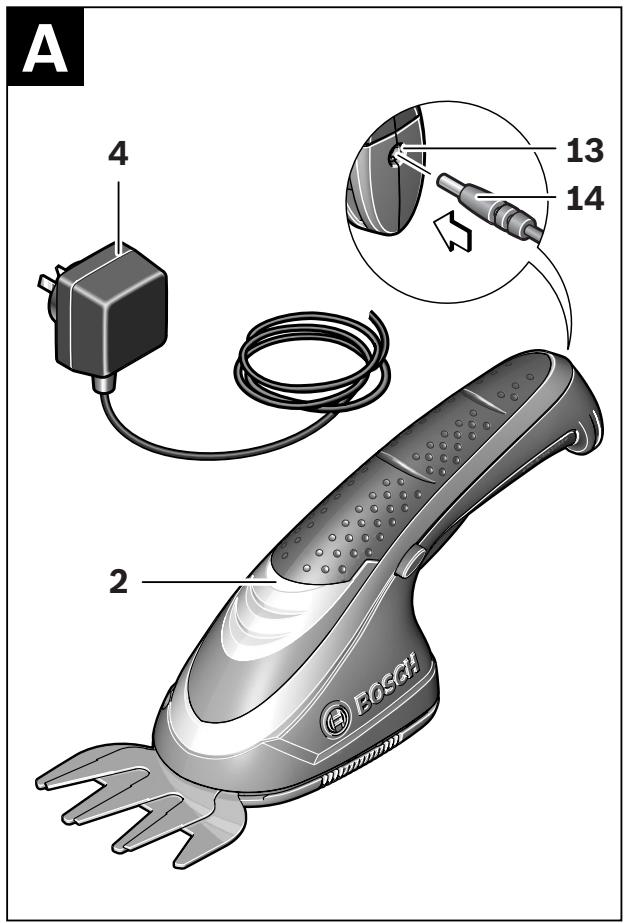
Battery Charging (see figure A)
- Do not use other battery chargers. The supplied battery charger is designed for the Lithium-lon battery in your garden product.
- Observe the mains voltage! The voltage of the power supply must correspond with the data given on the nameplate of the battery charger. Battery chargers marked with 230V can also be operated with 220V .
The voltage range of the charger is 100-240 V. Ensure that the plug matches the outlet.
Note: The battery is supplied partially charged. To ensure full capacity of the battery, completely charge the battery in the battery charger before using your power tool for the first time.
The lithium ion battery can be charged at any time without reducing its service life. Interrupting the charging procedure does not damage the battery.
The "Electronic Cell Protection (ECP)" protects the lithium ion battery against deep discharging. When the battery is run down or discharged, the garden product is shut off by means of a protective circuit: The blade no longer moves.
WARNING Do not continue to press the On/Off switch after the garden
product has been automatically switched off.
The battery can be damaged.
Plug the mains plug of the battery charger into a socket outlet and the charger plug 14 into the socket 13 on the rear side of the handle, in one way only.
The charging procedure starts as soon as the charger plug 14 of the battery charger is inserted into the socket 13.
The battery charge-control indicator 2 indicates the charging progress. During the charging process, the indicator flashes green. When the battery charge-control indicator 2 lights up green continuously, the battery is fully charged.
During the charging procedure, the handle of the garden product warms up. This is normal.
Disconnect the battery charger from the mains supply when not using it for longer periods.
The garden product cannot be used during the charge procedure; it is not defective when inoperative during the charging procedure.
Protect the battery charger against moisture!
Pole cart (accessory or supplied with "Grass Shear & Pole Cart")
The pole cart is designed only for use with the grass shear at ground level.
- Do not use the pole cart with the shrub shear or above ground level.
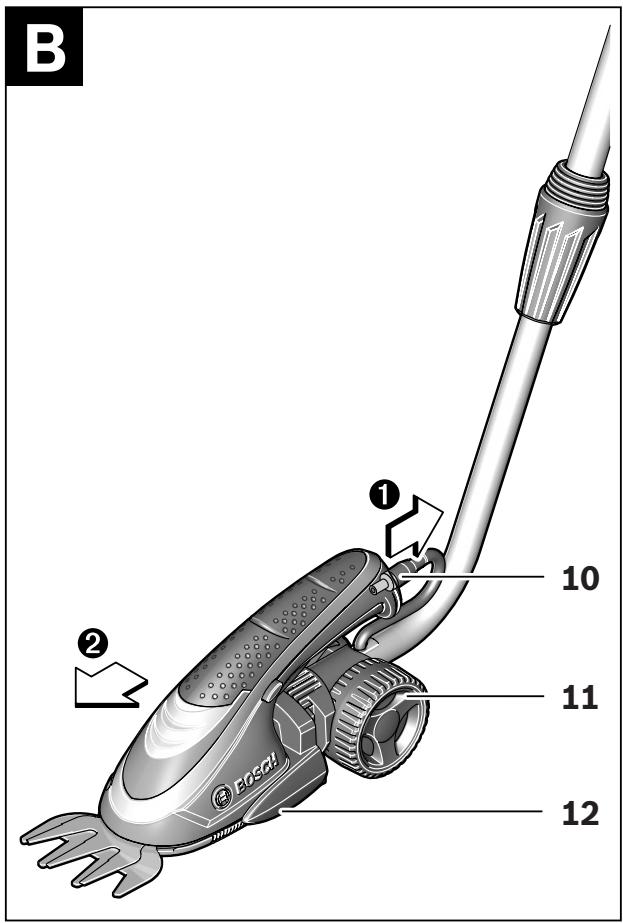
Removing Pole Cart (see figure B)
Unplug the handle connector 10.
To release the garden product from wheel cart 12, pull the garden product in the direction shown.
Fitting Pole Cart (grass shear only)
Align the grooves on the garden product with fixing on the wheel cart 12.
Plug in the handle connector 10.
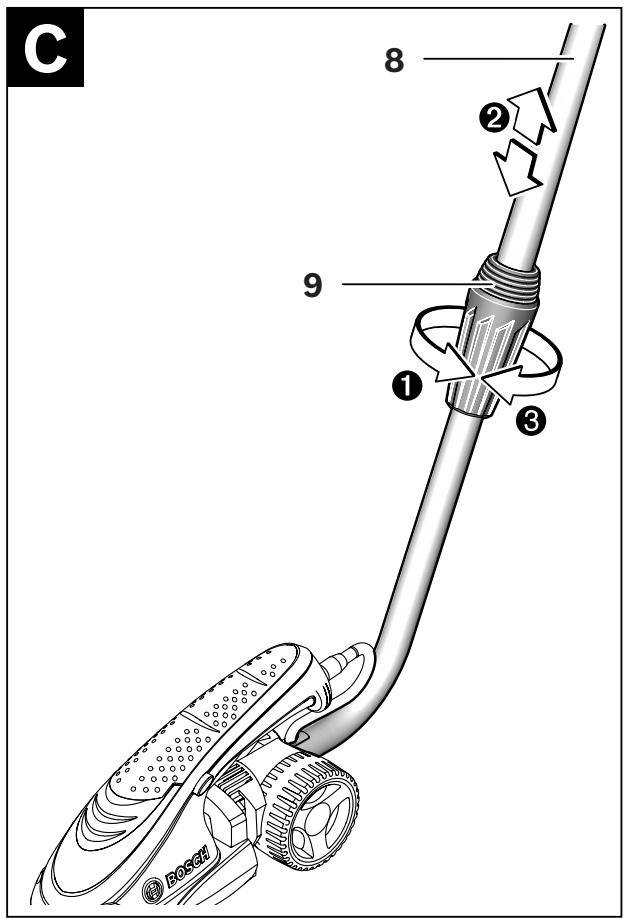
Adjusting Handle Length (see figure C)
1 Loosen the adjustment collar 9.
Pull the telescopic pipe 8 out to increase the height, or push it in to decrease the height.
3 Re-tighten adjustment collar 9.
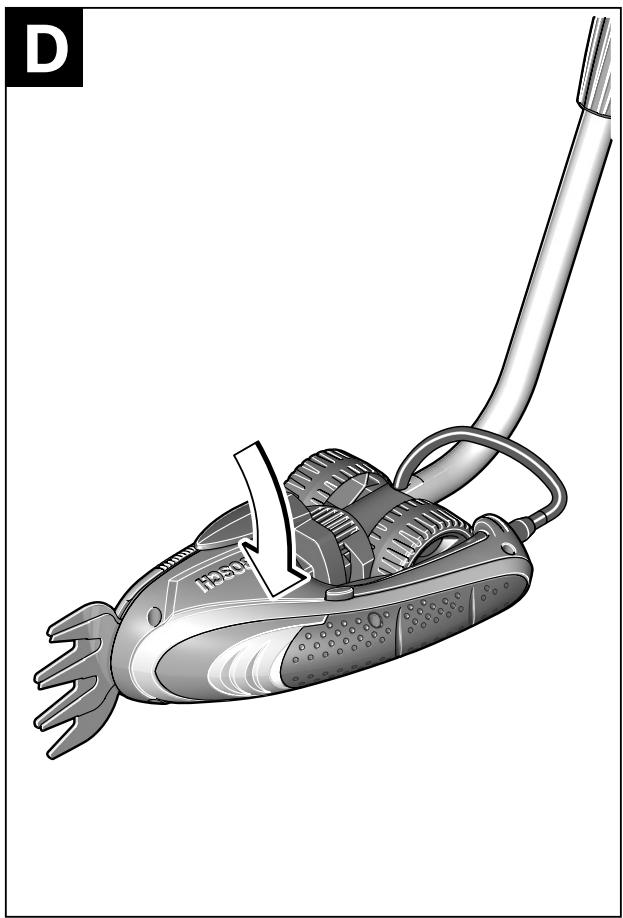
Adjusting for Edging Mode (see figure D)
Turn the garden product 90^ , in either direction to position the garden product in the vertical edging mode.
Operation
Initial Operation
Switching On
Press the lock-off button 6 and hold while actuating the On/Off switch 5.
Release the lock-off button 6 again.
Switching Off
Release the On/Off switch 5.
Battery Charge-control Indication
The battery charge-control indicator 2 indicates the charge condition of the battery for a few seconds when the On/Off switch 5 is pressed through halfway of fully.
| LED | Capacity |
| Continuous lighting, green | ≥35% |
| Flashing light, green | 15 – 35% |
| Flashing light, red | 5 – 15% |
| Continuous lighting, red | ≤5% |
Working Advice
Hold the garden product away from yourself. Stand in a secure and stable position.
For more tips on cutting please refer to website www.bosch-garden.com.
Anti Blocking
The garden product has a patented feature which works as follows:
If the blade stalls on a tough material, the load of the motor increases. The intelligent microelectronics senses this overload condition and repeatedly reverses the motor, in order to prevent stalling and to cut the material through.
This audible reversing cut action continues for up to 3 s.
After cutting through, the garden product continues in its normal mode, or in case the overload condition continues the blades automatically stop in the open position (e. g. in case a piece of metal fence accidentally blocks the garden product).
Cutting Hedges (shrub shear only)
Before cutting check the hedge for foreign objects e. g. wire fences.
Cut stems up to 8 mm in thickness. When cutting, move steadily along the line of cut, so that stems are fed directly into the cutter blades. The double edge of the cutting blade enables cutting to either direction, or with a side to side motion.
After use replace the blade transport guard.
Recommended times
- Cut hedges with deciduous leaves in June and October.
- Cut evergreen hedges in April and August.
- Cut conifer and other fast growing shrubs approx. every six weeks from May onwards.
Edging (grass shear only) (see figure D)
Guide the garden product along the edge of the lawn. Do not allow the blade to contact paved surfaces, stones or garden walls, since this will wear the blade rapidly.
For larger lawn it is advisable to use the pole cart (available as an accessory or supplier with "grass shear & pole cart" set).
After use replace the blade transport guard.
Maintenance and Service
Maintenance and Cleaning
Warning! Switch off before adjusting or cleaning. The blades continue to move for a few seconds after the garden product is switched off.
Caution! Do not touch the moving blades.
For safe and proper working, always keep the garden product clean.
Always wear protective gloves when using, adjusting or cleaning the garden product.
Note: To ensure long and reliable service, carry out the following maintenance regularly.
Regularly check for obvious defects such as loose fixings, and worn or damaged components.
Check if guards and protective devices are undamaged and properly mounted. Before using, carry out possibly necessary maintenance and repairs.
If the garden product should happen to fail despite the care taken in manufacture and testing, repair should be carried out by an authorised customer service agent for Bosch garden products.
In all correspondence and spare parts orders, please always include the 10-digit article number given on the type plate of the garden product.
Blade Maintenance
Always clean the cutting blades after operation and lubricate with Bosch Maintenance spray. During longer cutting jobs, we recommend periodically lubricating the cutting blade with Bosch Maintenance spray.
Visually check the condition of the cutting edges of the cutting blade.
Ensure that the cutting blade is covered with the blade guard supplied when not in use.
Changing the Blade (see figures E-J)
Warning! Switch off before adjusting or cleaning. The blades continue to move for a few seconds after the garden product is switched off.
Caution! Do not touch the moving blades.
Always wear protective gloves when using, adjusting or cleaning the garden product.
- Do not do the blade change without blade covers.
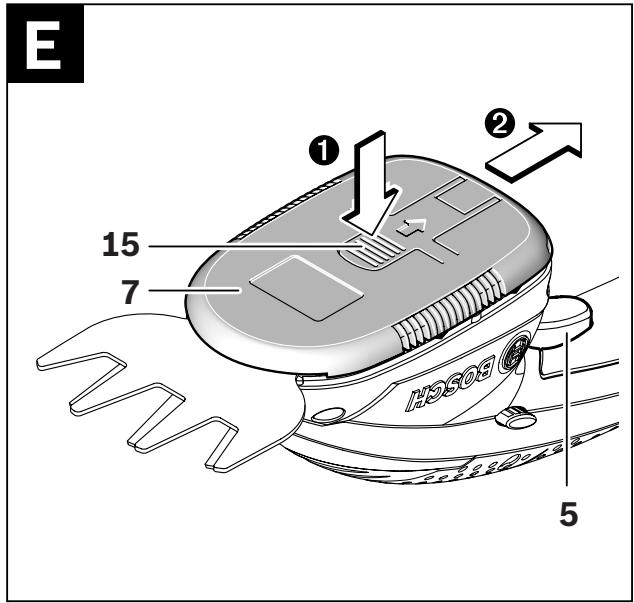
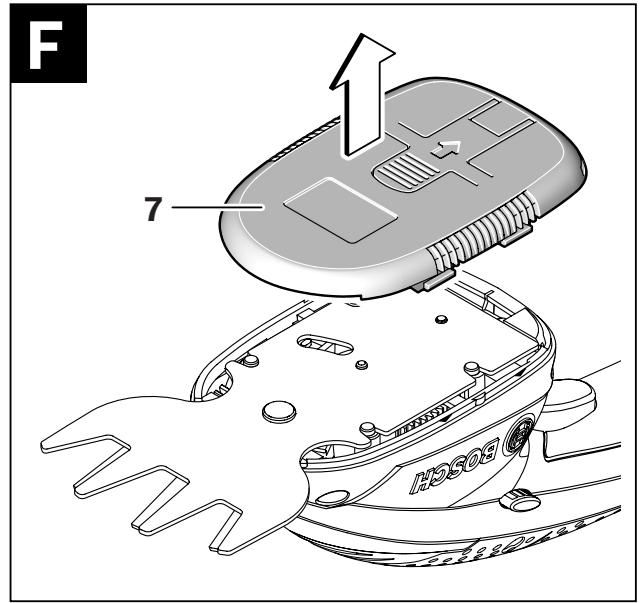
Blade Removal (see figures E-G)
Push the SDS drive cover release button 15 and slide the SDS drive cover 7 towards the On/Off switch 5. Lift away from the housing.
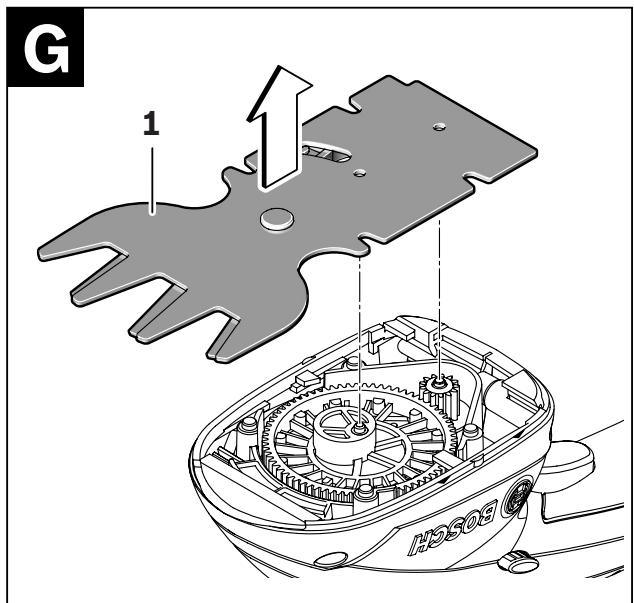
G Lift the blade 1 out.
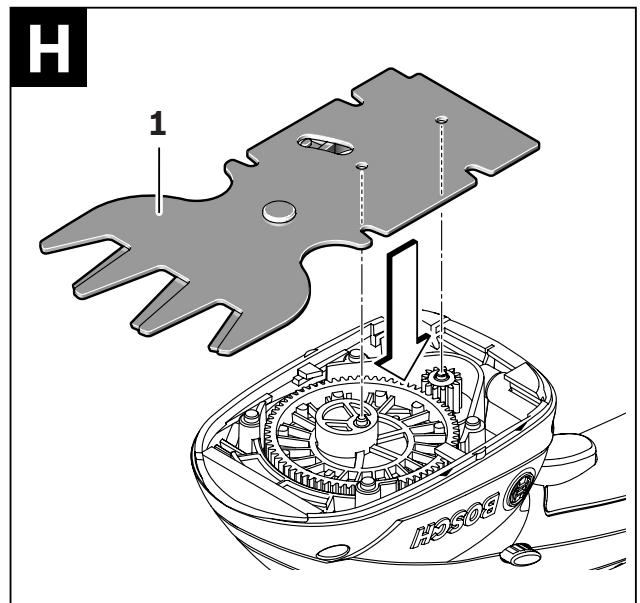
Blade Fitting (see figures H-J)
Fit the blade 1 as shown aligning the holes in the blade onto the drive pins and locate the blade 1 under the retaining rib in the rear corner of the housing.
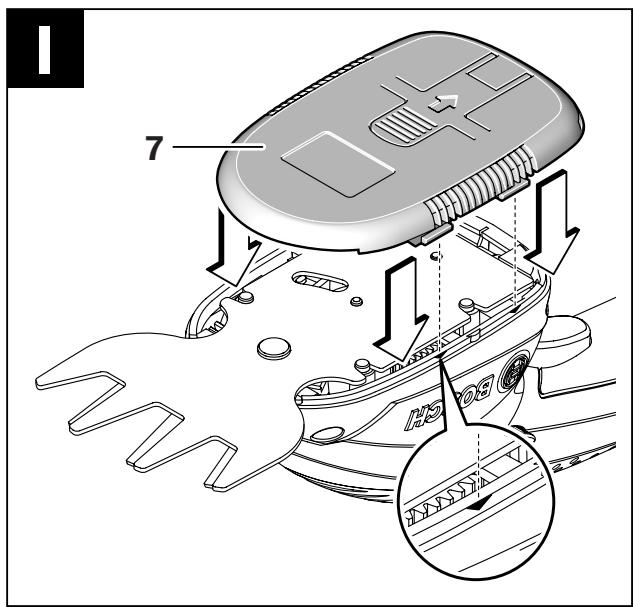
When refitting the SDS drive cover 7 ensure all 4 location legs are inside the housing prior to sliding cover into place.
J Slide the SDS drive cover 7 back towards the blade 1 to secure.
After Use/Storage
Warning! Switch off before adjusting or cleaning. The blades continue to move for a few seconds after the garden product is switched off.
Caution! Do not touch the moving blades.
Always wear protective gloves when using, adjusting or cleaning the garden product.
Clean the exterior of the garden product thoroughly using a soft brush and cloth. Do not use water, solvents or polishes. Remove all debris.
Ensure that the cutting blade is covered with the blade guard supplied when not in use.
Store the garden product in a secure, dry place out of the reach of children. Do not place other objects on top of the garden product.
Accessories
Grass shear blade 2609002039
Shrub shear blade 2609002040
Pole cart 2609002041
Lubricant spray, 250 ml. 1609 200 399
After-sales Service and Customer Assistance
Our after-sales service responds to your questions concerning maintenance and repair of your product as well as spare parts. Exploded views and information on spare parts can also be found under:
www.bosch-garden.com
Our customer service representatives can answer your questions concerning possible applications and adjustment of products and accessories.
Great Britain
Robert Bosch Ltd. (B.S.C.)
P.O.Box 98
Broadwater Park
North Orbital Road
Denham
Uxbridge
UB 95HJ
Tel. Service: +44 (0844) 736 0109
Fax: +44 (0844) 736 0146
E-Mail: boschservicecentre@bosch.com
Ireland
Origo Ltd.
Unit 23 Magna Drive
Magna Business Park
City West
Dublin 24
Tel. Service: +353 (01) 4666700
Fax: +353 (01) 466 68 88
Australia, New Zealand and Pacific Islands
Robert Bosch Australia Pty. Ltd.
Power Tools
Locked Bag 66
Clayton South VIC 3169
Customer Contact Center
Inside Australia:
Phone: +61 (01300) 307 044
Fax: +61 (01300) 307 045
Inside New Zealand:
Phone: +64 (0800) 543 353
Fax: +64 (0800) 428 570
Outside AU and NZ:
Phone: +61 (03) 9541 5555
www.bosch.com.au
Republic of South Africa
Customer service
Hotline: +27 (011) 6519600
Gauteng - BSC Service Centre
35 Roper Street, New Centre
Johannesburg
Tel.: +27 (011) 4939375
Fax: +27 (011) 493 01 26
E-Mail: bsctools@icon.co.za
KZN - BSC Service Centre
Unit E, Almar Centre
143 Crompton Street
Pinetown
Tel.: +27 (031) 7 01 21 20
Fax: +27 (031) 7 01 24 46
E-Mail: bsc.dur@za.bosch.com
Western Cape - BSC Service Centre
Democracy Way, Prosperity Park
Milnerton
Tel.: +27 (021) 5512577
Fax: +27 (021) 5513223
E-Mail: bsc@zsd.co.za
Bosch Headquarters
Midrand, Gauteng
Tel.: +27 (011) 6519600
Fax: +27 (011) 6519880
E-Mail: rbsa-hq.pts@za.bosch.com
Disposal
The garden product, accessories and packaging should be sorted for environmental-friendly recycling.
Do not dispose of garden products, battery chargers and batteries/rechargeable batteries into household waste!
Only for EC countries:
According to the European Guideline 2002/96/EC, electrical and electronic equipments that are no longer usable, and according to the European Guideline
2006/66/EC, defective or used
battery packs/batteries, must be collected separately and disposed of in an environmentally correct manner.
Batteries no longer suitable for use can be directly returned at:
Great Britain
Robert Bosch Ltd. (B.S.C.)
P.O.Box 98
Broadwater Park
North Orbital Road
Denham
Uxbridge
UB 95HJ
Tel. Service: +44 (0844) 736 0109
Fax: +44 (0844) 736 0146
E-Mail: boschservicecentre@bosch.com
- Integrated batteries may only be removed for disposal. Opening the housing shell can damage or destroy the garden product.
When removing the battery from the garden product, actuate the On/Off switch 5 until the battery is completely discharged. Unscrew the screw in the casing and take off the casing shell. Disconnect the connections on the battery and remove the battery.
Subject to change without notice.