
IDLCD1910HD - Television BUSH - Free user manual and instructions
Find the device manual for free IDLCD1910HD BUSH in PDF.


| Product Type | Television |
| Brand | Bush |
| Model | IDLCD1910HD |
| Screen Size (Diagonal) | 19 inches (48 cm) |
| Resolution | 1366 x 768 pixels (HD Ready) |
| Display Type | LCD |
| Aspect Ratio | 16:9 |
| Brightness | 250 cd/m² (typical) |
| Contrast Ratio | 1000:1 (typical) |
| Viewing Angle | 178° horizontal / 178° vertical |
| Video Inputs | 1 x HDMI, 1 x VGA (D-Sub), 1 x Composite (AV), 1 x SCART |
| Audio Inputs | 1 x PC Audio (3.5mm), 1 x RCA (L/R) for AV |
| Audio Output | 1 x Headphone (3.5mm) |
| Built-in Speakers | 2 x 3W |
| Power Supply | AC 100-240V, 50/60Hz |
| Power Consumption | Typical: 35W, Standby: <0.5W |
| Dimensions (with stand) | 45.0 x 33.5 x 8.5 cm (17.7 x 13.2 x 3.3 in) |
| Weight (with stand) | 3.5 kg (7.7 lbs) |
| VESA Mount | 75 x 75 mm |
| Remote Control | IR Remote (included) |
| Teletext | Yes, up to 100 pages |
| Sleep Timer | Off / 10/20/30/60/90/120/180 min |
| Child Lock | Yes |
| Cleaning Instructions | Turn off and unplug; wipe with a soft, dry cloth; do not use chemicals. |
| Safety Note | Do not place near heat sources; ensure ventilation slots are not blocked. |
Frequently Asked Questions - IDLCD1910HD BUSH
User questions about IDLCD1910HD BUSH
0 question about this device. Answer the ones you know or ask your own.
Ask a new question about this device
Download the instructions for your Television in PDF format for free! Find your manual IDLCD1910HD - BUSH and take your electronic device back in hand. On this page are published all the documents necessary for the use of your device. IDLCD1910HD by BUSH.
USER MANUAL IDLCD1910HD BUSH
natural_image
Black-and-white photo of a 4000 television displaying a snowy mountain landscape with evergreen trees (no text or symbols visible)IDLCD1910HD
The Gold Technical Support Line: 1902 215 259
Personal Product Support
(Charges will apply at \$2.95 per minute)
Thank you for buying this Bush product, which is designed to give you many years of trouble-free service.
You may already be familiar with using a similar unit, but please take time to read these instructions. They are designed to familiarise you with the unit's many features and to ensure you get the very best from your purchase.
Safety is important
Your safety and the safety of others is important. Therefore, please ensure you read the Safety Instructions before you operate this unit.
Warranty
In the unlikely event that your product fails to work normally, please call the below Bush warranty number to discuss the problem with one of our qualified service engineers.
Australia
Bush Warranty: 1800 509 394
New Zealand
Bush Warranty: 0800 450 259
- INTRODUCTION....1
- SAFETY INSTRUCTIONS....3
- INSTALLATION....3
ACCESSORIES....4
FRONT PANEL....4
KEY BOARD 5
REAR PANEL....5
ANTENNA CONNECTION....6
CONNECTING TO PC....7
PC PRESET....8
CONNECTING TO AV EQUIPMENTS....9
4. REMOTE CONTROL....10
BATTERY INSTALLATION....10
KEYS FUNCTION....11
5. OPERATION....12
BASIC OPERATION....12
TELETEXT....13
MENU OPERATION....14-18
6. TROUBLESHOOTINGS....19
7. TECHNICAL SPECIFICATION.... 20
8. WARRANTY....21
- Do not use this apparatus near water.
- Clean only with dry cloth.
- Do not block any ventilation openings. Install in accordance with the manufacturers instructions.
- Do not install near any heat sources such as radiators, heat registers, stoves, or other apparatus (including amplifiers) that produce heat.
- Protect the power cord from being walked on or pinched particularly at plugs convenience receptacles, and the point where they exit from the apparatus.
- Only use attachments/accessories specified by the manufacturer.
- Unplug this apparatus during lightning storms or when unused for long periods of time.
- Refer all servicing to a qualified service personnel. Servicing is required when the apparatus has been damaged in any way, such as power-supply cord or plug is damaged, liquid has been spilled or objects have fallen into apparatus, the apparatus has been exposed to rain or moisture, does not operate normally, or has been dropped.
- The apparatus should not be exposed to dripping or splashing and no objects filled with liquids, such as vases, should be placed on the apparatus.
- If the television is to be built into a compartment or similar enclosed, the minimum distances must be maintained. Heat build-up can reduce the service life of your television, and can also be dangerous.
ADDITIONAL SAFETY NOTES
Never tamper with any components inside the TV, or any other adjustment controls not mentioned in this manual.
All LCD-TVs are high voltage instruments. When you clean up dust or water drops on the LCD PANEL or CABINET, the power cord should be pulled out from the receptacle, then wipe the TV with a dry soft cloth.
During thunder and lighting, unplug the power cord and antenna cord to prevent damage to your TV.
All repairs to this TV should only be performed by qualified TV service personnel.
INSTALLATION NOTES
This TV can be connected to AC 100-240 Volts, 50/60HZ power supply. Never connect to a DC supply or any other power supply.
Locate the TV in the room where light does not strike the screen. Total darkness or a reflection on the picture screen can cause eyestrain. Soft and indirect lighting is recommended for comfortable viewing.
Allow enough space between the TV and the wall to permit ventilation.
Avoid excessively warm locations to prevent possible damage to the cabinet or premature component failure.
Do not cover the ventilation openings when using the TV.
ACCESSORIES
Infrared Remote Control.....1
User's Manual 1
Battery(AAA).... 2
FRONT PANEL
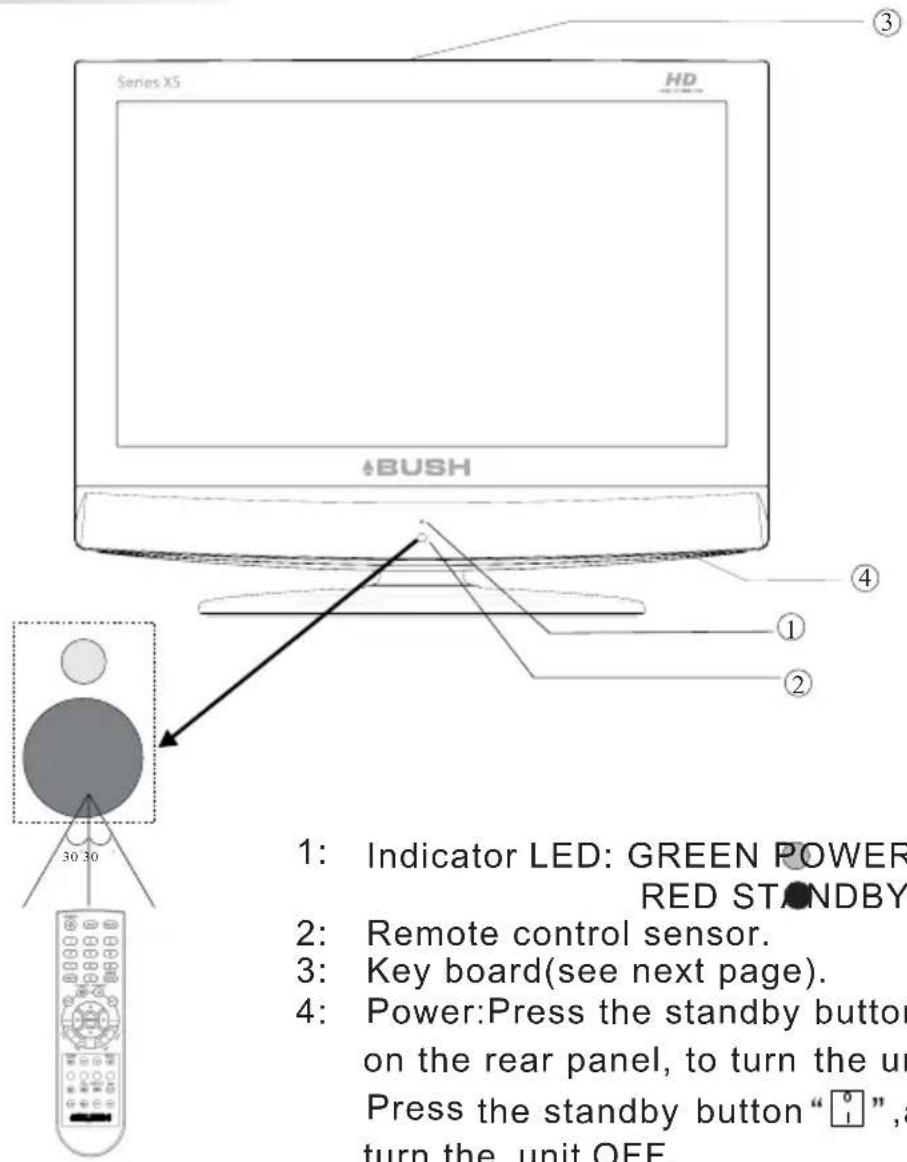
1: Indicator LED: GREEN POWER ON.
RED STONDBY.
2: Remote control sensor.
3: Key board(see next page).
4: Power:Press the standby button “☐” on the rear panel, to turn the unit on. Press the standby button “☐”, again to turn the unit OFF.
KEY BOARD

-
INPUT Press to display the Input Source Menu.
-
MENU Press to display the Main Menu.
-
VOL+/VOL- Press to adjust the sound level. In Menu mode, press VOL+/VOL- buttons to select the desired menu
-
CH+/CH- In TV mode, press the CH+/CH- buttons to change the channel up and down. In MENU mode, to select the menu items.
-
⏻ Standby button turns the TV on & off.
REAR PANEL

- ANTENNA INPUT
- HEADPHONE JACK
-
VGA-AUDIO INPUT
-
VIDEO AND YPbPr AUDIO INPUT
- AV INPUT
-
S-VIDEO INPUT
-
YPbPr INPUT
- VGA INPUT
- HDMI INPUT
ANTENNACONNECTION

Note:
AerialconnectionsIECfemale: ( ) .
Inputimpendanceunbalanced: 75.
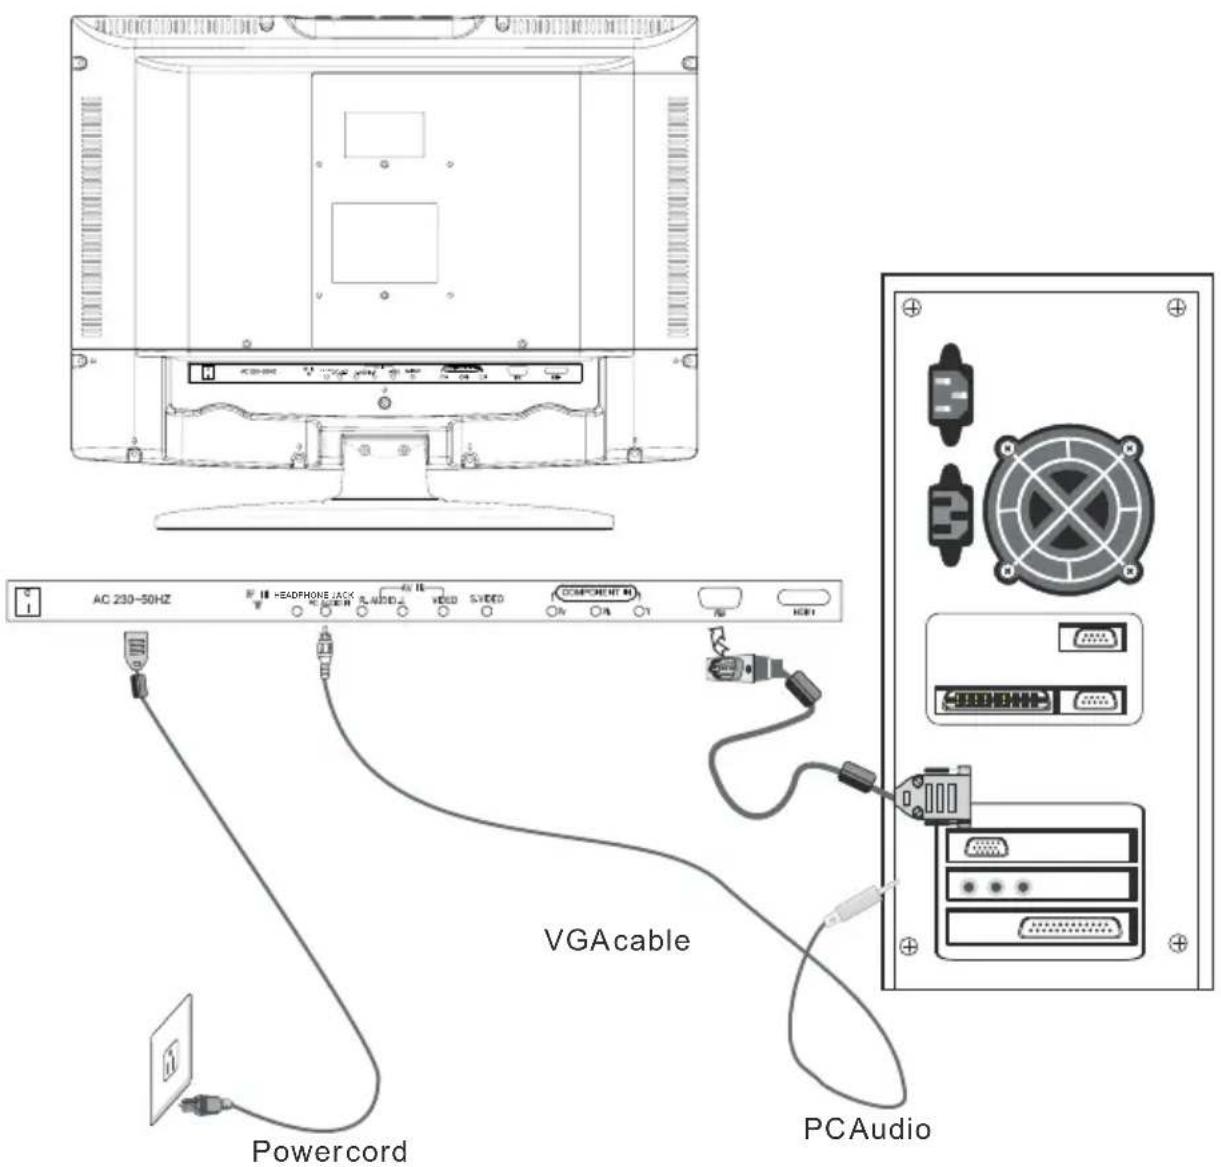
CONNECTINGTOPC
STEPS:
BesureboththeTVandcomputeraresettoPoweroff.
- . ConnectVGAandaudiocable
- . Connectthepowercord
- . . PowerontheTVswitchtheinputsourcetoVGAmode PoweronthePC.
Thissequence is very important.
PC PRESET
PRESET MODE(recommended resolution is 1024*768@60Hz)
| RESOLUTION | V.Freq.(Hz) H.Freq.(KHz) | ||
| 1 | 720*400 | 70 | 31.47 |
| 2 | 640*480 | 60 | 31.47 |
| 3 | 800*600 | 56 | 35.156 |
| 4 | 800*600 | 60 | 37.88 |
| 5 | 800*600 | 75 | 46.88 |
| 6 | 800*600 | 72 | 48.08 |
| 7 | 1024*768 | 60 | 48.36 |
| 8 | 1024*768 | 70 | 56.48 |
| 9 | 1024*768 | 75 | 60.02 |
CONNECTING TO AV EQUIPMENTS
This TV provides three groups of AV, two groups of YPbPr for convenient connection to VCR, DVD or other video equipment, and an HDMI for HD signal input.
You can use the input terminals on TV set rear as follows.

It can be connected to the following appliances: VCR, multi disc player, DVD, camcorder, video game or stereo system as well as a number of other electronic items.
YPbPr can support these video fomats:480i,576i,480p,576p,720p,1080i,1080p.
BATTERY INSTALLATION
- Remove the battery cover.
- Inserting the 2 AAA 1.5V batteries making sure the polarity (+ or -) of the batteries matches the polarity marks inside the unit.
- Mount the battery cover.
Replace with new batteries when the TV set begins to show the following symptoms: Operation is unsteady or erratic. Sometimes the TV set does not function with Remote Control Unit.

natural_image
Black cylindrical object with a white cross symbol on its surface (no text or symbols visible)
natural_image
Close-up of a black remote control switch with internal components and a curved handle (no text or symbols visible)Remark:
1) Alkaline Battery Recommended.
2) Remove batteries when they are exhausted or if the remote control is not to be used for an extended period of time.
KEYS FUNCTION

9 【MENU】:Press the Menu button to turn on the menu.
10【EXIT】: Press the Exit button to exit the menu.
11 [↑]/[↓]/[←]/[→]: Use the Arrow buttons to navigate the menu.
12【ENTER】:Press the Enter button to select and confirm your desired options.
13 【VOL+/-】: Press the Volume button to adjust the volume level up or down.
14【CH+/-】:Press the Channel button to adjust the channel up or down.
15【ZOOM】:Press the ZOOM button to select different screen sizes and to change size of the Teletext.
16【RECALL】: Press the Recall button to return to the previous program.
17 EPG: Press the EPG (Electronic Program Guide) button to turn on or off the guide in DTV mode.
18 LIST: Press the List button to view the channel list.
19 Green button: Press the Green button to access the edit option at the lower part of the screen.
20 Blue button: Press the Blue button to access the edit option at the lower part of the screen.
21 Red button: Press the Red button to access the edit option at the lower part of the screen.
22 Yellow button: Press the Yellow button to access the edit option at the lower part of the screen.
23 : Press the Teletext button to view the Teletext menu.
24 RADIO: Press the Radio button to turn the Radio on or off.
25 ☐ : Press the Still button to hold the Teletext page on display to prevent the page from changing.
26【SUBTITLE】: Press the Subtitle button to enter into the subtitle mode or subpage.
27【SLEEP】: Press the Sleep button to set sleep timer on or off.
28【FAV+】/【FAV-】:Press the FAV buttons to select the favourite channels in ascending or descending order.
29 i:Press the Index button to view the index page.
30【E/W】:Press the E/W button to switch between Eastern Europe and Western Europe languages in the teletext menu.
1【↓】: Turns Power On or Off.
2【MUTE】: Turns Sound On or Off.
3【INFO】: Turns Program information menu On or Off.
4【0-9】Number buttons: These buttons are used to select a channel number or to enter your code to unlock your password
5【INPUT】: Press the Input button to select signal source.
6 AUDIO 【∞I/Ⅱ】: This button can be used to switch between Audio options & Audio languages in DTV mode.
7【P. MODE ⚙️ : Press the P.Mode button to select the Picture mode.
8【S.MODE】: Press the S.Mode button to select the Sound mode.
BASIC OPERATION
TURN ON /OFF THE UNIT
- Connect the TV unit to the power source using the power cord.
- Turn on the main power switch.
- When the power indicator is red, the TV is in Standby mode. Press the button on remote control or on the top panel to turn on the TV. The indicator will now be green. Press the "button again to turn the TV back to standby."
- To turn off the TV, press①" button on the back of the front panel.
- The power consumption is less than 1W in Standby mode. Unused for a long time, please disconnect the power cord from the wall outlet.
Note: The TV set can turn off automatically after 5 minutes while there is no signal input.
CHANNEL SEARCH
Press the INPUT button on the remote control to select the TV or DTV input mode and press the ENTER button to confirm. If you are using the unit for the first time, an Installation Guide menu will be displayed to guide you through the Channel Scan. Use the remote control to finish Channel Scan.


CHANGING THE CHANNEL
Press the CH- or CH+ button to select the previous or next channels or press the 0-9 buttons to enter a channel number directly. Press LIST button to view the channels list and press the buttons to select the desired TV programmes.
CHANGING THE VOLUME
Press the VOL - or VOL + button to adjust the volume level. Press the VOL - button repeatedly to decrease the volume. Press the VOL button repeatedly to increase the volume.
CHANGING THE PICTURE MODE
Press theP.MODEbutton repeatedly to cycle through the available picture modes.
CHANGING THE SOUND MODE
Press the SMODE repeatedly to cycle through the available sound modes.
VIEW CHANNEL INFORAMTION
Press the INFO button to display the preset channel information.
MUTE
Press the MUTE to cut off the sound output, press this button again to resume sound output.
CHANGE INPUT SOURCE
Press the INPUT to trigger the press stance and press the ENTER button to confirm.
TELETEXT
Teletext is an information system broadcast by certain channels which can be consulted like a newspaper. It also offers access to subtitles for viewers with hearing problems or who are not familiar with the transmission language.
Display Teletext
-
Select a TV station with a teletext signal.
-
Press the ☐ button to enter the teletext mode.
-
Press the ☐ button again to enter the Mix mode.
-
Press the ☐ button a third time to exit.
Page selection
-
Enter the page number (three digit) using the number buttons. If you press a wrong number during input, you must complete the three digit number and then re-enter the correct page number.
-
The [↑] / ↓] buttons and CH+/CH- keys can be used to select the following page.
Hold
You can press the ☐ button to hold a page and press it again to release the page.
≡i Index
Press the i button to enter the main index page directly.
Enlarging Text
When a page is displayed, you can double the size of the text to make it easier to read.
-
Press the ☐ button to enlarge the top half of the page.
-
Press the ☐ button again to enlarge the bottom half of the page.
-
Press the ☐ button once more to return to the normal display.
Subpage
Some teletext may contain several sub-pages which are automatically paged in a certain cycle by the TV station.
-
You can select a certain subpage by pressing the SUBTITLE button directly and selecting the page number with the NUMBER buttons. Enter the subpage number, e.g.0003 for the third subpage.
-
Press the ☐ button, again to exit the subpage mode.
-
Press the ☐ button to return to the normal TV mode.
Colour buttons(Red, Green, Yellow, Cyan)
Press these buttons when promoted by the on screen Menu. Each colour will correspond with the appropriate option.
Using the Function
Menu overview
Many function settings and adjustments of the LCD TV will begin from the main menu.
Press the 【MENU】button to display the main menu.
【MENU】buttensone[←] / [→] buttons to cycle
through the main menu: Channel, Picture, Sound, Timer, Option and Lock. Press the【↑】/↓ buttons to select the submenu you want. When an item in the MENU is grey, it means that the item is not available or cannot be adjusted.
Channel Menu (In TV, DTV mode)
- Press the MENU button to select the Channel Menu. Press [←] / [→] buttons to cycle through the main menu.
- Press the [↑] / [↓] buttons to highlight the item to be adjusted.
- Press the [←] / [→] buttons to adjust the submenu or subitem.
- When you are satisfied with your adjustment, press the EXIT button to exit the Main Menu.
- If the channel is locked or Lock System is On, you should enter the password before channel searching.
Channel
To display the current channel number and to adjust it press the
[←] / [→] buttons.

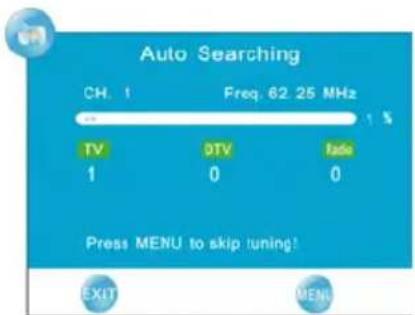
Auto Search
Press the [→] button to start Auto Search. Once the progress bar is full, the found channels will be stored. If you press the MENU button it will skip from TV to DTV searching mode.
Manual Search
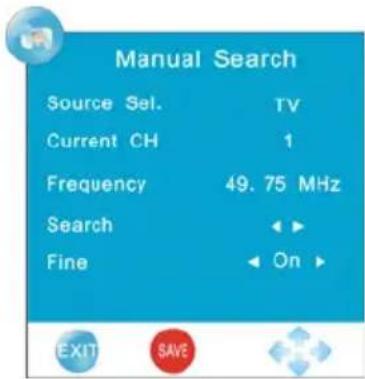
The Manual search option allows you to preset programs one by one. The first Source Sel. is TV, the other one is DTV. Press the RED button to save your program of choice.
Source Sel.: To display the current input source (TV/DTV)
Current CH: To display the channel number.
Frequency: To display the frequency of the program.
Search: To decrease and increase the frequency.
Fine: To adjust the frequency (In TV mode). After adjustment, the current channel number changes to yellow.
NOTE: In DTV mode, when highlighting Current CH or Frequency, the TV will begin DTV Manual Search.
Skip
You can select the skipped program function by pressing the number buttons directly. After adjustment, the current channel number changes to red.
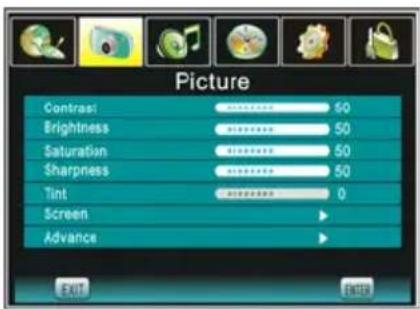
Picture Menu
- Press the MENU button to select the Picture Menu. Press the [←] / [→] buttons to cycle through the Main Menu.
- Press the [↑] / [↓] buttons to highlight the item to be adjusted.
- Press the [←] / [→] buttons to adjust the submenu or subitem.
- When you are satisfied with your adjustment, press the EXIT button to exit the Main Menu.
Contrast
Press the 【←】/【→】buttons to adjust the contrast of the picture.
Brightness
Press the [←] / [→] buttons to adjust the brightness of the picture.
Saturation
Press the [←] / [→] buttons to adjust the colour saturation.
Sharpness
Press the 【←】/【→】 buttons to adjust the Sharpness level of the picture.
Tint
Press the 【←】/【→】 buttons to adjust the tint of the picture (NTSC)
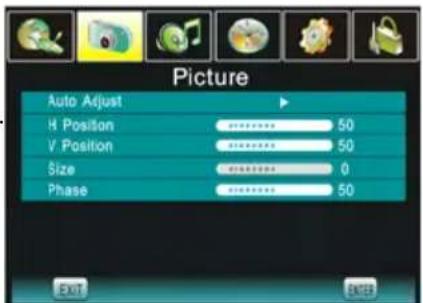
Screen(In PC-RGB mode)
Auto Adjust : Press the [→]button to adjust the position of the picture automatically.
H Position: Press the 【←】/【→】buttons to adjust the horizontal position.
V Position: Press the [←] / [→] buttons to adjust the vertical position.
Size: Press the [←] / [→] buttons to adjust the size of picture.
Phase: Press the [←] / [→] buttons to adjust the phase of picture.
Advance
ZOOM : Press the [←] / [→] buttons to select the ZOOM mode.
Colour Temp: Pressthe [←] / [→] buttons to select the Colour Temp mode.
DNR: Provide the picture with dymatic noise reduction treatment.

Sound Menu
- Press the MENU button to select the Sound Menu. Press the [←] / [→] buttons to cycle through the Main Menu.
- Press the 【↑】/【↓】 buttons to highlight the item to be adjusted.
- Press the [←] / [→] buttons to adjust the submenu or subitem.
- When you are satisfied with your adjustment, press the EXIT button to exit the Main Menu.
Treble
Press the [←] / [→] buttons to increase and decrease the level of the pitch.
Bass
Press the [←] / [→] buttons to increase and decrease the level of the pitch.
Balance
Press the 【←】/【→】 buttons to adjust the audio output between left and right speakers.
AVL
AVL(Automatic Volume Control) is used to control the volume automatically.
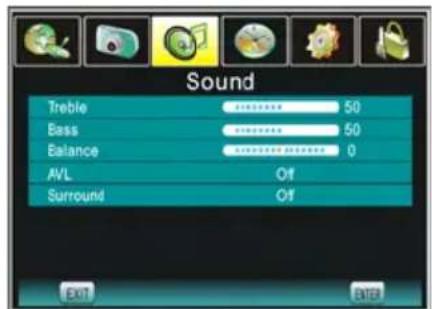
Surround
Press the 【←】/【→】 buttons to switch the surround sound.
Timer Menu
MENU button to select the Timer Menu. Press the Pressthe buttons to cycle through the Main Menu to select it.
- Press the [↑] / [↓] buttons to highlight the item to be adjusted.
- Press the [←] / [→] buttons to adjust the submenu or subitem.
- When you are satisfied with your adjustment, press the EXIT button to exit the Main Menu.
Clock
You can display either the DTV Signal Stream Time or set the System Time.
Off time
Press the [→] button to set the time for the TV to switch off.
On Time
Press the [→] button to set the time for your TV to turn on.
Sleep
Press the [←] / [→] buttons to select the Sleep Time you want.
Summer Time
Press the [←] / [→] buttons to switch the Summer Time on or off.
Time Zone
Press the [←] / [→] buttons to select your time zone.

Option Menu
MENU buttons to select the Option Menu. Press the [←] / [→] buttons to cycle through the Main Menu.
- Press the [↑] / [↓] buttons to highlight the item to be adjusted.
- Press the [←] / [→] buttons to adjust the submenu or subitem.
- When you are satisfied with your adjustment, press the EXIT button to exit the Main Menu.
Language
Press the 【←】/【→】 buttons to select OSD language
Panel Lock
Press the [←] / [→] buttons to switch the Panel Lock. When the Panel Lock is set to On, all of the buttons are locked. Press any button for more than 5 seconds to release it. When it is set as Off, the buttons of TV are in normal mode.

System
Press the [→] button to display the System Information: Software Information and Signal Information (Signal Information only in DTV mode).
Default
Press the [→] button to clear all programs or reset default setting.
Clear All Programm:Press the [→] button to clear all programs or information.
Factory Setting: Press the [→] button to restore factory setting.
NOTE: Lock Setting and Hotel Setting can't be restored.

Advance
Audio Language: Press the [←] / [→] buttons to set the default Audio Language.
Subtitle Language: Press the [←] / [→] buttons to set the default Subtitle Language.
Hearing Impaired: When hearing impaired is ON, the TV screen will turn on the subtitles and turn off when the functions is off.

EPG (In DTV mode)
This function gives you detailed information about the channel you are watching, indicating the time of the program playing. From the EPG it is possible to check the program information for the next eight days (If the information is available from the broadcaster .)
ENTER: Press the ENTER button to change channel.
RADIO: Press the RADIO button to switch between RADIO and DTV.
INFO: Press the INFO button to see the detailed information of the current channel.
Schedule: Press the GREEN button to see the schedule information.
DATE: Press the YELLOW button to see the detailed information of the next eight days, and you can press the [←] / [→] buttons to select the date information.
ReminderPress the BLUE button to book a program.

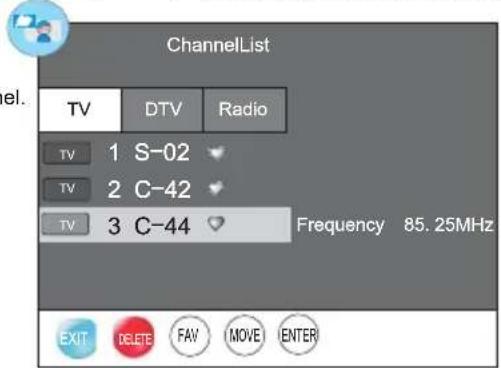
List (In TV/DTV mode)
Press the [→] button to display the Channel List picture. The list of programs will include all TV, DTV and Radio. When you press the [↑] / [↓] buttons to change programs, the signal quality, singal strength, frequency will display on screen.
(Only frequency in TV mode.)
DELETE: Press the RED button to delete a channel.
FAV: Press the GREEN button to set a channel as your favorite channel.
MOVE: Press the YELLOW button to move the position of the channel (In TV mode).
Lock Menu
- Press the MENU button to select the LockMenu. Press the [←] / [→] buttons to cycle through the Main Menu. The default password is "0000".
- Press the 【↓】 button to enter password menu, then input the password to enter the Lock Menu.
- Press the [↑] /↓ buttons to highlight the item to be adjusted.
- Press the 【←】 / 【→】 buttons to adjust the submenu or subitem.
- When you are satisfied with your adjustment, press the EXIT button to exit the Main Menu.
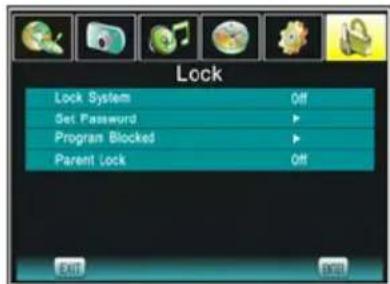
※ If you forget your private password, the super password is "1225", this will always unlock your TV.
Press the NUMBER buttons on the remote control to set the new password. When the new password has been input twice, the password is set. The TV will go back to the previous menu.
Set Password
Press the 【→】 button to see the Set Password submenu. Press the NUMBER buttons to enter the new password.
Program Blocked (In TV, DTV mode)
Press the GREEN button to lock the available program you want. Press the GREEN button again to unlock it.

Parent Lock (In DTV mode)
You can rate and lock programmes based on the censor age ratings.
NOTE: When you select "default factory settings" the Lock Setting won't change.
Hotel Mode
Press the INPUT button to display the Source Menu, then press → 1 → 4 → 7 → 0 in turn to enter into the Hotel Mode to adjust the relative settings.
On Source
Set the default signal source by pressing the 【←】 or 【→】 buttons. (The default signal source will be displayed when the TV turns on.) Optional signal sources are as follows: DTV, TV, Component, PC-RGB, HDMI, AV, S-Video.
On Channel
Set the default channel by pressing the [←] /* buttons (The default channel will be displayed when the TV turns on).

On Volume
Set the default volume by pressing the [←] button (The default volume is the volume when the TV turns on. Remember the default volume should be less than the maximum volume).
Volume Max.
Set max volume by pressing the [←] +■] buttons. When the max volume is lower than the default volume, the max volume is the priority.
Hotel Mode Enable
Set the hotel mode ON/OFF by pressing the [←] / [→] buttons. When it is "ON" and switch off at the AC power supply, the hotel mode is enabled. The TV will automatically enter into hotel mode when turns on next time.
NOTE:
When "HOTEL MODE" is "ON", the tuning and list function is locked.
When you select "default factory setting" the Hotel Setting won't change.
| Problem | Check | |||
| Picture Audio | ||||
 | Snow Noise |  | Check the Antenna position, direction and connection | |
 | Ghost |  | Normal audio | Check the Antenna position, direction and connection |
 | Interference |  | Noise | Check the Antenna connection Check for electrical interference, by moving other electrical products away from the TV. |
 | Normal Picture | 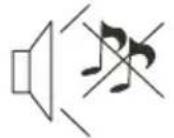 | Mute | Check if the Mute function is on Check the volume level Check the audio connections |
 | No picture Mut |  | Check the main power is on Check the system connections are correct and connected firmly. | |
 | No colour Nor |  | audio | Check the contrast, brightness and colour settings |
 | Picture breaking up |  | Normal audio or weak | Check the antenna connection Check the cable connection |
| LCD : | |
| ViewIng Picture Size(diagonal) | 19" |
| Resolution | 1366x768 |
| Aspect Ratio | 16:9 |
| Display colours | 16.7M |
| Brightness | 300 CD/M2 |
| Contrast ratio | 1000:1 |
| Response time | 5 ms |
| View angle | 170(H)/160(V) |
| TV: | |
| TV system | Digital TV: DVB-TAnalog TV: PAL |
| DVB-T decode | Audio: MPEG2 Audio Layer I&IVideo: MPEG2 Transport MP@HL |
| DVB-T de-modulation | Demodulator : COFDMOFDM Mod.: 2K, 8K FFT, SFN and MFNPacked Carries: 2K/8KGuard Interval: 1/4, 1/8, 1/16, 1/32 |
| Terminals: | |
| RF IN Input | 1 |
| ear phone Input | 1 |
| VGA-audio Input | 1 |
| AV Input | 1 |
| S-VIDEO Input | 1 |
| Y Pb Pr Input | 1 |
| Analog RGB(VGA) Input | 1 |
| HDMI Input | 1 |
| Others: | |
| Input Power Voltage | 100V-240V~ 50/60Hz |
| Power consumption | 60W |
| Audio Output Power (THD≤7%) | 2x2W |
NOTE: The specification shown above may be changed without prior notice for quality improvement.
Please keep your receipt as proof of purchase. This product is warranted for any defect in materials or workmanship for one year after purchase. This product is for normal domestic and office use only. This warranty does not cover damage from misuse or neglect, accidental damage, vermin infestation, excessive voltages such as lightning or power surges or any alteration that affects the performance or reliability of the product.
In the unlikely event that your product fails to work normally, please contact tBush Warranty on 1800 509 394 (Australia) or 0800 450 259 (New Zealand) and have your receipt of purchase on hand.
This warranty is subject to the following provisions:
- It is only valid within boundaries of the country of purchase.
- The product must be correctly assembled and operated in accordance with the instructions contained in the manual.
- This product must be used solely for domestic purposes.
- The warranty does not cover accidental damage.
- The warranty will be rendered invalid if the product is resold or has been damaged by inexpert repair.
- The manufacturer disclaims any liability for incidental or consequential damaged.
This warranty is in addition to, and does not diminish, your statutory or legal rights.
PO BOX 6287
Silverwater NSW 1811
www.bushaustralia.com.au
Bush Warranty: 1800 509 394 Australia
Bush Warranty: 0800 450 259 New Zealand
PO BOX 6287
Silverwater NSW 1811
www.bushaustralia.com.au
- Safety is important
- Warranty
- Australia
- New Zealand
- ADDITIONAL SAFETY NOTES
- INSTALLATION NOTES
- ACCESSORIES
- KEY BOARD
- REAR PANEL
- ANTENNACONNECTION
- CONNECTINGTOPC
- STEPS:
- PC PRESET
- CONNECTING TO AV EQUIPMENTS
- BATTERY INSTALLATION
- Remark:
- KEYS FUNCTION
- BASIC OPERATION
- TURN ON /OFF THE UNIT
- CHANNEL SEARCH
- CHANGING THE CHANNEL
- CHANGING THE VOLUME
- CHANGING THE PICTURE MODE
- CHANGING THE SOUND MODE
- VIEW CHANNEL INFORAMTION
- MUTE
- CHANGE INPUT SOURCE
- TELETEXT
- Display Teletext
- Page selection
- Hold
- ≡i Index
- Enlarging Text
- Subpage
- Colour buttons(Red, Green, Yellow, Cyan)
- Using the Function
- Menu overview
- Channel Menu (In TV, DTV mode)
- Channel
- Auto Search
- Manual Search
- Skip
- Picture Menu
- Contrast
- Brightness
- Saturation
- Sharpness
- Tint
- Advance
- Sound Menu
- Treble
- Bass
- Balance
- AVL
- Surround
- Timer Menu
- Clock
- Off time
- On Time
- Sleep
- Summer Time
- Time Zone
- Option Menu
- Language
- Panel Lock
- System
- Default
- EPG (In DTV mode)
- List (In TV/DTV mode)
- Lock Menu
- Set Password
- Program Blocked (In TV, DTV mode)
- Parent Lock (In DTV mode)
- Hotel Mode
- On Source
- On Channel
- On Volume
- Volume Max.
- Hotel Mode Enable
- NOTE:
Brand : BUSH
Model : IDLCD1910HD
Category : Television