ZTS2910X - Toaster Zelmer - Free user manual and instructions
Find the device manual for free ZTS2910X Zelmer in PDF.


| Product Type | Toaster |
| Brand | Zelmer |
| Model | ZTS2910X |
| Dimensions (W x D x H) | 28 x 20 x 18 cm |
| Weight | 1.2 kg |
| Power | 850 W |
| Voltage / Frequency | 220-240 V, 50/60 Hz |
| Number of Slots | 2 |
| Browning Control | 7 levels |
| Functions | Toasting, Defrost, Reheat, Cancel |
| Extra Lift | Yes |
| Self-Centering Racks | Yes |
| Crumb Tray | Removable, easy to clean |
| Cool-Touch Housing | Yes |
| Auto Shut-Off | Yes |
| Warranty | 2 years |
| Spare Parts Available | Crumb tray, heating elements, outer casing |
| Repairability Index | 7 / 10 |
| Cleaning & Maintenance | Unplug, empty crumb tray, wipe exterior with damp cloth |
Frequently Asked Questions - ZTS2910X Zelmer
User questions about ZTS2910X Zelmer
0 question about this device. Answer the ones you know or ask your own.
Ask a new question about this device
Download the instructions for your Toaster in PDF format for free! Find your manual ZTS2910X - Zelmer and take your electronic device back in hand. On this page are published all the documents necessary for the use of your device. ZTS2910X by Zelmer.
USER MANUAL ZTS2910X Zelmer
natural_image
Silver Zeimer 3000 standard toaster with black handle and control knob (no visible text or symbols beyond brand name)PLF INSTRUKCJA UŻYTKOWANIA TOSTER 4–7
CZ NÁVOD K POUŽITÍ
TOUSTOVAČ 8–11
SK NÁVOD NA OBSLUHU
HRIANKOVAČ 12–15
HU HASZNÁLATI UTASÍTÁS
KENYÉRPIRÍTÓ 16–19
RO INSTRUCTIUNI DE UTILIZARE
APARAT PENTRU PRĂJIT
PĂINE 20–23
An stylish toaster providing many practical solutions.



Szanowni Klienci!
Congratulations on your choice of our appliance, and welcome among the users of Zelmer products.
Please read these instructions carefully. Pay your special attention to important safety instructions. Keep this User's Guide for future reference.
Safety operation instructions
Read this entire manual carefully before using the appliance.

DANGER! / WARNING! Health hazard
Before touching the plug or turning on the toaster, make sure that your hands are dry.
- Use the toaster on a stable and dry surface.
● Always pull the plug from the power socket when the device is not in use and before cleaning.
- Allow the toaster to cool before cleaning and storing.
- Perform regular check of the power cord to make sure that there are no signs of any damage on it.
- In the event of the slightest trace of damage, the entire device should be returned to repair facility.
- After a malfunction of device or if it has been otherwise damaged, always bring the device to repair facility in order to check, repair or make adjustments as for this purpose special tools are required.
- If the supply cord is damaged, it must be replaced by the manufacturer, its service agent or similarly qualified persons in order to avoid a hazard.
- The appliance can only be repaired by qualified service personnel. Improper servicing may cause
a serious hazard to the user. In case of defects please contact a qualified service center.
- The temperature of accessible surfaces may be high when the appliance is operating.
- Do not touch hot surfaces. Use the lever and knob.
- This appliance can be used by children aged from 8 years and above and persons with reduced physical, sensory or mental capabilities or lack of experience and knowledge if they have been given supervision or instruction concerning use of the appliance in a safe way and understand the hazards involved. Children shall not play with the appliance. Cleaning and user maintenance shall not be made by children unless they are older than 8 and supervised.
- Keep the appliance and its cord out of reach of children less than 8 years.
- Never immerse any part of the toaster or the power cord and plug in water or other liquid.
- Never use the appliance with a damaged cord or plug after a malfunction or if it has been damaged in any way.
- The appliance generates heat during operation. They must be kept reasonable precautions to prevent the risk of burns, fire or other body or objects injury caused by contact with external surfaces during use or cooling.
-
Never use a toaster located on the side. Never add any food substances to bread or lubricate bread before roasting, as it could lead to electric shock or fire.
-
Never attempt to remove jammed toast, bread rolls, croissant or other baked goods with a knife or other tool, because the contact with live parts could cause an electric shock. Allow the appliance to cool, remove the plug and gently remove the bread.
- Only use the appliance indoors at room temperature and up to 2000 m above sea level.

CAUTION!
Not observance can result in damage to possessions
Remove all promotional stickers or packaging material prior to use the toaster for the first time.
Provide adequate space above and on the sides of the toaster in order to allow the free circulation of air. Avoid the device's contact with curtains, wallpaper, clothing, towels or other flammable materials during use. Do not use under cabinets or curtains. Caution is required in the case of surface where heat can be a problem - it is recommended to use a thermal insulation pad.
Bread can catch fire, so do not use bread toasters near flammable materials or under combustible materials such as curtains.
Use a toaster with crumb tray placed on the device.
Do not allow to collect the crumbs. Do not allow to collect the crumbs. Regularly clean the crumb tray in order to prevent the risk of fire.
Always connect the appliance to the power socket (alternating current only) equipped with a grounding prong, with a voltage indicated on the name plate.
The equipment is not designed to work with external time switches or a separate remote control system.
When using do not leave the device unattended, because the bread can be ignited.
Never allow wire hanging over the edge of the table or countertop, or touch hot surfaces or was curled.
Never place the device on or near gas or electric burner, or where it might come into contact with a hot oven or microwave.
Never cover the device when connected to a current or is hot.
Do not load the device with bread that contains sugar, jam or other additives.
Bread to be baked should be sized for your toaster, it should not protrude above the opening for bread
loading and should not be too thick or too long in order not to block nor to jam the toast lift.
Do not use harsh, abrasive or caustic cleaning agents to clean the device.

GESTION
Information on the product and suggestions for its use
This appliance is intended for domestic use only.
Before making the first piece of toast, run the toaster once or twice without any food item at the maximum degree of heat. This will significantly eliminate the "new" smell of the device.
When you turn on and use the toaster for the first time, as far as heating up the heating elements may have a slight smell of 'burnt'. This is not a threat nor any evidence of malfunction of the product. The smell should disappear after repeated use.
Technical parameters
The toaster technical parameters are included at the name plate.
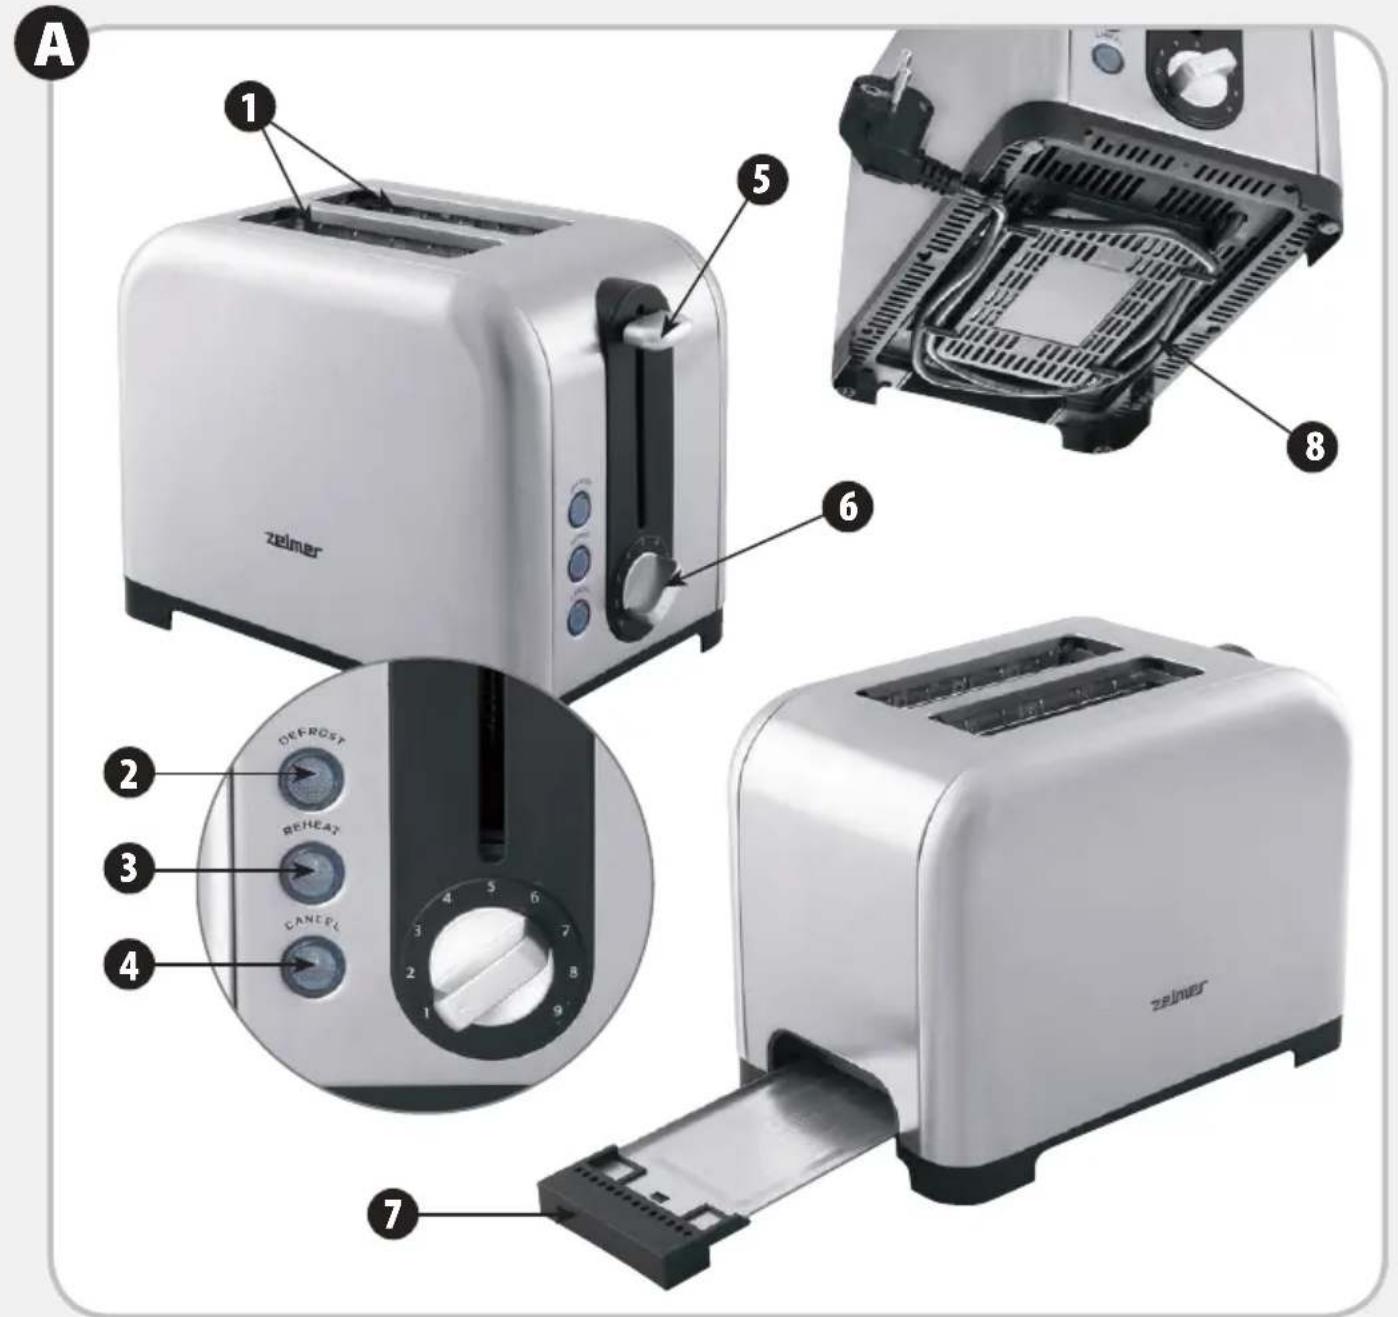
Composition of the toaster
1 Bread slots with adjustable width
2 Button DEFROST – frozen bread toasting
3 Button REHEAT – reheating of bread
4 Button CANCEL – cancel/stop the toasting
5 lever
6 Browning adjustment knob
7 Crumb tray
8 Power cord storage compartment

Maintenance and operation of the toaster
Place the toaster on a dry, flat surface away from potential heat sources (heating plates/panels, cookers, ovens, etc.).
Insert the plug into an AC wall outlet.
① Place the bread into the bread slots.

sure that the bread crumb tray is in the appliance.
② Select the desired browning with the adjustment knob. 9 browning degrees are available.

When the toaster is switched on and used for the first time, select position 3 (standard setting). Different bread types and individual preferences may require different settings.

the same browning degree, one slice of bread will be toasted better than two slices of bread toasted simultaneously.

ing continuous toasting, subsequently prepared toasts will be more browned than those prepared in the first cycle.
③ To insert bread into the toaster, slide the lever down until it locks into position. Toasting cycle will start.

lever will only lock when the appliance is connected to the power supply.

browning degree may be observed during toasting. When the bread is sufficiently browned, the toasting cycle may be stopped at any time by pressing the CANCEL button.
④ After the toasting cycle has ended, the lever will automatically slide up to the initial position.

bread is not sufficiently toasted, another toasting cycle may be run. Select light browning (adjustment knob in position 1 or 2) and then push the toasting lever down until it locks into position. Control the browning degree to ensure the toasts would not burn.
Remove the toasts, be careful not to touch any hot surface.

ead slices are stuck in the toaster, press the CANCEL button and pull out the plug from the socket. Wait until the toaster cools down completely and carefully move the bread so that no heating elements are damaged.
Additional features
FROZEN BREAD TOASTING
Place the frozen bread slices in the bread slots, select the desired degree of browning. Slide the bread slices down into the toaster by pushing the lever down until it locks into position and press the DEFROST button. The button will light up.

Frozen bread toasting takes more time than thawed bread.
BREAD REHEATING
This toaster enables bread reheating, irrespectively of the selected browning degree. Place the toasts in the bread slots. Slide the bread slices down into the toaster by pushing the lever down until it locks into position and press the REHEAT button. The button will light up.
Notes on toasting
Toasting is a combination of bread roasting and drying. Humidity levels vary for different types of bread, which may cause differences in the time of toasting.
For slightly dry bread, use a setting lower than the standard.
For fresh or wheat bread, use a higher setting than the standard.
Bread with a very uneven surface will require a higher setting.
Toasting thicker pieces of bread will last longer, because before toasting the bread needs to remove more moisture. Very thick pieces may require two toasting cycles.
Cleaning and maintenance of the toaster

① Before cleaning, always switch off the toaster, pull out the plug from the socket and wait until it cools down completely.
② To remove the bread crumbs from the toaster, remove the bread crumb tray located at the bottom of the toaster. Empty it and place it in the same position as previously.

Do not use the toaster with no bread crumb tray in place.
③ To remove the bread crumbs from inside of the toaster, turn the toaster upside down and gently shake the bread crumbs out.
④ The external surfaces clean with a soft, slightly damp cloth and wipe dry.

not allow excessive accumulation of bread crumbs in the tray. Bread crumb tray should be cleaned regularly.
Disposal
Dispose of packaging in an environmentally-friendly manner. This appliance is labelled in accordance with European Directive 2012/19/EU concerning used electrical and electronic appliances (waste electrical and electronic equipment – WEEE). The guideline determines the framework for the return and recycling of used appliances as applicable throughout the EU. Please ask your specialist retailer about current disposal facilities.

The manufacturer does not accept any liability for any damages resulting from unintended use or improper handling.
The manufacturer reserves his rights to modify the product any time in order to adjust it to law regulations, norms, directives, or due to construction, trade, aesthetic or other reasons, without notifying in advance.

natural_image
White zeimer toaster with black handle and front panel, no visible text or symbols on device body
natural_image
Close-up of a black industrial control dial with numbered rotary knob (no text or symbols visible)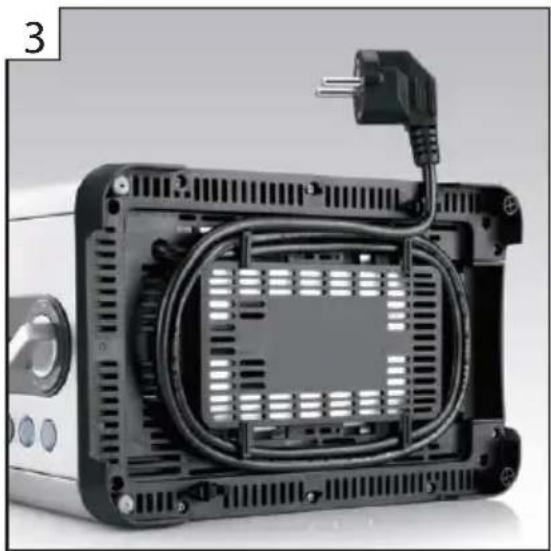
natural_image
Back view of a computer expansion unit with visible cooling fan and power outlet (no text or symbols)EN 1. Solid casing does not overheat
2. Adjustable toasting temperature
3. Cord storage


- Szanowni Klienci!
- Safety operation instructions
- DANGER! / WARNING! Health hazard
- CAUTION!
- Not observance can result in damage to possessions
- GESTION
- Information on the product and suggestions for its use
- Technical parameters
- Composition of the toaster
- Maintenance and operation of the toaster
- Additional features
- FROZEN BREAD TOASTING
- BREAD REHEATING
- Notes on toasting
- Cleaning and maintenance of the toaster
- Disposal
Brand : Zelmer
Model : ZTS2910X
Category : Toaster