
NV-GS38 - Camera PANASONIC - Free user manual and instructions
Find the device manual for free NV-GS38 PANASONIC in PDF.


| Product Type | Digital Camcorder (MiniDV) |
| Model | NV-GS38 |
| Brand | Panasonic |
| Dimensions (W x H x D) | Approx. 63 x 88 x 123 mm |
| Weight | Approx. 320 g (without battery) |
| Power Supply | 7.2 V DC, rechargeable battery (Li-ion) |
| Image Sensor | 1/6-inch CCD, 800k pixels |
| Optical Zoom | 32x |
| Digital Zoom | 1000x |
| LCD Monitor | 2.5-inch color LCD, 113k pixels |
| Recording Media | MiniDV tape |
| Image Stabilization | Electronic (EIS) |
| Minimum Illumination | 1 lux (with MagicPix mode) |
| Main Functions | Recording, playback, zoom, built-in flash, scene modes, digital effects |
| Cleaning & Care | Clean lens with soft cloth; avoid moisture; use dry environment; clean head with cleaning cassette if needed |
| Safety | Keep away from water; do not expose to extreme temperatures; use specified charger only |
| Spare Parts & Repairability | Battery pack, charger, remote control, AV cable, carrying case; service by authorized technician |
| General Information | Compatible with Windows/Mac via USB or FireWire (requires DV capture card); records standard definition video |
Frequently Asked Questions - NV-GS38 PANASONIC
User questions about NV-GS38 PANASONIC
0 question about this device. Answer the ones you know or ask your own.
Ask a new question about this device
Download the instructions for your Camera in PDF format for free! Find your manual NV-GS38 - PANASONIC and take your electronic device back in hand. On this page are published all the documents necessary for the use of your device. NV-GS38 by PANASONIC.
USER MANUAL NV-GS38 PANASONIC
natural_image
Illustration of a digital camera with lens and frame (no text or symbols)数码摄像机
Model No. NV-GS38GK NV-GS28GK

natural_image
Close-up of plant leaves with visible veins and soft focus (no text or symbols)Mini DY PAL
使用前,请完整阅读本说明书。


LSQT0894 A
安全注意事项
⑫取景器 -7-、-45-
37 三脚架插座
natural_image
Three-step diagram showing a car seatbelt mechanism with arrows indicating rotation and clockwise motion (no text or symbols)- 取下镜头盖时,请按住突起。

natural_image
Simple line drawing of a magnifying glass with bidirectional arrows (no text or symbols)手持带
调整带子长度以适合手的尺寸。
1 调整带子的长度。

natural_image
Illustration of a digital camera with an arrow indicating rotation or sound flow (no text or symbols present)natural_image
Illustration of a digital camera with an 180-degree angle indicator (no text or symbols on the device itself)
natural_image
Technical line drawing of a mechanical device with a 90-degree angle标注 (no text or symbols on the diagram itself)natural_image
Line drawing of a hand operating a digital camera with a scroll wheel (no text or symbols)调整视野
1 滑动目镜校正旋钮调整焦距。

- 可以从菜单调整取景器的亮度。
电源
给电池充电
充电指示灯
点亮: 正在充电
熄灭:充电完成
natural_image
Line drawing of a digital camera with an arrow indicating the left side of the camera (no text or symbols present)■ 取下电池
natural_image
Technical line drawing of a mechanical device with an upward arrow indicating motion (no text or symbols)natural_image
Technical illustration of a mechanical device with an inset close-up showing internal components (no text or symbols)当磁带仓不能收起时
natural_image
Line drawing of a vintage-style video camera with open screen and internal components (no text or symbols)natural_image
Diagram of a device with an open screen and a close-up view showing a device with a magnifying glass (no text or symbols)natural_image
Line drawing of a vintage digital camera with no visible text or symbols: 磁带录制模式
flowchart
graph LR
    A["1/3"] --> B["2/3"]
    B --> C["3/3"]
    C --> D["OFF"]
    D --> A
flowchart
graph TD
    A["Control"] --> B["OFF"]
    B --> C["Arrow pointing inward"]
| ▲ | ▶/11 | 回放 / 暂停 | -27- |
| ▼ | ■ | 停止 | -27- |
| ◀ | ◀◀ | 倒带 (倒带搜索回放) | -27- |
| ▶ | ▶▶ | 快进 (快进搜索回放) | -27- |
4) 记忆卡录制模式
([AUTO/MANUAL/FOCUS] 开关设置为 [AUTO])

flowchart
graph TD
    A["Device Icon"] --> B["OFF"]
    B --> C["Arrow to Right"]
flowchart
graph TD
    A["1/2"] --> B["2/2"]
    B --> C["OFF"]
flowchart
graph TD
    A["Control knob with icons"] --> B["OFF"]
    B --> C["Arrow pointing right"]
natural_image
Illustration of a camera lens interacting with a smartphone, showing light rays and motion arrows (no text or symbols)natural_image
Technical line drawing of a mechanical device with a separate cable and connector (no text or symbols)■ 关于夹子 (在背面)

natural_image
Technical line drawing of a mechanical component with no visible text or symbols3)

natural_image
Line drawing of a hand holding a camera (no text or symbols)natural_image
Line drawing of a digital camera and its corresponding circular component (no text or symbols)1 按录制开始 / 停止按钮开始录制。

natural_image
Illustration of a vintage camera and a separate image of a wolf's head (no text or symbols)natural_image
Black-and-white photo of two women posing with teddy bear toys (no visible text or symbols)natural_image
Two black-and-white photos: one showing a circular arrow symbol with directional arrows, the other showing a person in a circle with Chinese characters (no readable text or symbols)空白搜索功能
natural_image
Line drawing of a DSLR camera with a circular dial and control knob (no text or symbols)■ 清晰地拍摄静态图片
natural_image
Black-and-white photo of a child wearing a wide-brimmed hat standing on a sandy beach (no text or symbols visible)natural_image
Line drawing of a digital camera with an arrow indicating rotation or change (no text or symbols present)natural_image
Black-and-white photo collage showing two panels: one with a screen and abstract shapes, the other with people gathered around a table (no visible text or symbols)停止录制。(淡出)
natural_image
Two grayscale images showing a person in a garden and another with a white arrow pointing to the left (no text or symbols)■ 取消渐变
再次选择 [→] 指示。
■ 选择淡入 / 淡出的颜色
可以选择在渐变图片中出现的颜色。
1 设置 [设置] >> [淡入/淡出] >> [白色] 或 [黑色]。
■ 中途停止连续拍照
松开 [PHOTO SHOT] 按钮。
2 将 [AUTO/MANUAL/FOCUS] 开关设置为 [FOCUS]。

CLOSE (关闭 ), F16, ..., F2.0,
OPEN (打开) 0dB, ..., 18dB
值越接近 [CLOSE] 影像越暗。
值越接近 [18dB] 影像越亮。
带有 dB 的数值是增益值。
回放模式
回放磁带
- 设置为磁带回放模式。

natural_image
Line drawing of a digital camera with a circular inset showing a rotary dial (no text or symbols)1 用操纵杆操作。

natural_image
Two black-and-white photos: one showing a circular cross symbol with arrows, the other showing two people smiling (no text or symbols visible)▶/Ⅱ: 回放 / 暂停
朝 [+] 方向:增加音量
朝[-]方向:减少音量
(条线越接近[+],音量越大。)
natural_image
Black-and-white photo of two people sitting together, one holding a teddy bear and the other holding a stuffed toy (no visible text or symbols)
natural_image
Black-and-white photo of two people posing with teddy bear and stuffed animals (no visible text or symbols)natural_image
Black-and-white photo of two women posing with stuffed animals (no visible text or symbols)
natural_image
Black-and-white photo of two women posing with stuffed animals indoors (no visible text or symbols)natural_image
Line drawing of a digital camera with a circular dial and control buttons (no text or symbols)1 用操纵杆操作。


natural_image
Two women smiling outdoors, one holding a circular icon with play symbols (no readable text)◀: 回放前一幅图片。
▶: 回放后一幅图片。
- 不能录制音频。
2 设置 [高级功能] >> [录制待机] >> [是]。 (录像机)
natural_image
Black-and-white photo of two women posing with teddy bear toys (no visible text or symbols)16 bit (48 kHz/2 ch), 12 bit (32 kHz/4 ch)
画面传感器:
1/6 英寸 CCD 画面传感器
镜头:
自动光圈,F1.8,焦距长度;
(NV-GS38型)1.9-57.0mm(NV-GS28型)2.1-
50.4 mm,微距(全范围AF)
滤镜直径:
30.5 mm
变焦:
30:1 倍变焦 (NV-GS38 型)
24:1 倍变焦 (NV-GS28 型)
监视器:
2.5 英寸 LCD
取景器:
(NV-GS38型)彩色电子取景器
(NV-GS28型)电子取景器
麦克风:
立体声 (带变焦功能)
扬声器:
1个球形扬声器∅20mm
标准照度:
1,400 lx
所需最低照度:
2 |x(彩色夜视模式)
视频输出标准:
1.0 Vp-p, 75 ohm
S 视频输出标准:
JPEG (Design rule for Camera File system, 基于
Quick guide (English)
Power supply
Charging the battery
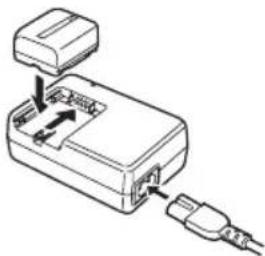
When this product is purchased, the battery is not charged. Charge the battery before using this product.
- If the DC input lead is connected to the AC adaptor, then the battery will not get charged. Remove the DC input lead from the AC adaptor.
1 Connect the AC mains lead to the AC adaptor and the AC mains socket.
2 Put the battery on the battery mount by aligning the mark, and then securely plug it in.
natural_image
Diagram of a device with an open box and cable, showing internal components (no text or symbols)Charging lamp
Lights up: Charging
Goes off: Charging completed
Flashing: The battery is over discharged (discharged excessively). In a while, the lamp will light up and normal charging will start. When the battery temperature is excessively high or low, the [CHARGE] lamp flashes and the charging time will be longer than normal.
Fitting the battery
Push the battery against the battery holder and slide it until it clicks.

natural_image
Line drawing of a DSLR camera with an attached box and arrow indicating motion (no text or symbols)Removing the battery
While sliding the [BATTERY RELEASE] lever, slide the battery to remove it.

- Hold the battery with your hand so it does not fall.
- Inserting/removing a cassette
1 Slide the [OPEN/EJECT] lever and open the cassette cover.
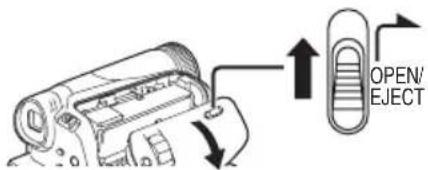
- When the cover is fully opened, the cassette holder will come out.
2 After the cassette holder is opened, insert/remove the cassette.

natural_image
Technical line drawing of a mechanical assembly with an upward arrow indicating motion (no text or symbols present)- When inserting a cassette, orient it as shown in the figure, and then securely insert it as far as it goes.
- When removing, pull it straight out.
3 Push the [PUSH] mark ① in order to close the cassette holder.

4 Only after the cassette holder is completely housed, close the cassette cover by pressing the mark ②.

- Inserting/removing a card
Before inserting/removing a card, be sure to turn the power [OFF].
- If the card is inserted or removed with the power turned on, this camera may malfunction or the data recorded on the card may be lost.
1 Open the LCD monitor and then slide the [◀OPEN] Lever to open the card slot cover.

natural_image
Line drawing of a vintage camera with open screen and mounted lens (no text or symbols)2 Insert/remove the card into/from the card slot.
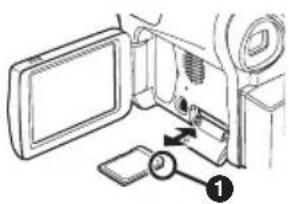
- When inserting a card, face the label side 1 towards you and push it straight in with one stroke as far as it goes.
- When removing the card, open the card slot cover and press the centre of the card and then pull it straight out.
3 Securely close the card slot cover.
■ Turning the camera on
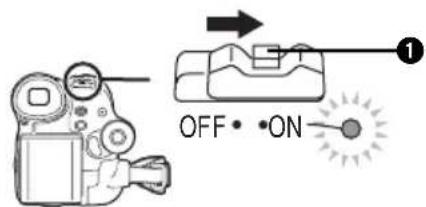
When the camera is turned on with the lens cap fitted, the automatic white balance adjustment may not function properly. Please turn the camera on after removing the lens cap.
How to turn on the power
1 While pressing the button ①, set the [OFF/ON] switch to [ON].
●The power lamp lights up.
How to turn off the power
1 While pressing the button ①, set the [OFF/ON] switch to [OFF].
●The power lamp goes off.

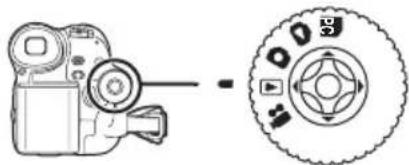
■ Selecting a mode
Rotate the mode dial to select the desired mode.
1 Rotate the mode dial.
- Set your desired mode to ①.
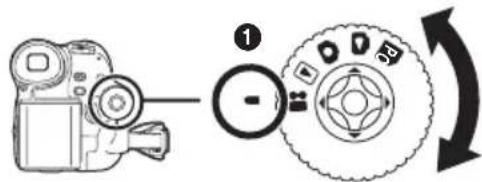
: Tape recording mode
Use this when you record the image on a tape. (Also, you can simultaneously record still pictures on a card while recording images on a tape.)
: Tape playback mode
Use this to play back a tape.
: Card recording mode
Use this to record still pictures on a card.
: Picture playback mode
Use this to play back the still pictures recorded on a card.
PC: P C mode
You can view or edit the images recorded on a card on your personal computer.
(Refer to the operating instructions for PC connection.)
■ How to use the joystick
Basic joystick operations
Operations on the menu screen and selection of files to be played back on the multi-image display
Move the joystick up, down, left, or right to select an item or file, and then push in the centre to set it.

| 1 | Select by moving up. |
| 2 | Select by moving down. |
| 3 | Select by moving left. |
| 4 | Select by moving right. |
| 5 | Determine by pushing the centre. |
Joystick and screen display
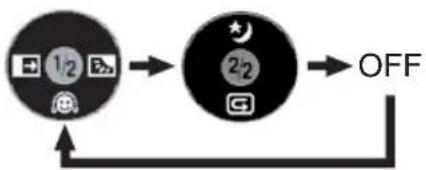
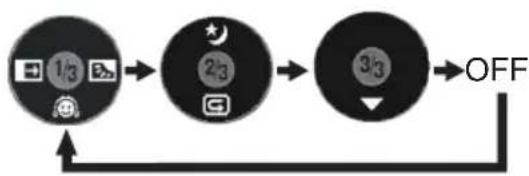
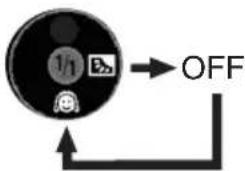
Push the centre of the joystick, and icons will be displayed on the screen. Each push switches the display as follows depending on the mode.
(In the Tape playback mode or the Picture playback mode, the icons will be automatically displayed on the screen.)
1) Tape recording mode
([AUTO/MANUAL/FOCUS] switch is set to [AUTO])
flowchart
graph TD
    A["1/2 Icon"] --> B["2/2 Icon"]
    B --> C["OFF"]
    D["Camera Icon"] --> A
| ▼ | Soft skin mode | |
| ◀ | ○ | Fade |
| ▶ | ○ | Backlight compensation |
| ▲ | ★Night view | |
| ▼ | ○ | Recording check |
2) Tape recording mode
([AUTO/MANUAL/FOCUS] switch is set to [MANUAL])
flowchart
graph LR
    A["1/3"] --> B["2/3"]
    B --> C["3/3"]
    C --> D["OFF"]
    D --> A
| ▼ | White balanceShutter speedIris or gain value | |
| ▶ | + | Select/Adjust |
| ◀ | — | Select/Adjust |
3) Tape playback mode

flowchart
graph TD
    A["Process"] --> B["OFF"]
    B --> C["Return Path"]
| ▲ | ▶/■ | Playback/pause |
| ▼ | ■ | Stop |
| ◀ | ◀Rewind (review playback) | |
| ▶ | ▶Fast forward (cue playback) | |
4) Card recording mode
([AUTO/MANUAL/FOCUS] switch is set to [AUTO])
flowchart
graph TD
    A["Device Icon"] --> B["OFF"]
    B --> C["Arrow"]
| ▼ | Soft skin mode |
| ▶ | Backlight compensation |
5) Card recording mode
([AUTO/MANUAL/FOCUS] switch is set to [MANUAL])

flowchart
graph TD
    A["1/2"] --> B["2/2"]
    B --> C["OFF"]
    C --> A
| ▼ | White balanceShutter speedIris or gain value | |
| ▶ | + | Select/Adjust |
| ◀ | — | Select/Adjust |
6) Picture playback mode

flowchart
graph TD
    A["Control knob with icons"] --> B["OFF"]
    B --> C["Arrow pointing right"]
| ▲ | ▼■ | Playback/stop |
| ▼ | 苗 | Erase |
| ◀ | ◀ | Playback previous picture |
| ▶ | ◀ | Playback next picture |
Switching the language
You can switch the language on the screen display or the menu screen.
1 Set [LANGUAGE] >> [English].

- The menu corresponding to the mode selected by the mode dial is displayed.
- Do not switch the mode dial when the menu is displayed.
2 Move the joystick up or down in order to select the top menu.


3 Move the joystick right or press it to set the selection.


4 Move the joystick up or down in order to select the sub-menu.


5 Move the joystick right or press it to set the selection.


6 Move the joystick up or down in order to select the item to be set.
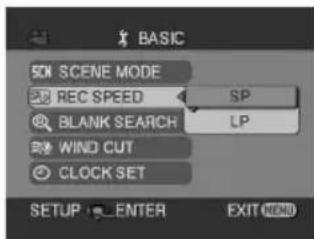

7 Press the joystick to determine the setting.

To get back to the previous screen Move the joystick left.

To exit the menu screen
Press the [MENU] button.
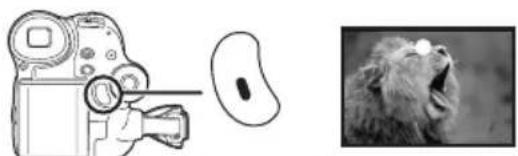
■ Recording on a tape
- Set to Tape Recording Mode.

natural_image
Line drawing of a digital camera and its corresponding circular dial (no text or symbols)1 Press the recording start/stop button to start recording.
natural_image
Illustration of a camera and a monkey photo (no text or symbols)2 Press the recording start/stop button again to pause recording.

natural_image
Black-and-white photo of two women sitting together, one holding a stuffed dog (no visible text or symbols)■ Recording still pictures on a card while recording image onto a tape
You can record still pictures while recording image onto a tape.
- Set to Tape Recording Mode.
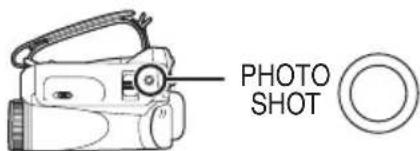
1 Press the [PHOTO SHOT] button fully while recording image onto a tape.

■ Recording still pictures onto a card (Photoshot)
- Set to Card Recording Mode.

natural_image
Line drawing of a vintage camera with a circular dial and hexagonal hub (no text or symbols)1 Press the [PHOTO SHOT] button.
■ Zoom in/out function
You can zoom in up to 30× (24× on NV-GS28) optically.
- Set to Tape/Card Recording Mode.
1 Wide-angle recording (zoom out): Push the [W/T] lever towards [W]. Close-up recording (zoom in): Push the [W/T] lever towards [T].

■ Playing back tape
- Set to Tape Playback Mode.
natural_image
Line drawing of a digital camera with a circular inset showing a rotary dial (no text or symbols)1 Operate with joystick.
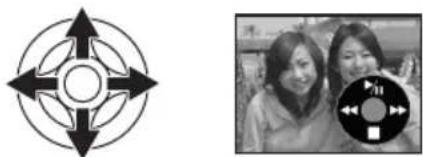
natural_image
Two black-and-white photos: one showing a circular target with arrows, the other showing two people with a circular icon (no text or symbols)▶/■: Playback/Pause
◀◀: Rewind/Review playback (Reverts to playback with the ▶/■■ icon.)
▶▶: Fast forward/Cue playback (Reverts to playback with the ▶/■■ icon.)
■: S t o p
To adjust volume
Adjust the speaker volume for playback.
1 Move the [-☐/VOL+] lever to adjust the volume.

Towards [+] : increases the volume Towards [-] : decreases the volume (Nearer the bar to [+] , larger the volume.)
■ Playback on TV
Images recorded by this camera can be played back on a TV.
- Insert a recorded tape into this camera.
1 Connect the movie camera and a TV.

flowchart
graph TD
    A["S-VIDEO"] --> B["A/V"]
    B --> C["1"]
    C --> D["2"]
    D --> E["[S-VIDEO IN"]]
    D --> F["[AUDIO IN"]]
    G["Computer"] --> H["[VIDEO IN"]]
    G --> I["[S-VIDEO IN"]]
- Connect the movie camera and a TV by using the AV cable ①.
- If the TV has an S-Video terminal, then also connect an S-Video cable ② (optional). It allows you to enjoy more beautiful images.
2 Turn on this camera and set the mode dial to the Tape Playback Mode.
3 Select the input channel on the TV.
4 Move the joystick up to select the [▶/■] icon to start playback.
●The image and audio are output on the TV.
5 Move the joystick down to select the [■] icon to stop playback.
■ Playing back card
- Set to Picture Playback Mode.
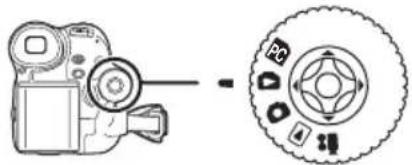
1 Operate with joystick.


natural_image
Two women smiling outdoors, one holding a circular icon with play symbols (no readable text)◀: Plays back the previous picture.
▶: Plays back the next picture.
▶/■: Slide show (Plays back the still pictures on the card in order) start/stop

LSQT0894 A
F0205Nw0 ( 15000 Ⓐ )
C
Matsushita Electric Industrial Co., Ltd.
Web site: http://www.panasonic.co.jp/global/
松下电器产业株式会社
日本国大阪
- Model No. NV-GS38GK NV-GS28GK
- 安全注意事项
- 手持带
- 调整视野
- 电源
- 给电池充电
- 充电指示灯
- ■ 取下电池
- 当磁带仓不能收起时
- : 磁带录制模式
- 4) 记忆卡录制模式
- ■ 关于夹子 (在背面)
- 空白搜索功能
- ■ 中途停止连续拍照
- 回放模式
- 回放磁带
- Quick guide (English)
- Power supply
- Charging the battery
- Charging lamp
- Fitting the battery
- Removing the battery
- - Inserting/removing a cassette
- - Inserting/removing a card
- ■ Turning the camera on
- How to turn on the power
- ■ Selecting a mode
- ■ How to use the joystick
- Basic joystick operations
- Joystick and screen display
- 1) Tape recording mode
- 2) Tape recording mode
- 3) Tape playback mode
- 4) Card recording mode
- 5) Card recording mode
- 6) Picture playback mode
- Switching the language
- ■ Recording on a tape
- ■ Recording still pictures on a card while recording image onto a tape
- ■ Recording still pictures onto a card (Photoshot)
- ■ Zoom in/out function
- ■ Playing back tape
- To adjust volume
- ■ Playback on TV
- ■ Playing back card
Brand : PANASONIC
Model : NV-GS38
Category : Camera