
HM-TA20GN - Camera PANASONIC - Free user manual and instructions
Find the device manual for free HM-TA20GN PANASONIC in PDF.


| Product Type | High Definition Mobile Camera |
| Model | HM-TA20GN (also HM-TA2) |
| Dimensions (HM-TA20) | 64.3 mm (W) × 112.6 mm (H) × 17.7 mm (D) (excluding projecting parts) |
| Dimensions (HM-TA2) | 59.8 mm (W) × 108.9 mm (H) × 16.9 mm (D) (excluding projecting parts) |
| Weight (HM-TA20 with SD card) | Approx. 155 g |
| Weight (HM-TA2 with SD card) | Approx. 144 g |
| Power Source | DC 5.0 V (USB) / DC 3.7 V (battery) |
| Battery | Built-in rechargeable lithium-ion, 3.7 V |
| Charging Time | Approx. 4 h 20 min via USB |
| Recording Media | SD/SDHC/SDXC Memory Card (up to 64 GB supported); Built-in memory approx. 10 MB |
| Video Recording Modes | 1080/30p (1920×1080), 720/30p (1280×720), 480/30p (640×480), iFrame (960×540) |
| Still Picture Resolutions | 8M (3264×2448, 4:3), 2M (1600×1200, 4:3 / 1920×1080, 16:9), 0.3M (640×480, 4:3) |
| Lens | F2.8, focal length 4.1 mm, 35mm equiv: motion 49 mm (16:9) / still 49 mm (16:9) or 39 mm (4:3) |
| Zoom | 1× optical, 4× digital |
| Display | 7.5 cm (3.0") LCD touch screen, approx. 230,000 dots |
| Waterproof/Dustproof (HM-TA20 only) | IP58: 3 m depth for 60 minutes |
| Drop Resistance (HM-TA20 only) | MIL-STD 810F Method 516.5-Shock; drop from 1.5 m onto 3 cm plywood |
| Connectivity | USB 2.0 (Type A), HDMI mini, headphone terminal |
| Software | HD Writer PE 2.0 (Windows); iMovie support (Mac) |
| Operating Temperature | 0 °C to 35 °C |
| Included Accessories | Hand strap with stylus pen, USB extension cord, tripod (optional) |
Frequently Asked Questions - HM-TA20GN PANASONIC
User questions about HM-TA20GN PANASONIC
0 question about this device. Answer the ones you know or ask your own.
Ask a new question about this device
Download the instructions for your Camera in PDF format for free! Find your manual HM-TA20GN - PANASONIC and take your electronic device back in hand. On this page are published all the documents necessary for the use of your device. HM-TA20GN by PANASONIC.
USER MANUAL HM-TA20GN PANASONIC
Operating Instructions
High Definition Mobile Camera
Model No. HM-TA20 HM-TA2

natural_image
Illustration of a mobile phone with a blank screen and control buttons (no text or symbols)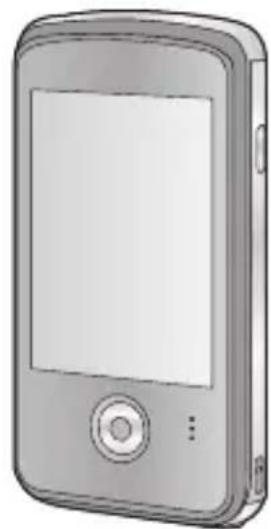
natural_image
Illustration of a mobile phone with a blank screen and control buttons (no text or symbols)Before use, please read these instructions completely.
HDMI

Model number suffix "EB" denotes UK model.
VQT3P01-1
EB EP GC GN
1AG6P1P6267-A(S)
Information for Your Safety
HM-TA20
WARNING:
TO REDUCE THE RISK OF FIRE, ELECTRIC SHOCK OR PRODUCT DAMAGE,
- Do not let water or other liquids drip or splash inside the unit.
- Do not expose accessories to rain, moisture, dripping or splashing.
- Do not place objects filled with liquids, such as vases, on accessories.
- Use only the recommended accessories.
- Do not remove covers.
- Do not repair this unit by yourself. Refer servicing to qualified service personnel.
HM-TA2
WARNING:
TO REDUCE THE RISK OF FIRE, ELECTRIC SHOCK OR PRODUCT DAMAGE,
- Do not expose this unit to rain, moisture, dripping or splashing.
- Do not place objects filled with liquids, such as vases, on this unit.
- Use only the recommended accessories.
- Do not remove covers.
- Do not repair this unit by yourself. Refer servicing to qualified service personnel.
CAUTION!
- DO NOT INSTALL OR PLACE THIS UNIT IN A BOOKCASE, BUILT-IN CABINET OR IN ANOTHER CONFINED SPACE. ENSURE THE UNIT IS WELL VENTILATED. TO PREVENT RISK OF ELECTRIC SHOCK OR FIRE HAZARD DUE TO OVERHEATING, ENSURE THAT CURTAINS AND ANY OTHER MATERIALS DO NOT OBSTRUCT THE VENTILATION VENTS.
- DO NOT OBSTRUCT THE UNIT'S VENTILATION OPENINGS WITH NEWSPAPERS, TABLECLOTHS, CURTAINS, AND SIMILAR ITEMS.
- DO NOT PLACE SOURCES OF NAKED FLAMES, SUCH AS LIGHTED CANDLES, ON THE UNIT.
- DISPOSE OF BATTERIES IN AN ENVIRONMENTALLY FRIENDLY MANNER.
(EB/EP only)
■ EMC Electric and magnetic compatibility
This symbol (CE) is located on the rating plate.
Use only the recommended accessories.
- Do not use any other USB extension cords except the supplied one.
- Keep the Memory Card out of reach of children to prevent swallowing.
Product Identification Marking is located on the bottom of unit.
■ Information for Users on Collection and Disposal of Old Equipment and used Batteries

natural_image
Symbol of a trash bin crossed with no visible text or labelsThese symbols on the products, packaging, and/or accompanying documents mean that used electrical and electronic products and batteries should not be mixed with general household waste.
For proper treatment, recovery and recycling of old products and used batteries, please take them to applicable collection points, in accordance with your national legislation and the Directives 2002/96/EC
and 2006/66/EC.
By disposing of these products and batteries correctly, you will help to save valuable resources and prevent any potential negative effects on human health and the environment which could otherwise arise from inappropriate waste handling.
For more information about collection and recycling of old products and batteries, please contact your local municipality, your waste disposal service or the point of sale where you purchased the items. Penalties may be applicable for incorrect disposal of this waste, in accordance with national legislation.

natural_image
Symbol of a trash bin crossed with a diagonal line, representing waste sorting or discharge (no text or numbers present)For business users in the European Union
If you wish to discard electrical and electronic equipment, please contact your dealer or supplier for further information.
[Information on Disposal in other Countries
outside the European Union]
These symbols are only valid in the European Union. If you wish to discard these items, please contact your local authorities or dealer and ask for the correct method of disposal.
![PANASONIC HM-TA20GN - outside the European Union] - 1](/content/2026/06/1193267/images/1e2a3d102c7769aaa1b8907050bce4c33f3f7b26751cfd375b913e624c92b81c.jpg)
natural_image
Simple line drawing of a trash bin with crossed lines indicating no waste or discharge (no text or symbols)Cd
Note for the battery symbol (bottom two symbol examples):
This symbol might be used in combination with a chemical symbol. In this case it complies with the requirement set by the Directive for the chemical involved.
■ Indemnity about recorded content
Panasonic does not accept any responsibility for damages directly or indirectly due to any type of problems that result in loss of recording or edited content, and does not guarantee any content if recording or editing does not work properly. Likewise, the above also applies in a case where any type of repair is made to the unit.
■ About recording method and compatibility of this unit
This unit can record detailed high definition images based on the MP4 format (MPEG-4 AVC/H.264 codec).
- Since the recording method is different from the AVCHD format, the data is not compatible.
■ Cards that you can use with this unit
SD Memory Card, SDHC Memory Card and SDXC Memory Card
- 4 GB or more Memory Cards that do not have the SDHC logo or 48 GB or more Memory Cards that do not have the SDXC logo are not based on SD Memory Card Specifications.
- Refer to page 26 for more details on SD cards.
■ For the purposes of these operating instructions
- SD Memory Card, SDHC Memory Card and SDXC Memory Card are referred to as the "SD card".
- Pages for reference are indicated by an arrow, for example: 00
These operating instructions are designed for use with models
HM-TA20 and . FHM-TA2 may be slightly different from
the original.
- The illustrations used in these operating instructions show model HM-TA20, however, parts of the explanation refer to different models.
- Depending on the model, some functions are not available.
- Features may vary, so please read carefully.
- Not all models may be available depending on the region of purchase.
Contents
HM-TA20
Please be sure to read “(Important) About the Waterproof/Dustproof and Anti-shock Performance of this unit [HM-TA20]” ( 8) before using this unit underwater to prevent the unit from being mishandled, which may cause water to seep in.
Information for Your Safety......2 (Important)
About the Waterproof/Dustproof and Anti-shock Performance of this unit [HM-TA20] 8
Check before using underwater 10
Using this unit underwater..... 12
Caring of this unit after using it underwater 13
Accessories...... 16
Optional accessories...... 16
Preparation
Parts identification and handling 17
Charging the battery...... 21
Charging and motion pictures recording time 24
Approximate operating time and number of recordable still pictures 24
Charging and voices recording time 25
Preparing the card 26
Cards that you can use with this unit.... 26
Inserting/removing an SD card 28
Turning the unit on/off...... 30
How to use the touch screen 31
Setting date and time...... 32
Recording/Playback
Recording 34
Selecting a mode 34
Recording motion pictures ..... 35
Recording still pictures...... 36
Recording voices 37
Intelligent Auto Mode 38
Digital zoom in/out function..... 39
Recording with the LED light... 39
Night view mode 40
Effect function (applying special effects) ..... 40
For underwater recording [HM-TA20].... 41
Playback 42
Playing back the slide show/continuous playback 47
Zooming in on a still picture during playback
(Playback zoom) 48
Deleting scenes, still pictures or voices.... 49
Creating still picture from motion picture 51
To delete unwanted parts of a motion picture 52
Setting of online sharing of motion pictures.... 53
Using the Setup menu screen 54
Menu list.... 54
Watching Motion/Still Pictures on your TV 59
With a PC
What you can do with a PC..... 61
Operating environment ...... 63
Installation 66
Connecting to a PC...... 68
About the PC display...... 70
Starting HD Writer PE 2.0 ..... 71
Reading the operating instructions of the software applications .... 71
If using Mac 72
To use as a camera for Skype .... 73
How to connect 75
Others
Indications 76
Messages/Troubleshooting..... 79
Cautions for use...... 83
Requests when disposing of this unit 88
About copyright 91
Recording modes/ approximate recordable time (motion pictures)......92
Approximate number of recordable pictures 93
Recording modes/approximate recordable time (voices)...... 93
Specifications.... 94
Index 99
(Important)
About the Waterproof/Dustproof and Anti-shock Performance of this unit [HM-TA20]
Waterproof/Dustproof Performance
This unit's waterproof/dustproof rating complies with the "IP58" rating. Provided the care and maintenance guidelines described in this document are strictly followed, this unit can operate underwater, to a depth not exceeding 3 m for a time not exceeding 60 minutes. (*1)
Anti-shock Performance
This unit also complies with “MIL-STD 810F Method 516.5-Shock”. This unit has cleared a drop test from a height of 1.5 m onto 3 cm thick plywood. In most cases this unit should not sustain any damage if dropped from a height not exceeding 1.5 m. (*2)
This does not guarantee no destruction, no malfunction, or waterproofing in all conditions.
*1 This means that this unit can be used underwater for specified time in specified pressure in accordance with the handling method established by Panasonic.
*2 “MIL-STD 810F Method 516.5-Shock” is the test method standard of the U.S. Defense Department, which specifies performing drop tests from a height of 122 cm, at 26 orientations (8 corners, 12 ridges, 6 faces) using 5 sets of devices, and passing the 26 orientation drops within 5 devices. (If failure occurs during the test, a new set is used to pass the drop orientation test within a total of 5 devices.) Panasonic’s test method is based on the above “MIL-STD 810F Method 516.5-Shock”. However, the drop height was changed from 122 cm to 150 cm dropping onto 3 cm thick plywood. This drop test was passed.
(Disregarding appearance change such as loss of paint or distortion of the part where drop impact is applied.)
■ Handling of this unit
- Waterproofing is not guaranteed if the unit is subject to an impact as a result of being hit or dropped etc. If an impact to this unit occurs, it should be inspected (subject to a fee) by a Panasonic's Service Center to verify that the waterproofing is still effective.
- The waterproof performance may be degraded due to the strong water pressure when this unit is used deeper than 3 m underwater.
- When this unit is splashed with detergent, soap, hot spring, bath additive, sun oil, sun screen, chemical, etc., wipe it off immediately.
- Waterproof function of this unit is for sea water and fresh water only.
- Any malfunction caused by customer misuse, or mishandling will not be covered by the warranty.
- The inside of this unit is not waterproof. Water leakage will cause malfunction.
● Supplied accessories are not waterproof.
- Cards are not waterproof. Do not handle with a wet hand. Also, do not insert wet card into this unit.
- Do not leave this unit for a long period of time in places where temperature is very low (at ski resorts or at high altitude etc.) or very high [above 35 °C], inside a car under strong sunlight, close to a heater, on the beach, etc. Waterproof performance may be degraded.
- Foreign objects may adhere to the inner side of the door/cover (around the rubber seal or connecting terminals) when the door/cover is opened or closed in places with sand or dust etc. This may result in the impairment of the waterproof performance if the door/cover is closed with foreign objects adhered. Be extremely careful since it may result in malfunction etc.
- If any foreign object is adhered to the inner side of the door/cover, remove with the lint-free cloth.
- If any liquid such as water droplets is adhered to this unit or inner side of the door/cover, wipe off with a soft dry cloth. Do not open or close the door/cover near the water, when underwater, using wet hands, or when this unit is wet. It may cause water leakage.
■ When inner side of the lens is fogged (condensation) It is not a malfunction or failure of this unit. It may be caused by the environment in which this unit is used.
What to do when inner side of the lens is fogged
- Turn off the unit and open the door/cover in a place with constant ambient temperature, away from high temperatures, humidity, sand and dust. The fog will disappear naturally in 10 minutes to 2 hours with the door/cover open when the temperature of this unit gets close to the ambient temperature.
- Contact Panasonic’s Service Center if the fogging does not disappear.
Conditions in which inner side of the lens may be fogged
Condensation may occur and the inner side of the lens may be fogged when this unit is used in areas that undergo a significant change in temperature or in high humidity, such as the following:
- When this unit is used underwater suddenly after being on a hot beach etc.
- When this unit is moved to a warm area from a cold area, such as at a ski resort or at high altitude
- When the door/cover is opened in a high-humidity environment
Check before using underwater
Do not open or close the door/cover in places with sand and dust, close to water, or with wet hands. Sand or dust adhering may cause water leaks.
1 Check that there are no foreign objects on the inner side of the door/cover.
- If there is any foreign object, such as lint, hair, sand, etc., on the surrounding area, water will leak within a few seconds causing malfunction.
- Wipe it off with a dry soft cloth if there is any liquid. It may cause water leaks and malfunction if you use this unit with liquid adhered.
- If there is any foreign material, remove with the lint-free cloth.
- Be extremely careful to remove the small sand etc. that may adhere to the sides and corners of the rubber seal.
2 Check for cracks and deformation of the rubber seal on the door/cover.
- The integrity of the rubber seals may decrease after about 1 year, with use and age. To avoid permanently damaging this unit the seals should be replaced once each year. Please contact Panasonic's Service Center for related costs and other information.
3 Close the door/cover securely.
- Lock the LOCK lever securely until the red part is no longer visible.
- To prevent water seeping into this unit, be careful not to trap foreign objects such as liquids, sand, hair or dust etc.
USB terminal cover

HDMI/Headphone
cover

SD card door

flowchart
graph TD
    A["Device C"] --> B["Device D"]
    C["Device E"] --> A
    style A fill:#f9f,stroke:#333
    style B fill:#ccf,stroke:#333
    style C fill:#cfc,stroke:#333
Ⓐ LOCK lever
⑧ Open/close lever
© Released state
(D) Locked state
⑤ Red part
Using this unit underwater
- Use this unit underwater at a depth of up to 3 m with the water temperature between 0 °C and 35 °C.
- Do not use this unit at a depth of over 3 m.
- Do not use it in the hot water over 35^ (in the bath or hot spring).
- Do not use this unit underwater not longer than 60 minutes continuously.
- Do not open or close the door/cover.
- Do not apply shock to this unit underwater. (Waterproof performance may not be maintained, and there is a chance of water leak.)
- Do not dive into the water holding this unit. Do not use this unit in a location where the water will splash strongly, such as rapid flow or waterfall. (Strong water pressure may be applied, and it may cause malfunction.)
- This unit will sink in the water. Take care not to drop this unit and lose it underwater by securely placing the strap around your wrist or similar measure.
- Attaching a tripod with a 5.5 mm screw or larger may open a hole in this unit through which water will leak.
- The touch screen will not work underwater. It will malfunction, so make sure to press the screen lock button. (→ 41)
Caring of this unit after using it underwater
Do not open or close the door/cover until the sand and dust is removed by rinsing this unit with water.
Make sure to clean this unit after using it.
- Thoroughly wipe off any water droplets, sand, and saline matter on your hands, body, hair, etc.
- It is recommended to clean this unit indoors, avoiding places where water spray or sand may fall.
Do not leave this unit uncared for more than 60 minutes after using it underwater.
- Leaving this unit with foreign objects or saline matter on it may cause damage, discolouration, corrosion, unusual odour, or deterioration of the waterproof performance.
1 Rinse with water with the door/cover closed.
- After use at the seaside or underwater, soak the unit in fresh water pooled in a shallow container for 10 minutes or less.

2 Drain water by holding this unit upside down and shaking it lightly a few times.
- After using this unit at the seaside or underwater, or after washing it, water will remain at the speaker site of this unit for a while and it may cause lower sound or sound distortion.
- Fasten the strap firmly to prevent this unit from dropping.
3 Wipe off water drops on this unit with a dry soft cloth and dry this unit in a shaded area which is well ventilated.

natural_image
Illustration of a handheld electronic device with sound waves on a textured surface (no text or symbols)- Dry this unit by standing it on a dry cloth.
- Do not dry this unit with hot air from dryer or similar. Waterproof performance will deteriorate due to deformation.
- Do not use chemicals such as benzine, thinner, alcohol, or cleanser, or soap or detergents.
4 Confirm that there are no water droplets, open the door/cover, and wipe off any water droplets or sand left inside using a soft dry cloth.
- Water droplets may adhere to the card when the door/cover is opened without thoroughly drying. Also, water may accumulate in the gap around the card compartment or the terminal connector. Be sure to wipe any water off with a soft dry cloth.
- The water droplets may seep into this unit when the door/cover is closed while it is still wet, causing condensation or failure.
For the United Kingdom and Ireland customers ■ Sales and Support Information
Customer Care Centre
- For customers within the UK: 0844 844 3852
- For customers within Ireland: 01 289 8333
- Visit our website for product information www.panasonic.co.uk
• E-mail: customer.care@panasonic.co.uk
Technical Support for AV Software
- For customers within the UK: 0844 844 3869
- For customers within Ireland: 01 289 8333
Direct Sales at Panasonic UK
• For customers: 0844 844 3856
- Order accessory and consumable items for your product with ease and confidence by phoning our Customer Care Centre Monday–Thursday 9.00 a.m.–5.30 p.m., Friday 9.30 a.m.–5.30 p.m. (Excluding public holidays)
- Or go on line through our Internet Accessory ordering application at www.pas-europe.com.
- Most major credit and debit cards accepted.
- All enquiries transactions and distribution facilities are provided directly by Panasonic UK.
- It couldn't be simpler!
- Also available through our Internet is direct shopping for a wide range of finished products, take a browse on our website for further details.
Accessories
Check the accessories before using this unit.
Keep the accessories out of reach of children to prevent swallowing.
Product numbers correct as of April 2011. These may be subject to change.
Hand strap with stylus pen
VFC4708

natural_image
Simple line drawing of a mechanical tool or tool with a loop handle and central grip (no text or symbols)- The stylus pen is used for operations that are hard to operate with your fingers or performing detailed operations with the touch screen operation. (→ 31)
USB extension cord
VFA0545
Tripod
VFC4709

natural_image
Two technical line drawings of electrical connectors: a cable with terminal connector and a threaded rod (no text or symbols)- The unit comes with built-in HD Writer PE 2.0 video editing software.
● Supplied accessories are not waterproof.
Optional accessories
Some optional accessories may not be available in some countries.
SD/SDHC/SDXC Memory Card (Refer to page 26)
AC adaptor (VSK0746)*
Order number:
(EB) VSK0752*
(EP) VSK0751*
(GC) A VSK0752*/B VSK0751*
Hong Kong Special Administrative Region of China and Saudi Arabia
B Areas Other than Hong Kong Special Administrative Region of China, Saudi Arabia
(GN) VSK0753*
* AC adaptor (VSK0746/VSK0751/VSK0752/VSK0753) is only for charging.
Preparation
Parts identification and handling
HM-TA20

HM-TA2

1 Internal microphones
2 Power button [ ] (\~/130)
3 Speaker
4 Hand strap fixture
- Attach the hand strap to this unit and adjust its length using the stylus pen.

5 Recording button ( 35)
6 Status indicator ( 21, 28, 30, 59)
7 LCD monitor (Touch screen) ( 31)
Due to limitations in LCD production technology, there may be some tiny bright or dark spots on the LCD monitor screen. However, this is not a malfunction and does not affect the recorded picture.
8
HM-TA20
Screen lock button ( 41)

9 Tripod receptacle
- If you attach a tripod which has 5.5 mm screw or larger, it may damage this unit.
10 LED light ( 39)
11 Lens
12 HM-TA2
USB Latch ( 21)

natural_image
Illustration of a projector with a circular button and grid screen (no text or symbols)
natural_image
Illustration of a mobile phone with three tripod legs (no text or symbols)
15 Headphone terminal [💡]
- Recommended additional earphones: Panasonic RP-HV154, RP-HJE130 (the product number is correct as of April 2011.)
—Max. output voltage of unit at earphone terminal: 150 mV or less
—Wide band characteristic voltage of headphone or earphone: 75 mV or larger
- Excessive sound pressure from earphones and headphones can cause hearing loss.
- Listening at full volume for long periods may damage the user's ears. Be sure to use the supplied or recommended headphones or earphones.
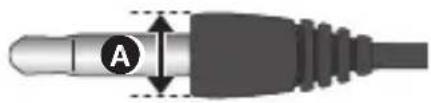
- Use the earphone/headphone with a part width ∅ 11 mm or smaller.
16 Reset button [RESET] ( 82)
HDMI/Headphone cover
19 HM-TA20
USB Latch ( 21)
20 USB terminal [ ] (→ 21, 66, 68, 75)
21 USB terminal cover ( 21)
22 HM-TA2
HDMI cover
23 HM-TA2
Headphone terminal cover
natural_image
Close-up of a black electrical plug with a circular icon labeled 'A' and a vertical dimension line (no text or symbols beyond the label)HM-TA20
About locks for USB terminal cover, HDMI/Headphone cover and SD card door
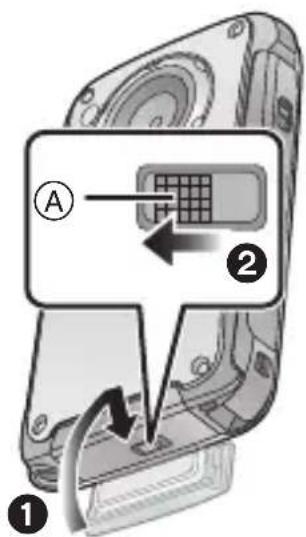
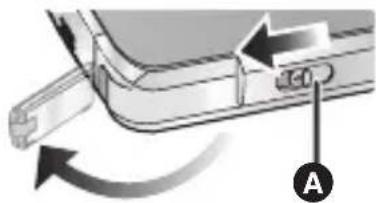
Each door/cover is equipped with a LOCK lever to lock the open/close lever. When opening and closing the door/cover, slide the LOCK lever and then slide the open/close lever.
USB terminal cover

HDMI/Headphone
cover

SD card door

Ⓐ LOCK lever
⑧ Open/close lever
Preparation
Charging the battery
When this unit is purchased, the battery is not charged. Charge the battery fully before using this unit for the first time.
Important:
- This unit has a built-in rechargeable lithium-ion battery. Do not remove except when disposing of this unit.
- The battery will not be charged if the unit is turned on.
- The battery can also be charged using the AC adaptor (optional). ( 16, 22)
1 Take out the USB terminal.
- Be careful as the USB terminal will jump out.
HM-TA20
1

natural_image
Close-up of a mechanical component with a labeled arrow pointing to a section (no text or symbols present)2

natural_image
Diagram of a mechanical device with directional arrows indicating motion or force (no text or symbols)3

natural_image
Diagram of a device being inserted into a slot, showing a pin and cable (no text or symbols present)① Slide the LOCK lever for the USB terminal cover A to release the lock on the open/close lever for the USB terminal cover B.
② Open the USB terminal cover while sliding the open/close lever for the USB terminal cover B in the direction indicated by the arrow.
③ Press the USB Latch Ⓐ until the USB terminal comes out.
HM-TA2
1
natural_image
Diagram of a mechanical component with directional arrows and a labeled point A (no text or symbols beyond label)2

natural_image
Diagram of a device with a USB cable and a labeled component (A), showing no readable text or symbols.① Slide the USB Latch A until the USB terminal cover opens.
② Slide the USB Latch A again until the USB terminal comes out.
2 Connect USB terminal of this unit to a PC with a USB extension cord.
- Be sure to connect USB terminal of this unit to a PC with a USB extension cord when charging the battery.
- Connect the USB extension cord by inserting it securely all the way without forcing.
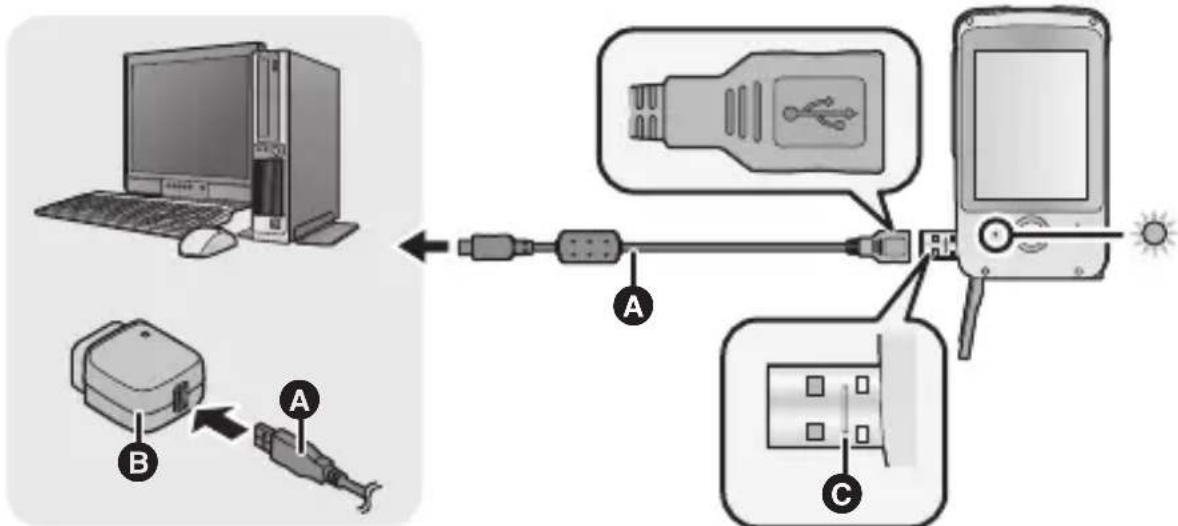
A USB extension cord (supplied)
B AC adaptor (optional)
- Do not use any other USB extension cords except the supplied one. (Operation is not guaranteed with any other USB extension cords.)
- Insert the USB extension cord securely all the way. (Insert to the line Ⓐ.) It will not operate properly if it is not inserted all the way.
- (EB) Always use a genuine Panasonic AC adaptor (VSK0752; optional). (EP) Always use a genuine Panasonic AC adaptor (VSK0751; optional). (GC) Always use a genuine Panasonic AC adaptor
(ⒶVSK0752/ⒷVSK0751; optional).
Ⓐ Hong Kong Special Administrative Region of China and Saudi Arabia
⑧ Areas Other than Hong Kong Special Administrative Region of China, Saudi Arabia
(GN) Always use a genuine Panasonic AC adaptor (VSK0753; optional). THE SOCKET OUTLET SHALL BE INSTALLED NEAR THE EQUIPMENT AND SHALL BE EASILY ACCESSIBLE.
The unit is in the standby condition when the AC adaptor is connected. The primary circuit is always “live” as long as the AC adaptor is connected to an electrical outlet.
- The status indicator will flash red at an interval of 2 seconds, indicating that charging has begun.
- During charging, the status indicator flashes. When charging is finished, the status indicator turns off.
■ To return the USB terminal to its original position
- When pressing the USB terminal with your fingers, press slowly and carefully.
HM-TA20
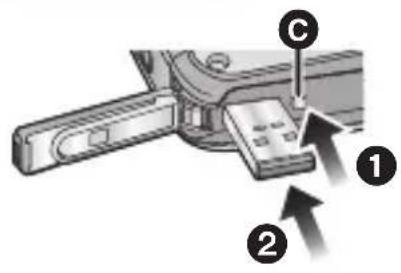


① Press the USB Latch ⓒ.
② While pressing on the USB Latch Ⓐ, press the USB terminal with your finger.
- Release your finger from the USB Latch Ⓐ, and push in the USB terminal until it is locked.
③ Close the USB terminal cover.
④ While the USB terminal cover is closed, slide the open/close lever for the USB terminal cover Ⓑ toward the direction of the arrow.
⑤ Slide the LOCK lever for the USB terminal cover Ⓐ to lock the open/close lever for the USB terminal cover Ⓑ.
HM-TA2
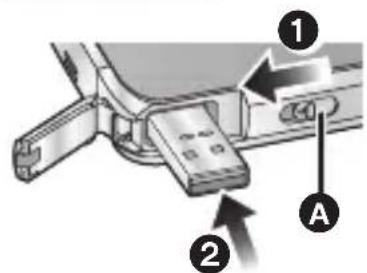
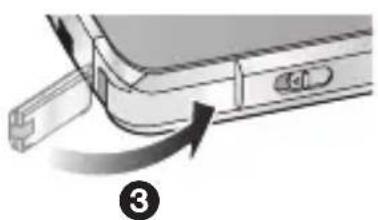
natural_image
Diagram of a device's cable or connector with a USB cable inserted, showing a curved arrow and numbered label (3) — no text or symbols present.① Slide the USB Latch A.
2 While the USB Latch A is slid, press the USB terminal with your finger.
- Release your finger from the USB LatcA, and push in the USB terminal until it is locked.
③ Close the USB terminal cover.
- Please refer to page 84 if the status indicator flashes quickly.
- Do not heat or expose to flame.
- Do not leave unit in an automobile exposed to direct sunlight for a long period time with doors and windows closed.
- If the operating time is still too short even after the battery is fully charged, the battery has worn out and needs to be replaced. Consult the dealer who you purchased this unit from.
- Operation is not guaranteed for all devices equipped with a USB terminal.
Charging and motion pictures recording time
■ Charging/Recording time
- Temperature: 25^ /humidity: 60% RH
| Charging time | Recording mode | Maximum continuous recordable time* | Actual recordable time |
| 4 h 20 min |  | 1 h 25 min 5 | 0 min |
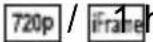 130 130 | min 55 min | ||
 | 1 h 45 min 1 | h |
* Maximum continuous recordable time for one scene:
- If [Video Rec Mode] is set to


29 min 59 sec
- If [Video Rec Mode] is set to : iFrame
Approx. 20 min (up to 4 GB recording capacity)
• These times are approximations.
- The indicated charging time is for when the battery has been discharged completely. Charging time and recordable time vary depending on the usage conditions such as high/low temperature.
- The actual recordable time refers to the recordable time when repeatedly starting/stopping recording, turning the unit on/off, adjusting the zoom etc.
- This unit becomes warm after use or charging. This is not a malfunction.
Approximate operating time and number of recordable still pictures
| Number of recordable pictures | Approx. 230 pictures | By CIPA standard |
| Recording time | Approx. 115 min | |
| Playback time Approx. 210 min | ||
Recording conditions by CIPA standard
- CIPA is an abbreviation of Camera & Imaging Products Association.
• Using a Panasonic SD Memory Card (2 GB)
Charging and voices recording time
■ Charging/Recording time
- Temperature: 25^ /humidity: 60% RH
| Charging time | Recording mode | Maximum continuous recordable time* |
| 4 h 20 min | PCM | 4 h 30 min |
| AAC 256 | 4 h 30 min | |
| AAC 128 / A4ch 380 min |
* Maximum continuous recordable time for one voice: Approx. 5 h (up to 4 GB recording capacity)
• These times are approximations.
- The indicated charging time is for when the battery has been discharged completely. Charging time and recordable time vary depending on the usage conditions such as high/low temperature.
- This unit becomes warm after use or charging. This is not a malfunction.
Battery capacity indication
- The display changes as the battery capacity reduces.

Preparation
Preparing the card
The following operations can be performed using this unit.
- When a card has not been inserted: Scenes, still pictures and voices can be recorded on the built-in memory and played back.
(appears.)
- When a card has been inserted: Scenes, still pictures and voices can be recorded on the card and played back.
Normally, insert the card to use.
Cards that you can use with this unit
This unit (an SDXC compatible device) is compatible with SD Memory Cards, SDHC Memory Cards and SDXC Memory Cards. When using an SDHC memory card/SDXC memory card with other equipment, check the equipment is compatible with these memory cards.
Use SD cards conforming to Class 4 or higher of the SD Speed Class Rating* for motion picture recording.
| Card type | Capacity | Motion picture/ Voice recording | Still picture recording |
| SD Memory Card | 8 MB/ 16 MB/32 MB/64 MB/ 128 MB/256 MB | Cannot be guaranteed in operation. | Cannot be guaranteed in operation. |
| 5 1 2 MB / 1 GB / 2 | GB Can be used. Can be used. | ||
| SDHC Memory Card | 4 GB/6 GB/8 GB/ 12 GB/16 GB/24 GB/ 32 GB | ||
| SDXC Memory Card | 48 GB/64 GB |
* SD Speed Class Rating is the speed standard regarding continuous writing.
Check via the label on the card, etc.
e.g.:
- Please confirm the latest information about SD Memory Cards/SDHC Memory Cards/SDXC Memory Cards that can be used for motion picture recording on the following website.
http://panasonic.jp/support/global/cs/e\_cam
(This website is in English only.)
- 4 GB or more Memory Cards that do not have the SDHC logo or 48 GB or more Memory Cards that do not have the SDXC logo are not based on SD Memory Card Specifications.
- When the write-protect switch Ⓐ on SD card is locked, no recording, deletion or editing will be possible on the card.
- Keep the Memory Card out of reach of children to prevent swallowing.

■ About Built-in Memory
• Recordable Memory size: Approx. 10 MB
- You can not copy the recorded pictures to a card.
- The built-in memory can be used as a temporary storage device.
- The access time for the built-in memory may be longer than the access time for a card.
Inserting/removing an SD card
When using an SD card not from Panasonic, or one previously used on other equipment, for the first time on this unit, format the SD card. ( 58) When the SD card is formatted, all of the recorded data is deleted. Once the data is deleted, it cannot be restored.
Caution:
Check that the status indicator has gone off.
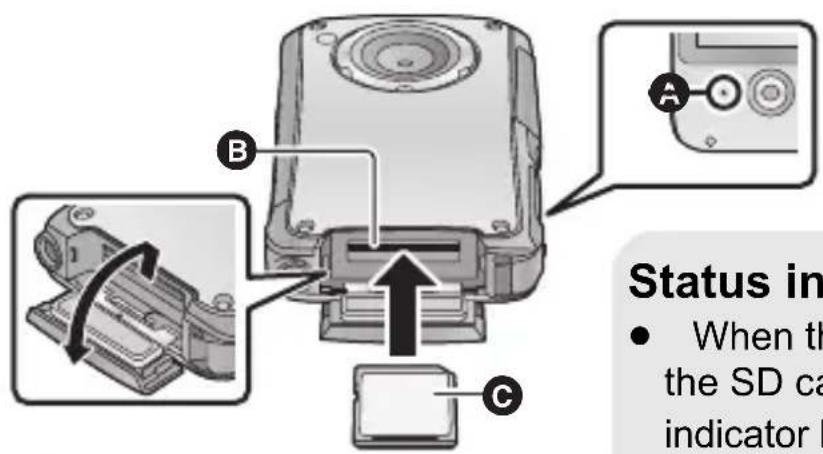
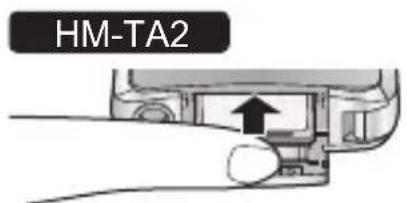
Status indicator A
- When this unit is accessing the SD card, the status indicator lights up.
- Insert SD card as shown in the figure.
1 Open the SD card door and insert (remove) the SD card into (from) the card slot Ⓑ.
- Face the label side Ⓐ in the direction shown in the illustration and press it straight in as far as it will go.
- Press the centre of the SD card and then pull it straight out.
HM-TA20
Open the SD card door after releasing the lock with the LOCK lever for the SD card door.
2 Securely close the SD card door.
- Do not touch the terminals on the back of the SD card.
- Do not apply strong shocks, bend, or drop the SD card.
- Electrical noise, static electricity or the failure of this unit or the SD card may damage or erase the data stored on the SD card.
- When the status indicator is lit, do not:
-Remove the SD card
– Turn the unit off
—Insert and remove the USB terminal
—Expose the unit to vibrations or shock
Performing the above while the status indicator is on may result in damage to data/SD card or this unit. - Do not expose the terminals of the SD card to water, dirt or dust.
- Do not place SD cards in the following areas:
—In direct sunlight
—In very dusty or humid areas
—Near a heater - Locations susceptible to significant difference in temperature (condensation can occur.)
—Where static electricity or electromagnetic waves occur - To protect SD cards, return them to their cases when you are not using them.
- About disposing of or giving away the SD card. (→ 87)
Preparation
Turning the unit on/off
Press the power button to turn on the unit.
• The LCD monitor lights on.
To turn off the unit
Continue pressing the power button until the LCD monitor goes off.
■ About the screen display
Please refer to page 76 for details of the icons displayed on the screen.
■ About the power save function
To prevent battery consumption, it will turn off the screen and go into idle mode after approx. 2 minutes of no operation. (The status indicator A flashes.)
The unit will be turned off automatically if no operation is performed for a further 5 minutes (approx.) while in idle mode.

natural_image
Illustration of a portable electronic device with a circular button and pointer, next to a sun icon (no text or symbols)- Idle mode is cancelled by pressing the Power button or Recording button.
■ About the high temperature warning icon
When the high temperature warning icon is displayed, the temperature of the unit is high.
- It is possible to continue recording/playback when 🚗is displayed, but it is recommended to stop operations and turn off the unit as soon as possible.
- If the temperature rises further, the unit will be turned off automatically after flashes. You will not be able to turn on the unit again until the temperature lowers (will flash.), so wait until the temperature lowers before using again.
- A countdown until the recording is stopped will start from approx. 15 seconds during motion picture recording, and the recording will stop when the display reaches 0 seconds.
- When you turn off the unit while the temperature is high (!is displayed.), you will not be able to turn on the unit again until the temperature lowers. (Will flash.)
Preparation
How to use the touch screen
You can operate by directly touching the LCD monitor (touch screen) with your finger.
It is easier to use the stylus pen (supplied) for detailed operation or if it is hard to operate with your fingers.
■ Touch
Touch and release the touch screen to select icon or picture.
- Touch the centre of the icon.
- Touching the touch screen will not operate while you are touching another part of the touch screen.
natural_image
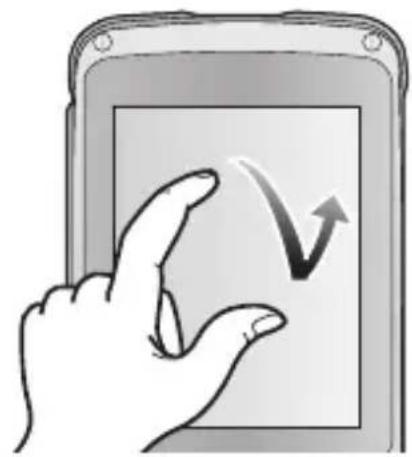
Illustration of a hand pointing at a tablet screen with an arrow icon (no text or symbols)■ Slide while touching
Move your finger while pressing on the touch screen.

natural_image
Illustration of two hands pointing at a screen with an arrow, no text or symbols present- Do not touch on the LCD monitor with hard pointed tips, such as ball point pens.
Preparation
Setting date and time
1 Select the menu. ( 54)

[MENU] → ⚡️ → [CLOCK SET]
2 Touch the date or time to be set, then set the desired value using ⚠️ ▼
- The year can be set between 2000 and 2039.
- The 24-hour system is used to display the time.
3 Touch [ENTER].
- The clock is not set when the unit is shipped.
- When the unit is turned on for the first time, a message asking you to set the date and time will appear.
- The date and time function is driven by a built-in lithium battery.
- If the built-in lithium battery needs to be charged, the message “Set date and time” appears. To recharge the built-in lithium battery, connect USB terminal of this unit to a booted PC. Leave the unit as it is for approx. 24 hours and the battery will maintain the date and time for approx. 3 months. (The battery is still being recharged even if the unit is off.)
- The date and time will be set to January 1, 2011 00:00 when recording is performed without the date and time set.
(EB Only)
WARNING
THE LITHIUM BATTERY IN THIS EQUIPMENT MUST ONLY BE REPLACED BY QUALIFIED PERSONNEL. WHEN NECESSARY, CONTACT YOUR LOCAL PANASONIC SUPPLIER.
(For Australia and New Zealand)
WARNING
THE LITHIUM BATTERY IN THIS UNIT MUST ONLY BE REPLACED BY QUALIFIED PERSONNEL. IF THIS IS NECESSARY, CONTACT THE PANASONIC CUSTOMER CARE CENTRE ON 132600 FOR YOUR NEAREST AUTHORIZED SERVICE CENTRE.
Recording/Playback
Recording
- This unit will perform automatic recording. Auto focusing, auto white balancing, and electronic stabilizer* will function during the recording.
* The electronic stabilizer will not function when recording still pictures or during operation of digital zoom. - Record with this unit vertically.
Selecting a mode
1 Touch [MODE].
- If [MODE] is not displayed, press the Recording button.
2 Touch the icon.
 | Motion Picture Recording Mode (→ 35)● || appears on the screen. |
 | Still Picture Recording Mode (→ 36)● (White) appears on the screen. |
 | Voice Recording Mode (→ 37)● (White) appears on the screen. |
Recording motion pictures
When in Motion Picture Recording Mode
1 Press the Recording button to start recording.
- When you begin recording, ▪ changes to ●.

2 Press the Recording button again to pause recording.
- The images recorded between pressing the Recording button to start recording and pressing it again to pause recording become one scene.
- In the following cases, the countdown until the recording is stopped will start from approx. 30 seconds and the recording will stop when the display reaches 0 second.
- When the total of the capacity of the SD card is about to be used during the recording.
- When the recording time reaches near the maximum continuous recordable time for a single scene. (→ 92)
- Please refer to page 92 for details on continuous recordable time for a single scene.
● Maximum number of recordable scenes on a single SD card is 899100. - Operation sound may be recorded when you perform touch operation while recording.
■ About the screen display when recording motion pictures
1080p: Recording mode
●: Recording motion picture
II: Recording pause
01h30m: Remaining time for motion picture recording
00m00s: Elapsed recording time
- “h” is an abbreviation for hour, “m” for minute and “s” for second.

natural_image
Black-and-white photo of a young boy in a sports jersey, no visible text or symbolsAbout the compatibility of the recorded motion pictures
- They are not compatible with devices other than those that support MP4. Images cannot be played with equipment that does not support MP4. Confirm that your equipment supports MP4 by referring to the operating instructions.
- There are some cases where the recorded motion pictures cannot be played back, even if the device supportsMP4. In such cases, play the recorded motion picture with this unit instead.
Recording still pictures
When in Still Picture Recording Mode
Press the Recording button.
- [is displayed where the focus is set.
• (Red) appears on the screen.

- Still pictures cannot be recorded while recording the motion picture.
- The screen aspect ratio changes depending on the number of recording pixels that is set.
- The focus prioritises closer subjects. It is not displayed at the desired position, reset the focus by getting closer to the subject or moving the unit, etc.
- Using a tripod is recommended when recording still pictures in dark places because the shutter speed becomes slow.
- The screen will turn black for an instant when pressing the Recording button.
■ About the screen display when recording still pictures
: Still picture operation indicator 8M : Number of recording pixels for still pictures
12345: Remaining number of recordable pictures
[] : Focus area
F2.8: Iris value
1/30: Shutter speed

Recording voices
When in Voice Recording Mode
1 Press the Recording button to start recording.
- When you begin recording, (White) changes to (Red).

2 Press the Recording button again to pause recording.
■ To record still pictures while recording voices
1 Touch.
- An image is displayed on the screen, and you will be able to record still pictures.
2 Touch to record a still picture.
- To prevent battery consumption, it will turn off the screen after approx. 2 minutes of no operation during voice recording. To display it again, touch the screen.
- Operation sound may be recorded when you perform touch operation while recording.
■ About the screen display when recording voices
PCM
: Recording mode

: Recording voice
01h30m : Remaining time for voice recording
01h30m59s: Elapsed recording time
- “h” is an abbreviation for hour, “m” for minute and “s” for second.

Intelligent Auto Mode
The following modes (appropriate for the condition) are set just by pointing the unit to what you want to record.
| Mode Scene | ||
 | Portrait When the object is a person | |
 | Scenery Recording outdoors | |
 *1 *1 | Spotlight Under a spotlight | |
 *2 *2 | Night portrait Recording night portrait | |
 *2 *2 | Night scenery Recording night scenery | |
 *2 *2 | Macro Recording zooming in on a flower etc. | |
 *1 *1 | Normal Other situations | |
 *2 *2 | ||
*1 In Motion Picture Recording Mode only
*2 In Still Picture Recording Mode only
- Depending on the recording conditions, the unit may not enter the desired mode.
- In the Portrait, Spotlight mode, the face will be surrounded by white frame when detected. In the Portrait mode, a subject that is bigger and close to centre of the screen will be surrounded by an orange frame.
- Up to 3 frames are indicated when a face is detected.
- When recording still pictures during voice recording, the Intelligent Auto Mode icon does not display on the screen. But the Intelligent Auto Mode will work.
- Using a tripod is recommended in Night Portrait and Night Scenery Mode.
- Faces cannot be detected depending on the recording conditions, such as when faces are of certain sizes or at certain tilts.
Digital zoom in/out function
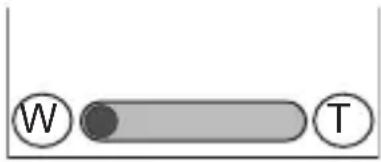
The maximum digital zoom ratio is ×4 .
Touch and hold ☐r . Ⓦ
- You can also zoom by directly touching the zoom bar.
- Motion picture: Independent of zoom magnification, this unit can focus on a subject approx. 30 cm away from the lens. Still picture: Independent of zoom magnification, this unit can focus on a subject approx. 10 cm away from the lens.
- The larger the zoom magnification, the more the image quality is degraded.
Recording with the LED light
The LED light enables brightening of the images taken in a dimly-lit place.
1 (While the recording is paused)
Touch [MENU].
2 Touch.
Each time 📋 is touched, the LED light is turned on or off.
- The setting will be cancelled when you turn off the unit or touch ▶ [PLAY].
- When the LED light is in use, the recordable time when using the battery is shortened.
- The subject should be within approx. 80 cm of the unit.
- Turn off the LED light at places where using a light is prohibited.
- Do not look directly at the LED light when it is on.
—The bright light may hurt your eyes. - Keep a distance of at least 1 m when recording babies.
- Do not use pointing the LED light at drivers etc. as it may lead to accidents.
HM-TA20
Setting for the LED light will be maintained even when the unit is turned off during the screen lock mode.
Night view mode
It is possible to record brighter than usual.
Change the mode to Motion Picture Recording Mode.
1 Touch [MENU] while the recording is paused.
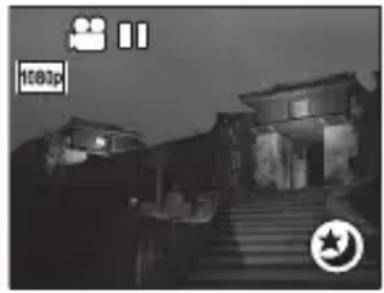
2 Touch.
• Each time ★ is touched, the night view mode is turned on or off.
When the scene is dark, or when the night view mode is on and the scene becomes bright,

will flash automatically.
You can also turn the night view mode on/off by touching ★.
- You cannot turn the night view mode on/off while recording.
- When the night view mode is on, Intelligent Auto Mode does not work.
Effect function (applying special effects)
You can record with effects such as changing the colour tone or making the skin tone smooth.
1 Touch [MENU] while the recording is paused.
2 Touch
3 Touch the desired effect icon to be set.
- Selected effect icon will be displayed in yellow, and the effect will be reflected on the screen.
 | Cancels the setting. |
 | Makes it black and white. |
 | Makes it sepia tone. |
 | Makes the skin tone smooth. |
- The setting will be normal when you turn off the unit or touch

[P.LAY]
For underwater recording [HM-TA20]
This unit can record motion pictures/still pictures under water to a depth 3 m.
1 Press and hold the screen lock button until the message appears.
- You cannot perform touch operations.
- While setting [MENU] or [MODE], it cannot be set to the screen lock mode.
- To release the screen lock mode, press and hold the screen lock button again.

natural_image
Illustration of a mobile phone with an arrow pointing to the side panel (no text or symbols visible)2 Press the Recording button.

■ To switch between Motion Picture Recording Mode and Still Picture Recording Mode Press the screen lock button.
- When you use the screen lock mode, you have the following limitations.
—The effect function will be released. - The zoom magnification will be × 1 .
- To use the LED light, turn on the LED light setting, and then set to screen lock mode. (→ 39)
Recording/Playback
Playback
During playback, we recommend you use this unit horizontally. In these operating instructions, instructions for playback are given primarily for using horizontally.
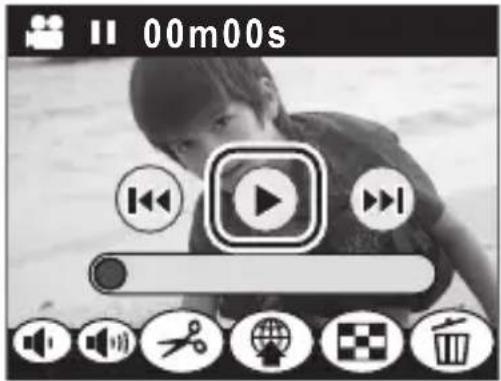
1 Touch ▶ [PLAY].
● The last recorded scene or still picture or voice will be played back.
- If voices to be played back was recorded with still pictures, the still picture is displayed. Touch / on the still picture or slide the screen display from right to left (from left to right) while touching it to playback next (previous) still picture.
- Playback will end and it will go into pause mode for recording when the Recording button is pressed.
2 Hold this unit horizontally.

A Operation icon
- The screen display automatically switches to horizontal.
- To display the operation icon, touch the screen. It will disappear when there is no operation for a few seconds.
3 Select the playback operation by touching the operation icon.
■ Playback operation
| Icon/Playback operation | Operating steps | Playback data |
| Thumbnail display | (Only playing back horizontally)Touch during pause.(→ 44) | All |
| Pause | Touch during playback. Scenes/Voices | |
| Volume adjustment | Touch or during playback.:Increases the volume:Decreases the volume | All |
| Fast forward/rewind playback | Touch (fast forward playback) or rewind playback) during playback or pause. | Scenes/Voices |
| Playback | Touch during pause.Playing back the slide show/continuous playback (→ 47) | All |
| Skip playback (to the start of a scene/voice)To the next (previous) still pictures | Touch or during playback or pause. | All |
| Direct playback | Touch the Direct playback bar or slide it while touching.The playback pauses temporarily and skips to the position touched or slid to while touching.Playback will start by releasing your touching or sliding finger. | Scenes/Voices |
- It is possible that you touch (Frame-by-frame playback) or
◀◀ (Reverse frame-by-frame playback) when editing. (→ 51, 52)
- To playback next (previous) scene, still picture or voice:
-Touch ▷ / ◁.
—Slide the screen display from right to left (from left to right) while touching it.
■ When selecting a scene, still picture or voice to be played back from thumbnail display
Scene/Still picture Voice


1 Touch.
2 Touch scene, still picture or voice to be played back.
- is displayed for scene, and is displayed for still picture.
• To display the next (previous) page:
- Touch △ / ▽ .
—Slide the thumbnail display upward (downward) while touching it.
■ When switching the thumbnail display for scene/still pictures and voice
Touch [MODE].
■ Playback with this unit vertically
Scene/Still picture Voice

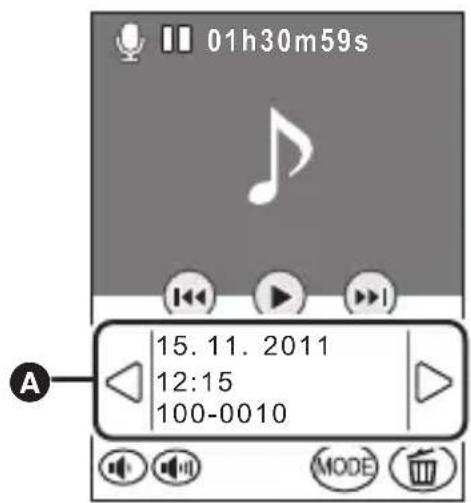
Touch the thumbnail display Ⓐ, then the touched scene, still picture or voice will play back. Touch /, the next (previous) page can be displayed.
- The only time you can display the thumbnail is while paused.
• ⚫ (→ 52), 📋 (→ 51)), 🌐 (→ 53) and 📃 (→ 44) icons will be displayed only when playing back horizontally.
■ About the screen display during playback
00m00s: Playback time (Motion Picture Playback Mode only)
- 00h00m00s is displayed during the Voice Playback Mode.
100-0001: File number 15. 11. 2011: Date indication

Motion picture compatibility
- This unit is based on the MPEG-4 AVC file format.
- This unit may degrade or not play back motion pictures recorded or created on other products, and other products may degrade or not play back motion pictures recorded on this unit, even if the products support MP4.
Still picture compatibility
- This unit is compliant with the unified standard DCF (Design rule for Camera File system) established by JEITA (Japan Electronics and Information Technology Industries Association) and with Exif (Exchangeable Image File Format). Files which do not comply with the DCF standard cannot be played back.
Voice compatibility
- This unit is compliant with LPCM file standards and AAC file standards.
- This unit may degrade or not play back voices recorded or created on other products, and other products may degrade or not play back voices recorded on this unit.
Playing back the slide show/continuous playback
Recorded motion pictures/still pictures or voices can be played back as a slide show/continuous playback.
For motion pictures/voices Touch and hold ▶ for approx. 2 seconds.
For still pictures Touch ▶.
- 📋 appears. - Slide show/continuous playback will start from the scene/still picture or
voices that is currently being played back. It will stop once all the recorded scenes/still pictures or voices are played back.
- Scenes are played back normally, and still pictures are played back for approx. 2 seconds each.
To cancel playing back the slide show/continuous playback Touch II.
- The unit will switch to the normal playback screen for the scene/still picture or voices that was being played back when the slide show/continuous playback was cancelled. (Scenes or voices will go into pause mode.)
- For the still pictures recorded while voice was recorded and played back during the continuous playback of the voice, it is possible to display the next (previous) still picture by sliding the screen display from right to left (from left to right) while touching it. (Still pictures will not change automatically by the voice that is being played back.)
Zooming in on a still picture during playback (Playback zoom)
You can zoom in by touching a still picture during playback.
1 Touch, and then touch the screen display during still picture playback.
- The still picture is zoomed in order of normal display (×1)→×2→×4. Touch 🔒 to zoom in from normal display to ×2, touch the screen display to zoom in from ×2 to ×4.
- The still picture is zoomed in on, centring on the part you touched.
- You can also zoom by touching +
2 Move to the zoomed in position by sliding the screen display while touching it.
Zooming out from the zoomed still picture
Touch — to zoom out. (×4 → ×2 → ×1)
- Touch [1× ] to return to normal playback (× 1) .
Deleting scenes, still pictures or voices
Deleted scenes, still pictures or voices cannot be restored, so perform appropriate confirmation of the contents before proceeding with deletion.
- When a card has been inserted, scenes, still pictures and voices can be deleted on the card.
- When a card has not been inserted, scenes, still pictures and voices can be deleted on the built-in memory.
■ To delete the scenes, still pictures or voices being played back with this unit horizontally
1 Touch while scenes, still pictures or voices to be deleted are being played back.
2 Touch [DELETE].
■ To delete scenes, still pictures or voices from the thumbnail display when using horizontally, or during playback when using vertically
1 (Only playing back horizontally) Touch during thumbnail display.
(Only playing back vertically)
Touch 面.
2 Touch the item.
| [SELECT] | (Only playing back horizontally)Touch the scene, still picture or voice to be deleted.When touched, the scene, still picture or voice is selected and theindication appears on the thumbnail. Touch the scene, still picture or voice again to cancel the operation.Up to 100 scenes, still pictures or voices can be selected to be deleted. |
| [ALL] | When scenes or still pictures are selected, all the scenes or still pictures on the SD card/built-in memory will be deleted. When voices are selected, all the voices on the SD card/built-in memory will be deleted. |
| [SINGLE] | (Only playing back vertically)Delete the selected scene, still picture or voice. |
| [RETURN] | Deleting is cancelled. |
3 (When [SELECT] or [ALL] are selected in step 2)
Touch [YES].
(When [SINGLE] is selected in step 2)
Touch [DELETE].
- Scenes, still pictures or voices protected on other products cannot be deleted.
- The scenes, still pictures or voices that cannot be played back (with on the thumbnail) may not be deleted.
- In case of [ALL], the deletion may take time if there are many scenes/still pictures or voices.
- If you delete scenes recorded on other products or still pictures conforming to DCF standard with this unit, all the data related to the scenes/still pictures may be deleted.
- When still pictures recorded on an SD card by other products are deleted, a still picture (other than JPEG) that cannot be played back on this unit may be erased.
Creating still picture from motion picture
A single frame from the recorded motion picture can be saved as a still picture.
(Only playing back horizontally)
1 Touch

2 Touch

3 Pause at the scene you want to save as a still picture during playback.
- It is convenient to use frame-by-frame playback.
4 Touch

● Quality will be different from the normal still picture.
■ Picture size
Size of the still pictures will differ depending on the [Video Rec Mode] of the recorded scenes.
| Recording mode Size of still pictures | |
| 1080p | 2 M (1920×1080) |
| 720p | 0.9 M (1280×720) |
| 480p | 0.3 M (640×480) |
| iFrame | 0.5 M (960×540) |
To delete unwanted parts of a motion picture
You can delete unwanted parts of scenes.
(Only playing back horizontally)
1 Touch

2 Touch

3 Slide A or B while touching it to determine the unwanted part C.
- When you touch Ⓐ or Ⓑ,
◀/llappears. When you touch ◀/you can advance or rewind frames. - Touch [EXIT] to close the edit screen.

4 (To check the scene excluding ⓒ)
Touch ▶.
- Playback operation during preview can be performed by touching playback bar.
- It will return to the previous screen when it is pressed.
5 Touch [ENTER].
6 Touch [ENTER]. - Touch [CANCEL] to return to the previous screen.
7 Touch the item.
| [SAVEASNEW] | It will store separately from the original scene. |
| [OVERWRITE] | Overwrites the original scene. |
| [DON'T SAVE] | Exit without deleting. |
Setting of online sharing of motion pictures
You can easily upload to YouTube or Facebook when this unit is connected to the PC by setting up the upload destination of the motion pictures. (→ 61) The PC for connection needs to have the HD Writer PE 2.0 installed and be connected to the Internet.
(Only playing back horizontally)
1 Touch
• Proceed to step 3 during playback.
2 (When the thumbnail is displayed) Touch the scene to be uploaded.
- When touched, the scene is selected and the indication appears on the thumbnail. (Up to 20 scenes can be selected.) Touch the scene again to cancel the operation. - Touch [ENTER].
3 Touch the upload destination.
- When touched, the icon is selected and the √indication appears. Touch the icon again to cancel the operation. - Touch [ENTER].
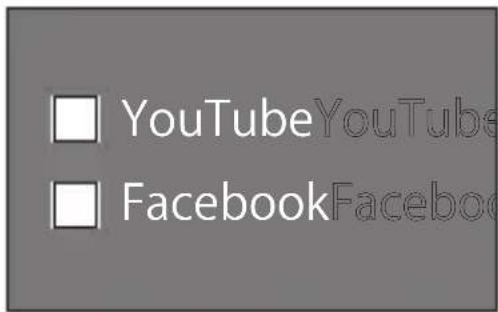
- The share setting will be automatically cancelled when the scene set for sharing is uploaded with the HD Writer PE 2.0.
Recording/Playback
Using the Setup menu screen
1 Touch ≡ [MENU].
2 Touch
3 Touch the submenu Ⓐ.
• To display the next (previous) page:
- Touch ▲ / ▼ .
- Slide the submenu display upward (downward) while touching it.
4 Touch the desired item to enter the setting.
- Touch [EXIT] to exit the menu setting.

Menu list
[Video Rec Mode]
Switch the picture quality of the motion pictures to be recorded.
![PANASONIC HM-TA20GN - [Video Rec Mode] - 1](/content/2026/06/1193267/images/8b1610f12097b1651bce76712f5d665d8a4fa1938bda17ff5cb3caffdf961e70.jpg)
[MENU] → 🐘 → [Video Rec Mode] → desired setting
![PANASONIC HM-TA20GN - [Video Rec Mode] - 2](/content/2026/06/1193267/images/789946ba75bbb268a4415819e1edc6e50375dba159aa5da28569b23c3a8d358e.jpg)
[1920×1080 30fps]/ [1280 ×720 30fps]/ [640 ×480 30fps]*1:
Set the recording mode to MP4.
![PANASONIC HM-TA20GN - [Video Rec Mode] - 3](/content/2026/06/1193267/images/eb74d76a38c853d730da6478aa5c64c9d2d77d8034c48c963fa8bbcce0c5b017.jpg)
[960×540 30fps]*2:
Set the recording mode to iFrame.
*1 Recording will have higher quality in the order of , and . 720p 480p
*2 iFrame is a format suitable for Mac (iMovie'11). It is recommended when using a Mac.
- Please refer to page 24 or details about charging and motion pictures recording time.
- This function's default setting is 720p
- Please refer to page 92 for details about approximate recordable time.
- When the unit is moved a lot or moved quickly, or when a fast-moving subject is recorded (particularly when recording using mosaic-type noise may appear at playback .
[PICTURE SIZE]
The higher the number of pixels, the higher the clarity of the picture when printing.
![PANASONIC HM-TA20GN - [PICTURE SIZE] - 1](/content/2026/06/1193267/images/6dc78502cba27b29cfb7e86daf7de979134fd3e1b313d04a3ed82080c07ee059.jpg)
[MENU] → ⚙️ → [PICTURE SIZE] → desired setting
8M (3264×2448)/2M (1920×1080) [16:9]/2M (1600×1200)/0.3M (640×480)
- This function's default setting is B M
- The recording will become longer depending on the recording pixels.
- Please refer to page 93 for details about the number of recordable pictures.
[Voice Rec Mode]
Select the recording quality.
![PANASONIC HM-TA20GN - [Voice Rec Mode] - 1](/content/2026/06/1193267/images/a8fd36bf2b6f9f1cfd92149c5d944fe96a945b9bc2f893b1e715d240b2c3b13a.jpg)
[MENU] → 🏠 → [Voice Rec Mode] → desired setting
PCM [High Quality]:
Set the recording mode to L-PCM.
AAC 256 [Standard 256kbps]/ [Long2Bime 128kbps]/ AAC 128Low [Interview 128k LowGain]:
Set the recording mode to AAC.
- Voice recording modes are PCM / in order of high to low audio quality
AAC 256
AAC 128
AAC 128Low -
AisCredcommended that you use when interviewing.
-
This function's default setting isPCM
- Please refer to page 9 for details about approximate recordable time.
[SELF TIMER]
This is for recording scenes, still pictures or voices using the timer.
![PANASONIC HM-TA20GN - [SELF TIMER] - 1](/content/2026/06/1193267/images/4ff927276fb24affc51d81f64199b09a567f72e50b67f84fba2f694802a4670c.jpg)
[MENU] → ⚡️ → [SELF TIMER] → desired setting
[OFF]: Cancel the setting
[2sec]: Records after 2 seconds
[10sec]: Records after 10 seconds
- When the Recording button is pressed or is touched (In Voice Recording Mode only), a motion picture/still picture or voice is recorded after the ⏻10 or ⏻2 flashes for the time which has been set. After recording, the Self-timer is cancelled.
- When another operation is performed during countdown of the self-timer, the countdown will stop.
- Setting the Self-timer to ⏻2 is a good way to prevent image shake when the Recording button is pressed or is touched (In Voice Recording Mode only) while using a tripod etc.
[CLOCK SET]
Please refer to page 32.
[DATE FORMAT]
It is possible to change the date format.
![PANASONIC HM-TA20GN - [DATE FORMAT] - 1](/content/2026/06/1193267/images/171cb2c5cabbe5c6f212c62e27b1bcdf87ca6594c025d6c9725051be7403f21a.jpg)
[MENU] → ⚙️ → [DATE FORMAT] → desired setting
[Y/M/D]/[M/D/Y]/[D/M/Y]
[ALERT SOUND]
You can check the start and stop of recording, or turning the unit on/off with an audio tone.
![PANASONIC HM-TA20GN - [ALERT SOUND] - 1](/content/2026/06/1193267/images/6cd3e2694f7e177093cc5d0fb3980cef782d6c9c262fe98f763cc54ad7eb015a.jpg)
[MENU] → ⚡️ → [ALERT SOUND] → [ON]
[HDMI resolution]
Select the desired method of HDMI output.
![PANASONIC HM-TA20GN - [HDMI resolution] - 1](/content/2026/06/1193267/images/8606fe485f39825767d7f40341827a5b2276f601ea19a2d098f37cdde0177683.jpg)
[MENU] → ⚙️ → [HDMI resolution] → desired setting
[AUTO]/[1080i]/[576p]/[480p]
- When [HDMI OUTPUT] is set to [50Hz], [576p] is displayed. When [HDMI OUTPUT] is set to [60Hz], [480p] is displayed.
- [AUTO] determines the output resolution automatically based on information from the recorded scene.
If the images are not output on the TV when the setting is [AUTO], switch to the method [1080i] or [576p]/[480p] which enables the images to be displayed on your TV. (Please read the operating instructions for the TV.)
[HDMI OUTPUT]
Output settings can be changed to match the environment in use when playing back connected to a TV.
![PANASONIC HM-TA20GN - [HDMI OUTPUT] - 1](/content/2026/06/1193267/images/fd1d7b0cc8295e2b7ae93e7f70046d38c9bde786866cb5a012b3b26f6b3fc048.jpg)
[MENU] → ⚙️ → [HDMI OUTPUT] → desired setting
[50Hz]/[60Hz]
[FORMAT MEDIA]
Please be aware that if a medium is formatted, then all the data recorded on the medium will be erased and cannot be restored. Back up important data on a PC etc. ( 61)
![PANASONIC HM-TA20GN - [FORMAT MEDIA] - 1](/content/2026/06/1193267/images/59384dd18ac6e420c2a1193f4a38dee7ab9a9e9985de5384bb855da7a863c27a.jpg)
[MENU] → ⚪ → [FORMAT MEDIA]
- When the confirmation message appears, select [YES].
- Do not turn this unit off or remove the SD card, while formatting. Do not expose the unit to vibrations or shock.
- When formatting the built-in memory, start the formatting after removing the SD card.
Use this unit to format media.
Do not format an SD card using any other equipment such as a PC. The card may not be used on this unit.
[LANGUAGE]
You can select the language on the screen display and the menu screen.
![PANASONIC HM-TA20GN - [LANGUAGE] - 1](/content/2026/06/1193267/images/e5ea897165fc02cd82ed7db6af8f4edacb38ce1d1dede2d2b4466670bb1f18d6.jpg)
[MENU] → ⚡️ → [LANGUAGE] → desired setting
Recording/Playback
Watching Motion/Still Pictures on your TV
• Use the HDMI mini cable (optional).
1 Connect this unit to a TV.
- The LCD monitor on this unit will turn off and the status indicator will flash.

flowchart
graph TD
    A["HDMI IN"] <--> B["Switch"]
    B --> C["Address Point A"]
    C --> D["Video Device"]
A HDMI mini cable (optional)
- Check that the plugs are inserted as far as they go.
- Always use a genuine Panasonic HDMI mini cable (RP-CDHM15, RP-CDHM30; optional).
2 Select the video input on the TV.
- Example:
Select the [HDMI] channel with a HDMI mini cable.
(The name of the channel may differ depending on the connected TV.)
- Check the input setting (input switch) and the audio input setting on the TV. (For more information, please read the operating instructions for the TV.)
3 Start playback on this unit.
Perform playback operations by touching the icons.
| During playback/pause During thumbnail display | |
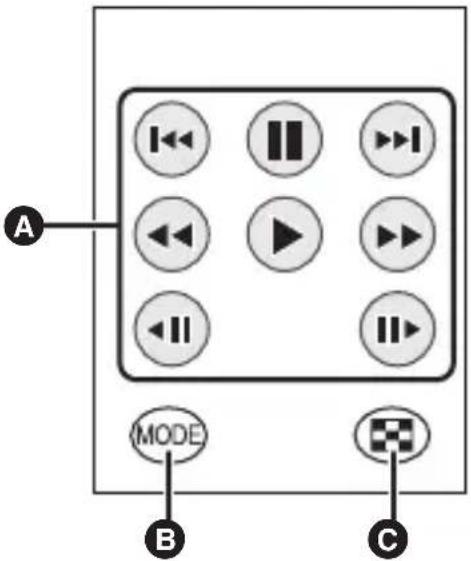 |  |
| A Playback operations (→ 43)B Switching the modes (→ 45)C Thumbnail display (→ 44)D Up/down/left/right, Enter | |
What you can do with a PC
- The unit comes with built-in HD Writer PE 2.0 video editing software.
• See page 66 for how to install HD Writer PE 2.0 on your PC.
HD Writer PE 2.0
You can copy the motion/still picture data to the HDD of PCs or write to SD cards using the HD Writer PE 2.0 software.
Refer to the operating instructions of HD Writer PE 2.0 (PDF file) for details on how to use it.
Smart wizard
The Smart wizard screen is automatically displayed when you connect this unit to a PC with HD Writer PE 2.0 installed. (→ 68)

- Select the function you wish to use and follow the on-screen instructions for easy copying and uploading motion pictures on the Internet.
- When there are scenes set to online sharing, the upload screen will be displayed.
| Available function using HD Writer PE 2.0 Data | type |
| Copying data to a PC Motion | picture and still picture |
| Playing back on a PC | |
| Online sharing:You can upload motion pictures on the Internet and share them with your family and friends.The upload screen is automatically displayed with the linking function with the HD Writer PE 2.0 when there are any scenes that are set for sharing in this unit. | Motion picture |
| Editing:Editing motion picture data copied on an HDD of a PCTitle, Transition, Delete partially, Divide SceneConverting part of motion picture into still picture |
- Voices recorded with this unit can be played back on a PC using QuickTime (Ver. 7 or later) or copied to a PC using Windows Explorer.
- Playing back still pictures on a PC using standard Windows picture viewer or a commercially available picture viewer, or copying still pictures to a PC using Windows Explorer is available.
• Refer to page 72 if using a Mac.
Important Notice
- When using an SDXC Memory Card, check the following support site. http://panasonic.net/avc/sdcard/information/SDXC.html
- Motion pictures that have been recorded on another device cannot be written to HD Writer PE 2.0.
(EB/EP only)
- We cannot guarantee operation if you use software other than HD Writer PE 2.0 to read motion picture.
(GC/GN only)
- We cannot guarantee operation if you use software other than HD Writer PE 2.0 to read/write motion picture.
- Do not start HD Writer PE 2.0 and other software at the same time. Close any other software if you start HD Writer PE 2.0 and close HD Writer PE 2.0 if you start any other software.
Operating environment
- Even if the system requirements mentioned in these operating instructions are fulfilled, some PCs cannot be used.
- Operation is not guaranteed in the following cases.
- When 2 or more USB devices are connected to a PC, or when devices are connected through USB hubs or by using extension cables other than the supplied USB extension cord.
-Operation on an upgraded OS.
-Operation on an OS other than the one pre-installed.
- This software is not compatible with Microsoft Windows 3.1,
Windows 95, Windows 98, Windows 98SE, Windows Me, Windows NT and Windows 2000.
■ Operating environment for HD Writer PE 2.0
| PC IBM PC/AT compatible PC | |
| OS | Windows 7 (32 bit/64 bit) Starter/Home Basic/Home Premium/Ultimate/Professional or SP1 Windows Vista (32 bit) Home Basic/Home Premium/Business/Ultimate SP1/SP2 Windows XP (32 bit) SP3 |
| CPU Intel Pentium 4 | 2.8 GHz or higherIntel Core 2 Duo 2.16 GHz or higher or AMD Athlon 64 X2 Dual-Core 5200+ or higher is recommended when a playback function is used.Intel Core 2 Quad 2.6 GHz or higher is recommended when using the editing function. |
| RAM | Windows 7: 1 GB or more (32 bit)/2 GB or more (64 bit)Windows Vista: 1 GB or moreWindows XP: 512 MB or more (1 GB or more recommended) |
| Display | High Colour (16 bit) or more (32 bit or more recommended)Desktop resolution of 1024×768 pixels or more (1920×1080 pixels or more recommended)Windows 7/Windows Vista: DirectX 9.0c compatible video card (DirectX 10 recommended)Windows XP: DirectX 9.0c compatible video card Compatible with DirectDraw overlayPCI ExpressTM×16 compatible recommendedVideo memory of 256 MB or more recommended |
| Free hard disk drive space | Ultra DMA — 100 or more450 MB or more (for installing the software) |
| Sound DirectSound | Support |
| Interface USB port [ | Hi-Speed USB (USB 2.0)] |
| Other requirements | Mouse or equivalent pointing deviceInternet connection |
- Input is not supported in languages other than English, German, French, Simplified Chinese and Russian.
- Operation is not guaranteed on Microsoft Windows Vista Enterprise, Windows XP Media Center Edition, Tablet PC Edition and Windows 7 Enterprise.
- This software is not compatible with a multi-boot environment.
- This software is not compatible with a multi-monitor environment.
-
If using Windows XP, an administrative account user only can use this software. If using Windows Vista/Windows 7, administrative account and standard account users only can use this software. (An administrative account user should install and uninstall this software.)
-
Operation during the playback may become slow if the CPU or memory is not fulfilling the requirements of the operating environment.
● Always use the most current driver for the video card. - Always make sure there is enough capacity on the HDD in the PC. It may become inoperable or the operation may stop suddenly if the capacity gets low.
■ Operating environment for the card reader function (mass storage)
| PC IBM PC/AT compatible PC | |
| OS | Windows 7 (32 bit/64 bit) or SP1Windows Vista (32 bit) (SP1/SP2)Windows XP (32 bit) (SP3) |
| CPU Windows 7/Window Vista:1.0 GHz or higher32-bit (x86) or 64-bit (x64) processorWindows XP: Intel Pentium III 450 MHz or higheror Intel Celeron 400 MHz or higher | |
| RAM | Windows 7: 1 GB or more (32 bit)/2 GB or more (64 bit)Windows Vista Home Basic: 512 MB or moreWindows Vista Home Premium/Business/Ultimate/Enterprise: 1 GB or moreWindows XP: 128 MB or more (256 MB or morerecommended) |
| Interface USB port | |
| Other requirements | Mouse or equivalent pointing device |
- The USB equipment operates with the driver installed as standard in the OS.
With a PC
Installation
When installing the software, log on to your computer as the
Administrator or with a user name with equivalent authorization. (If you do not have authorization to do this, consult your manager.)
- Before starting the installation, close all applications that are running.
- Do not perform any other operations on your PC while the software is being installed.
- Explanation of operations and screens is based on Windows 7.
- Turn on the unit.
1 Connect USB terminal of this unit to a PC with a USB extension cord.
- Do not use any other USB extension cords except the supplied one. (Operation is not guaranteed with any other USB extension cords.)
2 Touch [PC] on the screen of this unit.
- The following screen is displayed automatically. Click [HD Writer PE 2.0] [Yes].
- When using Windows 7 or if the following screen is not displayed automatically, select [Start] → [Computer] (or double-click on [Computer] on the desktop), and then double-click [HD Writer PE] → [setup(.exe)].
* Depending on the PC you are using, [CAM_APP] may be displayed.

3 Click [Next].
4 Read the [End User License Agreement], then place a check beside [I accept the terms of the license agreement] if you agree to them and click [Next].
5 Select where the application is to be installed, then click [Next].
6 Select [Yes] or [No] to create shortcut.
7 When installation is complete, some notes will appear. Check the contents, then close the window.
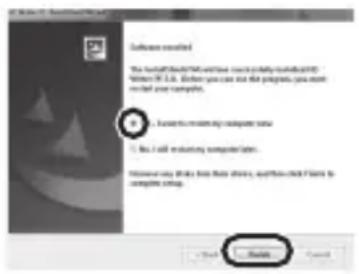
8 Select [Yes, I want to restart my computer now.], then click [Finish].
The PC must be rebooted for the application to work.

■ Uninstalling HD Writer PE 2.0
Follow the steps below to uninstall any software applications that you no longer require.
1 Select [Start] → [Control Panel] → [Uninstall a program].
2 Select [HD Writer PE 2.0], then click [Uninstall].
● Proceed with the uninstallation by following the on-screen instructions.
- After uninstalling the software, be sure to reboot the PC.
![Programs, a Programs and Features Uninstall or change in program To minimize the programs about the list and then click desktop, Settings, or Programs. [ ] [ ] [ ]](/content/2026/06/1193267/images/5693601a86ae8375946172ec2e9bb62e7cd9130e608a1428a1498f39e52bdf1d.jpg)
With a PC
Connecting to a PC
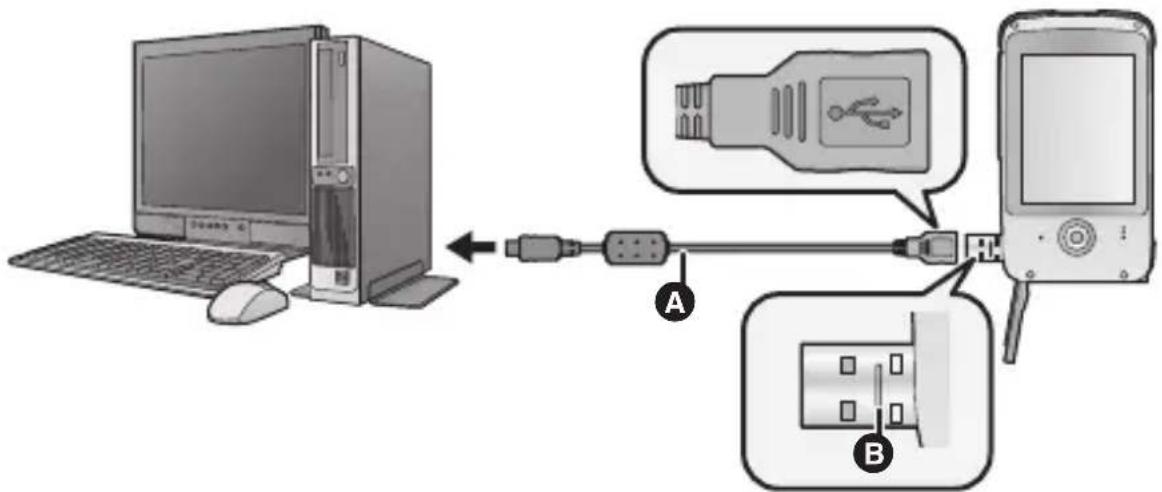
A USB extension cord (supplied)
- Turn on the unit.
1 Connect USB terminal of this unit to a PC with a USB extension cord.
- Do not use any other USB extension cords except the supplied one. (Operation is not guaranteed with any other USB extension cords.)
- Insert the USB extension cord securely all the way. (Insert to the line B.) It will not operate properly if it is not inserted all the way.
2 Touch [PC] on the screen of this unit.
• The LCD monitor turns off.
- The Smart wizard screen is automatically displayed when HD Writer PE 2.0 is installed.
- When there are scenes set to online sharing, the upload screen will be displayed.
- This unit is automatically recognised as an external drive of the PC. (→ 70)
- Do not disconnect the USB terminal of this unit while the status indicator is on.
- When performing reading/writing between a PC and an SD card, be aware that some SD card slots built into PCs and some SD card readers are not compatible with the SDHC Memory Card or SDXC Memory Card.
- When using an SDXC Memory Card, check the following support site. http://panasonic.net/avc/sdcard/information/SDXC.html
- Operation is not guaranteed for all devices equipped with a USB terminal.
■ To disconnect USB terminal of this unit safely
Select the icon in task tray displayed on the PC, and then click [Eject Panasonic Mobile Camera].
- Depending on your PC's settings, this icon may not be displayed.
About the PC display
When the unit is connected to a PC, it is recognised as an external drive.
- Removable disk (Example: ) is displayed in [Computer].
(EB/EP only)
We recommend using HD Writer PE 2.0 to copy motion picture data.
(GC/GN only)
We recommend using HD Writer PE 2.0 to copy or write back motion picture data.
Using Windows Explorer or other programmes on the PC to copy, move or rename files and folders recorded with this unit will result in them being unusable with HD Writer PE 2.0.
Example folder structure of an SD card:
① Up to a total of 999 files of motion pictures, still pictures and voices can be saved in a single folder.
② Recorded scenes.
③ JPEG format still pictures
4 Recorded voices
■ Copying your still pictures to your PC

flowchart
graph TD
    A["CAM_SD/CAM_MEM"] --> B["DCIM"]
    B --> C["100CDPFP"]
    C --> D["IMG0001.MP4"]
    C --> E["IMG0002.JPG"]
    C --> F["IMG0003.M4A"]
    C --> G["IMG0004.WAV"]
Card reader function (mass storage)
Still pictures recorded with this unit can be copied to the PC with Explorer or other programmes.
1 Double click the folder that contains the still pictures. ([DCIM] → [100CDPFP] etc.)
2 Drag and drop the still pictures onto the destination folder (on the PC's HDD).
- Do not delete the SD card's folders. Doing so may make the SD card unusable in this unit.
- When data not supported by this unit has been recorded on a PC, it will not be recognised by this unit.
- Always use this unit to format SD cards.
With a PC
Starting HD Writer PE 2.0
- To use the software, log on as an Administrator or as user name for standard user account (only for Windows 7/Windows Vista).
The software cannot be used with the user name for a guest account.
(On the PC)
Select [Start] → [All Programs] → [Panasonic] → [HD Writer PE 2.0] → [HD Writer PE].
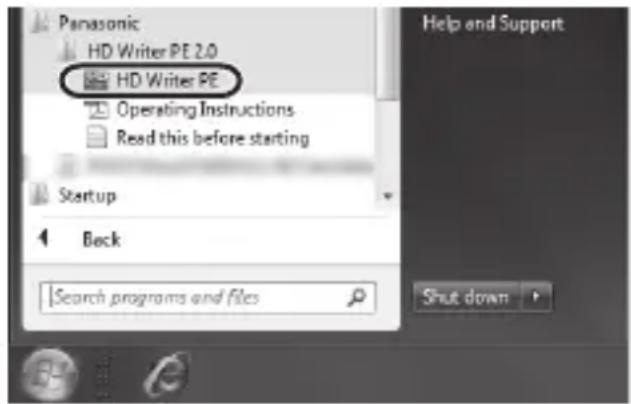
- For details on how to use the software applications, read the PDF operating instructions of the software.
Reading the operating instructions of the software applications
- You will need Adobe Acrobat Reader 5.0 or later or Adobe Reader 7.0 or later to read the PDF operating instructions.
Select [Start] → [All Programs] → [Panasonic] → [HD Writer PE 2.0] → [Operating Instructions].
If using Mac
- HD Writer PE 2.0 is not available for Mac.
- iMovie'11 supported. For details about iMovie'11, please contact Apple Inc.
■ Operating environment
| PC Mac | |
| OS Mac OS X 10.6.6 | |
| CPU Intel Core Duo or better | |
| RAM 1 GB or more | |
| Interface USB port |
- Even if the system requirements mentioned in these operating instructions are fulfilled, some PCs cannot be used.
- The USB equipment operates with the driver installed as standard in the OS.
■ Copying still pictures on PC
- Turn on the unit.
1 Connect USB terminal of this unit to a PC with a USB extension cord.
- Do not use any other USB extension cords except the supplied one. (Operation is not guaranteed with any other USB extension cords.)
2 Touch [PC] on the screen of this unit.
3 Double-click [CAM\_SD] or [CAM\_MEM] displayed on the desktop.
- Files are stored in [100CDPFP] folder etc. in the [DCIM] folder.
4 Using a drag-and-drop operation, move the pictures you want to acquire or the folder storing those pictures to any different folder on the PC.
■ To disconnect USB terminal of this unit safely
Drag [CAM_SD] or [CAM_MEM] disk icon to the [Trash], and then disconnect the USB terminal of this unit.
To use as a camera for Skype
It is possible to perform video conferencing using Skype when this unit is connected to a PC that is connected to the Internet.
Skype is a software that allows you to perform video conferencing using an Internet connection.
- Skype must first be installed before use.
- For downloading or details regarding Skype, refer to the Skype Website.
- For information on how to use Skype, refer to the Skype help file.
- Depending on the PC or Internet environment used, you may not be able to use Skype, images may be disrupted, cut off, the resolution may be low or the audio may be cut off.
- A higher performance CPU is recommended for high-quality video conferencing.
■ Operating environment for Skype
| PC | ||
| IBM PC/AT compatible PC Mac | ||
| Software Skype | 5.1 for Windows Skype 5.0 | for Mac OS X |
| OS | Windows 7 (32 bit/64 bit) or SP1Windows Vista (32 bit) (SP1/SP2)Windows XP (32 bit) (SP3) | Mac OS X10.6.6 |
| CPU Intel Core 2 | Duo 1.8 GHz or higher32-bit (x86) or 64-bit (x64) processor | Intel Core 2Duo1.8 GHzor higher |
| RAM Windows 7: | 1 GB or more (32 bit)/2 GB or more(64 bit)Windows Vista Home Basic:512 MB or moreWindows Vista Home Premium/Business/Ultimate/Enterprise: 1 GB or moreWindows XP: 512 MB or more | 512 MB or more |
| Free hard disk drive space | 100 MB free disk space | |
| Sound Speaker | or headphones | |
| Interface USB port | ||
| Other requirements | High-speed broadband Internet connection of 4 Mbps down/512 kbps up | |
- Even if the system requirements mentioned in these operating instructions are fulfilled, some PCs cannot be used.
- This software is not compatible with Microsoft Windows 3.1, Windows 95, Windows 98, Windows 98SE, Windows Me, Windows NT and Windows 2000.
- Operation on an upgraded OS is not guaranteed.
- Operation on an OS other than the one pre-installed is not guaranteed.
How to connect
- Turn on the unit.
1 Connect USB terminal of this unit to a PC with a USB extension cord.
- Connect the USB extension cord by inserting it securely all the way without forcing.
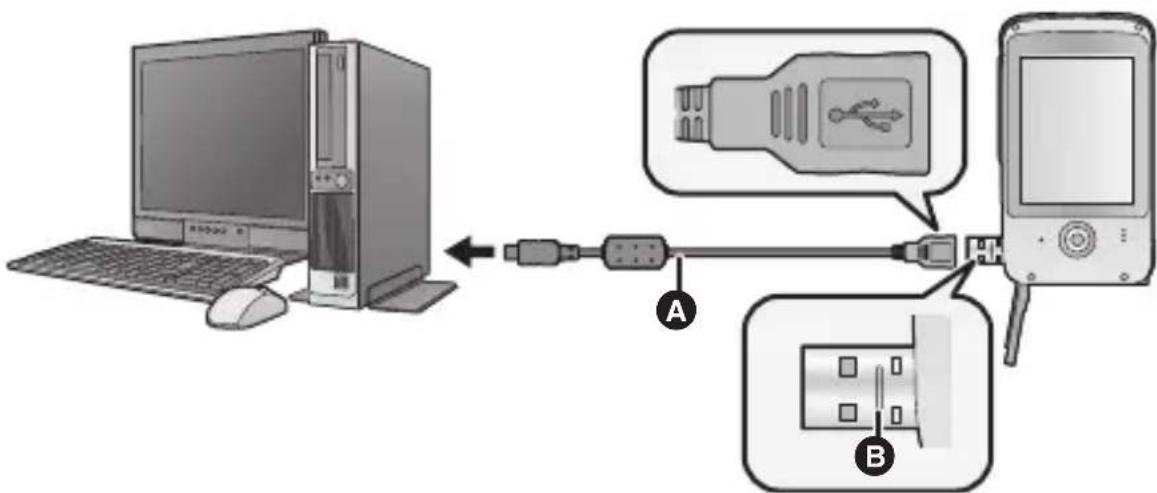
A USB extension cord (supplied)
- Do not use any other USB extension cords except the supplied one. (Operation is not guaranteed with any other USB extension cords.)
- Insert the USB extension cord securely all the way. (Insert to the line B.) It will not operate properly if it is not inserted all the way.
2 Touch [WEB CAMERA] on the screen of this unit.
3 (On a PC)
Start Skype.
- Check this unit is selected with the Skype settings.
- The image quality will automatically vary among 640 × 480 , 320 × 240 and 160 × 120 depending on the internet environment.
- When disconnecting the USB terminal of the unit from your PC, shut down Skype before disconnecting.
- Operation is not guaranteed for all devices equipped with a USB terminal.
Others
Indications
■ Recording indications
Motion pictures Still pictures Voices
| 1080p/720p/480p/Frame | Video Rec Mode (→ 54) |
| ● | Recording motion picture |
| ■ | Recording pause (motion picture) |
| HA/HA/ iA/ iA/ iE/ iE/ iE/ iE/ iE/ iE/ iE/ iE/ iE/ iE/ iE/ iE/ iE/ iE/ iE/ iE/ iE/ iE/ iE/ iE/ iE/ iE/ iE/ iE/ iE/ iE/ iE/ iE/ iE/ iE/ iE/ iE/ iE/ iE, iE, iE, iE, iE, iE, iE, iE, iE, iE, iE, iE, iE, iE, iE, iE, iE, iE, iE, iE, iE, iE, iE, iE, iE, iE, iE, iE, iE, iE, iE, iE, iE, iE, 01h30m | Remaining time for motion picture or voice recording (→ 35, 37) |
| 00m00s | Elapsed recording time for motion pictures(→ 35) |
| 00h00m00s | Elapsed recording time for voices (→ 37) |
| • “h” is an abbreviation for hour, “m” for minute and “s” for second. | |
| 15s | Countdown until recording stops (→ 30, 35) |
| #D | LED light (→ 39) |
| #A | High temperature warning (→ 30) |
| #OOO | Remaining battery power (→ 25) |
| ○(White) | Recording pause (still picture) |
| ○(Red) | Recording still picture |
| ○(White) | Recording pause (voice) |
| ○(Red) | Recording voice |
| 8M/2M/2M/0.3M | Number of recording pixels for still pictures (→ 55) |
| PCM / AAC 256 / AAC 128 / AAC 128Low | Voice Rec Mode (→ 55) |
| 12345 | Remaining number of recordable pictures (→ 36) |
| Focus area (→ 36) | |
| 10/2 | Self-Timer Recording (→ 56) |
| F2.8 | Iris value |
| 1/30 | Shutter speed |
| Effect icon (→ 40) | |
| Night View mode (→ 40) | |
| Recording still pictures during voice recording (→ 37) | |
■ Playback indications
Motion pictures Still pictures Voices
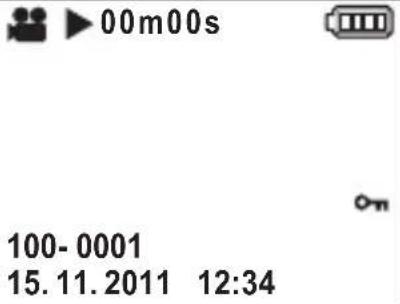 |  |  |
 | Motion picture icon (→ 42) | |
 | Still picture icon (→ 42) | |
 | Voice icon (→ 42) | |
 | Motion picture set for online sharing (→ 53) | |
 | Display during playback (→ 43) | |
 | Playing back the slide show/continuous playback (→ 47) | |
 | Protected motion pictures/still pictures/voices (→ 50) | |
| 00m00s | Playback time for motion pictures (→ 45) | |
| 00h00m00s | Playback time for voices (→ 45) | |
| 100-0001 | File number (→ 45) | |
| 15. 11. 2011 12:34 | Date/Time indication (→ 32) | |
■ Confirmatory indications

SD card is not inserted or is non-compatible.
Others
Messages/Troubleshooting
Messages
Major confirmation/error messages to be indicated on the screen in text.
Incompatible card. Please check card.
This card is not compatible or it cannot be recognised by the unit. If this message appears even though motion pictures, still pictures and voices are recorded on an SD card, the card may be unstable. Reinsert the SD card, then turn the unit off and then on again.
Troubleshooting
Problem Check
This unit cannot be turned on.
This unit does not stay on long enough.
Battery runs down quickly.
ts
- Charge the battery again to ensure it is sufficiently charged. (→ 21)
- In cold places, the battery using time becomes shorter.
- The battery has a limited life. If the operating time is still too short even after the battery is fully charged, the battery has worn out and needs to be replaced. Contact Panasonic's Service Center.
This unit cannot be operated though it is turned on.
This unit does not operate normally.
- Press the RESET button with the stylus pen. (→ 82) Then about 1 minute later, turn on the unit again. (Conducting the above operation while the SD card is being accessed may damage the data on the SD card.)
- If normal operation is still not restored, consult the dealer who you purchased this unit from.
| Problem Check | ts |
| The unit arbitrarily stops recording. | Use an SD card that can be used for motion picture recording. (→ 26)The recordable time may have shortened due to the deterioration of the data writing speed or repeated recording and deletion. Using the unit, format the SD card. (→ 58) |
| Scenes, still pictures or voices cannot be played back. | Any scenes, still pictures or voices where the thumbnails are displayed as cannot be played back. |
| Although this unit is correctly connected to a TV, images cannot be seen. | Please read the operating instructions of your TV and select the channel that matches the input used for the connection.Check the setting of [HDMI resolution]. (→ 57) |
| Scenes, still pictures or voices cannot be deleted. | Any scenes, still pictures or voices where the thumbnails are displayed as cannot be deleted. If the scenes, still pictures or voices are unnecessary, format the SD card to erase the data. (→ 58) Please be aware that if an SD card is formatted then all the data recorded on the SD card is erased and cannot be recovered. Back up important data on a PC etc. |
| If the SD card is inserted in this unit, it is not recognised. | If the SD card is formatted on a PC, it may not be recognised by this unit. Use this unit to format SD cards. (→ 58) |
Problem Check
If the SD card is inserted in another device, it is not recognised.
ts
- Check that the device is compatible with the capacity or type of SD card (SD Memory Card/SDHC Memory Card/SDXC Memory Card) that you inserted. Refer to the operating instructions of the device for details.
Colour or brightness of the image changes, or you may see horizontal bars in the image.
The LCD monitor flickers indoors.
- Colour or brightness of the image may change, or you may see horizontal bars in the image when the object is recorded under fluorescent light, mercury light or sodium light, etc., but this is not a malfunction.
"Error occurred. Please turn unit off, then turn on again." is displayed.
- The unit has automatically detected an error. Restart the unit by turning off and on.
- Press the RESET button with the stylus pen. (→ 82)
- Repair is needed if it is repeatedly displayed even if it is restarted. Consult the dealer who you purchased this unit from. Do not attempt to repair the unit by yourself.
Problem Check
When connected by the USB terminal, this unit is not detected by the PC.
ts
- After re-inserting the SD card into the unit, reconnect the USB terminal of this unit.
- Select another USB terminal on the PC.
- Check the operating environment. ( 63,72,73)
- Connect the USB terminal of this unit again after restarting the PC and turning on this unit again.
Cannot see the PDF operating instructions for HD Writer PE 2.0.
- You will need Adobe Acrobat Reader 5.0 or later or Adobe Reader 7.0 or later to read the PDF operating instructions for HD Writer PE 2.0.
When using Skype, the image/audio is cut off.
- Reconnect the USB terminal of this unit after shutting down Skype, and connect to Skype again.
About the RESET button
Use the stylus pen, when you press the RESET button.
HM-TA20
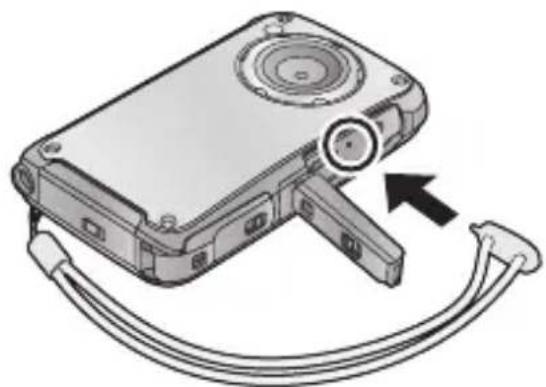
natural_image
Diagram of a compact electronic device with cable and connector, showing internal components and an arrow indicating direction (no text or symbols)HM-TA2

natural_image
Diagram of a portable electronic device with cable and connector, showing internal components and an arrow indicating direction (no text or symbols)Others
Cautions for use
(For Australia and New Zealand)
In the event of abnormal operation (e.g. if the unit emits smoke or an unusual smell), immediately stop operating the unit and consult the Panasonic Customer Care Centre on 132600.
About this unit
The unit and the SD card become warm during use. This is not a malfunction.
Do not drop or bump the unit. Do not subject to strong pressure.
- A strong impact can break the lens, LCD monitor or the unit's casing, causing it to malfunction.
- Do not attach any other items to the hand strap that's supplied with the unit. While being stored, that item can rest against the LCD monitor and damage it.
- While the unit is stored in a bag, be careful not to drop or hit the bag so that the unit may not be subjected to impact.
Keep this unit as far away as possible from electromagnetic equipment (such as microwave ovens, TVs, video games etc.).
- If you use this unit on top of or near a TV, the pictures and/or sound on this unit may be disrupted by electromagnetic wave radiation.
- Do not use this unit near cell phones because doing so may result in noise adversely affecting the pictures and/or sound.
- Recorded data may be damaged, or pictures may be distorted, by strong magnetic fields created by speakers or large motors.
- Electromagnetic wave radiation generated by microprocessors may adversely affect this unit, disturbing the pictures and/or sound.
- If this unit is adversely affected by electromagnetic equipment and stops functioning properly, turn this unit off and press the RESET button. Then turn this unit on.
Do not use this unit near radio transmitters or high-voltage lines.
- If you record near radio transmitters or high-voltage lines, the recorded pictures and/or sound may be adversely affected.
Make sure to use the supplied cords. If you use optional accessories, use the cords and the cables supplied with them. Do not extend the cords and the cables.
Do not spray insecticides or volatile chemicals onto the unit.
- If the unit is sprayed with such chemicals, its body may be marred and the surface finish may peel off.
- Do not leave rubber or plastic products in contact with the unit for a long time.
When you use the unit in a sandy or dusty place such as a beach, do not let sand or fine dust get into the body and terminals of the unit.
- Sand or dust may damage the unit. (Care should be taken when inserting and removing a card.)
HM-TA2
Keep the unit away from sea water.
- If sea water splashes onto the unit, wipe off the water with a well wrung cloth. Then wipe the unit again with a dry cloth.
Do not use the unit for surveillance purposes or other business uses.
- In certain situations, continuous use could cause the unit to overheat and cause a malfunction. Such use is strongly discouraged.
- This unit was designed for consumer intermittent use. It was not intended for continuous use, or for any industrial or commercial application resulting in prolonged use.
Perform a formatting of the built-in memory when this unit is to be disposed/transferred. ( 58)
About status indicator during charging
When the status indicator is flashing at a particularly fast rate, the following should be considered.
Flashing with approx. 2 second period (off for approx. 1 second, on for approx. 1 second):
- The battery is not charged. Press the RESET button, and try charging again.
- Check that the terminals of the unit are not dirty or covered with a foreign object, and connect this unit correctly once again. If a foreign object or dirt is present, turn off the unit and then remove it.
- The battery or environment is at an extremely high or low temperature. Wait until the temperature has returned to an appropriate level and try charging again. If you are still unable to charge, there may be a fault in this unit.
Cleaning
When cleaning, wipe this unit with a soft, dry cloth.
- If the unit is very dirty, dip a cloth in water and squeeze firmly, and then wipe the unit with the damp cloth. Next, dry the unit with a dry cloth.
- Use of benzine, paint thinner, alcohol, or dishwashing liquid may alter the unit body or peel the surface finish. Do not use these solvents.
- When using a chemical dust cloth, follow the instructions that came with the cloth.
LCD monitor
- Do not press the LCD monitor with excessive force. Uneven colours may appear on the LCD monitor and it may malfunction.
- When the LCD monitor gets dirty, wipe it with a soft cloth such as eye glass cleaner.
- Do not touch the LCD monitor with your finger nails, or rub or press with strong force.
- It may become hard to see or hard to recognise the touch when the LCD protection sheet is affixed.
- In a place with drastic temperature changes, condensation may form on the LCD monitor. Wipe it with a soft cloth such as eye glass cleaner.
- When the unit has become very cold, for example due to storage in a cold area, its LCD monitor will be slightly darker than usual immediately after the unit is turned on. The normal brightness will be restored when the unit's internal temperature rises.
Extremely high precision technology is employed to produce the LCD Monitor screen featuring a total of approximately 230,000 dots. The result is more than 99.99% effective dots with a mere 0.01% of the dots inactive or always lit. However, this is not a malfunction and does not affect the recorded picture.
About the Lens, the microphone and the speaker
- Do not press against the lens with excessive force.
- Do not leave the unit with the lens facing the sun, as rays of light from the sun may cause it to malfunction. Also, be careful when placing the unit outside or near a window.
- If the lens gets dirty with fingerprints etc., wipe the lens surface with a soft dry cloth.
(If you leave fingerprints on or otherwise dirty the lens, the pictures you take may look whiter than normal.)
HM-TA20
- A sound might be muffled or warped when there is water on the microphone or the speaker. Wipe the residues after letting the water drip out from the microphone and speaker by tipping this unit downward, and use it after letting it dry for a while.
- Do not poke the holes of microphone and speaker with sharp points. (It may damage the waterproof sheet inside, which may damage the waterproof performance.)
About the battery
The battery used in this unit is a rechargeable lithium-ion battery. It is susceptible to humidity and temperature and the effect increases the more the temperature rises or falls.
If the operating time is very short even after the battery has been recharged, the battery has worn out. Consult the dealer who you purchased this unit from.
About the SD card
- The memory capacity indicated on the label of an SD card is the total of the capacity for copyright protection and management and the capacity which can be used on the unit, a PC etc.
Do not leave the SD card where the temperature is high, where electromagnetic waves or static electricity are easily generated or exposed to direct sunlight.
Do not bend or drop the SD card.
- The SD card may be damaged or the recorded content may be damaged or deleted.
- Put the SD card in the card case or the storage bag after use and when storing or carrying the SD card.
- Do not allow dirt, dust or water to get into the terminals on the back of the SD card and do not touch the terminals with your fingers.
When disposing of or giving away the SD card, note that:
Formatting and deletion of this unit or computer only changes the file management information and does not completely delete the data in the SD card.
It is recommended to physically destroy the SD card or use the commercially available computer data deletion software to completely erase the data in the SD card before transferring to another party or disposing.
The customer is responsible for the management of the data in the SD card.
When not using the unit for a long period of time
- This unit should be stored in a cool place free from humidity, with as constant temperature as possible. (Recommended temperature: 15 °C to 25 °C, Recommended humidity: 40%RH to 60%RH)
● Always remove the SD card from the unit. - When storing this unit for a long period of time, we recommend charging it once a year.
- The battery will self-discharge little by little even when this unit is not used. The battery may get exhausted when you do not use it for a long period of time.
- When storing the unit in a cupboard or cabinet, it is recommended that you place a desiccant (silica gel) in with it.
About condensation
- Condensation occurs when the ambient temperature or humidity changes. Be careful of condensation since it causes lens stains, fungus and unit malfunction.
- If condensation occurs, turn the unit off and leave it for about 2 hours. The fog will disappear naturally when the temperature of the unit becomes close to the ambient temperature.
Others
Requests when disposing of this unit
When disposing of your used products, remove the battery built into the unit, and please cooperate in recycling of the battery. Please refer to page 89 about how to remove the battery.
- Please make sure that the battery is disposed of at an officially assigned location, if there is one in your country.
Do not disassemble this unit other than when disposing of this unit.
This is the rechargeable battery for this unit. Do not use other than with this unit.
Do not charge the rechargeable battery when it has been removed.
- Do not place in fire or heat it.
- Do not puncture with nails, subject it to impact, disassemble or modify it.
- Do not touch metal to the + and - terminals.
- Do not store or carry together with necklaces or hairpins, etc.
- Do not heat in microwaves or ovens, etc.
- Do not charge, use or leave in hot places such as next to fires or in extremely hot weather.
- Do not put into water.
This may cause leaking, overheating, fire or rupture.
- If a leak should occur, by no means touch the liquid with bare hands. If the liquid gets on the body or clothes, wash well with water. If the liquid gets into your eyes, there is a danger of blindness. Do not rub the eyes; after washing immediately with clean water, consult your physician.
Keep removed screws etc. out of the reach of small children.
If accidentally ingested there will be adverse physical effects.
- Should you suspect that such an object has been ingested, consult your physician immediately.
Battery used for this unit
Name: Lithium ion (Li-ion) rechargeable battery
Nominal voltage: DC 3.7 V
How to remove the battery
Disassemble after the battery runs out.
This figure describes the disposal of the unit, it is not instruction for repair. If disassembled, repair is not possible.
- Using a driver (optional), disassemble in the following sequence.
- If it cannot be removed smoothly, contact Panasonic's Service Center.
- Keep disassembled parts out of reach of children.
1 Remove all screws shown in the figure.
( : 9M screws, : 7 screws) HM-TA2
- Use a Phillips screwdriver (optional) to remove screws.

HM-TA2

natural_image
Line drawing of a rectangular electronic device with two circular buttons (no text or symbols)
natural_image
Line drawing of a portable electronic device with two circular ports and a central hub (no text or symbols)
natural_image
Line drawing of a vehicle chassis with wheels and structural components (no text or symbols)2 Open this unit as shown in the figure below, and remove the battery with a driver.
HM-TA20
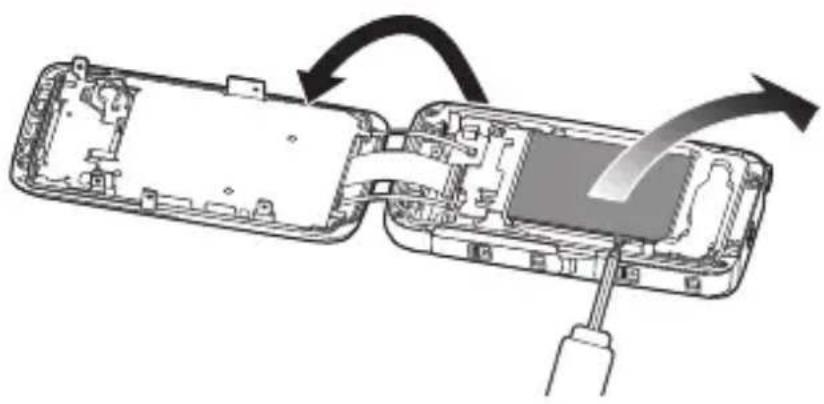
natural_image
Diagram of a device's internal structure showing two open compartments with tool holders, no text or symbols presentHM-TA2

natural_image
Diagram of a smartphone internal structure showing battery, switch, and cable assembly (no text or labels)Regarding the handling of used batteries
• Insulate the terminals with cellophane tape or similar.
- Do not disassemble.
Others
About copyright
■ Carefully observe copyright laws
Recording of pre-recorded tapes or discs or other published or broadcast material for purposes other than your own private use may infringe copyright laws. Even for the purpose of private use, recording of certain material may be restricted.
■ Licenses
- SDXC Logo is a trademark of SD-3C, LLC.
- HDMI, the HDMI Logo, and High-Definition Multimedia Interface are trademarks or registered trademarks of HDMI Licensing LLC in the United States and other countries.
- Microsoft ^® , Windows ^® and Windows Vista ^® are either registered trademarks or trademarks of Microsoft Corporation in the United States and/or other countries.
- Microsoft product screen shot(s) reprinted with permission from Microsoft Corporation.
- IBM and PC/AT are registered trademarks of International Business Machines Corporation of the U.S.
- Intel ^ , Core ^TM , Pentium ^ and Celeron ^ are the registered trademarks or trademarks of Intel Corporation in the United States and other countries.
- AMD Athlon ^TM is a trademark of Advanced Micro Devices, Inc.
- iMovie and Mac are trademarks of Apple Inc., registered in the U.S. and other countries.
- YouTube is a trademark of Google Inc.
- Facebook is a trademark of Facebook Inc.
- Other names of systems and products mentioned in these instructions are usually the registered trademarks or trademarks of the manufacturers who developed the system or product concerned.
This product is licensed under the AVC patent portfolio license for the personal and non-commercial use of a consumer to (i) encode video in compliance with the AVC Standard (“AVC Video”) and/or (ii) decode AVC Video that was encoded by a consumer engaged in a personal and non-commercial activity and/or was obtained from a video provider licensed to provide AVC Video. No license is granted or shall be implied for any other use. Additional information may be obtained from MPEG LA, LLC. See http://www.mpegla.com.
Others
Recording modes/approximate recordable time (motion pictures)
- SD cards are only mentioned with their main memory size. The stated times are the approximate recordable times for continuous recording.
| A B | C | ||||
| Recording mode | 1080p | 720p | 480p | iFrame | |
| Picture size | 1920×1080 | 1280 ×720 640 | ×480 960 | ×540 | |
| SD card | 4 GB | 40 min 5 | 0 min 2 h 2 | 0 min 20 | min |
| 16 GB 2 | h 40 min | 3 h 30 min | 9 h 50 min | 1 h 20 min | |
| 64 GB | 10 h | 13 h 30 min | 32 h | 5 h 20 min | |
| Built-in memory Approx. 10 MB | 3 s | 4 s | 13 s | 2 s | |
A Favors image quality
B Favors recording time
Use this to playback and edit using a Mac.
• The default setting is 720p
● Maximum continuous recordable time for one scene:
- If [Video Rec Mode] is set to


29 min 59 sec
-If [Video Rec Mode] is set to : iFrame
Approx. 20 min (up to 4 GB recording capacity)
- If a recording with a lot of action is recorded, the recording time is reduced.
- The recordable time may be reduced if recording of short scene is repeated.
Others
Approximate number of recordable pictures
- SD cards are only mentioned with their main memory size. The stated number is the approximate number of recordable pictures.
| Aspect ratio 4:3 | 16:9 | ||||
| Picture size | 8M3264×2448 | 2M1600 ×1200 | 0.3M640×480 | 2M1920×1080 | |
| SD card | 4 G B | 1400 5400 2 | 3900 5200 | ||
| 16 GB 5 | 800 22100 9 | 7600 21200 | |||
| 64 GB 2 | 3500 82300 | 247100 82300 | |||
| Built-in memoryApprox. 10 MB | 4 | 1 | 6 | 7 | |
Recording modes/approximate recordable time (voices)
- SD cards are only mentioned with their main memory size. The stated times are the approximate recordable times for continuous recording.
| Recording mode | PCM | AAC 256 | AAC 128 AAC 28Low | |
| File format | L-PCM | 256 kbps AAC | 128 kbps AAC/128 kbps AAC LowGain | |
| SD card | 4 G B | 5 h 30 min | 32 h | 62 h 20 min |
| 16 GB | 22 h | 131 h 10 min | 254 h 50 min | |
| 64 GB | 91 h | 532 h | 1033 h | |
| Built-in memory Approx. 10 MB | 30 s | 3 min | 7 min | |
• The default setting is P.CM
• Maximum continuous recordable time for one voice:
Approx. 5 h (up to 4 GB recording capacity)
- The recordable time may be reduced if short recording is repeated.
Others
Specifications
High Definition Mobile Camera
Information for your safety
Power source:
DC 5.0 V (When using USB)/DC 3.7 V (When using battery)
Power consumption:
Recording; 2.6 W/Charging; 2.5 W
Signal system:
1080/30p, 720/30p, 540/30p, 480/30p
Recording format:
MPEG-4 AVC file format compliant (.MP4)
Image sensor:
1/4 type (1/4") MOS image sensor
Total; 5330 K
Effective pixels;
Motion picture; 2930 K (16:9), 2190 K (4:3)
Still picture; 2930 K (16:9), 5080 K (4:3)
Lens:
F2.8
Focal length; 4.1 mm
35 mm equivalent;
Motion picture; 49 mm (16:9)/59 mm (4:3)
Still picture; 49 mm (16:9)/39 mm (4:3)
Minimum focus distance;
Motion pictures; Approx. 30 cm
Still pictures; Approx. 10 cm
Zoom:
1× Optical Zoom, 4× Digital Zoom
Monitor:
7.5 cm (3.0") LCD monitor (Approx. 230 K dots)
Microphone:
Stereo
Speaker:
1 round speaker, dynamic type
White balance adjustment:
Auto tracking white balance system
Standard illumination:
1,400 lx
Minimum required illumination:
Approx. 9 lx (1/30)
Card reader function (No copyright protection support)
(GC/GN only)
Card reader/writer function (No copyright protection support)
Hi-Speed USB (USB 2.0), USB terminal Type A
Battery charging function (charge via USB terminal with the unit turned off)
WEB camera;
Compression; Motion JPEG
Picture size; 640 × 480 , 320 × 240 , 160 × 120
Dimensions:
HM-TA20
64.3 mm (W)×112.6 mm (H)×17.7 mm (D) (excluding projecting parts)
HM-TA2
59.8 mm (W)×108.9 mm (H)×16.9 mm (D) (excluding projecting parts)
Mass in operation:
HM-TA20
Approx. 155 g [with an SD card (optional)]
HM-TA2
Approx. 144 g [with an SD card (optional)]
Mass:
HM-TA20
Approx. 153 g [without an SD card (optional)]
HM-TA2
Approx. 142 g [without an SD card (optional)]
Operating temperature:
0°C to 35°C
Operating humidity:
10%RH to 80%RH
Battery operation time:
See page 24
HM-TA20
Waterproof performance:
Equivalent to IEC 60529 "IPX8".
(Usable for 60 minutes in 3 m water depth)
HM-TA20
Dustproof performance:
Equivalent to IEC 60529 "IP5X".
HM-TA20
Crash resistance performance:
The test method of the unit is in compliance with “MIL-STD 810F Method 516.5-Shock”*.
* “MIL-STD 810F Method 516.5-Shock” is the test method standard of the U.S. Defense Department, which specifies performing drop tests from a height of 122 cm, at 26 orientations (8 corners, 12 ridges, 6 faces) using 5 sets of devices, and passing the 26 orientation drops within 5 devices.
(If failure occurs during the test, a new set is used to pass the drop orientation test within a total of 5 devices.)
- Panasonic's test method is based on the above “MIL-STD 810F Method 516.5-Shock”. However, the drop height was changed from 122 cm to 150 cm dropping onto 3 cm thick plywood. This drop test was passed.
(Disregarding appearance change such as loss of paint or distortion of the part where drop impact is applied.)
There is no guarantee of not breaking or malfunctioning under all conditions.
■ Motion pictures
Recording media:
SD Memory Card (FAT12 and FAT16 system compliant) SDHC Memory Card (FAT32 system compliant) SDXC Memory Card (exFAT system compliant) Refer to page 26 for details on SD cards usable in this unit. Built-in memory; Approx. 10 MB
Compression:
MPEG-4 AVC/H.264, iFrame
Recording mode and transfer rate:
1080p ; Approx. 12 Mbps (VBR)
720p ; Approx. 9 Mbps (VBR)
480p ; Approx. 3 Mbps (VBR)
iFrame ; Approx. 24 Mbps (VBR)
Refer to page 92 for the recordable time.
Picture size:
1080p ; 1920×1080/30p
720p ; 1280×720/30p
480p ; 640×480/30p
iFrame ; 960×540/30p
Audio compression:
AAC (2 ch)
■ Still pictures
Recording media:
SD Memory Card (FAT12 and FAT16 system compliant)
SDHC Memory Card (FAT32 system compliant)
SDXC Memory Card (exFAT system compliant)
Refer to page 26 for details on SD cards usable in this unit.
Built-in memory; Approx. 10 MB
Compression:
JPEG (Design rule for Camera File system, based on Exif 2.2 standard)
Picture size:
Picture aspect [4:3];
3264×2448/1600×1200/640×480
Picture aspect [16:9];
1920×1080
Refer to page 93 for the number of recordable pictures.
Voices
Recording media:
SD Memory Card (FAT12 and FAT16 system compliant)
SDHC Memory Card (FAT32 system compliant)
SDXC Memory Card (exFAT system compliant)
Refer to page 26 for details on SD cards usable in this unit.
Built-in memory; Approx. 10 MB
Compression:
AAC
Specifications may change without prior notice.
Index
A
Alert sound 57
Approximate number of recordable pictures ..... 93
B
Battery 86
Battery capacity indication .... 25
C
Card 26,86
Charging time 24, 25
Cleaning 85
Condensation 87
Creating still picture from motion picture 51
D
Date and time setting ..... 32
Date format 56
Delete 49
Delete unwanted parts ..... 52
Digital zoom 39
■ E
Effect function 40
F
Formatting 58
■ H
HD Writer PE 2.0 ..... 61
HDMI output 57
HDMI resolution 57
■
Intelligent auto mode ..... 38
■ L
Language 58
LCD monitor 85
LED light 39
Lens 86
■ M
Motion picture compatibility . . . 46
N
Night view mode .....40
P
Picture size .....55
Playback zoom .....48
Power button 30
R
Recordable time (motion pictures) .....24, 92
Recordable time (voices) .....25, 93
Remaining number of recordable pictures....36
Remaining time for motion picture recording .....35
Remaining time for voice recording .....37
Reset button 82
■ s
Screen lock button .....41
SD Memory Card .....26
SD Speed Class Rating .....26
SDHC Memory Card .....26
SDXC Memory Card .....26
Self timer .....56
Setup menu 54
Share setting .....53, 61
Skip playback .....43
Skype ....73
Slide show/ Continuous playback .....47
Still picture compatibility .....46
Stylus pen 31
■ T
Touch screen 31
■ v
Video Recording modes .....54
Voice compatibility .....46
Voice Recording modes .....55
Volume adjustment .....43
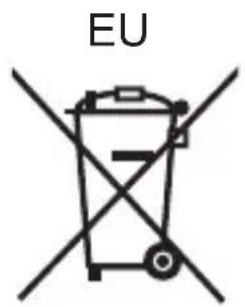
EU
Pursuant to at the directive 2004/108/EC, article 9(2)
Panasonic Testing Centre
Panasonic Marketing Europe GmbH
Winsbergring 15, 22525 Hamburg, Germany
- Operating Instructions
- High Definition Mobile Camera
- Model No. HM-TA20 HM-TA2
- Information for Your Safety
- WARNING:
- CAUTION!
- (EB/EP only)
- ■ EMC Electric and magnetic compatibility
- Use only the recommended accessories.
- ■ Information for Users on Collection and Disposal of Old Equipment and used Batteries
- For business users in the European Union
- [Information on Disposal in other Countries
- outside the European Union]
- Note for the battery symbol (bottom two symbol examples):
- ■ Indemnity about recorded content
- ■ About recording method and compatibility of this unit
- ■ Cards that you can use with this unit
- SD Memory Card, SDHC Memory Card and SDXC Memory Card
- ■ For the purposes of these operating instructions
- Contents
- HM-TA20
- Information for Your Safety......2 (Important)
- About the Waterproof/Dustproof and Anti-shock Performance of this unit [HM-TA20] 8
- Accessories...... 16
- Preparation
- Parts identification and handling 17
- Charging the battery...... 21
- Preparing the card 26
- Turning the unit on/off...... 30
- How to use the touch screen 31
- Setting date and time...... 32
- Recording/Playback
- Recording 34
- Playback 42
- Using the Setup menu screen 54
- Watching Motion/Still Pictures on your TV 59
- With a PC
- Others
- (Important)
- About the Waterproof/Dustproof and Anti-shock Performance of this unit [HM-TA20]
- Waterproof/Dustproof Performance
- Anti-shock Performance
- ■ Handling of this unit
- ■ When inner side of the lens is fogged (condensation) It is not a malfunction or failure of this unit. It may be caused by the environment in which this unit is used.
- What to do when inner side of the lens is fogged
- Conditions in which inner side of the lens may be fogged
- Check before using underwater
- Check that there are no foreign objects on the inner side of the door/cover.
- Check for cracks and deformation of the rubber seal on the door/cover.
- Close the door/cover securely.
- Using this unit underwater
- Caring of this unit after using it underwater
- Do not open or close the door/cover until the sand and dust is removed by rinsing this unit with water.
- Make sure to clean this unit after using it.
- Do not leave this unit uncared for more than 60 minutes after using it underwater.
- Rinse with water with the door/cover closed.
- Drain water by holding this unit upside down and shaking it lightly a few times.
- Wipe off water drops on this unit with a dry soft cloth and dry this unit in a shaded area which is well ventilated.
- Confirm that there are no water droplets, open the door/cover, and wipe off any water droplets or sand left inside using a soft dry cloth.
- For the United Kingdom and Ireland customers ■ Sales and Support Information
- Customer Care Centre
- Technical Support for AV Software
- Direct Sales at Panasonic UK
- Accessories
- Hand strap with stylus pen
- USB extension cord
- Tripod
- Optional accessories
- Parts identification and handling
- Tripod receptacle
- About locks for USB terminal cover, HDMI/Headphone cover and SD card door
- Charging the battery
- Important:
- Take out the USB terminal.
- Connect USB terminal of this unit to a PC with a USB extension cord.
- ■ To return the USB terminal to its original position
- Charging and motion pictures recording time
- ■ Charging/Recording time
- Approximate operating time and number of recordable still pictures
- Recording conditions by CIPA standard
- Charging and voices recording time
- Battery capacity indication
- Preparing the card
- Cards that you can use with this unit
- http://panasonic.jp/support/global/cs/e\_cam
- ■ About Built-in Memory
- Inserting/removing an SD card
- Caution:
- Status indicator A
- Open the SD card door and insert (remove) the SD card into (from) the card slot Ⓑ.
- Securely close the SD card door.
- Turning the unit on/off
- Press the power button to turn on the unit.
- To turn off the unit
- ■ About the screen display
- ■ About the power save function
- ■ About the high temperature warning icon
- How to use the touch screen
- ■ Touch
- ■ Slide while touching
- Setting date and time
- Select the menu. ( → 54)
- Touch the date or time to be set, then set the desired value using ⚠️ ▼
- Touch [ENTER].
- (EB Only)
- WARNING
- (For Australia and New Zealand)
- Recording
- Selecting a mode
- Touch [MODE].
- Touch the icon.
- Recording motion pictures
- When in Motion Picture Recording Mode
- Press the Recording button to start recording.
- Press the Recording button again to pause recording.
- ■ About the screen display when recording motion pictures
- About the compatibility of the recorded motion pictures
- Recording still pictures
- When in Still Picture Recording Mode
- Press the Recording button.
- ■ About the screen display when recording still pictures
- Recording voices
- When in Voice Recording Mode
- ■ To record still pictures while recording voices
- Touch.
- Touch to record a still picture.
- ■ About the screen display when recording voices
- Intelligent Auto Mode
- Digital zoom in/out function
- Touch and hold ☐r . Ⓦ
- Recording with the LED light
- Night view mode
- Effect function (applying special effects)
- For underwater recording [HM-TA20]
- Press and hold the screen lock button until the message appears.
- Press the Recording button.
- ■ To switch between Motion Picture Recording Mode and Still Picture Recording Mode Press the screen lock button.
- Playback
- Touch ▶ [PLAY].
- Hold this unit horizontally.
- Select the playback operation by touching the operation icon.
- ■ When selecting a scene, still picture or voice to be played back from thumbnail display
- Touch scene, still picture or voice to be played back.
- Motion picture compatibility
- Still picture compatibility
- Voice compatibility
- Playing back the slide show/continuous playback
- Zooming in on a still picture during playback (Playback zoom)
- Touch, and then touch the screen display during still picture playback.
- Move to the zoomed in position by sliding the screen display while touching it.
- Zooming out from the zoomed still picture
- Deleting scenes, still pictures or voices
- (When [SELECT] or [ALL] are selected in step 2)
- Touch [YES].
- Creating still picture from motion picture
- To delete unwanted parts of a motion picture
- Setting of online sharing of motion pictures
- (Only playing back horizontally)
- Touch
- (When the thumbnail is displayed) Touch the scene to be uploaded.
- Touch the upload destination.
- Using the Setup menu screen
- Menu list
- [Video Rec Mode]
- [PICTURE SIZE]
- [Voice Rec Mode]
- [SELF TIMER]
- [CLOCK SET]
- [DATE FORMAT]
- [ALERT SOUND]
- [HDMI resolution]
- [AUTO]/[1080i]/[576p]/[480p]
- [HDMI OUTPUT]
- [FORMAT MEDIA]
- [MENU] → ⚪ → [FORMAT MEDIA]
- [LANGUAGE]
- [MENU] → ⚡️ → [LANGUAGE] → desired setting
- Watching Motion/Still Pictures on your TV
- Connect this unit to a TV.
- A HDMI mini cable (optional)
- Select the video input on the TV.
- Start playback on this unit.
- What you can do with a PC
- HD Writer PE 2.0
- Smart wizard
- Important Notice
- (GC/GN only)
- Operating environment
- ■ Operating environment for HD Writer PE 2.0
- Installation
- Connect USB terminal of this unit to a PC with a USB extension cord.
- Touch [PC] on the screen of this unit.
- Click [Next].
- ■ Uninstalling HD Writer PE 2.0
- Connecting to a PC
- ■ To disconnect USB terminal of this unit safely
- About the PC display
- Example folder structure of an SD card:
- ■ Copying your still pictures to your PC
- Card reader function (mass storage)
- Starting HD Writer PE 2.0
- Reading the operating instructions of the software applications
- If using Mac
- ■ Operating environment
- ■ Copying still pictures on PC
- Double-click [CAM\_SD] or [CAM\_MEM] displayed on the desktop.
- Using a drag-and-drop operation, move the pictures you want to acquire or the folder storing those pictures to any different folder on the PC.
- To use as a camera for Skype
- How to connect
- Touch [WEB CAMERA] on the screen of this unit.
- Start Skype.
- Indications
- ■ Recording indications
- ■ Playback indications
- ■ Confirmatory indications
- Messages/Troubleshooting
- Messages
- Incompatible card. Please check card.
- Troubleshooting
- Problem Check
- ts
- About the RESET button
- Cautions for use
- About this unit
- Do not spray insecticides or volatile chemicals onto the unit.
- When you use the unit in a sandy or dusty place such as a beach, do not let sand or fine dust get into the body and terminals of the unit.
- HM-TA2
- Keep the unit away from sea water.
- Do not use the unit for surveillance purposes or other business uses.
- Perform a formatting of the built-in memory when this unit is to be disposed/transferred. ( → 58)
- About status indicator during charging
- When the status indicator is flashing at a particularly fast rate, the following should be considered.
- Flashing with approx. 2 second period (off for approx. 1 second, on for approx. 1 second):
- Cleaning
- When cleaning, wipe this unit with a soft, dry cloth.
- LCD monitor
- About the Lens, the microphone and the speaker
- About the battery
- About the SD card
- When not using the unit for a long period of time
- About condensation
- Requests when disposing of this unit
- Battery used for this unit
- How to remove the battery
- Remove all screws shown in the figure.
- Open this unit as shown in the figure below, and remove the battery with a driver.
- Regarding the handling of used batteries
- About copyright
- ■ Carefully observe copyright laws
- ■ Licenses
- Recording modes/approximate recordable time (motion pictures)
- Approximate number of recordable pictures
- Recording modes/approximate recordable time (voices)
- Specifications
- Power source:
- Power consumption:
- Signal system:
- Recording format:
- Image sensor:
- Lens:
- Zoom:
- Monitor:
- Microphone:
- Speaker:
- White balance adjustment:
- Standard illumination:
- Minimum required illumination:
- Dimensions:
- Mass in operation:
- Mass:
- Operating temperature:
- Operating humidity:
- Battery operation time:
- Waterproof performance:
- Dustproof performance:
- Crash resistance performance:
- There is no guarantee of not breaking or malfunctioning under all conditions.
- ■ Motion pictures
- Recording media:
- Compression:
- Recording mode and transfer rate:
- Picture size:
- Audio compression:
- ■ Still pictures
- Voices
- Index
- A
- B
- C
- D
- ■ E
- F
- ■ H
- ■
- ■ L
- ■ M
- N
- P
- R
- ■ s
- ■ T
- ■ v
- EU
Brand : PANASONIC
Model : HM-TA20GN
Category : Camera