
SMX8023B - Kitchen appliance VOX - Free user manual and instructions
Find the device manual for free SMX8023B VOX in PDF.


| Product Type | Multi-functional Kitchen Appliance |
| Brand | VOX |
| Model | SMX8023B |
| Dimensions (W x D x H) | 20 cm x 20 cm x 40 cm |
| Weight | 2.5 kg |
| Power Supply | 220-240V, 50/60 Hz, 1000W |
| Main Functions | Blending, Mixing, Chopping, Grating, Pureeing |
| Capacity | 1.5 L (max liquid level) |
| Operating Modes | Variable speed control, Pulse function |
| Material | Stainless steel blades, BPA-free plastic jug |
| Safety Features | Overload protection, Non-slip base, Safety lock lid |
| Maintenance & Cleaning | Detachable parts dishwasher safe; wipe base with damp cloth |
| Spare Parts & Repairability | Replacement jug, blades, and seals available; modular design for easy repair |
| Energy Consumption | Class A (typical) |
| Noise Level | ~85 dB |
| Cable Length | 1.2 m |
| Warranty | 2 years |
| Certifications | CE, RoHS |
| Included Accessories | Measuring cup, Stirring rod |
Frequently Asked Questions - SMX8023B VOX
User questions about SMX8023B VOX
0 question about this device. Answer the ones you know or ask your own.
Ask a new question about this device
Download the instructions for your Kitchen appliance in PDF format for free! Find your manual SMX8023B - VOX and take your electronic device back in hand. On this page are published all the documents necessary for the use of your device. SMX8023B by VOX.
USER MANUAL SMX8023B VOX
SMX-8023B
OPERATING INSTRUCTIONS STAND MIXER
UPUTSTVO ZA UPOTREBU MIKSER SA POSUDOM
MANUAL DE USUARIO BATIDORA DE PIE
MANUAL DO USUÁRIO BATEDEIRA COM SUPORTE
Thank you for purchasing our Stand Mixer. Each unit has been manufactured to ensure safety, reliability, and easy of use. Before use, please read these instructions carefully and keep them for future reference.
IMPORTANT SAFEGUARDS
When using your Stand Mixer, basic safety precautions should always be followed, including:
- This appliance is not intended for use by persons (including children) with reduced physical, sensory or mental capabilities, or lack of experience and knowledge concerning the use of this product, unless they are supervised or have been given instruction concerning use of the appliance by a person responsible for their safety.
- Children should be supervised to ensure that they do not play with the appliance.
- Always ensure that the voltage on the rating label corresponds to the voltage in your home.
- Check the power cord and plug regularly for any damage. If the cord or the plug is damaged, it must be replaced by the manufacturer or a qualified person in order to avoid an electrical hazard.
- This appliance is intended for household use only. Industrial or commercial use will void the warranty, and the supplier can not be held responsible for injury or damage caused when using the appliance for any other purpose than that intended.
- Incorrect operation and improper use can damage the appliance and cause injury to the user.
- Do not use the appliance if it has been dropped or damaged in any way. In case of damage, take the unit in for examination and/or repair by an authorized
service agent.
- To reduce the risk of electric shock, do not immerse or expose the motor assembly, plug or the power cord to water or any other liquid.
- Never immerse the unit in water or any other liquid for cleaning purposes.
- Remove the plug from the socket by gripping the plug. Do not pull on the cord to disconnect the appliance. Always unplug the unit when not in use, before cleaning or when adding or removing parts.
- The use of accessory attachments that are not recommended or supplied by the manufacturer may result in injuries, fire or electric shock.
- Do not let the cord hang over the edge of a table or counter. Ensure that the cord is not in a position where it can be pulled on inadvertently.
- Do not allow the cord to touch hot surfaces and do not place on or near a hot gas or electric burner or in a heated oven.
- Use of an extension cord with this appliance is not recommended. However, if it is necessary to use an extension lead, ensure that the lead is suited to the power consumption of the appliance to avoid overheating of the extension cord, appliance or plug point. Do not place the extension cord in a position where it can be pulled on by children or animals or tripped over.
-
Never use this unit near bathtubs, showers, basins or other vessels containing water.
-
This appliance is not suitable for outdoor use.
- Do not carry the appliance by the power cord.
- Do not leave this appliance unattended during use. Always unplug the unit when not in use or before cleaning the appliance.
- Always operate the appliance on a smooth, even and stable surface. Do not place the unit on a hot surface.
- The manufacturer does not accept responsibility for any damage or injury
caused by the improper or incorrect use of the appliance, or by repairs carried out by unauthorized personnel.
- In case of technical problems, switch off the machine and do not attempt to repair it yourself. Return the appliance to an authorized service facility for examination, adjustment or repair.
Always insist on the use of original spare parts. Failure to comply with the above mentioned precautions and instructions, could affect the safe operation of this machine.
KNOW YOUR ELECTRIC STAND MIXER
- Eject button
- Speed selector
- Turbo button
- Mixer handle
- Mixer head
- Lock button
- Tilt back and locking head button
- Mixing bowl
- Mixer stand
- Dough hook
- Beater

You must read all instructions carefully before using this appliance.
- Remove all packing material and please check carefully, making sure that your Stand Mixer is in good condition. It must have no cracks on the unit and no damage to the cord/plug. Do not discard any packaging until all accessories have been found.
- You must confirm that the voltage indicated on the Stand Mixer corresponds with the voltage in your home.
- Remove any adhesive labels or stickers before use.
TO USE YOUR ELECTRIC STAND MIXER
- Prior to initial use, wash all the parts which come into contact with food.
- Switch off and unplug the appliance before changing accessories.
- Select the desired attachments, depending on the mixing task to be performed: beaters for whisking, mixing and beating, or dough hooks for kneading.
Steps as below:
Install the beaters or dough hooks Hold the handle of the mixer head | with one hand and place the beater (dough hook) with the other. Insert it into the slot, press until it clicks into position.The one with gear can only be inserted into the right side of the hole and insert the one without gear to left side.Note:The two beaters and two dough hooks cannot be inserted in reverse directions. |
Install the hand mixer to the base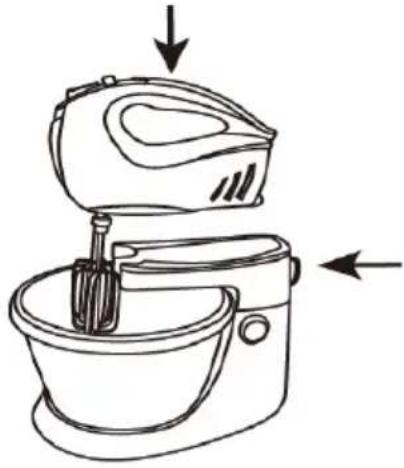 | Align the hole at the bottom of the hand mixer with the clips on top of the upper base, and then press the lock button to assemble the hand mixer to the upper base until it “clicks”.Make sure the mixer is placed at a flat and stable surface. |
Detach the hand mixer from the upper base
natural_image
Line drawing of a kitchen mixer with two views showing the motor and side view (no text or symbols)Place the mixing bowl onto the mixer stand
natural_image
Line drawing of a hand mixer blending liquid into a bucket (no text or symbols)
natural_image
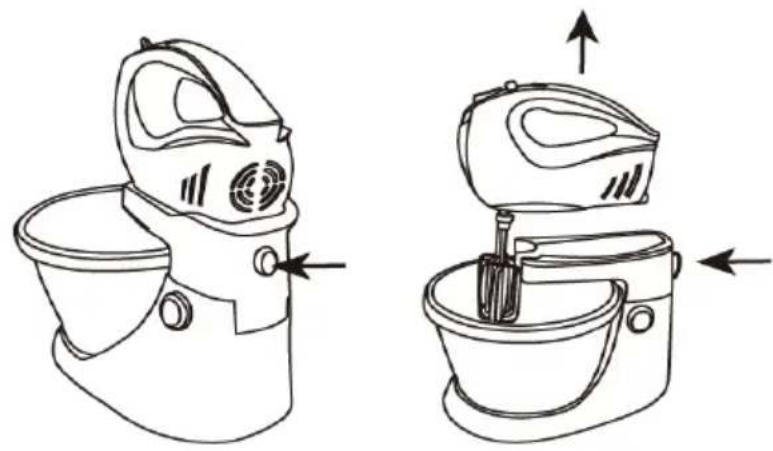
Line drawing of a hand mixer blending liquid into a bowl (no text or symbols)To detach the hand mixer from the upper base, press the lock button and lift the hand mixer's handle as per figure 3.
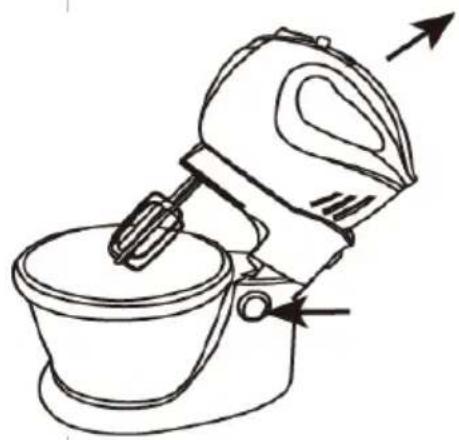
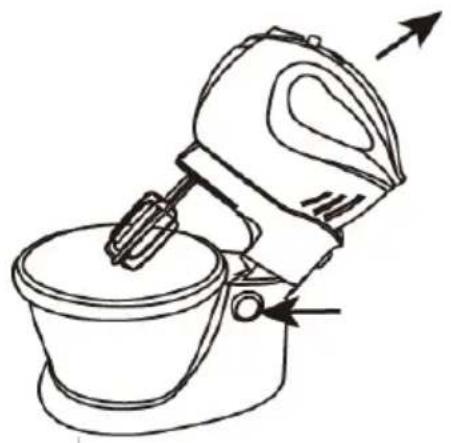
Press the tilt button and lift up the upper base with mixer head. Place the food into the bowl and place the mixing bowl onto the stand. (Figure left up)
After that, press the tilt button to lever down the mixer body until it locks into position. (Figure left down)
Connect the plug to the wall outlet and power on.
Switch on the appliance beginning from the lowest speed "1" to prevent ingredients splashing out of the bowl.
Then dial the speed selector according to your desired setting and the mixer will start working.
There are 5 settings and the speed will achieve the highest if the turbo button is pressed at any time.
The bowl will rotate by itself when working since it is self-turning rotation bowl.
Warning: The max operation time shall not exceed 5 minutes. Let the appliance rest for approximate 30 minutes until the mixer has cooled down.
- Never eject beaters or dough hooks when the appliance is in operation.
- After use, reset the speed control to position "0" and switch off.
- To disconnect the beaters (dough hooks) from the mixer, press the eject button and remove the beaters (dough hooks).
WARNING: Remove the beaters/dough hooks only when the speed is at "0" setting.
- Always unplug from the power supply when you have finished and before cleaning.
- The hand mixer can be used separately without the stand in position.
Notes on Turbo button
The speed will be increased to the maximum when the turbo button is pressed, then the appliance is operated at max speed and the operation period shall not exceed 1 minute at this speed.
MIXING GUIDE
| SPEED | DESCRIPTION |
| 1 | This is a good starting speed for bulk and dry foods such as flour, butter and potatoes. |
| 2 | Best speed for liquid ingredients. |
| 3 | For mixing cakes and quick breads. |
| 4 | For creaming butter and sugar, beating uncooked candy, desserts, etc. |
| 5 | For beating eggs, cooked icings, whipping potatoes, whipping cream, etc. |
| TURBO | Same speed as Speed “5”. |
Caution: When mixing flour, start with speed 1 for 30-60 seconds, then change to speed 5 for continuous mixing.
CARE AND CLEANING
- Unplug the appliance from the power supply.
- Clean the exterior of the appliance using a damp cloth.
- Clean the Beaters or Dough Hooks in warm soapy water. Rinse and wipe dry. Please note that beaters and hooks are suitable for dishwasher.
- We recommend cleaning the accessories immediately to remove any food residues from the accessories after use. This will make cleaning easier and prevents bacterial growth.
- If the supply cord damaged, it must be replaced by manufacturer, its service agent or similar qualified persons in order to avoid a hazard.
ENVIRONMENT FRIENDLY DISPOSAL

You can help protect the environment! Please remember to respect the local regulations: hand in the non-working electrical equipments to an appropriate waste disposal centre.
UPUTSTVO ZA UPOTREBU
MIKSER SA
POSUDOM
Model: SMX-8023B
UVOD
VAŽNA BEZBEDNOSNA UPUTSTVA
natural_image
Line drawing of a hand mixer with a coiled spring and directional arrow (no text or symbols)Držite ručku miksera jednom rukom i postavite mutilice (mutilice za testo) sa drugom. Ubacite ih u otvor za mutilice i pritisnite dok ne škljocnu. Mutilica sa prstenastim proširenjem može se ubaciti samo u desni otvor, dok se druga mutilica ubacuje u drugi otvor.
Napomena: Mutilice se ne mogu montirati obratno.
natural_image
Line drawing of a mixing bowl with an electric mixer, showing mechanical components and directional arrows (no text or symbols)natural_image
Line drawings of a two-part kitchen mixer with handle and side view (no text or symbols)Postavite posudu za mešanje na postolje
natural_image
Line drawing of a hand mixer blending liquid into a bucket, with directional arrows indicating motion (no text or symbols)
natural_image
Line drawing of a hand mixer blending liquid into a bowl (no text or symbols)Da odvojite ručni mikser od baze, pritisnite dugme za zaključavanje i podignite ručku ručnog miksera kao što je prikazano na slici 3.
Pritisnite dugme za podizanje i podignite gornju bazu zajedno sa ručnim mikserom. Stavite hranu u posudu a zatim stavite posudu na postolje. (Slika 4)
Nakon toga, pritisnite dugme za podizanje i spustite kućište miksera sa gornjom bazom dok ne škljocne. (Slika 5)
natural_image
Line drawing of a hand mixer with a coiled spring and pointer (no text or symbols)natural_image
Line drawing of a kitchen mixer with an open lid and mixing bowl, showing no text or symbolsnatural_image
Line drawing of a two-step kitchen mixer with fan and bucket, showing blade and handle assembly (no text or labels)natural_image
Line drawings of a mixing bowl using a hand mixer, showing two different states of operation (no text or symbols present)natural_image
Symbol of a trash bin crossed with no text or labels, accompanied by a black rectangular block below (no readable text or symbols)MANUAL DE INSTRUÇÕES
BATEDEIRA COM SUPORTE
Modelo: SMX-8023B
INTRODUÇÃO
natural_image
Line drawing of a kitchen mixer with two views showing the motor and bucket (no text or symbols)natural_image
Line drawings of a hand mixer in two different states (no text or symbols)INSTRUÇÕES PARA MISTURA
natural_image
Line drawing of a hand mixer with a coiled spring and directional arrow (no text or symbols)natural_image
Line drawing of a kitchen mixer with an open lid and mixing bowl, showing no text or symbolsnatural_image
Line drawings of a kitchen mixer with two views showing the motor and side view (no text or symbols)natural_image
Line drawings of a hand mixer in two different states (no text or symbols)natural_image
Line drawing of a hand mixer with a coiled spring and directional arrow (no text or symbols)natural_image
Line drawing of a mixing bowl with a hand mixer and an oven, showing directional arrows (no text or symbols)natural_image
Line drawings of a two-step kitchen mixer device with no text or symbolsnatural_image
Line drawings of a hand mixer in two different settings (no text or symbols)natural_image
Line drawing of a hand mixer with a coiled handle and directional arrow (no text or symbols)Držite ručku miješalice jednom rukom i postavite metlice (metlice za tijesto) sa drugom. Ubacite ih u otvor za metlice i pritisnite dok ne škljocnu. Metlica sa prstenastim proširenjem može se ubaciti samo u desni otvor, dok se druga metlica ubacuje u drugi otvor.
natural_image
Line drawing of a kitchen mixer with handle and side panel, showing mechanical components (no text or symbols)natural_image
Line drawing of a kitchen mixer with two views showing the motor and side view (no text or symbols)natural_image
Line drawing of a hand mixer blending liquid into a bucket, with directional arrows indicating motion (no text or symbols)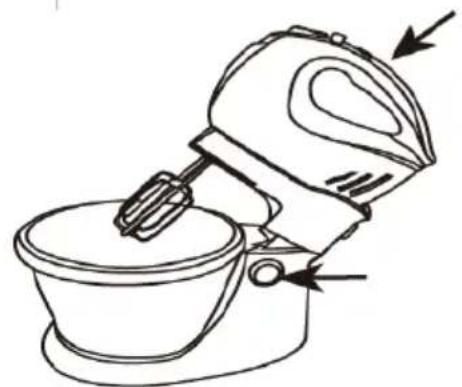
natural_image
Line drawing of a hand mixer blending liquid into a bowl (no text or symbols)natural_image
Line drawing of a hand mixer with a coiled spring and directional arrow (no text or symbols)natural_image
Line drawing of a kitchen mixer with an open lid and mixing bowl, showing no text or symbolsnatural_image
Line drawing of a kitchen mixer with two views showing the motor and bucket (no text or symbols)natural_image
Line drawings of a hand mixer in two different positions (no text or symbols)Da odvojite ručni mikser od baze, pritisnite dugme za zaključavanje i podignite ručku ručnog miksera kao što je prikazano na slici 3.
Pritisnite dugme za podizanje i podignite gornju bazu zajedno sa ručnim mikserom. Stavite hranu u posudu a zatim stavite posudu na postolje. (Slika levo gore)
Nakon toga, pritisnite dugme za podizanje i spustite kućište miksera sa gornjom bazom dok ne škljocne. (Slika levo dole)
natural_image
Line drawing of a hand mixer with a coiled spring and directional arrow (no text or symbols)natural_image
Line drawing of a mixing bowl with an electric mixer, showing mechanical components and directional arrows (no text or symbols)natural_image
Line drawings of a two-part kitchen mixer with handle and side arm (no text or symbols)natural_image
Line drawing of a hand mixer blending liquid into a bucket, with directional arrows indicating motion (no text or symbols)
natural_image
Line drawing of a hand mixer blending liquid into a bowl (no text or symbols)natural_image
Line drawings of a two-step kitchen mixer with fan and bucket, showing blade and handle assembly (no text or labels)natural_image
Line drawing of a hand mixer blending liquid into a bucket, with directional arrows indicating motion (no text or symbols)
natural_image
Line drawing of a hand mixer blending liquid into a bowl (no text or symbols)

- SMX-8023B
- IMPORTANT SAFEGUARDS
- KNOW YOUR ELECTRIC STAND MIXER
- TO USE YOUR ELECTRIC STAND MIXER
- Detach the hand mixer from the upper base
- Place the mixing bowl onto the mixer stand
- Notes on Turbo button
- CARE AND CLEANING
- ENVIRONMENT FRIENDLY DISPOSAL
- UPUTSTVO ZA UPOTREBU
- MIKSER SA
- POSUDOM
- Model: SMX-8023B
- UVOD
- VAŽNA BEZBEDNOSNA UPUTSTVA
- Postavite posudu za mešanje na postolje
- MANUAL DE INSTRUÇÕES
- BATEDEIRA COM SUPORTE
- Modelo: SMX-8023B
- INTRODUÇÃO
- INSTRUÇÕES PARA MISTURA
Brand : VOX
Model : SMX8023B
Category : Kitchen appliance