
MX 2002 - Kitchen appliance VOX - Free user manual and instructions
Find the device manual for free MX 2002 VOX in PDF.

| Product Type | Kitchen Appliance (Multi-Function Processor) |
| Model | MX 2002 |
| Brand | VOX |
| Dimensions (H x W x D) | 30 x 25 x 20 cm |
| Weight | 2.5 kg |
| Power | 750 W |
| Voltage / Frequency | 220-240 V / 50-60 Hz |
| Main Functions | Mixing, Blending, Chopping, Grinding, Whipping |
| Number of Speed Settings | 5 + Pulse |
| Bowl Capacity | 1.5 L |
| Material | Stainless Steel Blades, Plastic Body, Glass Bowl |
| Safety Features | Overload Protection, Safety Lock, Non-Slip Feet |
| Cleaning & Maintenance | Detachable Parts Dishwasher Safe, Wipe Motor Base with Damp Cloth |
| Warranty | 2 Years |
| Included Accessories | Chopping Blade, Dough Knife, Whisk, Spatula |
Frequently Asked Questions - MX 2002 VOX
User questions about MX 2002 VOX
0 question about this device. Answer the ones you know or ask your own.
Ask a new question about this device
Download the instructions for your Kitchen appliance in PDF format for free! Find your manual MX 2002 - VOX and take your electronic device back in hand. On this page are published all the documents necessary for the use of your device. MX 2002 by VOX.
USER MANUAL MX 2002 VOX
Before using your device for the first time, read this original instruction for use and the accompanying safety warnings. Act accordingly. Keep each user manual for later use or for forwarding to future users of the device.
General Information
Proper use
This vacuum cleaner is made for private household use and not for commercial use. The manufacturer assumes no liability for damage caused by improper use or misuse. Only use the vacuum cleaner with original spare parts, accessories or special accessories.
Disposal of Dust Filters
Dust filters are made of environmentally friendly materials. These items can be disposed of in the normal household waste, as long as they do not contain absorbed substances that are prohibited for household waste.
Spare Parts
Only use original accessories and original spare parts. In this way, you guarantee safe and trouble-free operation of the device.
For information on accessories and spare parts, contact your authorized dealer or service.
Scope of Delivery
The scope of delivery of your device is shown on its packaging. When the package is opened, check whether there are any missing parts inside.
Inform your dealer if accessories are missing or damaged in transport.
Warnings!
This appliance can be used by children aged from 8 years and above and persons with reduced physical, sensory or mental capabilities or lack of experience and knowledge if they have been given supervision or instruction concerning use of the appliance in a safe way and understand the hazards involved.
The appliance should not be cleaned and maintained by children without supervision.
- Keep packaging films out of reach of children.
Children under 3 years of age should be kept away from the appliance unless they are constantly supervised.
◆ Devices should not be used for playing.
Children older than 3 years old and younger than 8 years old should not plug the device into the electrical socket, should not adjust the device, and should not perform any action regarding the cleaning and maintenance of the device.
The device should not be operated without supervision.
Do not vacuum any inflammable or combustible materials such as cigarettes, ashes or charcoal, whether burning or extinguished.
Do not vacuum any inflammable or explosive liquids or gases, as well as areas where such materials are stored.
Safety Instructions
When using an electrical device, precautions should always be taken to avoid tire, electric shock and physical injury.
Read carefully the Information given in the instruction manual. Please keep the instruction manual. If you pass the device on to a third party, hand over the manual along with it.
Keep a floating bag of the device, accessories and equipment out of the reach of children and babies to avoid suffocation risk.
If you have concerns about the device, housing, cable, plug and similar pieces, do not use the device. Contact the nearest authorized Service center.
A malfunctioning device must be repaired by an authorized Service. Never attempt to repair or change any parts by yourself.
Since the device is powered by electricity, there is a risk of electric shock, therefore never touch the plug with wet hands.
When removing the plug from the socket, always pull the plug while holding it.
Do not attempt to pull the plug while holding the power cord. This may cause damage to the cable. Avoid damaging the power cable and bringing it into contact with heat sources or sharp edges.
Do not operate in outdoor areas. Your device may be adversely affected by dirt or rain. Keep your device away from water and protect it from rain or moisture.
Do not vacuum up water, liquids or any other kind of wet material. Do not vacuum recently wiped or shampooed carpets or rugs until they are completely dry.
Always operate your device within the voltage range indicated on it.
Never leave your device unattended when it is plugged in. Children should be supervised to ensure that they do not play with the appliance.
Always plug your device into a solid socket.
Make sure the plug is not in the socket when attaching or removing accessories, or when cleaning and maintaining the device.
Do not use the device with an extension cord.
To protect the power cord from damage, avoid pinching, twisting or rubbing it against sharp edges.
Do not point the tube, hose or any other accessory of the device at your eyes or ears and do not put them in your mouth.
Never use gasoline, solvents, abrasive cleaning agents, metal objects or hard brushes to clean the device.
Do not use appliances that release hot air such as hair dryers, stoves, etc. to dry the filters. Do not replace the filters until they are completely dry, otherwise, the smell of moisture may spread during operation, water may splash from the back and the filters may be damaged.
Do not vacuum the toner dust used in printers and copiers, as it is electrically conductive.
The crossed-out trash can sign indicates that you should never dispose of batteries and accumulators with household waste.
Troubleshooting
Before sending the product to the Authorized Service, you can use the table below to solve the problems.
Warning!
Before starting to solve the problem, turn off the device and pull out the mains plug. Never use the damaged product.
| Problem | Possible Cause | Solution |
| The device does not work | The device is not plugged in or has not been switched on. | Plug in or start the device. |
| There is no power flow in the socket. | Plug the vacuum cleaner into another socket that is working. | |
| The power cord is damaged. | Change the power cord by contacting an authorized Service center. | |
| The device does not suck up dust. | The dust bag is full. | Clean the dust bag. |
| The selected floorhead is not suitable for the surface. | Replace the floorhead with another one that is suitable for the surface. | |
| The filter is dirty. | Clean the filter. Ensure that the cyclone, Hepa, sponge and felt filters are clean. | |
| The hose, the telescopic tube or the unit is clogged. | Clear the obstruction. You can use a long stick for this if necessary. |
Technical Specifications
| Type | Value | |
| Voltage | V | 220-240 |
| Electrical frequency | Hz | 50/60 |
| Protection class | class | II |
| Weight (without the accessories) | kg | 4.9 |
| Range of motion | m | 7.5 |
| Dust volume max | lt | 2.5 |
| Length | mm | 429 |
| Width | mm | 318 |
| Height | mm | 279 |
| Suction power | W | >180 |
| Nominal power consumption | W | 2000 |
The right to make technical changes is reserved.
Environmental Protection

The package of the product is made of recyclable materials. Please take the packaging material to reusable places instead of disposing of it in the household waste.

Old appliances contain valuable recyclable materials that must be recycled. Therefore, please dispose of used devices through official collection systems.
Electrical and electronic appliances often contain materials that if handled or
Usage Recommendations
✿ Never operate the device without the filter. This can damage the motor and reduce the life of your device.
Always clean all of the parts as specified in the instruction manual. Do not clean any of the parts with water and/or cleaning agents unless specifically indicated in the instruction manual.
This vacuum cleaner is not suitable for:
Use on people or animals
Use to absorb
■ Small creatures (e.g. insects, spiders, etc.)
■ Substances that are hazardous to health, sharp-edged, hot or burning materials.
■ Wet or liquid substances
■ Highly flammable or explosive substances and gases
Attention!
☒ If you use water to wash your device's washable filters, make sure they are completely dry before putting them back in the device.
Do not dry the filter in direct sunlight, on a radiator or in a clothes dryer. Replace the washable filter if it cannot be cleaned properly or if it is damaged.
Overview and Parts Description

- Power cable winding button
- Rear wheel
- On/Off switch
- Carrying handle
- Suction power adjustment knob (only on certain models)
- Horizontal parking channel
- Dust container
- HEPA filter
- Air outlet cover
- Swivel wheel
- Plug
-
Upright parking channel
-
Sponge and felt filter
- Dust bag filter cartridge
- Telescopic tube
- Telescopic tube adjustment latch
- Dust container
- Hose
- Upholstery nozzle
- Narrow crevice tool
- Floor head
- Adjus ng the floorhead type
- Plastic tube
- Movable brush head (optional)
Use of the Device
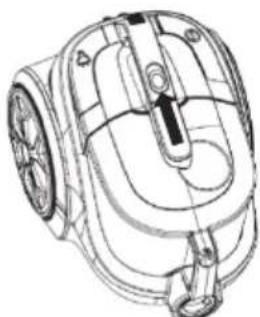
Attaching the hose

natural_image
Technical line drawing of a mechanical assembly with hoses and tubing (no text or symbols)1- The hose end is pushed into the hose port and locked by turning it to the right.
2- The hose end is turned to the left and removed by pulling back.
Adjusting the suction power of the handle

natural_image
Illustration of a handheld device with a black arrow indicating direction (no text or symbols)1- Suction power is adjusted from the suction power adjustment knob:
- Suction power adjustment knob on, low suction power
- Suction power adjustment knob off, high suction power
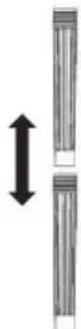
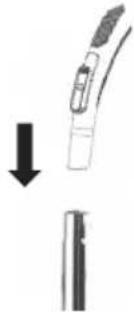
Attaching the telescopic tube to the handle

natural_image
Diagram showing a mechanical component with an arrow indicating downward motion, no text or symbols present1- Attach the handle and telescopic tube together and lock in place by pressing firmly.
Plastic tube
1- Connect the plastic tubes together.
2- Attach the handle and the plastic tube together and lock them in place by pressing firmly.
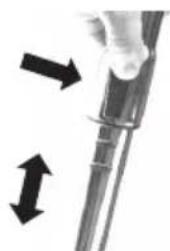
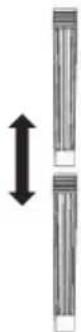
Telescopic tube adjustment latch
natural_image
Close-up of a medical or laboratory procedure showing two arrows pointing to a cylindrical device (no text or symbols visible)1- Adjust the telescopic tube to the desired length by pressing the telescopic tube adjustment knob.
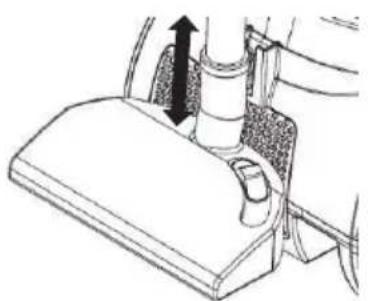
Attaching the tools to the telescopic tube

natural_image
Three black arrows pointing downward to different types of vacuum cleaner (no text or symbols visible)1- Attach the floorhead, the narrow crevice tool, upholstery nozzle and the telescopic tube together and lock them in place by pressing firmly.
2- Narrow crevice tool: Suitable for cleaning of the corners, narrow places and warm air heating unit, etc.
3- Upholstery nozzle: Suitable for cleaning your seats and sensitive surfaces as well as a dusting of your cushions, etc.
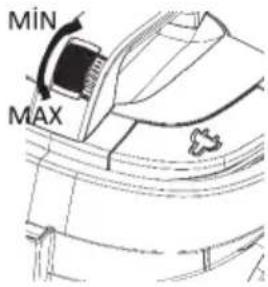
Adjusting the floorhead type

natural_image
Close-up of a gray industrial vacuum cleaner with a small inset showing a grid symbol (no text or labels visible)1- Carpets and rugs

natural_image
Close-up of a gray industrial vacuum cleaner with a small inset showing a grid pattern (no text or symbols visible)2- Hard surfaces
When the device does not work
When not in use, you can place the floorhead, tubes and hose horizontally or in an upright parking position.
natural_image
Mechanical assembly diagram showing a lever mechanism with a directional arrow (no text or labels)1- Horizontal parking

natural_image
Simple line drawing of a vacuum cleaner with a vertical tube and attached components (no text or symbols)2- Upright parking
Operating the device

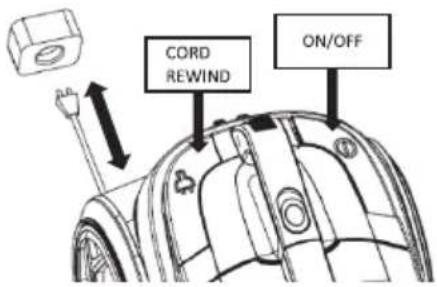
1 - Pull the power cord from the device and plug it into the socket.
2 - To start the device, press the on/off button on top of the device.
3 - To turn the device off, press the on/off button on top of the device and pull the power plug out of the socket.
4 - Press the automatic cord rewind button to rewind the power cord.
Adjusting the suction power (On power adjustable models)
1- You can adjust the suction power of the device by turning the suction power button located on the body of the device.
- Use maximum suction power when cleaning heavily soiled carpets and hard floors.
- Use minimum suction power when cleaning curtains, tablecloths, etc.
Removal of the dust bag
natural_image
Technical line drawing of a mechanical device with no visible text or symbols1- Push the dust bag cover latch forward and pull the dust bag up to remove it.
2- Empty the dust bag.
Tip: It is recommended to clean the filters every time you replace or empty the bag.

natural_image
Line drawing of a vacuum cleaner with side profile and height indicator (no text or symbols)ATTENTION!
Don't forget to attach the dust bag filter cartridge.
5-Place the dust bag in its place.
Cleaning of the dust bag

natural_image
Technical line drawing of a mechanical component with an arrow indicating direction (no text or symbols)1- Hold the dust bag over the trash can and press the lid handle on the dust bag.
Note: Always empty the dust bag when the dust level reaches the MAX sign.
2- When the dust bag is empty, close the lid, ensure that the lid is positioned correctly.
3- Push the dust bag into the device and lock it.
Note: Always verify that the dust container is correctly positioned when putting it in.
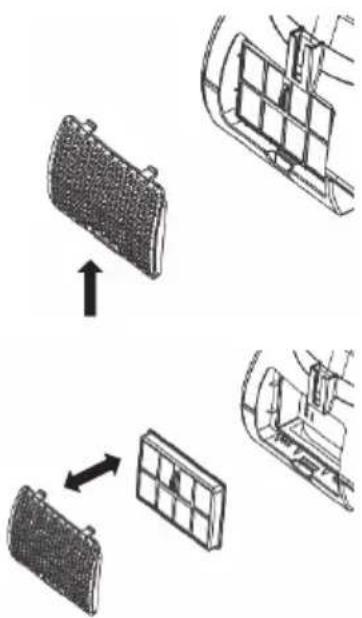
Cleaning of the dust bag filter cartridge

natural_image
Technical line drawing of a device housing with internal components (no text or symbols)1- Remove the dust bag filter cartridge, take out the sponge and felt filters.
2- Clean the sponge and felt filters.
Attention!
- Never clean the sponge and felt filters in the washing machine and never dry them with a hair dryer.
- Do not wash the pieces with cleaning agents or with hot water.
- Wait for the sponge and felt filters and dust bag to dry completely (at least 24 hours) before putting them back in the device.
- When putting back the motor protection filter, place the white felt filter first, then the black sponge on the filter cartridge.
Cleaning of the Hepa filter
flowchart
graph TD
    A["Battery Pack"] --> B["Grid Cell"]
    B --> C["Motor Component"]
    style A fill:#f9f,stroke:#333
    style B fill:#ccf,stroke:#333
    style C fill:#cfc,stroke:#333
1- Open and remove the filter cover by pressing the filter cover latch.
2- Remove the Hepa filter.
3- Empty the Hepa filter into a trash can to clean it.
NOTE: Do not wash the Hepa filter.
4- Place the clean filter into the filter case.
5- Close the filter cover.

SRB
SL 706
SL 806
UPUTSTVO ZA UPOTREBU USISIVAČ
Pre prve upotrebe uređaja, najpre pročitajte ovo uputstvo za upotrebu i prateća bezbednosna upozorenja. Postupajte u skladu sa uputstvom. Sačuvajte svako uputstvo za upotrebu za kasniju upotrebu ili za prosleđivanje budućim korisnicima uređaja.
Opšte informacije
Pravilna upotreba
Ovaj usisivač je napravljen za upotrebu u privatnom domaćinstvu, a ne za komercijalnu upotrebu. Proizvođač ne preuzima nikakvu odgovornost za štetu uzrokovanu nepravilnom ili pogrešnom upotrebom. Koristite usisivač samo sa originalnim rezervnim delovima, priborom ili posebnim priborom.
Odlaganje filtera za prašinu
Filteri za prašinu su napravljeni od ekološki prihvatljivih materijala. Ovi predmeti se mogu odlagati uz uobičajeni kućni otpad, sve dok ne sadrže apsorbovane supstance koje su zabranjene za kućni otpad.
Re ervni delovi
- Dugme za namotavanje kabla za napajanje
- Zadnji točak
- Prekidač za uključivanje/isključivanje
- Ručka za nošenje
- Dugme za podešavanje snage usisavanja (samo na određenim modelima)
- Horizontalni kanal za parkiranje
- Posuda za prašinu
- HEPA filter
- Poklopac za izlaz vazduha
- Okretni točak
- Utikač
-
Uspravni kanal za parkiranje
-
Sunder i filter od filca
- Uložak filtera za kesu za prašinu
- Teleskopska cev
- Jezičak za podešavanje teleskopske cevi
- Posuda za prašinu
- Crevo
- Mlaznica za tapaciranje
- Alat za uske otvore
- Podna glava za usisavanje
- Podešavanje tipa podne glave
- Plastična cev
- Pokretna glava četke (opciono)
Upotreba uređaja
natural_image
Technical line drawing of a mechanical assembly with hoses and a coiled spring (no text or symbols)1- Kraj creva se gura u otvor za crevo i zaključava okretanjem udesno.
2- Kraj creva se okreće ulevo i uklanja povlačenjem unazad.
natural_image
Illustration of a handheld device with a curved handle and arrow indicator (no text or symbols)1- Snaga usisavanja se podešava pomoću dugmeta za podešavanje snage usisavanja:
- Dugme za podešavanje snage usisavanja uključeno, niska snaga usisavanja
- Dugme za podešavanje snage usisavanja isključeno, velika snaga usisavanja
Pričvršćivanje teleskopske cevi na ručku
natural_image
Diagram showing a mechanical component with an arrow indicating downward motion, no text or symbols present1- Pričvrstite ručku i teleskopsku cev zajedno i učvrstite ih čvrstim pritiskom.
Plastična cev
1- Povežite plastične cevi zajedno.
2- Pričvrstite ručku i plastičnu cev zajedno i učvrstite ih čvrstim pritiskom.
Jezičak za podešavanje teleskopske cevi

natural_image
Close-up of a medical or laboratory procedure showing two arrows pointing to a cylindrical device (no text or symbols visible)natural_image
Diagram showing a vacuum cleaner with three downward arrows indicating mechanical components (no text or symbols present)1- Pričvrstite podnu glavu, alat za uske otvore, mlaznicu za tapaciranje i teleskopsku cev zajedno i učvrstite ih čvrstim pritiskom.
2- Dodatak za uske otvore: Pogodan za čišćenje uglova, uskih mesta i jedinice za grejanje toplog vazduha itd.
3- Mlaznica za tapaciranje: Pogodna za čišćenje vaših sedišta i osetljivih površina, kao i za brisanje prašine sa vaših jastuka itd.
Podešavanje tipa podne glave

natural_image
Close-up of a gray industrial vacuum cleaner with a small inset showing a control panel (no text or symbols visible)1- Tepisi i ćilimi

natural_image
Close-up of a black vacuum cleaner's base with a small inset showing a grid symbol (no text or labels visible)2- Tvrde površine
natural_image
Mechanical assembly diagram showing a lever mechanism with a directional arrow (no text or labels)1- Horizontalno parkiranje

natural_image
Line drawing of a vacuum cleaner with a valve and attached tubing, showing motion direction (no text or symbols)2- Uspravno parkiranje
Rukovanje uređajem
1 - Izvucite kabl za napajanje iz uređaja i uključite ga u utičnicu.
2 - Da biste pokrenuli uređaj, pritisnite dugme za uključivanje/isključivanje na vrhu uređaja.
3 - Isključite uređaj, pritisnite dugme za uključivanje/isključivanje na vrhu uređaja i izvucite utikač iz utičnice.
4 - Pritisnite dugme za automatsko namotavanje kabla da namotate kabl za napajanje.
Podešavanje snage usisavanja (na modelima sa podesivom snagom)

natural_image
Technical line drawing of a mechanical device with no visible text or symbols1- Gurnite jezičak poklopca kese za prašinu napred i povucite kesu nagore da biste je uklonili.
2- Ispraznite kesu za prašinu.
natural_image
Line drawing of a vacuum cleaner with side profile and height indicator (no text or symbols)PAŽNJA!
natural_image
Technical line drawing of a mechanical component with an arrow indicating direction (no text or symbols)1- Držite kesu za prašinu iznad kante za smece i pritisnite ručku poklopca na kesi za prašinu.
Napomena: Uvek ispraznite kesu za prašinu kada nivo prašine dostigne znak MAX.
natural_image
Technical line drawing of a device housing with internal components (no text or symbols)1- Uklonite uložak filter kese za prašinu, izvadite sunder i filtere od filca.
2- Očistite sunder i filtere od filca.
Pažnja!
- Nikada ne čistite sunder i filtere od filca u mašini za pranje veša i nikada ih ne sušite fenom.
- Nemojte prati delove sredstvima za čišćenje ili toplom vodom.
- Sačekajte da se sunder i filteri od filca i kesa za prašinu potpuno osuše (najmanje 24 sata) pre nego što ih vratite u uređaj.


- General Information
- Proper use
- Disposal of Dust Filters
- Spare Parts
- Scope of Delivery
- Warnings!
- Safety Instructions
- Troubleshooting
- Warning!
- Environmental Protection
- Usage Recommendations
- Attention!
- Overview and Parts Description
- Use of the Device
- Attaching the hose
- Adjusting the suction power of the handle
- Attaching the telescopic tube to the handle
- Plastic tube
- Telescopic tube adjustment latch
- Attaching the tools to the telescopic tube
- Adjusting the floorhead type
- When the device does not work
- Operating the device
- Adjusting the suction power (On power adjustable models)
- Removal of the dust bag
- Cleaning of the dust bag
- Cleaning of the dust bag filter cartridge
- Cleaning of the Hepa filter
- Opšte informacije
- Pravilna upotreba
- Odlaganje filtera za prašinu
- Re ervni delovi
- Upotreba uređaja
- Pričvršćivanje teleskopske cevi na ručku
- Plastična cev
- Jezičak za podešavanje teleskopske cevi
- Podešavanje tipa podne glave
- Rukovanje uređajem
- Podešavanje snage usisavanja (na modelima sa podesivom snagom)
- Pažnja!
Brand : VOX
Model : MX 2002
Category : Kitchen appliance