
AKE 40 - Chain saw BOSCH - Free user manual and instructions
Find the device manual for free AKE 40 BOSCH in PDF.
User questions about AKE 40 BOSCH
0 question about this device. Answer the ones you know or ask your own.
Ask a new question about this device
Download the instructions for your Chain saw in PDF format for free! Find your manual AKE 40 - BOSCH and take your electronic device back in hand. On this page are published all the documents necessary for the use of your device. AKE 40 by BOSCH.
USER MANUAL AKE 40 BOSCH
Operating instructions
Service +43(0)1/610380
Fax +43 (0)1 / 61 03 84 91
Kundenberater +43 (0)1 / 7 97 22 30 66
E-Mail:abe@abe-service.co.at
Schweiz
044/8471511
Fax 044/8471551
Luxemburg
+32(0)70/225565
Fax +32 (0)70 / 22 55 75
E-Mail: outillage.gereedschap@be.bosch.com
Senior Vice President
Engineering
Dr. Eckerhard Strötgen
Head of Product
Certification


Robert Bosch GmbH, Power Tools Division
WARNING! Read all safety warnings and all instructions. Failure to follow the warnings and instructions may result in electric shock, fire and/or serious injury.
Save all warnings and instructions for future reference.
The term "power tool" in the warnings refers to your mains operated (cored) power tool.
It is recommended that the first time user should have practical instruction in the use of the chainsaw and the protective equipment from an experienced operator and that the initial practice should be cutting logs on a saw horse or cradle.
Explanation of symbols:

Read instruction manual.

Do not expose to rain.

Remove the plug from the socket or mains immediately before carrying out any adjustments, servicing or maintenance or if the cable is damaged or cut.
Obtain and wear eye and ear protection at all times while operating the power tool.

Work area
- Keep work area clean and well lit. Cluttered and dark areas invite accidents.
Do not operate power tools in explosive atmospheres, such as in the presence of flammable liquids, gases or dust. Power tools create sparks which may ignite the dust or fumes. - Keep children and bystanders away while operating a power tool. Distractions can cause you to lose control.
Children and juveniles, except above age 16, under supervision and for educational purposes, must not operate the chain saw, nor should persons unfamiliar with the saw or its handling (when borrowing). Ensure operation manual is with the saw. Persons unfit or tired must not operate the chain saw.
Electrical safety
Power tool plugs must match the outlet. Never modify the plug in any way. Do not use any adapter plugs with earthed (grounded) power tools. Unmodified plugs and matching outlets will reduce risk of electric shock.
- Avoid body contact with earthed or grounded surfaces, such as pipes, radiators, ranges and refrigerators. There is an increased risk of electric shock if your body is earthed or grounded.
Do not expose power tools to rain or wet conditions. Water entering a power tool will increase the risk of electric shock.
- Do not abuse the cord. Never use the cord for carrying, pulling or unplugging the power tool. Keep cord away from heat, oil, sharp edges or moving parts. Damaged or entangled cords increase the risk of electric shock.
- When operating a power tool outdoors, use an extension cord suitable for outdoor use. Use of a cord suitable for outdoor use reduces the risk of electric shock.
Personal safety
Stay alert, watch what you are doing and use common sense when operating a power tool. Do not use a power tool while you are tired or under the influence of drugs, alcohol or medication. A moment of inattention while operating power tools may result in serious personal injury.
Use safety equipment. Always wear eye protection. Safety equipment such as dust masks, nonskid safety shoes, hard hat, or hearing protection used for appropriate conditions will reduce personal injuries.
Avoid accidental starting. Ensure the switch is in the off position before plugging in. Carrying power tools with your finger on the switch or plugging in power tools that have the switch on invites accidents.
Remove any adjusting key or wrench before turning the power tool on. A wrench or a key left attached to a rotating part of the power tool may result in personal injury.
- Do not overreach. Keep proper footing and balance at all times. This enables better control of the power tool in unexpected situations.
- Dress properly. Do not wear loose clothing or jewellery. Keep your hair, clothing and gloves away from moving parts. Loose clothes, jewellery or long hair can be caught in moving parts.
If devices are provided for the connection of dust extraction and collection facilities, ensure these are connected and properly used. Use of these devices can reduce dust related hazards.
Power tool use and care
- Do not force the power tool. Use the correct power tool for your application. The correct power tool will do the job better and safer at the rate for which it was designed.
- Do not use the power tool if the switch does not turn it on and off. Any power tool that cannot be controlled with the switch is dangerous and must be repaired.
- Disconnect the plug from the power source before making any adjustments, changing accessories, or storing power tools. Such preventive safety measures reduce the risk of starting the power tool accidentally.
Store idle power tools out of the reach of children and do not allow persons unfamiliar with the power tool or these instructions to operate the power tool. Power tools are dangerous in the hands of untrained users.
- Maintain power tools. Check for misalignment or binding of moving parts, breakage of parts and any other condition that may affect the power tool's operation. If damaged, have the power tool repaired before use. Many accidents are caused by poorly maintained power tools.
- Keep cutting tools sharp and clean. Properly maintained cutting tools with sharp cutting edges are less likely to bind and are easier to control.
Use the power tool, accessories and tool bits etc., in accordance with these instructions and in the manner intended for the particular type of power tool, taking into account the working conditions and the work to be performed. Use of the power tool for operations different from those intended could result in a hazardous situation.
Service
Have your power tool serviced by a qualified repair person using only identical replacement parts. This will ensure that the safety of the power tool is maintained.
Chain Saw SafetyWarnings:
- Keep all parts of the body away from the saw chain when the motor is operating. Before you start the saw, make sure the saw chain is not contacting anything. A moment of inattention while operating chain saws may cause entanglement of your clothing or body with the saw chain.
Always hold the chain saw with your right hand on the rear handle and your left hand on the front handle. Holding the chain saw with a reserved hand configuration increases the risk of personal injury and should never be done.
Wear safety glasses and hearing protection. Further protective equipment for head, hand, legs and feet is recommend. Adequate protective clothing will reduce personal injury by flying debris or accidental contact with saw chain. -
Do not operate a chain saw in a tree. Operation of a chain saw in a tree, may result in personal injury.
Always keep proper footing and operate the chain saw only when standing on fixed, secure and level surface. Slippery or unstable surfaces such as ladders may cause a loss of balance or control of the chain saw.
■ When cutting a limb that is under tension be alert for spring back. When the tension in the wood fibres is released the spring loaded limb may strike the operator and/or throw the chain saw out of control.
Use extreme caution when cutting brush and saplings. The slender material may catch the saw chain and be whipped toward you or pull you off balance. -
Carry the chain saw by the front handle with the saw chain stopped and the guide bar pointing to the rear. When transporting or storing the chain saw always fit the guide bar cover. Proper handling of the chain saw will reduce the likelihood of accidental contact with the moving saw chain.
Follow instructions for lubricating, chain tensioning and changing accessories. Improperly tensioned or lubricated chain may either break or increase the chance for kickback. - Keep handles dry, clean, and free from oil and grease. Greasy, oily handles are slippery causing loss of control.
Cut wood only. Don't use chain saw for purposes not intended - for example - Don't use chain saw for cutting plastic, masonry or nonwood building materials. Use of the chain saw for operations different then intended could result in a hazardous situation.
Causes and Operator Prevention of Kickback:
- Kickback may occur when the nose or tip of the guide bar touches an object, or when the wood closes in and pinches the saw chain in the cut.
- Tip contact in some cases may cause a sudden reverse reaction, kicking the guide bar up and back towards the operator.
- Pinching the saw chain along the top of the guide bar may push the guide bar rapidly back towards the operator.
Either of these reactions may cause you to lose control of the saw which could result in serious personal injury. Do not rely exclusively upon the safety devices built into your saw. As a chain saw user, you should take several steps to keep your cutting jobs free from accident or injury.
Kickback is the result of tool misuse and/or incorrect operating procedures or conditions and can be avoided by taking proper precautions as given below:
- Maintain a firm grip, with thumbs and fingers encircling the chain saw handles, with both hands on the saw and position your body and arm to allow you to resist kickback forces. Kickback forces can be controlled by the operator, if proper precautions are taken. Do not let go of the chain saw.
- Do not over reach and do not cut above shoulder height. This helps prevent unintended tip contact and enables better control of the chain saw in unexpected situations.
Only use replacement bars and chains specified by the manufacturer. Incorrect replacement bars and chains may cause chain breakage and/or kickback.
Follow the manufacturer's sharpening and maintenance instructions for the saw chain. Decreasing the depth gauge height can lead to increased kickback.
Product Specification
| Chain saw | AKE 30 | AKE 35 | AKE 40 | |
| Part number (typ) | 3 600 H34 0.. | 3 600 H34 0.. | 3 600 H34 0.. | |
| Rated power | [W] | 1600 | 1600 | 1600 |
| Chain speed (no load) | [m/s] | 9 | 9 | 9 |
| Chain bar length | [cm] | 30 | 35 | 40 |
| Nose sprocket | - | ● | ● | |
| Kickback Brake | ● | ● | ● | |
| Chain type | 3/8" - 90 | 3/8" - 90 | 3/8" - 90 | |
| Drive link thickness | [mm] | 1.1 (0.043") | 1.1 (0.043") | 1.1 (0.043") |
| Amount of drive links | 45 | 52 | 57 | |
| Oil reservoir capacity | [ml] | 200 | 200 | 200 |
| Automatic oiler | ● | ● | ● | |
| Metal gripping teeth | ● | ● | ● | |
| Weight without mains cable. approx. ** | [kg] | 3.9 | 4.0 | 4.1 |
| Protection class | ☐ / II | ☐ / II | ☐ / II | |
**measured with chain bar and chain
Note: Please observe the order number of your machine. The trade names of individual machines can vary.
Inrush currents cause short-time voltage drops. Under unfavourable power supply conditions, other equipment may be affected. If the system impedance of the power supply is lower than 0.25 Ohm, disturbances are unlikely to occur.
Intended Use
The chain saw is intended for sawing of trees, tree trunks, branches, wooden beams, planks, etc. Cuts can be sawed with or across the grain. This product is not suitable for sawing mineral materials.
Introduction
This manual gives instructions on the correct assembly and safe use of your chain saw. It is important that you read these instructions carefully.
Delivered Items
Carefully remove the machine from its packaging and check for complete contents:
- Chain saw
Cover plate
-Chain
-Chainbar
-Chain guard
-Chain oil (80 ml) - Operating instructions
- Adjusting Tool
When parts are missing or damaged, please contact your dealer.
A Operating Controls
1 Rear handle
2 On/Off switch
3 Lock-off button
4 Oil filler cap
5 Activation lever for kickback brake (hand guard)
6 Front handle
7 Nose sprocket (only AKE 35/40)
8 Chain guard
9 Chain
10 Chain bar
11 Gripping teeth
12 Cover plate
13 Adjusting tool
14 Locking nut
15 Fastening bolt
16 Chain tensioning peg
17 Chain tensioning screw
18 Guide fins for chain bar
19 Oil outlet
20 Symbol for rotation and cutting direction
21 Drive sprocket
22 Chain catch bolt
23 Mains plug*
24 Serial Number
Country specific
Not all of the accessories illustrated or described are included as standard delivery.
Warning! Switch off, remove plug from mains before adjusting cleaning or if the cable is cut, damaged or entangled.
Caution! Do not touch rotating chain.
Do not operate chain saw near other people, children or animals. Do not operate chain saw after drinking alcohol or under the influence of intoxicating drugs or medication.
Electrical Safety
Your machine is double insulated for safety and requires no earth connection. The operating voltage is 230V a.c., 50Hz (for non-EU countries 220V , 240V as applicable). Only use approved extension cables. Extension cords/leads should only be used if they comply with H07 RN-F types or IEC type design (60 245 IEC 66).
If you want to use an extension cable when operating your product, only the following cable dimensions should be used:
- 1.0 ~mm^2 : max length 40 m
- 1.5 ~mm^2 : max length 60 ~m
- 2.5mm^2 : max length 100 m
It is recommended for increased electrical safety to use a Residual Current Device (RCD) with a tripping current of not more than 30mA . Always check your RCD every time you use it.
For products not sold in GB:WARNING: For safety, it is essential that the mains plug 23 attached to the machine is fitted to the power supply cable 25 as shown.
The couplings of connection leads must be protected against splashes and the coupling sockets on the leads must be made of rubber or coated with rubber.
Fixing means for the connection leads must be used.
The connection lead must be inspected for signs of damage at regular intervals and may only be used if in perfect condition.
If the supply cord is damaged, it must be replaced by a Bosch Service Centre.
Products sold in GB only: Your chain saw is fitted with an approved 13 A (BS 1363/A) electric plug and is protected by a 13 A fuse (ASTA Approved to BS 1362).
If the fitted plug is not suitable for your socket outlets, it should be cut off and an appropriate plug fitted in its place by an authorized customer service agent.
The severed plug must be disposed of to avoid a possible shock hazard and should never be inserted into a 13 A socket elsewhere.
Assembly/Tensioning Chain

Do not connect the chain saw to mains before it is completely assembled.
Always use gloves when handling the chain.

Chain and chain bar Assembly
- Unpack all parts carefully.
- Place the chain saw on any suitable flat surface.
- Slide the chain 9 in the slot around the chain bar 10. Ensure chain is in correct running direction by comparing with chain symbol 20.
- Fit the chain onto the drive sprocket 21 and guide the chain bar 10, so that the fastening bolt 15 and the two guide fins 18 fit into the keyway of the chain bar 10, and that the chain tensioning peg 16 fits into the respective hole of the chain bar 10. If necessary, adjust chain tensioning screw 17 with adjusting tool 13 to bring tensioning peg 16 in alignment with the hole in the chain bar 10.
Check if all parts are seated properly and hold chain and chain bar in a level position.
- Fit cover plate 12.
- Handtighten locking nut 14 on fastening bolt 15.

Tensioning chain
Always check the chain tension before use, after the first cuts and regularly during use, approx. every 10 minutes. Upon initial operation, new chains can lengthen considerably.
The chain life of the saw chain mainly depends upon sufficient lubrication and correct tensioning.
Avoid tensioning the chain if it is hot, as this will cause the chain to become overtensioned when it cools down.
- Place the chain saw on any suitable flat surface.
- Ensure locking nut 14 is hand tight only.
- Check if the chain links are correctly located in the slot around the chain bar 10 and drive sprocket 21.
- Turn chain tensioning screw 17 clockwise using adjusting tool 13, until the correct chain tension is reached. The screwing action forces the chain bar 10 forward via the chain tensioning peg 16.
- The correct chain tension is reached when the chain 9 can be raised approx. 3 - 4mm from the chain bar in the centre. This should be done by using one hand to raise the chain against the weight of the machine.
- If the chain 9 is overtensioned, slightly turn the tensioning screw 17 anti-clockwise and re-check chain tension. Re-adjust chain tension as described if necessary.
- Re-tighten locking nut 14 fully with adjustment tool.
A B Lubrication
Important: The chain saw is not supplied filled with oil. It is essential to fill with oil before use. Never operate the chain saw without chain oil or at an empty oil tank level, as this will result in extensive damage to the product.
Chain life and cutting capacity depend on optimum lubrication. Therefore, the chain is automatically oiled during operation via the oil outlet 19.
Filling oil tank:
- Set chain saw on any suitable surface with oil filler cap 4 facing upward.
- Clean area around the oil filler cap 4 with cloth, unscrew cap.
- Add Bosch biodegradable chain saw oil until reservoir is full.
- Avoid dirt or debris entering oil tank, refit oil filler cap 4 and tighten.
Important: To allow venting of the oil reservoir, small breather channels are provided between the oil filler cap, to prevent leakage ensure machine is left in a horizontal position (oil filler cap 4 uppermost) when not in use.
It is important to use only the recommended biodegradable oil to avoid damage to the chain saw. Never use recycled/old oil. Use of non approved oil will invalidate the warranty.
Starting and Stopping
Observe the correct mains voltage! The voltage of the power source must agree with the value given on the nameplate of the machine. Machines designated for 230V can also be operated with 220V .
Starting
Hold chain saw as described in "Cutting".
Press the lock-off button 3, then fully press the On/Off switch 2 and hold in this position. The lock-off button 3 can now be released.
Stopping
Release the On/Off switch 2.
Do not stop chain saw after sawing by activating the front hand guard (kickback brake).
Kickback Brake
The kickback brake is a safety mechanism activated through the front hand guard 5, when kickback occurs. Chain stops immediately.
The following function check should be carried out at regular intervals. Push front hand guard 5 forward (position 2) and start the chain saw. The chain must not start. To deactivate the kickback brake, release On/Off switch 2 and pull hand guard 5 backwards (position 1).
Cutting
Before Cutting
Before and periodically during cutting check as follows:
- Is the chain saw in a fail-safe condition?
- Is the oil reservoir filled? Check oil level gauge 26 prior to starting and regularly during operation. Refill oil when oil level is low. The oil tank filling will last approx. 15 minutes, depending on sawing intensity and stops.
Is the chain tension in order and is the chain sharp? Check chain tension every 10 minutes during operation. Upon initial operation, new chains can lengthen considerably. The condition of the chain influences the cutting performance. Only a sharp chain protects from overload. - Is the kickback brake deactivated and its function ensured?
- Are you wearing the necessary protective equipment? Wear safety glasses and hearing protection. Further protective equipment for head, hand, legs and feet is recommend. Adequate protective clothing will reduce personal injury by flying debris or accidental contact with saw chain.
Kickback
Kickback is the sudden backward/upward motion of the chain saw, occurring when the chain (at the tip of the chain bar) comes in contact with a log or wood, or when the chain becomes jammed.
When kickback occurs the chainsaw reacts unpredictably and can cause severe injuries to the operator or bystanders.
Particular attention must be given when sawing sidewards, slanted or during length cuts, as the gripping teeth 11 usually can not be applied.
To avoid kickback:
- Saw with the chain bar at a flat angle.
- Never work with a loose, widely stretched or the heavily worn out chain.
- Ensure chain is sharpened correctly.
- Never saw above shoulder height.
- Never work with the tip of the chain bar.
- Always the hold chain saw firmly with both hands.
- Always use a Bosch low-kickback chain.
- Apply the metal gripping teeth 11 for leverage.
- Ensure correct chain tension.
General Behavior
D Always hold the chain saw firmly with both hands. Front grip with the left hand and rear grip with the right hand. Fully grip both handles at all times during operation. Never operate chain saw using only one hand. Ensure power cord is located to the rear, away from the chain and wood and so positioned that it will not be caught on branches or the like during cutting.
Use the chain saw only with secure footing. Hold the chain saw at the right-hand side of your body.
The chain must be running at full speed before it makes contact with the wood. Use the metal gripping teeth 11 to secure the saw onto the wood before starting to cut. Use the gripping teeth as a leverage point "X" while cutting.
Reset the gripping teeth at a lower point when sawing thicker logs by pulling the chain saw slightly backwards until the gripping teeth release, and reposition at lower level to continue sawing. Do not remove the saw completely from the wood.
Do not force the chain while cutting, let the chain do the work, using the gripping teeth 11 to apply minimal leverage pressure.
Do not operate the chain saw with arms fully extended or attempt to saw areas which are difficult to reach, or on a ladder. Never use the chain saw above shoulder height.
Sawing is optimized when the chain speed remains steady during cutting.
Beware when reaching the end of the cut. The weight of the saw may change unexpectedly as it cuts free from the wood. Accidents can occur to the legs and feet.
Always remove the saw from a wood cut while the saw is running.
Cutting Logs
Observe the following safety instructions:
E H Support logs so that the face sides at the cut do not close in against each other, which would result in the chain being jammed or pinched.
Position and set short logs safely prior to sawing.
Saw only wood or wooden objects. When sawing, always take care to avoid hitting stones, nails, etc., as these could be thrown up or cause damage to the chain or serious injury to the operator or bystanders.
Keep a running saw clear of wire fencing or the ground.
Use of the saw to thin out branches or bushes is not approved.
Length cuts must be carried out with care, as leverage with the gripping teeth 11 is not possible. Saw at a flat angle to avoid kickback.
When working on a slope, operate above or to the side of the trunk or laying tree.
Be careful not to trip over tree stumps, branches, roots, etc.
H Cutting Wood under Tension
There is a high risk of accidents when sawing wood, branch or trees under tension. Be extremely careful. Leave saw jobs like these to professionals.
When sawing logs supported on both ends, start the cut from above (Y) about 1/3 of the diameter into the log and then finish the cut (Z) from below, in order to avoid splitting of the log or jamming of the saw. Avoid contact of the chain saw with the ground. When sawing logs supported on only one end, start the cut from below (Y) about 1/3 of the diameter into the log and finish the cut from above (Z), in order to avoid log splitting or jamming of the chain saw.
Felling Trees
Always wear hard hat to protect head against falling branches.
The chain saw can only be used to fell trees smaller in diameter than the length of the chain bar.
Secure work area. Ensure no persons or animals are in the vicinity of the falling tree.
Never attempt to free a jammed saw with the motor running. Use wooden wedges to free chain and chain bar.
When cutting and felling operations are being performed by two or more persons, at the same time, the felling operations should be separated from the cutting operation by a distance of at least twice the height of the tree being felled. Trees should not be felled in a manner that would endanger any person, strike any utility line or cause any property damage. If the tree does make contact with any utility line, the company should be notified immediately.
The chain saw operator should keep on the uphill side of the terrain as the tree is likely to roll or slide downhill after it is felled.
An escape path should be planned and cleared as necessary before cuts are started. The escape path should extend back and diagonally to the rear of the expected line of fall.
3 Before felling is started, consider the natural lean of the tree, the location of larger branches and the wind direction to judge which way the tree will fall. Remove dirt, stones, loose bark, nails staples, and wire from the tree.
Notching Undercut: Make the notch (X - W) 1/3 the diameter of the tree, perpendicular to the direction of falls as Make the lower horizontal notching cut first. This will help to avoid pinching either the saw chain or the guide bar when the second notch is being made.
Felling Back Cut: Make the felling back cut (Y) at least 50mm higher than the horizontal notching cut. Keep the felling back cut parallel to the horizontal notching cut. Make the felling back cut so enough wood is left to act as a hinge. The hinge wood keeps the tree from twisting and falling in the wrong direction. Do not cut through the hinge.
As the felling gets close to the hinge the tree should begin to fall. If there is any chance that the tree may not fall in desired direction or it may rock back and bind the saw chain, stop cutting before the felling back cut is complete and use wedges of wood, plastic or aluminium to open the cut and drop the tree along the desired line of fall.
When the tree begins to fall remove the chain saw from the cut, stop the motor, put the chain saw down, then use the retreat path planned. Be alert for overhead limbs falling and watch your footing.
To complete the felling operation, drive a wedge (Z) into the horizontal cut.
Beware of falling branches when the tree starts to move.
Limbing a Tree
Limbing is removing the branches from a fallen tree. When limbing leave larger lower limbs to support the log off the ground. Remove the small limbs in one cut as illustrated. Branches under tension should be cut from the bottom up to avoid binding the chain saw.
Bucking a Log
Bucking is cutting a log into lengths. It is important to make sure your footing is firm and your weight is evenly distributed on both feet. When possible, the log should be raised and supported by the use of limbs, logs or chocks. Follow the simple directions for easy cutting.
When the log is supported along its entire length as illustrated, it is cut from the top (overbuck).
L When the log is supported on one end, as illustrated, cut 1/3 the diameter from the underside (underbuck). Then make the finished cut by overbucking to meet the first cut.
M When the log is supported on both ends, as illustrated, cut 1/3 the diameter from the top overbuck. Then make the finished cut by underbucking the lower 2/3 to meet the first cut.
N When bucking on a slope always stand on the uphill side of the log, as illustrated. When "cutting through", to maintain complete control release the cutting pressure near the end of the cut without relaxing your grip on the chain saw handles. Don't let the chain contact the ground. After completing the cut, wait for the saw chain to stop before you move the chain saw. Always stop the motor before moving from tree to tree.
Maintenance

Before any work on the machine itself, pull the mains plug from the socket.
Note: To ensure long and reliable service, carry out the following maintenance regularly.
Regularly check for obvious defects such as loose, dislodged or damaged chain and chain bar, loose fixings and worn or damaged components.
Check that covers and guards are undamaged and correctly fitted. Carry out necessary maintenance or repairs before using the chain saw.
If the chain saw should happen to fail despite the care taken in manufacturing and testing, repair should be carried out by an authorized customer service agent.
Before returning, ensure all oil in the oil tank has been emptied.
For all correspondence and spare parts orders, always include the 10-digit part number (TYP) from the nameplate of the machine!
Replacing/Changing Chain and Chain Bar
Fit the chain and chain bar as described in "Assembly and Tensioning Chain".
The circular groove of the chain bar will wear particularly on the lower edge with time. When replacing the chain turn the chain bar 180^ to allow even wear, thus extending chain bar life.
Check drive sprocket 21. If it is worn out or damaged due to strain, have it exchanged by an authorized Bosch service agent.
Sharpening Chain
Have your chain sharpened professionally at your Bosch approved service agent or sharpen the chain yourself using the Bosch sharpening kit or a Dremel power tool with the appropriate grinder (1453), both available at your Bosch approved service agent. Follow the sharpening instructions supplied with the sharpening kit.
Checking the Automatic Oiler
Proper functioning of the automatic oiler can be checked by running the chain saw and pointing the tip of the chain bar towards a piece of cardboard or paper on the ground. Caution: Do not touch the ground with the chain. Ensure safety clearance of 20~cm . If an increasing oil pattern develops, the automatic oiler is operating fine. If there is no oil pattern, despite a full oil reservoir, see "Fault Finding" or contact your Bosch approved service agent.
Accessories
Chain and Chain bar
AKE 30 F 016 800 259
AKE 35 F016800260
AKE 40 F 016 800 261
Chain
AKE 30 F 016 800 256
AKE 35 F016800257
AKE 40 F 016 800 258
Cleaning
Chain sharpening/cleaning kit.... F 016 800 262
Chain oil 1 litre. 2607000181
Chain oil 5 litre. F 016 800 111
Additional accessories
Gloves 2607000134
Protective goggles. F 016 800 178
SNR 19 ear protectors
(sounding proofing level 19 dB (A))...2 607 990 042
SNR 24 ear protectors
(sounding proofing level 24 dB (A))...2 607 990 043
A Cleaning/Storage
Clean the moulded plastic housing of the chain saw using a soft brush and clean cloth. Do not use water, solvents or polishes. Remove all debris, especially from the motor cooling vents 27.
Remove and brush clean the cover plate 12, chain and chain bar after 1 to 3 hours of use.
Clean the area under the cover plate 12, the drive sprocket 21 and chain bar assembly using a soft brush. Clean oil outlet 19 with a clean cloth.
If the chain saw is to be stored for a longer period of time, clean chain and chain bar.
Store in a secure, dry place out of the reach of children. Do not place other objects on the chain saw.
To prevent leakage ensure machine is left in a horizontal position (oil filler cap 4 uppermost).
When storing machine in original packaging the oil tank must be completely emptied.
Fault Finding
The following table gives checks and actions that you can perform if your machine does not operate correctly. If these do not identify/remedy the problem, contact your service agent.
Warning: Switch off and remove plug from mains before investigating fault.
| Symptom | Possible Cause | Remedy |
| Chain saw fails to oper- ate | Kickback brake is activatedNo powerMains socket faultyExtension cord damagedFuse faulty | Pull hand guard 5 back in position ➀ (Figure D)Check powerUse another socketCheck cord, replaceReplace fuse |
| Chain saw operates intermittently | Extension cord damagedLoose connectionInternal wiring defectiveOn/Off switch defective | Check cord, replaceContact service agentContact service agentContact service agent |
| Dry chain | No oil in reservoirVent in oil filler cap cloggedOil passage clogged | Refill oilClean capClean oil passage outlet |
| Kickback Brake/Run Down Brake | Brake does not stop chain | Contact service agent |
| Chain/chain bar over-heats | No oil in reservoirVent in oil filler cap cloggedOil passage cloggedChain is over tensionedDull chain | Refill oilClean capClean oil passage outletAdjust chain tensionSharpen chain or replace |
| Chain saw rips, vibrates, does not saw properly | Chain tension too looseDull chainChain worn outChain teeth are facing in the wrong direction | Adjust chain tensionSharpen chain or replaceReplace chainReassemble with chain in correct direction |
Disposal
Power tools, accessories and packaging should be sorted for environmentally-friendly recycling.
Only for EC countries:
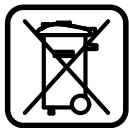
Do not dispose of power tools into household waste!
According to the European Directive 2002/96/EC on waste electrical and electronic equipment and its incorporation into national law, power tools
that are no longer suitable for use must be separately collected and sent for recovery in an environmentally-friendly manner.
Service
Exploded views and information on spare parts can be found under: www.bosch-pt.com
Great Britain
Robert Bosch Ltd. (B.S.C.)
P.O.Box 98
Broadwater Park
North Orbital Road
Denham-Uxbridge
MIDDLEX UB 9 5HJ
Service. +44 (0) 18 95 / 83 87 82
Fax Service +44 (0) 18 95 / 83 87 89
Advice line. +44 (0) 18 95 / 83 87 91
Fax Advice +44 (0) 18 95 / 83 87 93
Ireland
Beaver Distribution Ltd.
Greenhills Road
Tallaught-Dublin 24
Service. +353 (0)1 / 45 15 211
Fax +353 (0)1 / 45 17 127
Malaysia
Robert Bosch (SEA.) Pte. Ltd.
No. 8a, Jalan 13/6
Selangor Darul Ehsan
Petaling Jaya 46200
Malaysia
+60379583000
Fax (EW Dept.) +60 3 79 58 38 38
www.bosch.com.sg
Australia
Robert Bosch Australia Ltd.
RBAU/SPT2
1555 Centre Road
P.O. Box 66 Clayton
3168 Clayton/Victoria
+61 (0)1 / 800 804 777
Fax +61 (0)1 / 800 819 520
www.bosch.com.au
E-Mail: CustomerSupportSPT@au.bosch.com
New Zealand
Robert Bosch Limited
14-16 Constellation Drive
Mairangi Bay
Auckland
New Zealand
64(0)9/4786158
Fax +64 (0)9 / 47 82 914
Declaration of Conformity
Measured values determined according to 2000/14/EC (1 m distance away) and EN 50 144.
Typically the A-weighted noise levels of the product are: sound pressure level: 87 dB (A); sound power level: 101 dB (A).
Wear hearing protection!
The typical weighted acceleration is 11m / s^2
We declare under our sole responsibility that this product is in conformity with the following standards or standardization documents: EN 50 144 according to the provisions of the directives 89/336/EEC, 98/37/EC, 2000/14/EC.
EC Type Certification No. 2087047.01 CE by notified testing agency No. 0344.
2000/14/EC: The guaranteed sound power level L_WA is lower than 101 dB (A). Conformity assessment procedure according to Annex V.
Leinfelden, 01.09.2005.
Dr. Egbert Schneider
Senior Vice President
Engineering
Dr. Eckerhard Strötgen
Head of Product
Certification
ppa.
i.v. Mo Tu We Th Fr So Su
Robert Bosch GmbH, Power Tools Division
Subject to change without notice
Robert Bosch France S.A.S.
Dr. Egbert Schneider Senior Vice President
Engineering
Dr. Eckerhard Strötgen
Head of Product
Certification


Robert Bosch GmbH, Power Tools Division
Senior Vice President
Engineering
Dr. Eckerhard Strötgen
Head of Product
Certification


Robert Bosch GmbH, Power Tools Division
Leia a instrucao de service.
Proteger contra chuva.

Senior Vice President
Engineering
Dr. Eckerhard Strötgen
Head of Product
Certification


Robert Bosch GmbH, Power Tools Division
Senior Vice President
Engineering
Dr. Eckerhard Strötgen
Head of Product
Certification


Robert Bosch GmbH, Power Tools Division
Senior Vice President
Engineering
Dr. Eckerhard Strötgen
Head of Product
Certification


Robert Bosch GmbH, Power Tools Division
Dr. Egbert Schneider Senior Vice President Engineering
Dr. Eckerhard Strötgen
Head of Product Certification


Robert Bosch GmbH, Power Tools Division
Senior Vice President
Engineering
Dr. Eckerhard Strötgen
Head of Product
Certification


Robert Bosch GmbH, Power Tools Division
Ändringar forbéhalles
A Rengjoring/Lagring
Senior Vice President
Engineering
Dr. Eckerhard Strötgen
Head of Product
Certification


Robert Bosch GmbH, Power Tools Division
Senior Vice President
Engineering
Dr. Eckerhard Strötgen
Head of Product
Certification


Robert Bosch GmbH, Power Tools Division
Móvo yia xwpeC tnc EE:

Mn pixvETa nEeKTPiKa epyaEia
ota anoppimuata Tou ontiou oac!
Suuwpwa ME TIV KoivotIK Odbnyia
2002/96EKoETiKaTIC naaliec
nEeKTPiKec kai NkTPOVIOIEc
OuokueC kAI TIV mEtapopatnc
0e 8viko diikaio, ta axpnoTa nEktpiKa
epyaia deiv aunoxpeWtiko neov va
oulambdaoyvtai exxwpiota npiv va avakukawoou
mu TPOnO pIAIKo PPOC TO pEPIaALov.
Senior Vice President
Engineering
Dr. Eckerhard Strötgen
Head of Product
Certification


Robert Bosch GmbH, Power Tools Division
Tnpouμe to δikaiωma aλλayw
Bosch San. ve Tic. A.S.
Ahi Evran Cad. No:1 Kat:22
Polaris Plaza
80670 Maslak/Istanbul
Müsteri Danisman +90 (0)212 / 335 06 66
Müsteri Servis Hatti. +90 (0)212 / 335 07 52
Uygunluk beyani
Senior Vice President Engineering
Dr. Eckerhard Strötgen
Head of Product Certification


Robert Bosch GmbH, Power Tools Division
DeGISiklikermumkundur

BOSCH
Robert Bosch GmbH
Power Tools Division
70745 Leinfelden-Echterdingen
www.bosch-pt.com
F016 L70 362 (06.04) O/139