
DB5004 - Washing machine Cotech - Free user manual and instructions
Find the device manual for free DB5004 Cotech in PDF.


| Product Type | Freestanding Washing Machine |
| Brand | Cotech |
| Model | DB5004 |
| Dimensions (H x W x D) | 85 cm x 60 cm x 55 cm |
| Weight | Approx. 55 kg |
| Energy Class | A |
| Power Supply | 220-240 V, 50 Hz |
| Power Consumption | 2000 W (max) |
| Water Connection | Cold water inlet, 1.5 m hose |
| Maximum Load Capacity | 6 kg |
| Spin Speed | 1200 rpm |
| Wash Programs | Cotton, Synthetics, Delicates, Quick, Wool, Rinse & Spin, Drain |
| Temperature Settings | Cold, 30°C, 40°C, 60°C, 90°C |
| Noise Level (Wash/Spin) | 58 dB / 76 dB |
| Display | LED digital display with program status |
| Delay Start | Up to 24 hours |
| Child Lock | Yes, via button combination |
| Overheating Protection | Built-in thermal fuse |
| Unbalanced Load Detection | Automatic redistribution before spin |
| Cleaning | Periodic cleaning of detergent drawer and door seal; clean pump filter every 3 months |
| Spare Parts Availability | Through authorized Cotech service centers; 7 years after purchase |
| Reparability Index | 8.5/10 (based on European standards) |
| Warranty | 2 years from date of purchase (verify local terms) |
Frequently Asked Questions - DB5004 Cotech
User questions about DB5004 Cotech
0 question about this device. Answer the ones you know or ask your own.
Ask a new question about this device
Download the instructions for your Washing machine in PDF format for free! Find your manual DB5004 - Cotech and take your electronic device back in hand. On this page are published all the documents necessary for the use of your device. DB5004 by Cotech.
USER MANUAL DB5004 Cotech
Electric Snow Thrower
natural_image
Line drawing of a mobile power tool with wheels and handle (no text or symbols)ART.NO 31-8614
MODEL DB5004

Important!
Read the entire instruction manual carefully and make sure that you fully understand it before you use the equipment. Keep the manual for future reference.
Viktig information:
Original instructions
Bruksanvisning i original
1100 W Electric Snow Thrower
ART.NO 31-8614 MODEL DB5004
Please read the entire instruction manual before using the product and then save it for future reference. We reserve the right for any errors in text or images and any necessary changes made to technical data. In the event of technical problems or other queries, please contact our Customer Services (see address details on the back).
Safety





Double insulated for additional protection.
Conforms to relevant safety standards.
Read the entire instruction manual before use.
General hazard warning symbol. Specific safety precautions are required by the user.
Keep children and pets a safe distance away from the machine.
Beware of flying objects. Make sure onlookers are kept at a safe distance.
This product should be disposed of in accordance with local regulations. If you are unsure how to proceed, contact your local authority.
Never insert your hands into the discharge chute.
Danger – rotating feed screw.
Do not touch any rotating part before the machine stops.
Use ear protection.
Use eye protection.
General safety instructions
- The snow thrower must not be used by anyone (including children) suffering from physical or mental impairment. This product should not be used by anyone that has not read the instruction manual unless they have been instructed in its use by someone who will take responsibility for their safety.
- Read carefully through the instructions, familiarise yourself with all the controls and learn how to use the snow thrower correctly.
- Never let children or others who do not have adequate knowledge of these instructions use the snow thrower. Always check local regulations regarding age restrictions concerning the user.
- Remember that the user/driver is always ultimately responsible for accidents caused by use of the snow thrower.
- Be careful not to fall or slip, especially when reversing with the snow thrower.
- Never use the snow thrower whilst under the influence of drugs, alcohol or medicine. Do not use the product if you are tired or sick.
- The snow thrower must only be repaired by qualified service technicians and only using genuine spare parts.
- Only use accessories that are recommended by the manufacturer or retailer.
Preparations
- Make sure that the area to be cleared is free from foreign objects.
- Remove all service tools/keys before switching the snow thrower on. A spanner or other tool which has been left on a rotating part of the blower could result in an injury.
- Make sure that the controls are easily manoeuvrable and that they return to their original position when released.
- Plan ahead and think about where the cleared snow will be ejected in order to avoid personal injury or property damage caused by flying objects.
- Never use the snow thrower without wearing suitable clothing. Use appropriate footwear with good traction, especially in slippery conditions.
- Always use safety glasses or a visor when operating or carrying out maintenance on the snow thrower.
- Let the snow thrower adjust to the outdoor temperature before use.
Electrical safety
- If using an extension lead, make sure that it is designed for outdoor use.
- The plug of the extension lead must fit correctly into the wall socket. Never modify the plug in any way. Unmodified plugs and matching outlets will reduce the risk of electric shocks.
- Do not abuse the mains lead. Never use the mains lead or extension lead to pull or jerk the plug from the wall socket. Keep electrical leads away from heat, oil, sharp edges and moving parts. Never use a damaged mains or extension lead.
- Never use the snow thrower if its on/off switch is damaged or malfunctioning. Make sure that it is repaired by a qualified electrician before use.
Safety precautions during use
- Make sure to keep hands and feet away from rotating parts. Never stand in front of the discharge opening.
- The snow thrower must not be used for any other purpose than for removing snow.
- Be careful when using on gravel paths, pavement and roads. Be attentive for possible hazards and nearby traffic. Avoid steep inclines.
- Never direct discharged snow towards public roads or traffic.
- Switch the motor off immediately if the snow thrower strikes a foreign object. Inspect the snow thrower carefully after such an incident. Do not reuse the snow thrower until any possible damage has been repaired.
- If the snow thrower begins to vibrate abnormally, switch it off immediately and find the cause. Vibrations are normally a sign that there is a problem.
- Existing safety features must not be disconnected or made inoperative.
- Never use the snow thrower in the vicinity of fences, cars, windows or inclines.
• Always keep children and pets away from the areas to be cleared of snow. - Never overload the snow thrower by driving it too fast.
- Be very careful when reversing. Always look behind you for possible obstacles.
- Never direct the discharged snow towards onlookers. Never let anyone stand in front of the snow thrower.
- Never use the snow thrower in conditions of inadequate visibility or improper lighting.
- Make sure you are well-balanced and have a firm grip on the handles while using the snow thrower.
- Never use the snow thrower on the roof.
Specific safety instructions for electric snow throwers
- Read the instruction manual thoroughly. Familiarise yourself with all the controls and functions of the snow thrower before attempting to use it. It is very important that you know how to switch the snow thrower on and off and disengage the drive.
- Make sure that the snow thrower is assembled correctly and undamaged and that all the controls move smoothly and return to their original positions when released. If any part of the snow thrower is missing or damaged, it must be repaired/replaced before use.
- Plan ahead and think about where the cleared snow will ejected in order to avoid personal injury or property damage caused by flying objects.
- Always unplug the mains lead before clearing snow blockages from on and around the rotor blade. Note: Use a suitable tool such as a plastic or wooden stick – never your hands.
- Never leave the snow thrower unattended when it is connected to an electrical socket. Unplug the snow thrower when it is not in use.
- All safety devices and guards must be in place and working properly before the snow thrower is used.
-
If the mains and/or extension lead is damaged in any way during use, stop work immediately and unplug it. Have the lead replaced or repaired before continuing work.
-
If any part of the snow thrower has been replaced, all the functions of the snow thrower should be tested before snow clearing is commenced.
• Always unplug the mains lead before moving the snow thrower to another place. - Always respect local regulations regarding noise emissions and the environment when using the snow thrower. Show consideration for you neighbours and choose a reasonable time to begin work.
Buttons and functions
- Safety lock button
- Trigger
- Handle
- Handle clamping nut
- Adjustable auxiliary handle
- Shaft lock nut
- Rotor blade

Assembly
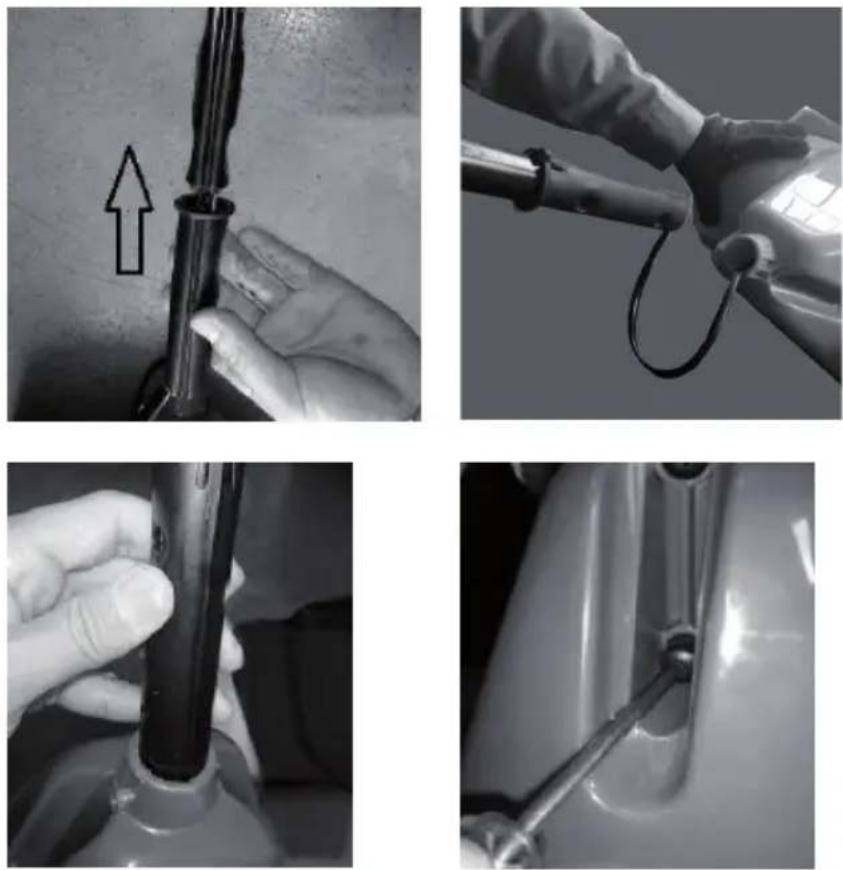
- Line the slot on the handle up with the slot at the upper end of the shaft.

natural_image
Technical illustration of a mechanical connector or fitting with threaded ends and a central shaft (no text or symbols)- Slide the handle onto the shaft until the spring catch engages in the hole on the shaft.

natural_image
Diagram of a mechanical component with threaded ends and a central hole, showing directional flow (no text or symbols)- Secure the handle to the shaft using the clamping nut.
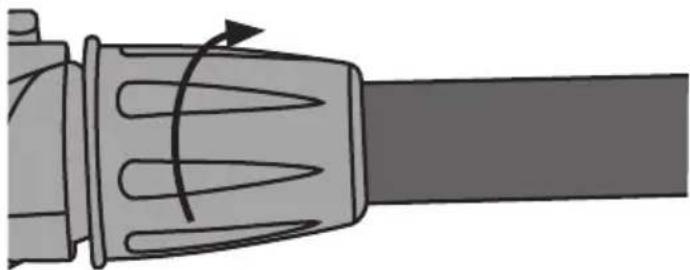
natural_image
Diagram of a mechanical component with internal blades and a curved arrow indicating rotation (no text or symbols)- Join the upper and lower parts of the shaft together. Make sure that the handle is facing the right way when the shaft is assembled.

natural_image
Close-up of three views of a metal pipe joint: showing a bolted end, a threaded rod, and a mechanical clamp (no text or symbols visible)- Slide the rubber bushing onto the end of the shaft, lining the holes in the bushing up with the holes in the shaft. The bushing has a tongue along its length which slots into a notch in the hole of the thrower housing. Slide the shaft into the thrower housing and fasten it with the two screws. Note: Since the mains lead runs along the inside of the shaft, you might need to hold the lead out of the way using a long slender implement to avoid punturing it with the screws.

- Attach the auxiliary handle in the position that suits you best.

natural_image
Close-up of a sculpted human figure with a triangular head and textured body, no visible text or symbols
natural_image
Close-up of a black plastic lever handle with triangular grip and metal rod (no text or symbols visible)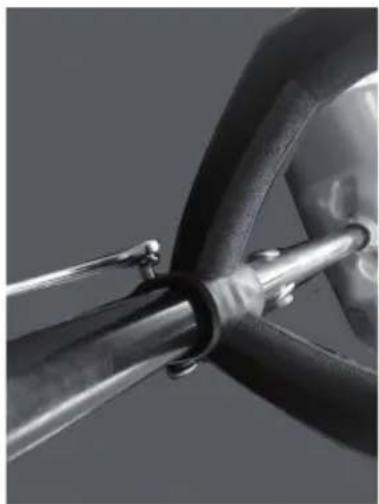
natural_image
Close-up of a bicycle wheel with metal brackets and mounting feet (no visible text or symbols)Switching on and off
Switching on
- Plug the snow thrower into a wall socket.
- Press and hold in the safety lock button.
- Squeeze the trigger.
Switching off
Release the trigger.
Care and maintenance
- Unplug the mains lead from the wall socket before cleaning.
- Clean the snow thrower after each use, wipe the outside of the housing clean and brush off any snow in and around the rotor blade.
- Regular checks should be made to make sure that all assembly screws are tight.
- Store the snow thrower in a dry place out of children's reach.
Disposal
This product should be disposed of in accordance with local regulations. If you are unsure how to proceed, contact your local council.
Specifications
Rated voltage 230 V AC, 50 Hz
Power 1100 W
No-load speed 2100 rpm
Clearance width 32 cm
Max snow depth 23 cm
Max throwing distance 5 m
Weight 6.4 kg
Noise level LpA 80 dB(A), K: 3.0 dB(A)
LwA 98 dB(A), K: 3.0 dB(A)
Vibration A_h : 5.0 m/s ^2 , K: 1.5 m/s ^2
Elektrisk snöskyffel 1100 W
ART.NR 31-8614 MODELL DB5004
Montering
natural_image
Technical illustration of a mechanical connector or fitting with threaded ends and a central shaft (no text or symbols)natural_image
Diagram of a mechanical component with threaded ends and a central hole, showing directional flow (no text or symbols)natural_image
Diagram of a mechanical component with internal blades and an arrow indicating rotation (no text or symbols)natural_image
Close-up of three views of a metal pipe joint: showing a bolt, a screw, and a wrench (no text or symbols visible)natural_image
Close-up of a sculpted human figure with textured grip, possibly a statue or sculpture (no visible text or symbols)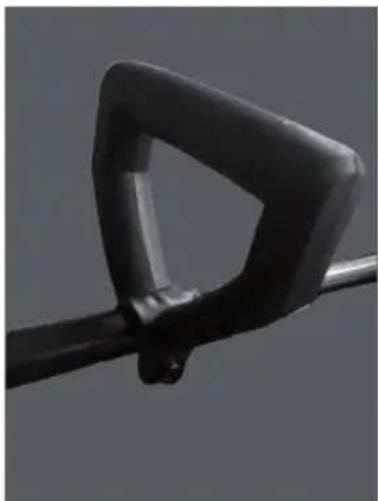
natural_image
Close-up of a black plastic clip holding a metal rod (no text or symbols visible)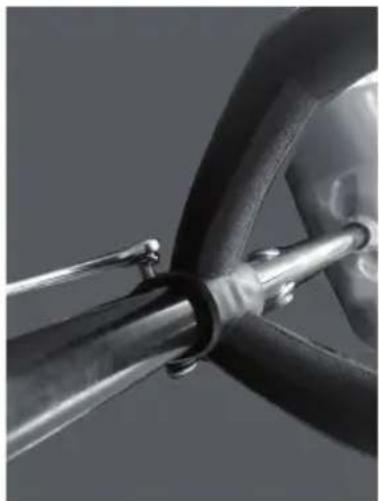
natural_image
Close-up of a bicycle wheel and suspension bracket (no text or symbols visible)Start och stopp
Start
Montering
natural_image
Technical illustration of a mechanical connector or fitting with threaded ends and a central shaft (no text or symbols)- Skyv håndtaket på riggrøret. Påse at sneppertlåsen klikker fast i hullet på røret.

natural_image
Diagram of a mechanical component with threaded ends and a central hole, showing flow direction (no text or symbols)natural_image
Diagram of a mechanical component with internal blades and a curved arrow indicating rotation (no text or symbols)natural_image
Close-up of two metallic cylindrical objects with circular holes, one showing a rough surface and the other a smooth surface (no text or symbols visible)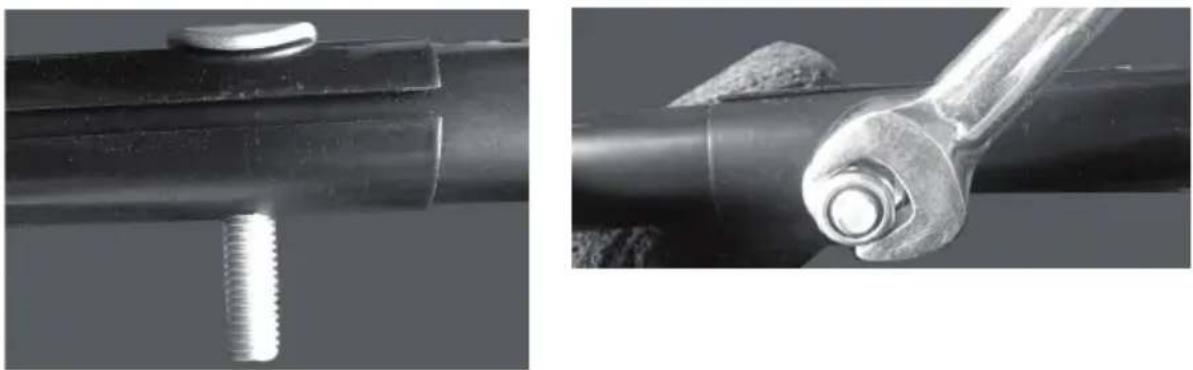
natural_image
Close-up of two metal pipe fittings with threaded fasteners, one showing a small metallic clip and the other a mechanical clamp (no text or symbols visible)- Skyv gummibussingen på riggrøret. Pass på at hullet i bussingen sitter over hullet på røret. Bussingen har en knott som skal passe mot et spor i festehullet. Skyv riggrøret i festehullet, sett skruene i og trekk til. Obs! Fordi strømkabelen går gjennom riggrøret kan det hende at du må skyve kabelen til siden med en passende gjenstand for å få skruene gjennom.
natural_image
Close-up of a sculpted human figure in profile, possibly a bird or crane, with no visible text or symbols.
natural_image
Close-up of a black plastic mechanical component with a triangular handle and metal rod (no text or symbols visible)
natural_image
Close-up of a bicycle wheel and connecting rod (no visible text or symbols)Start og stopp
Start
- Snøfreseren kobles til et strømuttak.
- Trykk og hold sperren for startknapp inne.
- Trykk inn startknappen.
Stopp
Slipp opp startknappen.
Asennus
natural_image
Technical illustration of a mechanical connector or fitting with threaded ends and internal components (no text or symbols)natural_image
Diagram of a mechanical component with threaded ends and a central hole, showing directional flow (no text or symbols)natural_image
Diagram of a mechanical component with internal blades and an arrow indicating rotation (no text or symbols)natural_image
Close-up of three views of a metal pipe joint: showing a bolt, a threaded rod, and a wrench (no text or symbols visible)natural_image
Monochrome sculpture of a human figure in profile, no visible text or symbols
natural_image
Close-up of a black triangular mechanical component attached to a metal rod (no text or symbols visible)
natural_image
Close-up of a mechanical component with metallic rods and a curved wheel (no visible text or symbols)Declaration of Conformity
POSTAL 10 – 13 Market Place
Kingston Upon Thames
Surrey
KT1 1JZ
- Electric Snow Thrower
- Important!
- Viktig information:
- W Electric Snow Thrower
- Safety
- General safety instructions
- Preparations
- Electrical safety
- Safety precautions during use
- Specific safety instructions for electric snow throwers
- Buttons and functions
- Assembly
- Switching on and off
- Switching on
- Switching off
- Care and maintenance
- Disposal
- Specifications
- Elektrisk snöskyffel 1100 W
- Montering
- Start och stopp
- Start
- Start og stopp
- Stopp
- Asennus
- Declaration of Conformity
Brand : Cotech
Model : DB5004
Category : Washing machine