
ASB8000 - Vacuum Cleaner ELECTROLUX - Free user manual and instructions
Find the device manual for free ASB8000 ELECTROLUX in PDF.


| Product Type | Blender |
| Brand | Electrolux |
| Model | ASB8000 |
| Capacity | 1.6 L (blender tank), 70 ml (filler cup) |
| Power Consumption | 600 W |
| Voltage / Frequency | 230–240 V / 50 Hz |
| Speed Settings | 3 continuous speeds + PULSE |
| Control Type | Rotary speed selector and PULSE button |
| Blade Assembly | Detachable, stainless steel, sharp |
| Housing Material | Plastic (motor housing), glass (tank, assumed) |
| Non-slip Feet | Yes, rubber |
| Cord Storage | Underside of appliance |
| Safety System | Prevents operation if tank not correctly seated |
| Dishwasher Safe Parts | Lid, filler cup, rubber seal, blade assembly, tank |
| Max Continuous Run Time (heavy loads) | 2 minutes, then cool for 10 minutes |
| Ice Crushing | Yes, using PULSE |
| Hot Liquids Processing | Allowed when lukewarm, half fill, low speed |
| Dimensions (approx.) | Height 40 cm, Width 18 cm, Depth 18 cm |
| Weight (approx.) | 2.5 kg |
| Certifications | Low Voltage Directive 2006/95/EC, EMC Directive 89/336/EEC |
Frequently Asked Questions - ASB8000 ELECTROLUX
User questions about ASB8000 ELECTROLUX
0 question about this device. Answer the ones you know or ask your own.
Ask a new question about this device
Download the instructions for your Vacuum Cleaner in PDF format for free! Find your manual ASB8000 - ELECTROLUX and take your electronic device back in hand. On this page are published all the documents necessary for the use of your device. ASB8000 by ELECTROLUX.
USER MANUAL ASB8000 ELECTROLUX
natural_image
Illustration of a blender with a handle and control knob (no text or symbols)PAGE
⑤ Bruksanvisning ..... 4
N Bruksanvisning ..... 13
FIN Käyttöohje. 21
GB Instruction book ..... 30
D Gebrauchsanweisung ..... 39
F Mode d'emploi ..... 49
NL Gebruiksaanwijzing. . . . . . . 58
① Istruzione per l'uso ..... 67
E Instrucciones de uso .....77
P Instruções de utilização ... .86
© CZ Návod k použití .....95
H Használati útmutató .....103
SK Návod na obsluhu .....112
HR Priručnik....120
RO Instructiuni de utilizare ....128


natural_image
Diagram of a blender with rotating and curved arrows indicating motion (no text or symbols)3

natural_image
Technical line drawing of a mechanical component with a central hub and flange (no text or symbols)4
natural_image
Diagram of a blender with a rotating base and handle, showing mechanical components and motion arrows (no text or symbols)5


3


S
S Bästa Kund,
Please read these instructions carefully.
Pay special attention to the safety instructions on the first pages. Keep the instructions in a safe place for future reference. Give them to any new owners of the appliance.
Using the warning triangle and/or the key words (Danger!, Caution!, Important!), information that is important for your safety or the correct functioning of the appliance is highlighted. It is essential that this information is observed.
This symbol guides you step by step through the operation of the appliance.
i Next to this symbol you will find additional information and practical tips on using the appliance.
Tips and information about the economical and environmentally friendly use of the appliance are marked with the clover.
Appliance Description (Fig. 1)
A Filler cup (capacity 70 ml)
B Flexible lid with pouring hole
C Blender tank (capacity 1.6 litre)
D Blade assembly, detachable
E Motor housing
F Rating label (rear side of appliance)
G Speed Selector
H PULSE Button
J Non-slip rubber feet
K Cord storage facility (underside of appliance)
! Safety Instructions
This appliance corresponds to accepted technological standards with regards to safety. Nevertheless, as a manufacturer we consider it our obligation to make you aware of the following safety information.
General Safety
- The appliance should only be connected to mains supplies with the same voltage and frequency ratings as those indicated on the Ratings Label.
• Always remove the plug when the appliance is not in use.
• In the event of a malfunction, unplug the appliance first! - Never pull the plug out of the power socket by pulling on the cord.
- Never try to operate the blender if – the casing has been damaged, – the cord has been damaged.
- If the power cord for this appliance has been damaged, it should only be replaced, for safety reasons, by the manufacturer or Customer Service, or by a suitably qualified person.
- Repairs to this appliance may only be carried out by qualified service engineers. Considerable danger may result from improper repairs. If repairs become necessary, please contact the Customer Care Department or your authorised dealer.
- This appliance is not intended for use by persons (including children) with reduced physical, sensory or mental capabilities, or lack of experience and knowledge, unless they have been given supervision or instruction concerning use of the appliance by a person responsible for their safety.
- If the appliance is used for purposes other than those intended or
used incorrectly, no liability can be accepted for any damage that may be caused.
Child Safety
- Do not leave the appliance running while unattended, or let children near the appliance unsupervised!
• Children should be supervised to ensure that they do not play with the appliance. - Packaging material, e.g. plastic bags, should not be accessible to children.
When operating the appliance
• Always place the unit on a flat, level surface.
- Never operate the appliance with wet hands.
- Ensure the Speed Selector is in the off position before plugging into the power outlet.
- Plastic parts should never be dried at or near direct sources of heat.
- The appliance must not be used for mixing dyes (paints, or lacquer, etc.). This can cause explosions!
- When you have finished using the appliance, before cleaning, switch off and pull the plug out of the socket.
- The blade assembly should only be disassembled by an authorised technician.
- Never clean the motor casing under running water or soapy water.
- Caution! The blade assembly is very sharp. Be careful when taking the blender apart and re-assembling. It may cause injury if handled incorrectly.
- Do not leave hard objects (for example spoons) in the blade assembly while running, and do not grasp the appliance with the hand inside the blender tank. This may cause injury!
Possible applications
The blender can be used for mixing a wide variety of drinks, crushing ice, reducing fruit and vegetables, whipping cream, etc.
Cord storage
The appliance is fitted with a cord storage facility at the bottom. If the connection cord to the power outlet is too long, it can be wrapped around the cord storage until it is the required length.
Disassembling the Appliance
Take the plug out of the socket.
Remove the lid (Fig. 1/B).
Remove the blender tank (Fig. 1/C).
Turn the blender blender tank upside down.
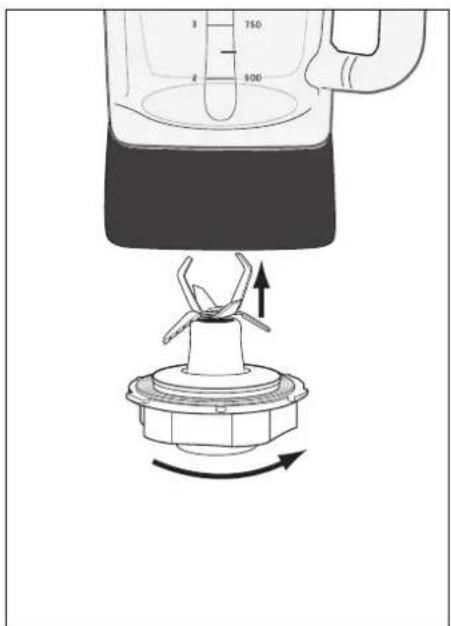
Turn the blade assembly counterclockwise using the filler cup (Fig. 1/A) as tool and remove (Fig. 3). The grooves of the filler cup fit the ribs of the blade assembly.
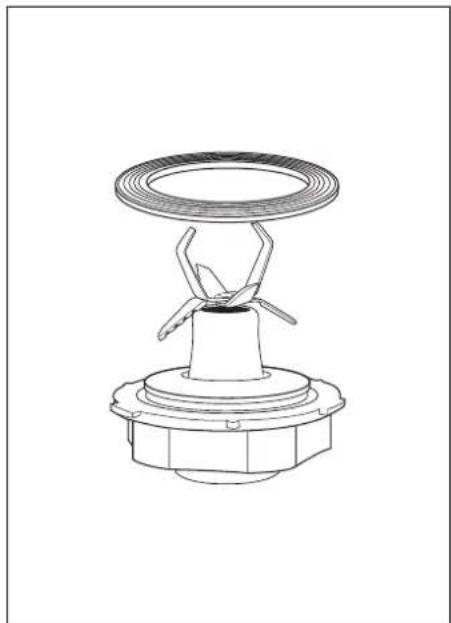
You can now remove the rubber seal (Fig. 4).
Caution! The blade assembly is very sharp. It can cause injury if handled incorrectly! The rubber seal can easily be irreparably damaged by the blade assembly. Caution! Do not use force when taking the blade assembly out of the blender, as this might cause damage. If necessary, tilt it slightly when removing. Do not attempt to remove the stainless steel blades from the blade assembly.
Assembling the Blender
Place the rubber seal on the blade assembly.
GB
Insert the blade assembly into the blender tank from the bottom. Turn it clockwise to fasten it (Fig. 5). Caution! Handle carefully!
You can use the filler cup as tool. The blender tank will leak if the blade assembly is not assembled correctly.
Seat the tank on the motor housing.
Set the lid on the blender tank.
Insert the filler cup, and lock it in.
Operating the Blender
Place the blender on a level, dry surface.
Plug the power cord into a power outlet.
Open the lid (Fig. 1/B) and put all the required ingredients in the blender tank.
Important! Do not exceed the maximum capacity of 1.6 litres.
You can add other ingredients through the filler hole while the blender is running. You can use the filler cup in the lid to do this (Fig. 1/A). Close the filler hole immediately after, to avoid splashing.
Do not start the blender without the lid (Fig. 1/B) in position.
Although the lid fits firmly to the blender tank, we advise when blending liquid ingredients, to place your hand on the lid as you initially start blending. As the powerful motor could cause the liquid to surge up causing leakage. Once you have started blending you can remove your hand.
Start the blender by turning the Speed Selector (Fig. 1/G) to the right, or by pressing the PULSE Button (Fig. 1/H).
i We recommend starting with blender Speed 1, then progressing to Speed 2 or 3. The PULSE Button runs the blender at full speed. The „Blending guide“ on page 34 shows the functions that can be performed and the suggested speeds to use.
After you have completed blending, turn the Speed Selector off to position
After mixing, first remove the blender tank, before taking off the lid.
Do not let the blender run for more than 2 minutes at a time using heavy loads. After running for 2 minutes with heavy loads, the blender should be left to cool for at least 10 minutes.
Safety System
The safety system prevents the blender from being operated if the blender tank is not correctly seated.
You should nevertheless still keep children away from the appliance.
Ice crushing
The blender can be used for crushing ice.
Simply add ice to the blender then press the PULSE button and hold for 1-2 seconds and release. Continue this process and in seconds your ice is crushed.
Processing hot liquids
If you would like to process hot liquids please allow to cool down until lukewarm, fill the blender tank only half full and start processing on low speed.
GB

When processing hot liquids the blender tank can become very warm, please take care to protect your hands.
When processing hot liquids steam is generated, please take care to avoid burns. Ensure that the steam is allowed ventilate out trough the lid or the hole for the filler cup.
Handy Blending Hints
- Food items for blending should be cut into cubes (approximately 2-3 cm), this will assist in achieving an even result.
- To ensure efficient mixing when blending dry mixtures, it may be necessary to stop the blender and push ingredients down the sides of the blender tank with a spatula.
- When making bread crumbs, use 2 to 3 day old bread, to minimise the possibility of clumping. If only fresh bread is available, dry it out for a few minutes in a low heated oven.
- When blending a variety of ingredients together, blend the liquids first, then add dry ingredients.
• Always ensure stones are removed from fruit and bones from meat as these can harm the blades. - Don't allow a used blender to sit for too long as the food will dry onto the blades, making it difficult to clean. If you can't clean the blender straight away, pour some warm water in it and allow to soak.
Care and Cleaning

Before cleaning the blender, take the plug out of the socket.

Make sure that no liquids get inside the motor housing!

Clean the housing with a damp cloth. Never immerse in water or clean under running water.

The blender tank and blade assembly can be cleaned quickly and safely using the PULSE Button.

Pour warm water into the blender tank, with a few drops of washing-up liquid.

Mix the water and wahing-up liquid, by pushing the PULSE Button briefly.

Finally, rinse the blender tank under running water.

If necessary, the blade assembly can also be cleaned separately.

Be careful when rinsing the blade assembly (The blades are sharp!). Use only water and washing-up liquid.
When replacing the blade assembly, turn it clockwise using the filler cup (Fig. 1/A) as tool. See paragraph „Assembling the Blender“ on page 31.

All removable parts (blender lid, filler cup, rubber seal, blade assembly and blender tank) can be cleaned in the dishwasher.
Technical Data
Mains voltage: 230 – 240 V / 50 Hz Power consumption: 600 W

This appliance conforms with the following EC Directives:
• Low Voltage Directive 2006/95/EC
• EMC Directive 89/336/EEC with amendments 92/31/EEC and 93/68/EEC
GB
Disposal

Packaging material
The packaging materials are environmentally friendly and can be recycled. The plastic components are identified by markings, e.g. >PE<, >PS<, etc. Please dispose of the packaging materials in the appropriate container at the community waste disposal facilities.

Old appliance
The symbol on the product or on its packaging indicates that this product may not be treated as
household waste. Instead it shall be handed over to the applicable collection point for the recycling of electrical and electronic equipment. By ensuring this product is disposed of correctly, you will help prevent potential negative consequences for the environment and human health, which could otherwise be caused by inappropriate waste handling of this product. For more detailed information about recycling of this product, please contact your local city office, your household waste disposal service or the shop where you purchased the product.
Blending guide
| Processing Task | Food | Suggested Setting | Suggested Processing Procedure |
| Aerating | Milkshakes, Smoothies | 2 and 3 | Use chilled milk. Blend until desired consistency is achieved. |
| Chopping | Nuts, Chocolate, Garlic or Herbs | PULSE | Pulse 12 cup at a time, to ensure evenly sized pieces. |
| Crumbing Bread Crumbs PULSE and 2 | Tear bread roughly. Blend until desired consistency. | ||
| Biscuit Crumbs PULSE and 2 | Break into pieces and as desired pulse or blend until crumbed. | ||
| Crushing Ice PULSE | Use the PULSE button several times until crushed as desired consistency. | ||
| Emulsifying Salad Dressing 1 | Blend until well combined. Oil may be added to the mixture during processing through the pouring hole in the lid. | ||
| Mixing Batters, Cakes 1 and 2 | Blend ingredients until just combined. Do not overprocess. | ||
| Pureeing | Soups, Vegetables, Fruits | 2 and 3 Blend until smooth. | |
Recommended blending speed
Speed Setting 1
- Whipping cream
• Puree vegetables & fruit - Curry pastes
• Coffee beans - Mayonnaise
Speed Setting 2
- Smoothies with fruit
- Soups
- Raw vegetables
- Cake batters
Speed Setting 3
- Cocktails
- Laksa pastes
- Milkshakes
PULSE
- Ice cubes
- Meat
- Breadcrumbs
- Biscuits
- Finely ground nuts
- Chocolate
- Self cleaning the unit
Example recipes
Ingredients Instructions
Soups/Starters
Cream of Vegetable Soup
250 g potatoes
125 g carrots
100 g celery
1 onion
11 meatstock
1 Cup Crème fraîche or cream
1 t a b l echopped herbs spoon
salt, pepper
Wash and peel the potatoes, carrots, celery, and onion, and chop them into pieces. Add the chopped vegetables to 1/3 of the meat stock and bring to the boil.
Cook for 10 minutes.
Leave the vegetables and stock to cool, then blend finely at blender Speed 2. Bring the rest of the meat stock to the boil in a pot, add the vegetable purée, and bring briefly to the boil again.
Season to taste with the Crème fraîche, salt and pepper
Sprinkle with the chopped herbs, and serve.
GB
Ingredients Instructions
Cold tomato soup
| 750 g tomatoes1 onion3 t a b l eolive oilspoons1 cup Crème fraîche1 lemon2 table-spoons1 table-spoon chopped basil leaves salt, pepper,sugar | Cut the tomatoes open crosswise and blanch with hot water. Skin the tomatoes and cut into large pieces.Peel the onions and cut into pieces.Put the tomatoes and onion in the blender and mix to a fine pure at Speed 2.Add the lemon juice, oil, and vinegar. Season to taste with the salt, pepper, and sugar. Stir in the Crème fraîche. |
Cream of Carrot soup
| 500 g carrots1/2 l vegetable stock1/8 l cream1/8 l white winechervil, parsley,salt, pepper,sugar | Wash and peel the carrots, and chop into pieces. Boil in 1/4 l vegetable stock for around 15 minutes. Leave to cool for a short time. Mix at blender Speed 2, then put them back in the pot. Add the rest of the stock and heat up the soup again. Add the white wine and cream to taste. |
Cold cucumber soup
| 750 g cucumber500 g natural joghourt1 clove garlic1 pinch sugar, salt, pepper1 bunch chives1 bunch dill | Wash and peel the cucumber, halve lengthwise and core it. Chop the flesh into pieces and put in the blender with the garlic. Mix at blender Speed 2. Add the joghourt and mix well. Season with sugar, salt, and pepper to taste.Garnish with the dill and chives. |
Ingredients Instructions
| Humus (Hommos) | |
| 250 g cooked chickpeas(canned chickpeas can be used- rinse well)3 table- olive oilspoons30 ml lemon juice4 cloves garlic30 ml water | Blend all ingredients on setting 2 for 40 seconds or until smooth. |
| Cakes and pastries | |
| Pancake mix | |
| 500 ml milk3 eggs1 pinch salt250 g flour | Add the ingredients to the blender in the above order.Mix to a paste at blender Speed 2.Meanwhile, scrape off any flour sticking to the sides of the cup.Leave the paste to rise for around 15 minutes before using. |
| Melt'n'Mix Cake | |
| 150 g S.R. flour140 g caster sugar125 g butter or margarine, melted2 eggs1 tea- vanilla spoon60 ml milk | Pre-heat oven to 180 °C. Grease a 20 cm round cake tin.Place all ingredients into blender jug. Blend on setting 2 for 50 seconds, or until smooth.Spread mixture into prepared tin and bake for approximately 30-35 minutes, until golden. Cool and ice as desired. |
GB
Ingredients Instructions
Drinks/Cocktails
Iced Coffee
| 2 table- instant coffee Dissolve the coffee powder in boiling water, then leave spoons | to cool. Pour a little water into the tank, then add the ice and crush on Speed 3. Blend all ingredients except cream on setting 1 for 30-60 seconds. |
| 50 ml boiling water | |
| 250 ml milk | |
| 12 cup crushed ice | Whip cream for 40 seconds. Pour into glasses and top with cream. Sprinkle with drinking chocolate. |
| 100 ml whipped cream |
Egg Nog
| 250 ml | hot milk | Blend milk, rum and honey on setting 2 for 30-60 seconds. |
| 2 table-spoons | Rum | Add egg and blend on setting 2 for a further 20 seconds. |
| 2 table-spoons | honey | Sprinkle with nutmeg and serve. |
| 1 egg | nutmeg |
Applications possibles
Share more of our thinking at
www.electrolux.com ASB8000 (822 949 412 - 01 - 0508)




The image contains no text.





Electrolux


- PAGE
- S
- S Bästa Kund,
- Appliance Description (Fig. 1)
- ! Safety Instructions
- General Safety
- Child Safety
- When operating the appliance
- Possible applications
- Cord storage
- Disassembling the Appliance
- Assembling the Blender
- GB
- Operating the Blender
- Safety System
- Ice crushing
- Processing hot liquids
- Handy Blending Hints
- Care and Cleaning
- Technical Data
- Disposal
- Packaging material
- Old appliance
- Recommended blending speed
- Speed Setting 1
- Speed Setting 2
- Speed Setting 3
- PULSE
- Example recipes
- Ingredients Instructions
- Soups/Starters
- Cream of Vegetable Soup
- Applications possibles
Brand : ELECTROLUX
Model : ASB8000
Category : Vacuum Cleaner