
18-2062 - Surveillance Camera Clas Ohlson - Free user manual and instructions
Find the device manual for free 18-2062 Clas Ohlson in PDF.


| Product Type | Indoor Wireless IP Camera |
| Model | NC802APT (Art. No 18-2062 / 36-2914) |
| Power Supply | 5V DC, 2.5A via included adapter |
| Network Interfaces | 10/100 Ethernet (RJ-45) and Wi-Fi 802.11g |
| Wireless Security | WEP 64/128-bit, WPA-PSK |
| Max Video Resolution | 640x480 (VGA) |
| Lens Field of View | 126° horizontal, 64° vertical (panorama angle) |
| Pan/Tilt Control | Yes, motorized (remote control via software) |
| Audio | Built-in microphone; external mic input (3.5mm) |
| Motion Detection | Yes (built-in) |
| Indoor Use Only | Yes (not weatherproof) |
| Software Compatibility | Windows 2000/XP; Internet Explorer 5.x or later with ActiveX |
| Included Accessories | Antenna, table stand, network cable, power adapter, CD (software & manual), quick guide |
| Care Instructions | Clean with soft damp cloth; do not use solvents |
| Safety Precautions | Use only supplied adapter; disconnect before cleaning; do not dismantle |
Frequently Asked Questions - 18-2062 Clas Ohlson
User questions about 18-2062 Clas Ohlson
0 question about this device. Answer the ones you know or ask your own.
Ask a new question about this device
Download the instructions for your Surveillance Camera in PDF format for free! Find your manual 18-2062 - Clas Ohlson and take your electronic device back in hand. On this page are published all the documents necessary for the use of your device. 18-2062 by Clas Ohlson.
USER MANUAL 18-2062 Clas Ohlson
natural_image
White portable water dispenser with circular lens and control panel (no visible text or symbols)Model/Modell/Malli:NC802APT
Quick guide – IP Camera
Art. No 36-2914/18-2062, model NC802APT
Please read the entire instruction manual before using and save it for future use. We apologise for any text or photo errors and any changes of technical data. If you have any questions concerning technical problems please contact our Customer Service Department (see address on reverse.)
Note! This is only a quick guide so that you can quickly get started with the product. A complete operator's manual in English is found on the supplied CD.
Safety
- The camera is for indoor use only.
- Use only the supplied or recommended power adaptor (5V DC).
- Never expose the camera to moisture or humidity.
• Always disconnect the camera from the electricity network before cleaning. - Never dismantle the camera. Dangerous current exists unprotected in certain components within the product casing. Contact with this can give electrical shock.
System demands
• Network connection PC with Windows 2000 or XP
- Microsoft Internet Explorer 5.x or later
Product Description
Wireless IP camera with motor for possibility to control the camera from another computer.
- 126irc (horizontal) + 64irc (vertical) panorama angle.
- Motion detector and built-in microphone.
Buttons and Functions
Front view of camera
| Camera lens The camera lens can be adjusted. However make sure that it is clean from dirt and dust to obtain the best image. | |
| Microphone The built-in microphone is place in the front of the camera.There is also a socket on the back of the camera for an extra microphone. When an external microphone is connected the internal microphone is disconnected. | |
| Power LEDs light up with steady shine when the camera is turned on.When the camera starts the LEDs blink for 15-20 seconds. | |
| Active When the LEDs blink, the camera image is transferred in real time to one or several users. | |
| Network LEDs light up with steady shine when the camera is connected to a network.The LEDs blink when the data is transferred to the network. |
Back view of camera
| Power Input Connection for the supplied power adaptor. | |
| MIC IN Connection (3.5 mm) for external microphone (e.g. a regular microphone for pc). The camera's built-in microphone is automatically disconnected when an external microphone is connected. | |
| LAN Connect a standard network cable to connect the camera to your network switch or router.Note!When a network cable is connected the wireless network (WLAN) is automatically disconnected.The power adaptor must always be disconnected before you connect or disconnect the network cable for the camera to be able to change between LAN or WLAN. | |
| Reset The reset button has two functions:A quick press restores the camera to a DHCP client (the camera obtains IP address from e.g. a router. A personal configured IP address is taken away).A long press (press and hold in for 3 seconds) restores the IP address, administrator's name and the administrator's password. The LED (Power) blinks three times when the camera is restored.IP address: DHCPAdministrator's name: administratorAdministrator's password: (no password) |
Mounting & Installation
1. Mounting of antenna
Attach the supplied antenna to the bracket on the top of the camera. The antenna can be angled for the best possible reception. The best reception is obtained with the antenna angled vertically.
2. Camera assembly
Mount the camera in the supplied table stand or mount it on the ceiling or wall next to the bracket hole on the back of the camera.
3. Connection of network cable
Connect a standard network cable to the LAN connection to connect the camera to your network switch or router.
When a network cable is connected the wireless network (WLAN) is automatically disconnected.
- For configuration it is recommended that the camera is connected through the network cable.
4. Starting the camera
Connect the supplied power adaptor to the input marked POWER. The camera starts automatically up. Use only the included or recommended adaptor.
5. Indicator lights
POWER When started the light is lit a short while before it changes to a blinking light for 15-20 seconds. Thereafter the light shines steadily.
ACTIVE The LEDs blink only when the camera image is transferred in real time to one or several users.
NETWORK Lights when the camera is connected to the network.
Install the configuration program
The following installation instructions apply for Windows XP with Service pack 2 installed.
- Insert the supplied CD into the computer's CD-ROM drive. The installation guide automatically starts and the start image is displayed. If the installation does not start automatically, use a file explorer setup.exe application found directly under the root folder on the CD-ROM.
- When the installation program has started a welcome image is displayed. Click on Setup Camera to start the installation.
- The installation program searches for the camera on the network and then displays the camera in the list to the left.
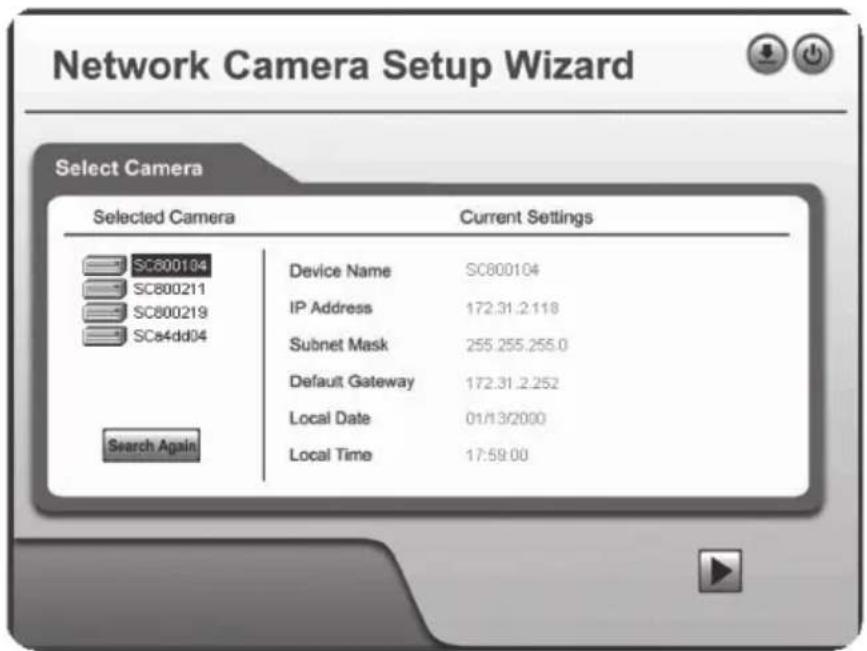
- Mark the camera and click “▶” next.
- In the next dialogue you enter the user name and password for the camera. Click “▶” next.
The preset user name and password are:
- User name: Administrator
- Password: (no password)
- Select if the camera is to use a fixed IP address (Fixed IP address) or to automatically obtain an IP address (Dynamic IP address) from e.g. a router with DHCP function. Select your choice and click “▶” next.
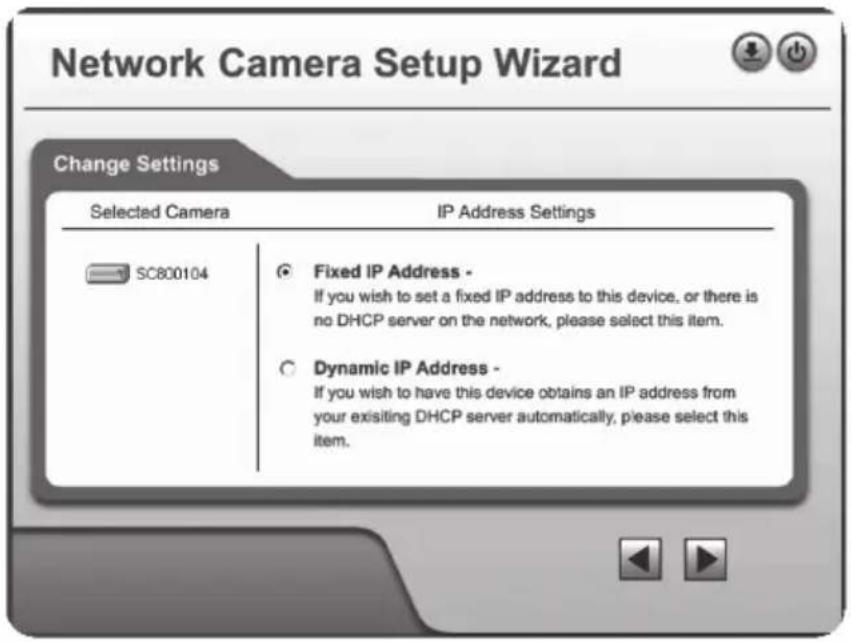
- If you have chosen to give the camera a fixed IP address in the earlier step TCP/IP Settings appears in the dialogue box.

- Enter a free IP address, Subnet Mask and Default Gateway for your network.
- Fill in Primary DNS and Secondary DNS if you wish to use the email and DNS functions. See information from your broadband supplier.
Click "▶" next to continue.
- Enter the network adjustments in the following dialogue box if the camera is to be used with the wireless:

Mode – Select Infrastructure if you have an Access Point. If you use a wireless router select AD-hoc.
ESSID – Enter your wireless network's SSID
Domain – Select your region in the list.
Channel – If you chose Ad-hoc select the same channel that your wireless network uses. See the instructions for wireless equipment.
Click “ ▶” next to continue.
- Select the same security level that your wireless network uses and click "▶" next to continue.
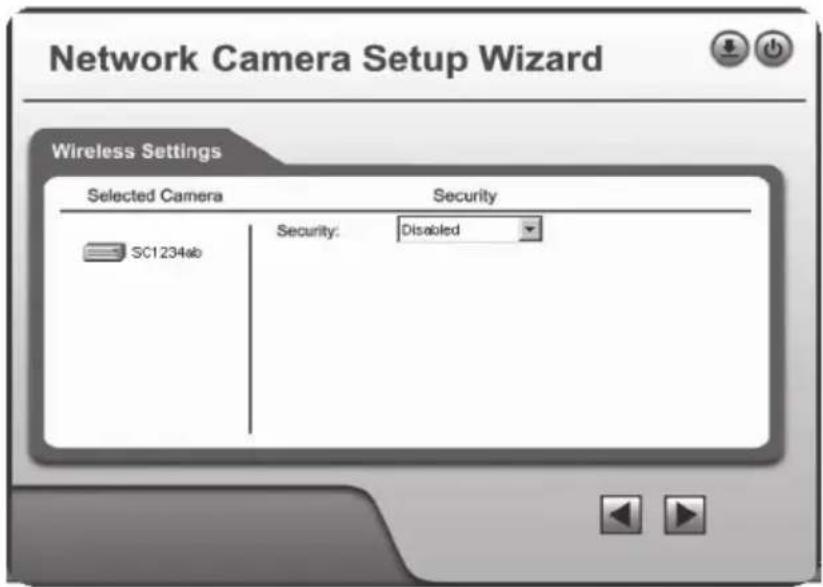
- If you chose WEP as a security screen in the above step the following dialogue box is shown above.

- Enter the same security settings as your wireless network. See the instructions for wireless equipment.
Click “ ▶” next to continue.
- If you chose WPA-PSK as a security screen in the above step the following dialogue box is shown above.
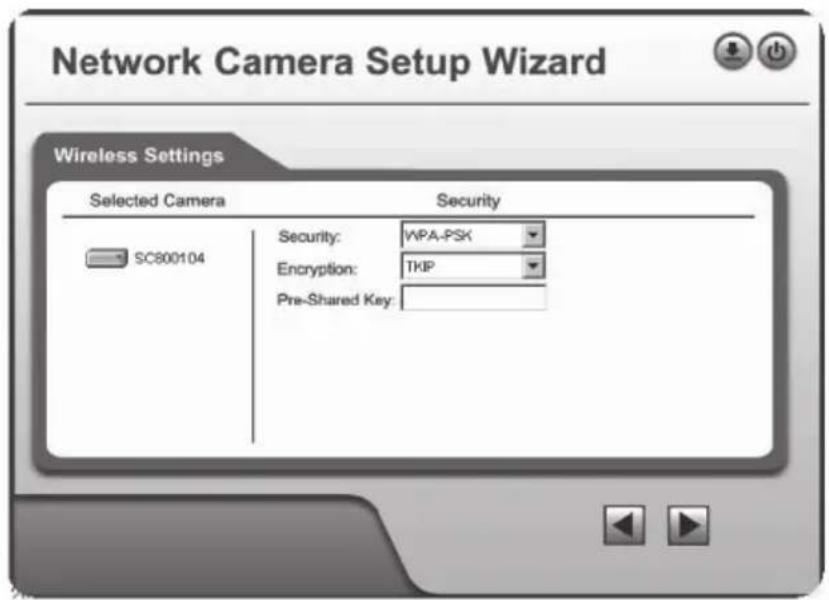
- Enter the same security settings as your wireless network. See the instructions for wireless equipment.
Click “ ▶” next to continue.
- Enter the camera description as well as time, date and time zone. Click “▶” next to continue.

- The following dialogue box shows the settings you have just entered. Click “▶” next to save or backward “◀” to change the settings.

- Click Install Utility when the dialogue box Successful! Appears. The installation of the video program begins.
- Follow the installation instructions on the screen to finish the installation.
Using the video program Monitor Manager
-
When the program has begun Monitor Manager is displayed on the screen.
-
Click the Setup button on the right side of the screen. The dialogue box Setup appears. If you have several cameras connected to the network you can also configure them here.


-
Select Camera Setup option and mark the camera in the list Camera List. Enter a number for the camera in the Local ID field. If needed you can also change the camera setting in the field Camera Data to the right.
-
Click Add when you have done your settings. The camera is added to the list of connected cameras.
- Click Exit. The program returns to the screen image Monitor Manager.
- Click on the camera's number in the control panel to the right. The camera image appears.
- If you have several cameras connected these are shown in the boxes above. Click one of the four boxes Video Layout in the control panel to the right to select how many camera layouts are to be displayed on the screen.
- Control the camera by clicking on the control arrows in the program's lower right corner.
Show the camera image via the web browser
Through the camera web interface you can view camera images in real time. You can also change existing configurations while adjusting the functions of the camera such as image, web and email configurations. For further instructions see the complete operator's manual in English which is found on the supplied CD-ROM.
Images in real time can only be shown if the web reader is ActiveX 8.0 – compatible (e.g. Internet Explorer 6.0).
- Enter the camera's IP address (in this case 192.168.1.35) and press Enter. Tip! Enter a page in the web browser's favourites/bookmarks!
- When the camera's web interface is loaded the main menu is displayed in the left corner.
Note!
- Images in real time can only be shown if the web browser is ActiveX 8.0 – compatible (e.g. Internet Explorer 6.0).
- You must accept and install the Active X component when the question comes up on the web browser window.
- Click View Video to show the camera image or click Administration to change the camera's settings (you must enter the user name and password to be able to change the camera settings).
Connecting to the camera via Internet
If the camera is installed in the network behind e.g. a router, the router must be configured for the camera to be able to be reached from internet. See your operating instructions for your router.
Care and Maintenance
Use a soft damp cloth to wipe the product. Never use strong solvents or detergents.
Trouble Shooting Schedule
Not able to connect to the camera / The program does not have contact with the camera
- Check that any firewalls in your computer are not blocking the camera connection to the network. Take the firewall away or configure the firewall.
- Make sure that the IP address you gave the camera corresponds with the network series of IP addresses. Connect the camera and run the configuration program again.
- Check that the network cable you are using is whole and also of the same type as the one supplied with the camera.
- Disconnect the camera's power supply a short while and try again later.
- Try to restore the camera by pressing the reset button in located on the bottom of the camera.
Disposal
Follow local ordinances when disposing of this product. If you are unsure about how to dispose of this product contact your municipality.
Specifications
Power Supply 5 V DC, 2.5 A via included adaptor
Network LAN/WLAN with support for TCP/IP, SMTP, SHCP, HTTP, DDNS
WLAN 802.11 g (WPA-PSK, WEP (64/128 bits security))
Max resolution 640x480 (VGA)
Snabbguide - IP-kamera
Art.nr 36-2914/18-2062, modell NC802APT
- Hvis du har valgt å gi kameraet en fast IP-adresse i trinnene foran vises dialogruten: TCP/IP Settings.

Mode – Velg Infrastructure hvis du bruker et accesspunkt. Bruker du en trådløs router velger du Ad-hoc.
Declaration of Conformity

Hereby, Clas Ohlson AB, declares that this wireless IP-camera,
36-2914/18-2062
NC802APT
is in compliance with the essential requirements and other relevant provisions of Directive 1999/5/EC.
Article 3.1a (Safety): EN 60950-1
Article 3.1b (EMC): EN 301489-1
EN 301489-17
Article 3.2 (Radio): EN 300328

Insjön, Sweden, Januari 2008
Klas Balkow
President
Clas Ohlson, 793 85 Insjön, Sweden
SVERIGE
KUNDTJÄNST Tel: 0247/445 00
Fax: 0247/445 09
E-post: kundtjanst@clasohlson.se
INTERNET www.clasohlson.se
BREV Clas Ohlson AB, 793 85 INSJÖN
NORGE
KUNDESENTER Tlf.: 23 21 40 00
Faks: 23 21 40 80
E-post: kundesenter@clasohlson.no
INTERNETT www.clasohlson.no
POST Clas Ohlson AS, Postboks 485 Sentrum, 0105 OSLO
SUOMI
ASIAKASPALVELU Puh: 020 111 2222
Faksi: 020 111 2221
For consumer contact, please visit
www.clasohlson.co.uk and click on
customer service.
INTERNET www.clasohlson.co.uk
- Quick guide – IP Camera
- Art. No 36-2914/18-2062, model NC802APT
- Safety
- System demands
- Product Description
- Buttons and Functions
- Front view of camera
- Back view of camera
- Mounting & Installation
- Mounting of antenna
- Camera assembly
- Connection of network cable
- Starting the camera
- Indicator lights
- Install the configuration program
- The preset user name and password are:
- Using the video program Monitor Manager
- Show the camera image via the web browser
- Note!
- Connecting to the camera via Internet
- Care and Maintenance
- Trouble Shooting Schedule
- Disposal
- Specifications
- Snabbguide - IP-kamera
- Art.nr 36-2914/18-2062, modell NC802APT
- Declaration of Conformity
- SVERIGE
- NORGE
- SUOMI
Brand : Clas Ohlson
Model : 18-2062
Category : Surveillance Camera