
CL3010 - Hand tool BLAUPUNKT - Free user manual and instructions
Find the device manual for free CL3010 BLAUPUNKT in PDF.


| Product Type | Hand tool |
| Brand | Blaupunkt |
| Model | CL3010 |
| Category | Manual hand tool |
| Material | Stainless steel with rubberized grip |
| Overall Length | 180 mm |
| Weight | 220 g |
| Handle Length | 110 mm |
| Blade/Head Material | Chrome vanadium steel |
| Features | Ergonomic non-slip handle, precision ground tip |
| Intended Use | DIY, household repairs, electronics |
| Included Components | 1 x hand tool, user manual |
| Maintenance | Clean with a dry cloth; lubricate pivot periodically |
| Storage | Store in a dry place, avoid moisture |
| Safety Warnings | Keep away from children; wear protective gloves |
| Warranty | 2 years (excluding wear and tear) |
| Certification | CE, RoHS |
| Repairability | Spare parts available through service centers |
| Packaging Dimensions | 220 x 80 x 30 mm |
| Country of Origin | China |
Frequently Asked Questions - CL3010 BLAUPUNKT
User questions about CL3010 BLAUPUNKT
0 question about this device. Answer the ones you know or ask your own.
Ask a new question about this device
Download the instructions for your Hand tool in PDF format for free! Find your manual CL3010 - BLAUPUNKT and take your electronic device back in hand. On this page are published all the documents necessary for the use of your device. CL3010 by BLAUPUNKT.
USER MANUAL CL3010 BLAUPUNKT
natural_image
Blue and black Blaupunkt lawn mower with red wheels and black handle (no visible text or symbols)Enjoy it.
| T4 | T4 | T | |||
| yr | vp | n n | |||
| ó | óxó | x | |||
| yr | vyv | r z | vz z r | ||
| yr | v v | vz r | |||
| yr | v | nv | yr | vz z r | v |
| n | n | n | ryr | p | n | |
| T | n | vz | z r | |||
| yr | v | n | vy | vpn | n | v |
| yr | v | yvn | ||||
| yr | vp | r | n n | |||
| yr | z | rt | y |
a vz z r ryr p vp



IMPORTANT INFORMATION
In order to achieve the highest satisfaction, enjoy the performance of the product and learn all its features and functions, please read this manual before using this product. Before using the device, read the manual and follow the instructions contained therein. The manufacturer is not liable for damage caused by the use of the device not in accordance with its intended use or improper handling. Retain the operating instructions so that they can also be used when using the product at a later date.
- Do not immerse the appliance in water or any other liquid.
- The appliance should be cleaned regularly as described in the section on Cleaning and maintenance of the appliance.
- Do not place the appliance close to sources of heat, flames, electric element Do not place it on top of any other appliance.
• Take special care when using the appliance when children or pets are around.
• Do not allow children to play with the appliance. - Do not expose the appliance to atmospheric conditions (rain, sun, etc.) or use it in humid conditions.
- Use only original accessories and spare parts for the appliance or those recommended by the manufacturer. The use of accessories or parts not recommended by the manufacturer may damage the appliance and jeopardise the safety of use.
- Keep your work area tidy and well lit.
• Disorder and insufficient lighting lead to accidents.
• A moment's inattention risks losing control of the tool. - Do not lean too far with the power tool. Maintain a stable posture and balance. This will help you maintain better control of the power tool in unforeseen situations.
- Avoid starting the power tool unintentionally. Check that the power switch is in the OFF position before connecting the power tool to the mains. Carrying the power tool with your finger on the trigger or connecting the power tool to the mains after it has already been switched on can lead to accidents.
- Wear appropriate clothing. Do not work in loose clothing or wear jewellery while working. Keep hair, clothing and gloves away from moving parts. Moving parts of the power tool can catch and pull in loose clothing, jewellery or long hair.
- Remove any spanners or tools from the power tool before starting it. A tool or spanner still connected to the rotating part of the power tool can cause injury.
- Use caution when working with power tools, concentrate on your work and use common sense. Do not use a power tool when tired or under the influence of drugs, alcohol or medication. Even a moment's inattention when working with a power tool risks a serious accident.
- Keep children away from the work area and DO NOT allow children to pull on the power cord this can cause serious injury.
- Before making any adjustments, changing accessories or putting the power tool away for storage, flip the switch to the off position to disconnect the power tool from the power supply. Such precautions reduce the risk of accidentally starting the power tool.
• Only use the tool in a dry, well-lit environment.
- This tool should not be used by anyone under 16 years of age.
 | Read the user manual. |  | Use ear protection |
 |  | Wear protective glovesGeneral warning | |
 | Fire hazard |  | Wear protective clothing |
 | Electric shock hazard |  | Wear a protective mask |
 | Wear safety glasses |  | Wear respiratory protection |
- Warning of danger. Use extreme caution.
- Important, read the instructions and observe the warnings.
-
Wear safety goggles.
-
Use protective earmuffs.
-
Always disconnect from power supply before repairing or maintenance. In the event of damage to the cable, immediately unplug this apparatus from the wall outlet.
-
Do not use the unit in the rain or in high humidity conditions.
Workplace safety :
- The appliance is designed for grass cutting. Do not use the unit for other activities.
- Keep the work area neat and well lit. Disorder and poor lighting contribute to accidents.
-
Before starting work, prepare and clear the area, remove all stones, branches, wires, and other foreign objects protruding from the ground and over which there is a risk of tripping.
• Take special care if working on sloping terrain or slopes. -
Do not use an electrically powered appliance in explosive environments created by flammable liquids, gases or dust. The appliance can produce sparks that can ignite dust or fumes.
- Do not allow children or observers into areas where an electrically powered appliance is in use. Distractions can cause loss of control of the appliance.
- Leave electrically powered garden equipment away from bystanders.
- The operator or user is responsible for accidents or hazards occurring to other persons or the environment.
Electrical safety
- Only connect the appliance to an outlet with characteristics consistent with the values on the rating plate.
- Do not expose electrically powered equipment to rain or wet conditions. If water enters the power tool, the risk of electric shock increases.
Human safety
- Do not operate the equipment if the user feels tired or is under the influence of alcohol, drugs or medication. Full concentration is required when using the device and caution must be exercised. A moment's inattention while using a power tool can lead to an accident and consequent serious injury or property damage.
- It is essential to wear personal protective equipment. Always wear close-fitting safety goggles (according to EN 166 or other national regulations). Wear ear protection due to the loudness of the equipment. The use of protective equipment such as a dust mask, non-slip safety shoes with
uppers, protective gloves is also recommended.
- Wear close fitting clothing. Loose clothing, jewellery, scarves can get caught by moving parts of the machine, which can lead to dangerous accidents. If the user has long hair, it should be secured and fastened.
- During operation, the appliance may eject various objects at high speed. There is a danger of injury. The use of suitable clothing is recommended.
- Before starting the power tool, remove all spanners and other tools used to adjust the unit. Leaving a spanner in a rotating part of the power tool may cause injury.
- Avoid working in an unnatural body position. Assume a correct and stable posture to avoid the possibility of losing balance. This will enable better control of the power tool in unpredictable situations.
- Avoid unintentional starting. Make sure the power cord is unplugged and the switch is in the off position before picking up or carrying the equipment. Carrying electrically powered equipment with your finger on the switch or connecting to the mains with the switch on may lead to an accident.
- Keep hands and feet away from moving (rotating) parts of the equipment.
- Keep a safe distance from bystanders.
- In spite of the inherently safe design the design itself, the use of safety measures and additional protective measures, there is always a risk of residual injury during operation.
- Do not use detergents or alcohol to clean the machine.
- The attachment system of the working tool must correspond to the dimensions of the power tool. Work tools with incorrect dimensions cannot be sufficiently guarded or
controlled.
- Personal protective equipment must be used. Depending on the type of work, wear a protective mask covering the entire face, eye protection such as safety goggles. Protect the eyes from airborne foreign bodies generated during work. Protect the respiratory tract against airborne dust and vapours with a dust mask. Exposure to noise over a prolonged period can lead to hearing loss.
- Ensure that bystanders are kept at a safe distance from the machine's working area. Anyone in the vicinity of a working power tool must use personal protective equipment
- Clean the ventilation slots of the equipment regularly.
- Before each start-up, check that: - the equipment is assembled correctly, in accordance with the instructions; - the cutting tool is in good working order; the blade attachment, damage and wear must be checked regularly; - the safety devices (e.g. cutting unit guard, housing, handle, motor switch) are in good working order and function correctly. When the machine is switched off, the blade still remains in motion for some time. Caution should be exercised.
Safety instructions for the charger and battery pack
- To connect the battery for charging, insert the battery into the charger and then connect the charger to a power source.
- Protect the charger from rain and moisture. The charger may only be used indoors.
- Keep the charger clean.
-
Do not use the charger on flammable objects and substrates (e.g. paper) or in environments with explosive and/or flammable atmospheres.
-
Always provide adequate ventilation when charging, as fumes or electrolyte may leak from the battery if the battery is damaged due to improper handling/damage.
- Unplug the charger from the wall socket when charging is complete. Do not leave it connected to a power source for longer than necessary.
- Store and charge the battery in a dry place and make sure no water gets into it.
- Keep the battery connectors clean and free from dirt.
- Protect the battery from shocks, moisture and never open or mechanically damage the battery.
- To check the charge level of the battery pack, press the button on the battery pack and, if necessary, charge the battery pack according to the number of LEDs and the expected operating time of the cordless tool.
General information
- Before removing the basket, it is necessary to switch off the engine to avoid potential hazards. Always observe the safe distance between the blade housing and the user, which is ensured by suitable handles. It is advisable to be particularly careful when mowing, especially on slopes, and when changing direction. To this end, it is advisable to wear footwear with a non-slip sole and long trousers to minimise the risk of injury.
- When removing the basket and changing direction on slopes, maintain a stable position. Always drive the mower across the slope and avoid mowing on slopes over 15^ for safety reasons. It is also important to be careful when reversing and pulling the mower to avoid tripping.
- When the mower is removed, the bumper guard should
close the rear discharge opening to prevent accidental access to the blade. If grass remains in the opening, it is advisable to move the mower some distance, the grass should fall out more freely. This will make it easier to restart the engine. Do not remove debris from the mower housing and blade by hand or foot, but use suitable tools such as a hand brush.
- When attaching the collection basket, make sure the engine is switched off and the cutting tool is stationary. Lift the bumper guard with one hand and hold the bag by the handle with the other, suspending it from the top. To ensure effective grass collection, it is advisable to clean the basket regularly, paying particular attention to the grilles. These measures will contribute to maintaining the safety and efficiency of the mower.

When this crossed-out wheeled bin symbol is attached to a product it means that the product is covered by the European Directive 2012/19/EU. Please inform yourself about the local separate collection system for electrical and electronic products. Used appliance should be delivered to the dedicated collecting points due to hazardous components, which may affect the environment. Do not dispose this appliance in the common waste bin.

Your products is designed a manufactured with high quality materials and components, which can be recycled and reused.
Description of appliance (A)
| 1 Top handle | 13a Plastic tabs |
| 2 Pressing levers for securing the upper section of the mower | 13b Grass container bars |
| 3 Lower handle | 13c Grass catcher handle |
| 4 Rear flap | 14 Cable |
| 5 Pressing levers for securing the lower section of the mower | 15 Release button |
| 6 Handle for carrying | 16 Starter handle |
| 7 Height of cut adjustment lever | 17 Grass ejection set |
| 8 Battery cover | 17a Bracket on mulching kit |
| 9 Batteries (not supplied) | 18 Twin charger |
| 9a Release button on battery | 19 Blade |
| 10 Ignition key | 20 Blade bolt |
| 11 Wheels | 21 Motor spindle |
| 12 Machine housing | |
| 13 Grass container |
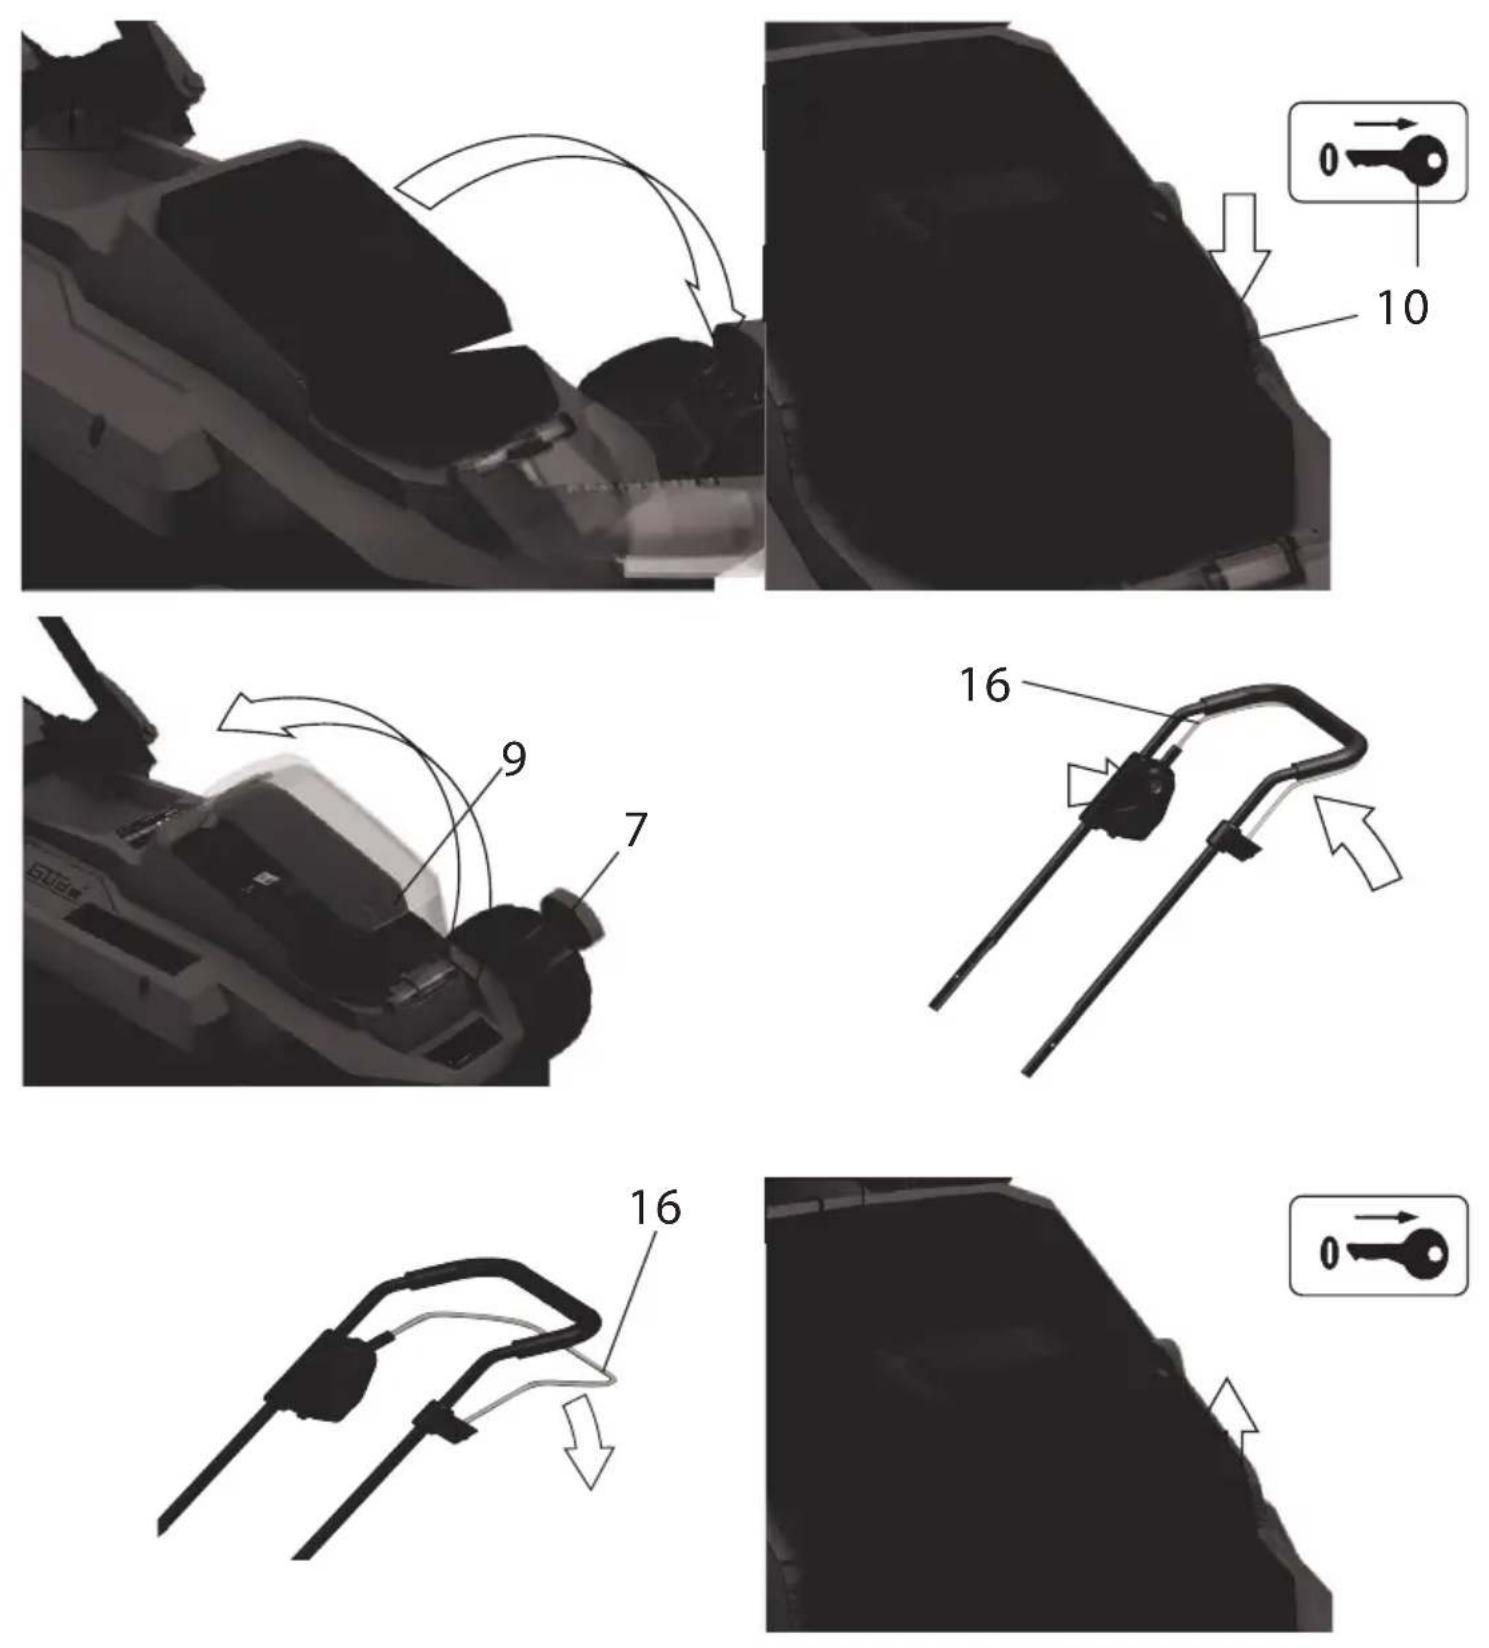
Switching on and off (G):
Do not start the unit incomplete or incorrectly assembled. Before starting, check that all safety components are in good condition.
1 Place the unit on a level surface.
2. lift the cover (8) of the appliance housing and insert the charged batteries (9).
3. insert the ignition key (10) into the appropriate hole next to the battery (9).
(The ignition key can only be inserted in one position).
4. make sure that the blade does not touch any objects before switching the unit on.
5. to switch the unit on, press the lock release button (16) and hold it down, then press the start lever (17). Then release the lock release button(16).
6. To switch off the unit, let go of the starting lever (17).
After the appliance has been switched off, the blade continues to rotate for a few seconds. Do not touch the moving blade.
To remove the battery pack (9) from the appliance, press the release button (9a) on the battery pack and pull out the battery pack.
To insert the battery pack (9), push it along the guide.
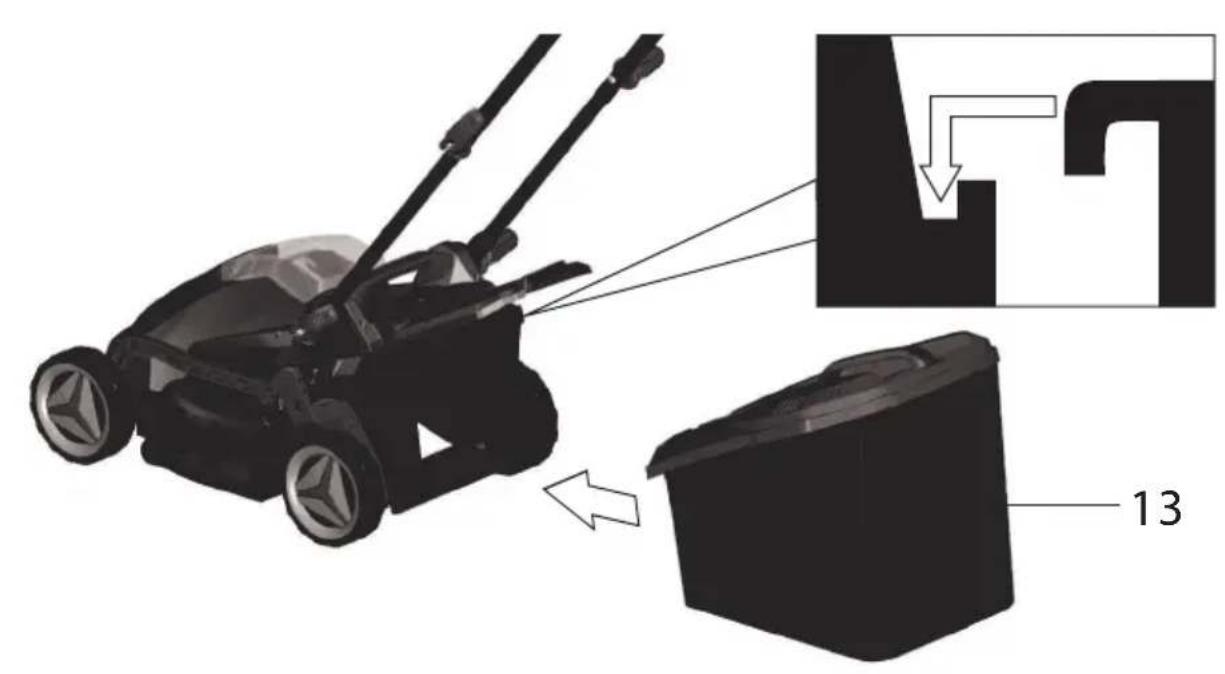
Removing the grass container (E)
- To install the grass container (13), lift the tailgate (4) and hang the grass container (13) on both handles.
- Fold the tailgate (4) over the grass container (13).
- To remove the grass container (13), lift up the cover (4) and remove the grass container (13).
- Fold the rear flap (4) back onto the machine housing (12).
Adjusting the height (F):
- Grasp the lever (7) of the cutting height adjustment and slide it past the ratchet mechanism to the desired cutting height.
The machine has 6 positions for adjusting the cutting height (F):
25 mm/35 mm - low cutting height
45 mm/55 mm - medium cutting height
75 mm - high cutting height
The correct cutting height is between 25 and 45mm for an ornamental lawn and approximately 45-65 mm for a utility lawn.
Storage (K)
- Release the pressure lever (2+5) and fold the upper rod (1) and lower rod (3) together to the unit takes up less space. When doing so, take care not to pinch the unit's cables.
• Store the appliance in a dry place out of the reach of children.
• Before storing the appliance in an enclosed space, allow the motor to cool down.
MOUNTING
Assembling the lower rod (B)
- Fold the lower attachment (3) upwards.
- Turn the lower levers (5) clockwise to fix them.
- Lock the clamping levers (5), push them towards the lower bar (3). Pull the clamping levers firmly and then align them to the rod so that tightening can be carried out with medium force. If this fails, continue turning the tightening lever clockwise or it should be loosened by turning it counterclockwise.
Installing the top rod (C)
Attach the upper rod (1) using the screws (2b), washers (2a) and upper levers (2) to the right and left of the lower rod (3). The release button (16) must be on the right side in the direction of mowing. Two positions are possible.
- Turn the clamping lever (2) clockwise.
- Lock the clamping levers (2) by pressing them in the direction of the bar (3). The tightening levers must rest against the rod in such a way that tightening with medium force is possible. If this fails, continue turning the tightening levers clockwise or loosen them by turning counterclockwise.
Assembling the grass container (E)
- Snap the handle (13c) of the grass container (13) into the top of the grass container (13).
- Place the plastic tabs (13a) of the grass container (13) on the bars of the grass container (13b).
Grass ejection kit (J)
Fixing the grass ejection kit
1 Remove the grass container.
2. lift up the rear flap
3. Slide the grass ejection kit (18) into place. The bracket (18a) will snap into place.
Removing the grass ejection kit(J)
4 Pull out the bracket (18a) and remove the grass ejection kit (18).
Cleaning and maintenance:
Remove the battery from the unit before servicing and storing! Contact of body parts with the moving cutting element can cause injury, disability or death!
Remember that the cutting element continues to move for a while after the engine is switched off.
- Cleanliness and regular maintenance are essential for the proper functioning of the machine. We recommend cleaning the mower thoroughly after each use, using a brush, cloth or compressed air. It is important to avoid the use of cleaners or solvents and to ensure that water does not get into the unit.
- Before each use, it is a good idea to carefully inspect the mower for visible defects such as loose or damaged components. Regularly checking the tightness of all bolts and screws is key, as worn or under-tightened components can lead to dangerous damage to the engine or frame.
- Regularly monitor the condition of the housing, safety components and collection basket for any damage and check their attachment stability. If you notice any abnormalities, it is recommended that they are repaired immediately or replaced with new ones.
• After mowing, wait for the engine to cool down before putting the mower into storage. If the blade hits a foreign object hard, stop the mower immediately and consult a service technician. - Carefully inspect the mower after each mowing and remove any plant debris from the wheels, holes and from under the housing (blade compartment). Use a delicate tool such as a piece of wood or plastic to do this, avoiding hard tools that can damage the machine.
- To minimise the risk of fire, regularly clean the engine compartment of plant debris. Any green residue surrounding the engine should be removed, and it is advisable to carry out this operation at least after the mowing season. With intensive use, it is advisable to repeat the cleaning 1-2 times during the season, ensuring that the blade is always sharp and well-balanced to guarantee an optimal cut.
Technical data:
Battery voltage 1 x 18 V, compatible with OneDNA18V series, Blaupunkt BP1840, BP1850
No-load speed n=2900 minutes ^1
Cutting width: 330 mm
Cutting height: 25/35/45/60/75 mm
Hopper capacity for grass cuttings: 30l
Weight without battery/charger 10.6 kg
Degree of protection IP40
Noise
Sound pressure level (LpA): 68.1 dB (A) ;
Measured sound power level (LpA): 80.5 dB (A) ;
Guaranteed sound power level (LpA): 96 dB (A) ;
WAŻNE INFORMACJE
EU – DECLARATION OF CONFORMITY
01/2024/CL3010
MANUFACTURER:
BLAUPUNKT COMPETENCE CENTER
2N-Everpol Sp. z o.o.
ul. Puławska 403A
02-801 Warsaw, Poland
Authorized person to prepare the technical documentation:
Tomasz Jakóbczyk
ul. Puławska 403A
02-801 Warsaw, Poland
We declare under our sole responsibility that our product:
Type of device:
Lawn mower
Name:
CL3010
If used for its intended use complies with the essential protection requirements relating to the:
2014/30/EU (EMC Directive)
2006/42/EC (MD Machinery Directive)
2011/65/EU (RoHS Directive) and its Annex II amending directive 2015/863/EU
The assessment of this product has been based on the following standards:
EMC standards:
EN 55014-1:2017+A1:2020 | EN IEC 55014-1:2021
EN 55014-2:2015 | EN IEC 55014-2:2021
MD and LVD standards:
ISO 12100:2010
EN 62841-1:2015
EN 62841-4-3:2021
EN 62233:2008
RoHS standards:
EN IEC 63000:2018
Warszawa, 19.01.2024
BLAUPUNKT
02-801 Warsaw, Poland
Corespondence address:
Puławska 12
05-532 Baniocha, Poland
Phone +48 22 688 08 00

DEKLARACJA ZGODNOŚCI UE
01/2024/CL3010
PRODUCENT:
BLAUPUNKT COMPETENCE CENTER
2N-Everpol Sp. z o.o.
ul. Puławska 403A
02-801 Warszawa, Polska
EN IEC 62841-4-3:2021
EN 62233:2008
Norma RoHS:
EN IEC 63000:2018

05-532 Banlocha, Poland
Telefon +48 22 688 08 00
Competence Center
2N-Everpol Sp. z o.o.
ul. Puławska 403A
02-801 Warsaw, Poland
phone:+48226880800
e-mail: info@everpol.pl
www.blaupunkt.com
In case of questions or problems please contact our service.
Tel. 00 48 22 688 08 33
Email:tools@blaupunkt.pl
Enjoy it.
All rights reserved. All brand names are registered trademarks of their respective owners. Specifications are subject to change without prior notice.


- Enjoy it.
- IMPORTANT INFORMATION
- Workplace safety :
- Electrical safety
- Human safety
- Safety instructions for the charger and battery pack
- General information
- Switching on and off (G):
- After the appliance has been switched off, the blade continues to rotate for a few seconds. Do not touch the moving blade.
- Removing the grass container (E)
- Adjusting the height (F):
- The machine has 6 positions for adjusting the cutting height (F):
- Storage (K)
- MOUNTING
- Assembling the lower rod (B)
- Installing the top rod (C)
- Assembling the grass container (E)
- Grass ejection kit (J)
- Removing the grass ejection kit(J)
- Cleaning and maintenance:
- Technical data:
- Noise
- WAŻNE INFORMACJE
- EU – DECLARATION OF CONFORMITY
- BLAUPUNKT COMPETENCE CENTER
- BLAUPUNKT
- DEKLARACJA ZGODNOŚCI UE
Brand : BLAUPUNKT
Model : CL3010
Category : Hand tool