
HuddlePair - Video Conferencing System HuddleCamHD - Free user manual and instructions
Find the device manual for free HuddlePair HuddleCamHD in PDF.


| Product Type | Video Conferencing System |
| Brand | HuddleCamHD |
| Model | HuddlePair |
| Dimensions (approx.) | 120mm x 80mm x 30mm |
| Weight | 200g |
| Power Supply | 5V, 2A via USB-C |
| Camera Resolution | Full HD 1080p |
| Field of View | 90° |
| Built-in Microphone | Yes, omnidirectional |
| Built-in Speaker | Yes, full-range |
| Connection Type | USB 2.0/3.0 (plug-and-play) |
| Compatible Operating Systems | Windows, macOS, Chrome OS |
| Software Compatibility | Zoom, Microsoft Teams, Google Meet, etc. |
| Mounting Options | Desk stand or tripod mount |
| Main Functions | Video conferencing with auto-focus, noise reduction |
| Maintenance & Cleaning | Wipe with a soft, dry cloth. Do not use liquids. |
| Safety Precautions | Keep away from water and heat. Do not disassemble. |
| Reparability | No user-serviceable parts. Contact support. |
| Accessories Included | USB cable, quick start guide |
Frequently Asked Questions - HuddlePair HuddleCamHD
User questions about HuddlePair HuddleCamHD
0 question about this device. Answer the ones you know or ask your own.
Ask a new question about this device
Download the instructions for your Video Conferencing System in PDF format for free! Find your manual HuddlePair - HuddleCamHD and take your electronic device back in hand. On this page are published all the documents necessary for the use of your device. HuddlePair by HuddleCamHD.
USER MANUAL HuddlePair HuddleCamHD
natural_image
Two black electronic devices: a circular video camera and a speaker phone, shown against a white background (no text or symbols visible on the devices themselves)Precautions.
Safety Tips.
- Please read this manual carefully before using the devices.
- Avoid damage from stress, violent vibration or liquid intrusion during transportation, storage or installation.
- Take care of the camera during installation to prevent damage to the camera case, ports, lens or pan/tilt armiture.
- Do not apply excessive voltage. (Use only the specified voltage.) Otherwise, you may experience electrical shock.
- Keep the camera away from strong electromagnetic sources.
- Do not aim the camera at bright light sources (e.g. bright lights, the sun, etc.) for extended periods of time.
- Do not clean the devices with any active chemicals or corrosive detergents.
- Do not disassemble the devices or any of the components. If problems arise, please contact your authorized dealer.
In the Box
Supplied Equipment
• HuddlePair Webcam (1)
• HuddlePod Speakerphone (1)
- User Manual (1)
• USB 2.0 charging cable (1)
• USB power adapter (1)

HuddleCamHD
152 Robbins Rd, Downingtown, PA, 19335, USA - HuddleCamHD.com | 1 800 - 486-5276
Physical Description
1. Webcam.

- Lens
106° Field of View
- Manual Tilt Mechanism
Allows for tilting the camera head.
- Manual Pan Mechanism
Allows for panning the camera head.
- Mounting Base
Allows for mounting above monitors, or using the 1/4-20 mounting screw
- USB 2.0 Cable
Allows for connecting the camera and speakerphone to your PC
152 Robbins Rd, Downingtown, PA, 19335, USA - HuddleCamHD.com | 1 800 - 486-5276
2. HuddlePod.
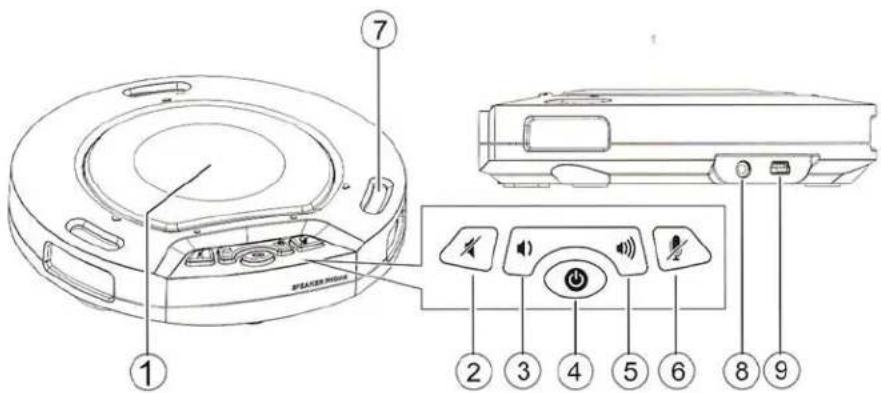
1. Loudspeaker
Reproduces audio from the connected PC.
2. Loudspeaker Mute Button
Press this button to turn off the sound output of the loudspeaker. Press the button again to turn the sound output of the loudspeaker. This does not control the audio output jack.
3. VOL - Button
Press this button to gradually turn down the sound of the loudspeaker.
4. Power Button
Press and hold this button to make the device enter standby mode (the bottom right blue light will blink) to wait for connection of the wireless adapter. When the adapter is connected, press and hold this button to power off the device. When power supplied via USB.
5. VOL + Button
Press this button to mute the microphone. To cancel the mite function, press button again.
6. Microphone Mute Button
Press this button to mute the microphone. To cancel the mute function, press button again.
7. Microphone
Picks up sound in all directions around the device (omnidirectional)
8. Audio Output
For audio output to a powered speaker or a 3.5mm headphone.
9. USB Power Port
For connecting USB power supply - only for charging of battery or powered operation.
Connection Setup
The HuddlePair camera includes the wireless receiver for the HuddlePod in the camera, which makes set up a breeze. Simply connect the USB 2.0 cable from the HuddlePair camera to your Mac or PC computer and select the devices within your preferred software.
A. Computer Conference Function
Connect the HuddlePair to a computer using the USB 2.0 cable from the camera. This kit can be used as an external camera, microphone and speaker for a computer, enabling software-based teleconferencing.
1. Preparation for use
This device is compatible with computers running operating systems including Microsoft Windows 7/8.1/10, Android (Version 4.4 or above) and Mac OSX. A communication application or VoIP package (e.g. WebEx, Zoom.us, Skype, GotoMeeting) with network conferencing function should be installed. The wireless adapter is installed inside the HuddlePair camera.
2. Power-on and Wireless Connection
Press and hold the power button on the HuddlePod until the device is turned on and enters standby mode. In this state, the bottom right blue light blinks continuously, waiting for the receiver to connect. When the USB 2.0 cable from the HuddlePair is connected to the computer, the triangular blue light will now stop blinking and stay on, suggesting a successful wireless connection between the device and the computer.
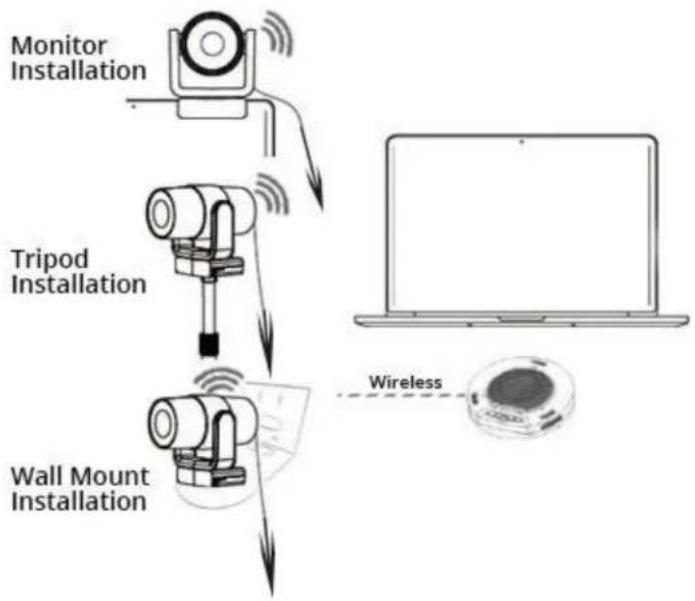
flowchart
graph TD
    A["Monitor Installation"] --> B["Tripod Installation"]
    B --> C["Wall Mount Installation"]
    D["Laptop"] --> E["Wireless Device"]
Notes:
- Connect the USB cable directly to the PC rather than through a USB hub, or some operational problems can arise.
- After successful connection, set the HuddlePod as the default communication device in the PC's Control Panel - Sounds and Audio Devices - Play (output) and Record (input). Otherwise, you can select the HuddlePod manually in the various software that uses the mic and speaker.
3. Adjusting the sound volume of the loudspeaker
During a conference call, if the sound volume of the loudspeaker is too low or too high, you can press the 🎯 or 🎯 buttons on the device repeatedly to adjust volume to a suitable level. If the sound volume is still not appropriate, you can adjust the sound volume of the loudspeaker further via the PC’s audio settings.
4. Adjusting the sound volume of the microphone
During a conference call, if the sound heard by the far end is too low or too high, you can ask the far end to adjust the sound volume on their end. If it's still not adequate, you can adjust the input volume of the microphone in the PC's audio settings.
5. Mute the microphone
During a conference call, to mute your mic, press 📋 button on the device. The mute indicator light will be on. You can still hear the sound of the far end, but the far end can't hear you. To cancel mic mute, press 📋 button on the device again. The mute indicator light will be off and the indicator triangular lights of the microphone will be on.
6. Mute the loudspeaker
During a conference call, press ↕ button to turn off the sound of the built-in speaker and the mute indicator of loudspeaker will turn on. To turn the sound of the loudspeaker back on, press ↕ button and the mute indicator light of the loudspeaker will turn off.
7. End the conference call
Use the call control features in your conferencing software to end the call
B. Music Playback and audio output port
This device can be used as an external speaker for computer equipment. Using music player software on the computer, you can hear music playback through the speaker on the device. Also, headphones can be connected to the 3.5mm audio output port on the device, or an active speaker can be connected to realize high-quality amplification for wider-range speech and music playback. In this application, you can press to mute the speaker on the device (the bottom left indicator will turn blue).
The external speaker or headphones will still play.
[Device only supplies left/mono channel audio]
Important Notes Regarding USB Connectivity:
USB 3.0 ports are backwards compatible with USB 2.0 devices. USB 2.0 ports are not completely forward compatible with USB 3.0 devices (some USB 3.0 devices will connect to USB 2.0 with limited functionality).
External USB hubs should be avoided (i.e. give the camera its own USB port on the device) as they are not well suited to transmitting HD video reliably.
USB extension systems must be fully compatible with the version of USB that you are using and must utilize an external power supply, when required. Always connect the HuddleCam directly to the PC in order to associate the UVC drivers before attempting to use any extension system.
USB power saving settings in the device's operating system should be turned off completely for reliable USB camera connectivity.
HuddleCam Cameras
All HuddleCamHD cameras utilize the UVC (USB Video Class) drivers that are built into Windows, Mac OS and Linux to stream HD video to your device via your device's USB port (USB 2.0 or USB 3.0 depending upon HuddleCam model). When your device successfully recognizes the camera, your device will register the HuddleCam as an “imaging device”. You can see this in your Windows Device Manager program (type “device manager” into the Windows search tool) as shown in the screenshot, below:


HuddleCamHD
152 Robbins Rd, Downingtown, PA, 19335, USA - HuddleCamHD.com | 1 800 - 486-5276
In this example, you can see the HuddleCam model in use connected as a fully functional USB 3.0 device (HuddleCamHD) as well as a USB 2.0 device with limited functionality (USB2.0 Camera).
If your device has not connected to or has not recognized the HuddleCam as an imaging device (in which case, you may see a new “unknown device”, “Westbridge” or “CYTFX3” labeled device show up in Device Manager’s “Universal Serial Bus Controllers” section rather than in the “Imaging Devices” section), the HuddleCam will not be available to software. In this case, try restarting the device and reconnecting the camera via USB (USB 2.0 or USB 3.0 depending upon HuddleCam model).
Similarly, you can see a connected device in System Information on a MAC. See screenshot below:
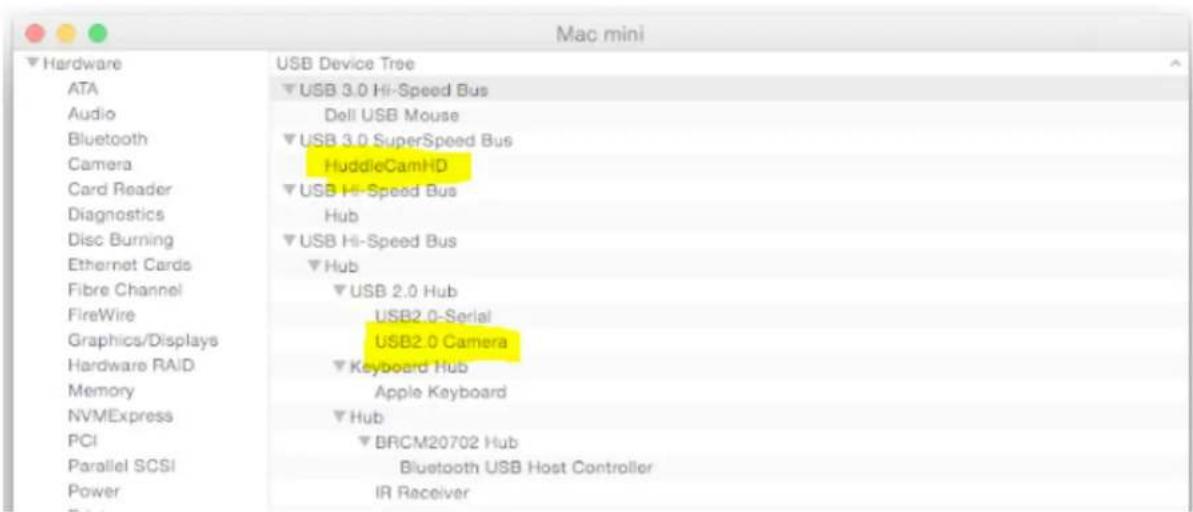
In this example, you can see the HuddleCam model in use connected as a fully functional USB 3.0 device “HuddleCamHD” as well as a “USB2.0 camera” with limited functionality (USB2.0 camera).
HuddlePod Description of Indicator Status......
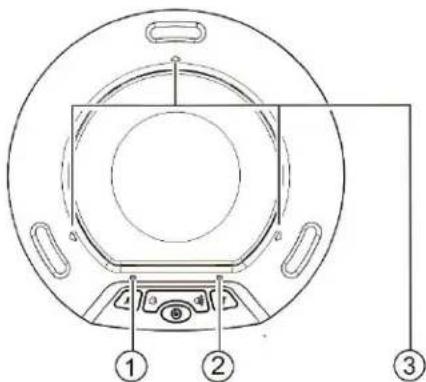
1. Bottom left indicator
When the loudspeaker is set within its normal operating parameters, this light is off. When the loudspeaker is muted, this light is on. When the loudspeaker is set to the maximum or minimum volume, this light will blink.
2. Bottom right indicator
The blue light will turn on when the microphone is muted. When the wireless adapter is not connected, the blue light will blink (indicating standby mode). When the built-in battery level is low, the orange light will blink. When fully charged, the orange light stays on when in standby mode.
3. Triangular indicators
When the device is powered on, the blue lights will blink once with a bright light and then turn off. When in standby mode and with a wireless connection, the blue lights will stay on with a dim light.
HuddlePod USB Power Supply and Charging......
-
This device is provided with a built-in rechargeable lithium ion battery. Before use of the device for the first time, charge the battery fully.
-
When one end of the USB cable is inserted into the USB port on the device and the other end to the USB port on a computer or to a USB power supply, power will be supplied to the device and the built-in battery will be charged. At the same time, the device will be powered on automatically.
-
Upon full charging, the bottom right indicator will turn orange and stay on when in standby mode.
-
When charging is finished, you can disconnect the USB cable from the device for portability. Turn off device before storing for travel.
-
In case of low battery during use, the bottom right indicator will turn orange and blink. In this case, use the USB cable to charge the built-in battery as soon as possible.

HuddleCamHD
152 Robbins Rd, Downingtown, PA, 19335, USA - HuddleCamHD.com | 1 800 - 486-5276
- Lithium ion batteries should not be left to sit in a fully discharged state for any significant period of time or voltage can drop below the battery protection circuit shutoff point, rendering the battery un-chargeable. Whenever the HuddlePod shuts down due to battery discharge, please recharge as soon as possible.
Note: A full recharge is not required to maintain battery life, however.
While Lithium ion batteries provide the longest run time from a full charge, they will provide more charge-discharge cycles with shallower cycles (do not fully discharge, do not fully charge). Decisions regarding how to maintain your HuddlePod battery will depend upon your intended session length. If meetings only last 1-3 hours per day, you can probably charge the HuddlePod for 1-3 hours each day and extend battery life. If you need the HuddlePod for 4-6 hours each day*, you are better off charging the HuddlePod to full capacity each day.
Notes:
-
Any USB charger without a Safety Certificate or one not intended for Lithium ion batteries, may cause explosion or damage to the HuddlePod.
-
*As a consumable, the built-in battery will gradually lose its total capacity (run time) between charges - after repeated charge-discharge cycles. Full Charge/Discharge cycle rating is 300-500 cycles to 80% of original capacity depending upon environmental factors, such as ambient temperature.
To obtain the Best Performance.
-
Install the product in a dry place with good ventilation, avoiding direct sunlight, vibration, moisture and cold. Keep away from heat sources and dust.
-
Keep the product far from motors, transformers and other electronic equipment to avoid electrical or magnetic interference.
-
Never install the product near electrical appliances such as induction cookers or microwave ovens to prevent operation failure caused by electromagnetic waves or magnetic fields.
-
Keep hands dry when connecting or disconnecting any cables to prevent electric shock.
-
Never use brute force when connecting cables, which may cause a fire, electric shock, product damage, a short or an open circuit.
-
Unplug all cables before cleaning the product.
-
Never use any chemical solvent to clean the product.
-
Unplug all cables if you do not intend for long-term use of this product.
-
Never loosen the screws on the product, which may cause poor sealing, reduce the functional qualities and violate the warranty.
-
Please do not put device into a fire, which may cause an explosion.
-
If there is any leakage from the unit, please do not touch the battery or the leaking substance, as the battery may be damaged.
-
Never try to repair the product by yourself. If you find any problems, please contact your dealer.

HuddleCamHD
152 Robbins Rd, Downingtown, PA, 19335, USA - HuddleCamHD.com | 1 800 - 486-5276
Installation Instructions......
Tripod Installation....
When using the HuddleCam with a tripod, screw the tripod to the bottom of the camera. The tripod screw must be a standard 1/4-20 mounting screw.
Note: Tripod must stand on a level surface.
TV Installation......
When using the HuddleCam with a TV, adjust the mounting base on the bottom of the camera.
Mount Installation....
When using the HuddleCam with a mount, screw the mounting screw to the bottom of the camera. The mounting screw must be a standard 1/4-20 mounting screw.
We recommend using the HCM-1-BK for wall mounting, & HCM-1C for ceiling mounting

HuddleCamHD
152 Robbins Rd, Downingtown, PA, 19335, USA - HuddleCamHD.com | 1 800 - 486-5276
Troubleshooting
| Problem | Cause | Resolution |
| There is no power to the camera. | USB cable from camera is disconnected from PC | Reconnect USB cable to PC |
| Camera will not connect to the PC via USB. | Camera connects sometimes. | Connect USB only after camera has completely booted |
| The Camera is not working at all. | No response or image from camera. | Disconnect power, and wait a few minutes, then connect the power again. Retry. |
| Audio is not coming out of HuddlePod Speaker | HuddlePod is turned off | Press and hold the power button for 3 seconds. If no LEDs light, the battery is discharged. Charge the battery and power on |
| HuddlePod is disconnected from PC | Ensure HuddlePod is within range of wireless receiver | |
| HuddlePod is unselected in application | Select the HuddlePod as your default device in the Windows Sound Control Panel & software | |
| Microphone is not working on HuddlePod | See power and connectivity checks above | |
| HuddlePod is unselected in application | Select the HuddlePod as your default device in the Windows Sound Control Panel & software | |
Specs.
Model Number: HC-HUDDLEPAIR
Camera Specs:
Camera & Lens
• Video CMOS Sensor 1/3" CMOS Sensor, 2.1 Mega Pixel
• Frame Rate (MJPEG) 1920 x 1080p-30/25, 1280 x 720p-30/25
• Frame Rate (YUY2) 1920 x 1080p-5, 1280 x 720p-10, 800 x 600p-25, 640 x 480p-30
- Lens FNo. = 1.8, Fixed focus lens
• Field of View 106°
• Warranty 2 Years parts and labor
- Compression
MJPEG, YUY2
Pan/Tilt Movement
• Pan Movement Left: 150°, Right: 150°
- Tilt Rotation Up: 30^ , Down: 30^
Rear Board Connectors
• Video Interface USB 2.0
• Power Supply Interface USB 2.0
Electrical Index
• Power Consumption 5V/500mA
Physical
• Material Aluminum, Plastic
- Dimensions 4.09"W x 4.588"H x 5.51"D [6"H w/ Tilt Up]
(104mm x 124mm x 140mm [152mmH w/ Tilt Up])
• Weight 1.10 lbs (0.5 kg)
• Color Black
• Operating Temperature 32^ F to +113°F ( 0^ C to +50°C)
• Storage Temperature -14°F to 140°F (-10°C +70°C)
• Humidity 20 \~ 85% Condensation free
• Working Environment Indoor only
HuddlePod Specs:
Microphone Specs
- Echo Cancellation 256 ms echo cancellation
• Audio Output Max 18dB w/ auto level control - Noise Cancellation Intelligent NC up to 16dB
• Digital EQ Built in Digital EQ for stable audio

HuddleCamHD
152 Robbins Rd, Downingtown, PA, 19335, USA - HuddleCamHD.com | 1 800 - 486-5276
- Battery Life
6 Hours
- Interface
USB 2.0 & 3.5mm Audio Out
Wireless Speakerphone Specifications
- Weight:
- Dimensions
• Operating Temperature - Compatibility
- USB Cable
• RF frequency range - Certifications
Box Specifications
- Weight
0.8 lbs (0.4kg)
- Dimensions
7" Diameter x 1.5" Height (178mmD x 38.1mmH)
Temp 32° \~ 104°F (0° \~ 40°C), Humidity 20% \~ 85%
MS WIN 7/8.1/10, Mac OS X 10.5+, Android 4.4+
Supplied for power + charging only
2.400 GHz - 2.4835 GHz
CE Mark (R & TTE Directive), FCC
2.5 lbs
9"W x 7.25"H 7.63"D
228.6mmW x 184.15mmH x 193.8mmD


- Precautions.
- Safety Tips.
- In the Box
- Supplied Equipment
- HuddleCamHD
- Physical Description
- Webcam.
- HuddlePod.
- Loudspeaker
- Loudspeaker Mute Button
- VOL - Button
- Power Button
- VOL + Button
- Microphone Mute Button
- Microphone
- Audio Output
- USB Power Port
- Connection Setup
- Computer Conference Function
- Preparation for use
- Power-on and Wireless Connection
- Notes:
- Adjusting the sound volume of the loudspeaker
- Adjusting the sound volume of the microphone
- Mute the microphone
- Mute the loudspeaker
- End the conference call
- Music Playback and audio output port
- Important Notes Regarding USB Connectivity:
- HuddleCam Cameras
- Bottom left indicator
- Bottom right indicator
- Triangular indicators
- Robbins Rd, Downingtown, PA, 19335, USA - HuddleCamHD.com | 1 800 - 486-5276
- To obtain the Best Performance.
- Installation Instructions......
- Specs.
- Model Number: HC-HUDDLEPAIR
- Camera Specs:
- Camera & Lens
- Pan/Tilt Movement
- Rear Board Connectors
- Electrical Index
- Physical
- HuddlePod Specs:
- Microphone Specs
- Wireless Speakerphone Specifications
- Box Specifications
Brand : HuddleCamHD
Model : HuddlePair
Category : Video Conferencing System