HC-EPTZ - Video Conferencing System HuddleCamHD - Free user manual and instructions
Find the device manual for free HC-EPTZ HuddleCamHD in PDF.

User questions about HC-EPTZ HuddleCamHD
0 question about this device. Answer the ones you know or ask your own.
Ask a new question about this device
Download the instructions for your Video Conferencing System in PDF format for free! Find your manual HC-EPTZ - HuddleCamHD and take your electronic device back in hand. On this page are published all the documents necessary for the use of your device. HC-EPTZ by HuddleCamHD.
USER MANUAL HC-EPTZ HuddleCamHD
HuddleCamHD EPTZ Webcam
NDI® | HX EPTZ CAMERA
natural_image
Black HuddleCamHD NDI® I-FX camera with lens and stand (no visible text or symbols on body)Precautions.
Safety Tips.
- Please read this manual carefully before using the camera.
- Avoid damage from stress, violent vibration or liquid intrusion during transportation, storage or installation.
- Take care of the camera during installation to prevent damage to the camera case, ports, or lens.
- Do not apply excessive voltage. (Use only the specified voltage.) Otherwise, you may experience electrical shock.
- Keep the camera away from strong electromagnetic sources.
- Do not aim the camera at bright light sources (e.g. bright lights, the sun, etc.) for extended periods of time.
- Do not clean the camera with any active chemicals or corrosive detergents.
- Do not disassemble the camera or any of the camera's components. If problems arise, please contact your authorized dealer.
- Contact your authorized dealer for repair.
In the Box.
Supplied Equipment.
• HC-EPTZ-NDI Camera (1)
• 12V Power Supply (1)
• IR Remote Controller (1)
- User Manual (1)

HuddleCamHD
152 Robbins Rd, Downingtown, PA, 19335, USA - HuddleCamHD.com | 1 800 - 486-5276
Physical Description......
- Front View......

text_image
HuddleCamHD NDI®/kx 1 2 3 4- Lens
108° Field of View lens
- Power LED
Blue LED lights when unit is powered and on.
- Mounting Base
Mounting base for camera. 1/4-20 mounting screw.
- Microphone Array
Beamforming Microphone Array

HuddleCamHD
152 Robbins Rd, Downingtown, PA, 19335, USA - HuddleCamHD.com | 1 800 - 486-5276
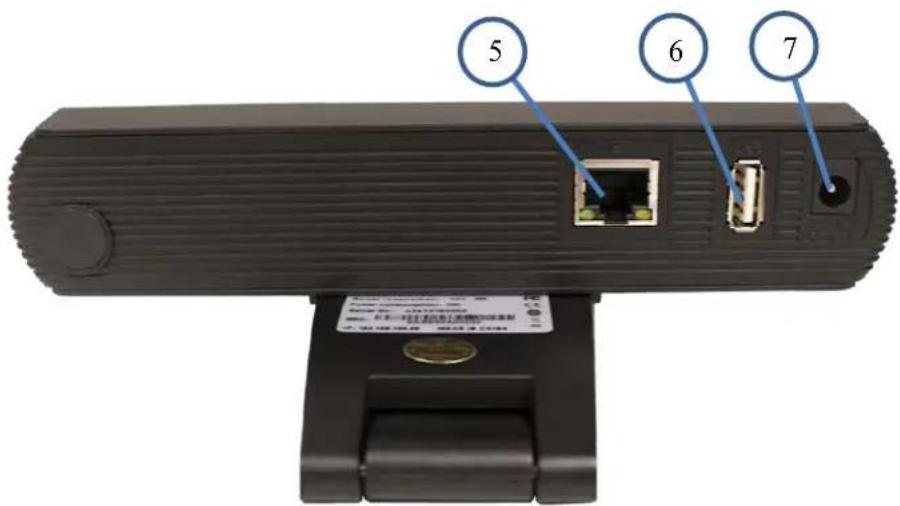
2. Rear View.
text_image
5 6 7- RJ-45 Connection
For connection to LAN and for PoE powering
- USB 2.0 Connection
For future use
- DC12V Power Connection
For powering on camera

HuddleCamHD
152 Robbins Rd, Downingtown, PA, 19335, USA - HuddleCamHD.com | 1 800 - 486-5276
NDI® | HX Connection Guide.
This connection guide will explain the method to connect your NDI®|HX camera to your PC for use with software applications.
Three easy steps:
- Install the latest NDI® Tools
- Connect your camera to the NDI® Virtual Input
- Select the NDI® Virtual Input in your software of choice
Step 1:
- Download and install the latest NDI® Tools https://www.newtek.com/ndihx/products/
Please note this will install NewTek® NDI® Studio Monitor & NDI® Virtual Input
Step 2:
- Open the NDI ^® Virtual Input
- Right-click the NDI ^® Virtual Input and select your camera of choice
Step 3:
- Open your software of choice
- Go to video settings and select video source as "NewTek NDI ^® Video"
NewTek®, NDI®, & NDI®|HX are all registered trademarks of VZRT Group®. Please note that your license key is non-transferrable.
OSD Menu.
On Screen Display Menu
Use the OSD menu to access and change the camera's settings.
Note: Electronic P / T / Z functionality is disabled when the OSD menu is displayed.
The camera OSD Menu offers the following settings options:
- Exposure
○ Full Auto
- ExpCompMode Off On / Off
- Exp Comp 0 -7 \~ +7
Note: Available when ExpCompMode is "On"
- Gain Limit 6 0 \~ 15
- Meter Average Bottom / Average / Top / Center
■ Backlight Off On / Off
■ DRC Strength 5 0 \~ 8
■ Anti-Flicker 60Hz Off / 50Hz / 60Hz
○ Shutter Priority
- Shutter 1/60 1/30s, 1/60s, 1/90s, 1/100s, 1/125s, 1/200s,
1/250s, 1/350s, 1/500s, 1/725s, 1/1000s,
1/1500s, 1/2000s, 1/3000s, 1/4000s,
1/6000s, & 1/10000s
■ Meter Average Bottom / Average / Top / Center
■ DRC Strength 5 0 \~ 8
○ Bright
■ Bright 7 0 \~ 17
- Gain Limit 6 0 \~ 15
■ Meter Average Bottom / Average / Top / Center
■ DRC Strength 5 0 \~ 8
■ Anti-Flicker 60Hz Off / 50Hz / 60Hz
○ Manual
| Shutter | 1/60 | 1/30s, 1/60s, 1/90s, 1/100s, 1/125s, 1/200s, 1/250s, 1/350s, 1/500s, 1/725s, 1/1000s, 1/1500s, 1/2000s, 1/3000s, 1/4000s, 1/6000s, & 1/10000s |
| Gain | 2 | 0 ~ 15 |
| DRC Strength | 5 | 0 ~ 8 |
- Color
○ Auto
| ■ AWB Sens | High | Low / Middle / High |
| ■ RG Tuning | 0 | -10 ~ +10 |
| ■ BG Tuning | 0 | -10 ~ +10 |
| ■ Saturation | 100% | 60% ~ 200% |
| ■ Hue | 7 | 0 ~ 14 |
- Indoor
| Saturation | 100% | 60%~200% |
| Hue | 7 | 0~14 |
- Outdoor
| Saturation | 100% | 60%~200% |
| Hue | 7 | 0~14 |
○ OnePush
| ■ AWB Sens | High | High / Low / Normal |
| ■ RG Tuning | 0 | -10 ~ +10 |
| ■ BG Tuning | 0 | -10 ~ +10 |
| ■ Saturation | 100% | 60% ~ 200% |
| ■ Hue | 7 | 0 ~ 14 |
○ Manual
| RG Tuning | 226 | 0 ~ 255 |
| BG Tuning | 188 | 0 ~ 255 |

HuddleCamHD
152 Robbins Rd, Downingtown, PA, 19335, USA - HuddleCamHD.com | 1 800 - 486-5276
■ Saturation 100% 60% \~ 200%
- Hue 7 0 \~ 14
- Image
■ Luminance 7 0 \~ 14
- Contrast 7 0 \~ 14
- Sharpness 4 Auto / 0 \~ 15
- Flip-H Off Off / On
- Flip-V Off Off / On
- Gamma EXT Default / 0.45 / 0.5 / 0.56 / 0.63
■ Style Default Clarity / Bright / PC / Clarity (LED) / Norm
■ LDC 10 Off / -10 \~ +10
- Noise Reduction
■ 2D-NR Close / Auto / 1 \~ 5
■ 3D-NR Close / 1 \~ 8
- Setting
- Language English English, Chinese, Russian, Italian, German, French, Spanish
- Protocol VISCA VISCA, PELCO-P, PELCO-D
- Visca Addr 1 1 - 7 (VISCA), 0 - 254 (PELCO-P), 0 - 31 (PELCO-D)
■ EPTZ On On / Off - Zoom Limit 1x-3x 1x-3x / 1x-4x / 1x-8x / 2x-4x / 2x-8x / 3x-8x
■ Audio In MicIn 16K MicIn 16K
■ AutoFraming Off On / Off
• Information Displays current camera settings
- Restore Default Restore camera default settings
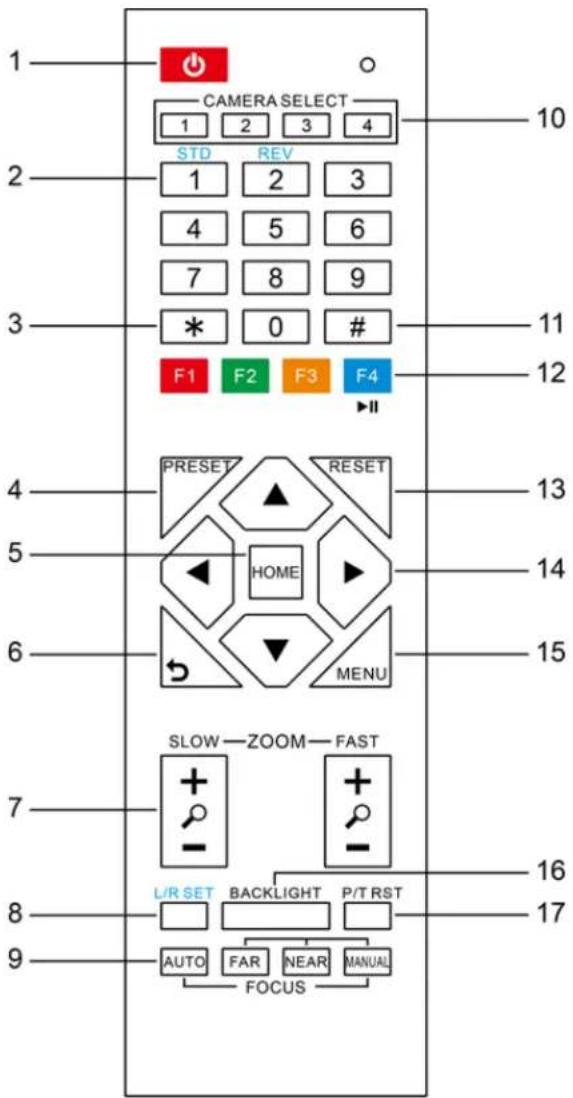
IR Remote Controller
Note: IR Remote will not work on other HuddleCamHD cameras
1. Standby Button:
Press this button to enter standby mode. Press it again to enter normal mode.
NOTE: Power consumption in standby mode is approximately half of the normal mode.
2. Position Buttons:
To set preset or call preset
3. \* (asterisk) Button:
For multiple functions.
4. Preset Button:
Allows for setting a preset
NOTE: [PRESET] + Numeric button (0-9) to set
5. Home Buttons:
Press the Home button to send the camera back to front
6. Return Button:
Press the button to back previous menu
7. Zoom Buttons:
Zoom+: Zoom In (Slow and fast speed)
Zoom-: Zoom Out (Slow and fast speed)
8. L/R Set Button:
Set the left & right direction of the remote control.
(not available on this model)
9. Focus Buttons:
Used for focus adjustment
Press AUTO to adjust the focus on the center of the object automatically. To adjust the focus manually, press the MANUAL button, and adjust it with FAR and NEAR.
10. Camera Address Select Buttons:
Camera the button corresponding to the camera which you want to operate with the remote controller
11. # Button:
For multiple functions
12. Multiple function Buttons:
Function 1. Set camera IR address
Press 3 keys contiguously can set camera IR address as follow:
[*] + [#] + [F1]: IR Address 1
[*] + [#] + [F2]: IR Address 2
[*] + [#] + [F3]: IR Address 3
[*] + [#] + [F4]: IR Address 4
Function 2. Image freezing function
text_image
CAMERA SELECT 1 2 3 4 STD REV 1 2 3 4 5 6 7 8 9 * 0 # F1 F2 F3 F4 PRESET RESET HOME MENU SLOW—ZOOM—FAST L/R SET BACKLIGHT P/T RST AUTO FAR NEAR MANUAL FOCUSPress [F4] to start the freeze function. The word "Freeze" displays on the upper left corner. After five seconds, the display disappears automatically (though the freeze feature continues). To cancel the freeze, press the [F4] key the word "Unfreeze" displays on the upper left corner. After five seconds, the display disappears automatically.
13. Reset Button:
Clear preset: Erase a preset position [RESET] + numeric button (0-9), or: [*] + [#] + [RESET]: Erase all presets
14. Pan/Tilt Control Buttons:
Allows for electronic Pan/Tilt control
15. Menu Buttons:
Menu Button: Press this button to enter or exit the OSD menu.
16. Backlight Button:
Backlight button: Press this button to enable the backlight compensation. Press it again to disable the backlight compensation.

HuddleCamHD
152 Robbins Rd, Downingtown, PA, 19335, USA - HuddleCamHD.com | 1 800 - 486-5276
NOTE: Only available in manual exposure mode.
NOTE: If there is a light begin the subject, the subject will appear dark. In this case, press the backlight ON/OFF button. To cancel the function, press the backlight ON/OFF button
17. P/T RST Button:
Press this button to self-calibrate pan & tilt once again.
NOTE: not available on this model
- Shortcuts:
[*] + [#] + [1]: Display OSD menu in English
[*] + [#] + [3]: Display OSD menu in Chinese
[*] + [#] + [4]: Show IP Address
[*] + [#] + [6]: Quickly restore the default settings
[*] + [#] + [8]: Show the camera version
[*] + [#] + [9]: Quickly set mount mode (flip/normal)
[*] + [#] + [MANUAL]: Resets IP information
[#] + [*] + [4]: Toggle between DHCP & Static IP addressing
[#] + [*] + [#] + [1]: Set IP address to 192.168.100.81
[#] + [*] + [#] + [2]: Set IP address to 192.168.100.82
[#] + [*] + [#] + [3]: Set IP address to 192.168.100.83
[#] + [*] + [#] + [4]: Set IP address to 192.168.100.84
[#] + [*] + [#] + [5]: Set IP address to 192.168.100.85
[#] + [*] + [#] + [6]: Set IP address to 192.168.100.86
[#] + [*] + [#] + [7]: Set IP address to 192.168.100.87
[#] + [*] + [#] + [8]: Set IP address to 192.168.100.88
[#] + [*] + [#] + [9]: Set IP address to 192.168.100.89
[#] + [*] + [#] + [0]: Set IP address to 192.168.100.80
Care Of The Unit.
Remove dust or dirt on the surface of the lens with a blower (commercially available).
Installation Instructions.
Monitor Installation.
When mounting the HuddleCamHD camera on a monitor, ensure that the mount screw is fastened tightly to the camera. Use the top mount to rest the camera on a monitor. Position the bottom mount on the back of the monitor to secure the camera in position. You can rotate the camera lens as necessary.
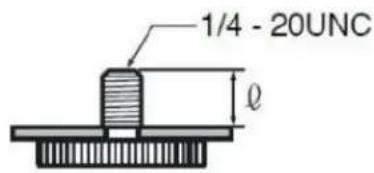
Tripod Installation.
When using the HuddleCamHD camera with a tripod, screw the tripod to the bottom of the camera. The tripod screw must fit below specifications:
The tripod screw must fit shown specifications:
text_image
1/4 - 20UNC l$$ \varrho = 5 - 7 \mathrm{mm} $$
Network Connection.
1. Operating Environment
• OS: Windows 7/8.1/10 & Mac OS
• Network Protocol: TCP/IP
- Min Requirements: CPU(P4/2+GHz)/128M RAM/40Gb HD/ support for scaled graphics card, support for DirectX 8.0 or better.
2. Equipment Installation
1) Connect camera to your network via a CAT5/6 patch cable or directly to your PC. (Note: external power is required when connecting directly to PC)
2) Turn camera on by plugging in power from power supply or using PoE
3) If successful, the orange network light will illuminate, and the green light will start flashing.
4) If unsuccessful, examine if the patch cable is bad or if you have connected to an inactive network jack.
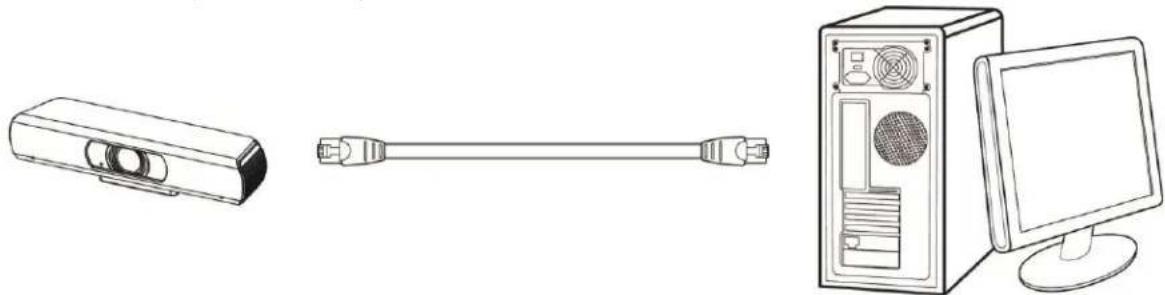
3. Network Connection
Please see examples of the connection method between network camera and computer, as in pictures 1.1 and 1.2, below:
natural_image
Line drawings of three electronic devices: a remote control unit, a cable with connector, and a desktop computer tower (no text or symbols)Picture 1.1 Direct connection via a standard "patch cable" / network cable

natural_image
Line drawings of various electronic devices including projector, wireless router, switch, and desktop computer (no text or symbols)Picture 1.2 Connection to LAN via "Patch cable" / network cable to LAN wall jack or LAN switch
Setting up the Camera's IP.
- The first thing you are going to want to do to get your camera up and streaming on your network is to connect your camera to power, to an active network port on your network. (Note it will power on when power is applied via power supply or PoE)
- Next, go online and download the IP Address Settings Tool, for Windows & MacOS, from the HuddleCamHD Download Page. Once you complete the installation and launch the tool "UPGRADE vX.X" you should be able to click the "Search" button to locate all the available HuddleCamHD cameras on your network.
a. If you are having issues with camera discovery...
i. There is likely an issue with mDNS not being enabled / configured properly - consult your network administrator or network equipment manufacturers manual for proper setup.
ii. The Network Drop Down may be on the wrong network interface
iii. You can always revert to the direct PC to Camera connection as shown in the previous section
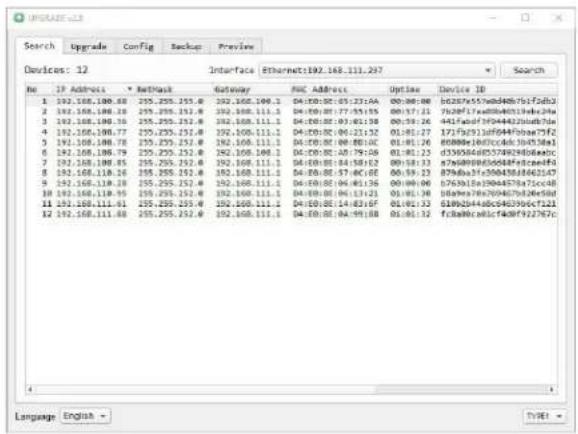
text_image
Search Upgrade Config Backup Preview Devices: 12 Interface Ethernet1992.168.111.267 Search No IP Address Network Gateway MAC Address Update Device ID 1 192.108.100.68 255.255.252.0 192.168.166.1 04:00:00:05:23:AA 00:00:00 02678755wbd40b75f25db2 2 192.168.166.18 255.255.252.0 192.168.111.1 04:00:00:07:55:39 08:37:31 7626F17e0040f13e4e34a 3 192.168.166.38 255.255.252.0 192.168.111.1 04:00:00:07:45:39 08:38:26 9417faed7f39444220d67b 4 192.168.166.77 255.255.252.0 192.168.111.1 04:00:00:06:25:32 01:01:27 1717fb913ff644fbaea75f2 5 192.168.166.78 255.255.252.0 192.168.111.1 04:00:00:08:88:0C 01:01:26 80888e16f3cc4d8_3b4538a1 6 192.168.166.79 255.255.252.0 192.168.166.1 04:00:00:08:79:06 01:01:23 83395646f5574929d8e4dC 7 192.168.166.85 255.255.252.0 192.168.111.1 04:00:00:04:58:12 00:58:33 8766b9f3f356484f3cfeef4 8 192.168.118.26 255.255.252.0 192.168.111.1 04:00:00:07:4C:GE 06:59:33 879da3f3f356438f4d8c2fA7 9 192.168.118.38 255.255.252.0 192.168.111.1 04:00:00:04:4E:36 00:00:00 8763b3a3b3b4e478a7bc4e8 10 192.168.118.95 255.255.252.0 192.168.111.1 04:00:00:04:3E:3Y 04:3E:3X 849b9e4a4cGcGdGdGdGdGdGdGdGdGdGdGdGdGdGdGdGdGdGdGdGdGdGdGdGdGdGdGdGdGdGdGdGdGdGdGdGdGdGdGdGdGdGdGdGdGdGdGdGdGdGdGg 11 192.168.111-94 255.255.252.0 192.168.111.1 04:00:00:04:4E:3B 04:4E:3D 84:4E:3Z 84:4E:3Z 84:4E:3Z 84:4E:3Z 84:4E:3Z 12 192.168.111-88 255.255.252.0 192.168.111.1 04:00:00:04:4E:3B 84:4E:3D 84:4E:3Z 84:4E:3Z 84:4E:3Z 84:4E:3Z Language English - TYPE:- The next thing you would want to do is change your camera's IP address to be in the same range as your network. The camera comes with a default static IP address of 192.168.100.99. You will need to update that to be in the same range as your network. If you look at the example above, you can see from the other cameras on the network, that the network is set up to be in the range of 192.168.111.XXX. Please see the "Extras" section at the end of this document for further information on finding your network IP scheme.
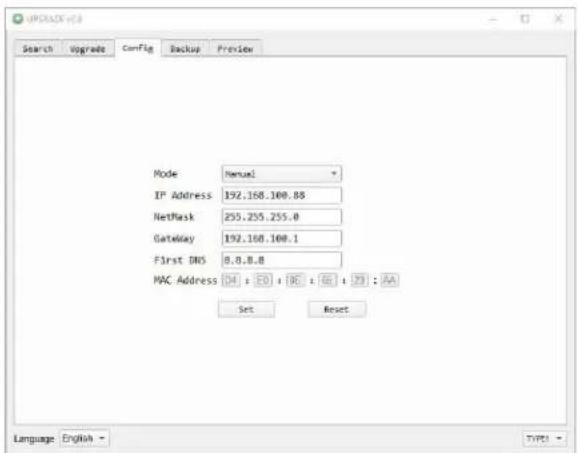
- Once you know your IP range you can right click on the camera you wish to change the IP address for and click "Config". Note: if you need to find the IP range of your network, you can do so by following the guide in the extras section at the end of this document.
152 Robbins Rd, Downingtown, PA, 19335, USA - HuddleCamHD.com | 1 800 - 486-5276
text_image
UPDAX+V3 Search Upgrade Config Backup Preview Mode Manual IP Address 192.160.100.88 NetMask 255.255.255.0 Gateway 192.160.100.1 First DNS 0.0.0.0 MAC Address 04 : 00 : 06 : 07 : 08 : AA Set Reset Language English TYPE:You should now be able to set your camera's IP address to one in the range of your network. You should be able to leave the subnet mask alone, unless you are configuring the camera for use across subnets.
(Note that in more complex network environments you may have to request a "Static IP" from the Network Administrator(s) to prevent any possible complications on your network in addition request the appropriate Network Mask, Default Gateway and First DNS for use with Static IP)
-
Now that you have set the Static IP address of your HuddleCamHD camera, you should be able to access the WebUI for control and settings via a web browser.
-
Open your desired browser and type in the Static IP address you assigned to your camera, in step 4, you will be prompted for a Username and Password, both are "admin" by default.
-
You may be prompted to download the ActiveX component for live viewing if utilizing Microsoft Internet Explorer (not Edge). Currently no other browsers are supported.
-
You should have full P / T / Z control over your camera using the P / T / Z controls on the left side. You can adjust many of your camera's settings via the IP interface and if using Internet Explorer with the ActiveX plugin you will also receive a live preview.

text_image
Live Video Image Audio System Network Information Zoom In Zoom Out Focus In Focus Out Pan Speed 10 Tilt Speed 10 Zoom Speed 1 Focus Speed 1 Set Call Preset: (0-254) PTZ Back VLE Private Information- You should now be able to pull an RTSP stream from your camera into VLC, WireCast, OBS, etc...
a. You can test the RTSP stream in VLC media player.
b. Once you install VLC and launch the program you should be able to go to the "Media" drop down meny and then select "Open Network Stream".
c. In the network URL, you should enter "rtsp://
i. In the example below, for a HuddleCamHD camera with the static IP address of 192.168.111.84, the RTSP stream would be accessed by entering "rtsp://192.168.111.84:554/1"
ii. The "554" part is the port number used by the camera, and the "1" is the stream number.
iii. There are up to three RTSP network streams available
- One for HD content "1"
- One for SD content "2"
- One for SD content "3"

text_image
Open Media File Disc Network Capture Device Network Protocol Please enter a network URL: http://192.168.111.84:554/1 http://www.example.com/stream.avi http://01234 mms//mms.example.com/stream.asx http://server.example.org/s080/text.sdo http://www.yourtube.com/watch?v-gg64x Show more options Play CancelExtras.
- Discovering your Network IP range.
a. Changing you IP address without talking to your network admin could lead to conflicts with your network.
b. If you change your address to one that is already in use it will cause communications problems.
- If you need to discover the IP address range of your network you can do so by using command prompt for Windows or Terminal for Apple computers.
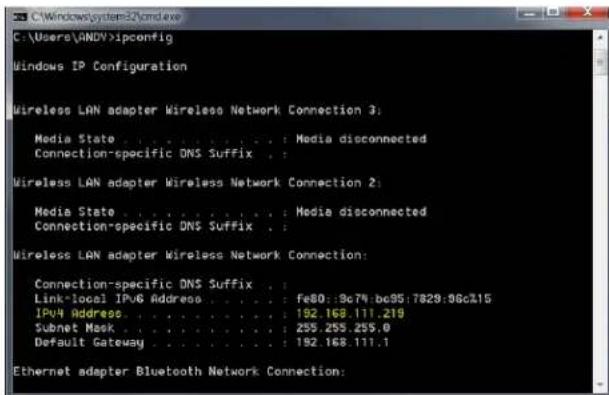
- To do this on a PC, you would type "CMD" into your search bar in the Windows menu. You should see a black box pop up with the ability to type in the box.
- If you type "ipconfig" and hit "Enter" on your keyboard you will see a bunch of information pop up in your command prompt.
- When you see "IPv4 Address" that is your computers IP address on your current network. So you would use the first 3 sets of numbers from this as your IP range.
text_image
C:\Windows\System32\cmd\v C:\Users\ANDV>ipconfig Windows IP Configuration Wireless LAN adapter Wireless Network Connection 3: Media State . . . . . . . . . . : Media disconnected Connection-specific DNS Suffix . Wireless LAN adapter Wireless Network Connection 2: Media State . . . . . . . . . . . : Media disconnected Connection-specific DNS Suffix . Wireless LAN adapter Wireless Network Connection: Connection-specific DNS Suffix . Link-local IPv6 Address . . . . . . . . . : Fe80:9c74:bc95:7829:96c15 IPv4 Address . . . . . . . . . . : 192.168.111.210 Subnet Mask . . . . . . . . : 295.295.295.0 Default Gateway . . . . . . . . : 192.168.111.1 Ethernet adapter Bluetooth Network Connection: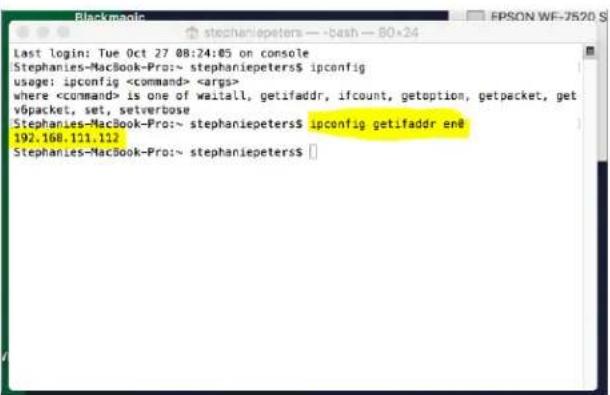
text_image
Last login: Tue Oct 27 08:24:05 on console Stephanies-MacBook-Pro:~ stephaniepeters$ ipconfig usage: ipconfig- If you need to find the IP range of your Apple computer, you would first open a new finder window and then go to Applications, and then Utilities. You should see the program "Terminal" in that menu, select that program.
- Now, you would type in "IP config getifaddr en0". Once you type this string and click "Enter" on your keyboard you will receive back an IP address.
- So the IP range of the network, according to the Apple computer is 192.168.111.xxx, you can use this to figure out the IP range in which your camera needs to be set.

HuddleCamHD
152 Robbins Rd, Downingtown, PA, 19335, USA - HuddleCamHD.com | 1 800 - 486-5276
Camera Web Interface.
1) The left pane features PTZ, Preset, Focus, and OSD Control Options
2) The right pane features configuration options and a live preview (IE only)
1.2 Menu & Control

text_image
Live Video Image Audio System Network Information Zoom In Zoom Out Zoom Speed 7 Set Call Preset (0~254) Menu Language English- Configuration Options: Live Preview, Video Parameters, Image Settings, Audio Settings, Network Configuration and Camera Info.
- OSD Control: The MENU button will open / close the OSD. Up, Down, Left and Right arrows allow for navigation and changing options.
- Pan / Tilt Control: The Up, Down, Left and Right arrows allow electronic pan and tilt when EPTZ has been enabled. (Electronic Pan/Tilt is available once you have electronically zoomed in.)
- Zoom Control: Zoom in and zoom out buttons allow for adjustment wide or tele when EPTZ is enabled from the OSD.
- Speed Control: Zoom speeds can be set at any rate between 0 - 7.
- PTZ Preset: After manually setting up a shot that you would like to return to later, you can save presets for quick recall of these positions. Type a number between 0 and 254 into the Preset box. Click the "Set" button to save the current location with that preset number. Click the "Call" button to cause the camera to return to that position. This enables smooth, quick and convenient control without the need to manually drive the camera.
- Language Selection: Click either "Russian", "Chinese" or "English" to change the language of the menu.

HuddleCamHD
152 Robbins Rd, Downingtown, PA, 19335, USA - HuddleCamHD.com | 1 800 - 486-5276
Video.
Click "Video" - the streaming parameters may now be set in the right-side area.
The camera can send 3 simultaneous streams.
For example, you can send one stream in HD and one in SD so that PCs may have their own stream resolution depending on bandwidth concerns or usage..

text_image
Video Settings Video Format: 60Hz Encode Level: mainprofile EPTZ: On NDI Preset: Off First stream Encode Protocol: H264 Resolution: 1920x1080 Bit Rate: 12288 (96~16384) kbps Qfactor: 80 (1~99) Frame Rate: 30 fps I Key Frame Interval: 60 (2~1200) Bit Rate Control: CBR VBR Fluctuate Level: 1
text_image
Second stream Encode Protocol: H264 Resolution: 640x360 Bit Rate: 2048 (96~16384) kbps Frame Rate: 30 fps I Key Frame Interval: 60 (2~1200) Bit Rate Control: CBR VBR Fluctuate Level: 1 Third stream Encode Protocol: H264 Resolution: 3840x2160 Bit Rate: 16384 (96~16384) kbps Frame Rate: 30 fps I Key Frame Interval: 60 (2~1200) Bit Rate Control: CBR VBR Fluctuate Level: 1 Apply Cancel1. Video Settings
Video Format:
Supports 50Hz(PAL) and 60Hz(NTSC) and OSD formats.
Note: 60Hz is often used for North America
Video Coding:
H.264 (High Profile, Main Profile, Base Line)
*Note may override / limit other settings
H.265 (High Profile, Main Profile, Base Line)
*Note may override / limit other settings
MJPEG (Single Stream Output only)
*Note may override / limit other settings
EPTZ:
Electronic Pan/Tilt/Zoom. Toggle on & off
Note: When EPTZ is on, high res stream is to stream 3 for NDI® compatibility
2. Streams (1 - 3)
NDI® Modes:
Users can select from pre-determined high-quality IP stream settings for use with NDI®
"NDI Ultra" will provide a 2160@30 fps NDI® feed
"NDI Medium" will provide a 1080@30 NDI® feed
"NDI Low" will provide a 720@30 NDI® feed
NDI modes set the NDI ^® preview mode at a 360@30 NDI ^® feed
Resolution:
The first stream allows for the following output resolutions: 1920x1080, 1280x720, 1024x576, 960x540, 640x480, 640x360 resolutions
The second stream allows for the following output resolutions: 3840x2160@15, 1920x1080, 1280x720, 1024x576, 720x480, 720x408, 640x360, 480x270, 320x240, 320x180 resolutions.
The third stream allows for the following output resolutions: 1024x576, 960x540, 720x480, 720x408, 640x360, 480x270, 320x240, 320x180 resolutions.
Bit Rate:
Users can assign the bit rate of the stream (Bitrate range is from 32 kbps \~ 102400 kbps noting that bandwidth is shared by all three streams).
Maximum Frame Rate:
Users can specify the maximum frame rate (fps or frames per second). Higher frame rates provide smoother video but require higher bit rate settings..
Output is limited to a maximum of 30 fps.
I Key Frame Interval:
This setting defines how many predicted frames will be used for each actual frame provided (from 1-1200). Shorter intervals increase video quality at the cost of requiring higher bit rates in order to look good, it is best to consult the recommended settings for your ingestion system.
Bit Rate Control Method:
Constant Bit Rate (CBR): The video encoder will encode at a constant rate as set in bitrate setting.
Variable Bit Rate (VBR): The video encoder will encode at a variable rate, with a maximum as set in the bit rate setting.
VBR should only be used when working against bandwidth constraints.
Fluctuation Level:
This setting affects how aggressive variable bit rate adjustments will be (Fluctuate Range is from 1 \~ 6).
Spikes that are too large may affect video quality.
Low levels will not save on as much bandwidth

HuddleCamHD
152 Robbins Rd, Downingtown, PA, 19335, USA - HuddleCamHD.com | 1 800 - 486-5276
Image.
Click "Image" - the image parameters may now be set in the right side area.

text_image
Brightness: Saturation: Contrast: Sharpness: Hue: 7 4 7 4 7 Flip Mirror Apply Cancel DefaultBrightness:
Image brightness can be adjusted from 0-14 using the presented slider control.
The box on the right shows the corresponding numerical value. (Default is 7)
Saturation:
Color Saturation can be adjusted from 0-14 using the presented slider control.
The box on the right shows the corresponding numerical value. (Default is 4)
Contrast:
Contrast can be adjusted from 0-14 using the presented slider control.
The box on the right shows the corresponding numerical value. (Default is 10)
Sharpness:
Sharpness can be adjusted from 0-15 using the presented slider control.
The box on the right shows the corresponding numerical value. (Default is 3)
Hue:
Hue can be adjusted from 0-14 using the presented slider control.
The box on the right shows the corresponding numerical value. (Default is 7)
Flip & Mirror:
Check the "Flip" box to invert the image vertically for a ceiling mount.
Check the "Mirror" box to reverse the image horizontally. (Default is unchecked)
Apply, Cancel and Default Buttons:
After adjusting the parameters, press the "Apply" button to save settings.
Press the "Cancel" button to cancel any adjustment of the parameters.
Press the "Default" button to return to the default values.

HuddleCamHD
152 Robbins Rd, Downingtown, PA, 19335, USA - HuddleCamHD.com | 1 800 - 486-5276
Audio.
Click "Audio" - the audio parameters may now be set in the right side area.

text_image
Audio Settings Audio Switch: On ▼ Audio Type: AAC ▼ Sample Rate: 16K ▼ Bit Rate: 96K ▼ noise_cancel_level: 1 ▼ Input Type: MIC ▼ Input Vol L : 8 (0~30) db Input Vol R : 8 (0~30) db ADTS Options: Off ▼ Apply CancelAudio Switch:
Enable or Disable audio embedding
Audio Encoding:
AAC
Audio Sample Rate Options:
16K, 44.1K, or 48K
Audio Bit Rate Options:
96K, 128K, or 256K
Noise_Cancel_Level:
0, 1, 2, or 3
Input Type / Parameters:
3.5mm Line Input requiring
A stereo un-balanced line level input
(No amplification or power is supplied from the cameras 3.5mm port)
Input Vol L Settings:
Adjusts the volume of the left audio channel (-97 to +30dB)
Input Vol R Settings:
Adjusts the volume of the right audio channel (-97 to +30dB)
ADTS Options:
Audio Data Transport Stream - Can be set to ‘On’ or ‘Off’ (Use with MJPEG only)
Apply and Cancel Buttons:
After modifying the parameters, press the "Apply" button to save.
Press the "Cancel" button to discard any changes not applied yet.

HuddleCamHD
152 Robbins Rd, Downingtown, PA, 19335, USA - HuddleCamHD.com | 1 800 - 486-5276
System.
Click "System" - the system parameters may now be set in the right side area.

text_image
Initialize Work Mode: RTSP Reboot: Reboot User UserName: admin Passwd: ********** Guest: guest Passwd: ********** Apply Cancel1. Initialize
Work Mode:
Legacy feature to support Third-Party solutions and has no standard use.
Reboot Button:
The “Reboot” button will initiate a system restart. This is required after changing most settings.
2. User
User and Password:
Users can modify the Admin / Guest passwords (letters and numbers only).
The default credentials are:
User: admin and Password: admin
User: guest and Password: guest
Apply and Cancel Buttons:
After modifying the parameters, press the "Apply" button to save.
Press the "Cancel" button to leave settings unchanged.

HuddleCamHD
152 Robbins Rd, Downingtown, PA, 19335, USA - HuddleCamHD.com | 1 800 - 486-5276
Network
Click "Network" - the network parameters may now be set in the right side area.
text_image
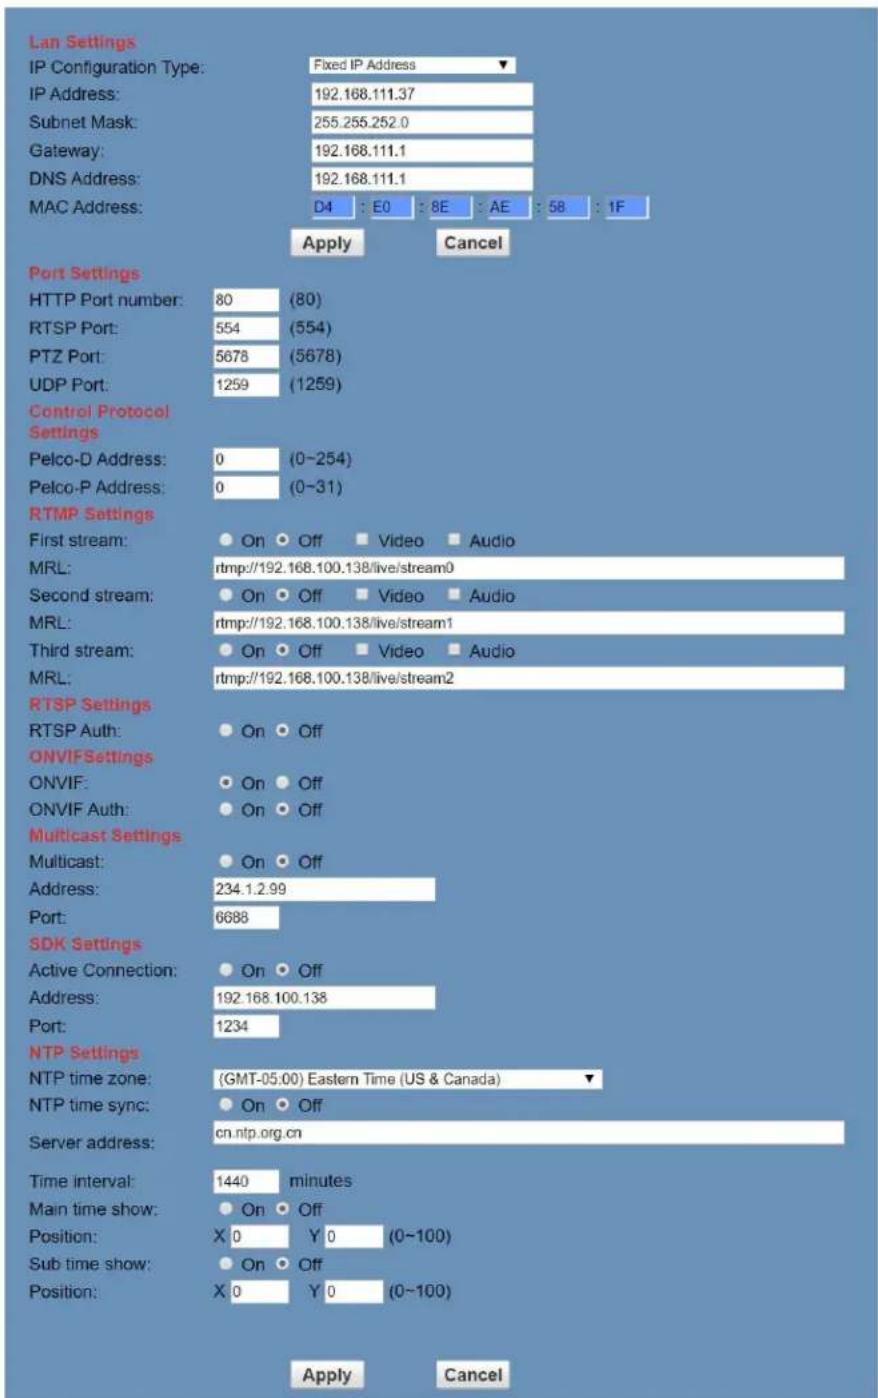
Lan Settings IP Configuration Type: Fixed IP Address IP Address: 192.168.111.37 Subnet Mask: 255.255.252.0 Gateway: 192.168.111.1 DNS Address: 192.168.111.1 MAC Address: D4 : E0 : 8E : AE : 58 : 1F Apply Cancel Port Settings HTTP Port number: 80 (80) RTSP Port: 554 (554) PTZ Port: 5678 (5678) UDP Port: 1259 (1259) Control Protocol Settings Pelco-D Address: 0 (0~254) Pelco-P Address: 0 (0~31) RTMP Settings First stream: On Off Video Audio MRL: rtmp://192.168.100.138/live/stream0 Second stream: On Off Video Audio MRL: rtmp://192.168.100.138/live/stream1 Third stream: On Off Video Audio MRL: rtmp://192.168.100.138/live/stream2 RTSP Settings RTSP Auth: On Off ONVIFSettings ONVIF: On Off ONVIF Auth: On Off Multicast Settings Multicast: On Off Address: 234.1.2.99 Port: 6688 SDK Settings Active Connection: On Off Address: 192.168.100.138 Port: 1234 NTP Settings NTP time zone: (GMT-05.00) Eastern Time (US & Canada) ▼ NTP time sync: On Off Server address: cn.ntp.org.cn Time interval: 1440 minutes Main time show: On Off Position: X 0 Y 0 (0~100) Sub time show: On Off Position: X 0 Y 0 (0~100) Apply CancelPage 22 of 32

HuddleCamHD
152 Robbins Rd, Downingtown, PA, 19335, USA - HuddleCamHD.com | 1 800 - 486-5276
1. LAN Settings:
IP settings for the device can be set here for either Static (fixed) or DHCP (dynamic) addressing.
The default IP address of the camera is 192.168.100.99.
Please note that after changing the IP settings for the camera, you may not be able to reconnect until your PC is set for and connected to the same subnet or visible via proper network routing.
2. Port Settings:
While the IP address identified the device, the camera uses multiple ports for communication that can be adjusted if necessary.
HTTP Port: This is the port for web applications using the default port of 80.
RTSP Port: The camera supports the RTSP streaming protocol using the default port of 554.
PTZ Port: Supports camera control via the TCP protocol using the default port of 5678
UDP Port: Supports camera control via the UDP protocol using the default port of 1259
3. Control Protocol Settings:
Control IDs / addresses for Pelco-D (0-255) and Pelco-P (0-31) may be set here.
4. RTMP Settings:
The camera provides for up-to three (3) RTMP streams to an RTMP server or servers providing an appropriate RTMP string to use with the camera's encoder.
Set 1 ^st , 2 ^nd , and/or 3 ^rd stream to ‘On’ or ‘Off’ as desired.
Check to include video and/or audio as desired.
Enter the address provided from / for the RTMP server in the MRL location
Note: an RTMP streaming server is required for use of RTMP streaming feature.
5. RTSP Authorization:
Enable or disable authorization for accessing the RTSP output stream(s)
6. ONVIF Settings:
Turn ONVIF compatibility ‘On’ / ‘Off’ (for ONVIF compatible streaming and control).
Turn ONVIF authorization 'On' / 'Off' (username and password for connection).
7. Multicast Settings: (Only use if your network has been configured to support multicast)
Turn Multicast streaming 'On' or 'Off' (reboot required to commit)
Address and Port Settings: Enter the desired multicast address and port to be used by the camera on the multicast capable network.
Note: Do not attempt to use Multicast streaming unless your network has been setup and tested to support multicast e.g. IGMPv3, significant network performance issues or outages may result otherwise. The public internet does not support multicast streaming.
8. SDK Settings: (Only enable if you are developing using the SDK)
Address and Port Settings: Enter the desired SDK address and port to be used by the camera for use with development of software under the SDK.

HuddleCamHD
152 Robbins Rd, Downingtown, PA, 19335, USA - HuddleCamHD.com | 1 800 - 486-5276
9. NTP Settings:
Network Time Protocol: Enable to synchronize clock between camera & a time server
10. Apply and Cancel Buttons
After modifying the parameters, press the "Apply" button to save.
Press the "Cancel" button to leave settings unchanged.
Information.
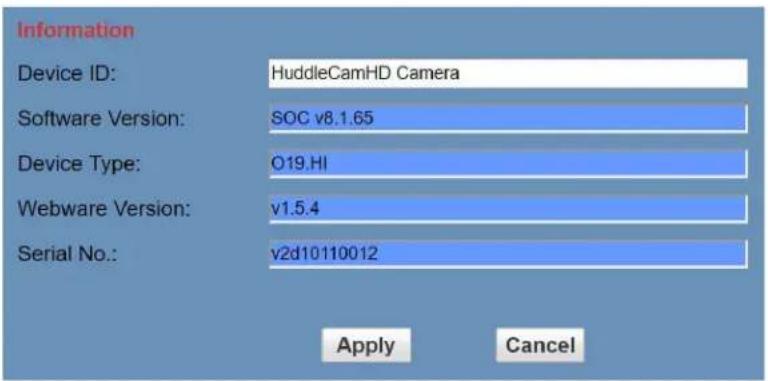
Click "Information" - shows the current device information, as shown below.
You may change the Device ID as required for your application.
(This is utilized by NDI® Software when identifying your camera on the network.)
text_image
Information Device ID: HuddleCamHD Camera Software Version: SOC v8.1.65 Device Type: O19.HI Webware Version: v1.5.4 Serial No.: v2d10110012 Apply CancelNetwork Camera Control Protocol......
Setup camera for IP (First see "Setting up the Camera's IP" section above)
Control Notes for PTZ Control
The camera currently supports various PTZ control methods including: The web interface, HTTP-CGI and TCP/UDP protocols
The camera includes an internal TCP server with the default port number of 5678.
When the client and server set up a TCP connection, the client sends commands to the internal server and the server will then parse and execute the PTZ commands.
The camera includes an internal UDP server with the default port number of 1259.
When the client and server set up a UDP connection, the client sends commands to the internal server and the server will then parse and execute the PTZ commands.
The HuddleCamHD command format based on VISCA / VISCA over IP can be found online at HuddleCamHD.com/Resources
HTTP CGI Control: The camera's integrated web server supports HTTP-CGI for control. Please see command list below for reference.
| ControlFunction | Command | Variable | Values | Comments |
| Pan & Tilt | http://[camera ip]/cgi-bin/ptzctrl.cgi?ptzcmd&[action]&[pan speed]&[tilt speed] | [camera ip] | *Camera's current IP | |
| [action] | up | moves camera 'up' | ||
| down | moves camera 'down' | |||
| left | moves camera 'left' | |||
| right | moves camera 'right' | |||
| leftup | moves camera 'left' & 'up' | |||
| rightup | moves camera 'right' & 'up' | |||
| leftdown | moves camera 'left & 'down' | |||
| rightdown | moves camera 'right' & 'down' | |||
| ptzstop | tells camera to 'stop' moving | |||
| [pan speed] | 1 | slowest 'pan' speed | ||
| ... | ranges from 1 - 24 | |||
| 24 | fastest 'pan' speed | |||
| [tilt speed] | 1 | slowest 'tilt' speed | ||
| ... | ranges from 1 - 20 | |||
| 20 | fastest 'tilt' speed | |||
| Zoom | http://[camera ip]/cgi-bin/ptzctrl.cgi?ptzcmd&[action]&[zoom speed] | [camera ip] | *camera's current IP | |
| [action] | zoomin | zooms camera in |

HuddleCamHD
152 Robbins Rd, Downingtown, PA, 19335, USA - HuddleCamHD.com | 1 800 - 486-5276
| zoomout | zooms camera out | |||
| zoomstop | stops zooming | |||
| [zoom speed] | 1 | slowest ‘zoom’ speed | ||
| ... | ranges from 1 - 7 | |||
| 7 | fastest ‘zoom’ speed | |||
| Focus | http://[camera ip]/cgi-bin/ptzctrl.cgi?ptzcmd&[action]&[focus speed] | [camera ip] | *camera's current IP | |
| [action] | focusin | focuses camera in | ||
| focusout | focuses camera out | |||
| focusstop | stops focusing | |||
| [focus speed] | 1 | slowest ‘focus’ speed | ||
| ... | ranges from 1 - 7 | |||
| 7 | fastest ‘focus’ speed | |||
| Focus Lock | http://[camera ip]/cgi-bin/param.cgi?ptzcmd&[action]_mfocus | [camera ip] | *camera's current IP | |
| [action] | lock | locks focus state | ||
| unlock | unlocks focus state | |||
| Home Position | http://[camera ip]/cgi-bin/ptzctrl.cgi?ptzcmd&home | [camera ip] | *cameras current IP | |
| Preset | http://[camera ip]/cgi-bin/ptzctrl.cgi?ptzcmd&[action]&[position number] | [camera ip] | *cameras current IP | |
| [action] | posset | position ‘set’ | ||
| poscall | position ‘call’ | |||
| [position number] | 0 | beginning of range 1 | ||
| ... | range 1 from 0-89 | |||
| 89 | end of range 1 | |||
| 100 | beginning of range 2 | |||
| ... | range 2 from 100-254 | |||
| 254 | end of range 2 | |||
| Direct Position Recall | http://[camera ip]/cgi-bin/ptzctrl.cgi?ptzcmd&[mode]&[pan speed]&[tilt speed]&[pan position]&[tilt position] | [camera ip] | *cameras current IP | |
| [mode] | abs | absolute positioning | ||
| rel | relative positioning | |||
| [pan speed] | 1 | slowest ‘pan’ speed | ||
| ... | ranges from 1 - 24 | |||
| 24 | fastest ‘pan’ speed | |||
| [tilt speed] | 1 | slowest ‘tilt’ speed | ||
| ... | ranges from 1 - 20 | |||
| 20 | fastest ‘tilt’ speed | |||
| [pan position] | 0000 or FFFF | home position | ||
| 0001 | first step ‘pan’ right | |||
| ... | range from 0000 - 0990 (HEX) | |||
| 0990 | last step ‘pan’ right | |||
| FFFE | first step ‘pan’ left | |||
| ... | range from FFFF - F670 (HEX) | |||
| F670 | last step ‘pan’ left | |||
| [tilt position] | 0000 or FFFF | home position | ||
| 0001 | first step ‘tilt’ up | |||
| ... | Range from 0001 - 0510 (HEX) | |||
| 0510 | last step ‘tilt’ down | |||
| FFFE | first step tilt down | |||
| ... | range from FFFF - FE51 (HEX) | |||
| FE51 | last step tilt down | |||
| Direct Zoom Recall | http://[camera ip]/cgi-bin/ptzctrl.cgi?ptzcmd&zoomto&(zoom speed)&[zoom position] | [camera ip] | *cameras current IP | |
| [zoom speed] | 0 | slowest ‘zoom’ speed | ||
| ... | range from 0 - 7 | |||
| 7 | fastest zoom speed | |||
| [zoom position] | 0000 | full wide | ||
| ... | range from 0000 - 4000 (HEX) | |||
| 4000 | full tele |

HuddleCamHD
152 Robbins Rd, Downingtown, PA, 19335, USA - HuddleCamHD.com | 1 800 - 486-5276
| Navigation Function | ||||
| Command | Variable | Values | Comments | |
| OSD Access | http://[camera ip]/cgi-bin/param.cgi?navigate_mode&[mode] | [camera ip] | *cameras current IP | |
| [mode] | OSD | calls OSD Menu | ||
| PTZ | P/T/Z Control Mode | |||
| OSD Menu Navigation | http://[camera ip]/cgi-bin/ptzctrl.cgi?ptzcmd&[action] | [camera ip] | *cameras current IP | |
| [action] | up | moves menu ‘up’ | ||
| down | moves menu ‘down’ | |||
| enter | selects an OSD option | |||
| return | returns to previous menu | |||
| Image Adjustments | ||||
| Function | Command | Variable | Values | Comments |
| Image Settings | http://[camera ip]/cgi-bin/param.cgi?post_image_value&[mode]&[level] | [camera ip] | *cameras current IP | |
| [mode] | bright | adjust brightness | ||
| saturation | adjust saturation | |||
| contrast | adjust contrast | |||
| sharpness | adjust sharpness | |||
| hue | adjust hue | |||
| [level] | 0 | beginning of range | ||
| ... | ranges from 0 - 14 | |||
| 14 | end of range | |||
| Image Orientation | http://[camera ip]/cgi-bin/param.cgi?post_image_value&[mode]&[state] | [camera ip] | *cameras current IP | |
| [mode] | Flip | flipped image adjustments | ||
| Mirror | mirror image adjustments | |||
| [state] | 1 | flip / mirror | ||
| 0 | default | |||
| Default Image Settings | http://[camera ip]/cgi-bin/param.cgi?get_image_default_conf | [camera ip] | *cameras current IP | defaults all image settings above |
| JPEG Snapshot | ||||
| Function | Command | Variable | Values | Comments |
| Take Snapshot | http://[camera ip]/snapshot.jpg | [camera ip] | *cameras current IP | |
| Change Resolution | http://[camera ip]/cgi-bin/snapshot.cgi?post_snapshot_conf&resolution=[size] | [camera ip] | *cameras current IP | |
| [size] | 1920x1080 | Sets JPEG resolution to 1920x1080 | ||
| 960x600 | Sets JPEG resolution to 960x600 | |||
| 480x300 | Sets JPEG resolution to 480x300 | |||
| Photobooth Pictures | ||||
| Function | Command | Variable | Values | Comments |
| Take Snapshot | http://[camera ip]/cgi-bin/booth.cgi?0&4&[delay]&photo&0 | [camera ip] | *cameras current IP | |
| [delay] | 1 | shortest delay | ||
| ... | delay in seconds 1 - 9 | |||
| 9 | longest delay | |||
| Get Snapshot | http://[camera ip]/photo[num].jpg | [num] | 1 | photo 1 |
| ... | photos 1 - 4 | |||
| 4 | photo 4 | |||

HuddleCamHD
152 Robbins Rd, Downingtown, PA, 19335, USA - HuddleCamHD.com | 1 800 - 486-5276
| Photobooth Videos | ||||
| Function | Command | Variable | Values | Comments |
| Take Video | http://[camera ip]/cgi-bin/booth.cgi?0&4&[delay]&video&[length] | [camera ip] | *cameras current IP | |
| [delay] | 1 | shortest delay | ||
| ... | delay in seconds 1 - 9 | |||
| 9 | longest delay | |||
| Get Video | http://[camera ip]/video[num].jpg | [num] | 1 | video 1 |
| ... | videos 1 - 4 | |||
| 4 | video 4 | |||
| Inquiries | ||||
| Function | Command | Variables | Values | Comments |
| Video | http://[camera ip]/cgi-bin/param.cgi?get_media_video | [camera ip] | *cameras current IP | Network video configuration |
| Audio | http://[camera ip]/cgi-bin/param.cgi?get_media_audio | [camera ip] | Network audio configuration | |
| Network | http://[camera ip]/cgi-bin/param.cgi?get_network_conf | [camera ip] | Network configuration | |
| Information | http://[camera ip]/cgi-bin/param.cgi?get_device_conf | [camera ip] | Camera information | |
| Serial Number | http://[camera ip]/cgi-bin/param.cgi?get_serial_number | [camera ip] | Serial number *Not always accurate | |
Photobooth Functionality.
Your HuddleCamHD camera has the ability to quickly, and easily, take a series of four (4) still images or video files that are stored on the camera and made accessible with a standard web browser on the same network. We'll cover how to use this new feature to take still images, videos and how to retrieve them.
Photos.
You have two (2) options to initiate a series of four (4) still images being captured...
You can enter the following HTTP string into any web browser on the same network as the camera to initiate a series of four (4) still images.
Take Still Images: http://
In this example the variable “delay” is utilized to add additional delay, in seconds, between still images being taken. The variable “delay” can have any value from 1 - 9, with the values representing time in seconds
You can also press the "F1" button on your IR remote to initiate a "quick capture" that has, approximately, a four (4) second delay between four (4) still images being captured.
To retrieve your series of four (4) still images you will need to open a standard web browser with network access to the camera and use the following HTTP strings to retrieve the still image files as desired.
Still Image 1: http://
Still Image 2: http://
Still Image 3: http://
Still image 4: http://
Videos
You have two (2) options to initiate a series of four (4) videos being captured...
You can enter the following HTTP string into any web browser on the same network as the camera to initiate a series of four (4) video recordings.
Take Video: http://
In this example the variable “delay” is utilized to add additional delay, in seconds, between videos being taken. The variable “delay” can have any value from 1 - 9 with the values representing time in seconds.
In this example the variable “length” is utilized to adjust the overall length, in seconds, of each video file. The variable “length” can have any value from 1 - 10 with the values representing time in seconds.

HuddleCamHD
152 Robbins Rd, Downingtown, PA, 19335, USA - HuddleCamHD.com | 1 800 - 486-5276
You can also press the “F2” button on your IR remote to initiate a “quick capture” that has, approximately, a four (4) second delay between four (4) ten (10) second videos being captured.
To retrieve your series of four (4) videos you will need to open a standard web browser with network access to the camera and use the following HTTP strings to retrieve the video files as desired.
Video 1: http://
Video 2: http://
Video 3: http://
Video 4: http://
Video Note: It can take the camera time for the video files to be fully captured and processed; if they are not retrievable please wait an additional 30 - 60 seconds for the process to complete

HuddleCamHD
152 Robbins Rd, Downingtown, PA, 19335, USA - HuddleCamHD.com | 1 800 - 486-5276
Troubleshooting
| Problem | Cause | Resolution |
| There is no power to the camera. | Power adapter is disconnected from outlet or from camera. | Check the connections between the camera, power adapter and outlet. If anything is disconnected, reconnect it. |
| There is no PoE power being supplied. | Use the included power supply. | |
| Camera is unable to electronically pan, tilt, and/or zoom. | No electronic zoom has been performed | Zoom first then try panning or tilting. |
| Pan, tilt or zoom range limit was reached. | Try to pan/tilt/zoom in the other direction. | |
| IR Remote control not working. | The “camera select” button on the remote control is not set to match the “IR select” switch number set on the camera. | Choose the correct “IR select” number to match camera settings. |
| IP control not working | Commands being sent are incorrect or to wrong IP / port | Refer to VISCA manual and network setup. |
| The Camera is not working at all. | No response or image from camera. | Disconnect power, and wait a few minutes, then connect the power again. Retry. |
Specs.
Model Number: HC-EPTZ-NDI
Camera & Lens
• Video CMOS Sensor 1/2.5" CMOS 8.51M Mega Pixel
• Resolution 3840x2160, 1920x1080, 1280x720, 1024x576, 960x540, 640x480, 640x360
• Frame Rate 50Hz: 1 \~ 25 fps, 60Hz: 1 \~ 30 fps
- Zoom Up to 8X Digital Zoom
• Focal Length f=2.8mm
• Field of View 108°
• Min Lux 0.05 Lux (@ F1.8, AGC ON)
- Warranty 3 years parts and labor
Rear Board Connectors
• Video Interface NDI®|HX / RJ45
• Power Supply Interface 12VDC 1A
Electrical Index
• PoE Requirements: 802.3af
• Power Supply Adapter 12V DC 1A
• Input Voltage 12V DC (10.5-14V DC)
• Input Power 24W (Max)
• Working Environment Indoor
Physical
• Material Aluminum, Plastic
- Dimensions 7.63"W x 2.36"H x 3.66"D (without mount)
(194mm × 60mm × 93mm)
• Weight 0.7 lbs (0.34 kg)
- Box Dimensions 9.375" x 4.3125" x 4.625" (238mm x 109.5mm x 117.5mm)
- Boxed Weight 2.4 lbs (1.1 kg)
• Color Black
• Operating Temperature 32^ F to +113^ F ( 0^ C to +45^ C)
• Storage Temperature -14°F to 140°F (-10°C +60°C)
• Working Environment Indoor only