
PLCD23A - Car Radio Pyle - Free user manual and instructions
Find the device manual for free PLCD23A Pyle in PDF.


| Product Type | Car Radio / Stereo Receiver |
| Brand | Pyle |
| Model | PLCD23A |
| Form Factor | Single DIN (approx. 7.0 x 1.9 x 4.9 inches) |
| Weight | Approx. 1.5 lbs (0.68 kg) |
| Power Supply | 12V DC (negative ground) |
| Max Output Power | 4 x 50 watts (RMS typically 15-20W per channel) |
| Display | LCD with adjustable color illumination |
| Radio Tuner | AM/FM stereo (30 presets) |
| Playback Media | CD, CD-R/RW, MP3/WMA files |
| Input Ports | Front AUX (3.5mm), USB, SD card slot |
| Output Ports | Front, Rear, Subwoofer RCA preouts (2.5V) |
| Bluetooth | Integrated for hands-free calling & audio streaming |
| Remote Control | Included wireless remote |
| Detachable Face | Yes, for theft prevention |
| Equalizer | Preset EQ modes (Rock, Pop, Classic, Flat) |
| Dimensions (DIN) | 178 x 50 x 125 mm (W x H x D) |
| Safety Features | Disc ejection protection, short circuit protection |
| Cleaning | Wipe with dry cloth, avoid harsh chemicals |
| Spare Parts | Trim ring, installation sleeve, wiring harness available separately |
Frequently Asked Questions - PLCD23A Pyle
User questions about PLCD23A Pyle
0 question about this device. Answer the ones you know or ask your own.
Ask a new question about this device
Download the instructions for your Car Radio in PDF format for free! Find your manual PLCD23A - Pyle and take your electronic device back in hand. On this page are published all the documents necessary for the use of your device. PLCD23A by Pyle.
USER MANUAL PLCD23A Pyle
DC 12V. Negative Ground
Max.7A
4 X 7Watts.
2 STEREO channels.
178[W] X 154[D] X 50[H] mm.
FM SECTION
Frequency range
Effective sensitivity
I.F Frequency
88MHz -108MHz
10uV
10.7MHz.
AM(MW) SECTION
Frequency range
530KHz - 1700KHz
RCA LINE OUT
Output
CD Max. 800mV.
CD PLAYER
System
Suitable CDs
Frequency characteristics
Compact Disc Audio System.
CD, CD-R, CD-RW Disc.
40Hz-100Hz ≤ 5dB
10KHz-20KHz ≤ 5dB.
60dB [1KHz]
Specifications subject to change, forgive without notification.

PLCD23A
INSTRUCTION MANUAL

Thank you for purchasing this car audio product.
Please read this manual carefully before operating this car audio product.
Please keep this manual for future use. It will be helpful to you if you are encounter any operational problem.
Selecting fine audio equipment is only the start of your musical enjoyment. Now it is time to consider how to maximize the enjoyment you will get from knowing how to work your new car stereo receiver.
We hope you enjoy using this product and encourage you to always listen at a moderate, safe sound level to avoid any possible hearing damage or loss.
If you listen to excessively loud sound over time, your hearing can adapt to higher volumes and what sounds "normal" to you may be quite harmful and can cause you to have permanent hearing loss. So please practice "safe sound" and always listen at moderate sound levels only.
Start with your volume control at the lowest setting, and slowly increase the level until you can hear it comfortably and clearly, free from distortion.
Once you have established this comfortable sound level, leave it there.
WARNING!
To reduce the risk of fire or electric shock, do not use the unit in the rain or moisture environment.
To prevent direct exposure to laser beam, do not try open the enclosure.
Visible and invisible laser radiation when open and interlocks defeated.
To protect our environment, do not dispose of electrical equipment in the domestic waste. Please return any electrical equipment that you will no longer use to the collection points provided for their disposal.
This helps avoid the potential effects of incorrect disposal on the environment and human health. This will contribute to the recycling and other forms of reutilization of electrical and electronic equipment. Information concerning where the equipment can be disposed of can be obtained from your local authority.
INSTALLATION METHOD
This is an anti-theft installation method.
The main unit wears a METAL MOUNTING SLEEVE.
Please connect the wiring, eg, the Power supply, the Speakers and the Antenna according to the requirements of this Instruction Manual, then install the metal mounting sleeve into the car as per the diagram illustrated below.

NOTE
Before installing and operating the CD player, remove the metal mounting sleeve illustrated by the arrows.
Remove the two screws that protect the CD player during transportation before operating the player.
To attach the removable faceplate, insert the right side of the faceplate into the right of the CD player chassis first. Then push the left side of the faceplate into the chassis until you hear it "click".


- Make sure you use a speaker with 4 ohm load impedance
- Make sure the auto antenna wire (Blue) does NOT come into contact with the vehicle chassis.
CAUTION:
In order to protect power IC from being burnt out during installation the car stereo, it is necessary to follow the steps below to connect the wires during installation:
Step 1: Connect the ground wire (Black):
Step 2: Connect all speaker wires and power antenna wire (Blue): Left speaker Right spe
| Front speaker: White (+) | White/Black (-) | Gray (+) | Gray/Black (-) |
| Rear speaker: Green (+) | Green/Black (-) | Violet (+) | Violet/Black (-) |
Step 3: RCA Line Out (R- Red/ L-White).
Step 4: Connect Back up (Yellow) and Acc wire (Red)
LOCATION AND FUNCTION OF CONTROLS

-
OPEN BUTTON(OPEN)
-
Power(POWER) button
-
CD SLOT
-
LCD DISPLAY
-
EJECT(▲) key
-
Volume up/menu up(+) button
-
Volume down/menu down(-) button
-
MODE(MODE) Button & LOUDNESS(LOU) button
-
Mute(MUTE) Button & RAUSE, PLAY(▶)
-
Audio select(SEL) button
-
EQ (Preset Equalizer) Button
-
BAND(BND) Button & Track Repeat ON/OFF(RPT) button
-
TUNING KNOB
-
STEREO/MONO Button & Track INTRO ON/OFF (INT) button
-
LOC/DX Button & Track Random ON/OFF (RDM) Button
-
TRACK UP/FAST FORWARD BUTTON(▶)
-
TRACK DOWN/REVERSE BUTTON(■)
-
AUX INPUT JACK
General Controls
1. OPEN BUTTON
To remove the front panel from the main body, press the OPEN key. And the anti-theft LED indicator will be flashed all the time till the front panel be refixed into the main body.
2. POWER ON/OFF
In power off (ACC on) mode, turn on the unit by pressing the POWER button on the front panel; It also can turn on the unit to insert a disc into CD slot. It will start play the first track on the current disc. Press the POWER button short to turn off the unit.
3 & 4.VOLUME UP(+)/DOWN(-) BUTTONS
Press the volume UP(+) or DN(-) button short or hold to raise or lower the volume level during playback. The both buttons are also used to adjust the settings for Bass, Treble, Balance, Fader, when you are in those audio modes.
5. MUTE ON/OFF BUTTON (Only for radio mode)
This button serves to switch the MUTED state on/off during RADIO mode. Press the mute(MUTE) button short to suppress the speaker temporarily. Press it again to resume listening.
6. AUDIO FUNCTION AND MENU SELECT/ADJUST
1)Audio mode select and adjustment:
Press the SEL button repeatedly to cycle through four audio modes:
-> VOLUME ->BASS ->TREBLE -> BALANCE -> FADER
After selecting a certain audio mode, you can adjust the setting for Bass, Treble Balance, fader by pressing the UP(+) or DN(-) button.
The control mode of E.VOL is operated with following numeric display.
- VOL: (MIN)00. 01.....45, 46(MAX)
- BASS/TREB: -6, -5.....00....5.6
- BAI·9I 8I 00 8R 9R
- EAD: 9E 8E 00 8R 9R
In each mode, the waiting time is about 3 seconds, and the waiting time is over, it returns to the last display mode of RADIO or CDP mode.
7. EQ BUTTON
Press the EQ button short to access the preset equalizer mode. Press it repeatedly to choose EQ OFF, or 4 preset equalizer curves: FLAT, CLAS, ROCK, POP. The audio output will change correspondingly.
8. LOUDNESS BUTTON
Pressing and holding the LOU button to enhance the bass output when low volume level. Pressing and holding it again to cancel loudness effect.
TROUBLE SHOOTING
Before using the check list please make all the connections first. If you still have questions after going through the checklist, please consult your local customer service representative.
| PROBLEM | CAUSE | SOLUTION |
| No power | The car ignition is not on. | If the power supply is properly connected to the car, switch the ignition key to "ACC" |
| The fuse is blown | Replace the fuse | |
| Disc cannot be loaded or ejected | Another CD is present in the player | Remove CD in the player, then insert a new one with label face up |
| Disc incorrectly inserted upside-down | Insert the CD with label face up | |
| CD is extremely dirty or defective | Clean the CD or try a different CD | |
| Temperature inside the car is too high | Give enough time for the temperature in the vehicle to cool down. | |
| Condensation | Turn off the player for at least an hour, then try again. | |
| No sound | Volume is too low | Adjust volume to desired level |
| Wiring is not properly connected | Check the wiring connection | |
| Sound skips | The installation angle is more than 30 degrees | Adjust the installation angle to less than 30 degrees |
| CD is extremely dirty or defective | Clean the CD or try a different CD | |
| The radio does not work | The antenna cable is not connected | Insert the antenna cable firmly |
CARE FOR USING CD'S: O E A N 12 ^3 y
About CD-R/CD-R/W discs:
In addition to commercially-recorded audio CD's, this unit can play CD-R and CD-R/W discs. In come cases, particularly when recorded on older CD burners, some CD-R and CD-R/W discs may not play. Also, whenever you are recording a CD for playback in this receiver, it is recommended that you record at 24x or slower speed for CD-R and 4x or slower for CD-R/W to achieve higher signal quality and better playback performance.
- To keep the disc clean:
Do not attach any sticker or adhesive tape on the disc. Handle the disc by its edge to keep the disc clean and do not touch the surface. Before playing a disc, wipe it off with a clean, dust-free cleaning cloth. Wipe the disc outwards from the disc center. - When one has already been inserted. Doing so may damage the unit. Insert a disc with labeled surface up, or it will damage the unit.
- Do not expose the disc to direct sunlight or nearby heat sources such as heating vents, caliduct which can cause the disc to warp. Do not leave disc in a car if it is parked in direct sunlight as that will lead to a considerable rise in the temperature inside the car.
- Do not use any secondhand or rented disc, usually, there is glue on the surface of those discs, it will stop the unit working and damage it.
- Always store the disc in its case for protection. Scratched up discs will produce poor sound performance and cause CD player to skip.
- In raining day or wet area, the moisture may form on the disc or the optical parts. The playback may not be possible. If moisture forms on the disc, wipe it off with a soft cloth. If moisture forms on the optical parts of the unit, allow the unit to sit for about one hour with power on.
- Do not use solvents such as benzine or thinners. Commercially available cleaners or anti-static spray will damage the unit.
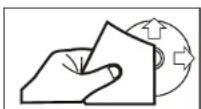


9. MODE BUTTON
Press the MODE(MOD) button to select the CDP (if disc is loaded into the disc slot), RADIO or AUX mode.
Tuner Controls
1. BAND BUTTON
In radio mode, press the BAND(BND) button switches the receiver from AM to FM or vice versa. The icon of the selected band will be visible on the display.
2. TUNING CONTROL
Rotate this knob at radio mode to select the desired radio broadcasting station. The selected frequency will appear on the LCD display.
- ST/MON BUTTON (This operation is effective on FM reception only.) During radio mode, press this button to change between mono and stereo modes. The character ST will appear on the LCD display while there is a strong signal from an FM station that is broadcasting in stereo. Mono improves the reception of the distant stereo FM stations.
4. LOC/DXBUTTON (This operation is effective on FM reception only.)
In RADIO mode, press the LOC button toggles between local or distant FM reception. Pressing LOC will improve reception in some areas where the signal is too strong. LOC will appear on the LCD display indicating you are in the local reception mode. Press it again to release it to improve distant reception when you are located in an area with a weak signal.
Disc Playback Controls
1. TO LOAD/UNLOAD DISC
Insert a disc into the disc slot with label surface up, it will automatically play the first track in the disc several seconds later. Press the EJECT(▲) button short to eject the loaded disc.
2. TO SELECT NEXT OR PREVIOUS TRACK
In disc playback mode, press the button short to play the next track. Press the button short to play the previous track.
3. TO FAST FORWARD OR REVIEW
In disc mode, press and hold the◀ o▶ button to fast forwards or fast reverse. Releasing them starts playback at the location.
4. INTRO ON/OFF BUTTON
During CD playback process, press the INT button short to activate or cancel the CD track scan mode. During INTRO on, it begins playing the first 10 secs. section of each song, until the last song is played. It stops the CD track scanning and begins playing the enter track when the INT button is pressed again.
5. RPT ON/OFF
During CD playback process, press the RPT button short to activate or cancel CD track repeat play mode. During RPT on, it repeats the playing track of the current disc.
6. RDM ON/OFF
During CD playback process, press the RDM button short to activate or cancel track random play mode. During RDM on, it play all tracks in random of the current disc.
7. TO PLAY/ PAUSE TRACK
In disc playback process, press the▶ button to suspend the playback, press again to resume normal playback.
PRECAUTIONS AND MAINTENANCE
CAUTION: Do not install the detachable panel before connecting the wire.
- The unit is designed for negative terminal of the battery which is connected to the vehicle metal. Please confirm it before installation.
- During the radio or CDP mode, if you drop the front panel, the unit will automatically turned off.
- If the car interior is extremely hot, as after being parked in the sun, do not use the player until the car has been driven for a while to cool off the interior.
- Store the detachable in its protective case for safe keeping.
- To drop/take away/install and recover front panel, see under the illustration.

RELEASE BUTTON

FRONT PANEL

RELEASE BUTTON
- INSTRUCTION MANUAL
- WARNING!
- INSTALLATION METHOD
- NOTE
- CAUTION:
- General Controls
- OPEN BUTTON
- POWER ON/OFF
- & 4.VOLUME UP(+)/DOWN(-) BUTTONS
- MUTE ON/OFF BUTTON (Only for radio mode)
- AUDIO FUNCTION AND MENU SELECT/ADJUST
- EQ BUTTON
- LOUDNESS BUTTON
- TROUBLE SHOOTING
- CARE FOR USING CD'S: O E A N 12 a3 y
- MODE BUTTON
- Tuner Controls
- BAND BUTTON
- TUNING CONTROL
- LOC/DXBUTTON (This operation is effective on FM reception only.)
- Disc Playback Controls
- TO LOAD/UNLOAD DISC
- TO SELECT NEXT OR PREVIOUS TRACK
- TO FAST FORWARD OR REVIEW
- INTRO ON/OFF BUTTON
- RPT ON/OFF
- RDM ON/OFF
- TO PLAY/ PAUSE TRACK
- PRECAUTIONS AND MAINTENANCE
Brand : Pyle
Model : PLCD23A
Category : Car Radio